Pioneer CDJ-400: Mixing different tracks Cue point settings
Mixing different tracks Cue point settings: Pioneer CDJ-400
Table of contents
- IMPORTANT VENTILATION CAUTION Operating Environment
- FEATURES
- BEFORE OPERATING (FEATURES) CONTENTS
- DISCS USABLE WITH THIS UNIT Types of discs playable on this unit Playing MP3 files
- BEFORE OPERATING (DISCS USABLE WITH THIS UNIT)
- CAUTIONS REGARDING HANDLING Location Storing Discs Installation Guidelines Condensation Cleaning and Handling Compact Discs Cleaning the Player CD Lens Cleaner
- CONNECTIONS 2. Connecting control cable for relay play
- 3. Connecting to other devices 4. Connecting the power cord
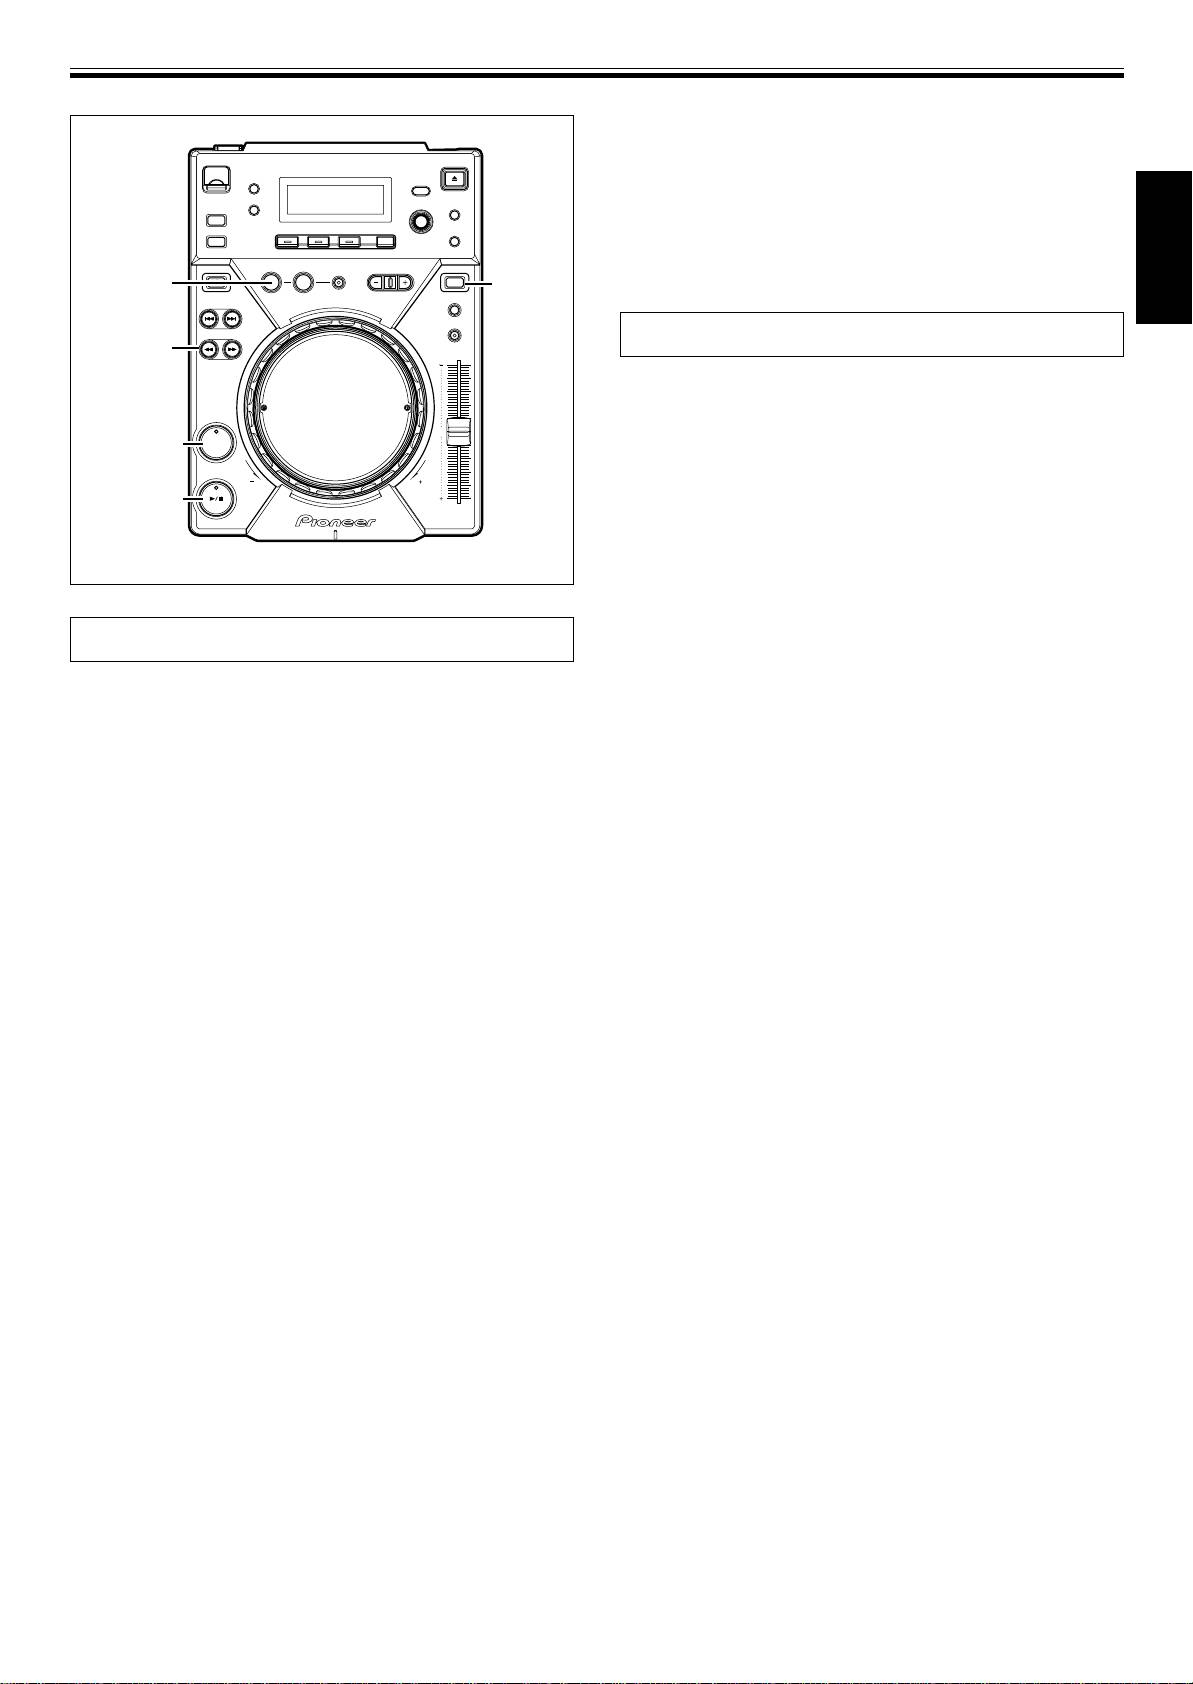
- PANEL FACILITIES 7. HOLD button
- 30. Jog touch indicators Rear Panel
- About TEXT display Removing the jog sheet
- DISC LOADING/UNLOADING
- DJ PLAYER OPERATIONS Starting playback Auto cue function Resume function To stop playback To temporarily interrupt playback
- Track cueing Jog dial functions Rotary search Fast-forward/fast-reverse
- Scratch Jog Effect Digital Jog Break Change playback speed Applying master tempo
- Mixing different tracks Cue point settings
- ADVANCED OPERATIONS Fader start playback Loop playback Scratch play Spin play Reverse play
- Relay play using two players Cue point/loop point memory Writing and reading data
- MIDI SETTING
- TROUBLESHOOTING Symptom
- Error message display
- SPECIFICATIONS
OPERATIONS (DJ PLAYER OPERATIONS)
2. Press the PLAY/PAUSE button (6).
¶ Playback will instantly start from the set cue point.
7 Cue point sampler (confirming cue points)
After specifying a cueing point, press the CUE button
in the cue standby mode.
¶ The sound at the specified cue point will continue to play as
long as the CUE button is pressed.
IN/
REALTIME CUE/
¶ During playback of MP3s, sounds can be heard only for cue
REV
VINYL
HOT LOOP
VINYL
points within the same folder.
English
Mixing different tracks
SEARCH
1, ¡
Example: Mix track B with track A which is currently playing from
the speakers.
¶ Connect CD1 to the DJ mixer’s CH-1, and connect CD2 to CH-2.
¶ Raise the TRIM, CHANNEL FADER, and MASTER VOLUME set-
CUE
CUE
tings appropriately so that sound is produced from CD1.
1.
Set the DJ mixer’s CROSS FADER slider at its left side (CH-1).
¶ Track A is heard from speakers.
PLAY/PAUSE
2. Load a CD on player CD2.
3. Press the TRACK SEARCH buttons (4, ¢) on player
CD2 to find and select track B.
4. Operate the DJ mixer’s MONITOR SELECTOR button to
monitor CH-2.
5. Turn the DJ mixer’s MONITOR LEVEL dial so that track B
Cue point settings
can be heard from the headphones.
¶ Only track A is heard from the main speakers.
Once a cue point has been stored in memory, it can be used during
6. Set cueing position for track B on the headphones.
playback to set the player in the cue standby mode (ready to begin
1 With player CD2 in the playback mode, press the PLAY/PAUSE
playback from the cueing position by pressing the CUE button).
button (6) near the desired cueing point.
7 Setting the cue during CDJ mode
¶ The player will enter the pause mode.
1. During playback, press the PLAY/PAUSE button (6) to
2 Rotate player CD2’s jog dial and search for the track’s cueing
pause playback at the point you wish to set as cue point.
point (first beat).
3 When cueing point is found, press player CD2’s CUE button.
2. Search for the precise position of the cue point.
¶ The player’s sound will be muted and cueing will be com-
¶ Using frame numbers to specify cue points.
pleted.
Cue points may be specified in one-frame units (where 75
7. Simultaneously press player CD2’s PLAY/PAUSE button
frames are equivalent to one second).
Use the jog dial or the forward or reverse SEARCH button (1,
(6) along with the sound of track A played from the
¡) to advance to the desired frame. Each rotation of the jog
speakers.
dial corresponds to 135 frames in the specified direction; by
¶ Only track A will be heard from the main speakers.
pressing the SEARCH button (1, ¡) frames will advance 1
¶ Track B will be heard from the headphones.
frame in the specified direction. During the playback of MP3s,
8. Move the TEMPO control slider so that the tempo
only files inside the same folder can be searched.
(BPM=Beat Per Minutes) of track B and A matches.
¶ Listening to the sound to determine the cue point.
Move the TEMPO control slider of player CD2’s so that the BPM of
While turning the jog dial slowly, return the track to the point
track B matches the BPM of track A.
immediately before the desired playback point (The cue point
¶ When the two BPM rates match, the BPM synchronization is
will be the point directly after the sound which can be heard
complete.
during the cueing pause).
9. Press the CUE button on player CD2.
3. Press the CUE button when the frame number or sound
¶ Player CD2 will enter pause mode at the cue point.
has reached the desired cueing point.
10.
Press the PLAY/PAUSE button (6) of player CD2 in time
¶ The sound is muted, and the time display lights steadily when
with track A of player CD1 (the sound heard from speaker).
the cue point has been stored in memory.
¶ Track B will begin playing.
¶ Each time a new cue point is stored to memory, the previous
11. While checking the sound on the headphones, gradually
cue point will be erased.
move the DJ mixer’s CROSS FADER slider from left to
[Changing the cue point]
right.
1. Press the CUE button during playback.
¶ The sound of track A from the speakers will gradually be
¶ This will take you back to the set cue point.
mixed with the sound of track B.
2. Press the SEARCH button (1, ¡) and set to audible
¶ When the DJ mixer’s CROSS FADER slider is completely
pause mode.
moved to the right side, the sound heard from the speaker
3. Go through steps 2 and 3 of “Cue Point Settings” men-
will have changed from track A to track B, and the operation is
complete.
tioned above.
7 Long Mix Play
7 Setting the cue during VINYL mode
If the BPM rates match, the mixed sound of track A and track B will
7 REALTIME CUE
not sound unnatural even if the CROSS FADER slider is placed in the
During playback, press the IN/REALTIME CUE/HOT LOOP
middle position.
button at the desired cueing point.
7 Fader Start Play
¶ This point will be set as a new cue point.
By using the Cross Fader Start function of Pioneer DJ mixer, step 10
7 Back Cue (returning to cue point)
above can be skipped for simpler mixing.
1. Press the CUE button during playback.
In addition, when the CROSS FADER slider is returned to its original
¶ This will take you back to the set cue point.
position, the status returns to that in step 9, so that the same play can
¶ During the playback of MP3 files, back cue can be per-
be repeated.
formed only within the same folder. As long as a new cue
point is not overwritten, the cue point will be saved after
17
folder search as well.
<DRB1451>
En


