Pioneer CDJ-400: DJ PLAYER OPERATIONS Starting playback Auto cue function Resume function To stop playback To temporarily interrupt playback
DJ PLAYER OPERATIONS Starting playback Auto cue function Resume function To stop playback To temporarily interrupt playback: Pioneer CDJ-400
Table of contents
- IMPORTANT VENTILATION CAUTION Operating Environment
- FEATURES
- BEFORE OPERATING (FEATURES) CONTENTS
- DISCS USABLE WITH THIS UNIT Types of discs playable on this unit Playing MP3 files
- BEFORE OPERATING (DISCS USABLE WITH THIS UNIT)
- CAUTIONS REGARDING HANDLING Location Storing Discs Installation Guidelines Condensation Cleaning and Handling Compact Discs Cleaning the Player CD Lens Cleaner
- CONNECTIONS 2. Connecting control cable for relay play
- 3. Connecting to other devices 4. Connecting the power cord
- PANEL FACILITIES 7. HOLD button
- 30. Jog touch indicators Rear Panel
- About TEXT display Removing the jog sheet
- DISC LOADING/UNLOADING
- DJ PLAYER OPERATIONS Starting playback Auto cue function Resume function To stop playback To temporarily interrupt playback
- Track cueing Jog dial functions Rotary search Fast-forward/fast-reverse
- Scratch Jog Effect Digital Jog Break Change playback speed Applying master tempo
- Mixing different tracks Cue point settings
- ADVANCED OPERATIONS Fader start playback Loop playback Scratch play Spin play Reverse play
- Relay play using two players Cue point/loop point memory Writing and reading data
- MIDI SETTING
- TROUBLESHOOTING Symptom
- Error message display
- SPECIFICATIONS
OPERATIONS (DJ PLAYER OPERATIONS)
DJ PLAYER OPERATIONS
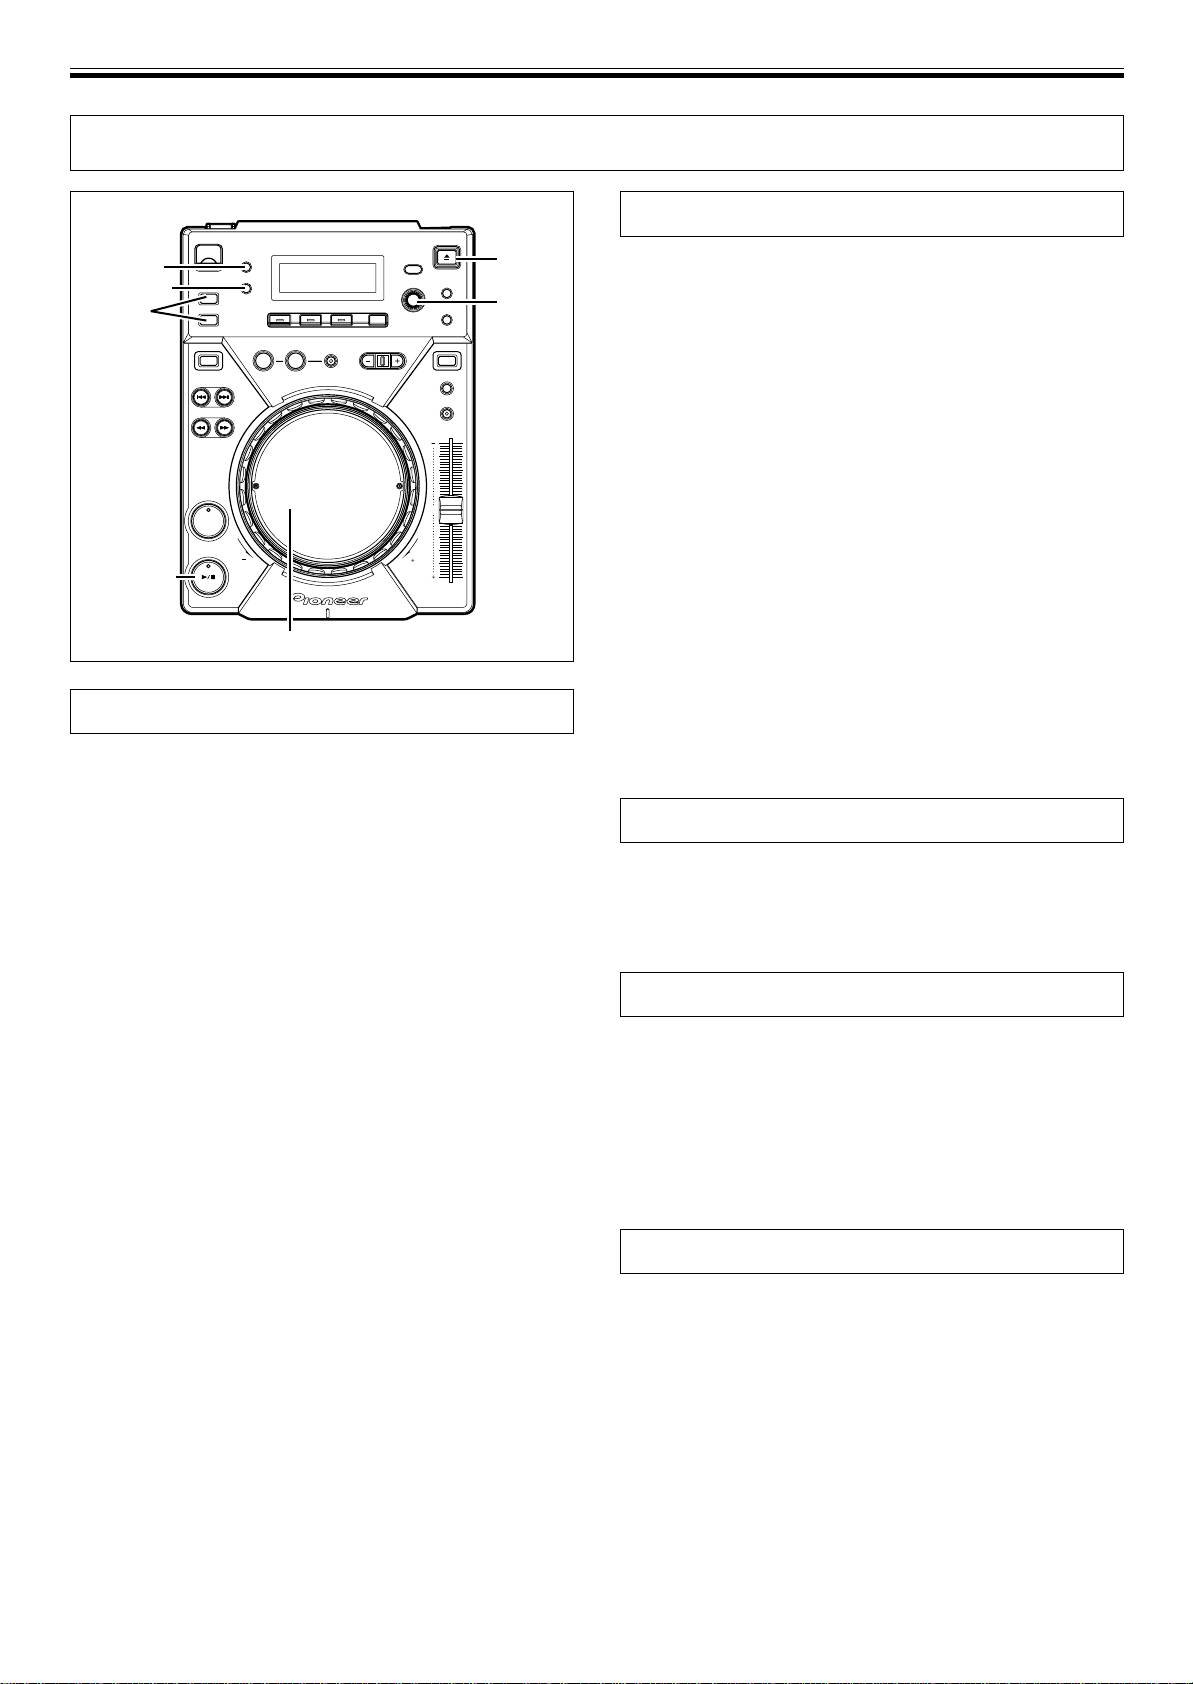
Starting playback
EJECT
1. Insert disc in the player.
AUTO CUE
¶ When inserting a disc, keep the label-side up, and insert only
TEXT MODE
one disc into the disc loading slot located in the front panel of
SELECT
SOURCE
PUSH
the unit. (☞P.13)
SELECT
¶ If a CD-ROM with no MP3 file in the first session is inserted, the
REV
VINYL
display will read [NO TRACK] and the CD-ROM will not be
played.
¶ When a USB memory device is connected to the USB port,
press the SOURCE SELECT button to alternate between play-
back from disc (CD) or files on the USB memory.
2. When Auto Cue function is ON, press the PLAY/PAUSE
button (6).
¶ Wait for the display’s time display to appear before pressing the
CUE
button. The non-recorded portion at the beginning of the dis-
played track will be skipped and playback will begin instantly.
When the first track’s playback ends, the player will automati-
PLAY/PAUSE
cally search for the beginning of the next track. The indicator
on the CUE button will light, the PLAY/PAUSE button (6) in-
dicator will flash and the player will then wait for the PLAY/
Jog dial
PAUSE button (6) to be pressed before beginning playback
of the next track.
When the Auto Cue function is turned off, playback will
begin automatically from the first track.
Auto cue function
¶ When Auto Cue function is turned off, playback will continue
after the first track has been played, with all subsequent tracks
When a disc is loaded or track search/track change is performed, this
being played in sequence.
function automatically sets the cue point (☞P.17) to the point imme-
diately before the actual audio starts.
¶ Turning on/off
Resume function
Hold down the AUTO CUE button to turn the auto cue function on.
The auto cue indicator [A. CUE] in the display lights when auto cue
When the same disc is inserted after being ejected once, the disc will
is on. Hold down the AUTO CUE button again to turn the auto cue
be restarted from the place immediately before the disc was ejected.
function off.
However, the Digital Jog Break and Scratch Jog Effect functions will
¶ The on/off of the auto cue function will still be saved when the
not be restored. If desired, the TRACK SEARCH button can be pressed
power is turned off.
before playback begins to perform normal track search and playback.
¶ The auto cue level can be varied.
7 Changing the auto cue level
To stop playback
1. Hold down the TEXT MODE/UTILITY MODE button for one
second or more.
1. Press the EJECT button.
Utility setting mode is enabled. Turn the rotary dial so the display
¶ Playback will stop and the disc will be ejected.
screen shows [A.CUE LEVEL], then press to confirm.
¶ The CDJ-400 is not provided with a conventional stop button.
The display screen will show [–60dB](when in default state).
¶ In the event the EJECT button is pressed accidentally, immedi-
2. Change the value by turning the rotary dial.
ately (before [EJECT] is displayed in the display) press the
Values can be selected from –36 dB, –42 dB, –48 dB, –54 dB,
PLAY/PAUSE button (6) to cancel the eject command; play-
–60 dB, –66 dB, –72 dB, and –78 dB.
back will then restart from the place immediately before the
3. Press the rotary dial to select.
EJECT button was pressed (during this time, sound output will
Utility setting mode will be canceled if no command is entered for
be temporarily interrupted).
15 seconds. Pressing the BACK button will also exit the setting
mode.
To temporarily interrupt playback
Press the PLAY/PAUSE button (6) during playback.
¶ The PLAY/PAUSE button (6) indicator and the CUE button indi-
cator will flash and playback will be paused.
¶ When the PLAY/PAUSE button (6) is pressed again, the indica-
tor on the button will light and the playback will continue.
¶ In CDJ mode, broken playback sound will be output even during
pause. If you wish for no sound to be output, lower the output
level of the audio mixer.
¶ After setting the unit to pause, if no subsequent operation is per-
formed for 100 minutes, the disc rotation will automatically stop.
In this event, pressing the PLAY/PAUSE button (6) will cause
playback to resume.
¶ If the [END] display is left on for 100 minutes without further
player operations, the unit will stop, even if it is in the play mode.
14
<DRB1451>
En


