Pioneer CDJ-400: 30. Jog touch indicators Rear Panel
30. Jog touch indicators Rear Panel: Pioneer CDJ-400
Table of contents
- IMPORTANT VENTILATION CAUTION Operating Environment
- FEATURES
- BEFORE OPERATING (FEATURES) CONTENTS
- DISCS USABLE WITH THIS UNIT Types of discs playable on this unit Playing MP3 files
- BEFORE OPERATING (DISCS USABLE WITH THIS UNIT)
- CAUTIONS REGARDING HANDLING Location Storing Discs Installation Guidelines Condensation Cleaning and Handling Compact Discs Cleaning the Player CD Lens Cleaner
- CONNECTIONS 2. Connecting control cable for relay play
- 3. Connecting to other devices 4. Connecting the power cord
- PANEL FACILITIES 7. HOLD button
- 30. Jog touch indicators Rear Panel
- About TEXT display Removing the jog sheet
- DISC LOADING/UNLOADING
- DJ PLAYER OPERATIONS Starting playback Auto cue function Resume function To stop playback To temporarily interrupt playback
- Track cueing Jog dial functions Rotary search Fast-forward/fast-reverse
- Scratch Jog Effect Digital Jog Break Change playback speed Applying master tempo
- Mixing different tracks Cue point settings
- ADVANCED OPERATIONS Fader start playback Loop playback Scratch play Spin play Reverse play
- Relay play using two players Cue point/loop point memory Writing and reading data
- MIDI SETTING
- TROUBLESHOOTING Symptom
- Error message display
- SPECIFICATIONS
BEFORE OPERATING (PANEL FACILITIES)
22. TRACK SEARCH buttons (4, ¢)
25. SCRATCH JOG EFFECT/DIGITAL JOG BREAK
Changes tracks in the forward/reverse direction. (☞P.15)
buttons
The button’s function changes depending on the JOG mode.
23. Reverse button (DIRECTION REV) (☞P. 18)
7 SCRATCH JOG EFFECT buttons
When this button is pressed, its indicator lights and the unit is
Turns on/off each of the effects BUBBLE, TRANS, and WAH
set to reverse play.
during VINYL mode (☞P.16).
24. LOOP buttons
7 DIGITAL JOG BREAK buttons
7 IN/REALTIME CUE/HOT LOOP button/indicator
Turns on/off each of the effects JET, ROLL, and WAH during
English
Use to input loop-in point. (IN ☞P.18)
CDJ mode (☞P.16).
Use to set the current playback point as cue point. (REALTIME
26. SOURCE SELECT buttons
CUE ☞P.17)
7 USB select button
When pressed during loop play, returns playback to loop-in
Select when playing files from a connected USB memory de-
point and begins replay. (HOT LOOP ☞P.18)
vice. Each time the button is pressed, the function alternates
7 OUT/OUT ADJUST button/indicator
between USB and PC.
Use to input loop-out point. (OUT ☞P.18)
7 CD select button
When pressed during loop play, adjusts loop-out point. (OUT
Select when playing CDs or files on a CD-ROM.
ADJUST ☞P.18)
7 RELOOP/EXIT button
27. USB port
After finishing loop play, the stored loop-in/out information
Use to connect a USB memory device.
can be used to begin loop play again. (RELOOP ☞P.18)
28. TEXT MODE/UTILITY MODE button
When pressed during loop play, loop play stops and playback
Changes the TEXT display (☞P.12)
returns to normal playback mode. (EXIT ☞P.18)
Hold the button depressed to enter utility setting mode.
7 BEAT LOOP/LOOP DIVIDE buttons/indicator
29. TIME MODE/AUTO CUE button
If pressed while playing or pausing a track, the loop-end will
Switches the display between the track’s elapsed time and re-
be calculated based on the BPM (Beat Per Minute) of the track,
maining time (☞P.12).
and loop-play will then start (BEAT LOOP ☞P.18).
Hold the button depressed to turn the auto cue function on/off
Pressing the – button during loop-playback will divide the
(☞P.14).
playback loop, and pressing the + button will return the
playback loop to its original length (LOOP DIVIDE ☞P.18).
30. Jog touch indicators
During loop-playback, the button’s indicator will light to
During VINYL mode, lights when the top of the jog dial is
indicate that the LOOP DIVIDE button is enabled.
pressed.
2
3 41
5
6
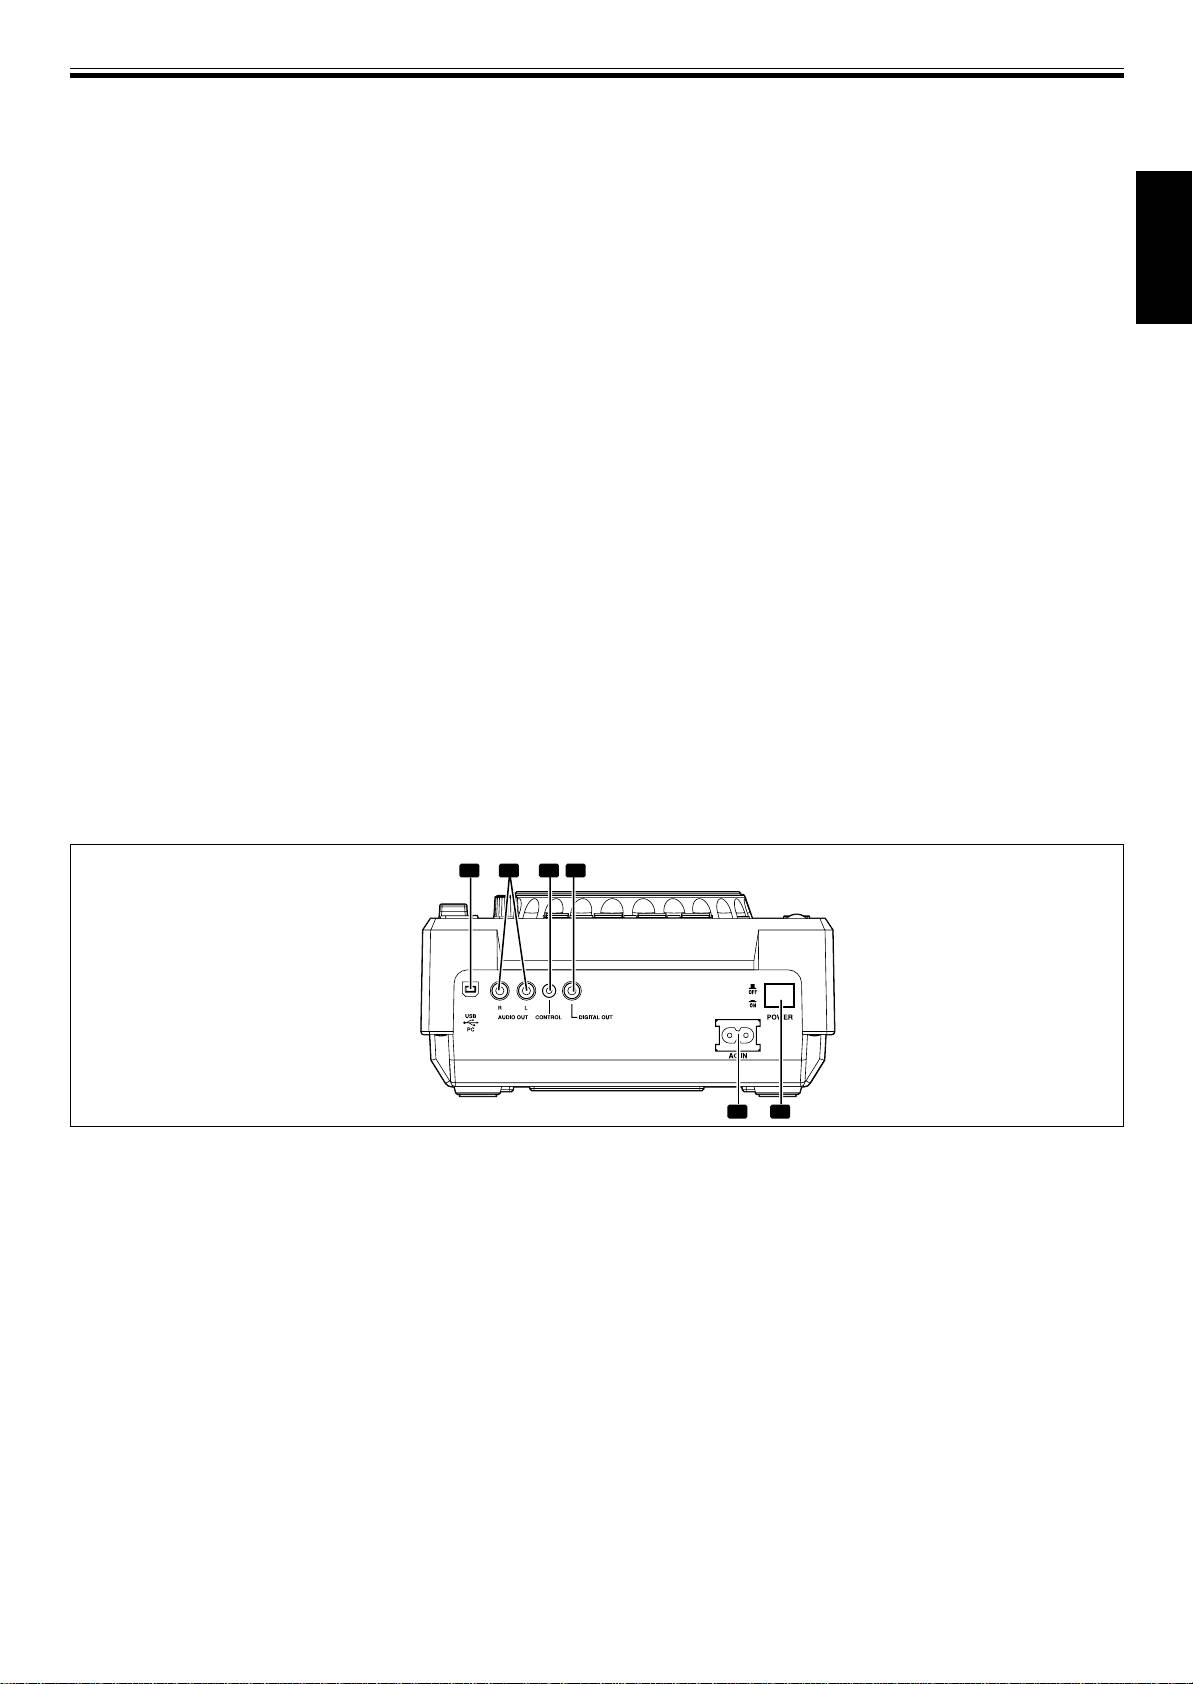
Rear Panel
4. DIGITAL OUT connector
RCA type coaxial digital output connectors used to connect a
DJ mixer or AV amplifier, CD player, etc., equipped with dig-
1. USB port
ital input connectors. The digital outputs here support all DJ
Use to connect a computer.
and other functions, but only audio data is output (without
2. AUDIO OUT L, R connectors
subcodes; CD graphics are not supported).
RCA-type analog audio output jacks.
5. AC inlet (AC IN)
3. CONTROL connector
Use the accessory power cord to connect this inlet to a stand-
When the accessory control cord is used to connect this con-
ard AC power outlet.
nector to the corresponding CONTROL connector on a Pio-
6. POWER — OFF/_ ON switch
neer DJ mixer, the DJ mixer can be used to control the CD
player for fader start play and back cue.
Also, by connecting this connector to the CONTROL connec-
tor on another Pioneer DJ CD player, automatic relay play can
be performed. (☞ P. 19)
11
<DRB1451>
En


