Kenwood KDC-U31R: INSTALLATION / CONNECTION
INSTALLATION / CONNECTION: Kenwood KDC-U31R
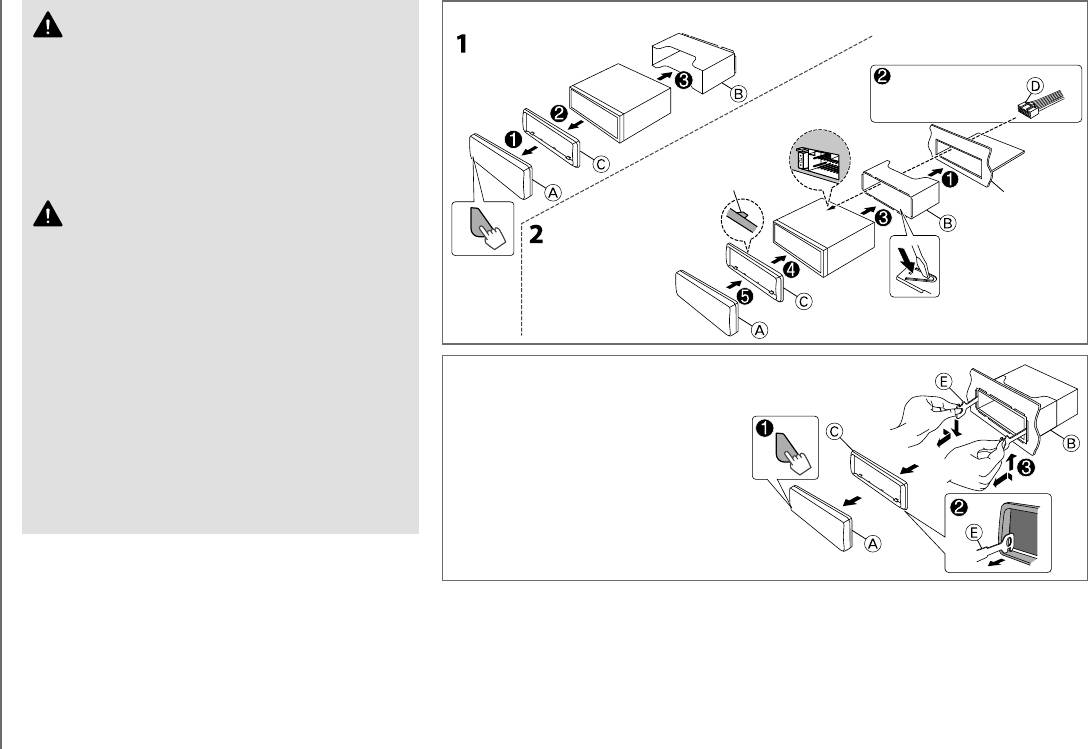
Installating the unit (in-dash mounting)
Warning
• The unit can only be used with a 12 V DC power supply, negative
ground.
Do the required
• Disconnect the battery’s negative terminal before wiring and
wiring. (
➜
13)
mounting.
• Do not connect Battery wire (yellow) and Ignition wire (red) to the car
chassis or Ground wire (black) to prevent a short circuit.
• Insulate unconnected wires with vinyl tape to prevent a short circuit.
Hook on the top side
• Be sure to ground this unit to the car’s chassis again after installation.
Dashboard of
Caution
your car
Orientate the trim plate as
• For safety’s sake, leave wiring and mounting to professionals. Consult
illustrated before fitting.
the car audio dealer.
• Install this unit in the console of your vehicle. Do not touch the metal
parts of this unit during and shortly after use of the unit. Metal parts
Bend the appropriate tabs to hold
such as the heat sink and enclosure become hot.
the mounting sleeve firmly in place.
• Do not connect the
·
wires of speaker to the car chassis, Ground wire
(black), or in parallel.
• Mount the unit with the angle of 30º or less.
How to remove the unit
• If your vehicle wiring harness does not have the ignition terminal,
1
Detach the faceplate.
connect Ignition wire (red) to the terminal on the vehicle’s fuse box
2 Fit the catch pin on the extraction
which provides 12 V DC power supply and is turned on and off by the
keys into the holes on both sides of
INSTALLATION / CONNECTION
ignition key.
• After the unit is installed, check whether the brake lamps, blinkers,
the trim plate, then pull it out.
wipers, etc. on the car are working properly.
3 Insert the extraction keys deeply into
• If the fuse blows, first make sure the wires are not touching car’s
the slots on each side, then follow
chassis, then replace the old fuse with one that has the same rating.
the arrows as shown on the right.
Basic procedure
1 Remove the key from the ignition switch, then
disconnect the · terminal of the car battery.
2 Connect the wires properly.
See Wiring connection.
(
➜
13)
3 Install the unit to your car.
See Installing the unit (in-dash mounting).
4 Connect the · terminal of the car battery.
5 Reset the unit.
(
➜
3)
12
EN_KDC-U41R[E]1.indd 12EN_KDC-U41R[E]1.indd 12 8/14/12 2:58:43 PM8/14/12 2:58:43 PM

Wiring connection
Part list for installation
Rear/subwoofer output
A
Faceplate
Fuse (10 A)
Antenna terminal
REAR
RL
( ×1 )
B
Mounting sleeve
If no connections are made, do not let the wire come out from the tab.
STEERING WHEEL
Light blue/yellow
REMOTE INPUT
( ×1 )
To the steering wheel remote control adapter
(Steering remote control wire)
REMOTE CONT
C
Trim plate
Blue/White
ANT CONT
To the power control terminal when using the optional power amplifier, or to the antenna
(Power control wire/ Antenna control wire)
P. CONT
control terminal in the vehicle.
( ×1 )
D
Wiring harness
Brown
To the terminal that is grounded when either the telephone rings or during conversation.
(Mute control wire)
MUTE
(To connect the Kenwood navigation system, consult your navigation manual.)
( ×1 )
Connecting the ISO connectors on some VW/
Yellow (Battery wire)
Audi or Opel (Vauxhall) automobiles
E
Extraction key
Red (Ignition wire)
You may need to modify the wiring of the
supplied wiring harness as illustrated below.
Pin
Color and function
A4 Yellow : Battery
( ×2 )
A5 Blue/White : Power control
Ignition wire
A7 Red : Ignition (ACC)
Red (A7)
(Red)
A7 (Red)
A8 Black : Earth (ground) connection
Yellow (A4)
Unit
Vehicle
B1 / B2 Purple
ª
/ Purple/black
·
: Rear speaker (right)
Battery wire
A4 (Yellow)
B3 / B4 Gray
ª
/ Gray/black
·
: Front speaker (right)
(Yellow)
ISO connectors
B5 / B6 White
ª
/ White/black
·
: Front speaker (left)
Default wiring
B7 / B8 Green
ª
/ Green/black
·
: Rear speaker (left)
ENGLISH |
13
EN_KDC-U41R[E]f.indd 13EN_KDC-U41R[E]f.indd 13 8/24/12 12:58:23 PM8/24/12 12:58:23 PM
Оглавление
- CONTENTS BEFORE USE
- BASICS
- GETTING STARTED
- RADIO
- CD / USB / iPod
- AUX
- AUDIO SETTINGS
- DISPLAY SETTINGS MORE INFORMATION
- TROUBLESHOOTING
- SPECIFICATIONS
- INSTALLATION / CONNECTION
- INHALT VOR DER INBETRIEBNAHME
- GRUNDLAGEN
- ERSTE SCHRITTE
- RADIO
- CD / USB / iPod
- AUX
- AUDIOEINSTELLUNGEN
- DISPLAY-EINSTELLUNGEN WEITERE INFORMATIONEN
- FEHLERSUCHE
- TECHNISCHE DATEN
- EINBAU / ANSCHLUSS
- CОДЕРЖАНИЕ ПОДГОТОВКА К ЭКСПЛУАТАЦИИ
- ОСНОВНЫЕ СВЕДЕНИЯ
- НАЧАЛО ЭКСПЛУАТАЦИИ
- РАДИОПРИЕМНИК
- Компакт-диск / USB / iPod
- AUX
- ЗВУКОВЫЕ НАСТРОЙКИ
- НАСТРОЙКИ ДИСПЛЕЯ ДОПОЛНИТЕЛЬНАЯ ИНФОРМАЦИЯ
- УСТРАНЕНИЕ ПРОБЛЕМ
- ТЕХНИЧЕСКИЕ ХАРАКТЕРИСТИКИ
- УСТАНОВКА И ПОДКЛЮЧЕНИЕ
- ЗМІСТ ПЕРЕД ВИКОРИСТАННЯМ
- ОСНОВИ
- ПОЧАТОК РОБОТИ
- РАДІО
- Компакт-диск / USB / iPod
- AUX
- НАСТРОЙКИ ЗВУКУ
- НАСТРОЙКИ ЭКРАНУ ДОДАТКОВІ ВІДОМОСТІ
- НЕСПРАВНОСТІ
- ХАРАКТЕРИСТИКИ
- ВСТАНОВЛЕННЯ / З’ЄДНАННЯ


