Pioneer VSX-322-K: Connecting a TV and playback component Plugging the receiver
Connecting a TV and playback component Plugging the receiver: Pioneer VSX-322-K
4
En
Connecting a TV and playback component Plugging the receiver
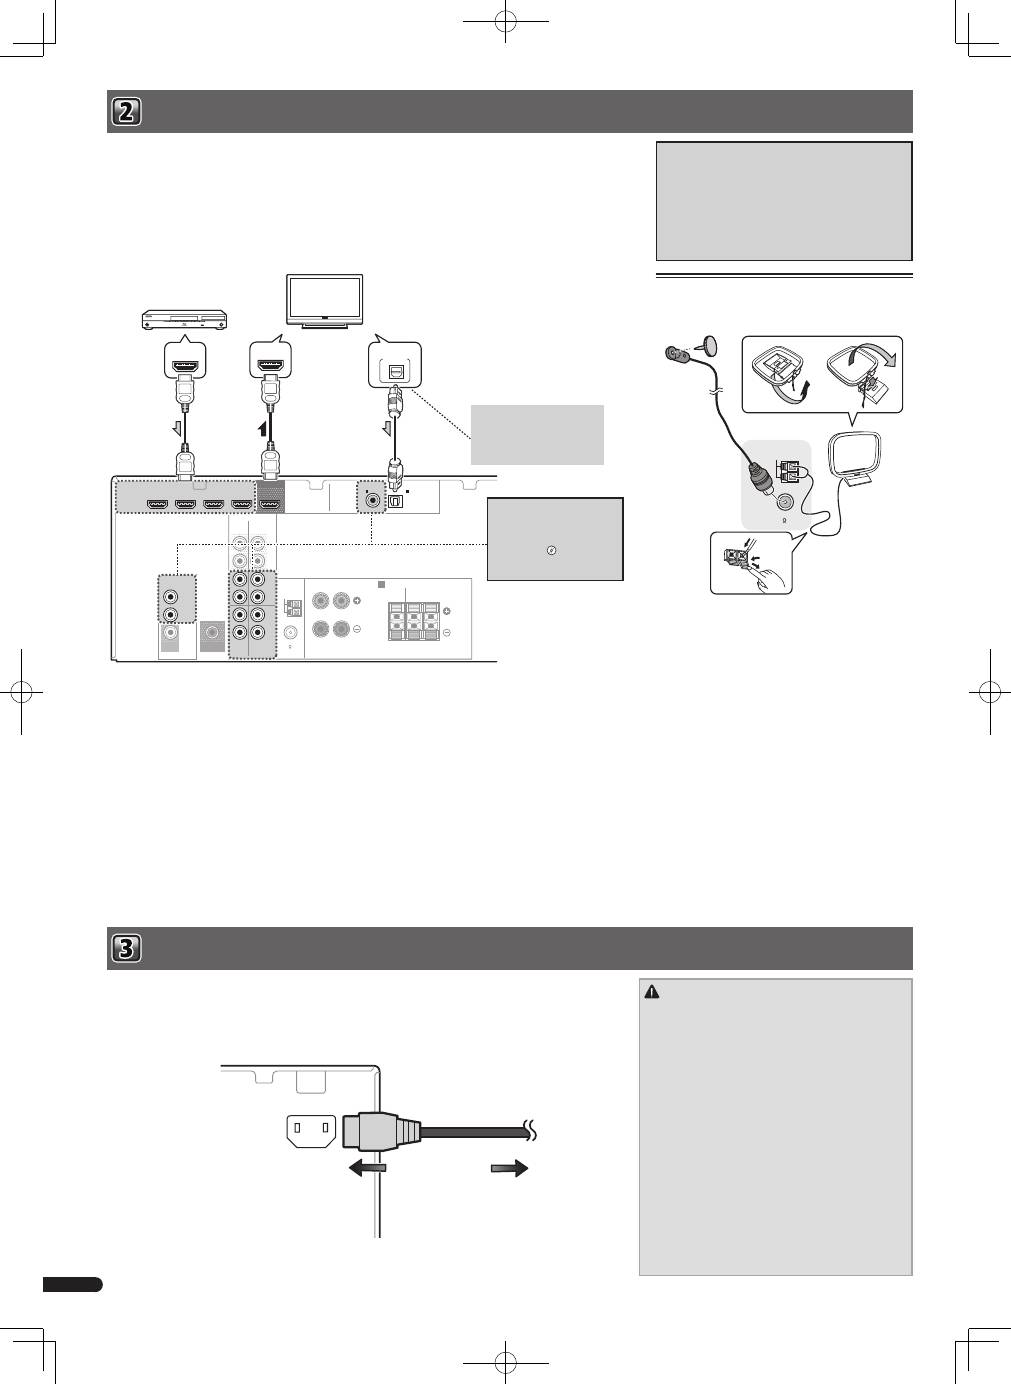
If you have an HDMI or DVI (with HDCP) equipped component (Blu-ray Disc player, etc.), you can connect it to this
receiver using a commercially available HDMI cable.
• The following connection/setting is required to listen to the sound of the TV over this receiver.
– If the TV does not support the HDMI Audio Return Channel function, connect the receiver and TV with audio
cables (as shown).
– If the TV supports the HDMI Audio Return Channel function, the sound of the TV is input to the receiver via the
HDMI terminal, so there is no need to connect an audio cable. In this case, set ARC at HDMI Setup to ON.
– The ARC function may not operate even with the above connections. If this is the case, connect the receiver
and the TV with an audio cable.
About video outputs connection
This receiver is not loaded with a video converter.
When you use HDMI cables for connecting to the
input device, the same cables should be used for
connecting to the TV.
The signals input from the analog (composite) video
input of this unit will not be output from the HDMI
OUT.
HDMI
VIDEO
L
R
R
L
COAXIAL
AUDIO
SPEAKERS
ANTENNA
OPTICAL
ASSIGNABLE
OUT
A
CD-R/TAPE SURR BACK
PRE OUT
L
R
(Single)
(
CD-R / TAPE
)
IN
CD/SAT
MONITOR
OUT
CD/SAT
DVD
IN
TV
IN
IN
IN
DVD
DVR/BDR IN
DVD IN
BD IN
CD/SAT IN
(
TV
)
IN
1
IN
1
FM UNBAL
75
AM LOOP
CENTER
SURROUND
R
L
SUBWOOFER
PRE OUT
FRONT
R
L
OUT
HDMI IN
HDMI OUT
DIGITAL AUDIO OUT
OPTICAL
HDMI/DVI-compatible components
(Blu-ray Disc player, etc.)
HDMI/DVI-compatible TV
If the TV does not support the
HDMI Audio Return Channel
function, this connection is
required to listen to the TV
sound over the receiver.
If the device you wish to
connect does not have an
HDMI output terminal, it
can be connected via these
terminals.
l
“
Connecting
your component with no HDMI
terminal”
CAUTION
• Handle the power cord by the plug part. Do not pull
out the plug by tugging the cord, and never touch the
power cord when your hands are wet, as this could
cause a short circuit or electric shock. Do not place
the unit, a piece of furniture, or other object on the
power cord or pinch the cord in any other way. Never
make a knot in the cord or tie it with other cables. The
power cords should be routed so that they are not
likely to be stepped on. A damaged power cord can
cause a fire or give you an electric shock. Check the
power cord once in a while. If you find it damaged,
ask your nearest Pioneer authorized independent
service company for a replacement.
• Do not use any power cord other than the one
supplied with this unit.
• Do not use the supplied power cord for any purpose
other than that described below.
• The receiver should be disconnected by removing the
mains plug from the wall socket when not in regular
use, e.g., when on vacation.
Connecting antennas
Connect FM wire antenna and the the AM loop antenna
as shown below.
ANTENNA
FM UNBAL
75
AM LOOP
Only plug in after you have connected all your components to this receiver, including the speakers.
1
Plug the supplied power cord into the AC IN socket on the back of the receiver.
2
Plug the other end into a power outlet.
AC IN
To power outlet
Table of contents
- Connecting the speakers
- Connecting a TV and playback component Plugging the receiver
- 0 Basic playback
- Raccordement des enceintes
- Raccordement d’un téléviseur et de périphériques de lecture Branchement du récepteur
- 0 Lecture de base
- Collegamento degli altoparlanti
- Connettere una TV e componenti playback Collegamento del ricevitore
- 0 Riproduzione di base
- De luidsprekers aansluiten
- Aansluiting van uw TV en weergave-apparatuur De receiver aansluiten op het stopcontact
- Basisbediening voor afspelen
- Conexión de los altavoces
- Conexión de componentes de reproducción y de un TV Conexión del receptor
- 0 Reproducción básica
- Anschluss der Lautsprecher
- Anschließen eines Fernsehers und von Wiedergabe-Geräten Anschluss des Receivers an das Stromnetz
- 0 Standard-Wiedergabe
- Подключение громкоговорителей
- Подключение телевизора и компонентов воспроизведения Подключение ресивера к электророзетке
- 0 Основные операции воспроизведения


