Yamaha BRX-610: SETUP MENU
SETUP MENU: Yamaha BRX-610
SETTINGS
SETUP MENU
The SETUP menu enables various audio/visual settings and adjustments for functions using the remote control unit.
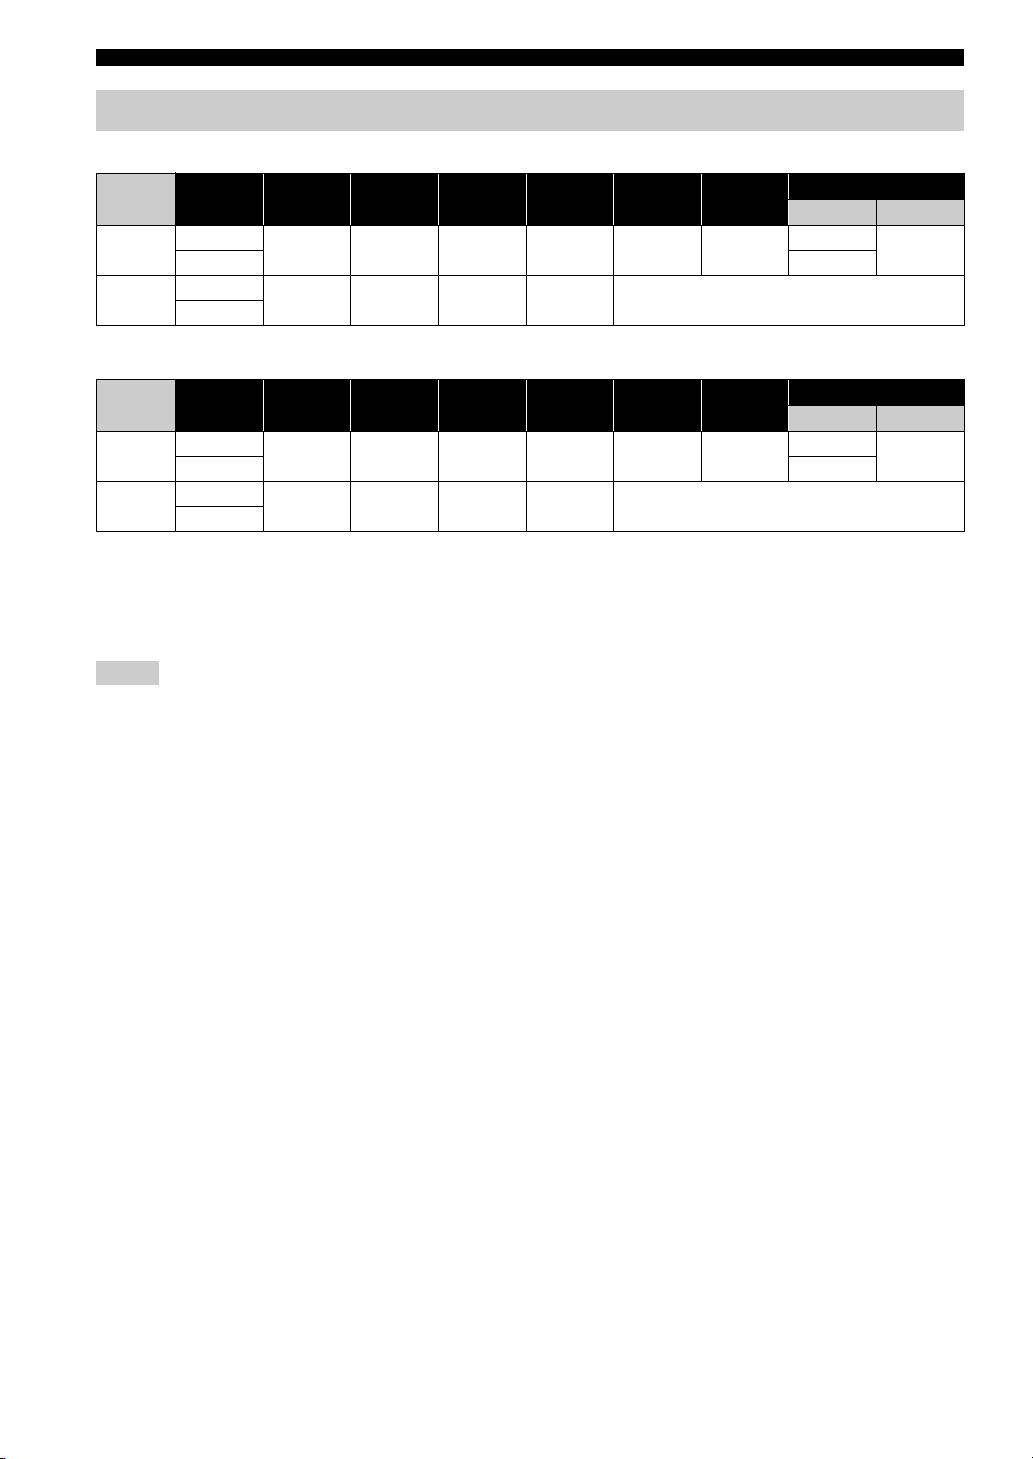
Menu/Submenu Item Function Page
System Screen Saver Sets screen saver to On/Off. 35
Auto Power Off Disc/USB/Net: Sets auto power off mode to On/Off.
35
Other Inputs: Sets auto power off mode to on by hours or Off.
General Setting
Disc Auto Playback Sets this unit to start disc playback automatically. 35
HDMI Control Sets this unit to receive control signal from the remote
35
control of your TV.
Load Default Resets all settings to the default setting except Security
35
setting.
Upgrade Performs upgrade of this unit. 35
Easy Setup Sets language, resolution, screen aspect ratio. 35
Local Storage Displays status of Local Storage, formats Local Storage and
35
selects the front/rear USB port for Local Storage.
3D Playback
Displays a warning message concerning 3D video playback
35
Message
when this unit is turned on.
Language OSD Selects the language for On Screen Display. 35
Menu Prioritizes the language for disc menu. 35
Audio Prioritizes the language for audio. 35
Subtitle Prioritizes the language for subtitle. 35
Playback Closed Caption Sets the closed caption to On/Off. 36
Angle Mark Sets to display the Angle Mark when a BD/DVD disc with
36
multiple angles is played back.
PIP Mark Sets to display the PIP Mark when a BD/DVD disc with
36
Picture in Picture is played back.
Secondary Audio
Sets to display the Secondary Audio Mark when a BD/DVD
36
Mark
disc with secondary audio is played back.
Last Memory Sets this unit to remember the last playback position of a disc
36
when it is set to standby mode or the disc tray is opened.
Security Change Password Changes password for Parental Control and Country Code. 36
Parental Control Sets the Parental Control depending on the disc content. 36
Country Code Sets your Country Code. 36
Network Internet Connection Sets the internet connection to Enable/Disable. 36
Information Displays network information screen. 36
Connection Test Performs the network connection test. 36
IP Setting Sets the IP setting to Auto/Manual. 36
BD-Live
Sets the BD-Live connection to Permitted/Partial Permitted/
36
Connection
Prohibited.
DLNA Sets the DLNA to Enable/Disable. 36
Proxy Setting Sets the proxy setting. 36
32 En
SETUP MENU
Menu/Submenu Item Function Page
TV 3D Output Selects 3D or 2D videos. 37
TV Screen Sets the screen aspect ratio of the connected TV, and adjust
37
the video output.
Display Setting
Video Out Select Selects the resolution of video output. 37
TV System Selects the TV System from NTSC/PAL/Multi. 37
Color Space Selects Color Space from YCbCr 4:4:4/YCbCr 4:2:2/ Full
37
RGB/RGB.
HDMI Deep Color Selects HDMI Deep Color from 30 bits/36 bits/Off. 37
HDMI 1080p 24Hz Sets HDMI 1080p 24Hz to Auto/Off. 38
Lip Sync Adjusts the lag between video and audio, such as when the
38
mouth movement is out of sync with the voice.
Video Process Video Mode Adjusts the visual image. 38
Color Adjust Adjusts Brightness/Saturation/Hue for each color. 38
Noise Reduction Sets the level of Noise Reduction. 38
De-interlacing
Sets how to detect the video signal.
38
Mode
Audio Output HDMI Selects the output mode of HDMI terminal from Bitstream/
39
PCM/Off.
DRC Sets the DRC (Dynamic Range Compression). 39
Audio Setting
Speaker Setting Configuration Sets the audio output from the 5.1 ch surround speaker
39
terminals.
2ch Downmix Sets the audio output from SPEAKERS FRONT L/R
39
terminals.
Test Tone Outputs the test tone for speaker setup. 39
Subwoofer Size Sets the subwoofer speaker size. 39
Post Process UpMix Multi-channelizes the 2-channel audio signal. 39
Displays software version and MAC address (p. 50).
SETTINGS
39
System
Information
English
33 En
SETUP MENU
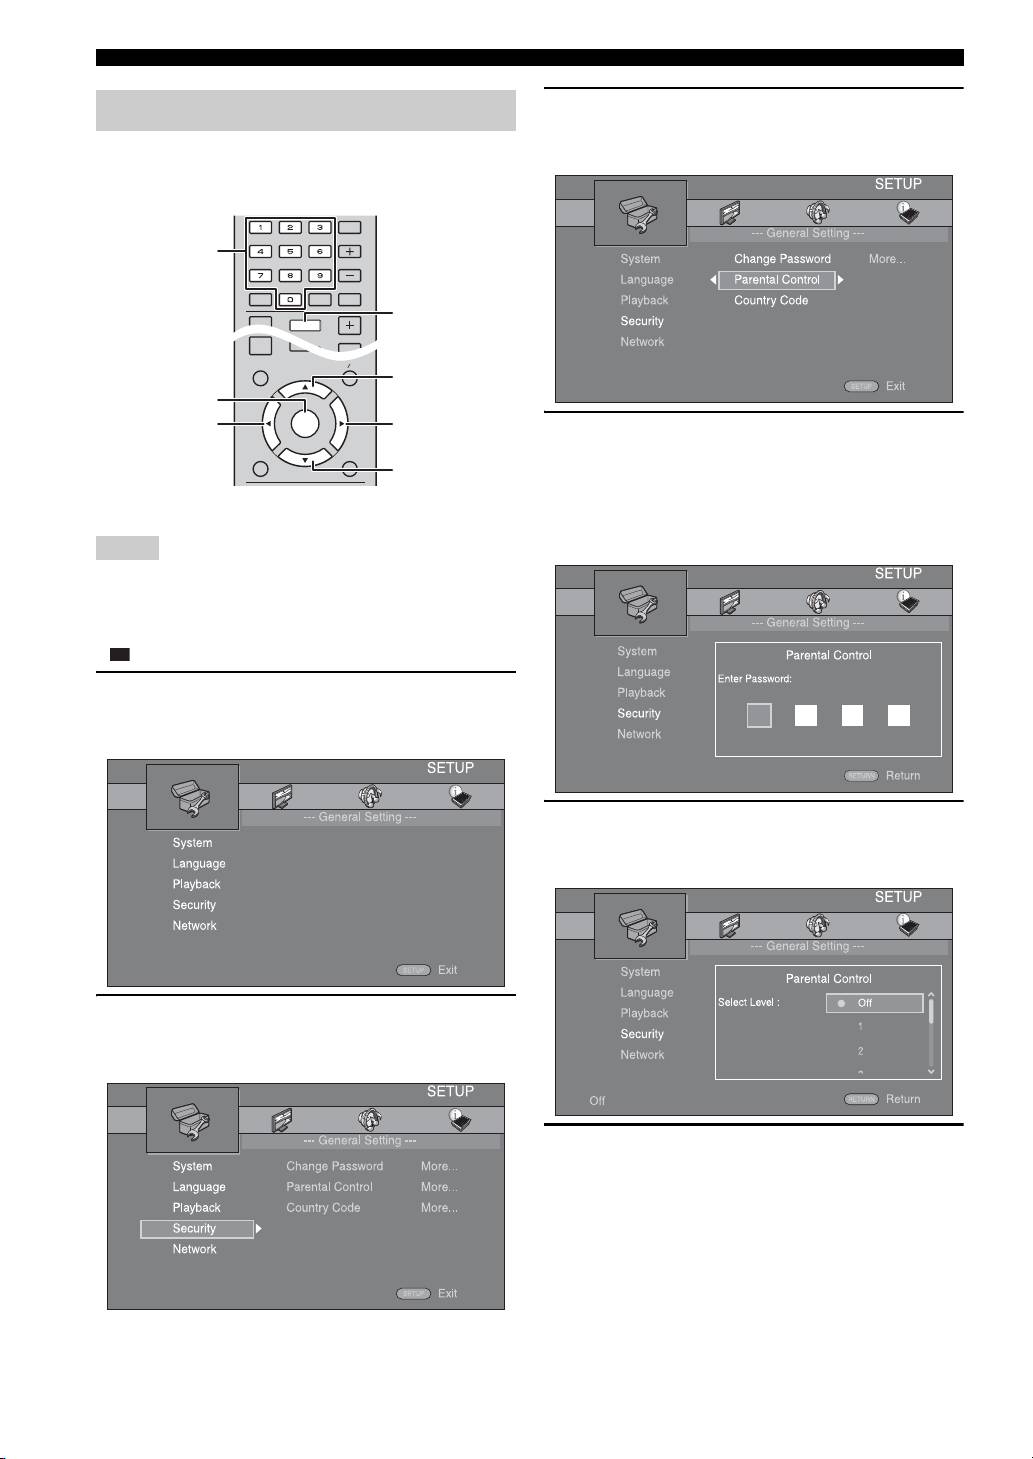
3 Select a menu item.
Operation for SETUP menu
Press 5/a to select [Parental Control], then press
You need to display SETUP menu screen to perform
ENTER or cursor 3.
settings for this unit. The following is the explanation for
basic operations of SETUP menu.
4 Enter your password with Numeric buttons.
– The default password is 0000.
– You cannot move to the next setting screen until
you have input the correct password.
Example: Setting [Parental Control]
– To change the password, refer to “[Change
Password]” (p. 36).
Notes
• Some items cannot be set when the input source is set to other
than Disc/USB/Network. In this case, set the input source to
Disc/USB/Network.
• Some items cannot be set during playback. In this case, press
twice to stop playback completely before setting.
1 Press SETUP to display SETUP menu screen.
Press 2/3 to select [General Setting], then press
ENTER or a .
5 Select a next item.
Press 5/a to select the Parental Control Level for
BD/DVD discs, then press ENTER.
2 Select a Submenu.
Press 5 /a to select [Security], then press ENTER or
cursor 3.
6 Exit the menu screen.
Press 2 to return to the previous menu.
34 En
VOLUME
OPTION
HOME
TOP MENU
POP-UP MENU
ENTER
RETURN ON SCREEN
SLEEP
MUTESEARCHCLEAR
DISPLAY
SETUP
VOLUME
OPTION
HOME
Numeric
SW
buttons
SETUP
5
ENTER
2
3
a

SETUP MENU
[Local Storage]
General Setting
You can display Local Storage information, format Local
Storage, and select [Front USB]/[Rear USB] to save the
The default settings are marked with “
*
”.
BD-Live data.
To format (empty) the “BUDA” folder in the USB
■ System
memory device, select [Information] and press ENTER
[Screen Saver]
when [Format] is focused on the screen.
You can set the screen saver to [On]/[Off].
Front USB, Rear USB
*
When set to [On], this unit will switch to screen saver
y
mode if there is no operation for 3 minutes.
Local Storage is used as an auxiliary memory when a BD disc is
On*, Off
played back.
[Auto Power Off]
[3D Playback Message]
You can set auto power off mode to [On]/[Off] when the
You can turn on or off a warning message concerning 3D
input is selected to Disc/USB/Network. When other inputs
video playback that appears on the TV when this unit is
are selected, auto power off mode can be set by hours or to
turned on.
[Off].
On
*
, Off
Disc/USB/Net: On*, Off
Other Inputs: 1 hour, 2 hours, 4 hours, 8 hours*, Off
■ Language
[Disc Auto Playback]
[OSD]
You can set [Disc Auto Playback] to [On]/[Off]. When set
You can select the language for On Screen Display which
to [On], a disc will play back automatically after loading.
is the messages or menu displayed on the screen such as
On
*
, Off
SETUP menu.
[HDMI Control]
English, , , , ,
Fran
You can set this unit to receive control signal from a TV
, , ,
compatible with the HDMI control function via an HDMI
[Menu]
cable (p. 13).
You can prioritize the language for disc menu.
On, Off
*
English, , , , , ,
y
For details on the HDMI control function, refer to page 30.
, Portuguese, Danish, , Finnish,
SETTINGS
Norwegian, , Korean, Japanese, More
Note
[Audio]
When set to [On], power consumption during standby mode
You can prioritize the audio language for BD/DVD
increases due to the HDMI control function.
playback. For details on setting items, refer to “[Menu]”
(p. 35).
[Load Default]
[Subtitle]
You can reset all settings of this unit to default setting
You can prioritize the language for Subtitle.
except Security setting (p. 36). For details on default
settings, refer to pages 32-39.
English, , , , , ,
[Upgrade]
, Portuguese, Danish, , Finnish,
You can upgrade the software manually from [USB
Norwegian, , Korean, Japanese, More, Off
Storage] or [Network]. For details on software upgrade,
refer to “SOFTWARE UPGRADE” (p. 41).
The default settings in [Language] differ depending on
[Easy Setup]
your model.
You can perform Easy Setup (p. 17).
English
35 En
ç
ais Español Deutsch Italiano
Svenska Nederlandse
Fran
ç
ais Español Deutsch Italiano
Nederlandse Svenska
Fran
ç
ais Español Deutsch Italiano
Nederlandse Svenska

SETUP MENU
■ Playback
[Country Code]
You can set the Country Code you live in. The password
[Closed Caption]
(refer to “[Change Password]” on page 36) needs to be
You can set to display the closed caption (p. 50) when a
entered before the Country Code is set. This setting may
BD/DVD disc with closed caption is played back.
be used for rating of the Parental Control and disc
On, Off
*
playback.
[Angle Mark]
■ Network
You can set to display the Angle Mark ( ) when a BD/
DVD disc with multiple angles is played back.
[Internet Connection]
On
*
You can set to [Enable] when you use BD-Live (p. 27),
, Off
DLNA (p. 22) and software upgrade from the network
[PIP Mark]
(p. 41).
You can set to display the PIP Mark ( ) when a BD
Enable
*
, Disable
disc with picture in picture (p. 27) is played back.
[Information]
On
*
, Off
You can display network information screen. On this
[Secondary Audio Mark]
screen, you can view the information of Interface
You can set to display the Secondary Audio Mark ( )
(Ethernet), Address Type, IP Address, Subnet Mask,
when a BD disc with secondary audio is played back.
Default Gateway, and DNS.
On
*
, Off
[Connection Test]
[Last Memory]
You can perform an internet connection test. If the test is
You can set whether this unit remembers the last playback
failed, please check [IP Setting] (p. 36) and perform the
position of a disc when it is set to standby mode or the disc
test again.
tray is opened.
[IP Setting]
On
*
, Off
You can configure the network settings.
Auto* Select to automatically configure the network
settings of this unit with the DHCP server.
Note
Manual Select to configure the network settings (IP Address,
Some discs are not compatible with this function.
Subnet Mask, Default Gateway, and DNS) manually.
■ Security
y
[Change Password]
• Numeric buttons Enters characters.
You can set the password for changing the Parental
• 2/3 Moves the highlight.
Control Level and Country Code. Refer to “[Parental
• CLEAR Deletes a character.
Control]” (p. 36) and “[Country Code]” (p. 36).
• ENTER Saves the settings and exits from the menu.
[BD-Live Connection]
Notes
You can set access restriction to BD-Live contents.
• The default password is 0000.
Permitted Allows all BD-Live discs to connect the network.
• If you forget the password, refer to “TROUBLESHOOTING”
Partial
Allows only discs with owner certification.
(p. 42) and set all the Security settings to their default settings.
Permitted
*
[Parental Control]
Prohibited Prohibits all BD-Live discs to connect the network.
In some BD/DVD discs, a control level for disc viewing is
set depending on the age of the viewer. You can set the
[DLNA]
Parental Control shown on the screen depending on the
You can set the DLNA (p. 22) to [Enable]/[Disable].
disc content.
When you do not use the DLNA function, set to [Disable].
The password (refer to “[Change Password]” on page 36)
Enable
*
, Disable
needs to be entered before the Parental Control Levels is
[Proxy Setting]
set.
You can set Proxy Setting. Set to [Disable] for normal use.
After you set the Parental Control, when you play back a
Set to [Enable] to set the proxy setting.
disc with level higher than current Parental Control Level,
or you want to change the Parental Control Level, a dialog
Enable Enables proxy host and proxy port setting.
box will pop up to ask you to enter the password.
Disable
*
Sets proxy server to disable. Select this item when
proxy server is not used.
Off*, 1 to 8
Proxy Host Sets proxy host.
Proxy Port Sets proxy port.
36 En
SETUP MENU
[Video Out Select]
Display Setting
You can select the video output resolution from
[Composite], [HDMI Auto], [HDMI 1080p], [HDMI
The default settings are marked with “
*
”.
1080i], [HDMI 720p], [HDMI 480p/576p], and [HDMI
480i/576i]. When set to [HDMI Auto], resolution is set to
■ TV
the maximum resolution according to the connected TV.
[3D Output]
For more details on output formats, refer to “About the
You can select 3D or 2D video output from this unit.
video output formats” (p. 40).
Auto* This unit automatically selects 3D or 2D videos.
Composite, HDMI Auto
*
, HDMI 1080p, HDMI 1080i, HDMI
Off This unit always selects 2D videos.
720p, HDMI 480p/576p, HDMI 480i/576i
Notes
Note
Even if you set [3D Output] to [Auto] and play back a BD 3D
• When you connect your TV and this unit via the VIDEO jack,
disc, this unit selects 2D images depending on the connection and
select [Composite], [HDMI 480p/576p], or [HDMI 480i/576i].
the setting of TV, etc (p. 13).
• To output HD audio (such as Dolby TrueHD or DTS-HD) from
the HDMI terminal, set [Video Out Select] to [HDMI Auto] or
[TV Screen]
more than [HDMI 720p].
You can set the screen aspect ratio of the connected TV,
[TV System]
and adjust the video output.
You can select [TV System] from [PAL], [NTSC] and
If you switch your TV (i.e. because you have bought a
[Multi]. Set the same TV System as your TV set. For more
new one) and the screen aspect ratio of the connected TV
details on output formats, refer to “About the video output
changes, you will have to change the TV Screen setting.
formats” (p. 40).
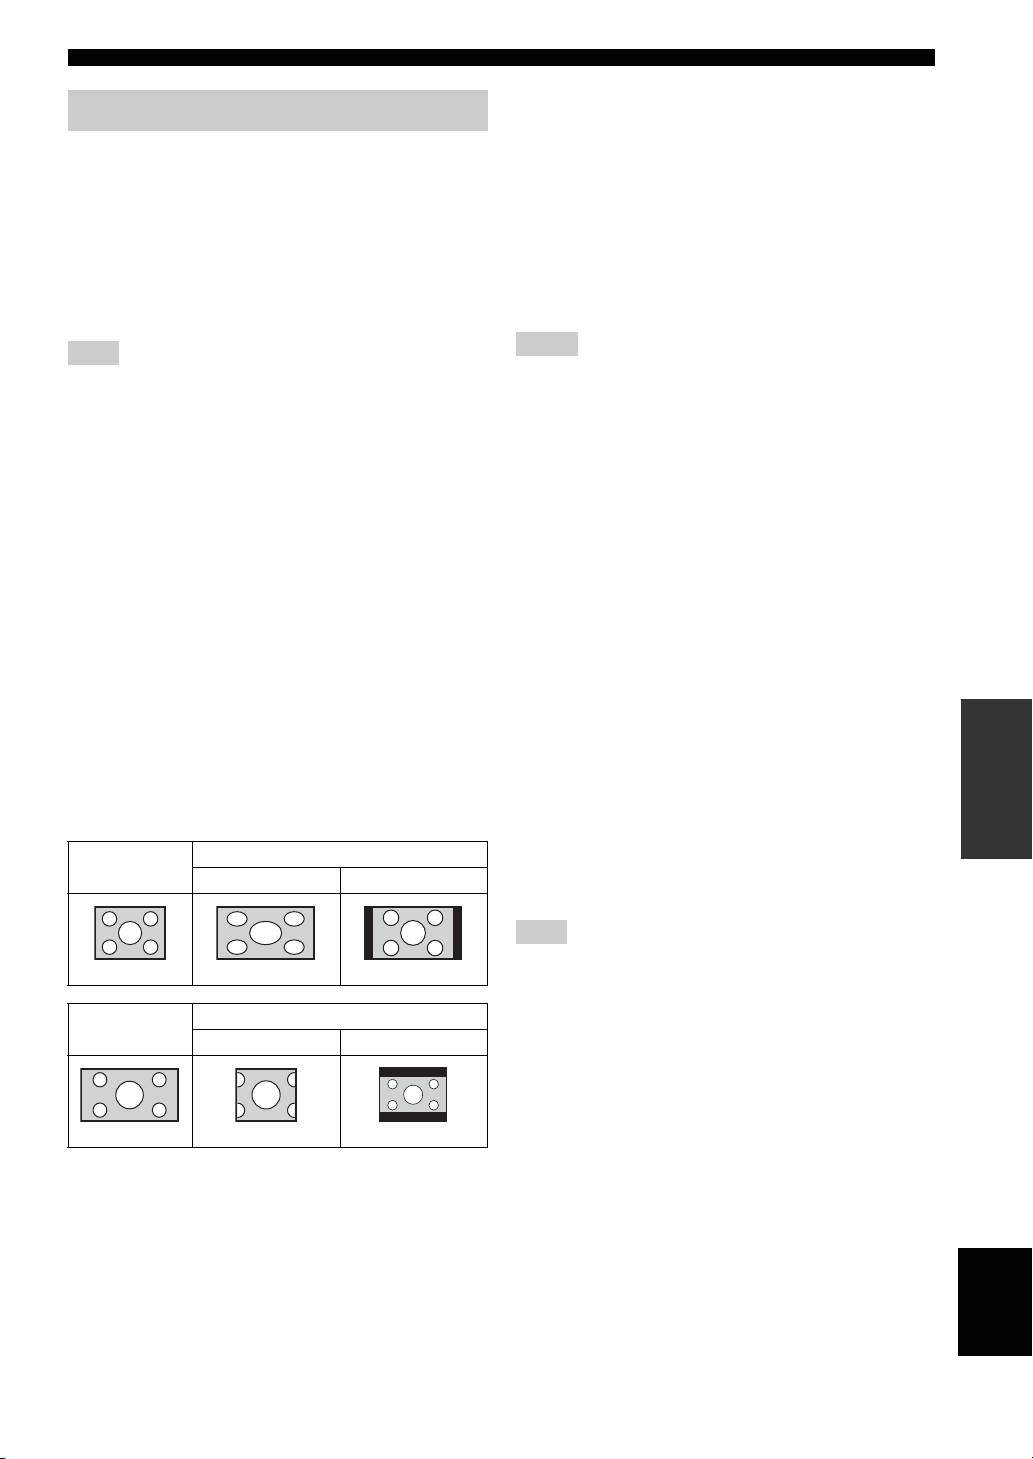
16:9 Full Select this when this unit is connected to a TV with a
16:9 screen. When a 4:3 aspect ratio video is played
NTSC, PAL
*
, Multi (Asia, China, Europe and Russia models)
back, the video is displayed as shown below.
NTSC
*
, PAL, Multi (U.S.A. and Canada models)
16:9 Normal
*
Select this when this unit is connected to a TV with a
16:9 screen. When a 4:3 aspect ratio video is played
[Color Space]
back, the video is displayed as shown below.
You can select the Color Space (p. 50) output from
4:3 Pan Scan Select this when this unit is connected to a TV with a
HDMI. This function is available when this unit is
4:3 screen. When a 16:9 aspect ratio video is played
connected with an HDMI cable.
SETTINGS
back, the video is displayed as shown below.
YCbCr 4:4:4
*
Sets Color Space to YCbCr 4:4:4.
4:3 Letterbox Select this when this unit is connected to a TV with a
YCbCr 4:2:2 Sets Color Space to YCbCr 4:2:2.
4:3 screen. When a 16:9 aspect ratio video is played
back, the video is displayed as shown below.
Full RGB When RGB is set and white and black on the screen
are too faint, select this item. This setting is effective
when a connected component supports RGB 0-255
Original
On 16:9 (wide screen) TV
range.
image size
16:9 Full 16:9 Normal
RGB Outputs video signal at normal signal range.
Note
This function is only available on TVs that support this function.
4:3
[HDMI Deep Color]
When your TV is compatible with Deep Color (p. 50), set
Original
On 4:3 TV
this item according to your TV. This function is available
image size
4:3 Pan Scan 4:3 Letterbox
when this unit is connected with an HDMI cable.
30 bits, 36 bits, Off
*
16:9
English
37 En

SETUP MENU
[HDMI 1080p 24Hz]
[Color Adjust]
This outputs the BD-Video encoded in 24Hz frame rate in
You can adjust Brightness/Saturation/Hue for each color
HDMI 1080p 24Hz. Smoother video playback may be
(Red/Green/Blue/Yellow/Cyan/Magenta). To use this
available with this function. This function is available
function, set [Video Mode] to [Custom]. For details on the
when your TV supports this function, and this unit is
setting items, refer to “[Video Mode]” (p. 38).
connected with an HDMI cable. For more details on
The default settings are 0.
output formats, refer to “About the video output formats”
[Noise Reduction]
(p. 40).
You can set the Noise Reduction to a level of 0 to 3. 0 is
Auto
*
, Off
off, and 3 is the maximum level.
0
*
, 1, 2, 3
Note
[De-interlacing Mode]
This setting is disabled when output resolution is other than
1080p.
You can select how to detect the video signal. Set to
[Auto] for normal use. When horizontal stripping noise
[Lip Sync]
appears on the screen, set this to [Film]/[Video] to remove
You can set/adjust the Lip Sync (p. 50) function.
the noise.
Auto* This unit adjusts the Lip Sync function
automatically.
Auto
*
, Film, Video
Manual You can adjust the Lip Sync function manually. You
can set the delay of the audio for 2D and 3D contents
independently.
2D
3D
Off This unit does not adjust the Lip Sync function.
■ Video Process
[Video Mode]
You can select [Video Mode] below.
Standard* The image is most natural and well-balanced. This
mode suits for normal use.
Vivid The image is more vivid and sharp.
Cinema The image suits for watching movie in dark room.
Custom You can adjust the visual image manually. Press 5 /
a to select the parameter, then press 2 /3 to adjust
the figure.
Brightness
Adjusts the overall brightness of the image.
Saturation
Adjusts the richness of the color in the projected
image.
Hue
Adjusts the tint of the projected image.
Contrast
Adjusts the bright areas (white levels) in the image.
Sharpness
Adjusts the sharpness of objects in the video.
CTI
Smooths out the edges of color images. Color images
are rendered more distinct.
The default settings are 0.
38 En

SETUP MENU
3 Press RETURN to go back to speaker selection.
Audio Setting
[2ch Downmix]
The default settings are marked with “
*
You can select down mix method to 2-ch from [Stereo] or
”.
[Lt/Rt].
■ Audio Output
Stereo*, Lt/Rt
[HDMI]
[Test Tone]
You can select the output mode of the HDMI terminal.
You can check if the speaker setting is correct by
Bitstream, PCM, Off
*
outputting the test tone.
[Subwoofer Size]
Notes
You can select the size for your subwoofer speaker to be
[Small] or [Large]. When your subwoofer driver diameter
• To output sound from the speakers, select [Off].
• Sound from your iPod or the audio signal input to the DIGITAL
is more than 20 cm, or when you feel low-frequency and
IN (COAXIAL and OPTICAL) jacks of this unit, cannot be
bass sound is weak, select [Large].
output to a TV from this unit through the HDMI cable.
Small*, Large
• To output HD audio (such as Dolby TrueHD or DTS-HD) from
the HDMI terminal, set [Video Out Select] to [HDMI Auto] or
■ Post Process
more than [HDMI 720p] (p. 37).
[UpMix]
[DRC]
You can multi-channelize the 2-channel audio signal
You can set the DRC (Dynamic Range Compression)
(effective on speaker output). To multi-channelize, select
(p. 50) to [On]/[Off]/[Auto]. When set to [Auto], DRC is
[Dolby PLII] or [DTS NEO:6]. You can select [Cinema]
automatically turned on for a source with DRC
or [Music] when [DTS NEO:6] is selected. Also you can
information in Dolby TrueHD format. DRC makes the
select [Movie] or [Music] when [Dolby PLII] is selected.
strong sound such as plosive sound lower, and
Off*, Dolby PLII, DTS NEO:6
conversations more audible. It is useful when you watch
movies in the night.
■ System Information
Off
*
, On, Auto
Software version and MAC address (p. 50) are displayed.
■ Speaker Setting
SETTINGS
[Configuration]
You can set the output of 5.1 ch surround depending on
the connected speakers.
1 Press 5 /a to select a speaker you want to configure,
then press ENTER.
2 Adjust the figures below. Note that some of items are
not displayed depend on the selected speaker.
Size When the woofer section of a speaker is 16 cm
(6-1/2 in) or larger, select [Large]. When
smaller than 16 cm (6-1/2 in), select [Small].
Large, Small*
Trim Adjusts the selected speaker’s level (volume
level).
-6 to +6 dB (in 0.5 dB step)
The default setting is 0 dB.
Delay Separately adjusts the timing at which each
speaker produces audio so that sounds from the
speakers reach the listening position at the same
time.
0.5 to 10 m (in 0.5 m step)
The default setting is 3 m.
Disable When selected speaker is not in use, select
[Yes].
English
Yes, No*
39 En
SETUP MENU
About the video output formats
When [TV System] is set to [NTSC]
HDMI
HDMI
HDMI
HDMI
HDMI
HDMI 1080p
Resolution Composite
Auto
480i/576i
480p/576p
720p
1080i
24Hz Others
Playback BD
1080p 24 Hz
HDMI
480p Max 480i 480p 720p 60 Hz 1080i 60 Hz
1080p 60 Hz
others 1080p 60 Hz
Playback BD
VIDEO
480i OFF 480i 480i OFF
others
When [TV System] is set to [PAL]
HDMI
HDMI
HDMI
HDMI
HDMI
HDMI 1080p
Resolution Composite
Auto
480i/576i
480p/576p
720p
1080i
24Hz Others
Playback BD
1080p 24 Hz
HDMI
576p Max 576i 576p 720p 50 Hz 1080i 50 Hz
1080p 50 Hz
others 1080p 50 Hz
Playback BD
VIDEO
576i OFF 576i 576i OFF
others
When [TV System] is set to [Multi]
When [TV System] is set to [Multi], video signal is output at the same frequency as the source. Refer to the tables above
for details on the frequency setting of the TV and resolution of the output video signal.
While a menu screen such as SETUP menu is displayed, video signal is output at the same frequency as the source.
Notes
• “Max” in the table means that resolution is set to the maximum resolution supported by the connected TV.
• [HDMI 1080p 24Hz] setting is disabled when output resolution is other than [HDMI 1080p].
• No signals are output from the VIDEO jack when output resolution is set to [HDMI Auto], [HDMI 720p], [HDMI 1080i], or [HDMI
1080p].
• When [TV System] is set to [NTSC] and video source is not 60 Hz, the video output signal is converted to 60 Hz.
• When [TV System] is set to [PAL] and video source is not 50 Hz, the video output signal is converted to 50 Hz.
40 En
Оглавление
- CAUTION: READ THIS BEFORE OPERATING YOUR UNIT.
- CONTENTS
- WHAT YOU CAN DO WITH THIS UNIT
- ABOUT DISCS AND FILES
- PART NAMES AND FUNCTIONS
- CONNECTION
- NETWORK AND USB CONNECTION
- OTHER CONNECTION
- INITIAL WIZARD/EASY SETUP
- BASIC OPERATION
- ADVANCED PLAYBACK OPERATION
- LISTENING TO FM RADIO STATIONS
- USING USEFUL FUNCTIONS
- SETUP MENU
- SOFTWARE UPGRADE
- TROUBLESHOOTING
- GLOSSARY
- SPECIFICATIONS
- PRECAUCIÓN: LEA LAS INDICACIONES SIGUIENTES ANTES DE UTILIZAR ESTE APARATO
- CONTENIDO
- FUNCIONES DE ESTA UNIDAD
- INFORMACIÓN SOBRE DISCOS Y ARCHIVOS
- NOMBRES Y FUNCIONES DE LAS OPCIONES
- CONEXIÓN
- CONEXIÓN DE RED Y USB
- OTRA CONEXIÓN
- ASISTENTE INICIAL/CONFIGURACIÓN SENCILLA
- FUNCIONAMIENTO BÁSICO
- FUNCIONAMIENTO DE REPRODUCCIÓN AVANZADO
- ESCUCHAR EMISORAS DE RADIO FM
- UTILIZACIÓN DE FUNCIONES ÚTILES
- MENÚ SETUP
- ACTUALIZACIÓN DE SOFTWARE
- SOLUCIÓN DE PROBLEMAS
- GLOSARIO
- ESPECIFICACIONES
- ПРЕДУПРЕЖДЕНИЕ: ВНИМАТЕЛЬНО ПРОЧИТАЙТЕ ЭТО ПЕРЕД ИСПОЛЬЗОВАНИЕМ АППАРАТА.
- СОДЕРЖАНИЕ
- ВОЗМОЖНОСТИ ЭТОГО УСТРОЙСТВА
- О ДИСКАХ И ФАЙЛАХ
- НАЗВАНИЕ ДЕТАЛЕЙ И ФУНКЦИИ
- ПОДКЛЮЧЕНИЕ
- СЕТЕВОЕ И USB-ПОДКЛЮЧЕНИЕ
- ДРУГИЕ ПОДКЛЮЧЕНИЯ
- НАЧАЛЬНЫЕ УСТАНОВКИ/ПРОСТАЯ УСТАНОВКА
- ОСНОВНОЕ УПРАВЛЕНИЕ
- РАСШИРЕННЫЕ ОПЕРАЦИИ ВОСПРОИЗВЕДЕНИЯ
- ПРОСЛУШИВАНИЕ FM-РАДИОСТАНЦИЙ
- ИСПОЛЬЗОВАНИЕ ПОЛЕЗНЫХ ФУНКЦИЙ
- МЕНЮ “УСТАНОВКИ”
- ОБНОВЛЕНИЕ ПРОГРАММНОГО ОБЕСПЕЧЕНИЯ
- УСТРАНЕНИЕ НЕИСПРАВНОСТЕЙ
- ГЛОССАРИЙ
- ТЕХНИЧЕСКИЕ ХАРАКТЕРИСТИКИ
- 注意:在操作本机之前请阅读此部分。
- 目录
- 本机的功能
- 关于碟片和文件
- 部件名称和功能
- 连接
- 网络和 USB 连接
- 其他连接
- 初始向导 / 简易设置
- 基本操作
- 高级播放操作
- 聆听 FM 无线电台
- 使用实用功能
- 设置菜单
- 软件升级
- 故障排除
- 术语表
- 规格
