Yamaha BRX-610: PART NAMES AND FUNCTIONS
PART NAMES AND FUNCTIONS: Yamaha BRX-610
PART NAMES AND FUNCTIONS
INTRODUCTION
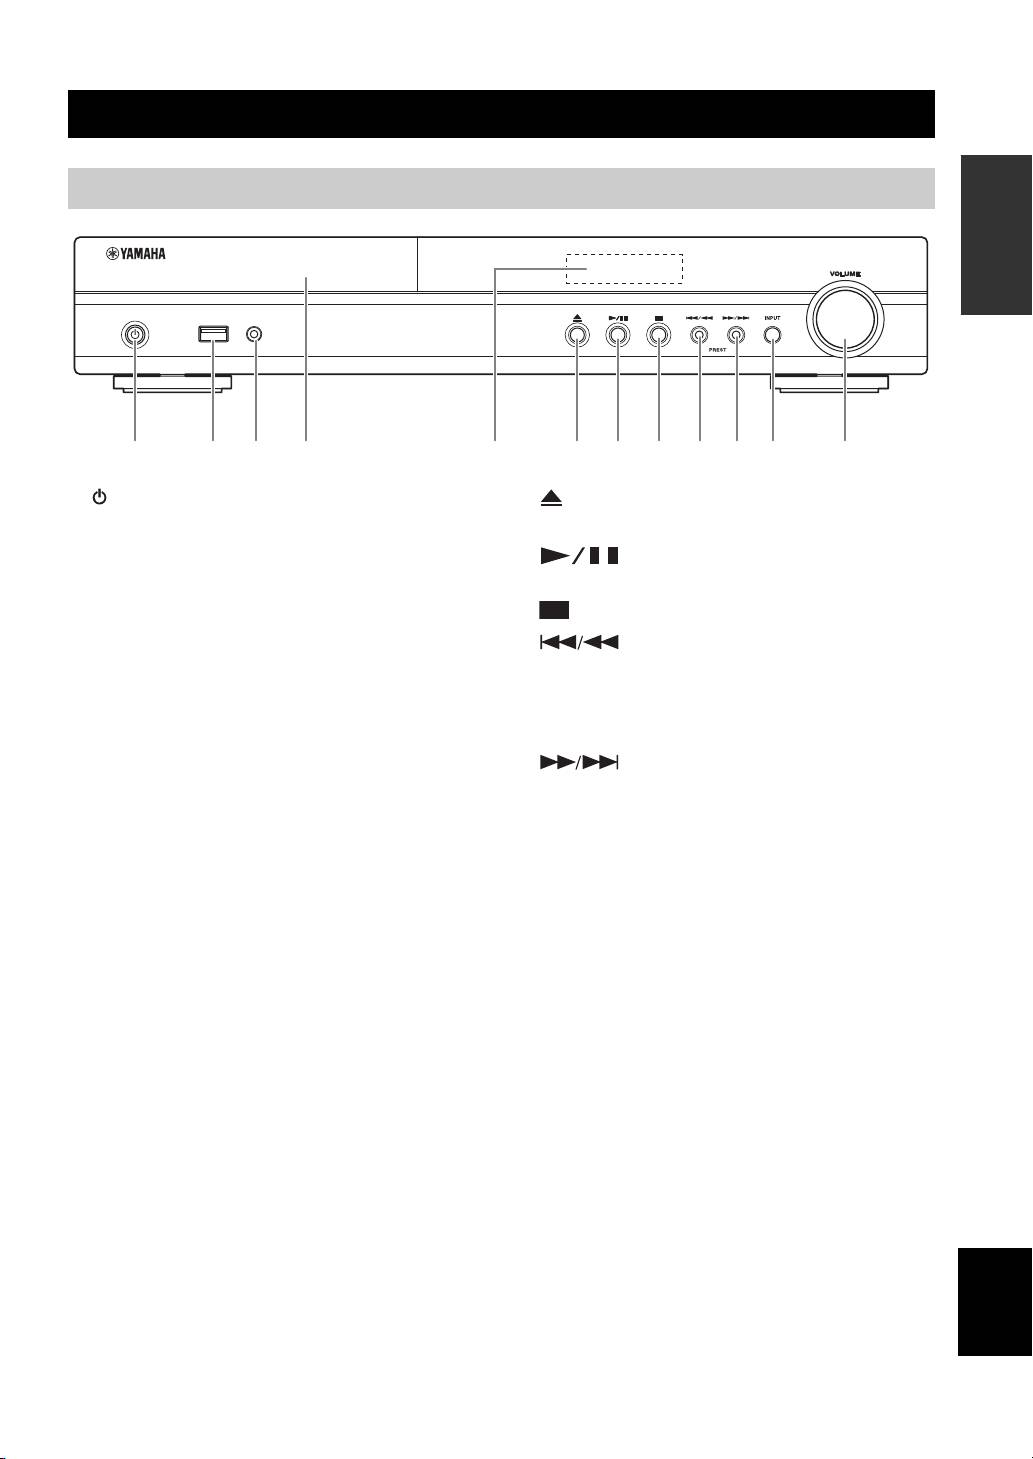
Front panel
USB PORTABLE
iPod/iPhone
2 3 4 6 7 8159 0 A B
1 (On/Standby):
6 (Eject):
Turns this unit on/Sets to standby mode.
Opens/Closes the disc tray.
y
7 (Play/Pause):
This unit has an automatic standby function.
Starts/Pauses playback.
• When the source is set to Disc/USB/Network, this unit
automatically switches to standby mode if it is left turned on
8 (Stop)
for 1 hour without playback or any other operation being
9 (Search backward/Skip backward):
performed.
Press to skip backward, and press and hold to search
• When the source is NOT set to Disc/USB/Network, this unit
automatically switches to standby mode if it is left turned on
backward.
for between 1 to 8 hours without playback or any other
PRESET <:
operation being performed according to the setting in
Press to select a preset station.
SETUP menu (p. 35).
0 (Search forward/Skip forward):
2 iPod/iPhone/USB port (p. 12, 15):
Press to skip forward, and press and hold to search
Connect your iPod or USB memory device.
forward.
3 PORTABLE (p. 14):
PRESET >:
Connect a portable digital music player other than
Press to select a preset station.
iPod.
A INPUT:
4 Disc tray door
Selects the input source.
5 Front panel display
B VOLUME:
Turns the volume up/down.
English
5 En
PART NAMES AND FUNCTIONS
Remote control
1 Infrared signal transmitter (p. 10)
Note
2 MARKER : Sets Bookmark at a specified
DVD VIDEO
will appear on the top left corner of the screen when the
point of a movie (p. 26). After Bookmark is set, press
pressed button is not available.
DIGEST to select the set point you want to jump to. You can
set up to 12 Bookmarks.
1
3 : Opens/Closes the disc tray.
2
G
4 PROGRAM : Sets the order of playback
DVD CD
H
(p. 26). You can set up to 15 tracks of an audio disc or titles/
3
chapters of a DVD-Video disc.
PROGRAM MARKER DIGEST ZOOM
I
4
J
5 Numeric buttons: Enters numbers, or during playback,
SLEEP
jumps to the track/chapter corresponding to the number you
K
input. These buttons may not be available depending on the
disc type and playback condition.
5
SW
L
6 CLEAR: Clears entered number/set item.
6
MUTESEARCHCLEAR
7 DISPLAY: Switches the information shown on the front
7
panel display (p. 23, 29).
DISPLAY
SETUP
M
8
VOLUME
8 SETUP: Displays SETUP menu screen (p. 32).
9
OPTION
HOME
9 OPTION: Enters option menu mode (p. 29).
0
TOP MENU
POP-UP MENU
N
0 HOME: Displays HOME menu screen (p. 20).
A STATUS: Displays the playback information on the screen
(p. 25).
ENTER
B DIMMER: Changes brightness of the front panel display.
Choose brightness from normal (bright), mid dim, or dim by
RETURN ON SCREEN
pressing this button repeatedly.
C SUBTITLE : Changes subtitle
BD DVD VIDEO
languages (p. 50) if available. You can also select this item
O
A
TUNING
from On Screen menu (p. 24).
B
PRESET
D PIP : Turns on/off the Picture in Picture (p. 27). PIP
BD
DIMMER
STATUS
Mark ( ) is displayed on the screen when this function is
C
P
D
PIP
SUBTITLE
AUDIO
MEMORY
available. You can also select this item from On Screen menu
(p. 24).
E
SHUFFLE
REPEAT
A B
Q
Note
F
iPod
TV
STB
TUNER
R
PIP Mark is displayed only when [PIP Mark] is set to [On]
DISC
USB NET
AUX
PORTABLE
(p. 36).
E REPEAT
BD DVD CD VIDEO MUSIC
PHOTO
: Selects repeat mode. Repeat mode shown below
will change each time you press the button (p. 23, 25).
: Repeats the title being played back.
: Repeats the chapter being played back.
: Repeats the folder being played back.
: Repeats all tracks/files on the disc/folder.
: Repeats the track/file being played back.
F SHUFFLE :
DVD CD VIDEO MUSIC PHOTO
Selects shuffle play mode (p. 23, 24).
G DIGEST : Shows 12 photo thumbnails. When
PHOTO
thumbnails are displayed, you can proceed to the next/
previous page with / .
DVD VIDEO
: Displays Bookmark select bar (p. 26).
H : Turns this unit on or sets it to standby mode.
6 En

PART NAMES AND FUNCTIONS
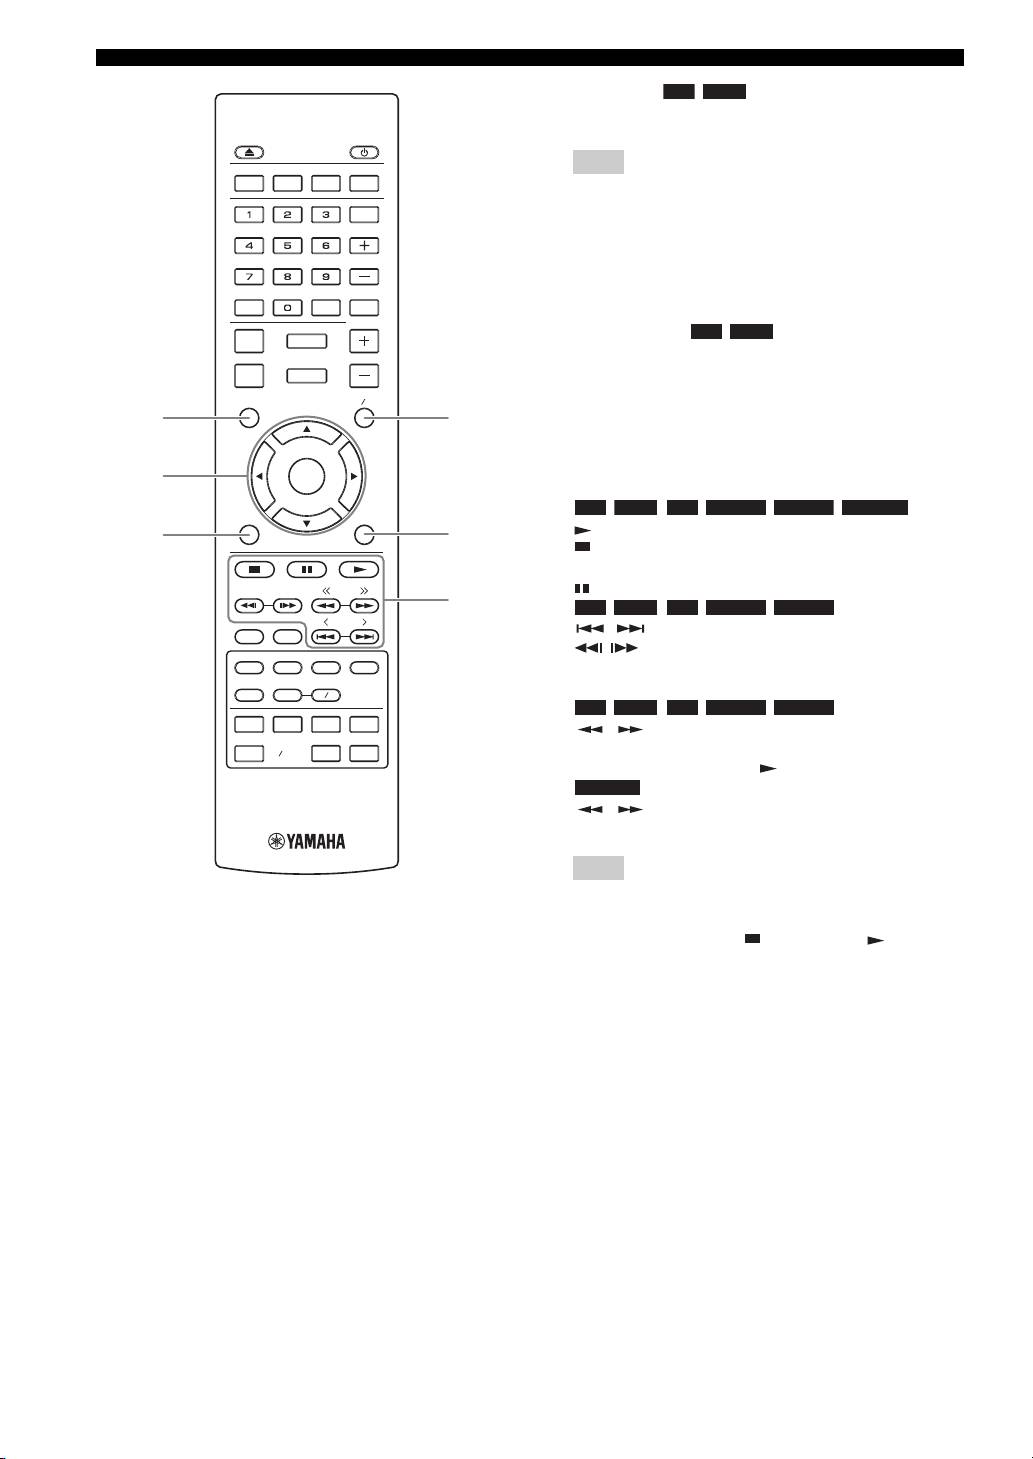
I ZOOM : Zooms in/out. The
DVD VIDEO PHOTO
size of the screen will change each time you press the button
(zoom in/out: 3 steps each).
J Color buttons : Use these buttons according to on-
BD
INTRODUCTION
screen instructions.
K SLEEP: Sets to sleep mode (p. 30).
L Subwoofer volume control buttons
BD DVD
CD VIDEO MUSIC
: Controls the subwoofer volume
level (p. 12).
M Volume control buttons: Controls the volume level.
Press MUTE to turn off the volume. Press again to resume
the volume.
N SEARCH : Jumps
BD DVD CD VIDEO MUSIC
to a specified point during playback. For details on this
function, refer to “Using search” (p. 26). You can also select
this item from Status menu (p. 25).
O AUDIO : Changes the audio language or
BD DVD
format. You can also select from On Screen menu (p. 24).
P FM control buttons
TUNING << / >>: Starts manual tuning. Press and hold to
start automatic tuning (p. 28).
PRESET < / >: Selects preset station (p. 28).
MEMORY: Starts preset tuning and stores preset stations
(p. 28).
Q A/B : Plays back a
BD DVD CD VIDEO MUSIC
specific part you want to repeat.
1 Press A/B at the scene where you want to set the start
point. [A-] is displayed on the screen.
2 Press A/B again at the scene where you want to set the end
point. [A-B] is displayed on the screen.
Repeat playback starts.
3 To cancel the repeat playback, press A/B. [A-B]
disappears and the repeat playback is finished.
Note
This function cannot be performed depending on the
specifications of the disc.
R Input select buttons: Selects the input source (p. 18, 28).
Continued to the next page.
English
7 En
\
PART NAMES AND FUNCTIONS
S TOP MENU : Displays the top menu screen
BD DVD
(p. 51) if the disc contains a menu. Select the desired item
using 5 /a /2 /3 and ENTER.
Note
PROGRAM MARKER DIGEST ZOOM
Specific operations may be different depending on the disc.
Follow the instructions of each menu screen.
SLEEP
T Cursor buttons (5/a /2/3): Moves to select the focused
item.
SW
ENTER: Confirms the focused menu/item.
MUTESEARCHCLEAR
U RETURN: Returns to the previous menu or screen, etc.
V POP-UP/MENU : Displays pop-up menu. The
BD DVD
DISPLAY
SETUP
VOLUME
menu contents displayed vary depending on the disc. For
OPTION
HOME
details on how to see and operate the pop-up menu, refer to
the manual for the disc. The top menu screen may be
TOP MENU
POP-UP MENU
displayed by pressing POP-UP/MENU depending on the
S
V
disc.
W ON SCREEN: Displays On Screen menu (p. 24).
t
ENTER
X Control buttons
BD DVD CD VIDEO MUSIC PHOTO
:
RETURN ON SCREEN
: Plays back contents.
U
W
: Stops playback. To stop playback completely, press this
button twice.
TUNING
: Pauses playback.
X
BD DVD CD VIDEO MUSIC
:
PRESET
/ : Skips backward/forward.
DIMMER
STATUS
/ : Press for instant search/replay. Instant search
PIP
SUBTITLE
AUDIO
MEMORY
skips the content 30 seconds. Instant replay replays the
content from 10 seconds before.
SHUFFLE
REPEAT
A B
BD DVD CD VIDEO MUSIC
:
iPod
TV
STB
TUNER
/ : Searches backward/forward. The search speed
DISC
USB NET
AUX
PORTABLE
will change each time you press the button (search backward/
forward: 5 steps each). Press to resume normal playback.
PHOTO
:
/ : Changes the speed of a slide show (slower/
faster: 3 steps).
Note
Depending on the disc, this unit resumes playback from the
point where the unit was previously stopped. To play back
from the beginning, press and then press .
8 En

PART NAMES AND FUNCTIONS
Rear panel
INTRODUCTION
2 4 5 6 7 8931
1 AC IN jack (p. 16):
6 AUDIO IN (AUX) jacks (p. 14):
Connect the supplied power cable.
Connect other audio devices such as a CD or MD
player.
2 SPEAKERS terminals (p. 11):
Connect speakers.
7 OUTPUT (VIDEO/SUBWOOFER/HDMI) jacks
(p. 12, 13):
3 ANTENNA jack (p. 12):
The VIDEO jack outputs analog video signal.
Connect an FM antenna.
Use the SUBWOOFER jack when you are using an
4 REMOTE CONTROL (IN/OUT) jacks (U.S.A.
active subwoofer speaker (built-in amplifier).
and Canada models only):
Use the HDMI jack to connect to your TV.
Connect other components for remote control.
8 NETWORK (LAN) jack (p. 15):
5 DIGITAL IN (COAXIAL/OPTICAL) jacks
Connect your hub or broadband router.
(p. 13, 14):
9 USB jack (p. 15):
Connect your satellite or cable TV tuner to the
Connect a USB memory device.
COAXIAL jack. The OPTICAL jack is for the audio
signal from your TV when your TV is not ARC (Audio
Return Channel) supported.
English
9 En
PART NAMES AND FUNCTIONS
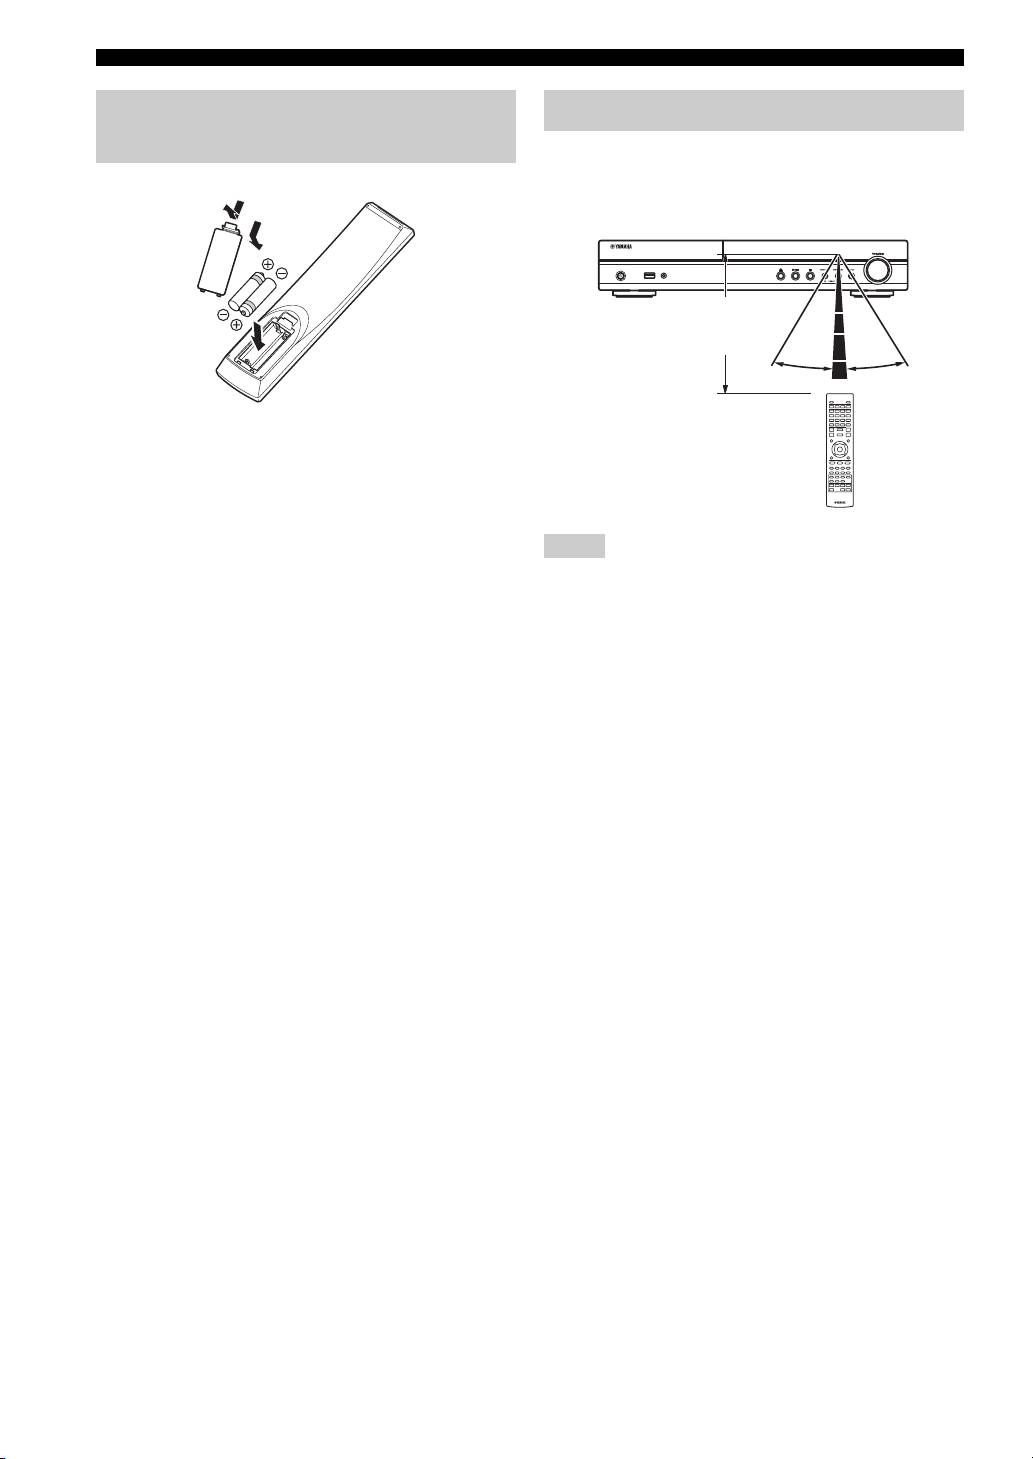
Installing the batteries in the
remote control
The remote control transmits a directional infrared beam.
Be sure to aim the remote control directly at the remote
control sensor on the front panel of this unit during
1
operation.
3
■ Notes on batteries
• Change both batteries when the operation range of the remote
control decreases.
• Use AAA, R03, UM-4 batteries.
• Make sure that the polarities are correct. Refer to the illustration
inside the battery compartment.
• Remove the batteries if the remote control is not to be used for
• The area between the remote control and this unit must be clear
an extended period of time.
of large obstacles.
• Do not use old batteries together with new ones.
• Do not spill water or other liquids on this remote control.
• Do not use different types of batteries (such as alkaline and
• Do not drop the remote control.
manganese batteries) together. Read the packaging carefully as
• Do not leave or store the remote control in the following types
these different types of batteries may have the same shape and
of conditions:
color.
– high humidity, such as near a bath
• If the batteries have leaked, dispose of them immediately.
– high temperature, such as near a heater or a stove
Avoid touching the leaked material or letting it come into
– extremely low temperatures
contact with clothing, etc. Clean the battery compartment
– dusty places.
thoroughly before installing new batteries.
• Do not expose the remote control sensor to strong lighting, in
• Do not throw away batteries with general house waste; dispose
particular, an inverter type fluorescent lamp; otherwise, the
of them correctly in accordance with your local regulations.
remote control may not work properly. If necessary, position
• Keep batteries away from children. If a battery is accidentally
the system away from direct lighting.
swallowed, contact your doctor immediately.
• When not planning to use the remote control for long periods of
time, remove the batteries from the remote control.
• Do not charge or disassemble the supplied batteries.
10 En
2
Using the remote control
USB PORTABLE
iPod/iPhone
Within 6 m
2
(20 feet)
30˚ 30˚
Notes
Оглавление
- CAUTION: READ THIS BEFORE OPERATING YOUR UNIT.
- CONTENTS
- WHAT YOU CAN DO WITH THIS UNIT
- ABOUT DISCS AND FILES
- PART NAMES AND FUNCTIONS
- CONNECTION
- NETWORK AND USB CONNECTION
- OTHER CONNECTION
- INITIAL WIZARD/EASY SETUP
- BASIC OPERATION
- ADVANCED PLAYBACK OPERATION
- LISTENING TO FM RADIO STATIONS
- USING USEFUL FUNCTIONS
- SETUP MENU
- SOFTWARE UPGRADE
- TROUBLESHOOTING
- GLOSSARY
- SPECIFICATIONS
- PRECAUCIÓN: LEA LAS INDICACIONES SIGUIENTES ANTES DE UTILIZAR ESTE APARATO
- CONTENIDO
- FUNCIONES DE ESTA UNIDAD
- INFORMACIÓN SOBRE DISCOS Y ARCHIVOS
- NOMBRES Y FUNCIONES DE LAS OPCIONES
- CONEXIÓN
- CONEXIÓN DE RED Y USB
- OTRA CONEXIÓN
- ASISTENTE INICIAL/CONFIGURACIÓN SENCILLA
- FUNCIONAMIENTO BÁSICO
- FUNCIONAMIENTO DE REPRODUCCIÓN AVANZADO
- ESCUCHAR EMISORAS DE RADIO FM
- UTILIZACIÓN DE FUNCIONES ÚTILES
- MENÚ SETUP
- ACTUALIZACIÓN DE SOFTWARE
- SOLUCIÓN DE PROBLEMAS
- GLOSARIO
- ESPECIFICACIONES
- ПРЕДУПРЕЖДЕНИЕ: ВНИМАТЕЛЬНО ПРОЧИТАЙТЕ ЭТО ПЕРЕД ИСПОЛЬЗОВАНИЕМ АППАРАТА.
- СОДЕРЖАНИЕ
- ВОЗМОЖНОСТИ ЭТОГО УСТРОЙСТВА
- О ДИСКАХ И ФАЙЛАХ
- НАЗВАНИЕ ДЕТАЛЕЙ И ФУНКЦИИ
- ПОДКЛЮЧЕНИЕ
- СЕТЕВОЕ И USB-ПОДКЛЮЧЕНИЕ
- ДРУГИЕ ПОДКЛЮЧЕНИЯ
- НАЧАЛЬНЫЕ УСТАНОВКИ/ПРОСТАЯ УСТАНОВКА
- ОСНОВНОЕ УПРАВЛЕНИЕ
- РАСШИРЕННЫЕ ОПЕРАЦИИ ВОСПРОИЗВЕДЕНИЯ
- ПРОСЛУШИВАНИЕ FM-РАДИОСТАНЦИЙ
- ИСПОЛЬЗОВАНИЕ ПОЛЕЗНЫХ ФУНКЦИЙ
- МЕНЮ “УСТАНОВКИ”
- ОБНОВЛЕНИЕ ПРОГРАММНОГО ОБЕСПЕЧЕНИЯ
- УСТРАНЕНИЕ НЕИСПРАВНОСТЕЙ
- ГЛОССАРИЙ
- ТЕХНИЧЕСКИЕ ХАРАКТЕРИСТИКИ
- 注意:在操作本机之前请阅读此部分。
- 目录
- 本机的功能
- 关于碟片和文件
- 部件名称和功能
- 连接
- 网络和 USB 连接
- 其他连接
- 初始向导 / 简易设置
- 基本操作
- 高级播放操作
- 聆听 FM 无线电台
- 使用实用功能
- 设置菜单
- 软件升级
- 故障排除
- 术语表
- 规格
