Yamaha BRX-610: CONNECTION
CONNECTION: Yamaha BRX-610
PREPARATIONS
CONNECTION
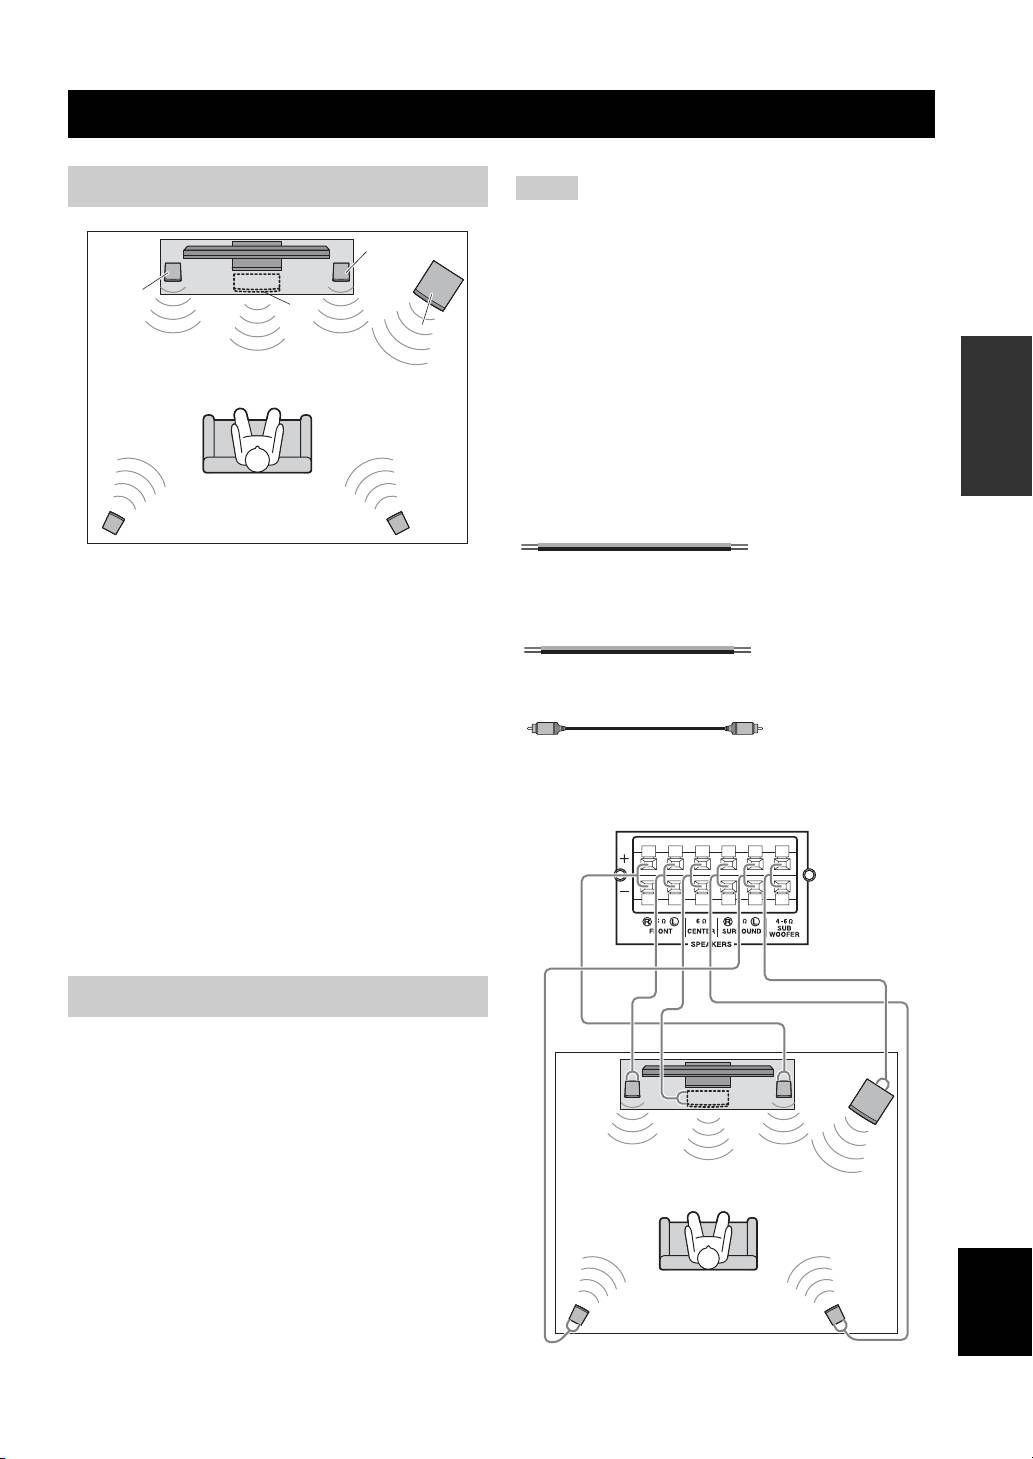
5.1-channel speaker layout
Notes
• Disconnect the power plug before connecting speakers.
• When connecting speakers, use speakers having more than 6Ω
FR
impedance for the front, center and surround speakers, and 4Ω
to 6Ω impedance for a passive subwoofer. For an active
FL
subwoofer (built-in amplifier), you need not be concerned about
C
impedance.
SW
• When connecting an active subwoofer (built-in amplifier), be
PREPARATIONS
sure turn it off before connecting to the unit.
• Be careful that the core of the speaker cable does not touch
anything or come into contact with the metal areas of the unit.
This may damage the unit or the speakers.
■ Necessary cables (not supplied)
When the subwoofer is passive:
• Speaker cables × 6
SL
SR
+
+
–
–
Front speakers (FR and FL):
When the subwoofer is active:
For the front channel sound (stereo sound) and effect
• Speaker cables × 5
sound.
+
+
–
–
Center speaker (C):
• Monaural pin cable (for subwoofer) × 1
For the center channel sound (dialogue, vocals, etc.).
Surround speakers (SR and SL):
For effect and vocal sound from surround channel. The
surround back channel sound is output from the surround
The rear panel of this unit
(when the subwoofer is passive)
speakers when a disc which has 7.1- or 6.1-channel
sounds is played back.
Subwoofer (SW):
For low-frequency effect (LFE) sound and bass sound
from front and surround channels.
Connecting speakers
Connect speakers to the unit.
When you are using a subwoofer speaker, check if it is
active (built-in amplifier, with power cable) or passive
(not built-in amplifier, without power cable). The cable
used for connecting a subwoofer differs depending on the
subwoofer type.
After connecting the speakers, setting according to the
speaker type (size, number of available speakers, etc.) is
required. See page 39 for speaker setting.
English
11 En
CONNECTION
■ Connecting speaker cables
Each speaker has two speaker cables. One is for
connecting the – (negative) terminal of the unit and the
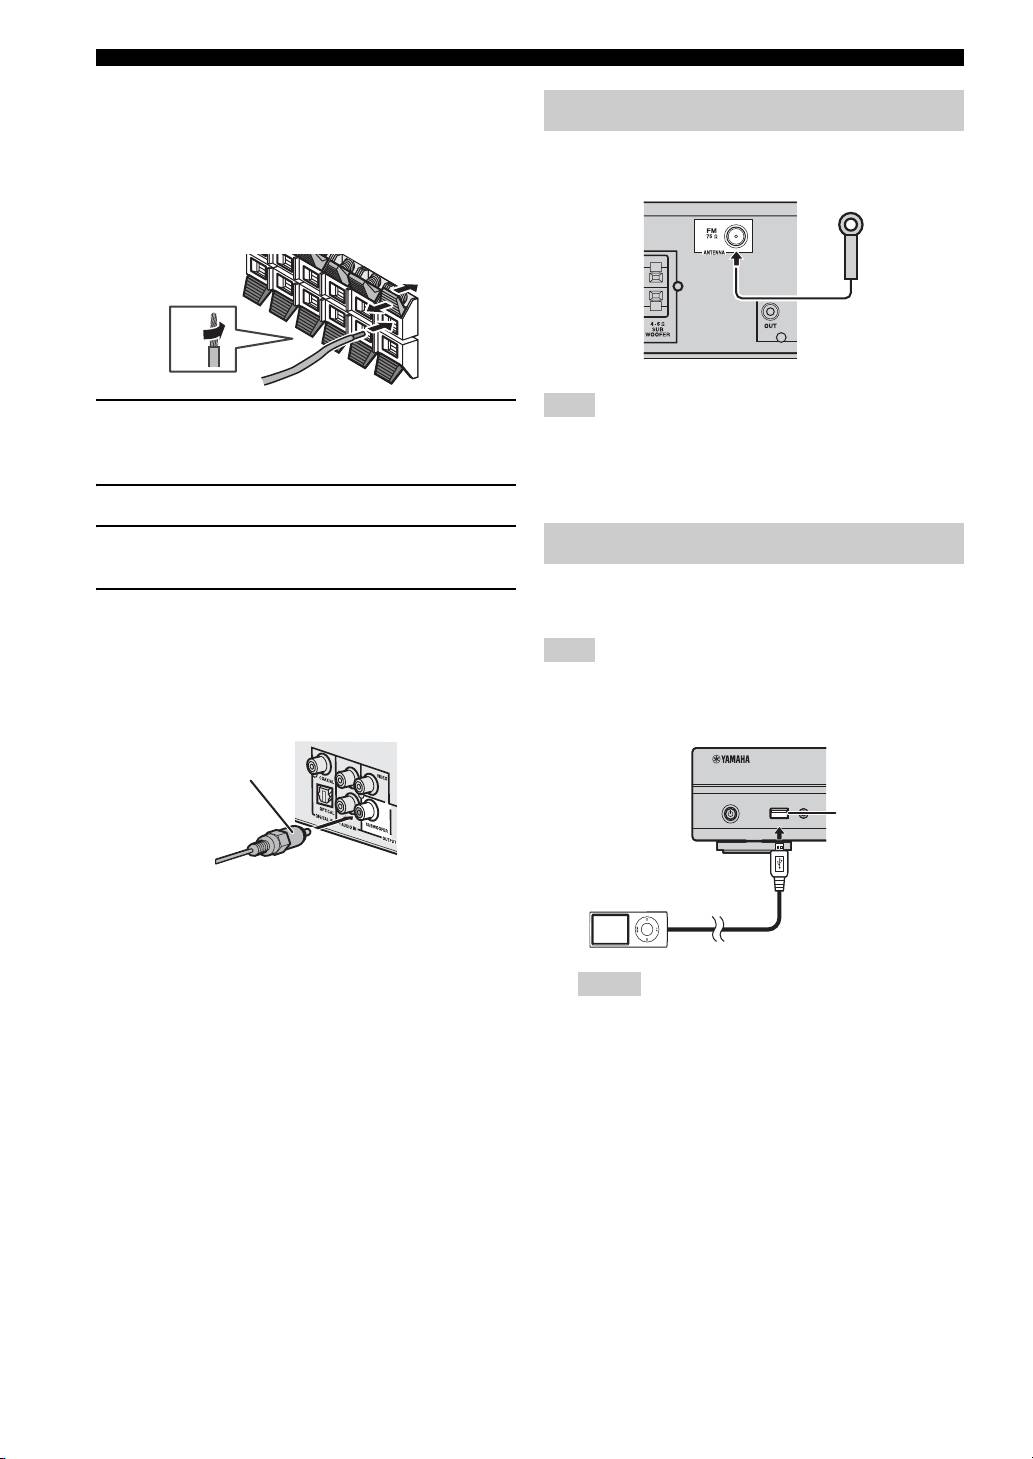
You can enjoy listening to FM radio stations by
speaker, and the other is for the + (positive) terminal. The
connecting the supplied indoor FM antenna.
cables are different colors, so they do not get mixed up.
Connect the black side to the – (negative) terminal and the
other side to the + (positive) terminal.
1 Remove approximately 10 mm of insulation from the
If there is a problem of weak radio wave reception in your area or
end of the speaker cable and twist the bare wire
you want to improve radio reception, we recommend that you use
firmly.
commercially available outdoor antennas. For details, consult the
nearest authorized Yamaha dealer or service center.
2 Press the tab on the speaker terminal down.
3 Insert the bare wire of the speaker cable into the
terminal.
You can enjoy music stored in your iPod by connecting it
4 Lift the tab to secure the speaker cable.
to this unit.
■ Connecting an active subwoofer
When connecting an active subwoofer (built-in amplifier),
This unit is compatible with iPod classic, iPod nano (2nd, 3rd,
use a monaural pin cable. Before connecting an active
4th, 5th and 6th generation), iPod touch (1st, 2nd, 3rd, and 4th
subwoofer, turn it off.
generation), iPhone, iPhone 3G/3GS, and iPhone 4.
About subwoofer speaker
• Use the speaker terminal to connect a passive
subwoofer speaker. Use the SUBWOOFER output jack
to connect an active subwoofer speaker (built-in
amplifier).
• Make sure the USB cable is connected securely between
• You can adjust the subwoofer volume level by using
your iPod and this unit.
this unit’s remote control. For an active subwoofer
• Connect your iPod to the front USB port of this unit. The
rear USB port is not compatible with your iPod.
speaker (built-in amplifier), you can also use the control
on the subwoofer to adjust volume level. Use these
functions to decrease the volume level if strange noise
or sound is output from the subwoofer.
• If you are not using a subwoofer speaker, select SETUP
menu = [Audio Setting] = [Speaker Setting] =
[Configuration] = [SW] = [Disable].
12 En
4
3
4
3
2
2
1
Connecting the FM antenna
1
Note
Connecting iPod
Note
Monaural pin cable
USB PORTABLE
USB port
iPod/iPhone
Notes

CONNECTION
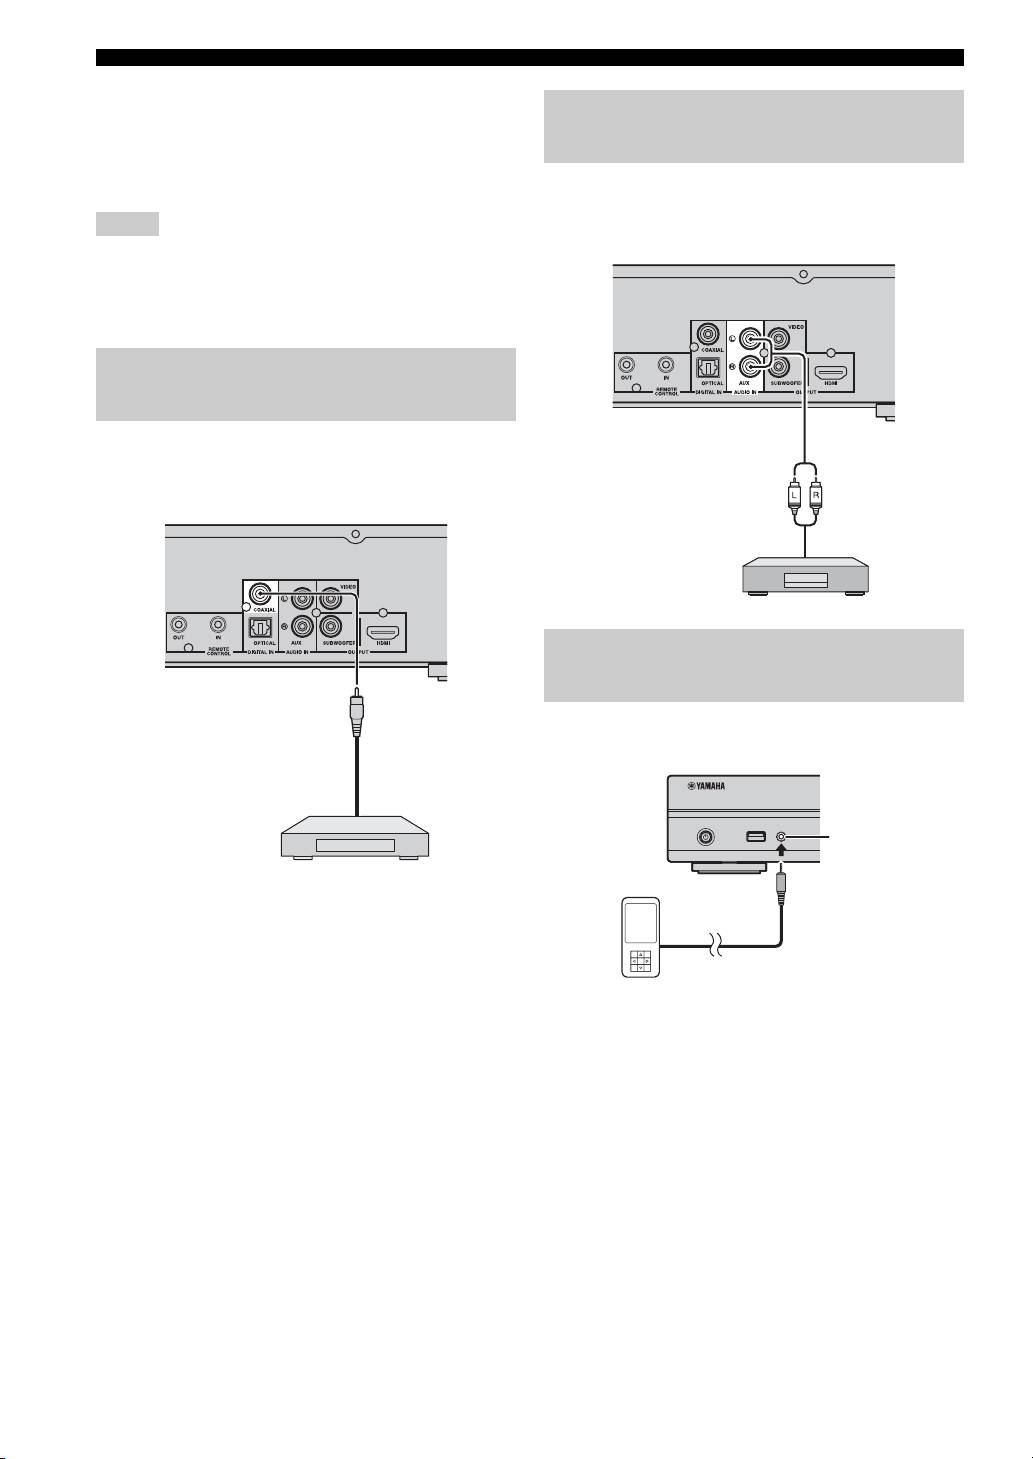
Connecting to a TV
Make sure you refer the following illustration carefully so that connections between this unit and your TV are properly
made.
CAUTION
Do not connect the power cable of this unit until all connections are completed.
1 Connect your TV using an HDMI cable (commercially available). The digital video signal is output from this unit to
your TV. If your TV’s HDMI terminal is ARC (audio return channel) supported, steps 2 to 3 are not necessary since
digital audio signal is output from the TV to the unit through the HDMI cable.
PREPARATIONS
2 Connect your TV using an optical cable (commercially available) to play back TV digital audio through this unit.
3 If an HDMI connection is unavailable, connect your TV using a video pin cable. Analog video signal is output from
this unit to your TV.
This unit
3 Composite video cable
(supplied)
TV
VIDEO
AV INPUT
HDMI IN
OPTICAL
1 2 3
(ARC)
DIGITAL AUDIO OUT
1 HDMI cable
(commercially available)
2 Optical cable
(commercially available)
■ HDMI connection
■ About audio return channel (ARC)
• You can enjoy high quality digital picture and sound
supported TV
through the HDMI terminals.
• You can connect an HDMI cable to the audio return
• Firmly connect an HDMI cable (commercially
channel supported terminal (the terminal with “ARC”
available) to the HDMI terminal of this unit.
indicated) on the TV. In this case, you do not need to
• Use HIGH SPEED HDMI cables that have the HDMI
connect an optical cable.
logo (p. 52).
• You need to activate the HDMI control function of this
unit so as to activate audio return channel (ARC) (
p. 35).
y
• When you use the HDMI control function, refer to “Operating
What is audio return channel (ARC)?
this unit by TV remote control (the HDMI control function)”
This function allows digital audio signal to be output from
(p. 30) and “[HDMI Control]” (p. 35).
a TV to this unit through an HDMI cable, without using an
• For information on the output mode of the HDMI terminal,
optical cable.
refer to “[HDMI]” (p. 39).
• When no picture is displayed, refer to
y
“TROUBLESHOOTING” (p. 42).
If your TV is not ARC supported, connect the TV and this unit
via the OPTICAL jack on the unit.
■ Connection for the playback of Blu-ray
3D discs
You need the following equipment and connections to
enjoy BD 3D discs on this unit:
English
–a TV that has 3D functionality.
– a TV and this unit must be connected with HDMI
cables.
– a BD disc should contain 3D images.
13 En
CONNECTION
■ Video connection
• Firmly connect the composite video cable (supplied) to
Connecting audio devices (such as
the VIDEO jack.
a CD or MD player)
• Refer to page 40 for information on the video output
formats.
You can connect audio devices (such as a CD player, MD
player, etc.) to the unit.
Notes
• If you play back the image via VCR, the image may deteriorate
due to the copy guard function.
• To enjoy BD 3D discs on this unit, you need to connect a TV
and this unit using HDMI cables (commercially available).
Connecting a satellite/cable TV
tuner
You can connect a satellite or cable TV tuner that is not
HDMI supported using a digital audio pin cable.
Connecting a portable digital
music player other than iPod
You can connect a portable digital music player other than
iPod to the front panel of this unit.
y
To connect a satellite or cable tuner to TV, you need extra video
pin cables (commercially available).
14 En
USB PORTABLE
iPod/iPhone
PORTABLE
Оглавление
- CAUTION: READ THIS BEFORE OPERATING YOUR UNIT.
- CONTENTS
- WHAT YOU CAN DO WITH THIS UNIT
- ABOUT DISCS AND FILES
- PART NAMES AND FUNCTIONS
- CONNECTION
- NETWORK AND USB CONNECTION
- OTHER CONNECTION
- INITIAL WIZARD/EASY SETUP
- BASIC OPERATION
- ADVANCED PLAYBACK OPERATION
- LISTENING TO FM RADIO STATIONS
- USING USEFUL FUNCTIONS
- SETUP MENU
- SOFTWARE UPGRADE
- TROUBLESHOOTING
- GLOSSARY
- SPECIFICATIONS
- PRECAUCIÓN: LEA LAS INDICACIONES SIGUIENTES ANTES DE UTILIZAR ESTE APARATO
- CONTENIDO
- FUNCIONES DE ESTA UNIDAD
- INFORMACIÓN SOBRE DISCOS Y ARCHIVOS
- NOMBRES Y FUNCIONES DE LAS OPCIONES
- CONEXIÓN
- CONEXIÓN DE RED Y USB
- OTRA CONEXIÓN
- ASISTENTE INICIAL/CONFIGURACIÓN SENCILLA
- FUNCIONAMIENTO BÁSICO
- FUNCIONAMIENTO DE REPRODUCCIÓN AVANZADO
- ESCUCHAR EMISORAS DE RADIO FM
- UTILIZACIÓN DE FUNCIONES ÚTILES
- MENÚ SETUP
- ACTUALIZACIÓN DE SOFTWARE
- SOLUCIÓN DE PROBLEMAS
- GLOSARIO
- ESPECIFICACIONES
- ПРЕДУПРЕЖДЕНИЕ: ВНИМАТЕЛЬНО ПРОЧИТАЙТЕ ЭТО ПЕРЕД ИСПОЛЬЗОВАНИЕМ АППАРАТА.
- СОДЕРЖАНИЕ
- ВОЗМОЖНОСТИ ЭТОГО УСТРОЙСТВА
- О ДИСКАХ И ФАЙЛАХ
- НАЗВАНИЕ ДЕТАЛЕЙ И ФУНКЦИИ
- ПОДКЛЮЧЕНИЕ
- СЕТЕВОЕ И USB-ПОДКЛЮЧЕНИЕ
- ДРУГИЕ ПОДКЛЮЧЕНИЯ
- НАЧАЛЬНЫЕ УСТАНОВКИ/ПРОСТАЯ УСТАНОВКА
- ОСНОВНОЕ УПРАВЛЕНИЕ
- РАСШИРЕННЫЕ ОПЕРАЦИИ ВОСПРОИЗВЕДЕНИЯ
- ПРОСЛУШИВАНИЕ FM-РАДИОСТАНЦИЙ
- ИСПОЛЬЗОВАНИЕ ПОЛЕЗНЫХ ФУНКЦИЙ
- МЕНЮ “УСТАНОВКИ”
- ОБНОВЛЕНИЕ ПРОГРАММНОГО ОБЕСПЕЧЕНИЯ
- УСТРАНЕНИЕ НЕИСПРАВНОСТЕЙ
- ГЛОССАРИЙ
- ТЕХНИЧЕСКИЕ ХАРАКТЕРИСТИКИ
- 注意:在操作本机之前请阅读此部分。
- 目录
- 本机的功能
- 关于碟片和文件
- 部件名称和功能
- 连接
- 网络和 USB 连接
- 其他连接
- 初始向导 / 简易设置
- 基本操作
- 高级播放操作
- 聆听 FM 无线电台
- 使用实用功能
- 设置菜单
- 软件升级
- 故障排除
- 术语表
- 规格
