Yamaha BRX-610: instruction
Class: Household, kitchen appliances, electronics and equipment
Type:
Manual for Yamaha BRX-610
Table of contents
- CAUTION: READ THIS BEFORE OPERATING YOUR UNIT.
- WHAT YOU CAN DO WITH THIS UNIT SUPPLIED PARTS
- ABOUT DISCS AND FILES Types of discs/files that can be used with this unit
- Loading a disc Notice for watching 3D video images Disc precautions
- Front panel
- Remote control 4 PROGRAM : Sets the order of playback
- I ZOOM : Zooms in/out. The
- S TOP MENU : Displays the top menu screen
- Rear panel
- Installing the batteries in the remote control Using the remote control
- 5.1-channel speaker layout Connecting speakers
- Connecting the FM antenna Connecting iPod
- Connecting to a TV
- Connecting audio devices (such as a CD or MD player) Connecting a satellite/cable TV tuner Connecting a portable digital music player other than iPod
- NETWORK AND USB CONNECTION Connecting to the NETWORK terminal Connecting to the USB port
- OTHER CONNECTION Connecting the power cable
- INITIAL WIZARD/EASY SETUP Setting with the Initial Wizard/Easy Setup
- BASIC OPERATION
- BASIC OPERATION
- BASIC OPERATION Playing back photo/music/video
- BASIC OPERATION ■ Operations for viewing photos
- BASIC OPERATION Using network content Using network services
- Operation for iPod Operation for CDs
- ADVANCED PLAYBACK OPERATION On Screen menu
- Status menu
- Using Bookmark Using search Program play
- Enjoying BONUSVIEW™ and BD- Live™
- LISTENING TO FM RADIO STATIONS Tuning to radio stations Selecting preset radio stations Presetting radio stations
- Deleting preset stations Displaying Radio Data System information (Russia model only)
- USING USEFUL FUNCTIONS Setting the sleep timer Operating this unit by TV remote control (the HDMI control function)
- USING USEFUL FUNCTIONS ■ Registering HDMI components to TV ■ Changing the connection method and connected components
- SETUP MENU Menu/Submenu Item Function Page
- Menu/Submenu Item Function Page
- Operation for SETUP menu
- SETUP MENU General Setting
- SETUP MENU ■ Playback ■ Network ■ Security
- Display Setting ■ TV
- SETUP MENU ■ Video Process
- Audio Setting ■ Audio Output ■ Post Process ■ System Information ■ Speaker Setting
- About the video output formats When [TV System] is set to [PAL] When [TV System] is set to [Multi]
- SOFTWARE UPGRADE Upgrading the software
- TROUBLESHOOTING General Problem Cause Remedy Page
- Problem Cause Remedy Page
- Radio reception Problem Cause Remedy Page iPod Status message Cause Remedy Page Problem Cause Remedy Page
- Problem Cause Remedy Page USB Status message Cause Remedy Page Problem Cause Remedy Page
- Disc playback ■ General Problem Cause Remedy Page
- ■ Picture Problem Cause Remedy Page Remote control Problem Cause Remedy Page Network Problem Cause Remedy Page
- TROUBLESHOOTING Problem Cause Remedy Page
- Messages on the screen Error message Cause Remedy Page Others Problem Cause Remedy Page
- GLOSSARY
- SPECIFICATIONS
- SPECIFICATIONS
TLF
CAUTION
LASER Specification:
Use of controls or adjustments or performance of procedures
Class 1 LASER Product
other than those specified herein may result in hazardous
Wave length: 790 nm (CDs)/658 nm (DVDs)/405 nm (BDs)
radiation exposure.
Laser output: max. 1 mW
Especificaciones LÁSER:
PRECAUCIÓN
Producto LÁSER de Clase 1
El uso de los controles, los ajustes o los procedimientos que
Longitud de onda: 790 nm (CD)/658 nm (DVD)/405 nm (BD)
no se especifican enste manual pueden causar una exposición
Salida de láser: máxima de 1 mW
peligrosa a la radiación.
LASER Технические характеристики:
BRX-610
ПРЕДОСТЕРЕЖЕНИЕ
Класс 1 LASER продукт
Использование органов управления или произведение
Длина волны: 790 nm (CD)/658 nm (DVD)/405 nm (BD)
Blu-ray Disc Receiver
настроек или выполнение процедур, не указанных в
Выходная мощность лазера: не более 1 мВт
данной инструкции, может отразиться на выделении
опасной радиации.
BRX-610
The laser component in this product is capable of emitting radiation
exceeding the limit for Class 1.
CAUTION:
INVISIBLE LASER RADIATION WHEN OPEN.
El componente láser de este producto es capaz de emitir radiación
DO NOT STARE INTO BEAM.
que sobrepasa el límite establecido para la clase 1.
INVISIBLE LASER RADIATION WHEN OPEN.
DANGER:
Лазерный компонент данного изделия может выделять
радиацию, превышающую ограниченный уровень
AVOID DIRECT EXPOSURE TO THE BEAM.
радиации для Класса 1.
Owner’s Manual
Manual de Instrucciones
Инструкция по эксплуатации
Printed in China BRX-610_TLF-1
© 2011 Yamaha Corporation
CAUTION: READ THIS BEFORE OPERATING YOUR UNIT.
1 To assure the finest performance, please read this manual
17 Before moving this unit, press to set this unit to the
carefully. Keep it in a safe place for future reference.
standby mode, and disconnect the AC power plug from
2 Install this sound system in a well ventilated, cool, dry,
the wall outlet.
clean place - away from direct sunlight, heat sources,
18 Condensation will form when the surrounding
vibration, dust, moisture, and/or cold. For proper
temperature changes suddenly. Disconnect the power
ventilation, allow the following minimum clearances.
cable from the outlet, then leave this unit alone.
Top: 10 cm
19 When using this unit for a long time, this unit may
Rear: 10 cm
become warm. Turn the power off, then leave this unit
Sides: 10 cm
alone for cooling.
3 Locate this unit away from other electrical appliances,
20 Install this unit near the AC outlet and where the AC
motors, or transformers to avoid humming sounds.
power plug can be reached easily.
4 Do not expose this unit to sudden temperature changes
21 The batteries shall not be exposed to excessive heat such
from cold to hot, and do not locate this unit in an
as sunshine, fire or the like.
environment with high humidity (i.e. a room with a
humidifier) to prevent condensation inside this unit,
This unit is not disconnected from the AC power source as long as
which may cause an electrical shock, fire, damage to this
it is connected to the wall outlet, even if this unit itself is turned off
unit, and/or personal injury.
by . This state is called the standby mode. In this state, this unit is
5 Avoid installing this unit where foreign object may fall
designed to consume a very small quantity of power.
onto this unit and/or this unit may be exposed to liquid
dripping or splashing. On the top of this unit, do not
WARNING
place:
TO REDUCE THE RISK OF FIRE OR ELECTRIC SHOCK, DO
– Other components, as they may cause damage and/or
NOT EXPOSE THIS UNIT TO RAIN OR MOISTURE.
discoloration on the surface of this unit.
– Burning objects (i.e. candles), as they may cause fire,
LASER SAFETY
damage to this unit, and/or personal injury.
This unit employs a laser. Due to possible eye injury, only a qualified
– Containers with liquid in them, as they may fall and
service person should remove the cover or attempt to service this
liquid may cause electrical shock to the user and/or
device.
damage to this unit.
6 Do not cover this unit with a newspaper, tablecloth,
DANGER
curtain, etc. in order not to obstruct heat radiation. If the
This unit emits visible laser radiation when open. Avoid direct eye
temperature inside this unit rises, it may cause fire,
exposure to beam. When this unit is plugged into the wall outlet, do
damage to this unit, and/or personal injury.
not place your eyes close to the opening of the disc tray and other
7 Do not plug in this unit to a wall outlet until all
openings to look into inside.
connections are complete.
8 Do not operate this unit upside-down. It may overheat,
WARNING
possibly causing damage.
DO NOT TOUCH THIS UNIT WHEN IT IS USED
9 Do not use force on switches, knobs and/or cords.
CONTINUOUSLY AT HIGH VOLUME BECAUSE THE
10 When disconnecting the power cable from the wall outlet,
BOTTOM OF THIS UNIT MAY BECOME HOT. IT MAY LEAD
grasp the plug; do not pull the cable.
TO INJURIES SUCH AS BURNS, ETC.
11 Do not clean this unit with chemical solvents; this might
damage the finish. Use a clean, dry cloth.
12 Only voltage specified on this unit must be used. Using
this unit with a higher voltage than specified is dangerous
and may cause fire, damage to this unit, and/or personal
injury. Yamaha will not be held responsible for any
damage resulting from use of this unit with a voltage
other than specified.
13 To prevent damage by lightning, keep the power cable
and outdoor antennas disconnected from a wall outlet or
this unit during a lightning storm.
14 Do not attempt to modify or fix this unit. Contact
qualified Yamaha service personnel when any service is
needed. The cabinet should never be opened for any
reasons.
15 When not planning to use this unit for long periods of
time (i.e. vacation), disconnect the AC power plug from
the wall outlet.
16 Be sure to read the “TROUBLESHOOTING” section on
common operating errors before concluding that this unit
is faulty.
i En

CONTENTS
INTRODUCTION PREPARATIONS
INTRODUCTION
SETTINGS
WHAT YOU CAN DO WITH THIS UNIT ......... 2
SETUP MENU.......................................................32
SUPPLIED PARTS ................................................ 2
Operation for SETUP menu .................................... 34
ABOUT DISCS AND FILES................................. 3
General Setting ........................................................ 35
Types of discs/files that can be used with this unit ... 3
Display Setting ........................................................ 37
Loading a disc............................................................ 4
Audio Setting........................................................... 39
Disc precautions......................................................... 4
About the video output formats ............................... 40
Notice for watching 3D video images ....................... 4
SOFTWARE UPGRADE .....................................41
PART NAMES AND FUNCTIONS...................... 5
Upgrading the software............................................ 41
Front panel ................................................................. 5
Remote control........................................................... 6
ADDITIONAL INFORMATION
Rear panel .................................................................. 9
Installing the batteries in the remote control ........... 10
TROUBLESHOOTING .......................................42
Using the remote control ......................................... 10
General..................................................................... 42
Radio reception........................................................ 44
iPod.......................................................................... 44
PREPARATIONS
USB ......................................................................... 45
CONNECTION..................................................... 11
Disc playback .......................................................... 46
OPERATIONS SETTINGS
5.1-channel speaker layout ...................................... 11
Remote control ........................................................ 47
Connecting speakers ................................................ 11
Network ................................................................... 47
Connecting the FM antenna..................................... 12
Messages on the screen............................................ 49
Connecting iPod....................................................... 12
Others....................................................................... 49
Connecting to a TV.................................................. 13
GLOSSARY...........................................................50
Connecting a satellite/cable TV tuner...................... 14
SPECIFICATIONS...............................................51
Connecting audio devices (such as a CD or MD
player).................................................................. 14
Connecting a portable digital music player
other than iPod..................................................... 14
■ About this manual
NETWORK AND USB CONNECTION............ 15
• This manual describes how to operate this unit using a
Connecting to the NETWORK terminal.................. 15
Connecting to the USB port..................................... 15
remote control except when it is not available. Some of
OTHER CONNECTION ..................................... 16
these operations are also available using the front panel
Connecting the power cable..................................... 16
buttons.
• Notes contain important information about safety and
operating instructions. y indicates a tip for your
OPERATIONS
operation.
INFORMATION
ADDITIONAL
INITIAL WIZARD/EASY SETUP..................... 17
• “iPod” described in this manual may also refer to
Setting with the Initial Wizard/Easy Setup.............. 17
“iPhone”.
BASIC OPERATION........................................... 18
• This manual is printed prior to production. Design and
Playing back photo/music/video.............................. 20
specifications are subject to change in part as a result of
Using network content............................................. 22
improvements, etc. In case of differences between the
Using network services............................................ 22
Operation for iPod ................................................... 23
manual and the product, the product has priority.
Operation for CDs.................................................... 23
ADVANCED PLAYBACK OPERATION......... 24
The icons used in this manual
On Screen menu....................................................... 24
Icons are used to indicate available buttons/functions for a
Status menu.............................................................. 25
Using Bookmark...................................................... 26
particular format.
Program play............................................................ 26
Using search............................................................. 26
BD
: BD-Video
Enjoying BONUSVIEW™ and BD-Live™............ 27
DVD
: DVD-Video, DVD-VR, DVD+VR
LISTENING TO FM RADIO STATIONS ........ 28
CD
: Audio CD
Tuning to radio stations ........................................... 28
VIDEO
: AVCHD, WMV
Presetting radio stations........................................... 28
Selecting preset radio stations (Preset tuning)......... 28
MUSIC
: MP3, WMA, WAV
English
Deleting preset stations............................................ 29
PHOTO
: JPEG
Displaying Radio Data System information (Russia model only)
.. 29
USING USEFUL FUNCTIONS .......................... 30
Setting the sleep timer ............................................. 30
Operating this unit by TV remote control
(the HDMI control function) ............................... 30
1 En
INTRODUCTION
WHAT YOU CAN DO WITH THIS UNIT
Blu-ray 3D Disc (Blu-ray Disc™)/DVD/CD Playback
*1
\ p. 24
Play back commercially-released Blu-ray 3D Discs (BD discs), in addition to DVDs and CDs.
BONUSVIEW™ and BD-Live™ Playback
*1
\ p. 27
Download additional contents available via BD-Live™ supported BD discs, and enjoy
secondary audio/video on BONUSVIEW™-supported BD discs.
USB Digital Connection for iPod and iPhone
*1
\ p. 19
Direct USB cable connection to an iPod or iPhone enables high quality digital sound without any
degradation caused by digital-to-analog conversion.
Home Network Server (DLNA supported)
*1, 2
\ p. 22
Enjoy a variety of PC contents on your TV by connecting to a network server.
YouTube™ Contents Playback (Russia and Asia models only)
*2
\ p. 22
Enjoy YouTube™ contents on your TV.
Receiving FM Radio and Radio Data System Information
\ p. 28
(Russia model only)
Listen to FM radio. Radio Data System broadcasts provide program information on the front
panel display (Russia model only).
Initial Wizard and Easy Setup \ p. 17
Easily set language, resolution, screen aspect ratio with the Initial Wizard/Easy Setup screen.
Operate with the TV Remote Control (HDMI CEC supported) \ p. 30
HDMI control function (using HDMI cable connection) provides multiple device operation with
a single remote control.
*
1
For details on playable discs and files, refer to page 3.
*
2
Network setting is needed to use this function.
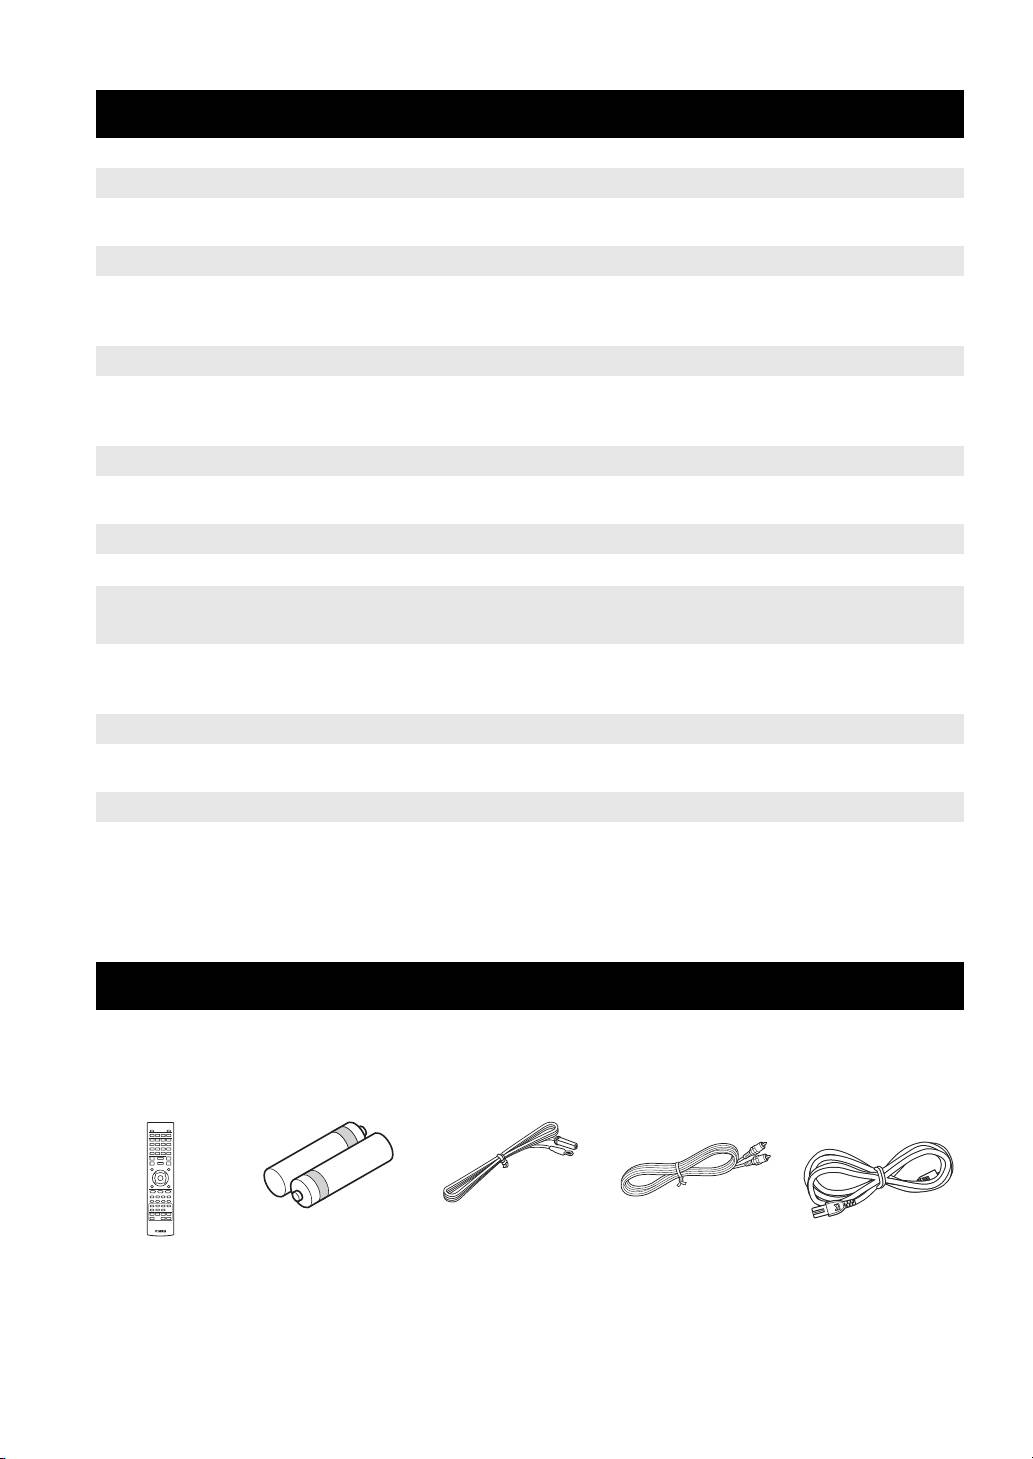
SUPPLIED PARTS
Make sure you have all of the following items.
Remote control Indoor FM antenna
Batteries (×2)
*3
Composite video
Power cable
*4
(AAA, R03, UM-4)
cable (1.5m)
*
3
The supplied indoor FM antenna differs depending on your model.
*
4
The power cable differs depending on your model.
2 En
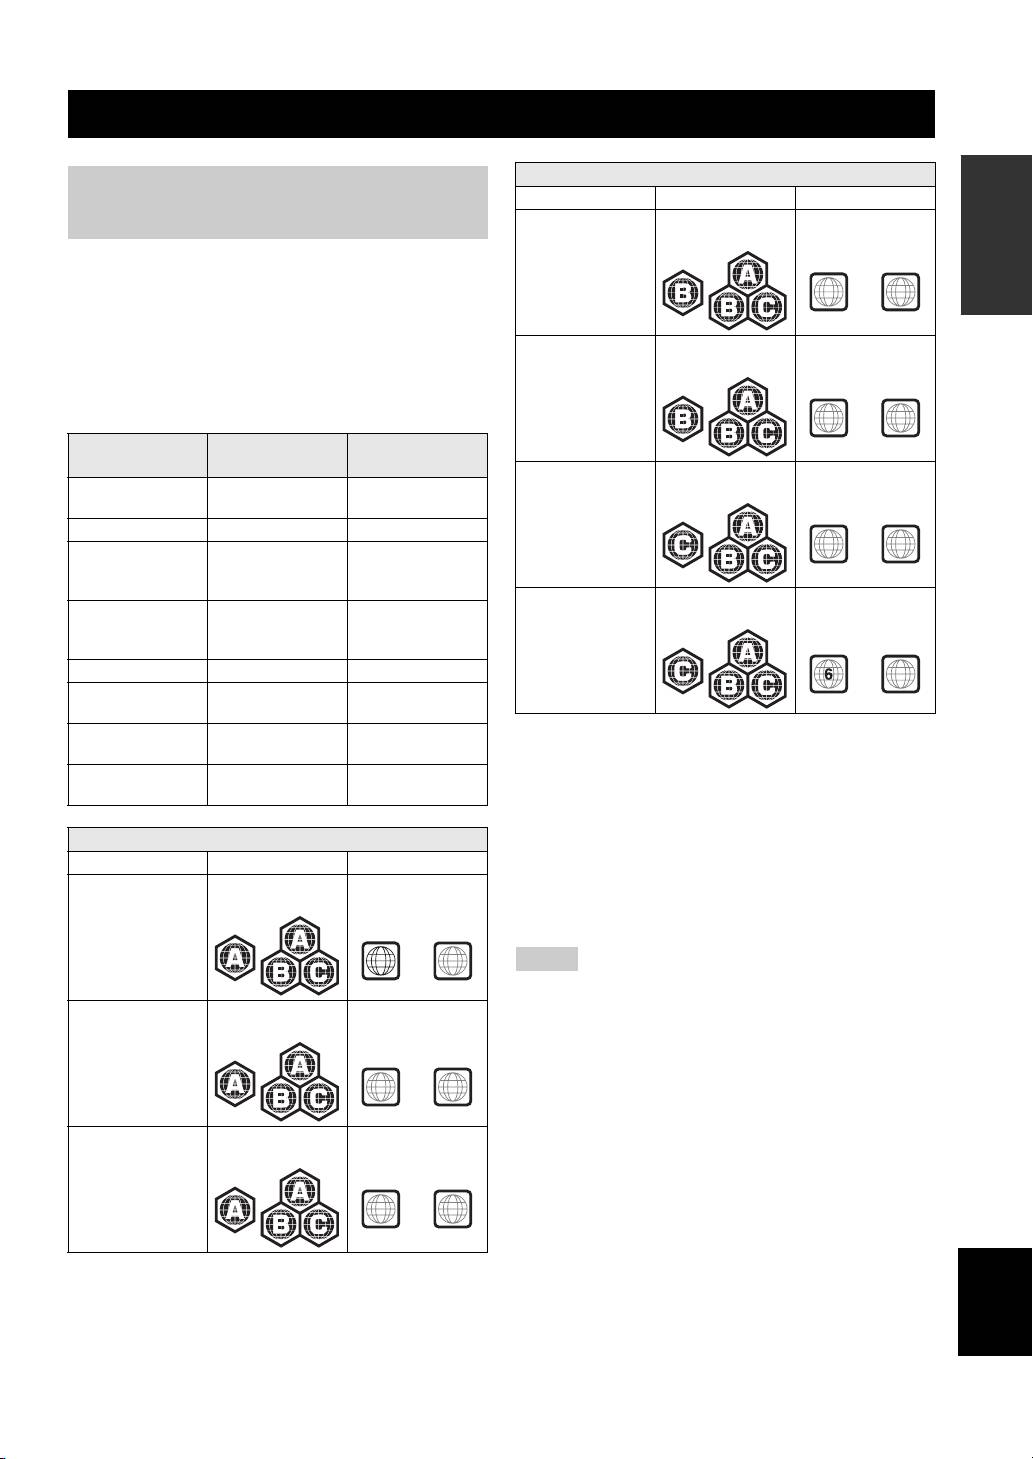
ABOUT DISCS AND FILES
INTRODUCTION
Region management information
Types of discs/files that can be
Destination BD-Video DVD-Video
used with this unit
Europe Region code “B” or
Region number “2”
“ALL”
or “ALL”
• 12 cm and 8 cm discs can be played back in this unit.
Do not use an 8 cm to 12 cm adapter.
2
ALL
• Use discs that conform to compatible standards as
indicated by the presence of official logos on the disc
label. Playback of discs not complying with these
Australia Region code “B” or
Region number “4”
“ALL”
or “ALL”
standards is not guaranteed. In addition, the image
quality or sound quality is not guaranteed even if the
discs can be played back.
4
ALL
Recording
Disc Type
Data Format
Format
Russia Region code “C” or
Region number “5”
BD-ROM/BD-R/
BD-Video --
“ALL”
or “ALL”
BD-RE
DVD-ROM DVD-Video --
5
ALL
DVD-R/DVD-R DL/
DVD-Video/DVD-
WMV/MP3/WAV/
DVD-RW
VR/AVCHD/Data
WMA/JPEG
Disc
China Region code “C” or
Region number “6”
DVD+R/DVD+R
DVD-Video/
WMV/MP3/WAV/
“ALL”
or “ALL”
DL/DVD+RW
DVD+VR/AVCHD/
WMA/JPEG
Data Disc
CD-ROM CDDA/HDCD --
ALL
CD-R/CD-RW CDDA/Data Disc WMV/MP3/WAV/
WMA/JPEG
USB -- WMV/MP3/WAV/
• BD/DVD video players and discs have region codes,
WMA/JPEG
which dictate the regions in which a disc can be played.
Network -- WMV/MP3/WMA/
• BD/DVD Video operations and functions may be
WAV/JPEG
different from the explanations in this manual and some
operations may be prohibited due to disc
Region management information
manufacturer’s settings.
Destination BD-Video DVD-Video
• If a menu screen or operating instructions are displayed
U.S.A. and Canada Region code “A” or
Region number “1”
during playback of a disc, follow the operating
“ALL”
or “ALL”
procedure displayed.
1
ALL
Notes
• Playback for some of the discs in the left side column tables
Asia Region code “A” or
Region number “3”
may not be possible depending on the disc.
“ALL”
or “ALL”
• Finalize all recording media that is played back in this unit.
• “Finalize” refers to a recorder processing a recorded disc so that
it will play in other players/recorders as well as this unit. Only
3
ALL
finalized discs will play back in this unit. (This unit does not
have a function to finalize discs.)
• Playback of all files on the disc, USB memory device and
Central and South
Region code “A” or
Region number “4”
America
“ALL”
or “ALL”
network is not guaranteed.
• A copyright protected file cannot be played back via a USB
memory device and network.
4
ALL
MP3/WMA audio file requirement
• Sampling frequency: within 32 - 48 kHz (MP3/WMA),
LPCM 44.1 kHz/16 bit/Stereo (WAV)
English
• Bitrate: within 8 - 320 kbps (MP3), 32 - 192 kbps
(WMA)
WMV file requirement
• WMV9, maximum resolution is 1,920 × 1,080.
3 En
ABOUT DISCS AND FILES
Loading a disc
Notice for watching 3D video
images
• Insert the disc with the label facing up.
• In case of the disc recorded on both sides, face down the
• Some people may experience discomfort (such as eye
side you want to play back.
strain, fatigue, or nausea) while watching 3D video
images. We recommend that all viewers take regular
Notes
breaks while watching 3D video images.
• Playback may begin automatically, depending on the disc and
• If you experience any discomfort, stop watching the 3D
setting of this unit.
video images until the discomfort subsides. Consult a
• The menu may be displayed first, depending on the disc.
doctor if you experience severe discomfort.
• The disc load time may vary depending on the disc.
• Read the owner’s manuals (BD disc and TV) and/or the
caution messages that appear on the TV carefully.
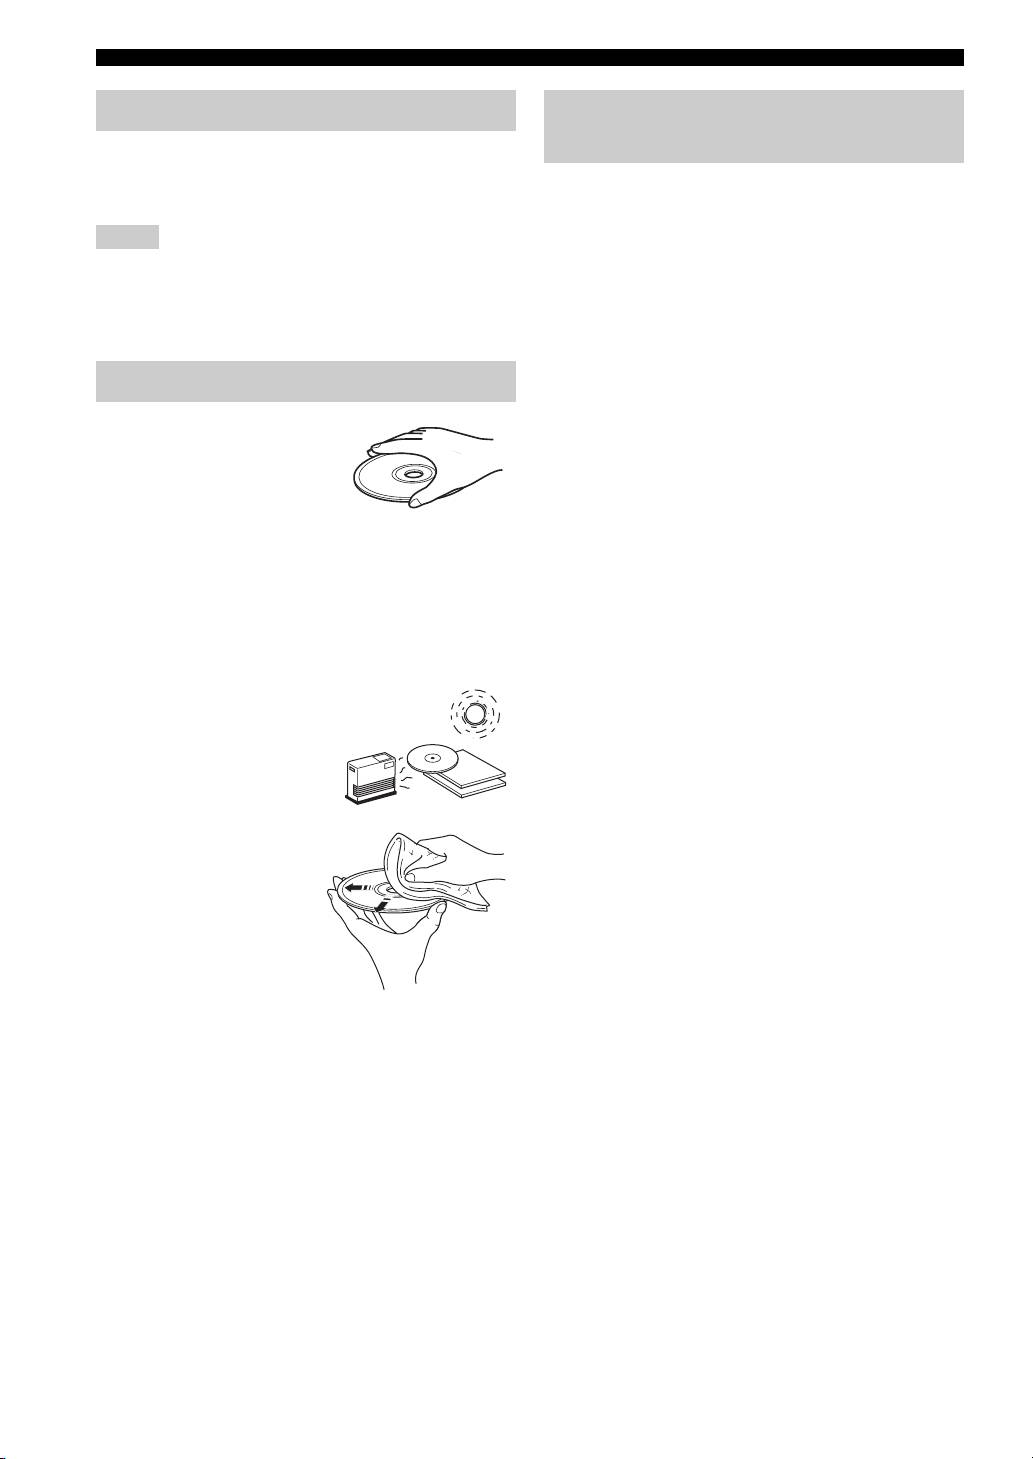
Disc precautions
• The vision of young children (especially those under six
years old) is still under development. Consult your
• Do not touch the surface of the
doctor (such as a pediatrician or eye doctor) before
disc. Hold a disc by its edge
allowing young children to watch 3D video images.
(and the center hole).
• Adults should supervise young children to ensure they
• Do not use a pencil or pointed
follow the recommendations described above.
marker to write on the disc.
• Do not put a tape, seal, glue, etc., on a disc.
• Do not use a protective cover to prevent scratches.
• Do not load more than one disc into this unit at one
time. This can cause damage to both this unit and the
discs.
• Do not insert any foreign objects into the disc slot.
• Do not load a cracked, warped, or glued disc.
• Do not expose a disc to
direct sunlight, high
Caution
temperature, high
humidity, or a lot of dust.
• If a disc becomes dirty,
wipe it with a clean, dry
cloth from the center out
to the edge. Do not use
record cleaner or paint
thinner.
• To avoid malfunction, do
not use a commercially
available lens cleaner.
4 En
PART NAMES AND FUNCTIONS
INTRODUCTION
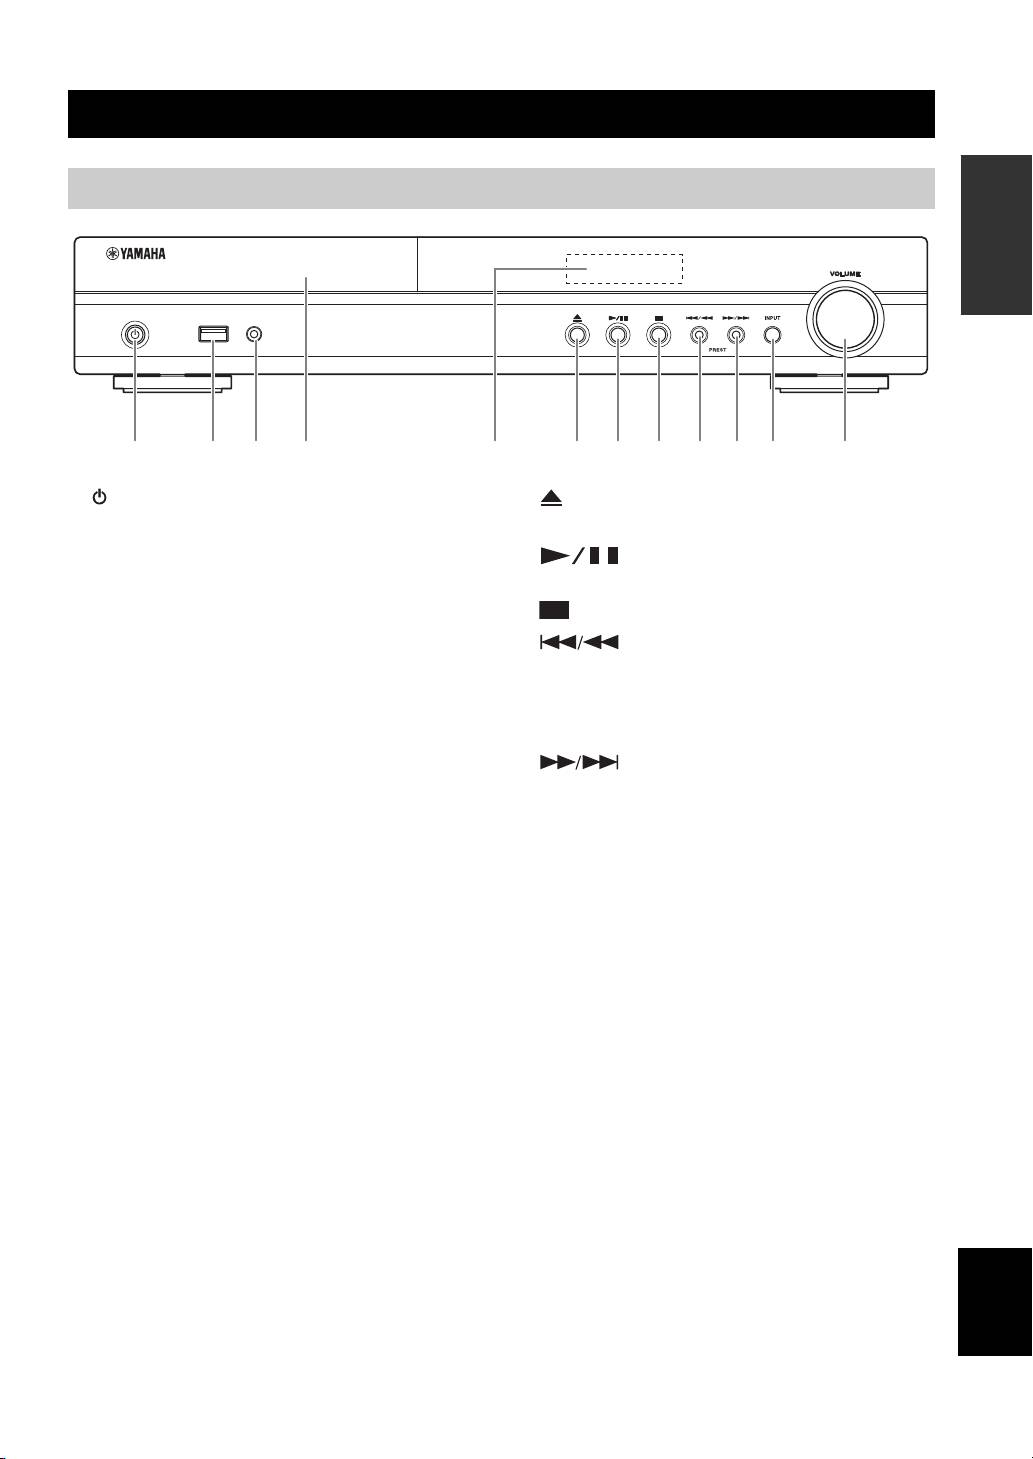
Front panel
USB PORTABLE
iPod/iPhone
2 3 4 6 7 8159 0 A B
1 (On/Standby):
6 (Eject):
Turns this unit on/Sets to standby mode.
Opens/Closes the disc tray.
y
7 (Play/Pause):
This unit has an automatic standby function.
Starts/Pauses playback.
• When the source is set to Disc/USB/Network, this unit
automatically switches to standby mode if it is left turned on
8 (Stop)
for 1 hour without playback or any other operation being
9 (Search backward/Skip backward):
performed.
Press to skip backward, and press and hold to search
• When the source is NOT set to Disc/USB/Network, this unit
automatically switches to standby mode if it is left turned on
backward.
for between 1 to 8 hours without playback or any other
PRESET <:
operation being performed according to the setting in
Press to select a preset station.
SETUP menu (p. 35).
0 (Search forward/Skip forward):
2 iPod/iPhone/USB port (p. 12, 15):
Press to skip forward, and press and hold to search
Connect your iPod or USB memory device.
forward.
3 PORTABLE (p. 14):
PRESET >:
Connect a portable digital music player other than
Press to select a preset station.
iPod.
A INPUT:
4 Disc tray door
Selects the input source.
5 Front panel display
B VOLUME:
Turns the volume up/down.
English
5 En
PART NAMES AND FUNCTIONS
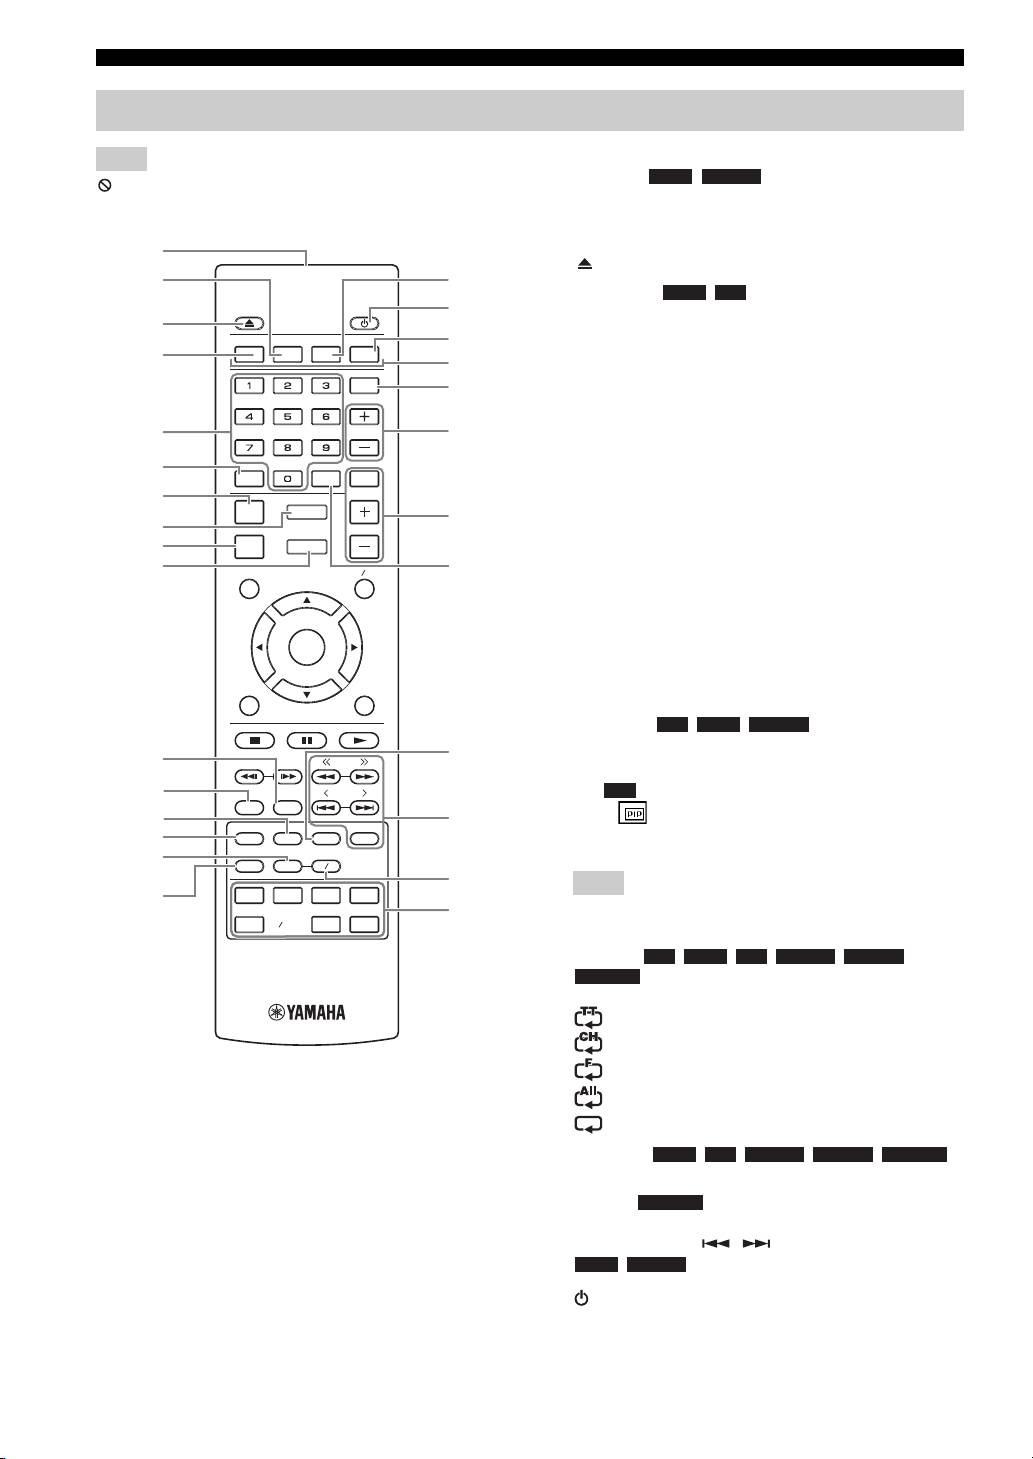
Remote control
1 Infrared signal transmitter (p. 10)
Note
2 MARKER : Sets Bookmark at a specified
DVD VIDEO
will appear on the top left corner of the screen when the
point of a movie (p. 26). After Bookmark is set, press
pressed button is not available.
DIGEST to select the set point you want to jump to. You can
set up to 12 Bookmarks.
1
3 : Opens/Closes the disc tray.
2
G
4 PROGRAM : Sets the order of playback
DVD CD
H
(p. 26). You can set up to 15 tracks of an audio disc or titles/
3
chapters of a DVD-Video disc.
PROGRAM MARKER DIGEST ZOOM
I
4
J
5 Numeric buttons: Enters numbers, or during playback,
SLEEP
jumps to the track/chapter corresponding to the number you
K
input. These buttons may not be available depending on the
disc type and playback condition.
5
SW
L
6 CLEAR: Clears entered number/set item.
6
MUTESEARCHCLEAR
7 DISPLAY: Switches the information shown on the front
7
panel display (p. 23, 29).
DISPLAY
SETUP
M
8
VOLUME
8 SETUP: Displays SETUP menu screen (p. 32).
9
OPTION
HOME
9 OPTION: Enters option menu mode (p. 29).
0
TOP MENU
POP-UP MENU
N
0 HOME: Displays HOME menu screen (p. 20).
A STATUS: Displays the playback information on the screen
(p. 25).
ENTER
B DIMMER: Changes brightness of the front panel display.
Choose brightness from normal (bright), mid dim, or dim by
RETURN ON SCREEN
pressing this button repeatedly.
C SUBTITLE : Changes subtitle
BD DVD VIDEO
languages (p. 50) if available. You can also select this item
O
A
TUNING
from On Screen menu (p. 24).
B
PRESET
D PIP : Turns on/off the Picture in Picture (p. 27). PIP
BD
DIMMER
STATUS
Mark ( ) is displayed on the screen when this function is
C
P
D
PIP
SUBTITLE
AUDIO
MEMORY
available. You can also select this item from On Screen menu
(p. 24).
E
SHUFFLE
REPEAT
A B
Q
Note
F
iPod
TV
STB
TUNER
R
PIP Mark is displayed only when [PIP Mark] is set to [On]
DISC
USB NET
AUX
PORTABLE
(p. 36).
E REPEAT
BD DVD CD VIDEO MUSIC
PHOTO
: Selects repeat mode. Repeat mode shown below
will change each time you press the button (p. 23, 25).
: Repeats the title being played back.
: Repeats the chapter being played back.
: Repeats the folder being played back.
: Repeats all tracks/files on the disc/folder.
: Repeats the track/file being played back.
F SHUFFLE :
DVD CD VIDEO MUSIC PHOTO
Selects shuffle play mode (p. 23, 24).
G DIGEST : Shows 12 photo thumbnails. When
PHOTO
thumbnails are displayed, you can proceed to the next/
previous page with / .
DVD VIDEO
: Displays Bookmark select bar (p. 26).
H : Turns this unit on or sets it to standby mode.
6 En

PART NAMES AND FUNCTIONS
I ZOOM : Zooms in/out. The
DVD VIDEO PHOTO
size of the screen will change each time you press the button
(zoom in/out: 3 steps each).
J Color buttons : Use these buttons according to on-
BD
INTRODUCTION
screen instructions.
K SLEEP: Sets to sleep mode (p. 30).
L Subwoofer volume control buttons
BD DVD
CD VIDEO MUSIC
: Controls the subwoofer volume
level (p. 12).
M Volume control buttons: Controls the volume level.
Press MUTE to turn off the volume. Press again to resume
the volume.
N SEARCH : Jumps
BD DVD CD VIDEO MUSIC
to a specified point during playback. For details on this
function, refer to “Using search” (p. 26). You can also select
this item from Status menu (p. 25).
O AUDIO : Changes the audio language or
BD DVD
format. You can also select from On Screen menu (p. 24).
P FM control buttons
TUNING << / >>: Starts manual tuning. Press and hold to
start automatic tuning (p. 28).
PRESET < / >: Selects preset station (p. 28).
MEMORY: Starts preset tuning and stores preset stations
(p. 28).
Q A/B : Plays back a
BD DVD CD VIDEO MUSIC
specific part you want to repeat.
1 Press A/B at the scene where you want to set the start
point. [A-] is displayed on the screen.
2 Press A/B again at the scene where you want to set the end
point. [A-B] is displayed on the screen.
Repeat playback starts.
3 To cancel the repeat playback, press A/B. [A-B]
disappears and the repeat playback is finished.
Note
This function cannot be performed depending on the
specifications of the disc.
R Input select buttons: Selects the input source (p. 18, 28).
Continued to the next page.
English
7 En
\
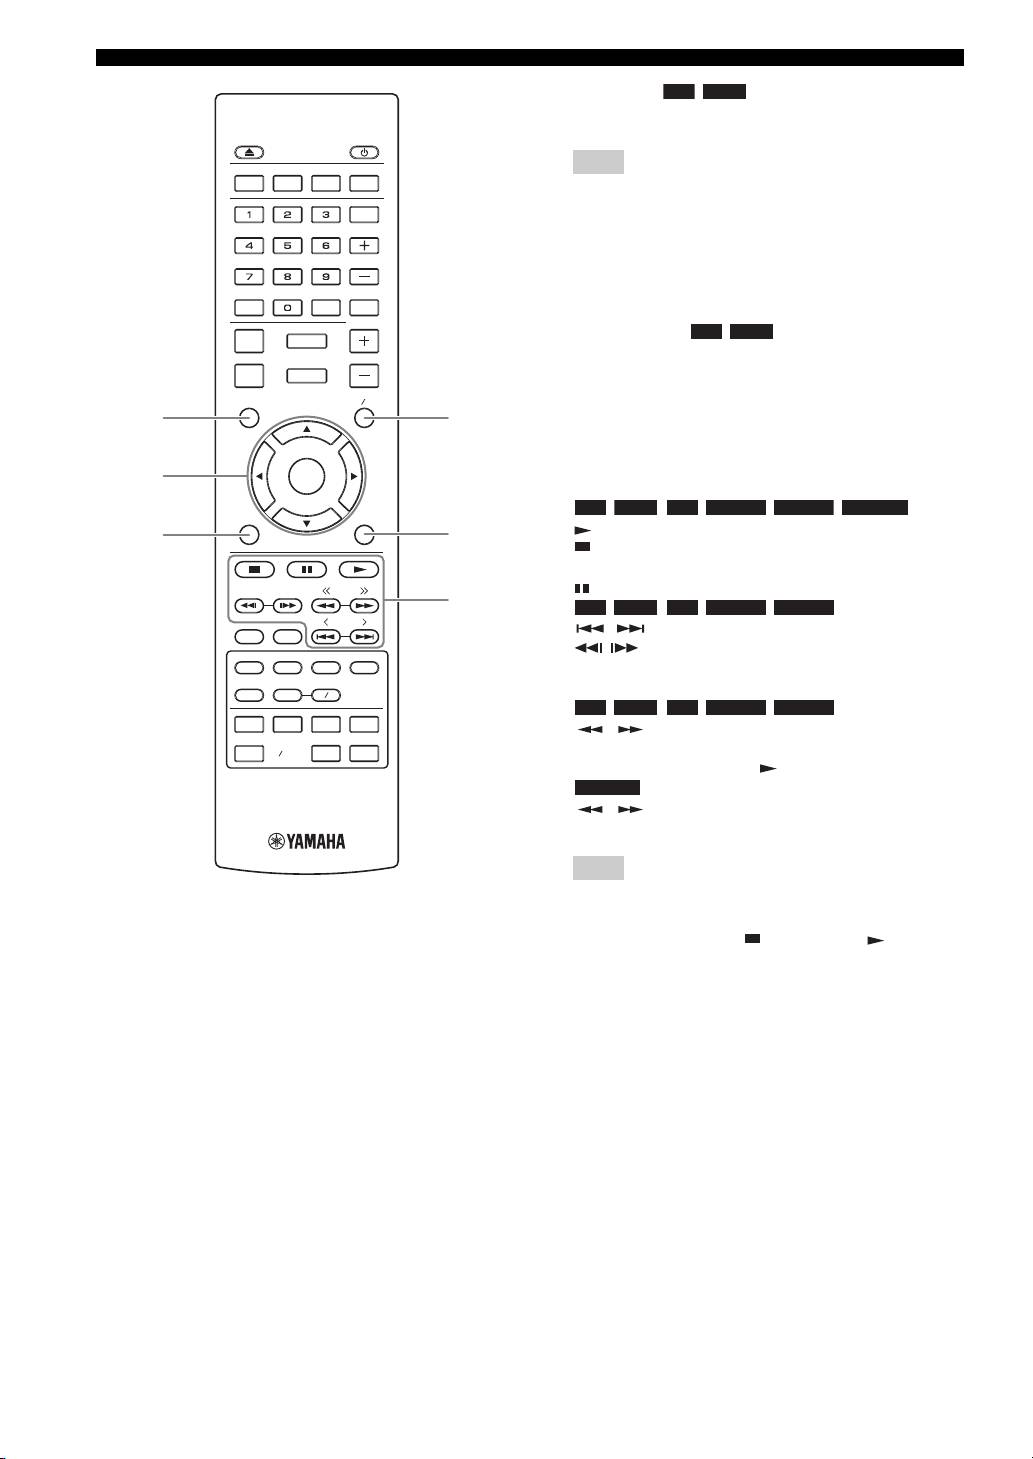
PART NAMES AND FUNCTIONS
S TOP MENU : Displays the top menu screen
BD DVD
(p. 51) if the disc contains a menu. Select the desired item
using 5 /a /2 /3 and ENTER.
Note
PROGRAM MARKER DIGEST ZOOM
Specific operations may be different depending on the disc.
Follow the instructions of each menu screen.
SLEEP
T Cursor buttons (5/a /2/3): Moves to select the focused
item.
SW
ENTER: Confirms the focused menu/item.
MUTESEARCHCLEAR
U RETURN: Returns to the previous menu or screen, etc.
V POP-UP/MENU : Displays pop-up menu. The
BD DVD
DISPLAY
SETUP
VOLUME
menu contents displayed vary depending on the disc. For
OPTION
HOME
details on how to see and operate the pop-up menu, refer to
the manual for the disc. The top menu screen may be
TOP MENU
POP-UP MENU
displayed by pressing POP-UP/MENU depending on the
S
V
disc.
W ON SCREEN: Displays On Screen menu (p. 24).
t
ENTER
X Control buttons
BD DVD CD VIDEO MUSIC PHOTO
:
RETURN ON SCREEN
: Plays back contents.
U
W
: Stops playback. To stop playback completely, press this
button twice.
TUNING
: Pauses playback.
X
BD DVD CD VIDEO MUSIC
:
PRESET
/ : Skips backward/forward.
DIMMER
STATUS
/ : Press for instant search/replay. Instant search
PIP
SUBTITLE
AUDIO
MEMORY
skips the content 30 seconds. Instant replay replays the
content from 10 seconds before.
SHUFFLE
REPEAT
A B
BD DVD CD VIDEO MUSIC
:
iPod
TV
STB
TUNER
/ : Searches backward/forward. The search speed
DISC
USB NET
AUX
PORTABLE
will change each time you press the button (search backward/
forward: 5 steps each). Press to resume normal playback.
PHOTO
:
/ : Changes the speed of a slide show (slower/
faster: 3 steps).
Note
Depending on the disc, this unit resumes playback from the
point where the unit was previously stopped. To play back
from the beginning, press and then press .
8 En

PART NAMES AND FUNCTIONS
Rear panel
INTRODUCTION
2 4 5 6 7 8931
1 AC IN jack (p. 16):
6 AUDIO IN (AUX) jacks (p. 14):
Connect the supplied power cable.
Connect other audio devices such as a CD or MD
player.
2 SPEAKERS terminals (p. 11):
Connect speakers.
7 OUTPUT (VIDEO/SUBWOOFER/HDMI) jacks
(p. 12, 13):
3 ANTENNA jack (p. 12):
The VIDEO jack outputs analog video signal.
Connect an FM antenna.
Use the SUBWOOFER jack when you are using an
4 REMOTE CONTROL (IN/OUT) jacks (U.S.A.
active subwoofer speaker (built-in amplifier).
and Canada models only):
Use the HDMI jack to connect to your TV.
Connect other components for remote control.
8 NETWORK (LAN) jack (p. 15):
5 DIGITAL IN (COAXIAL/OPTICAL) jacks
Connect your hub or broadband router.
(p. 13, 14):
9 USB jack (p. 15):
Connect your satellite or cable TV tuner to the
Connect a USB memory device.
COAXIAL jack. The OPTICAL jack is for the audio
signal from your TV when your TV is not ARC (Audio
Return Channel) supported.
English
9 En
PART NAMES AND FUNCTIONS
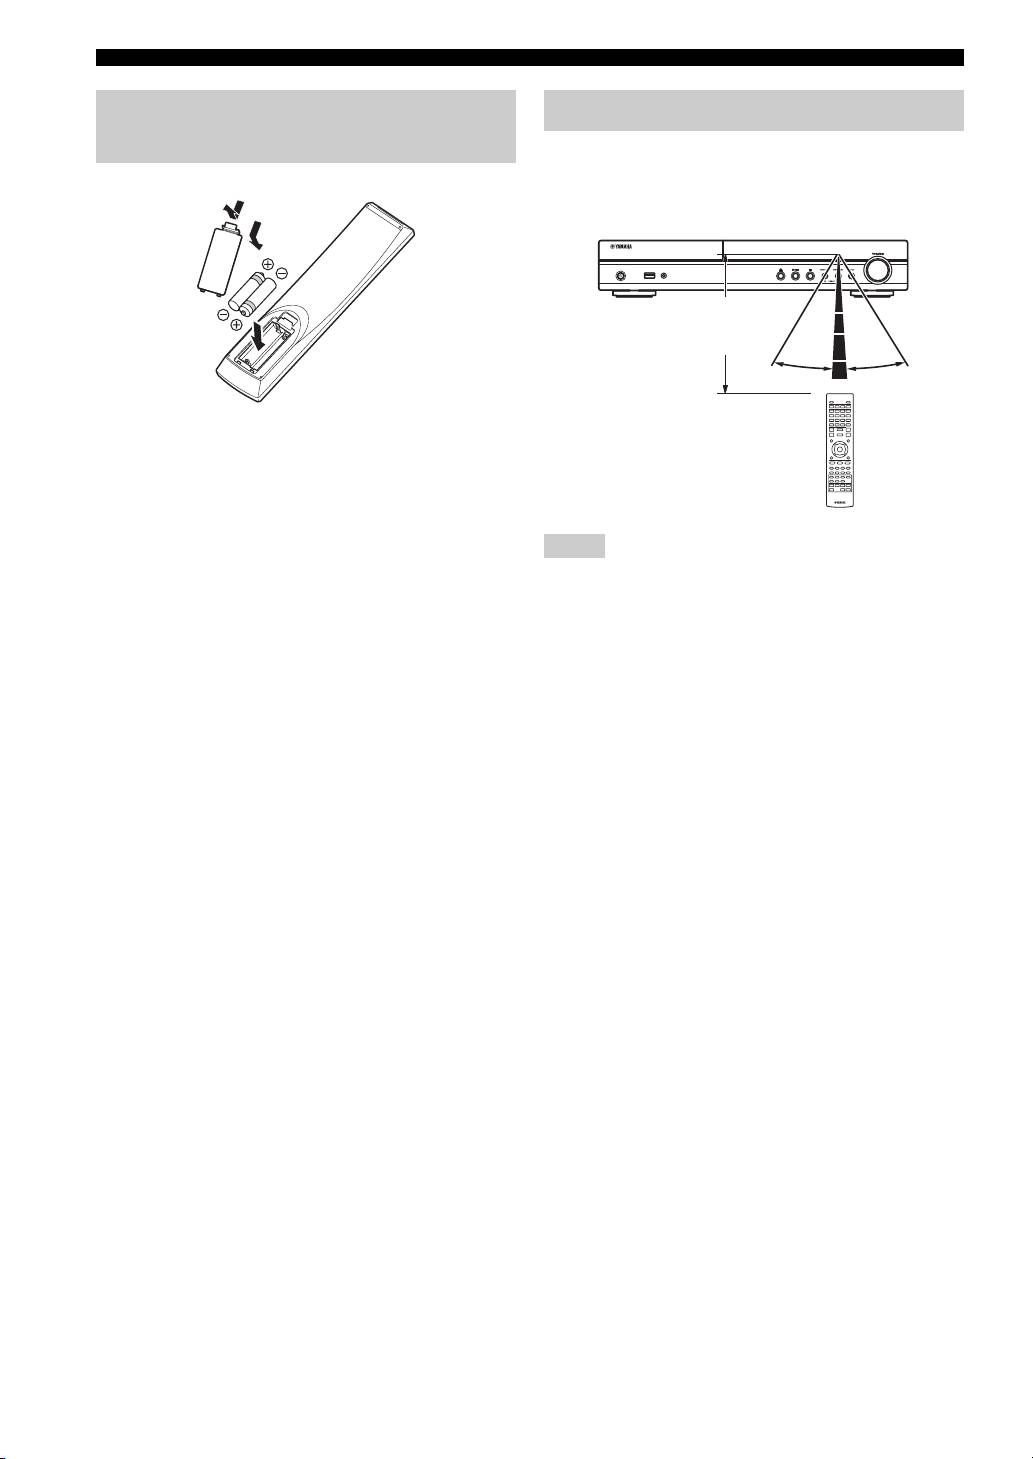
Installing the batteries in the
remote control
The remote control transmits a directional infrared beam.
Be sure to aim the remote control directly at the remote
control sensor on the front panel of this unit during
1
operation.
3
■ Notes on batteries
• Change both batteries when the operation range of the remote
control decreases.
• Use AAA, R03, UM-4 batteries.
• Make sure that the polarities are correct. Refer to the illustration
inside the battery compartment.
• Remove the batteries if the remote control is not to be used for
• The area between the remote control and this unit must be clear
an extended period of time.
of large obstacles.
• Do not use old batteries together with new ones.
• Do not spill water or other liquids on this remote control.
• Do not use different types of batteries (such as alkaline and
• Do not drop the remote control.
manganese batteries) together. Read the packaging carefully as
• Do not leave or store the remote control in the following types
these different types of batteries may have the same shape and
of conditions:
color.
– high humidity, such as near a bath
• If the batteries have leaked, dispose of them immediately.
– high temperature, such as near a heater or a stove
Avoid touching the leaked material or letting it come into
– extremely low temperatures
contact with clothing, etc. Clean the battery compartment
– dusty places.
thoroughly before installing new batteries.
• Do not expose the remote control sensor to strong lighting, in
• Do not throw away batteries with general house waste; dispose
particular, an inverter type fluorescent lamp; otherwise, the
of them correctly in accordance with your local regulations.
remote control may not work properly. If necessary, position
• Keep batteries away from children. If a battery is accidentally
the system away from direct lighting.
swallowed, contact your doctor immediately.
• When not planning to use the remote control for long periods of
time, remove the batteries from the remote control.
• Do not charge or disassemble the supplied batteries.
10 En
2
Using the remote control
USB PORTABLE
iPod/iPhone
Within 6 m
2
(20 feet)
30˚ 30˚
Notes
PREPARATIONS
CONNECTION
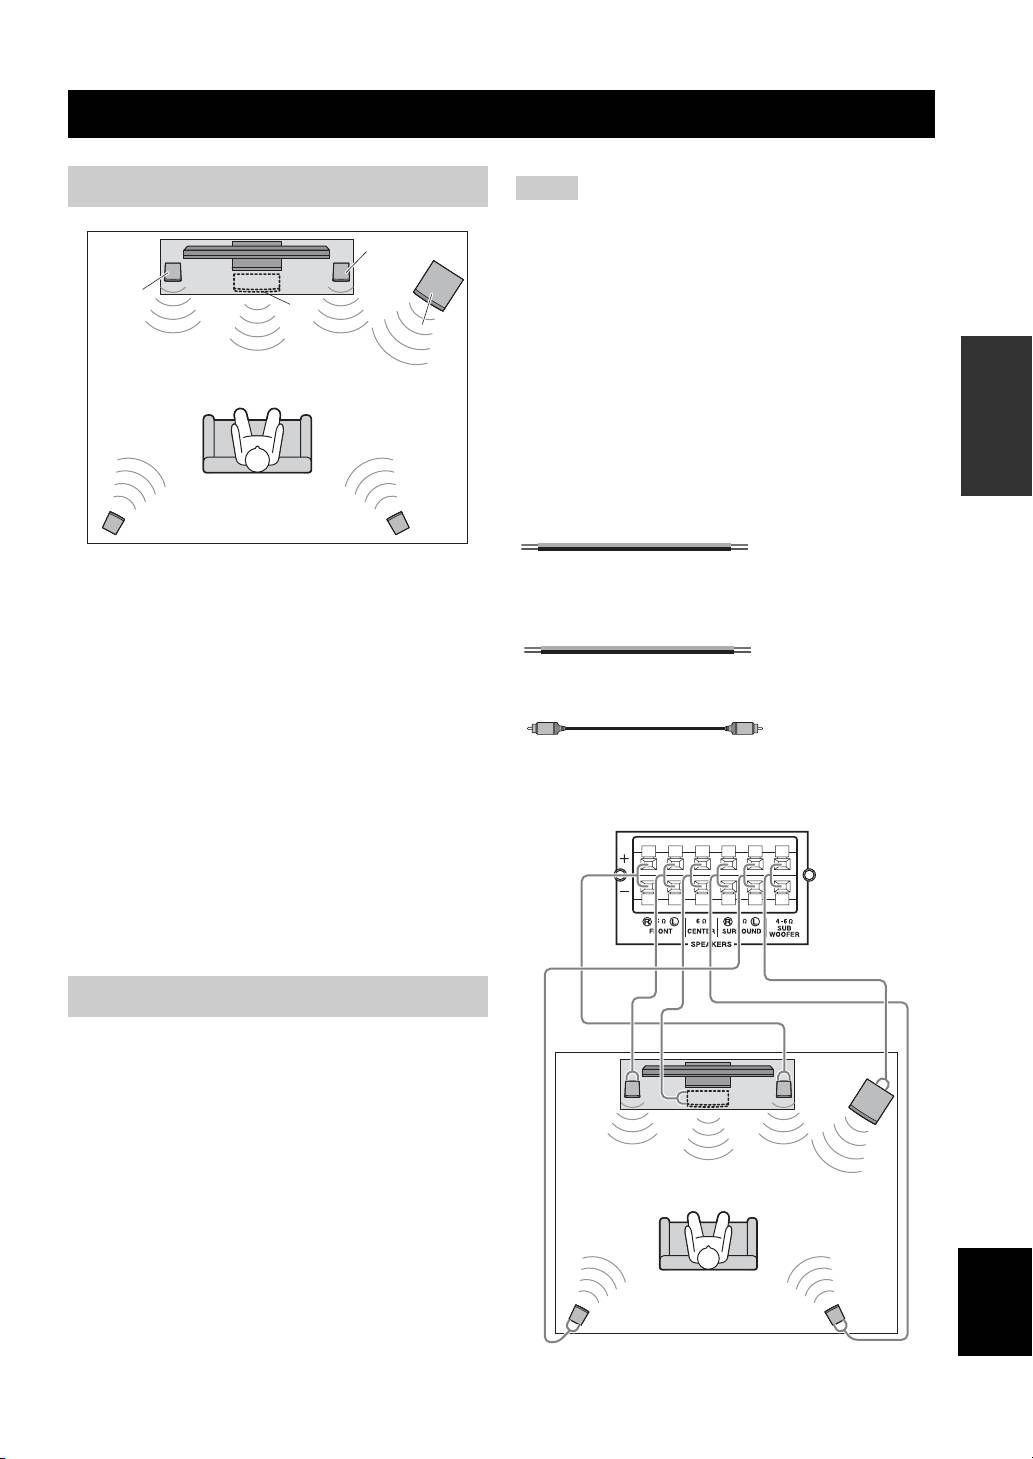
5.1-channel speaker layout
Notes
• Disconnect the power plug before connecting speakers.
• When connecting speakers, use speakers having more than 6Ω
FR
impedance for the front, center and surround speakers, and 4Ω
to 6Ω impedance for a passive subwoofer. For an active
FL
subwoofer (built-in amplifier), you need not be concerned about
C
impedance.
SW
• When connecting an active subwoofer (built-in amplifier), be
PREPARATIONS
sure turn it off before connecting to the unit.
• Be careful that the core of the speaker cable does not touch
anything or come into contact with the metal areas of the unit.
This may damage the unit or the speakers.
■ Necessary cables (not supplied)
When the subwoofer is passive:
• Speaker cables × 6
SL
SR
+
+
–
–
Front speakers (FR and FL):
When the subwoofer is active:
For the front channel sound (stereo sound) and effect
• Speaker cables × 5
sound.
+
+
–
–
Center speaker (C):
• Monaural pin cable (for subwoofer) × 1
For the center channel sound (dialogue, vocals, etc.).
Surround speakers (SR and SL):
For effect and vocal sound from surround channel. The
surround back channel sound is output from the surround
The rear panel of this unit
(when the subwoofer is passive)
speakers when a disc which has 7.1- or 6.1-channel
sounds is played back.
Subwoofer (SW):
For low-frequency effect (LFE) sound and bass sound
from front and surround channels.
Connecting speakers
Connect speakers to the unit.
When you are using a subwoofer speaker, check if it is
active (built-in amplifier, with power cable) or passive
(not built-in amplifier, without power cable). The cable
used for connecting a subwoofer differs depending on the
subwoofer type.
After connecting the speakers, setting according to the
speaker type (size, number of available speakers, etc.) is
required. See page 39 for speaker setting.
English
11 En
CONNECTION
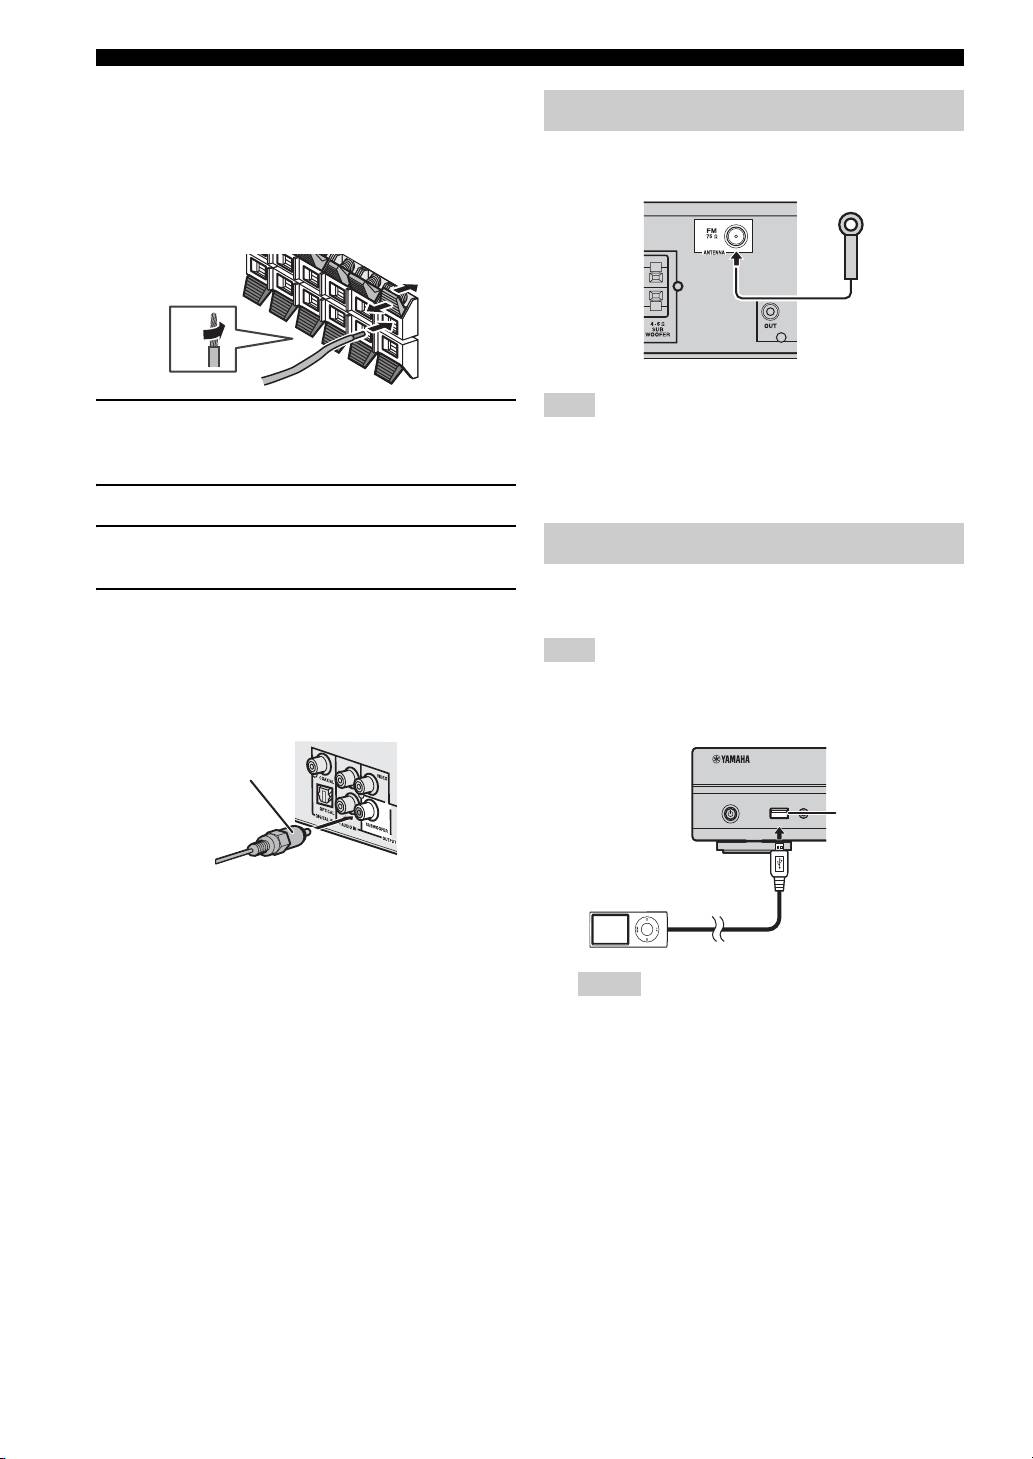
■ Connecting speaker cables
Each speaker has two speaker cables. One is for
connecting the – (negative) terminal of the unit and the
You can enjoy listening to FM radio stations by
speaker, and the other is for the + (positive) terminal. The
connecting the supplied indoor FM antenna.
cables are different colors, so they do not get mixed up.
Connect the black side to the – (negative) terminal and the
other side to the + (positive) terminal.
1 Remove approximately 10 mm of insulation from the
If there is a problem of weak radio wave reception in your area or
end of the speaker cable and twist the bare wire
you want to improve radio reception, we recommend that you use
firmly.
commercially available outdoor antennas. For details, consult the
nearest authorized Yamaha dealer or service center.
2 Press the tab on the speaker terminal down.
3 Insert the bare wire of the speaker cable into the
terminal.
You can enjoy music stored in your iPod by connecting it
4 Lift the tab to secure the speaker cable.
to this unit.
■ Connecting an active subwoofer
When connecting an active subwoofer (built-in amplifier),
This unit is compatible with iPod classic, iPod nano (2nd, 3rd,
use a monaural pin cable. Before connecting an active
4th, 5th and 6th generation), iPod touch (1st, 2nd, 3rd, and 4th
subwoofer, turn it off.
generation), iPhone, iPhone 3G/3GS, and iPhone 4.
About subwoofer speaker
• Use the speaker terminal to connect a passive
subwoofer speaker. Use the SUBWOOFER output jack
to connect an active subwoofer speaker (built-in
amplifier).
• Make sure the USB cable is connected securely between
• You can adjust the subwoofer volume level by using
your iPod and this unit.
this unit’s remote control. For an active subwoofer
• Connect your iPod to the front USB port of this unit. The
rear USB port is not compatible with your iPod.
speaker (built-in amplifier), you can also use the control
on the subwoofer to adjust volume level. Use these
functions to decrease the volume level if strange noise
or sound is output from the subwoofer.
• If you are not using a subwoofer speaker, select SETUP
menu = [Audio Setting] = [Speaker Setting] =
[Configuration] = [SW] = [Disable].
12 En
4
3
4
3
2
2
1
Connecting the FM antenna
1
Note
Connecting iPod
Note
Monaural pin cable
USB PORTABLE
USB port
iPod/iPhone
Notes

CONNECTION
Connecting to a TV
Make sure you refer the following illustration carefully so that connections between this unit and your TV are properly
made.
CAUTION
Do not connect the power cable of this unit until all connections are completed.
1 Connect your TV using an HDMI cable (commercially available). The digital video signal is output from this unit to
your TV. If your TV’s HDMI terminal is ARC (audio return channel) supported, steps 2 to 3 are not necessary since
digital audio signal is output from the TV to the unit through the HDMI cable.
PREPARATIONS
2 Connect your TV using an optical cable (commercially available) to play back TV digital audio through this unit.
3 If an HDMI connection is unavailable, connect your TV using a video pin cable. Analog video signal is output from
this unit to your TV.
This unit
3 Composite video cable
(supplied)
TV
VIDEO
AV INPUT
HDMI IN
OPTICAL
1 2 3
(ARC)
DIGITAL AUDIO OUT
1 HDMI cable
(commercially available)
2 Optical cable
(commercially available)
■ HDMI connection
■ About audio return channel (ARC)
• You can enjoy high quality digital picture and sound
supported TV
through the HDMI terminals.
• You can connect an HDMI cable to the audio return
• Firmly connect an HDMI cable (commercially
channel supported terminal (the terminal with “ARC”
available) to the HDMI terminal of this unit.
indicated) on the TV. In this case, you do not need to
• Use HIGH SPEED HDMI cables that have the HDMI
connect an optical cable.
logo (p. 52).
• You need to activate the HDMI control function of this
unit so as to activate audio return channel (ARC) (
p. 35).
y
• When you use the HDMI control function, refer to “Operating
What is audio return channel (ARC)?
this unit by TV remote control (the HDMI control function)”
This function allows digital audio signal to be output from
(p. 30) and “[HDMI Control]” (p. 35).
a TV to this unit through an HDMI cable, without using an
• For information on the output mode of the HDMI terminal,
optical cable.
refer to “[HDMI]” (p. 39).
• When no picture is displayed, refer to
y
“TROUBLESHOOTING” (p. 42).
If your TV is not ARC supported, connect the TV and this unit
via the OPTICAL jack on the unit.
■ Connection for the playback of Blu-ray
3D discs
You need the following equipment and connections to
enjoy BD 3D discs on this unit:
English
–a TV that has 3D functionality.
– a TV and this unit must be connected with HDMI
cables.
– a BD disc should contain 3D images.
13 En
CONNECTION
■ Video connection
• Firmly connect the composite video cable (supplied) to
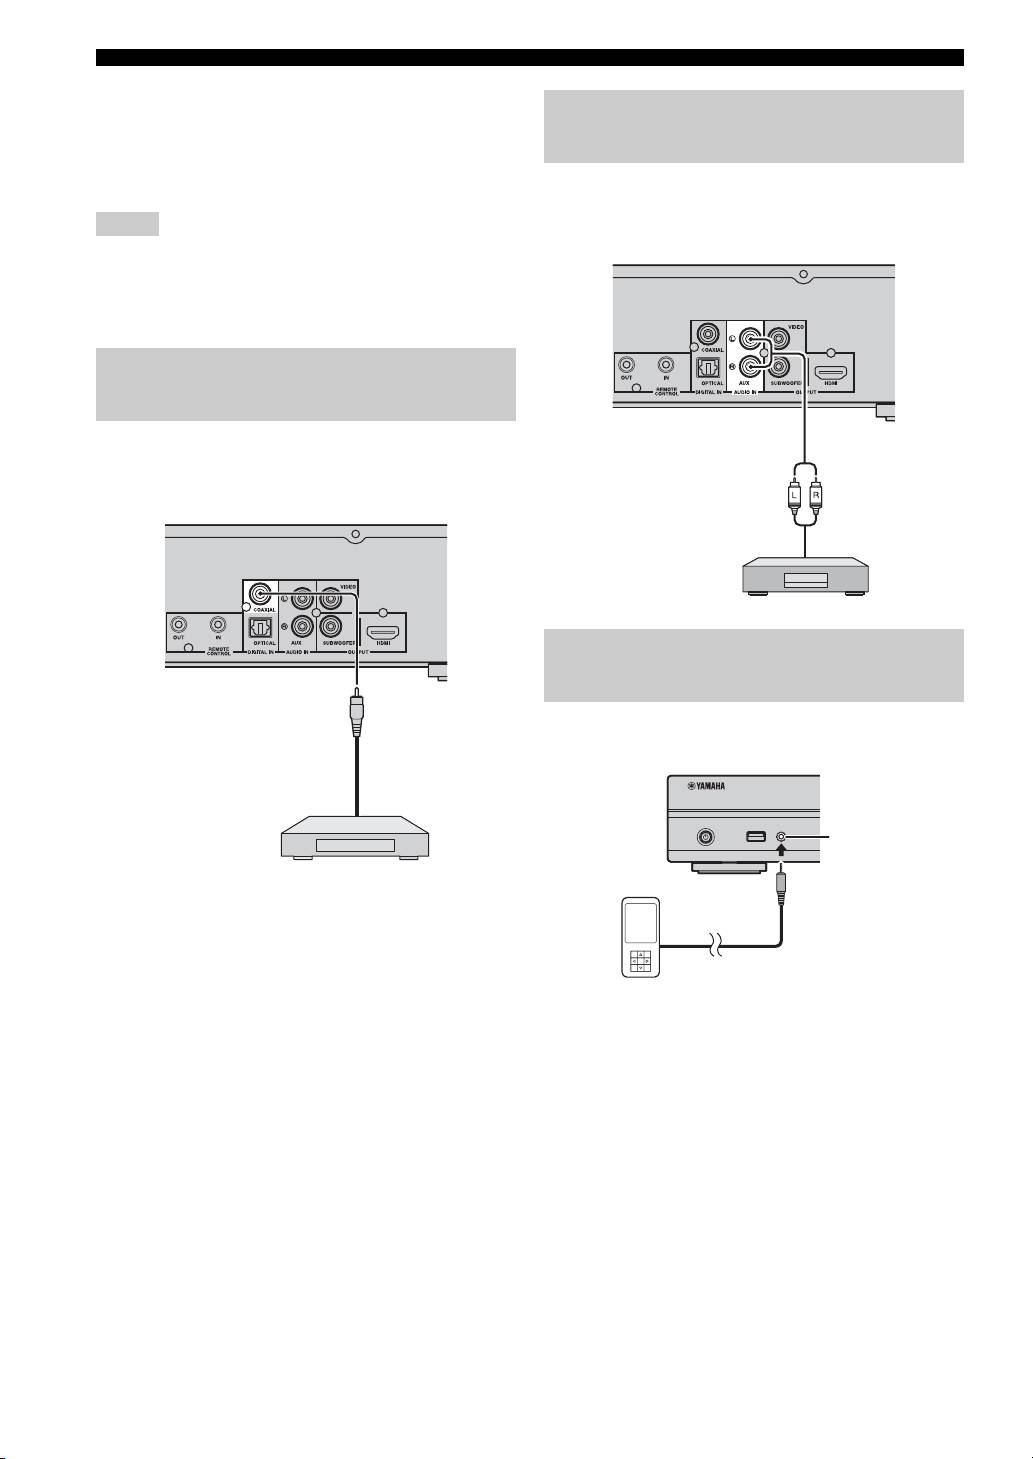
Connecting audio devices (such as
the VIDEO jack.
a CD or MD player)
• Refer to page 40 for information on the video output
formats.
You can connect audio devices (such as a CD player, MD
player, etc.) to the unit.
Notes
• If you play back the image via VCR, the image may deteriorate
due to the copy guard function.
• To enjoy BD 3D discs on this unit, you need to connect a TV
and this unit using HDMI cables (commercially available).
Connecting a satellite/cable TV
tuner
You can connect a satellite or cable TV tuner that is not
HDMI supported using a digital audio pin cable.
Connecting a portable digital
music player other than iPod
You can connect a portable digital music player other than
iPod to the front panel of this unit.
y
To connect a satellite or cable tuner to TV, you need extra video
pin cables (commercially available).
14 En
USB PORTABLE
iPod/iPhone
PORTABLE

NETWORK AND USB CONNECTION
Connecting to the NETWORK terminal
• PC contents can be played back by connecting this unit to the network.
• You can enjoy a variety of contents with interactive functions by connecting to the internet when playing BD-Live
compatible discs. Refer to page 27 for information on BD-Live functions.
Notes
PREPARATIONS
• Firmly connect a network cable (commercially available) to the NETWORK terminal.
• Use only an STP (shielded twisted pair) network cable.
• When using the internet, a broadband internet connection as shown below is required.
• Connect the other connector of the network cable to the hub/broadband router.
• When using a broadband internet connection, a contract with an internet service provider is required. For more details, contact your
nearest internet service provider.
• Refer to the operation manual of the equipment you have as the connected equipment and connection method may differ depending on
your internet environment.
• Use a network cable/router supporting 10BASE-T/100BASE-TX.
This unit
Connecting to the USB port
• You can connect a USB memory device (2 GB or
greater and formatted with FAT 32/16) for BD Local
Storage to the USB port on the rear panel (or front
panel) of this unit to save the BD-Live data (p. 27) or to
upgrade the software of this unit (p. 41).
• Firmly connect a USB memory device (commercially
available) to the USB port.
CAUTION
To USB
To NETWORK
• Do not remove the USB memory device or unplug the power
port
terminal
cable while the operations for BD-Live or software upgrade are
being performed.
• Do not use a USB extension cable when connecting a USB
USB memory
device
Network cable
memory device to the USB port of this unit. Using a USB
(commercially
(commercially
extension cable may prevent the unit from performing correctly.
available)
available)
Notes
y
To save BD-Live data on the USB
• Yamaha cannot guarantee that all brands’ USB memory devices
memory device on the front
To LAN
will operate with this unit.
terminal
panel, set [Local Storage] to
• For more notes on using USB memory devices, refer to
[Front USB] (p. 35).
page 18.
LAN
Internet
Modem
Hub or
PC
broadband router
■ After connecting
English
• When you set the Network setting manually, refer to “Network” (p. 36).
• To play back the PC contents on your network, refer to “Using network content” (p. 22).
15 En
OTHER CONNECTION
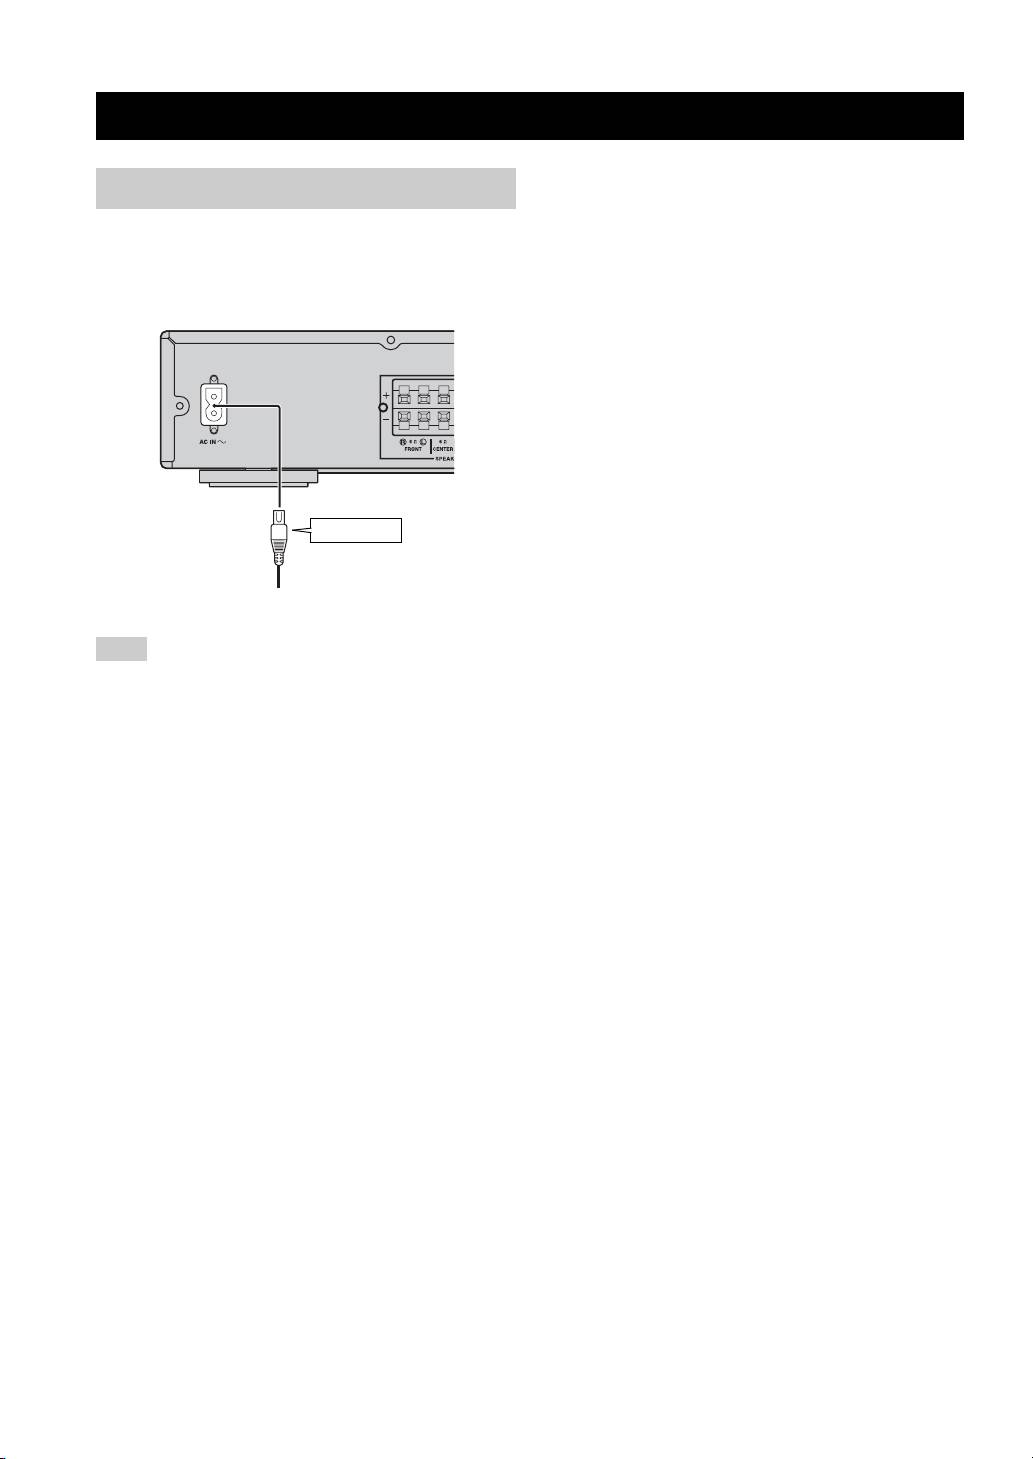
Connecting the power cable
After all connections are completed, plug the supplied
power cable into the AC IN on the rear of this unit. Then
plug into AC outlet.
To AC inlet
To AC outlet
Note
TO PREVENT RISK OF ELECTRIC SHOCK, DO NOT
TOUCH THE UN-INSULATED PARTS OF ANY CABLES
WHILE THE POWER CABLE IS CONNECTED.
16 En
OPERATIONS
INITIAL WIZARD/EASY SETUP
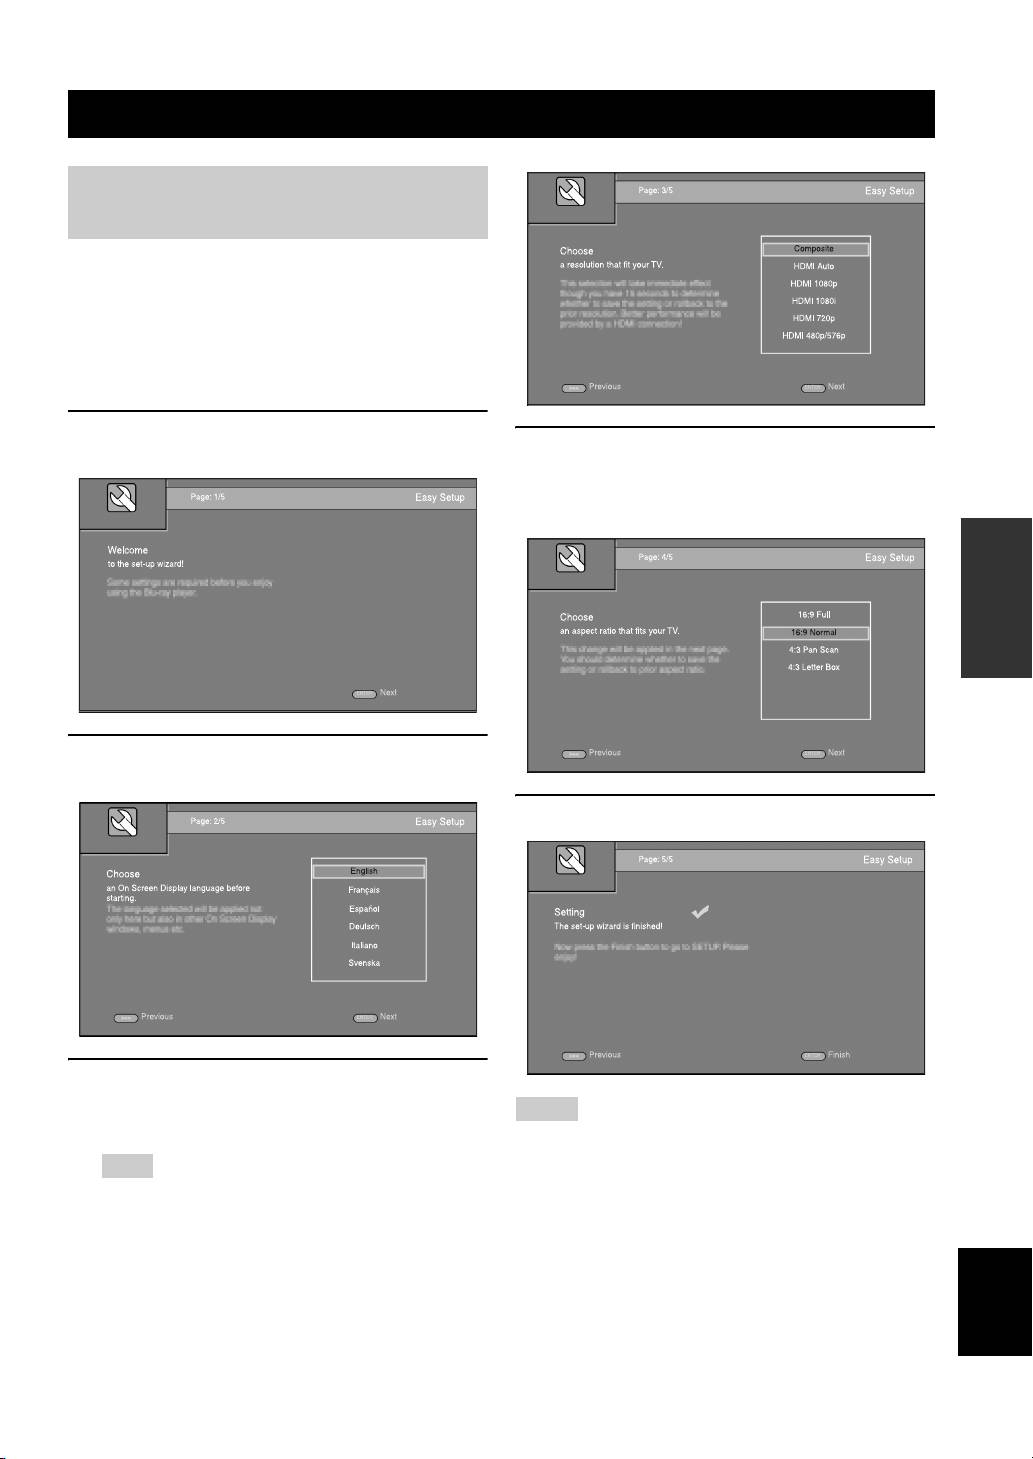
Setting with the Initial Wizard/Easy
Setup
Initial Wizard/Easy Setup allows you to set language,
resolution, and screen aspect ratio easily. Initial Wizard
screen is displayed when you turn this unit on for the first
time after purchase or upgrade. Same setting can be
performed from SETUP menu = [System] = [Easy
Setup] (p. 32).
1 When Easy Setup screen is displayed, press ENTER
4 Press 5 /a to select the screen aspect ratio, then
to start Easy Setup.
press ENTER. For details on setting items, refer to
“[TV Screen]” (p. 37).
Easy Setup is completed.
OPERATIONS
2 Press 5/a to select the language you want to display
on the screen, then press ENTER.
5 Press ENTER to exit Easy Setup.
3 Press 5/a to select the resolution, then press
ENTER. For details on setting items, refer to “[Video
Notes
Out Select]” (p. 37).
• When no picture is displayed after Initial Wizard/Easy Setup is
completed, refer to “TROUBLESHOOTING” (p. 42).
Note
• A warning message concerning 3D video playback appears
When you connect your TV and this unit via the VIDEO
when this unit is turned on. Press ENTER to dismiss the
jack, select [Composite].
message or CLEAR to disable it (p. 35).
English
17 En
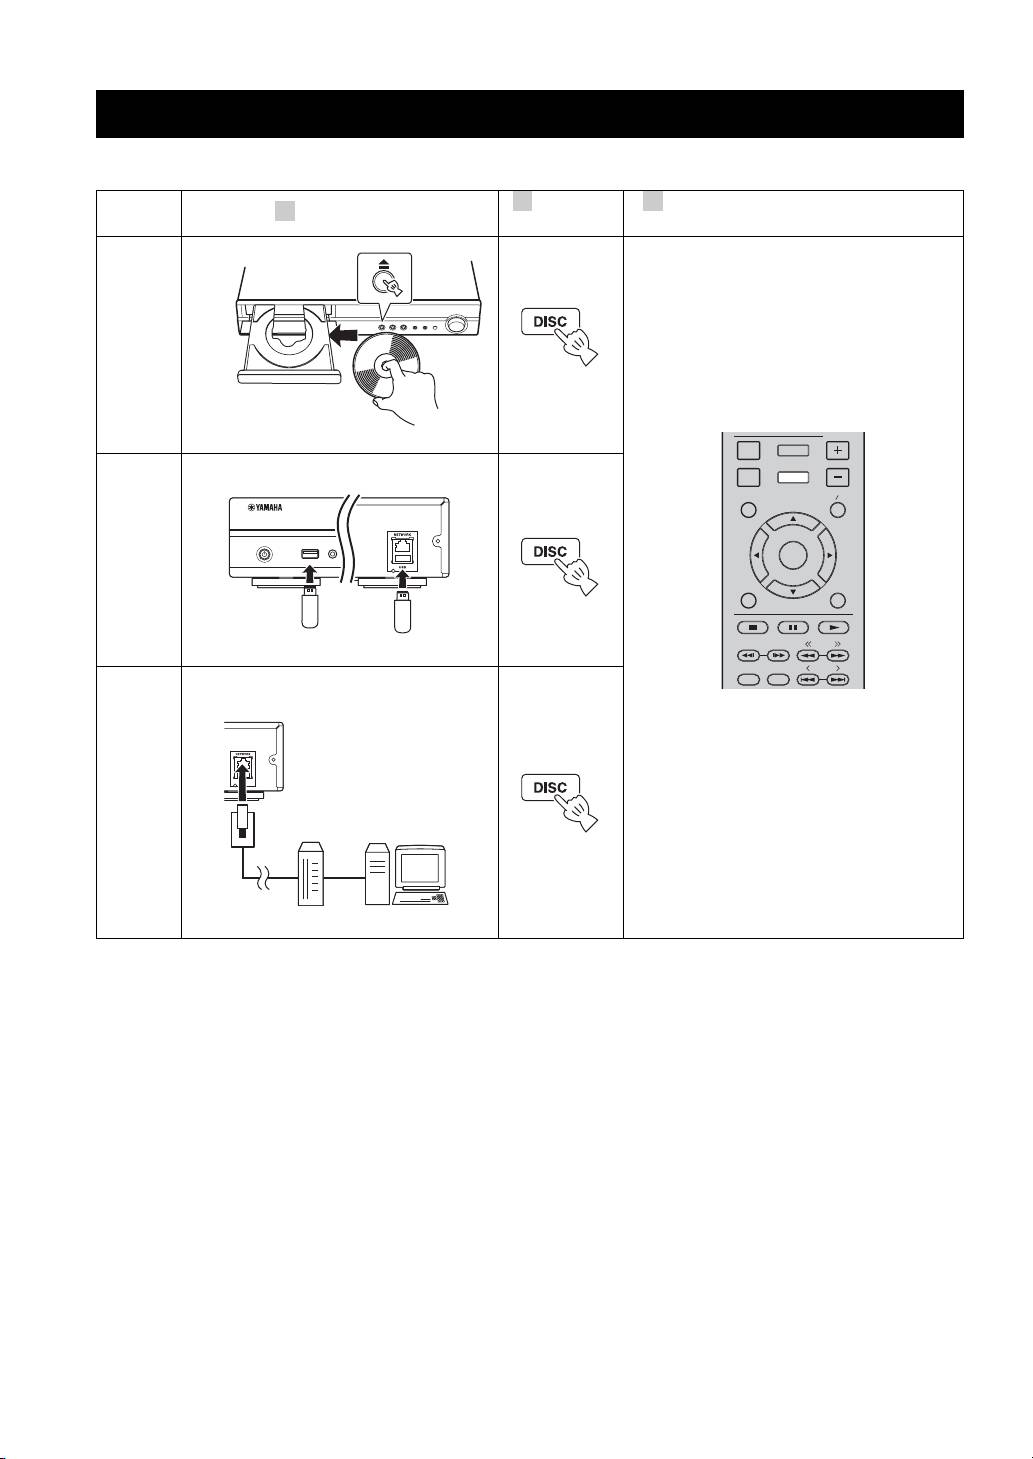
BASIC OPERATION
Follow the procedures below to play back the source.
2 3
Switch the
Refer to the following pages for more
1
Set the source
input
operations
Disc
p. 20, 23
DISPLAY
SETUP
VOLUME
Front Rear
OPTION
HOME
TOP MENU
POP-UP MENU
USB PORTABLE
*1
ENTER
USB
iPod/iPhone
RETURN ON SCREEN
p. 15, 20
TUNING
PRESET
DIMMER
STATUS
Network
(PC contents
and
YouTube*2)
p. 15, 22
*
1
· Some devices may not work properly even if they meet the requirements.
· Playability of and power supply to all kind of USB devices are not guaranteed.
· The reading time may exceed 30 seconds depending on the number of files/folders.
· Yamaha and suppliers accept no liability for the loss of data saved on the USB devices connected to this unit.
As a precaution, it is recommended that the files are made backup copies.
*2 Available for Russia and Asia models only.
18 En
