Yamaha CD-S300: instruction
Class: Household, kitchen appliances, electronics and equipment
Type: CD-player
Manual for Yamaha CD-S300
Table of contents
- CAUTION: READ THIS BEFORE OPERATING YOUR UNIT.
- CONTROLS AND FUNCTIONS Front panel
- Rear panel connections
- Remote control
- Program playback
- PLAYING BACK iPod/USB DEVICE Connecting iPod/USB devices Playing back iPod Playing back USB devices
- Disconnecting iPod/USB devices Supported iPod/USB devices
- PLAYABLE DISC AND FILE FORMAT
- PLAYABLE DISC AND FILE FORMAT USING THE ADVANCED SETUP
- TROUBLESHOOTING Problems Possible Causes Solutions
- Problems Possible Causes Solutions SPECIFICATIONS

©
G
Compact Disc Player
Lecteur Compact Disc
OWNER’S MANUAL
MODE D’EMPLOI
BEDIENUNGSANLEITUNG
BRUKSANVISNING
MANUALE DI ISTRUZIONI
MANUAL DE INSTRUCCIONES
GEBRUIKSAANWIJZING
ИНСТРУКЦИЯ ПО ЭКСПЛУАТАЦИИ
2009 Yamaha Corporation All rights reserved.
Printed in Malaysia WS19240
VARO!
CAUTION
AVATTAESSA OLET ALTTIINA NÄKYVÄLLE JA
Use of controls or adjustments or performance of
NÄKYMÄTTÖMÄLLE LASER SÄ TEILYLLE. ÄLÄ
procedures other than those specified herein may result
KATSO SÄTEESEEN.
in hazardous radiation exposure.
VORSICHT
AVERTISSEMENT
SICHTBARE UND UNSICHTBARE
L’utilisation de commandes et l’emploi de réglages ou
LASERSTRAHLUNG WENN ABDECKUNG
de méthodes autres que ceux décrits ci-dessous,
GEÖFFNET. NICHT DEM STRAHL AUSSETSEN.
peuvent entraîner une exposition à un rayonnement
dangereux.
DANGER
VORSICHT
VISIBLE AND INVISIBLE LASER RADIATION
Die Verwendung von Bedienelementen oder die
WHEN OPEN. AVOID DIRECT EXPOSURE TO
Einstellung bzw. die Ausführung von anderen als in
BEAM.
dieser Anleitung beschriebenen Vorgängen kann zu
ATTENTION
Gefährdung durch gefährliche Strahlung führen.
RAYONNEMENT LASER VISIBLE ET INVISIBLE EN
CAS D’OUVERTURE. EXPOSITION DANGEREUSE
OBSERVERA
AU FAISCEAU.
Användning av reglage eller justeringar eller utförande
av åtgärder på annat sätt än så som beskrivs häri kan
ПРЕДУПРЕЖДЕНИЕ
resultera i farlig strålning.
ПPИ OTKPЫTИИ УCTPOЙCTBA BЫ MOЖETE
ПОДBEPГHУTБСЯ ВОЗДЕЙСТВИЮ BИДИMOГO И
ATTENZIONE
HEBИДИMOГO ЛAЗEPHOГO ИЗЛУЧEHИЯ.
L’uso di controlli, regolazioni, operazioni o procedure
ИЗБЕГAИTE BOЗДЕЙСТВИЯ ЛУЧA.
non specificati in questo manuale possono risultare in
esposizione a radiazioni pericolose.
PRECAUCIÓN
El uso de los controles, los ajustes o los procedimientos
que no se especifican enste manual pueden causar una
exposición peligrosa a la radiación.
LET OP
Gebruik van bedieningsorganen, instellingen of
procedures anders dan beschreven in dit document kan
leiden tot blootstelling aan gevaarlijke stralen.
ЕРЕЖЕНИЕ
Использование органов управления или произведение
настроек или выполнение процедур, не указанных в
данной инструкции, может отразиться на выделении
опасной радиации.
CAUTION
VISIBLE AND INVISIBLE LASER RADIATION
WHEN OPEN. AVOID EXPOSURE TO BEAM.
ADVARSEL
SYNLIG OG USYNLIG LASERSTRALING VED
ÅBNING. UNDGÅ UDSÆTTELSE FOR STRÅLING.
ADVARSEL
SYNLIG OG USYNLIG LASERSTRÅLING NÅR
DEKSEL ÅPNES. UNNGÅ EKSPONERING FOR
STRÅLEN.
VARNING
SYNLIG OCH OSYNLIG LASERSTRÅLNING NÄR
DENNA DEL ÄR ÖPPNAD. BETRAKTA EJ
STRÅLEN.
i

VAROITUS
VARO!
Muiden kuin tässä esitettyjen toimintojen säädön tai
AVATTAESSA JA SUOJALUKITUS
asetusten muutto saattaa altistaa vaaralliselle säteilylle tai
OHITETTAESSA OLET ALTTIINA
muille vaarallisille toiminnoille.
NÄKYMÄTTÖMÄLLE LASERSÄTEILYLLE.
ÄLÄ KATSO SÄTEESEEN.
DK
Advarsel: Usynlig laserstråling ved åbning når
VARNING!
sikkerhedsafbrydere er ude af funktion. Undgå utsættelse
OSYNLIG LASERSTRÅLNING NÄR DENNA DEL
for stråling.
ÄR ÖPPNAD OCH SPÄRREN ÄR URKOPPLAD.
BETRAKTA EJ STRÅLEN.
Bemærk: Netafbryderen POWER er sekundært indkoblet
og ofbryder ikke strømmen fra nettet. Den indbyggede
netdel er derfor tilsluttet til lysnettet så længe netstikket
sidder i stikkontakten.
N
Observer: Nettbryteren POWER er sekundert innkoplet.
Den innebygdenetdelen er derfor ikke frakoplet nettet så
lenge apparatet er tilsluttet nettkontakten.
S
Klass 1 laseraparat
Varning! Om apparaten används på annat sättþän i denna
bruksanvisning specificerats, kan användaren utsättas för
osynlig laserstrålning, som överskrider gränsen för
laserklass 1.
Observera! Strömbrytaren POWER är sekundärt kopplad
och inte bryter inte strömmen från nätet. Den inbyggda
nätdelen är därför ansluten till elnätet så länge
stickproppen sitter i vägguttaget.
SF
Luokan 1 laserlaite
Varoitus! Laitteen käyttäminen muulla kuin tässä
käyttöohjeessa mainitulla tavalla saattaa altistaa käyttäjän
turvallisuusluokan 1 ylittävälle näkymättömälle
lasersäteilylle.
Oikeus muutoksiin varataan. Laite ei saa olla alttiina
tippu-ja roiskevedelle.
Huom. Toiminnanvalitsin POWER on kytketty
toisiopuolelle, eikä se kytke laitetta irti sähköverkosta.
Sisäänrakennettu verkko-osa on kytkettynä
sähköverkkoon aina silloin, kun pistoke on pistorasiassa.
ii
CAUTION: READ THIS BEFORE OPERATING YOUR UNIT.
1 To assure the finest performance, please read this manual
19 The batteries shall not be exposed to excessive heat such as
carefully. Keep it in a safe place for future reference.
sunshine, fire or like.
2 Install this sound system in a well ventilated, cool, dry, clean
20 VOLTAGE SELECTOR (Asia and General models only)
place – away from direct sunlight, heat sources, vibration,
The VOLTAGE SELECTOR on the rear panel of this unit
dust, moisture, and/or cold. For proper ventilation, allow the
must be set for your local main voltage BEFORE plugging
following minimum clearances.
into the wall outlet. Voltages are:
Top : 2.5 cm (1 inch)
.....................................AC 110/120/220/230-240 V, 50/60 Hz
Rear: 2.5 cm (1 inch)
Sides: 2.5 cm (1 inch)
As long as this unit is connected to the wall outlet, it is
3 Locate this unit away from other electrical appliances, motors,
not disconnected from the AC power source even if
or transformers to avoid humming sounds.
you turn off this unit by .
4 Do not expose this unit to sudden temperature changes from
cold to hot, and do not locate this unit in an environment with
WARNING
high humidity (i.e. a room with a humidifier) to prevent
TO REDUCE THE RISK OF FIRE OR ELECTRIC
condensation inside this unit, which may cause an electrical
shock, fire, damage to this unit, and/or personal injury.
SHOCK, DO NOT EXPOSE THIS UNIT TO RAIN
5 Avoid installing this unit where foreign objects may fall onto
OR MOISTURE.
this unit and/or this unit may be exposed to liquid dripping or
splashing. On the top of this unit, do not place:
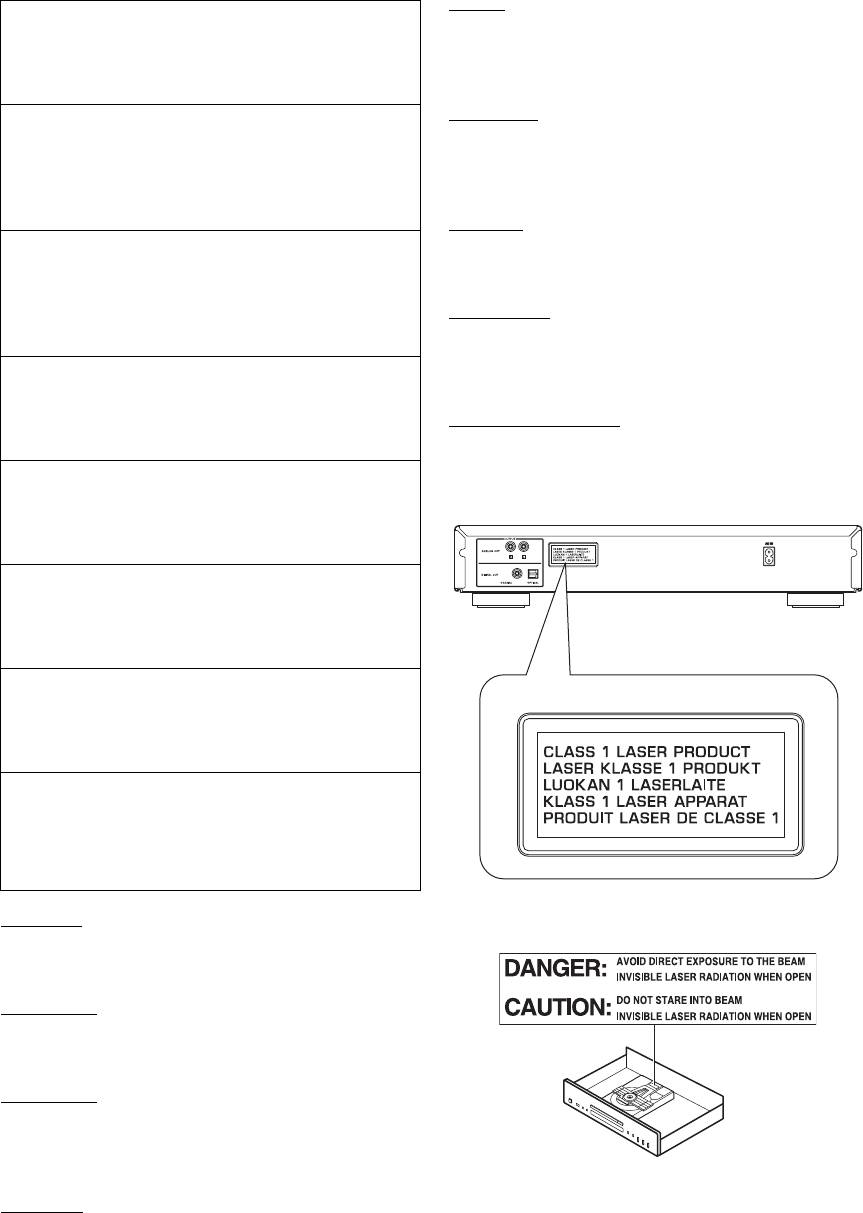
LASER SAFETY
– Other components, as they may cause damage and/or
This unit employs a laser. Due to possible eye injury, only a qualified
service person should remove the cover or attempt to service this
discoloration on the surface of this unit.
device.
– Burning objects (i.e. candles), as they may cause fire,
damage to this unit, and/or personal injury.
DANGER
– Containers with liquid in them, as they may fall and liquid
This unit emits visible laser radiation when open. Avoid direct eye
may cause electrical shock to the user and/or damage to
exposure to beam. When this unit is plugged into the wall outlet, do
this unit.
not place your eyes close to the opening of the disc tray and other
6 Do not cover this unit with a newspaper, tablecloth, curtain,
openings to look into inside.
etc. in order not to obstruct heat radiation. If the temperature
inside this unit rises, it may cause fire, damage to this unit,
The laser component in this product is capable of
and/or personal injury.
emitting radiation exceeding the limit for Class 1.
7 Do not plug in this unit to a wall outlet until all connections
are complete.
■ For U.K. customers
8 Do not operate this unit upside-down. It may overheat,
If the socket outlets in the home are not suitable for the
possibly causing damage.
plug supplied with this appliance, it should be cut off and
9 Do not use force on switches, knobs and/or cords.
an appropriate 3 pin plug fitted. For details, refer to the
10 When disconnecting the power cable from the wall outlet,
instructions described below.
grasp the plug; do not pull the cable.
Note
11 Do not clean this unit with chemical solvents; this might
damage the finish. Use a clean, dry cloth.
The plug severed from the mains lead must be destroyed, as a
plug with bared flexible cord is hazardous if engaged in a live
12 Only voltage specified on this unit must be used. Using this
socket outlet.
unit with a higher voltage than specified is dangerous and may
cause fire, damage to this unit, and/or personal injury.
Yamaha will not be held responsible for any damage resulting
■ Special Instructions for U.K. Model
from use of this unit with a voltage other than specified.
13 To prevent damage by lightning, keep the power cord
IMPORTANT
disconnected from a wall outlet or the unit during a lightning
THE WIRES IN MAINS LEAD ARE COLOURED IN
storm.
ACCORDANCE WITH THE FOLLOWING CODE:
14 Do not attempt to modify or fix this unit. Contact qualified
Blue: NEUTRAL
Yamaha service personnel when any service is needed. The
Brown: LIVE
cabinet should never be opened for any reasons.
As the colours of the wires in the mains lead of this apparatus
15 When not planning to use this unit for long periods of time
may not correspond with the coloured markings identifying
(i.e. vacation), disconnect the power cable from the wall
the terminals in your plug, proceed as follows:
outlet.
The wire which is coloured BLUE must be connected to the
terminal which is marked with the letter N or coloured
16 Install this unit near the wall outlet and where the power cable
BLACK. The wire which is coloured BROWN must be
can be reached easily.
connected to the terminal which is marked with the letter L or
17 Be sure to read the “TROUBLESHOOTING” section in this
coloured RED.
manual on common operating errors before concluding that
Making sure that neither core is connected to the earth
terminal of the three pin plug.
this unit is faulty.
18 Before moving this unit, press to turn off this unit and then
disconnect the power cable from the wall outlet.
iii En

CONTENTS
INTRODUCTION
INTRODUCTION
ADDITIONAL INFORMATION
CONTROLS AND FUNCTIONS ......................... 2
PLAYABLE DISC AND FILE FORMAT............8
Front panel ................................................................. 2
USING THE ADVANCED SETUP.......................9
Rear panel connections.............................................. 3
TROUBLESHOOTING .......................................10
Remote control........................................................... 4
SPECIFICATIONS...............................................11
Program playback ................................... 5
Audio CD
OPERATION
OPERATION
PLAYING BACK iPod/USB DEVICE................. 6
Connecting iPod/USB devices................................... 6
Playing back iPod ...................................................... 6
Playing back USB devices......................................... 6
Disconnecting iPod/USB devices.............................. 7
Supported iPod/USB devices..................................... 7
INFORMATION
■ Features
• If the batteries have leaked, dispose of them
ADDITIONAL
• Optical Digital Output
immediately. Avoid touching the leaked material or
• Coaxial Digital Output
letting it come into contact with clothing, etc. Clean the
• CD-R, CD-RW Disc Playability
battery compartment thoroughly before installing new
(For details, refer to page 8.)
batteries.
• MP3, WMA Disc Playability
• Do not throw away batteries with general house waste;
• MP3, WMA File Playability Stored on USB Device
dispose of them correctly in accordance with your local
(For details, refer to page 8.)
regulations.
• iPod Playability
■ Handling the remote control
• Program Play (Audio CD only)
• The area between the remote control and this unit must
• Random-Sequence Play
be clear of large obstacles.
• Single Track/File, Entire Disc/Folder/Whole device
• Do not spill water or other liquids on the remote
Repeat Play
control.
• Repeat A-B Play (Audio CD only)
• Do not drop the remote control.
• Adjustable Display Information and Brightness
• Do not leave or store the remote control in the
• PURE DIRECT Function
following types of conditions:
■ Supplied accessories
– places of high humidity, such as near a bath
Please check that you have received all of the following
– places of high temperature, such as near a heater or a
parts.
stove
• Power cable
– places of extremely low temperatures
• Remote control
– dusty places
• Batteries (AA, R6, UM-3) (×2)
• Do not expose the remote control sensor to strong
• RCA stereo cable
lighting, in particular, an inverter type fluorescent
lamp; otherwise, the remote control may not work
■ Notes on batteries
properly. If necessary, position this unit away from
• Change all of the batteries if you notice that the
direct lighting.
operation range of the remote control decreases.
• Use AA, R6, UM-3 batteries.
■ About this manual
• Make sure that the polarities are correct. See the
• y indicates a tip for your operation.
illustration inside the battery compartment.
• In this manual, audio CDs are referred to as “Audio
• Remove the batteries if the remote control is not used
CD”, MP3/WMA discs as “Data Disc”, and MP3/
for an extended period of time.
WMA files stored on the USB device as “USB”.
• Do not use old batteries together with new ones.
• The , and
Audio CD Data Disc USB
• Do not use different types of batteries (such as alkaline
icons indicate music data formats that can be used in
and manganese batteries) together. Read the packaging
the operation.
English
carefully as these different types of batteries may have
• This manual is printed prior to production. Design and
the same shape and color.
specifications are subject to change in part as a result of
improvements, etc. In case of differences between the
manual and the product, the product has priority.
1 En
INTRODUCTION
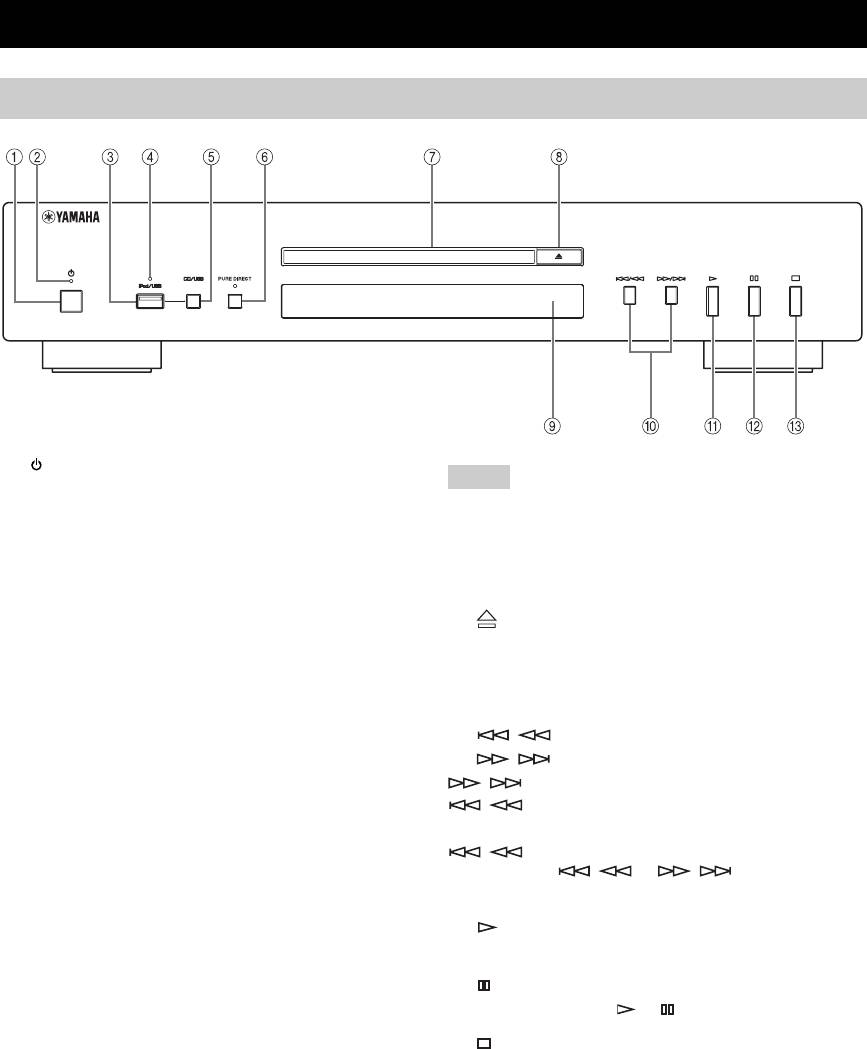
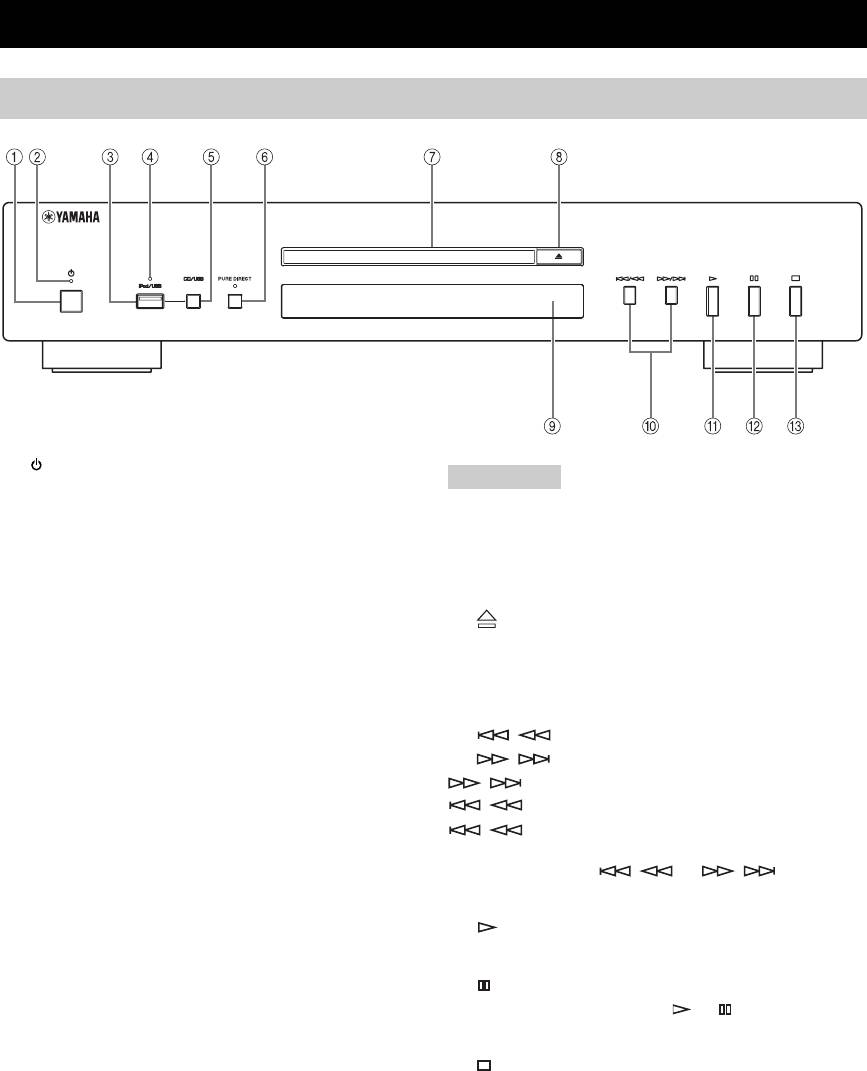
CONTROLS AND FUNCTIONS
Front panel
1 (Power)
Note
Press to turn the power on/off.
Connect using the ANALOG OUT terminals when you use
y
PURE DIRECT mode (refer to page 3).
• The power indicator above lights up when this unit is turned on.
• Playback starts automatically if the power is turned on while a
7 Disc tray
disc is set in the disc tray.
Loads a disc.
2 Power indicator
8 (Open/Close)
Lights up as follows:
Opens or closes the disc tray.
ON: Bright
OFF: Off
9 Remote control sensor
Receives signals from the remote control.
3 iPod/USB port
Connect your iPod or USB device. See page 6 for details.
0 / (Skip/Search backward),
/ (Skip/Search forward)
4 iPod/USB indicator
/ : Skips to the next track.
Off: CD mode is selected.
/ : Skips back to the beginning of the current
Orange: Connection ready.
track.
Green: iPod/USB is connected and playable files have
/ (twice): Skips to the previous track.
been detected (playback ready).
Press and hold / or / to search
5 CD/USB
backward/forward.
Swithes between CD mode and iPod/USB mode (see
A (Play)
page 6).
Starts playback.
y
B (Pause)
When the iPod/USB indicator is not lit, this unit is in the CD
mode.
Pauses playback. Press or to resume playback.
6 PURE DIRECT
C (Stop)
Turns on or off the PURE DIRECT mode to improve
Stops playback.
audio quality.
y
• The PURE DIRECT indicator lights up.
• The digital output is turned off.
• The front panel display is turned off during playback and only
the minimum required indicators and messages are displayed
during in the operation.
2 En
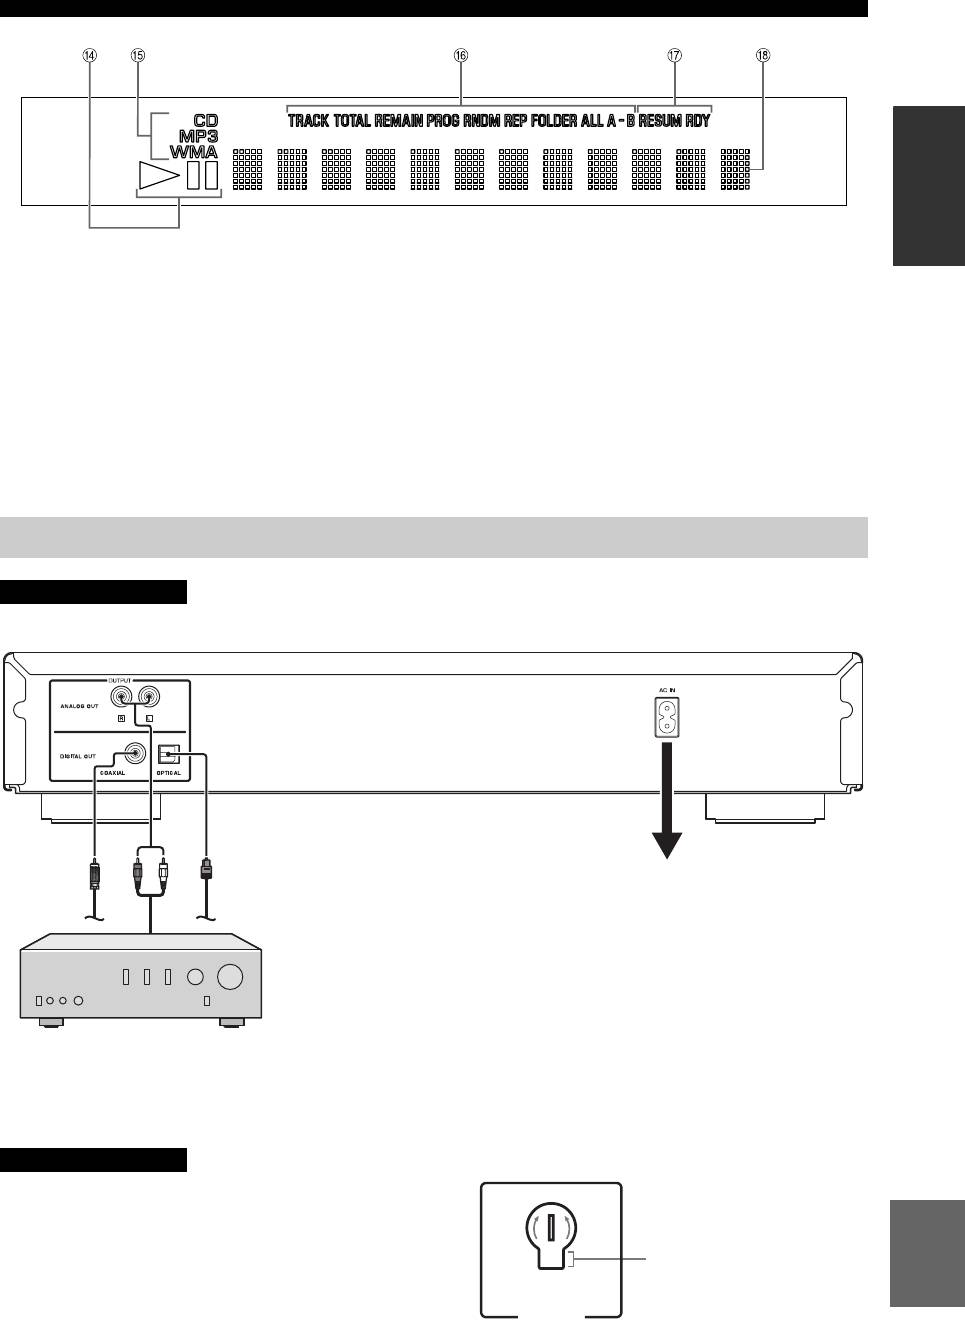
CONTROLS AND FUNCTIONS
INTRODUCTION
D Playback Status Indicator
G Advanced setup indicator
Lights up when this unit is in the play or pause mode.
Indicates the enabled special modes. See “USING THE
ADVANCED SETUP” (page 9) for details.
E Source type indicator
Indicates the type of content being played back.
H Multi-information display
F Time and playback mode indicator
Indicates the current playback mode and the status of the
time display (see pages 5 and 5 for playback modes, and
page 5 for time display).
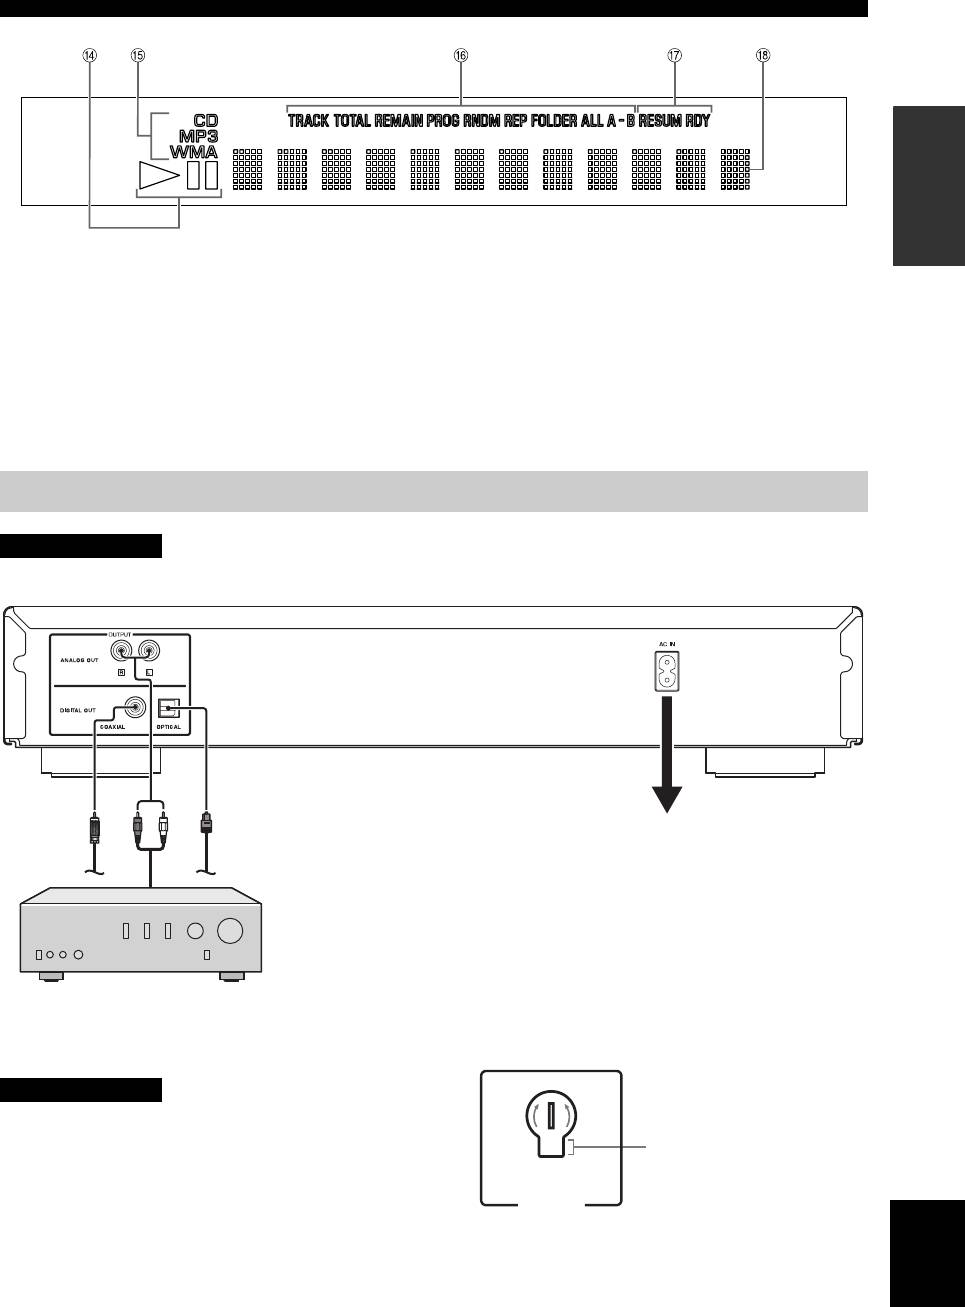
Rear panel connections
CAUTION
Before making any connection, switch OFF the power to the unit, the amplifier and any other component.
Audio cable (supplied)
Optical digital cable
cable
Coaxial digital
Connect the supplied power cable into
the AC IN inlet on the rear panel when
all connections are complete, and then
plug in the power cable to the AC outlet.
The audio signals are only output from the ANALOG OUT jacks
when the PURE DIRECT mode is on.
Amplifier
■ VOLTAGE SELECTOR
Voltages are as follows:
(Asia and General models only)
...............AC 110/120/220/230-240 V, 50/60 Hz
CAUTION
The VOLTAGE SELECTOR on the rear panel of this unit
230-
must be set for your local voltage BEFORE plugging the
240V
Voltage indication
power cable into the AC wall outlet. Improper setting of
the VOLTAGE SELECTOR may cause damage to this
VO LTAGE
SELECTOR
unit and create a potential fire hazard.
English
Rotate the VOLTAGE SELECTOR clockwise or
counterclockwise to the correct position using a straight
slot screwdriver.
3 En
CONTROLS AND FUNCTIONS
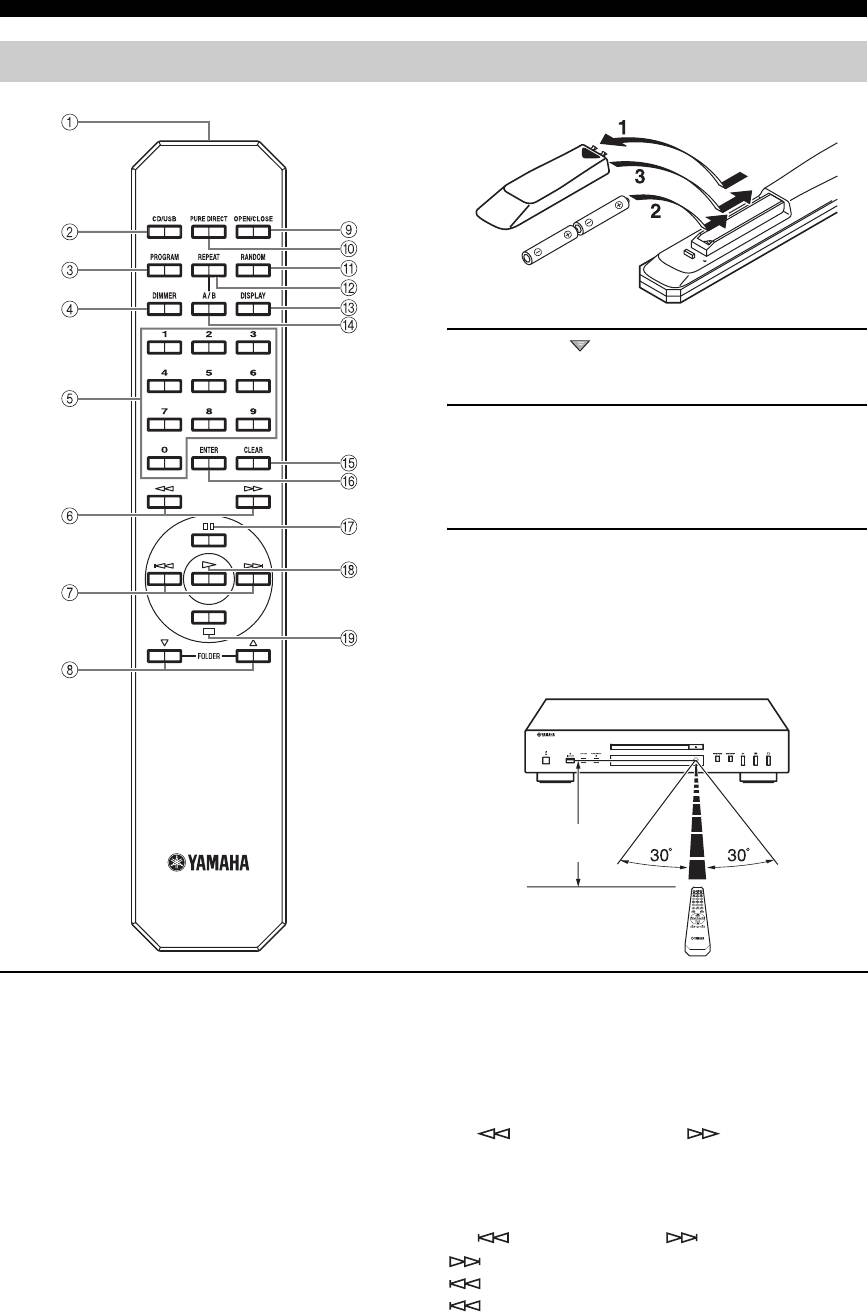
Remote control
■ Installing batteries in the remote control
1 Press the part and slide the battery
compartment cover off.
2 Insert the two supplied batteries (AA, R6,
UM-3) according to the polarity markings (+
and –) on the inside of the battery
compartment.
3 Slide the cover back until it snaps into place.
■ Using the remote control
The remote control transmits a directional infrared beam.
Be sure to aim the remote control directly at the remote
control sensor on the front panel of this unit during
operation.
Within 6 m
(20 ft)
1 Infrared signal transmitter
y
Sends infrared signals to this unit.
This setting is retained even if you turn off this unit.
2 CD/USB
5 Numeric buttons
Switches between CD mode and iPod/USB mode (see
Use to select directly a track on the disc or a file in the
page 6).
current folder.
y
6 (Search backward), (Search
This setting is retained even if you turn off this unit.
forward)
Searches tracks backward/forward while the key is
3 PROGRAM
pressed.
Turns on or off the program playback mode. See
“Program playback” on the next page.
7 (Skip backward), (Skip forward)
: Skips to the next track.
4 DIMMER
: Skips back to the beginning of the current track.
Each time you press DIMMER, the brightness level
(twice): Skips to the previous track.
changes by 4 levels.
4 En
CONTROLS AND FUNCTIONS
8 FOLDER (Folder down), (Folder up)
D A/B
Audio CD
Data Disc USB
Repeats playback of a specified section of a track. To set
: Skips to the previous folder.
the starting and end points (A and B), press A/B twice
: Skips to the next folder.
during playback.
INTRODUCTION
Refer to page 6 for details.
To cancel repeat A-B, press A/B again.
9 OPEN/CLOSE
Notes
Opens or closes the disc tray.
• You cannot set repeat A-B from one track to another track.
0 PURE DIRECT
• You cannot set repeat A-B for Data Disc and USB.
• If you stop playback by pressing (Stop), repeat A-B is canceled.
Turns on or off the PURE DIRECT mode to improve
• You cannot use repeat A-B when this unit is in the PURE
audio quality. See page 2 for details.
DIRECT mode.
y
E CLEAR
This setting is retained even if you turn off this unit.
Erases the programmed track.
A RANDOM
F ENTER
Turns on or off the random sequence playback mode.
Confirms a track number entered when you are
Note
programming tracks.
The random playback mode is canceled when the disc is ejected.
G (Pause)
B REPEAT
Pauses playback. Press or to resume playback.
Repeats playback of a single track or all tracks. Each time
H (Play)
you press REPEAT during playback, the repeat playback
Starts playback.
mode changes as follows:
• REP TRACK (single repeat playback): A single track
See pages 8 for more information on MP3/WMA
is played back repeatedly.
playback.
• REP ALL (all repeat playback): All tracks (the entire
disc) are played back repeatedly.
I (Stop)
Data Disc USB
Stops playback.
• REP FOLDER (folder repeat playback): All files (the
entire folder) are played back repeatedly.
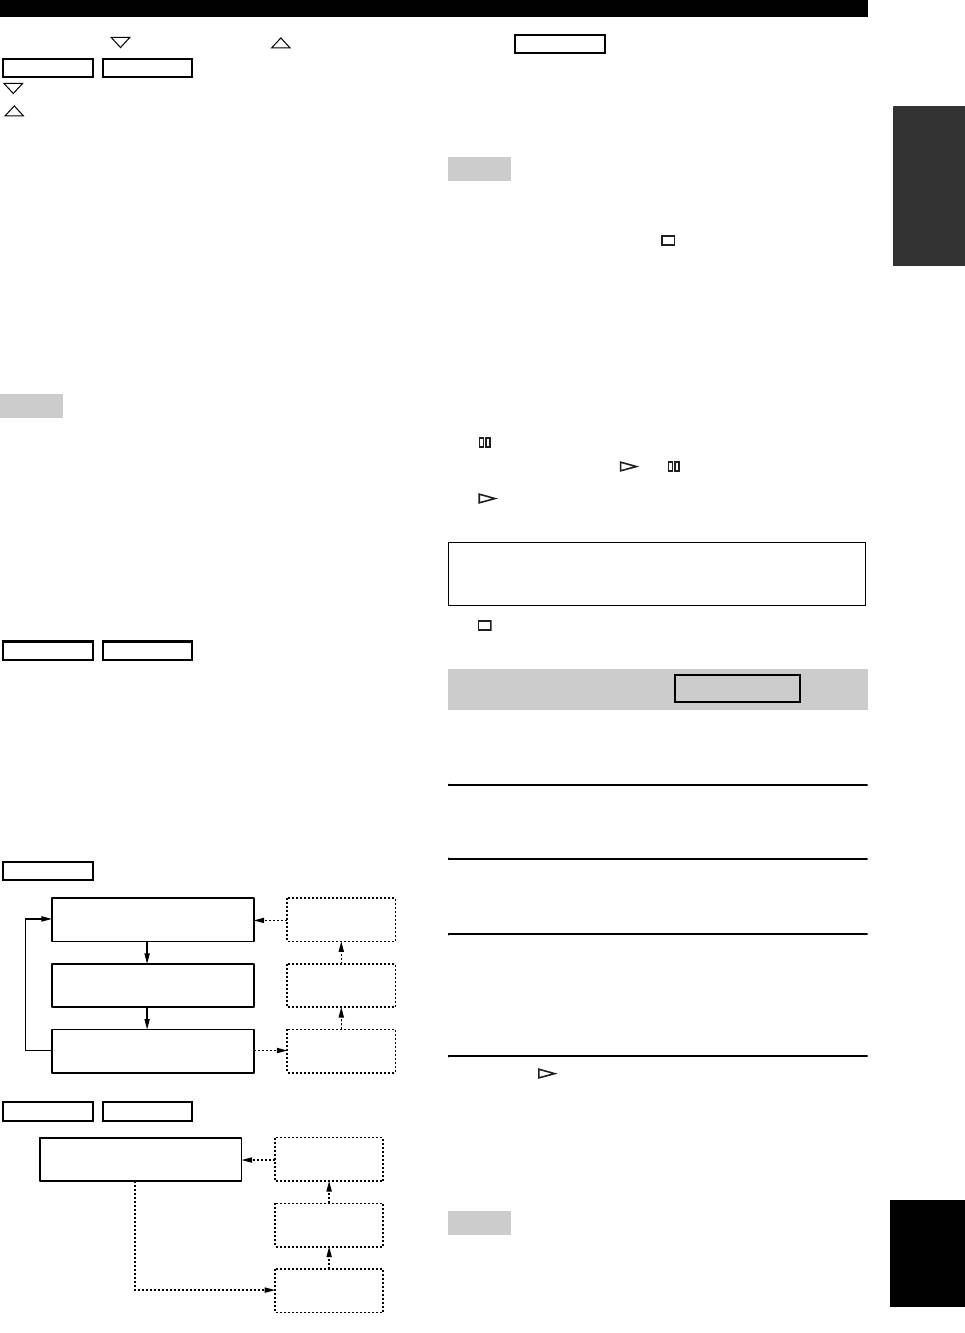
Program playback
Audio CD
y
In the program playback mode, you can play back tracks
Repeat play also works with program play and random-sequence
in a programmed sequence.
play.
C DISPLAY
1 Press PROGRAM while playback is stopped.
Switches the time display. Each time you press DISPLAY
This unit is set to the program editing mode.
during playback, the time display changes as follows:
Audio CD
2 Select a track by using the numeric buttons
and ENTER.
Elapsed time of the current
Album name
track (default)
3 Repeat step 2 to program the next track.
Remaining time of the current
Artist name
You can program up to 24 tracks.
track
y
To cancel the programmed track, press CLEAR.
Total remaining time of the
Track name
disc
4 Press .
(CD TEXT disc only)
Playback starts from the beginning of the
Data Disc USB
programmed sequence.
Elapsed time of the current
Album name
y
file (default)
To erase all programmed tracks, press CLEAR when the
playback is stopped.
Artist name
English
Note
The programmed tracks are erased when the disc is ejected or this
Title
unit is turned off.
(Files including tag
information only)
5 En
OPERATION
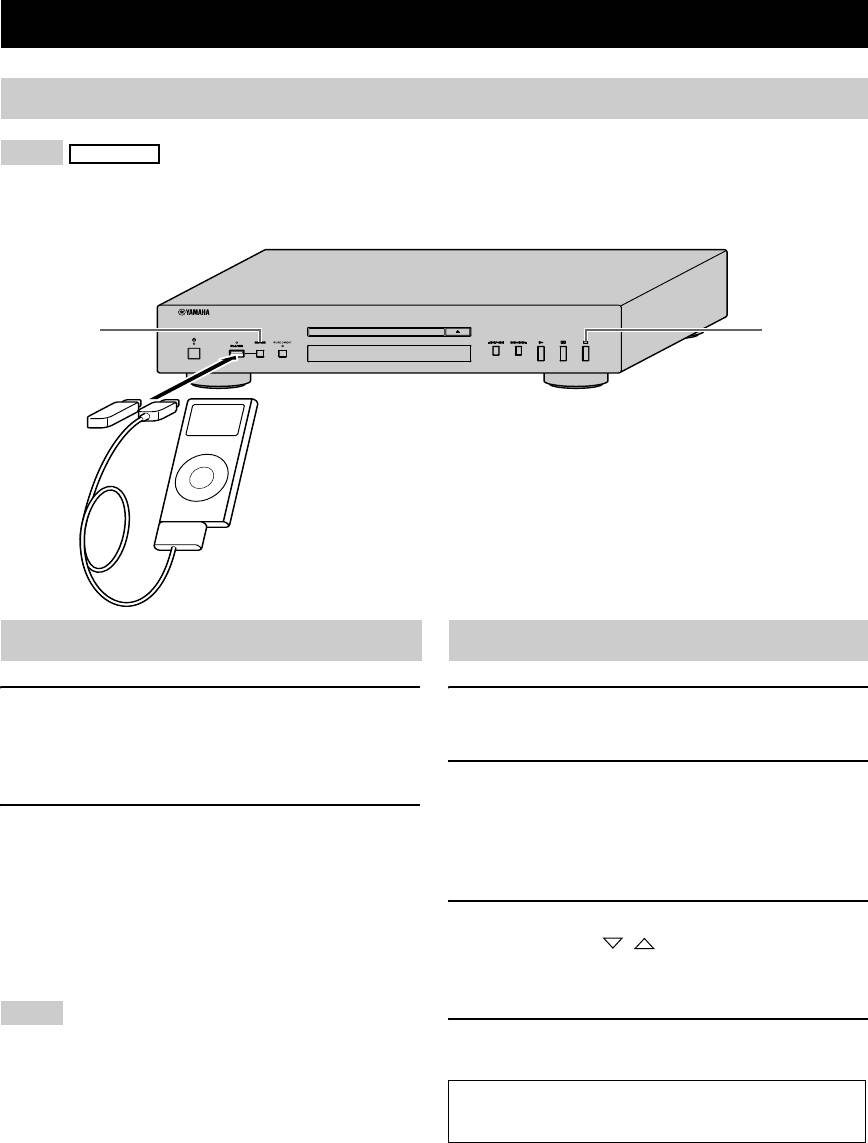
PLAYING BACK iPod/USB DEVICE
Connecting iPod/USB devices
Notes
iPod
• Use the USB cable supplied with your iPod. If no USB cable is supplied, purchase one from Apple Inc.
• Turn off your iPod.
• Do not use a USB hub.
1
4
Connect your USB device or iPod via USB cable
Playing back iPod
Playing back USB devices
1 Press CD/USB to select the iPod/USB mode.
1 Press CD/USB to select the iPod/USB mode.
The iPod/USB indicator on the front panel lights up
The iPod/USB indicator on the front panel lights up.
in orange, then changes to green when playback is
ready.
2 Start playback.
Filename is displayed in the front panel display and
2 Start playback.
playback starts automatically in order by date and
Operate your iPod to start playback, select a track,
time of creation if playable files are in the USB
pause, and stop playback.
device.
y
You can also use the following buttons: p (Playback), e
3 Select a track.
(Pause), s (Stop), b (Skip backward), a (Skip forward),
Press FOLDER / on the remote control to
w (Search backward), and f (Search forward) on this unit
select a folder, and then press b/a or numeric
or Remote Control.
buttons to select a track.
Note
4 Stop playback.
iPod may not function properly with this unit if software on iPod
is not updated. Be sure to use the latest version of iPod software.
Press s (Stop).
See pages 8 for more information on MP3/WMA
playback.
6 En

PLAYING BACK iPod/USB DEVICE
Disconnecting iPod/USB devices
Stop playback, and then disconnect your iPod or USB
device. It is recommended that you press CD/USB to
switch to the CD mode, confirm that the CD/USB
indicator goes off, and then disconnect your iPod/USB
device.
CAUTION
Do not disconnect your iPod or USB device while playing
back from the connected device, or while “USB
READING” appears in the front panel display.
OPERATION
Supported iPod/USB devices
■ Supported iPod models
• iPod classic (including 120GB model)
• iPod nano (2nd, 3rd and 4th generations)
• iPod touch (1st and 2nd generations)
(as of April 2009)
Notes
• iPod is licensed on the condition that individuals perform
privately duplication and playback of uncopyrighted material or
material legally approved of duplication and playback.
Infringement of copyright is prohibited by law.
• Yamaha and suppliers accepts no liability for the loss of data
saved on iPod connected to this unit. As a precaution, it is
recommended that the files are made backup copies.
■ Supported USB devices
This unit supports USB mass storage class devices (e.g.,
flash memories, card readers or portable audio players)
that use FAT16 or FAT32 format.
Notes
• Some devices may not work properly even if they meet the
requirements.
• This unit does not support encrypted USB memory devices.
• Do not connect devices other than USB mass storage class
devices: USB chargers, USB hubs, PCs, external HDD, etc.
• When you insert two or more memory cards at the same time
into a card reader connected to the iPod/USB port on this unit,
only one of the memory cards is recognized.
• Yamaha and suppliers accepts no liability for the loss of data
saved on the USB devices connected to this unit. As a
precaution, it is recommended that the files are made backup
copies.
• Playability of and power supply to all kinds of USB devices are
not guaranteed.
English
7 En
ADDITIONAL INFORMATION
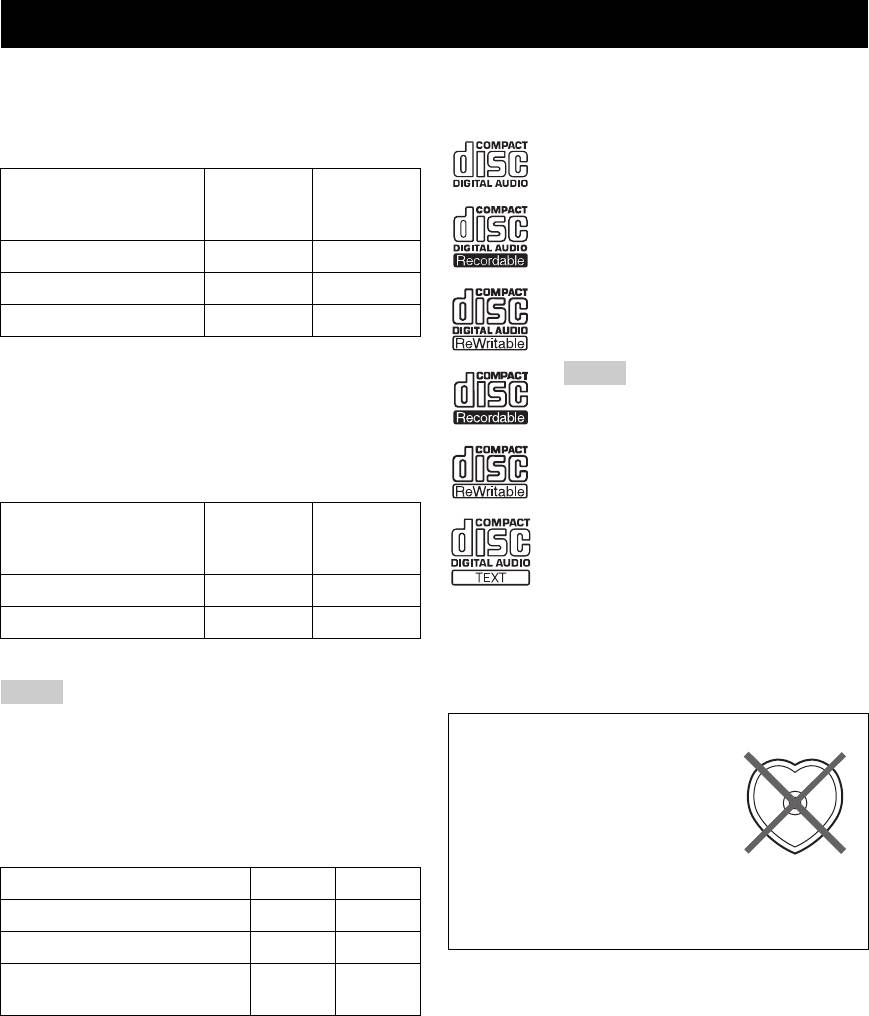
PLAYABLE DISC AND FILE FORMAT
■ Playable MP3 and WMA files (USB
■ Playable discs
device and Data Disc)
Use compact discs bearing the marks below.
MP3
....
Compact discs (digital audio)
Sampling
Bitrate
Format
frequency
....
(kbps)
CD-R, CD-RW digital audio discs
(kHz)
• CD-R or CD-RW discs bearing one of
MPEG 1 Audio Layer-3
32-320 * 32/44.1/48
the following phrases.
FOR CONSUMER
MPEG 2 Audio Layer-3, 2
8-160 * 16/22.05/24
FOR CONSUMER USE
MPEG-2.5 Audio Layer-2
8-160 * 8/11.025/12
FOR MUSIC USE ONLY
• Finalized CD-R or CD-RW discs.
* Variable bitrate is also supported.
Note
WMA
This compact disc player may not be able to
• Version 8
play some CD-R/CD-RW discs or discs on
• Version 9 (Standard and variable bitrates are
which recording was not made correctly.
supported. Professional and Lossless are not
supported.)
Sampling
....
CD-TEXT discs
Bitrate
Profile
frequency
(kbps)
• The disc title, artist name, and track
(kHz)
name are also displayed in addition to
High Profile
32-320 * 32/44.1/48
the time displays when playing back a
CD with CD TEXT.
Mid Profile
16-32 16/22.05
* Variable bitrate is also supported.
To play back an 8-cm (3-inch) CD
Place it in the inner recessed area of the disc tray. Do not
Notes
put a normal (12-cm) CD on top of an 8-cm (3-inch) CD.
• Playback for Data Disc starts in alphanumeric order.
To prevent a malfunction of this unit:
• Playback for USB starts in order by date and time of creation.
• Do not use any nonstandard
• Copyright-protected WMA (DRM) files cannot be played back
shaped disc (heart, etc.) available
by this unit.
• The disc must be ISO 9660 compatible.
on the market because it might
• Elapsed time may not be displayed correctly while playing back
damage the unit.
variable bitrate contents.
Data Disc USB
• Do not use a disc with tape, stickers, or paste on it. If
you use such a disc, the disc may get stuck in the
Maximum file number
999 32767
unit, or damage to the unit may result.
Maximum folder number
256 256
Maximum file number per
512 512
folder
8 En
PLAYABLE DISC AND FILE FORMAT
■ Handling compact discs
• Use a soft-tipped pen when writing on the label side of
• Always handle with care so that the playing surface is
the disc.
not scratched. Do not warp discs.
• When a disc is not being used, remove it from this unit
and store in an appropriate case.
• Do not expose discs to direct sunlight, high
temperature or high humidity for a long time.
• To keep clean the playing surface, wipe with a clean,
Note: Do not use any lens cleaners as they may be a
cause of malfunction.
dry cloth. Do not use any type of disc cleaner, spray, or
any other chemical-based liquid.
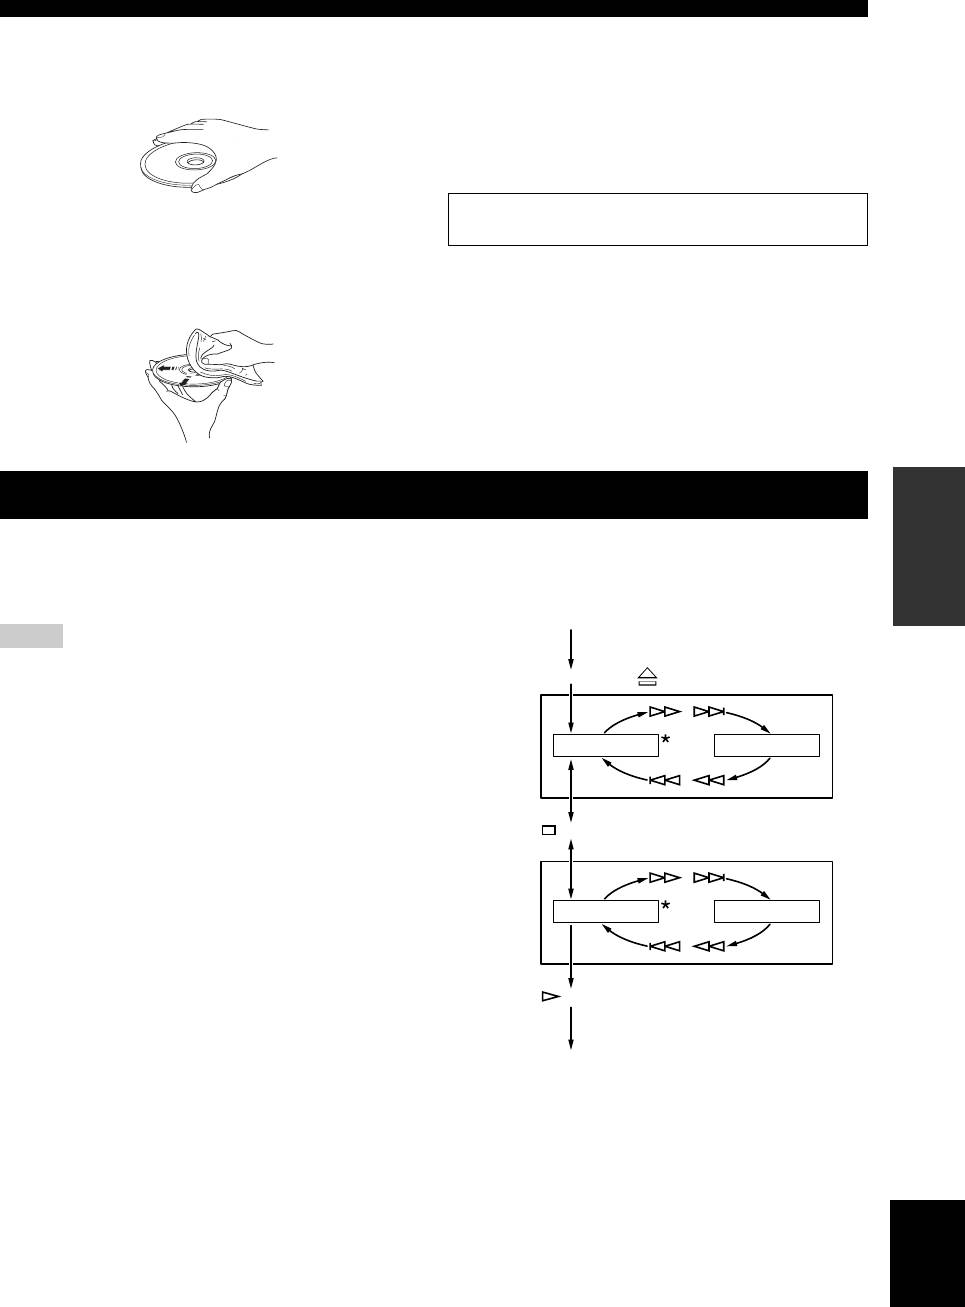
• Do not wipe with a circular motion; wipe straight
outward from the center.
INFORMATION
ADDITIONAL
USING THE ADVANCED SETUP
This unit is equipped with the following two special
To activate and configure Advanced setup, follow the
modes, which may be useful for special purposes at stores
steps below. Use the buttons on the front panel.
or offices.
POWER OFF
Note
Activate
Advanced
The special mode functions are incompatible with iPod.
setup
PURE DIRECT + (Open/Close) + POWER ON
Play mode
Play mode memory
memory
/
Retains the current playback mode (REPEAT and
RANDOM) after turning off the power, saving the time of
PLAY MEM OFF PLAY MEM ON
setting the playback mode again each time you turn on the
/
power.
The RESUM indicator in the front panel display lights up
(Stop)
when enabled.
Ready
Ready mode
mode
/
Pauses playback after each track, allowing you to start the
RDY MODE OFF RDY MODE ON
next track at any desired timing.
The RDY indicator in the front panel display lights up
/
when enabled.
Store
(Play)
settings
POWER OFF
*: Default Setting
Next time you turn on the power, the unit turns on with
the settings that you specified above.
English
9 En

TROUBLESHOOTING
If the unit fails to operate normally, check the following points to determine whether the problem can be corrected by the
simple measures suggested. If it cannot be corrected, or if the problem is not listed in the Problems column, disconnect
the power cable and contact your authorized Yamaha dealer or service center for help.
Refer to
Problems Possible Causes Solutions
page
This unit fails to turn
The power cable is not connected to the AC IN
Connect the power cable firmly.
on.
inlet on the rear panel or not plugged in the wall
3
outlet.
The disc tray does
A foreign object is obstructing the tray. Carefully check the disc tray and remove the
—
not close completely.
foreign object.
Disc playback does
The disc is damaged. Check the disc carefully; replace it if necessary. —
not start.
There is moisture on the laser pickup. Wait 20 to 30 minutes after turn on this unit ON
—
before trying to play back a disc.
The disc is loaded upside down. Reload the disc with the label side up. —
The disc is dirty. Clean the disc. 9
The format of the MP3 or WMA file is not
Replace the disc with a correctly recorded disc
9
compatible with this unit.
playable with this unit.
The CD-RW (ReWritable) disc is not recorded
Replace the disc with a correctly recorded disc
9
correctly.
playable with this unit.
The disc is a non-standard disc not playable with
Replace the disc with a correctly recorded disc
9
this unit.
playable with this unit.
This unit is in iPod/USB mode. Switch to disc mode by pressing CD/USB. 2
iPod playback does
The connected iPod is not compatible with this
Connect an iPod compatible with this unit.
not start though iPod
unit.
The compatible iPod are as follows:
is connected.
• iPod classic (including 120GB model)
7
• iPod nano (2nd, 3rd and 4th generations)
• iPod touch (1st and 2nd generations)
(As of April 2009)
This unit is in disc mode. Switch to iPod/USB mode by pressing CD/
6
USB.
USB playback does
Improper USB device connections. Connect the USB device again. 6
not start.
The format of the MP3 or WMA file is not
Replace the file with a correctly recorded file
8
compatible with this unit.
playable with this unit.
This unit is in disc mode. Switch to iPod/USB mode by pressing CD/
6
USB.
Playback is delayed,
The disc may be scratched or damaged. Check the disc carefully; replace it if necessary.
or begins at the
8
wrong place.
No sound. Improper output cable connections. Connect the cables properly. If the problem
3
persists, the cables may be defective.
Improper amplifier operation. Set the amplifier controls to the correct input
—
selection.
Sound of a
PURE DIRECT is turned on. Turn PURE DIRECT off. Or make an analog
component
connection.
connected to the
2, 3
DIGITAL OUT jacks
is not played.
10 En

TROUBLESHOOTING
Refer to
Problems Possible Causes Solutions
page
Sound “skips”. This unit is being subjected to vibrations or
Relocate this unit.
—
impacts.
The disc is dirty. Clean the disc. 8
Sound “hums”. Improper cable connections. Securely connect the audio cables. If the
3
problem persists, the cables may be defective.
Noise from a nearby
The tuner is too close to this unit. Move the tuner and this unit farther apart or turn
—
tuner.
off this unit.
Noise from inside of
The disc may be warped. Replace the disc.
—
the disc tray.
The remote control
Wrong distance or angle. The remote control functions within a
does not work or
maximum range of 6 m (20 ft) and no more than
4
function properly.
30 degrees off-axis from the front panel.
Direct sunlight or lighting (from an inverter type
Reposition this unit.
of fluorescent lamp, etc.) is striking the remote
—
control sensor of this unit.
The batteries are weak. Replace all batteries. 4
INFORMATION
ADDITIONAL
SPECIFICATIONS
Audio Section
General
• Frequency response ..................................... 2 Hz - 20 kHz, ± 0.5 dB
• Power requirements
U.S.A. and Canada models .............................. AC 120 V, 60 Hz
• Harmonic distortion + noise (1 kHz).........................0.003 % or less
Australia model ................................................AC 240 V, 50 Hz
• S/N ratio.................................................................... 105 dB or more
Europe and U.K. models .................................. AC 230 V, 50 Hz
• Dynamic range............................................................ 96 dB or more
Asia and General models ...... AC 110-120/220-240 V, 50/60 Hz
China model .....................................................AC 220 V, 50 Hz
• Output voltage (1 kHz, 0 dB) ...........................................2.0 ± 0.3 V
• Operating temperature............... +5 °C to +35 °C (+41 °F to +95 °F)
Laser Diode Properties
• Power consumption................................................................... 13 W
• Material..................................................................................GaAlAs
• Dimensions (W × H × D)................................... 435 × 86 × 260 mm
• Wavelength.............................................................................790 nm
• Weight ...................................................................................... 3.5 kg
• Laser Output ..............................................................max. 1.23 μW*
Please note that all specifications are subject to change
* This output is the value measured at a distance of about 200 mm
without notice.
from the objective lens surface on the Optical Pick-up Block.
iPod™
“iPod” is a trademark of Apple Inc., registered in U.S. and
other countries.
“Made for iPod” means that an electronic accessory has
been designed to connect specifically to iPod and has been
certified by the developer to meet Apple performance
standards.
Apple is not responsible for the operation of this device or
its compliance with safety and regulatory standards.
English
11 En
ATTENTION : VEUILLEZ LIRE CE QUI SUIT AVANT D’UTILISER L’APPAREIL.
1 Pour utiliser l’appareil au mieux de ses possibilités, lisez
14 Ne tentez pas de modifier ni de réparer l’appareil. Consultez
attentivement ce mode d’emploi. Conservez-le soigneusement
le service Yamaha compétent pour toute réparation qui serait
pour référence.
requise. Le coffret de l’appareil ne doit jamais être ouvert,
2 Installez cet ensemble audio dans un endroit bien ventilé,
quelle que soit la raison.
frais, sec et propre. Veillez à ce qu’il soit à l’abri de la lumière
15 Si vous envisagez de ne pas vous servir de l’appareil pendant
du soleil, des sources de chaleur, des vibrations, de la
une longue période (par exemple, pendant les vacances),
poussière, de l’humidité et du froid. Pour une ventilation
débranchez la fiche du cordon d’alimentation au niveau de la
correcte, ménagez les espaces minimums suivants:
prise secteur.
Haut: 2,5 cm
16 Installez cet appareil à proximité de la prise secteur et à un
Arrière: 2,5 cm
emplacement où la fiche d’alimentation est facilement
Côtés: 2,5 cm
accessible.
3 Placez l’appareil loin des équipements, moteurs et
17 Lisez la section intitulée « GUIDE DE DÉPANNAGE » où
transformateurs électriques, pour éviter les ronflements
figurent une liste d’erreurs de manipulation ordinaires avant
parasites.
de conclure à une anomalie une anomalie de l’appareil.
4 N’exposez pas l’appareil à des variations brutales de
18 Avant de déplacer cet appareil, appuyez sur pour le mettre
température, ne le placez pas dans un environnement très
hors tension, puis débranchez la fiche câble d’alimentation de
humide (par exemple dans une pièce contenant un
la prise murale.
humidificateur) car cela peut entraîner la condensation
19 Les piles ne doivent pas être exposées à une chaleur extrême,
d’humidité à l’intérieur de l’appareil qui elle-même peut être
par exemple au soleil, à une flamme, etc.
responsable de décharge électrique, d’incendie, de dommage
20 VOLTAGE SELECTOR
à l’appareil ou de blessure corporelle.
(Modèles pour l’Asie et Standard uniquement)
5 Evitez d’installer l’appareil dans un endroit où des objets
Le commutateur VOLTAGE SELECTOR placé sur le
peuvent tomber, ainsi que là où l’appareil pourrait être exposé
panneau arrière de cet appareil doit être convenablement
à des éclaboussures ou des gouttes d’eau. Sur le dessus de
positionné AVANT de brancher la fiche du cordon
l’appareil, ne placez pas :
d’alimentation secteur. Les tensions d’alimentation possibles
– d’autres appareils qui peuvent endommager la surface de
sont :
l’appareil ou provoquer sa décoloration.
.................................... CA 110/120/220/230–240 V, 50/60 Hz
– des objets se consumant (par exemple, une bougie) qui
peuvent être responsables d’incendie, de dommage à
L’appareil est relié au bloc d’alimentation tant qu’il
l’appareil ou de blessure corporelle.
reste branché à la prise de courant murale, même si
– des récipients contenant des liquides qui peuvent être à
vous mettez l’appareil hors tension en appuyant sur .
l’origine de décharge électrique ou de dommage à
l’appareil.
6 Ne couvrez pas l’appareil d’un journal, d’une nappe, d’un
AVERTISSEMENT
rideau, etc. car cela empêcherait l’évacuation de la chaleur.
POUR RÉDUIRE LES RISQUES D’INCENDIE OU
Toute augmentation de la température intérieure de l’appareil
DE DÉCHARGE ÉLECTRIQUE, N’EXPOSEZ PAS
peut être responsable d’incendie, de dommage à l’appareil ou
CET APPAREIL À LA PLUIE OU À L’HUMIDITÉ.
de blessure corporelle.
7 Ne branchez pas la fiche du cordon d’alimentation de
SÉCURITÉ LASER
l’appareil sur une prise secteur aussi longtemps que tous les
L’appareil utilise un laser. En raison des risques de blessure des yeux,
raccordements n’ont pas été effectués.
le retrait du couvercle ou les réparations de l’appareil devront être
8 Ne pas faire fonctionner l’appareil à l’envers. Il risquerait de
confiés exclusivement à un technicien d’entretien qualifié.
chauffer et d’être endommagé.
DANGER
9 N’exercez aucune force excessive sur les commutateurs, les
Risque d’exposition au laser en cas d’ouverture. Eviter l’exposition
boutons et les cordons.
directe des yeux au faisceau. Lorsque cet appareil est branché à la
10 Pour débrancher la fiche du cordon d’alimentation au niveau
prise de courant, ne pas approcher les yeux de l’ouverture du plateau
de la prise secteur, saisissez la fiche et ne tirez pas sur le
changeur et des autres ouvertures pour regarder à l’intérieur.
cordon.
11 Ne nettoyez pas l’appareil au moyen d’un solvant chimique,
Le laser de cet appareil peut émettre un rayonnement
ce qui pourrait endommager la finition. Utilisez un chiffon sec
dépassant les limites de la classe 1.
et propre.
12 N’alimentez l’appareil qu’à partir de la tension prescrite.
Alimenter l’appareil sous une tension plus élevée est
dangereux et peut être responsable d’incendie, de dommage à
l’appareil ou de blessure corporelle. Yamaha ne saurait être
tenue responsable des dommages résultant de l’alimentation
de l’appareil sous une tension autre que celle prescrite.
13 Pour empêcher tout dommage causé par les éclairs,
déconnectez le cordon d’alimentation et toute antenne
extérieure de la prise murale pendant un orage.
i Fr

SOMMAIRE
INTRODUCTION
INTRODUCTION
INFORMATIONS SUPPLÉMENTAIRES
COMMANDES ET FONCTIONS........................ 2
FORMAT DE DISQUE ET FICHIER
Panneau avant ............................................................ 2
LISIBLES.............................................................8
Connexions du panneau arrière ................................. 3
UTILISER LE RÉGLAGE AVANCÉ ..................9
Télécommande........................................................... 4
GUIDE DE DÉPANNAGE...................................10
Lecture programmée ............................... 5
Audio CD
CARACTÉRISTIQUES TECHNIQUES............11
OPÉRATIONS
OPÉRATIONS
LECTURE iPod/PÉRIPHÉRIQUE USB ............. 6
Connexion des iPod/périphériques USB ................... 6
Lecture de l’iPod........................................................ 6
Lecture des périphériques USB ................................. 6
Débrancher les iPod/périphériques USB ................... 7
iPod/périphériques USB pris en charge..................... 7
• Si les piles ont fui, mettez-les au rebut immédiatement.
SUPPLÉMENTAIRES
■ Caractéristiques
INFORMATIONS
• Sortie numérique optique
Dans la mesure du possible, ne touchez pas le produit
• Sortie numérique coaxiale
qui a fui et évitez qu’il ne vienne en contact avec vos
• Lisibilité disque CD-R, CD-RW
vêtements, etc. Nettoyez soigneusement le logement
(Pour plus de détails, reportez-vous à la page 8).
des piles avant de mettre en place des piles neuves.
• Lisibilité disque MP3, WMA
• Ne vous débarrassez pas des piles comme s’il s’agissait
• Lisibilité fichier MP3, WMA enregistré sur un
ordures ménagères; traitez-les conformément à la
périphérique USB
réglementation locale.
(Pour plus de détails, reportez-vous à la page 8).
■ Manipulation du boîtier de télécommande
• Lisibilité de l’iPod
• Entre le boîtier de télécommande et l’appareil l’espace
• Lecture programmée (Audio CD uniquement)
doit être libre d’obstacles.
• Lecture en séquence aléatoire
• Ne renversez aucun liquide sur le boîtier de télécommande.
• Lecture répétée de plage unique/fichier, tout le disque/
• Ne laissez pas tomber le boîtier de télécommande.
fichier/périphérique en entier
• Ne conservez pas, ne rangez pas le boîtier de
• Lecture répétée A-B (Audio CD uniquement)
télécommande dans les endroits suivants:
• Réglage des informations de l’afficheur et de la luminosité
– très humides, par exemple près d’un bain
• Fonction PURE DIRECT
– très chauds, par exemple près d’un appareil de
chauffage ou d’un poêle
■ Accessoires fournis
– exposés à des températures très basses
Vérifiez que vous avez bien reçu tous les éléments suivants.
– poussiéreux
• Cordon d’alimentation
• Ne pas exposer le capteur de télécommande à une
• Télécommande
lumière puissante, en particulier à une lampe fluorescente
• Piles (AA, R6, UM-3) (×2)
à onduleur, sinon le boîtier de télécommande ne
• Câble stéréo RCA
fonctionnera pas correctement. Le cas échéant, faites en
sorte que le boîtier ne soit pas directement éclairé.
■ Remarques concernant les piles
• Changez toutes les piles lorsque vous remarquez que la
■ À propos de ce manuel
portée de la télécommande est plus courte.
• Le symbole y appelle votre attention sur un conseil
• Utilisez des piles AA, R6 ou UM-3.
d’utilisation.
• Assurez-vous que les pôles sont correctement orientés.
• Dans ce manuel, les CD audio sont appelés « Audio
Voir l’illustration à l’intérieur du logement des piles.
CD », les disques MP3/WMA sont appelés « Data
• Retirez les piles si la télécommande n’est pas utilisée
Disc » et les fichiers MP3/WMA enregistrés sur le
pendant un certain temps.
périphérique USB sont appelés « USB ».
• N’utilisez pas tout à la fois des piles neuves et des piles
• Le , et
Audio CD Data Disc USB
usagées.
Français
indiquent les formats de données musicales pouvant
• N’utilisez pas non plus des piles de deux types
être utilisés lors de l’opération.
différents (par exemple, des piles alcalines et des piles
• Ce mode d’emploi a été imprimé avant la fabrication de
au manganèse). Lisez attentivement les indications
l’appareil. Les caractéristiques et la présentation ont pu être
portées sur le boîtier des piles car leur apparence peut
modifiées à fin d’amélioration, etc. En cas de divergence
être la même bien que leur type diffère.
entre le mode d’emploi et l’appareil, ce dernier prime.
1 Fr
INTRODUCTION
COMMANDES ET FONCTIONS
Panneau avant
1 (Mise sous tension)
Remarque
Appuyez sur la touche pour mettre l’appareil sous tension.
Connectez en utilisant les terminaux de ANALOG OUT lorsque
y
vous utilisez le mode PURE DIRECT (voir la page 3).
• Le témoin situé au-dessus de cette touche s’allume lorsque vous
mettez l’appareil sous tension.
7 Plateau du disque
• La lecture démarre automatiquement si vous mettez l’appareil
Pour charger un disque.
sous tension alors qu’un disque est inséré dans le plateau du
CD.
8 (Ouvrir/Fermer)
Pour ouvrir ou fermer le plateau du disque.
2 Témoin de mise sous tension de l’appareil
S’allume selon les descriptions suivantes:
9 Capteur de télécommande
ALLUMÉ: Brillant
Reçoit les signaux émis par la télécommande.
ÉTEINT: Hors tension
0 / (Suivant/Recherche en arrière),
3 Port iPod/USB
/ (Suivant/Recherche en avant)
Connectez votre périphérique iPod ou USB. Pour plus de
/ : Pour passer à la plage suivante.
détails, voir page 6 pour plus de détails.
/ : Pour retourner au début de la plage en cours.
/ (deux fois): Pour retourner à la plage
4 Témoin iPod/USB
précédente.
Éteint: mode CD sélectionné.
Maintenez la touche / ou / enfoncée
Orange: Connexion prête.
pour effectuer une recherche vers l’arrière/avant.
Vert: iPod/USB connecté et les fichiers lisibles ont été
détectés (lecture prête).
A (Lire)
Pour lancer la lecture.
5 CD/USB
Commute entre le mode CD et le mode iPod/USB (voir
B (Pause)
page 6).
Lecture en pause. Appuyez sur ou pour reprendre la
y
lecture.
Lorsque le témoin iPod/USB n’est pas allumé, cet appareil est en
C (Arrêter)
mode CD.
Arrête la lecture.
6 PURE DIRECT
Activez ou désactivez le mode PURE DIRECT pour
améliorer la qualité audio.
y
• Le témoin PURE DIRECT s’allume.
• La sortie numérique est désactivée.
• L’afficheur du panneau avant est désactivé lors de la lecture et
seuls les témoins et les messages minimum requis sont affichés.
2 Fr
COMMANDES ET FONCTIONS
INTRODUCTION
D Témoin du statut de lecture
G Témoin de réglage avancé
S’allume lorsque cet appareil est en mode de lecture ou de
Indique les modes spécifiques activés. Pour plus de
pause.
détails, voir « UTILISER LE RÉGLAGE AVANCÉ »
(page 9).
E Témoin du type de source
Indique le type du contenu de la lecture en cours.
H Affichage d’informations multiples
F Témoin de l’affichage du temps et du mode
de lecture
Indique le mode de lecture en cours et le statut d’affichage
du temps (voir pages 5 et 5 pour les modes de lecture, et
page 5 pour l’affichage du temps).
Connexions du panneau arrière
ATTENTION
Avant d’établir une connexion, veillez à ce que l’appareil, l’amplificateur et tous les autres composants soient hors tension.
Câble audio (fourni)
optique
Câble numérique
câble
Numérique coaxial
Raccordez le cordon d’alimentation à la
prise d’entrée AC IN située sur le panneau
avant lorsque toutes les connexions sont
complètes, puis branchez le cordon
d’alimentation à la prise murale.
Lorsque le mode PURE DIRECT est activé, les signaux audio
sortent uniquement des prises de la ANALOG OUT.
Amplificateur
■ VOLTAGE SELECTOR
Tournez le VOLTAGE SELECTOR dans le sens horaire
(Modèles pour l’Asie et standard
ou antihoraire pour le mettre en position correcte à l’aide
uniquement)
d’un tournevis.
Les tensions sont les suivantes :
ATTENTION
...............................110/120/220/230-240 V CA, 50/60 Hz
Le VOLTAGE SELECTOR situé sur le panneau arrière
Français
de cet appareil doit être réglé sur votre tension secteur
locale AVANT le raccordement du câble d’alimentation
230-
240V
Témoin de tension
fourni à la prise murale CA. Un réglage incorrect du
VOLTAGE SELECTOR peut endommager l’appareil et
créer un risque d’incendie.
VO LTAGE
SELECTOR
3 Fr

COMMANDES ET FONCTIONS
Télécommande
■ Installation des piles dans la télécommande
1 Appuyez sur la partie et faites glisser le
couvercle du compartiment à piles pour le retirer.
2 Insérez les deux piles fournies (AA, R6, UM-
3) en respectant les polarités (+ et –)
indiquées dans le compartiment à piles.
3 Faites glisser le couvercle pour le remettre
en place jusqu’à ce qu’il s’encliquette.
■ Utilisation de la télécommande
La télécommande émet un faisceau infrarouge directionnel.
Veillez à diriger la télécommande directement vers le
capteur de télécommande situé sur le panneau avant de cet
appareil pendant le fonctionnement.
À moins de 6 m
1 Émetteur de signal infrarouge
y
Envoie des signaux infrarouges à cet appareil.
Ce réglage est conservé, même si vous mettez cet appareil hors tension.
2 CD/USB
5 Boutons numériques
Commute entre le mode CD et le mode iPod/USB (voir
À utiliser pour sélectionner directement une plage sur le
page 6).
disque ou un document dans le fichier en cours.
y
6 (Rechercher en arrière),
Ce réglage est conservé, même si vous mettez cet appareil hors tension.
(Rechercher en avant)
Recherche les plages en arrière/en avant lorsque la touche
3 PROGRAM
est enfoncée.
Pour activer ou désactiver le mode de lecture programmée. Pour
plus de détails, voir « Lecture programmée » à la page suivante.
7 (Sauter en arrière), (Sauter en avant)
: Pour passer à la plage suivante.
4 DIMMER
: Pour retourner au début de la plage en cours.
Chaque fois que vous appuyez sur DIMMER, le niveau de
(deux fois): Pour retourner à la plage précédente.
luminosité change de 4 niveaux.
4 Fr
