Yamaha BRX-610 – page 2
Manual for Yamaha BRX-610
Table of contents
- CAUTION: READ THIS BEFORE OPERATING YOUR UNIT.
- WHAT YOU CAN DO WITH THIS UNIT SUPPLIED PARTS
- ABOUT DISCS AND FILES Types of discs/files that can be used with this unit
- Loading a disc Notice for watching 3D video images Disc precautions
- Front panel
- Remote control 4 PROGRAM : Sets the order of playback
- I ZOOM : Zooms in/out. The
- S TOP MENU : Displays the top menu screen
- Rear panel
- Installing the batteries in the remote control Using the remote control
- 5.1-channel speaker layout Connecting speakers
- Connecting the FM antenna Connecting iPod
- Connecting to a TV
- Connecting audio devices (such as a CD or MD player) Connecting a satellite/cable TV tuner Connecting a portable digital music player other than iPod
- NETWORK AND USB CONNECTION Connecting to the NETWORK terminal Connecting to the USB port
- OTHER CONNECTION Connecting the power cable
- INITIAL WIZARD/EASY SETUP Setting with the Initial Wizard/Easy Setup
- BASIC OPERATION
- BASIC OPERATION
- BASIC OPERATION Playing back photo/music/video
- BASIC OPERATION ■ Operations for viewing photos
- BASIC OPERATION Using network content Using network services
- Operation for iPod Operation for CDs
- ADVANCED PLAYBACK OPERATION On Screen menu
- Status menu
- Using Bookmark Using search Program play
- Enjoying BONUSVIEW™ and BD- Live™
- LISTENING TO FM RADIO STATIONS Tuning to radio stations Selecting preset radio stations Presetting radio stations
- Deleting preset stations Displaying Radio Data System information (Russia model only)
- USING USEFUL FUNCTIONS Setting the sleep timer Operating this unit by TV remote control (the HDMI control function)
- USING USEFUL FUNCTIONS ■ Registering HDMI components to TV ■ Changing the connection method and connected components
- SETUP MENU Menu/Submenu Item Function Page
- Menu/Submenu Item Function Page
- Operation for SETUP menu
- SETUP MENU General Setting
- SETUP MENU ■ Playback ■ Network ■ Security
- Display Setting ■ TV
- SETUP MENU ■ Video Process
- Audio Setting ■ Audio Output ■ Post Process ■ System Information ■ Speaker Setting
- About the video output formats When [TV System] is set to [PAL] When [TV System] is set to [Multi]
- SOFTWARE UPGRADE Upgrading the software
- TROUBLESHOOTING General Problem Cause Remedy Page
- Problem Cause Remedy Page
- Radio reception Problem Cause Remedy Page iPod Status message Cause Remedy Page Problem Cause Remedy Page
- Problem Cause Remedy Page USB Status message Cause Remedy Page Problem Cause Remedy Page
- Disc playback ■ General Problem Cause Remedy Page
- ■ Picture Problem Cause Remedy Page Remote control Problem Cause Remedy Page Network Problem Cause Remedy Page
- TROUBLESHOOTING Problem Cause Remedy Page
- Messages on the screen Error message Cause Remedy Page Others Problem Cause Remedy Page
- GLOSSARY
- SPECIFICATIONS
- SPECIFICATIONS
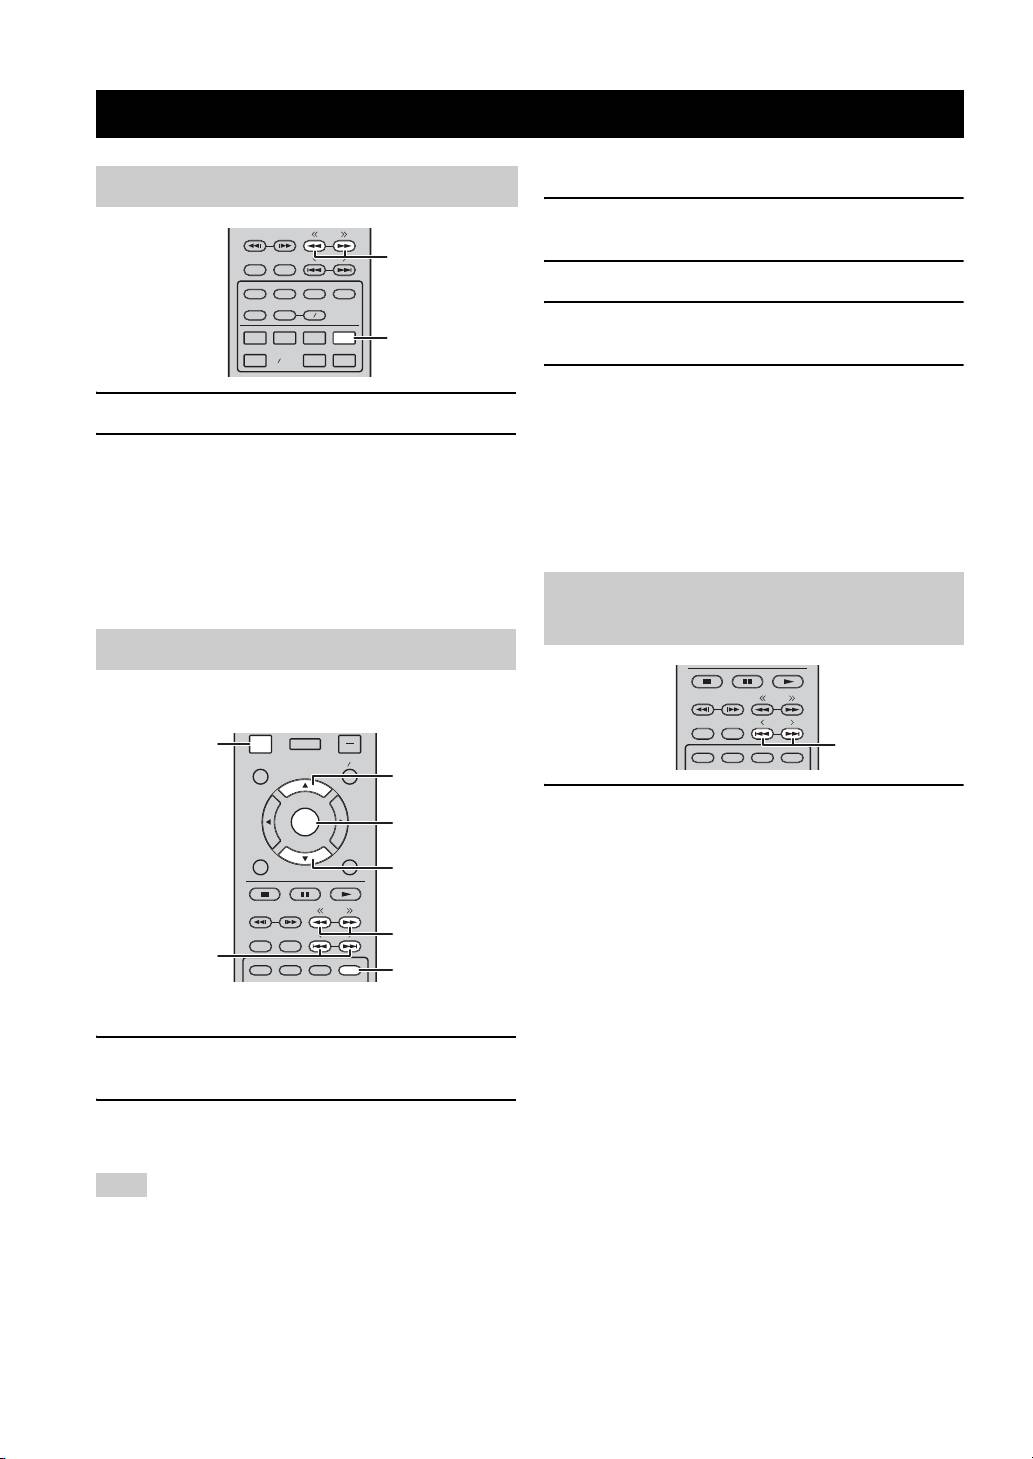
BASIC OPERATION
2 3
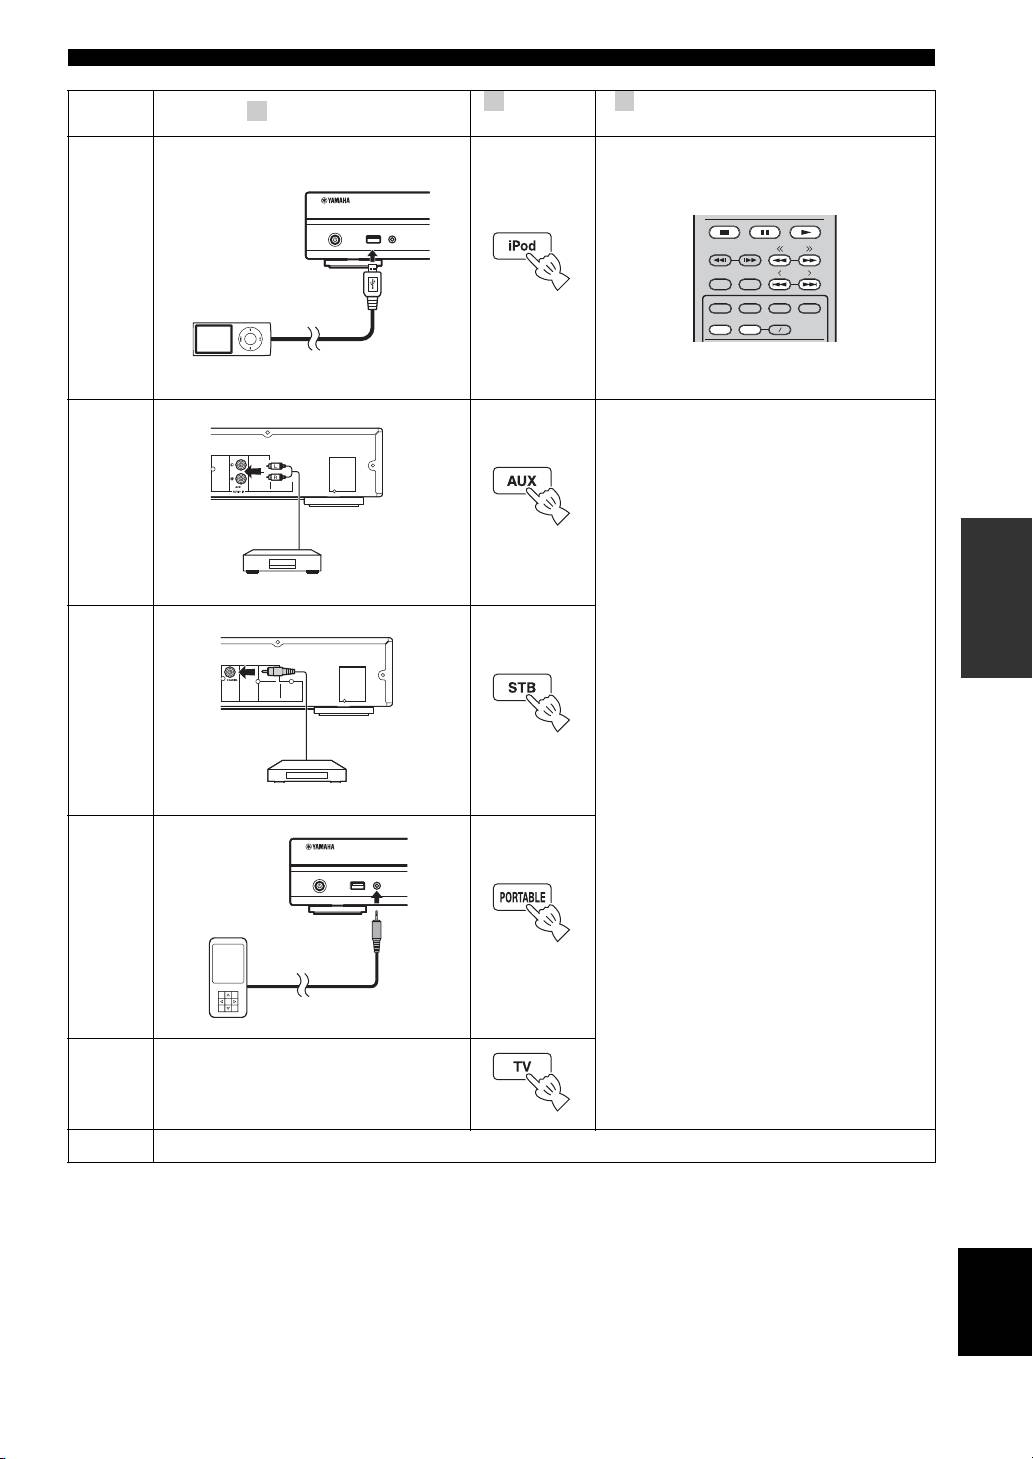
Switch the
Refer to the following pages for more
1
Set the source
input
operations
USB PORTABLE
iPod/iPhone
TUNING
iPod
*1
PRESET
DIMMER
STATUS
PIP
SUBTITLE
AUDIO
MEMORY
SHUFFLE
REPEAT
A B
p. 12, 23
AUX
To AUX
OPERATIONS
p. 14
STB
To COAXIAL
For details on operation, refer to the
instruction manual supplied with the
connected device.
p. 14
Portable
To output TV sounds, refer to page 13
TV
for connection.
FM
To receive FM radio stations, refer to page 28.
*
1
Some features may not be available depending on the model or the software version of your iPod.
English
19 En
USB PORTABLE
iPod/iPhone
p. 14
BASIC OPERATION
■ Common operations for playing back
Playing back photo/music/video
files in a selected folder
HOME and MEDIA menus allow you to browse and play
Example: Selecting a movie file on a USB memory
multi-media files on data discs, USB memory devices and
device
your network.
Note
Note
Stop the playback of the video before you move to MEDIA menu
screen.
For details on playable discs and files, refer to page 3.
■ Basic operation
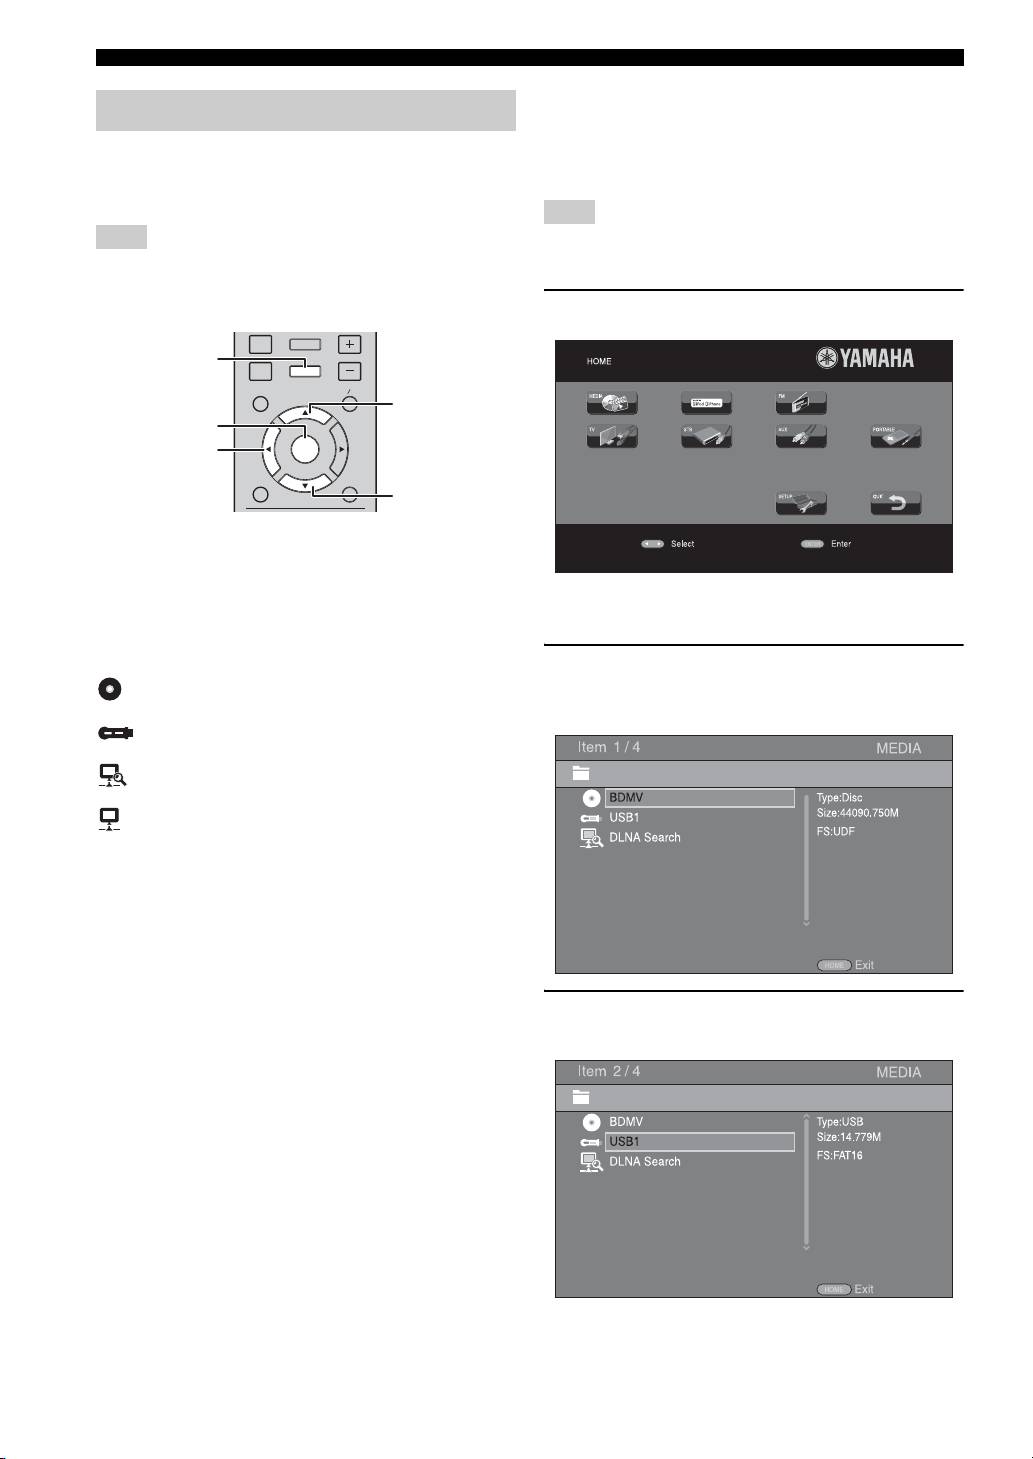
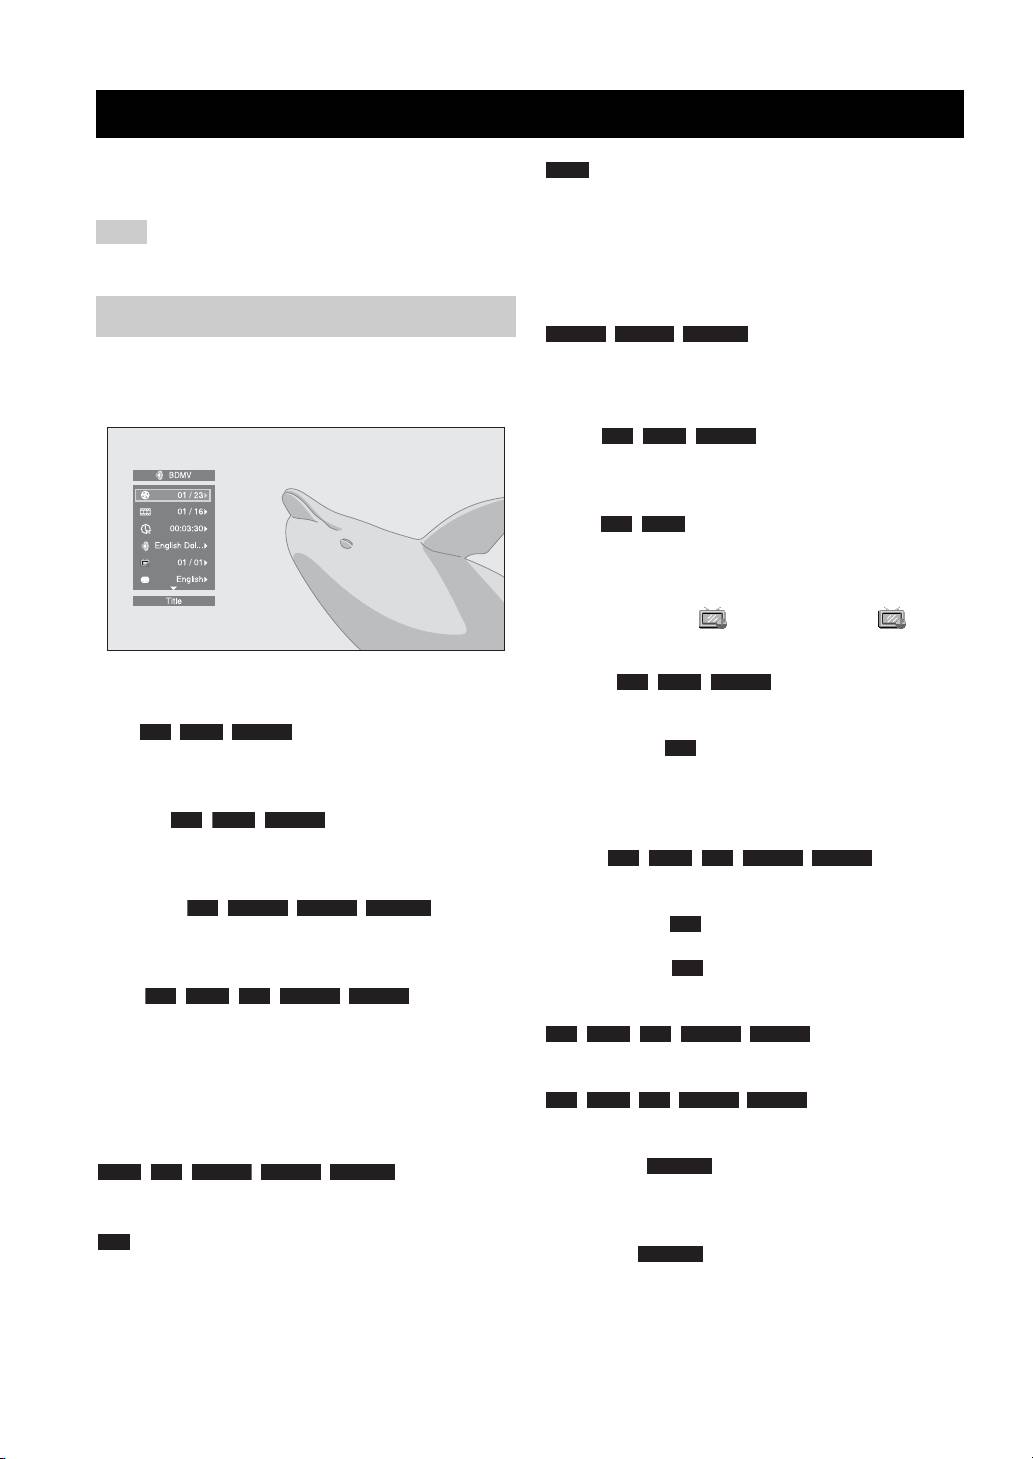
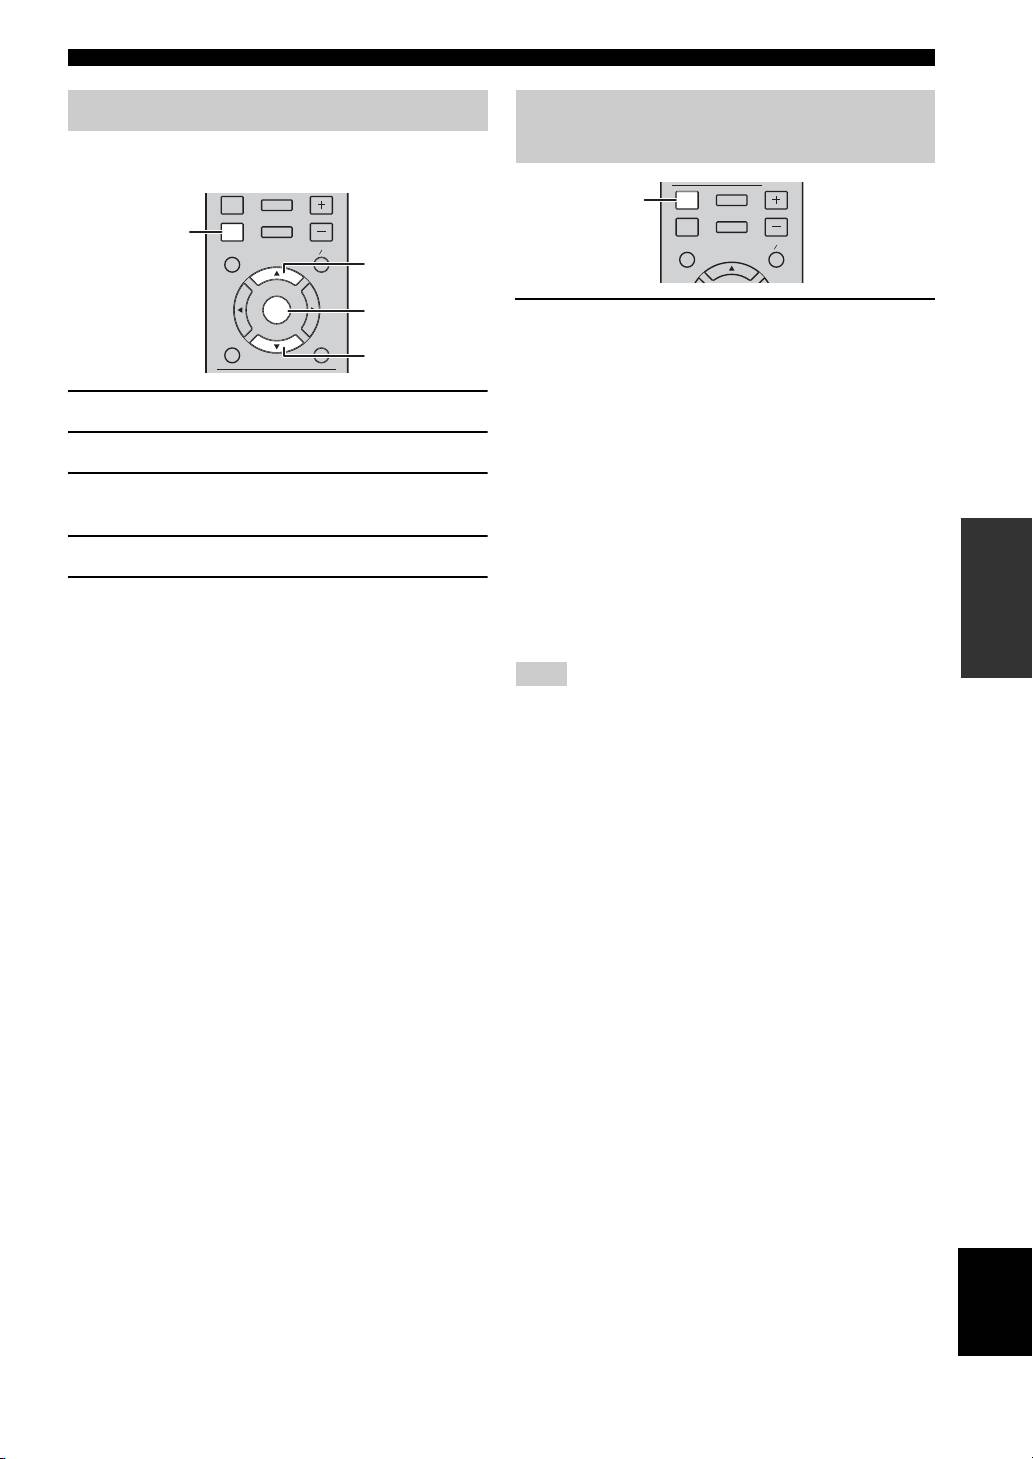
1 Press HOME to move to HOME menu screen.
DISPLAY
SETUP
HOME
VOLUME
OPTION
HOME
TOP MENU
POP- UP MENU
5
ENTER
2
ENTER
RETURN ON SCREEN
a
5/a : Moves the focus.
2: Returns to the parent folder.
HOME: Moves to/exits HOME menu screen.
y
ENTER: Confirms the folder/file.
HOME menu screen may differ depending on the model.
■ Icons on the top of MEDIA menu
2 Press 2/3/5 to select [MEDIA], then press
: Plays back the disc on the tray, or displays
ENTER.
contents in the data disc.
MEDIA screen appears.
: Displays contents in the USB memory device
connected to the USB port.
: Searches for a DLNA (p. 22) server on the
network.
: Displays contents on the connected DLNA server.
3 Select the item which contains the file you want to
play back, then press ENTER.
20 En
BASIC OPERATION
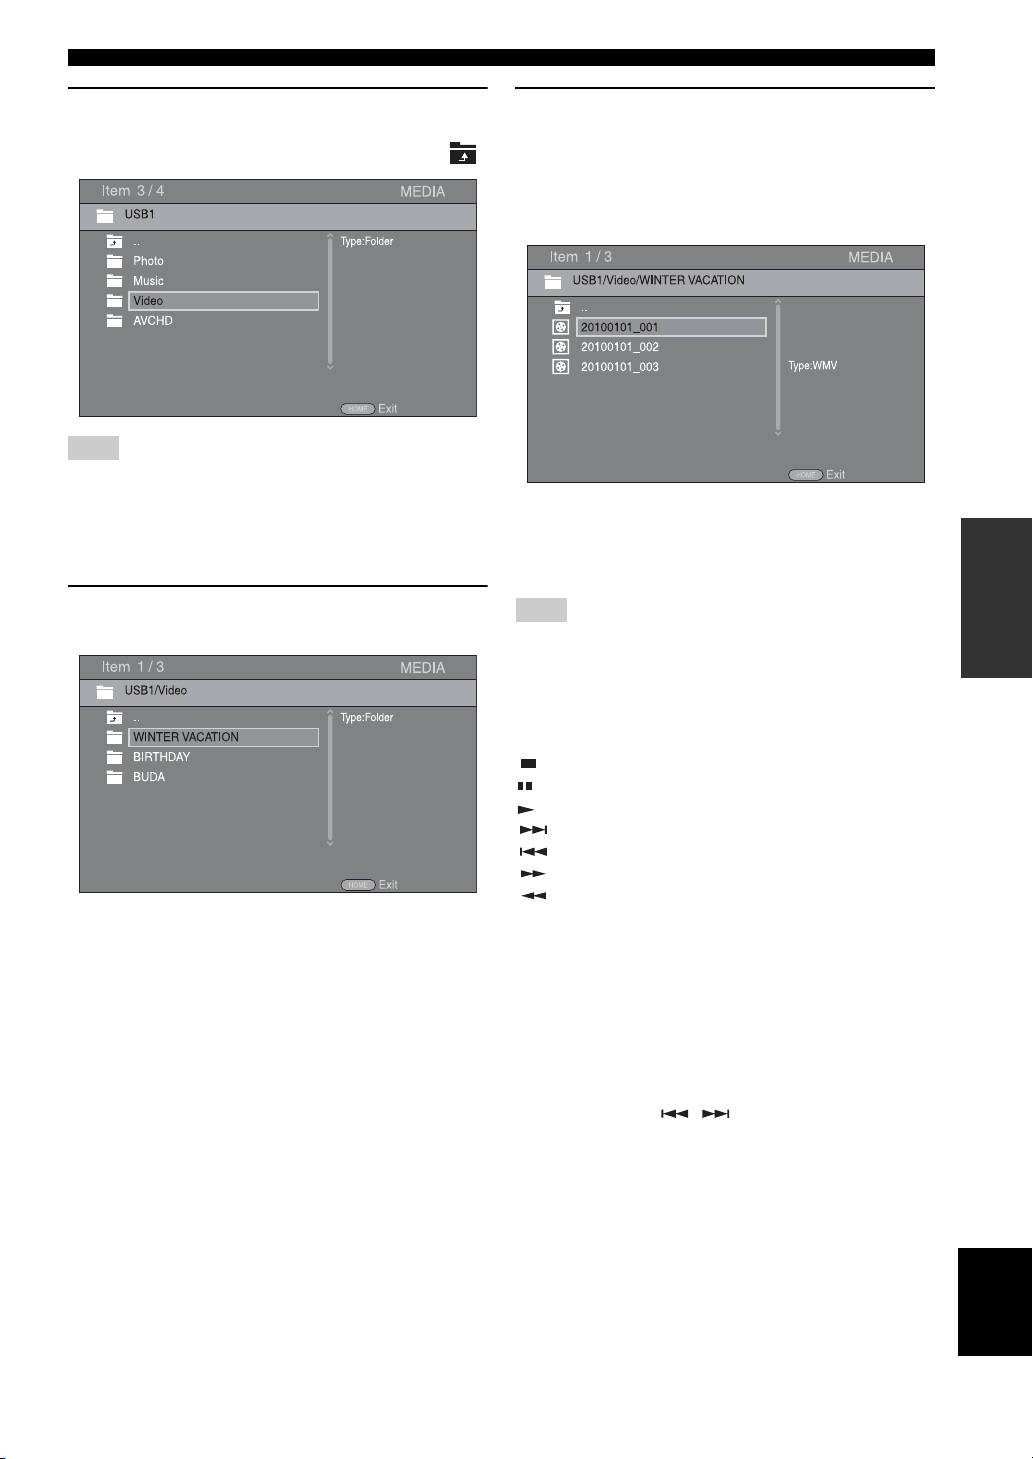
4 Select the Photo, Music, Video or AVCHD folder
6 Select the file you want to play back, then press
you want to play back, then press ENTER.
ENTER.
To return to the parent folder, press 2 or select .
When a video file is selected, playback starts.
When a music file is selected, Status menu is
displayed and playback starts.
When a photo file is selected, slide show starts.
Note
Note that the only the file type selected on this step will be
displayed in the following step. For example, if you selected the
y
Photo folder in this step, only photo files are displayed after this
To enjoy a slide show with music, press HOME to return to
OPERATIONS
step. When you want to play back other than photo, return to this
HOME menu screen while music is played back, and select the
step and select file type again.
photo file.
5 Select the folder(s) containing the file you want to
Note
play back.
The displayed file may not be played back depending on the
content.
■ Operations for viewing photos
While viewing photos, the buttons on the remote control
work as shown below.
: Stops a slide show and returns to the file browser.
: Pauses a slide show.
: Plays a slide show.
: Moves to a next photo.
: Moves to a previous photo.
: Makes a slide show faster in 3 steps.
: Makes a slide show slower in 3 steps.
5 : Inverts a photo.
a : Reflects a photo.
2 : Rotates a photo counterclockwise.
3 : Rotates a photo clockwise.
ZOOM: Zooms in/out a photo (zoom in/out: 3 steps each).
5/a /2/3 : Pans in zoom mode when a photo is
larger than the screen.
DIGEST: Switches to thumbnail mode (p. 6). When
thumbnails are displayed, you can proceed to the next/
previous page with / .
English
21 En
BASIC OPERATION
3 Select the file you want to play back.
Using network content
Notes
■ About DLNA
• The playback and operating quality may be affected by your
This unit is a DLNA certified digital media player. You
home network condition.
can manage photo, music and video contents stored on
• The files from removable media, such as USB memory devices
DLNA servers on your home network.
or DVD-drive on your media server, may not be shared
DLNA (Digital Living Network Alliance) provides easy
properly.
sharing of digital media through network in the home, and
you can enjoy digital contents stored on your DLNA-
server-software-installed PC or other DLNA compatible
Using network services
device with your TV via this unit. To connect this unit to
You can instantly watch the videos that the following
your DLNA servers, some settings for the DLNA server or
network services provide.
device are required. For details, refer to your DLNA
– YouTube
server software or DLNA device.
■ Playing back shared contents
■ Notices for network services
Note
• Access to content provided by third parties requires a
high speed internet connection and may also require
To play back files on your PC, install a DLNA server software,
account registration and a paid subscription.
such as Windows Media Player 12, and share files you want to
• Third party content services may be changed,
play back.
suspended, interrupted, or discontinued at any time
without notice, and Yamaha disclaims any liability in
1 Turn on the PC with DLNA server software installed
connection with such occurrences.
or the DLNA device connected to your home
• Some content may only be available for specific
network.
countries and may be presented in specific languages.
• Yamaha does not represent or warrant that content
2 Press HOME to display HOME menu screen, then
services will continue to be provided or available for a
select [MEDIA] to move to MEDIA menu.
particular period of time, and any such warranty,
The DLNA servers connected to the network are
express or implied, is disclaimed.
listed on the screen.
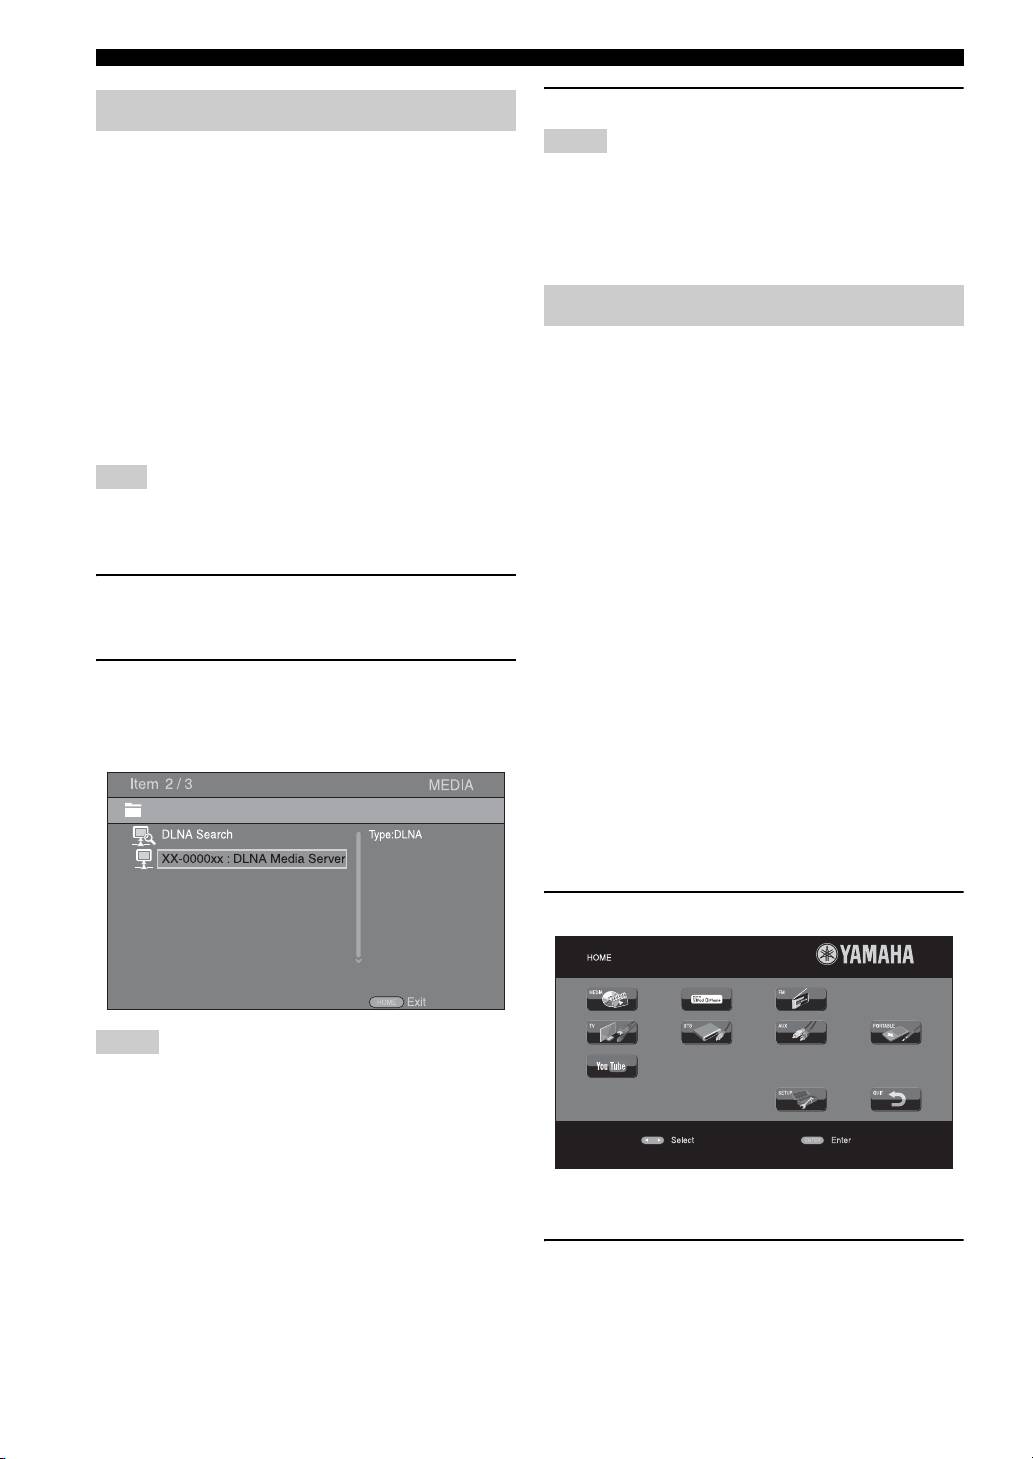
■ Playing videos from YouTube™
You can watch movies from YouTube over the internet
using this unit.
The services may be changed without notice.
1 Press HOME to display HOME menu screen.
Notes
• If your DLNA server is not listed, select [DLNA Search] to find
it.
• Depending on the DLNA server, this unit may need to be
permitted from the server.
• To play the file on the DLNA server, this unit and the server
must be connected to the same access point.
• The file requirements may not always be compatible. There
y
may be some restrictions depending on file features and DLNA
HOME menu screen may differ depending on the model.
sever capability.
2 Press 5/a /2 /3 to select [YouTube], then press
ENTER.
y
To return to HOME menu screen, press RETURN.
22 En
BASIC OPERATION
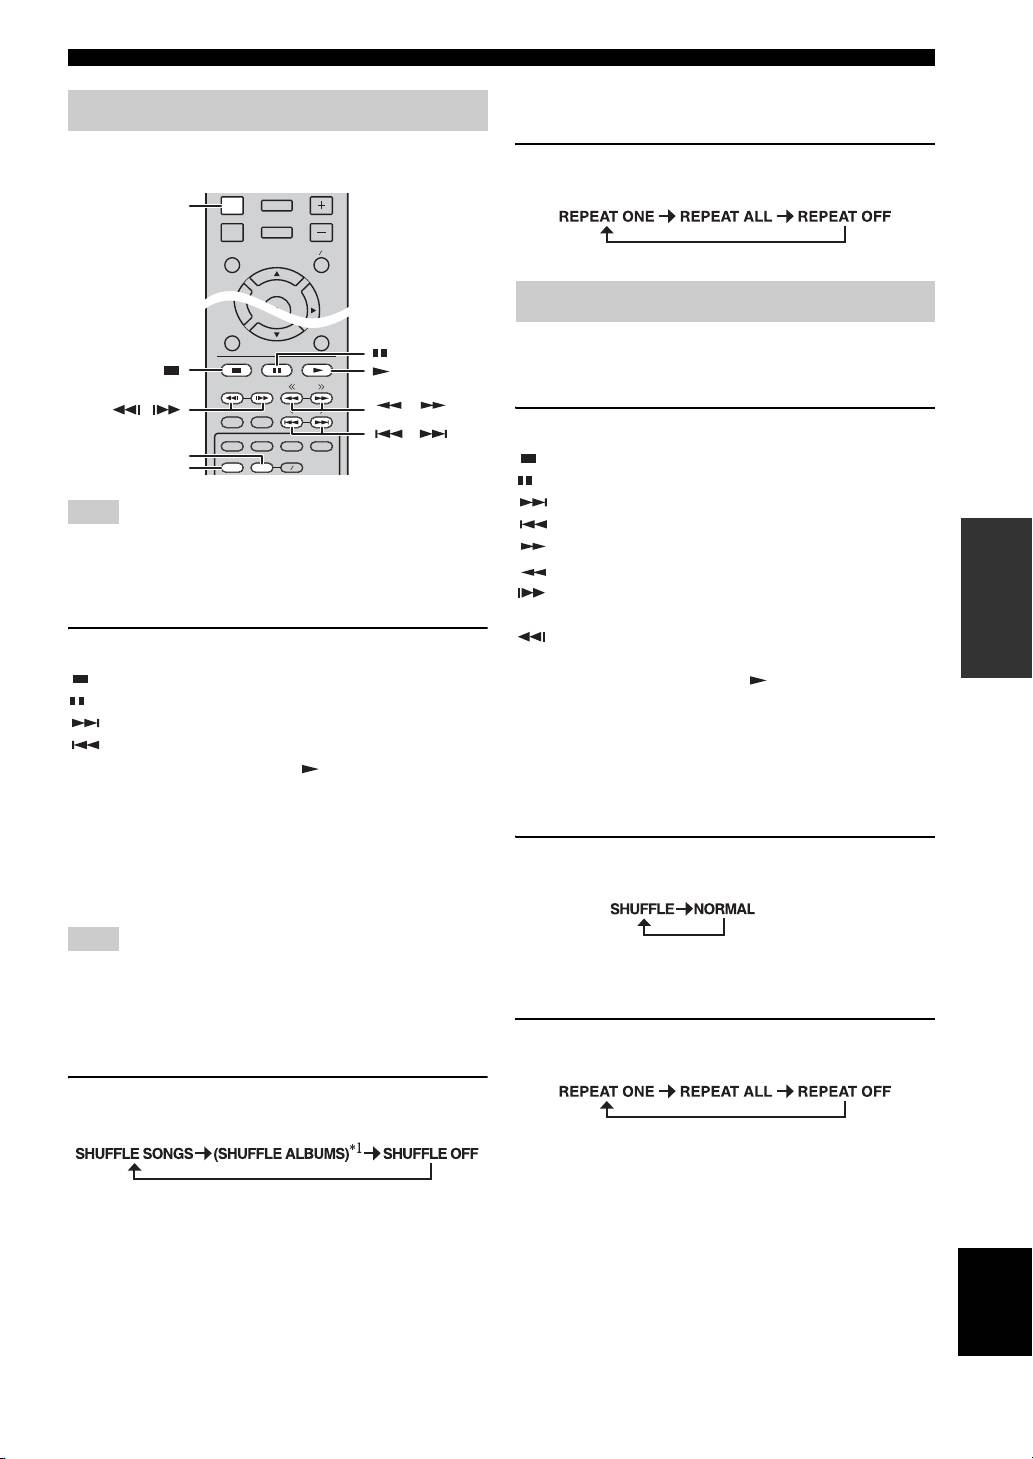
■ Repeat play
Operation for iPod
You can repeat playback as you want.
You can operate playback of your iPod by using the
1 Press REPEAT repeatedly for repeat play.
buttons on the remote control.
Each press cycles as follows:
You can also operate playback of music for CDs.
■ Playback controls
1 Press any buttons below during playback.
: Stops playback.
: Pauses playback.
: Skips forward.
Note
: Skips backward.
OPERATIONS
Some features may not be compatible depending on the model or
: Searches forward.
the software version of your iPod.
: Searches backward.
: Press for instant search. Instant search skips the
■ Playback controls
music 30 seconds.
: Press for instant replay. Instant replay replays the
1 Press any buttons below during playback.
music from 10 seconds before.
: Stops playback.
To start/resume playback, press .
: Pauses playback.
y
: Skips forward.
You can also use the Numeric buttons to enter the number of
: Skips backward.
the song directly. To clear the entry, press CLEAR.
To start/resume playback, press .
■ Shuffle play
y
You can play back in random sequence.
Press DISPLAY to display information below on the front panel
display during playback.
• Song name
1 Press SHUFFLE repeatedly for shuffle play.
• Artist name
Each press toggles as follows:
• Album name
Note
There are some characters that cannot be displayed on the front
■ Repeat play
panel display of this unit.
You can repeat playback as you want.
■ Shuffle play
1 Press REPEAT repeatedly for repeat play.
You can play back in random sequence.
Each press cycles as follows:
1 Press SHUFFLE repeatedly for shuffle play.
Each press cycles as follows:
*
1
You cannot set ALBUMS when you use an iPod touch and
iPhone.
English
23 En
RETURN ON SCREEN
TUNING
PRESET
DIMMER
STATUS
PIP
SUBTITLE
AUDIO
MEMORY
SHUFFLE
REPEAT
A B
DISPLAY
SETUP
VOLUME
OPTION
HOME
TOP MENU POP-UP MENU
ENTER
DISPLAY
Operation for CDs
,
,
,
REPEAT
SHUFFLE
ADVANCED PLAYBACK OPERATION
This chapter explains playback of commercially available
DVD
BD/DVD/CD discs, and recorded DVD-RW/R discs.
– Normal
– Shuffle CH (chapter)
Note
– Shuffle TT (title)
– Shuffle All
For the basic playback operation, refer to page 6.
– Random CH (chapter)
– Random TT (title)
– Random All
On Screen menu
VIDEO MUSIC PHOTO
– Normal
To display On Screen menu, press ON SCREEN. After
– Shuffle F (folder)
that, press 5/a /2/3 to select an item, then press
– Random F (folder)
ENTER to operate the desired function.
Audio : Shows audio language/
BD DVD VIDEO
signal of a BD/DVD disc currently selected. You can
select the desired type of audio.
Angle : Shows the currently-selected angle
BD DVD
number. If the video is recorded with multiple angles, you
can change the angle.
y
When the Angle Mark ( ) is set to [On] (p. 36), is
displayed on the screen when this function is available.
Subtitle : Shows the currently-
BD DVD VIDEO
On Screen menu contains following items.
selected subtitle language when the subtitle is provided.
Title : Shows the title number being
BD DVD VIDEO
Subtitle Style : Shows the currently-selected
BD
played back. You can skip to the desired title by selecting
subtitle style. This function is available only for Video-file
it from this item.
external subtitle. You can select the desired text style of
subtitle.
Chapter : Shows the chapter
BD DVD VIDEO
number being played back. You can skip to the desired
Bitrate : Shows
BD DVD CD VIDEO MUSIC
chapter by selecting it from this item.
bitrate of the audio/video signal.
Track/File : Shows
CD VIDEO MUSIC PHOTO
Second Video : Turns the PIP on/off (p. 6).
BD
track/file number being played back. You can skip to the
desired track/file by selecting it from this item.
Second Audio : Turns the secondary audio on/off.
BD
Time : Shows the
BD DVD CD VIDEO MUSIC
Ins Search
playback time. Select display type from the following:
BD DVD CD VIDEO MUSIC
: Skips 30 seconds.
– Elapsed playback time of the title, chapter, disc,
track or file.
Ins Replay
– Remaining playback time of the title, chapter, disc,
BD DVD CD VIDEO MUSIC
: Replays the content
track or file.
from 10 seconds before.
Mode/Play Mode
Slide Show :
PHOTO
DVD CD VIDEO MUSIC PHOTO
: Shows current
Shows slide show speed. You can select the slide show
playback mode. You can select playback mode from the
speed from Slow/Medium/Fast.
following:
CD
Transition : Shows how photo appears on the
PHOTO
–Normal: Normal playback.
screen. You can select the transition type.
– Shuffle: Random playback without repetition.
– Random: Random playback with repetition.
24 En
ADVANCED PLAYBACK OPERATION
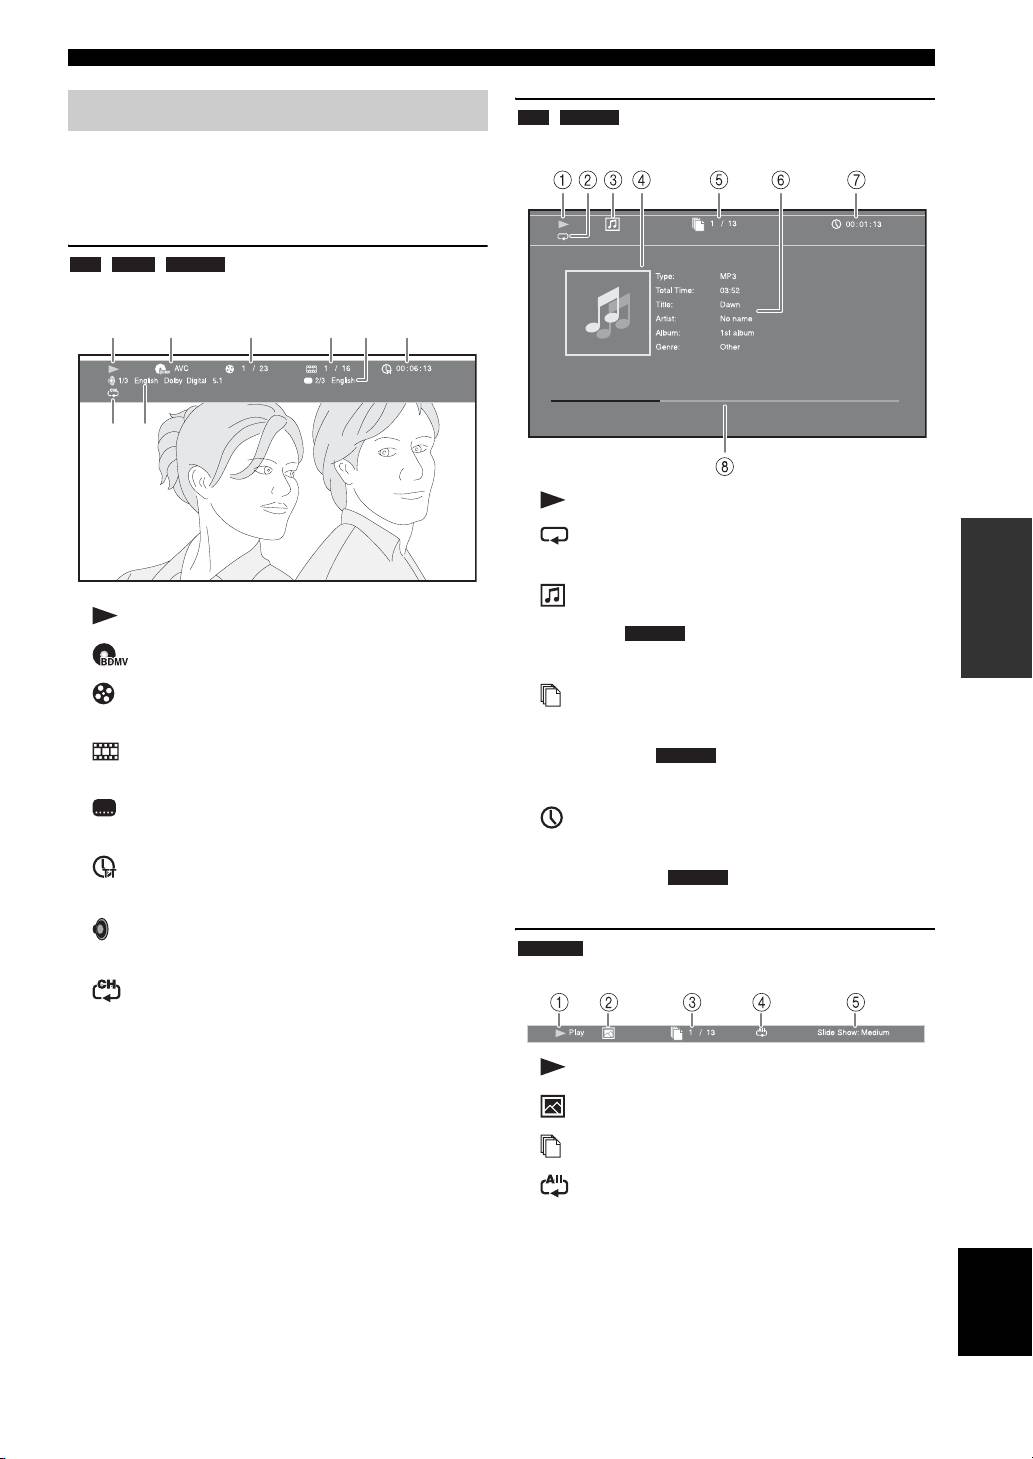
Status menu
CD MUSIC
Example: Icons when playing a music file
This shows various settings, such as subtitles, angle
settings and the title/chapter/track number currently
played back. To display Status menu, press STATUS.
Status menu contains following menus.
BD DVD VIDEO
Example: Icons when playing a BD disc
13
2465
78
1 (Playback status)
2 (Repeat mode): Shows current repeat mode
OPERATIONS
(p. 6).
3 (Disc type/music file icon)
1 (Playback status)
4 (Artwork) : Displays artwork if the file
MUSIC
2 (Disc type/video file icon)
contains it.
3 (Title number being played): You can jump to
5 (Track/file number being played): You can
specified title with SEARCH button (p. 7).
jump to specified track with SEARCH button (p. 7).
4 (Chapter number being played): You can
6 (Information) : Displays music information
MUSIC
jump to specified chapter with SEARCH button (p. 7).
if the file contains them.
5 (Subtitle currently selected): You can change
7 (Elapsed playback time): You can jump to
the subtitle language with SUBTITLE button (p. 6).
specified point with SEARCH button (p. 7).
6 (Elapsed playback time): You can jump to
8 (Progress bar) : Shows progress status of
MUSIC
specified point with SEARCH button (p. 7).
current song.
7 (Audio currently selected): You can change the
audio language or format with AUDIO button (p. 7).
PHOTO
Example: Icons when viewing a photo file
8
(Repeat mode):
Shows current repeat mode
(p. 6).
1 (Playback status)
2 (Photo file icon)
3 (File number being displayed)
4 (Repeat mode): Shows current repeat mode
(p. 6).
5 (Slide show speed)
English
25 En

ADVANCED PLAYBACK OPERATION
2 Press ENTER to program playback order.
Using Bookmark
For audio disc, press 5/a to select a desired track,
This allows you to set Bookmark at the specified point of
then press ENTER.
the video. After Bookmark is set, you can move to the
For DVD-Video discs, select a desired title (shown as
point you set using this function. You can set up to 12
TT) and chapter (shown as CH) instead of a track.
Bookmarks.
To clear a set track, select the track you want to clear,
then press CLEAR.
DVD VIDEO
Press RETURN to cancel the Program play.
Example: Setting Bookmark when playing back a movie.
1 Press MARKER during playing back the movie to set
Bookmark. Bookmark number and the status are
displayed.
2 After Bookmark is set, press DIGEST to display
Bookmark select bar.
3 After programming is finished, press to set and
3 Press 2/3 to select the Bookmark you want to play
start program playback.
back, then press ENTER.
Press CLEAR to delete the selected Bookmark.
4 To cancel program play, stop playback completely by
pressing twice.
Note
When playback is finished (e.g., ejecting the disc, pressing
twice), Bookmarks are automatically deleted.
Using search
This allows you to jump to the specified point during
Program play
playback.
This allows you to program playback order of audio disc
BD DVD CD VIDEO MUSIC
tracks or DVD chapters.
Example: Searching to the specified point
You can program up to 15 tracks/chapters.
1 Press SEARCH during playback. Status bar appears.
DVD CD
Example: Programming the playback order of CD tracks
2 Press 5/a /2 /3 to select one of the item below,
then press ENTER.
1 Press PROGRAM during playback to display
BD DVD
:
PROGRAM screen.
– Title number (shown as )
– Chapter number (shown as )
– Elapsed title time (shown as )
– Elapsed chapter time (shown as )
CD
:
– Track number (shown as )
– Elapsed track time (shown as )
– Elapsed disc time (shown as )
VIDEO MUSIC
:
– File number (shown as )
– Elapsed file time (shown as )
26 En
ADVANCED PLAYBACK OPERATION
■ Using the feature of BD-Live™
3 Press 5/a or number buttons to set/adjust the value
of the focused item, and press ENTER to jump to the
1 Set the Network setting (p. 36).
specified point.
2 Connect the USB memory device to this unit (p. 15).
4 To close the status bar, press STATUS.
• BD-Live data is saved in a USB memory device
connected to this unit.
Enjoying BONUSVIEW™ and BD-
• Connect a USB memory device (2 GB or greater
Live™
and formatted with FAT 32/16) supporting USB
2.0 High Speed (480 Mbit/s) to the USB port that
This unit supports BONUSVIEW (p. 50) (BD-ROM
you select on Local Storage (p. 35). The default
Profile 1 Version 1.1) and BD-Live (p. 50) (BD-ROM
setting is the USB port on the rear panel.
Profile 2) playback functions.
• A “BUDA” folder is created automatically in the
USB memory device when necessary.
Note
• If there is insufficient storage space, the data will
not be copied/downloaded. Delete unneeded data
Functions and playback method vary depending on the disc.
Refer to the guidance on the disc or the supplied user’s manual.
or use a new USB memory device.
• Some time may be required for the data to load
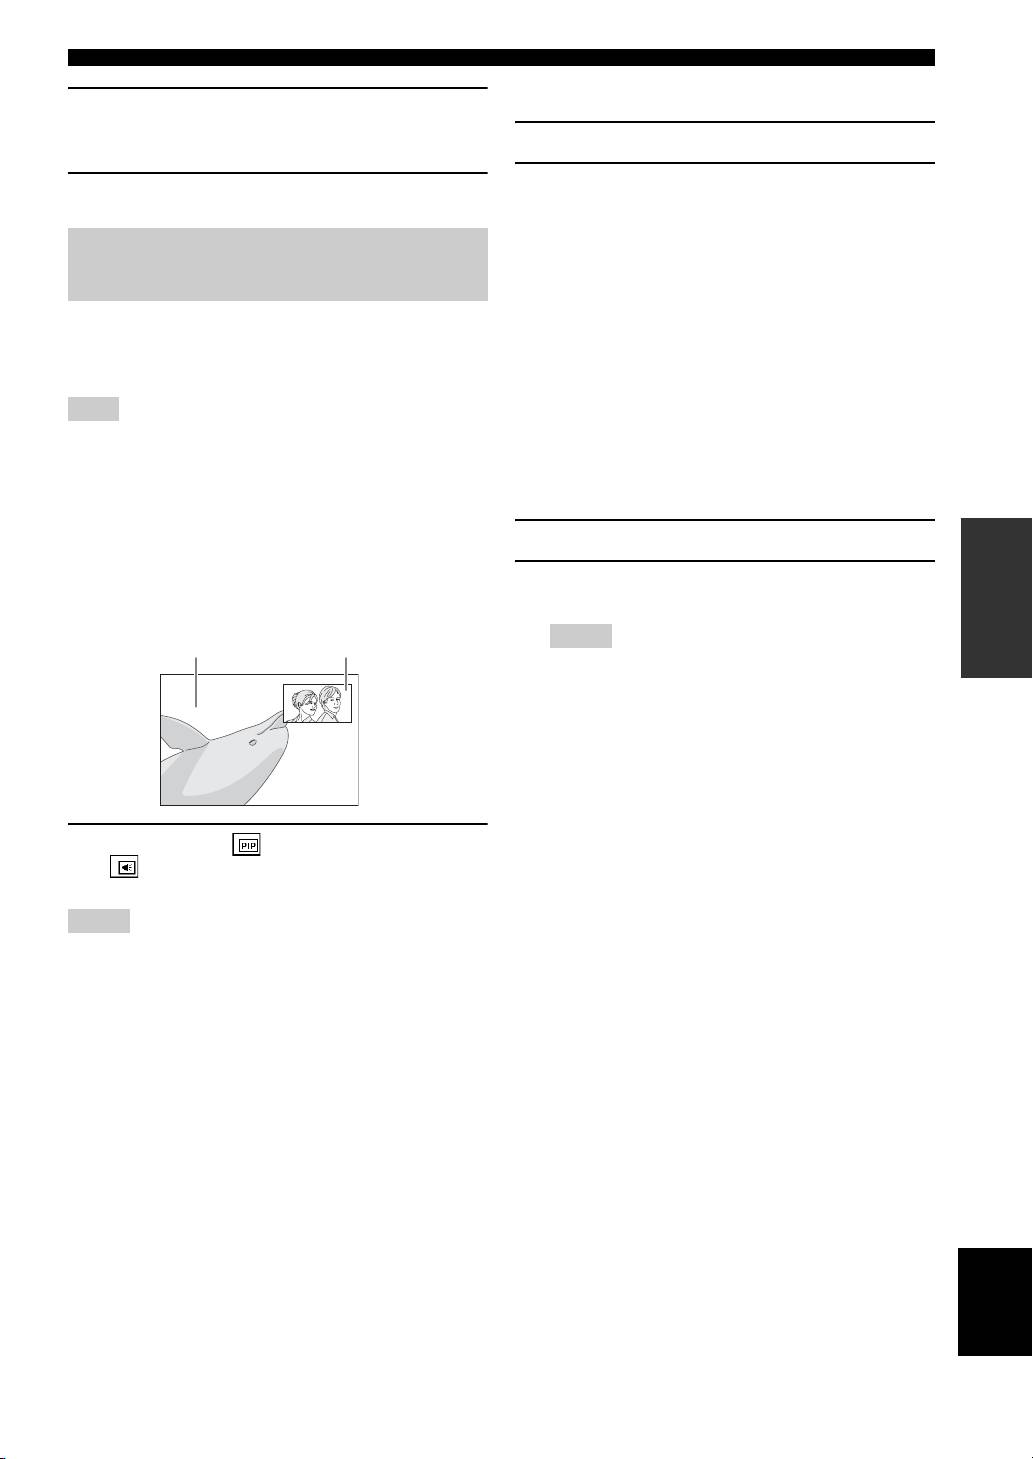
■ Using Picture in Picture function
(read/write).
(secondary audio/video playback)
OPERATIONS
BD-Video that includes secondary audio and video
3 Play back the disc.
compatible with Picture in Picture can be played back
4 Run BD-Live according to the instructions on the
with secondary audio and video simultaneously as a small
disc.
video in the corner.
Primary video Secondary video
Notes
• Regarding playback method of BD-Live contents, etc.,
perform the operations in accordance with the instructions
in the BD disc manual.
• To enjoy BD-Live functions, perform the network
connection (p. 15) and Network settings (p. 36).
• Refer to “[BD-Live Connection]” (p. 36) regarding the
setup to restrict access to BD-Live contents.
• The time required to download the provided programs into
the USB memory device connected to this unit varies
1 While PIP Mark ( ) or Secondary Audio Mark
depending on the internet connection speeds and the data
( ) is displayed, press PIP to turn the Picture in
volume of the programs.
Picture function on/off.
• BD-Live programs provided through the internet may not
be able to display the connection depending on the status
Notes
(upgrading) of the provider. In such cases, take out the
• To listen to secondary audio from a TV connected with an
disc and try again.
HDMI cable, make sure that the Audio Output setting (HDMI)
• If the BD-Live screen does not appear for a while after
is set to [PCM] (p. 39).
you select the BD-Live function in the BD disc menu, the
• Depending on the disc, to listen to secondary audio, you may
USB memory device may not have enough free space. In
need to set secondary audio to on from the top menu of the disc
such cases, eject the disc from this unit, and then erase the
(p. 8).
data in the USB memory device selecting [Format] in
• The secondary audio and video for Picture in Picture may
[Local Storage] (p. 35).
automatically play back and be removed depending on the
content. Also, playable areas may be restricted.
English
27 En
LISTENING TO FM RADIO STATIONS
■ Manual preset tuning
Tuning to radio stations
1 Select a favorite radio station by pressing << / >>
TUNING
(TUNING).
PRESET
<<, >> (TUNING)
DIMMER
STATUS
2 Press MEMORY.
PIP
SUBTITLE
AUDIO
MEMORY
SHUFFLE
REPEAT
A B
3 Select the preset number you want to store to by
iPod
TV
STB
TUNER
TUNER
pressing 5/a or < / > (PRESET).
DISC
USB NET
AUX
PORTABLE
4 Press ENTER.
The manual preset is complete.
1 Press TUNER.
y
2 Press and hold << / >> (TUNING).
• You can preset up to 30 FM stations.
Automatic tuning starts.
• To cancel the manual preset while choosing a preset number,
press MEMORY again.
y
• You can delete a preset station by pressing OPTION →
If the signal received from the station you want to select is weak,
ENTER to select [PRESET DEL] (p. 29).
you can also tune into radio stations manually by pressing << /
>> (TUNING) repeatedly. In this case, the sound will be
monaural.
Selecting preset radio stations
(Preset tuning)
Presetting radio stations
You can store your favorite FM stations with the preset
TUNING
function.
PRESET
DIMMER
STATUS
OPTION
OPTION
HOME
<, > (PRESET)
PIP
SUBTITLE
AUDIO
MEMORY
TOP MENU
POP-UP MENU
5
1 Select the preset radio station in FM mode by
ENTER
ENTER
pressing < / > (PRESET).
RETURN ON SCREEN
y
a
You can also use the Numeric buttons on the remote control or
< / > (PRESET) on the front panel of this unit to select the preset
TUNING
radio station.
PRESET
<<, >> (TUNING)
DIMMER
STATUS
<, > (PRESET)
PIP
SUBTITLE
AUDIO
MEMORY
MEMORY
■ Automatic preset tuning
1 Press and hold MEMORY for more than 3 seconds in
FM mode.
2 Press ENTER.
Start the automatic preset.
Note
When you perform the automatic preset, all stored stations are
cleared and the new stations are stored.
28 En
LISTENING TO FM RADIO STATIONS
Deleting preset stations
Displaying Radio Data System
information (Russia model only)
You can delete a preset station by using the option menu
([PRESET DEL]).
DISPLAY
SETUP
DISPLAY
DISPLAY
SETUP
VOLUME
VOLUME
OPTION
HOME
OPTION
OPTION
HOME
TOP MENU POP-UP MENU
TOP MENU
POP- UP MENU
5
ENTER
ENTER
1 Press DISPLAY repeatedly while listening.
RETURN ON SCREEN
PS (Program Service)
a
↓
PTY (Program Type)
1 Press OPTION.
↓
RT (Radio Text)
2 Press ENTER.
↓
CT (Clock Time)
3 Select the preset number you want to delete by
pressing 5/a .
↓
MONO/STEREO
OPERATIONS
4 Press ENTER.
*
↓
Frequency
5 Press OPTION to exit option menu.
↓
Back to the PS
*To delete additional preset number, repeat steps 2 to 4.
Note
y
If the signal transmission of the Radio Data System station is too
[PRESET DEL] is displayed on the front panel display only when
weak, this unit may not be able to receive Radio Data System
the input source is set to FM.
information completely. In particular, RT (Radio Text)
information uses a lot of bandwidth, so it may be less available
compared to other types of information.
English
29 En
USING USEFUL FUNCTIONS
You can also enjoy the following function.
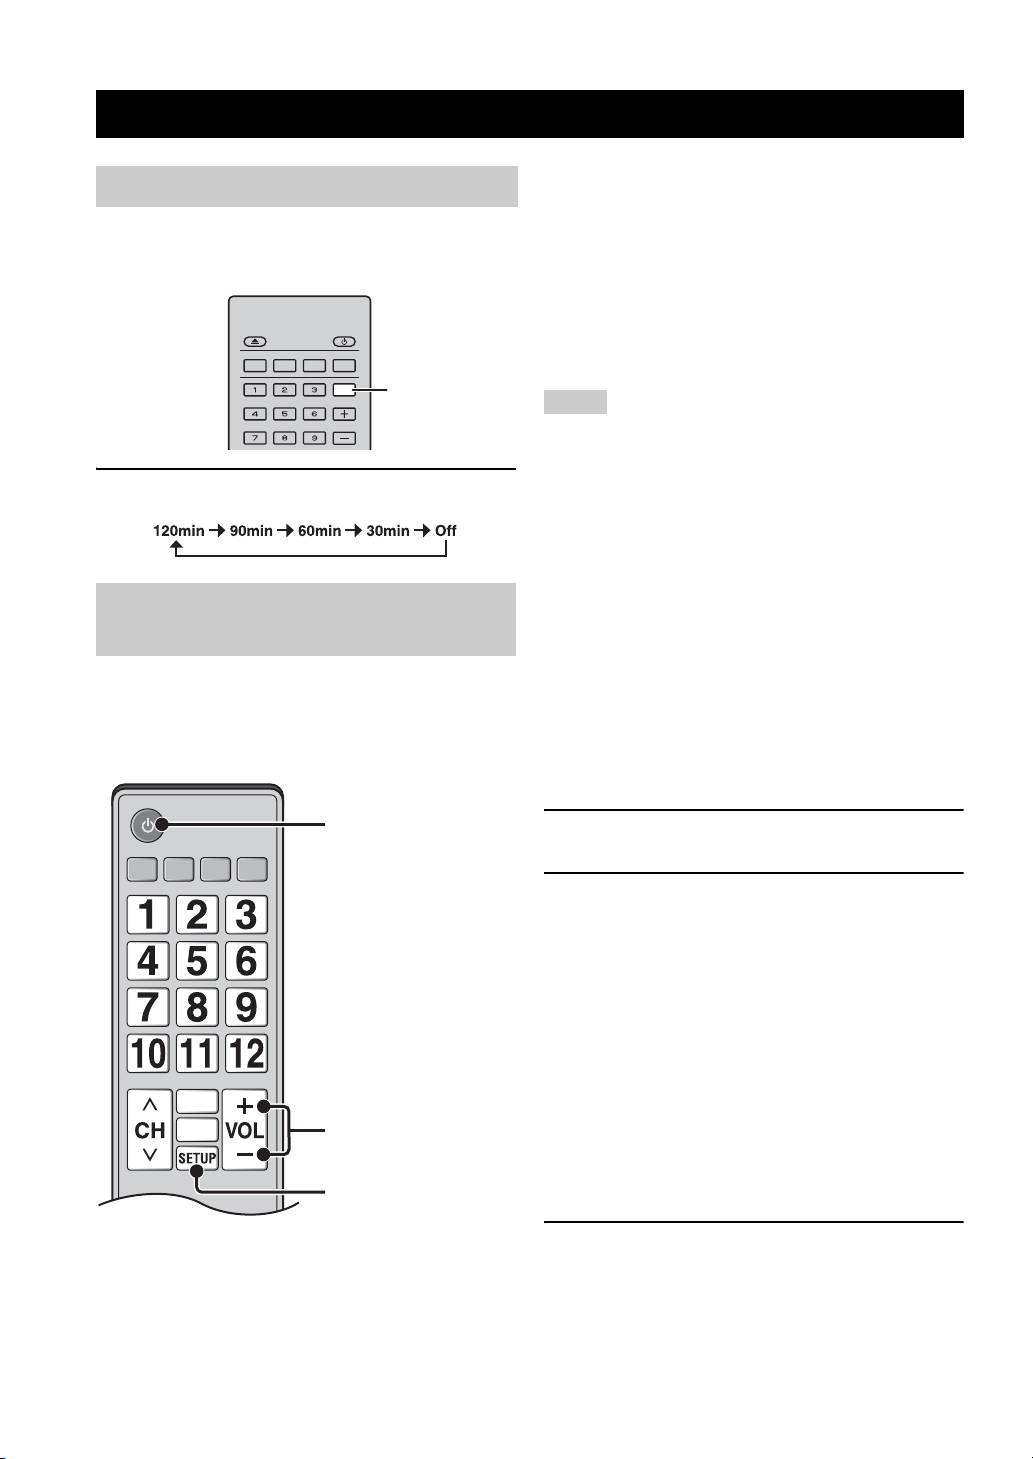
Setting the sleep timer
• When you start playback of DVD/BD discs other than
CD discs on this unit or display HOME/SETUP menu
You can set the sleep timer by using the remote control.
screen, the input selector of the TV is switched to this
The sleep timer sets this unit to standby mode after the
unit automatically (One Touch Play).
specified time elapses.
*1 When you select this unit to output TV sounds by using the
TV remote control, the unit automatically selects TV as the
input source, and sound can be enjoyed from the speakers
PROGRAM MARKER DIGEST ZOOM
connected to the unit.
SLEEP
SLEEP
Notes
SW
• This unit may be operated by using cursor buttons of TV remote
control for some TVs.
• Even if your TV supports the HDMI control function, some
1 Press SLEEP repeatedly.
functions may not be available. For details, refer to the manual
supplied with your TV.
• HDMI control function may not work properly depending on
the TV.
• Functions other than ones shown above may work depending on
the TV.
Operating this unit by TV remote
• In order to make the HDMI control function available, set up
settings for the HDMI control function on ALL components
control (the HDMI control function)
(this unit, TV, and other components). Certain operation may
also be required.
You can use the TV remote control to operate this unit if
• Each function may be set independently to activate/deactivate
your TV supports the HDMI control function and is
depending on the TV.
connected to this unit’s HDMI terminal.
• Refer to the operation manuals supplied with the TV for details
Remote control of TV (Example)
regarding setup.
■ Setting the HDMI control function
Turns on/off both TV and
1 Turn on all components connected to the TV with
this unit.
HDMI.
2 Check all components connected with HDMI and
enable the HDMI control function on each
component.
For this unit, set [HDMI Control] to [On] (p. 35).
For external components, refer to the manual
supplied with each component.
y
• The default setting of [HDMI Control] is set to [Off] for
this unit.
• The example of TV settings
– From a setup menu on your TV, select “Link setting” =
Controls the volume of
this unit.
“HDMI control setting” (example), then set a setting
such as “HDMI control function” to “ON” (example).
– Setting such as “Speaker priority” should be set to “AV
Select this unit or TV to
output sounds.
*1
amplifier”.
3 Turn off the TV and then turn on it again.
30 En

USING USEFUL FUNCTIONS
■ Registering HDMI components to TV
1 Select this unit as the input source of the TV.
2 Select Disc/USB/Network as the input source of this
unit.
3 Check that the image from this unit is correctly
displayed on the TV.
4 Check that the HDMI control function works (turn on
this unit or adjust the volume level using the TV
remote control).
y
For some HDMI components, you only need to set the HDMI
control function. Registering HDMI components to TV is not
required in this case.
If the HDMI control function is not working
Check the following:
• The TV is connected to the HDMI terminal of this unit.
OPERATIONS
The HDMI control function is set to [On] in SETUP
menu (p. 35).
• The HDMI control function is enabled on the TV. (Also
check the relative settings such as power interlock
function or speaker priority.)
The HDMI control function is not working even
checking the above
• Turn off this unit and the TV, and then turn them back
on again.
• Unplug the AC power supply cable of this unit, the TV
and external components connected to the TV with
HDMI.
Plug them in again after about 30 seconds.
■ Changing the connection method and
connected components
When the connected components and jacks are changed,
reset this unit with following procedures.
1 Turn off the HDMI control function of the TV and
this unit, turn off all connected devices, and change
the connections.
2 Perform the step 1 to 3 of “Setting the HDMI control
function” (p. 30).
English
31 En
SETTINGS
SETUP MENU
The SETUP menu enables various audio/visual settings and adjustments for functions using the remote control unit.
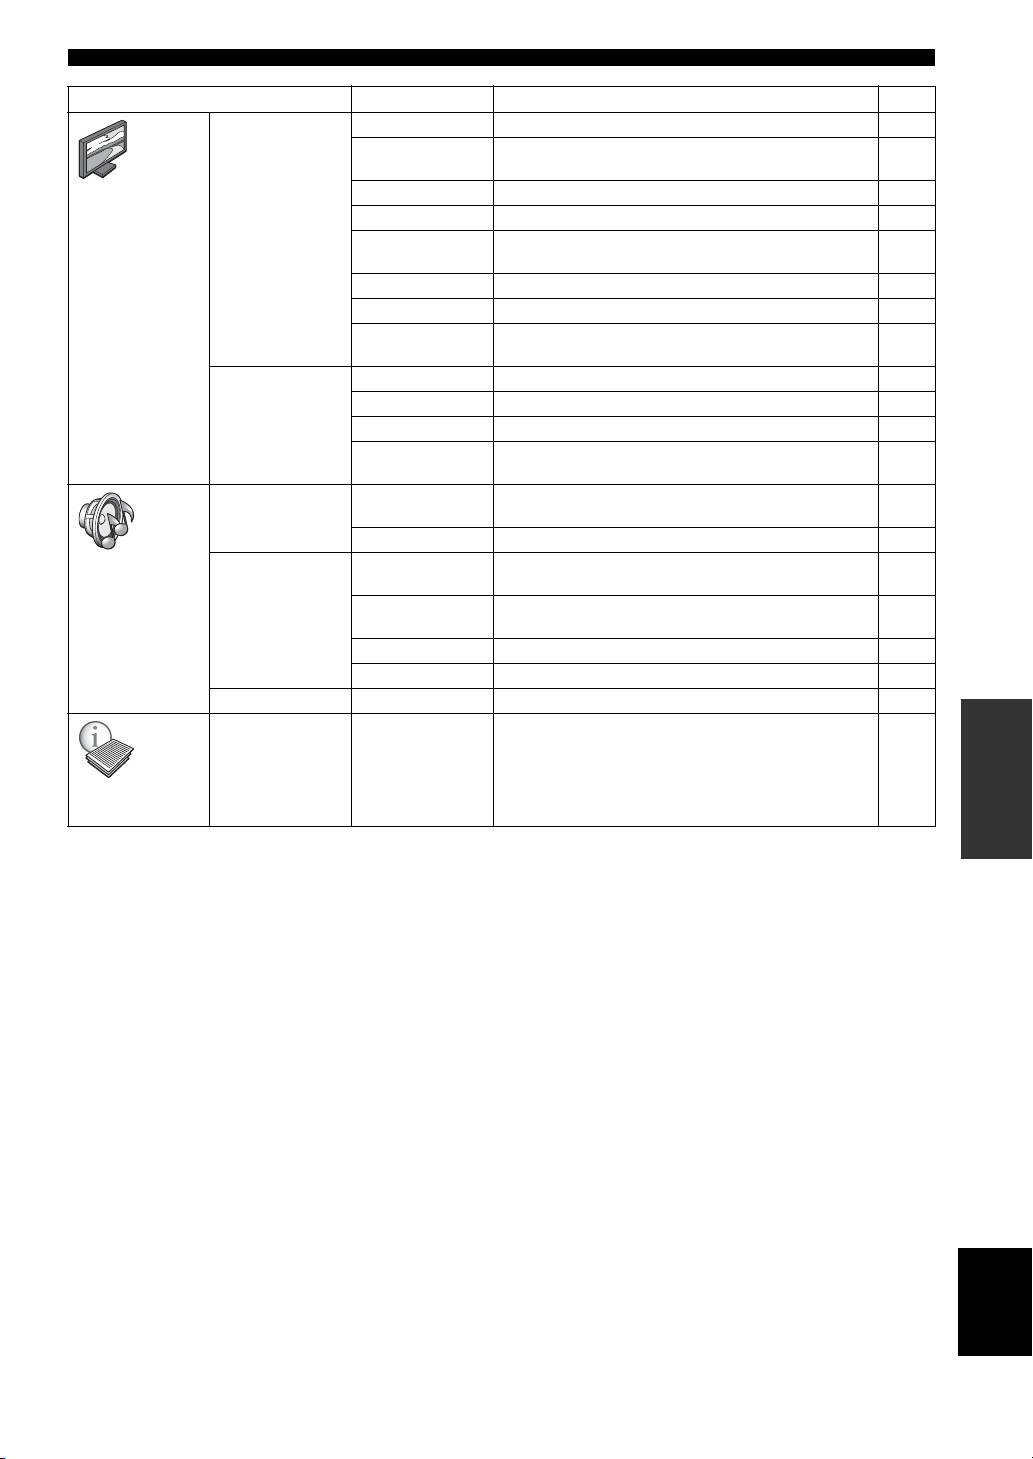
Menu/Submenu Item Function Page
System Screen Saver Sets screen saver to On/Off. 35
Auto Power Off Disc/USB/Net: Sets auto power off mode to On/Off.
35
Other Inputs: Sets auto power off mode to on by hours or Off.
General Setting
Disc Auto Playback Sets this unit to start disc playback automatically. 35
HDMI Control Sets this unit to receive control signal from the remote
35
control of your TV.
Load Default Resets all settings to the default setting except Security
35
setting.
Upgrade Performs upgrade of this unit. 35
Easy Setup Sets language, resolution, screen aspect ratio. 35
Local Storage Displays status of Local Storage, formats Local Storage and
35
selects the front/rear USB port for Local Storage.
3D Playback
Displays a warning message concerning 3D video playback
35
Message
when this unit is turned on.
Language OSD Selects the language for On Screen Display. 35
Menu Prioritizes the language for disc menu. 35
Audio Prioritizes the language for audio. 35
Subtitle Prioritizes the language for subtitle. 35
Playback Closed Caption Sets the closed caption to On/Off. 36
Angle Mark Sets to display the Angle Mark when a BD/DVD disc with
36
multiple angles is played back.
PIP Mark Sets to display the PIP Mark when a BD/DVD disc with
36
Picture in Picture is played back.
Secondary Audio
Sets to display the Secondary Audio Mark when a BD/DVD
36
Mark
disc with secondary audio is played back.
Last Memory Sets this unit to remember the last playback position of a disc
36
when it is set to standby mode or the disc tray is opened.
Security Change Password Changes password for Parental Control and Country Code. 36
Parental Control Sets the Parental Control depending on the disc content. 36
Country Code Sets your Country Code. 36
Network Internet Connection Sets the internet connection to Enable/Disable. 36
Information Displays network information screen. 36
Connection Test Performs the network connection test. 36
IP Setting Sets the IP setting to Auto/Manual. 36
BD-Live
Sets the BD-Live connection to Permitted/Partial Permitted/
36
Connection
Prohibited.
DLNA Sets the DLNA to Enable/Disable. 36
Proxy Setting Sets the proxy setting. 36
32 En
SETUP MENU
Menu/Submenu Item Function Page
TV 3D Output Selects 3D or 2D videos. 37
TV Screen Sets the screen aspect ratio of the connected TV, and adjust
37
the video output.
Display Setting
Video Out Select Selects the resolution of video output. 37
TV System Selects the TV System from NTSC/PAL/Multi. 37
Color Space Selects Color Space from YCbCr 4:4:4/YCbCr 4:2:2/ Full
37
RGB/RGB.
HDMI Deep Color Selects HDMI Deep Color from 30 bits/36 bits/Off. 37
HDMI 1080p 24Hz Sets HDMI 1080p 24Hz to Auto/Off. 38
Lip Sync Adjusts the lag between video and audio, such as when the
38
mouth movement is out of sync with the voice.
Video Process Video Mode Adjusts the visual image. 38
Color Adjust Adjusts Brightness/Saturation/Hue for each color. 38
Noise Reduction Sets the level of Noise Reduction. 38
De-interlacing
Sets how to detect the video signal.
38
Mode
Audio Output HDMI Selects the output mode of HDMI terminal from Bitstream/
39
PCM/Off.
DRC Sets the DRC (Dynamic Range Compression). 39
Audio Setting
Speaker Setting Configuration Sets the audio output from the 5.1 ch surround speaker
39
terminals.
2ch Downmix Sets the audio output from SPEAKERS FRONT L/R
39
terminals.
Test Tone Outputs the test tone for speaker setup. 39
Subwoofer Size Sets the subwoofer speaker size. 39
Post Process UpMix Multi-channelizes the 2-channel audio signal. 39
Displays software version and MAC address (p. 50).
SETTINGS
39
System
Information
English
33 En
SETUP MENU
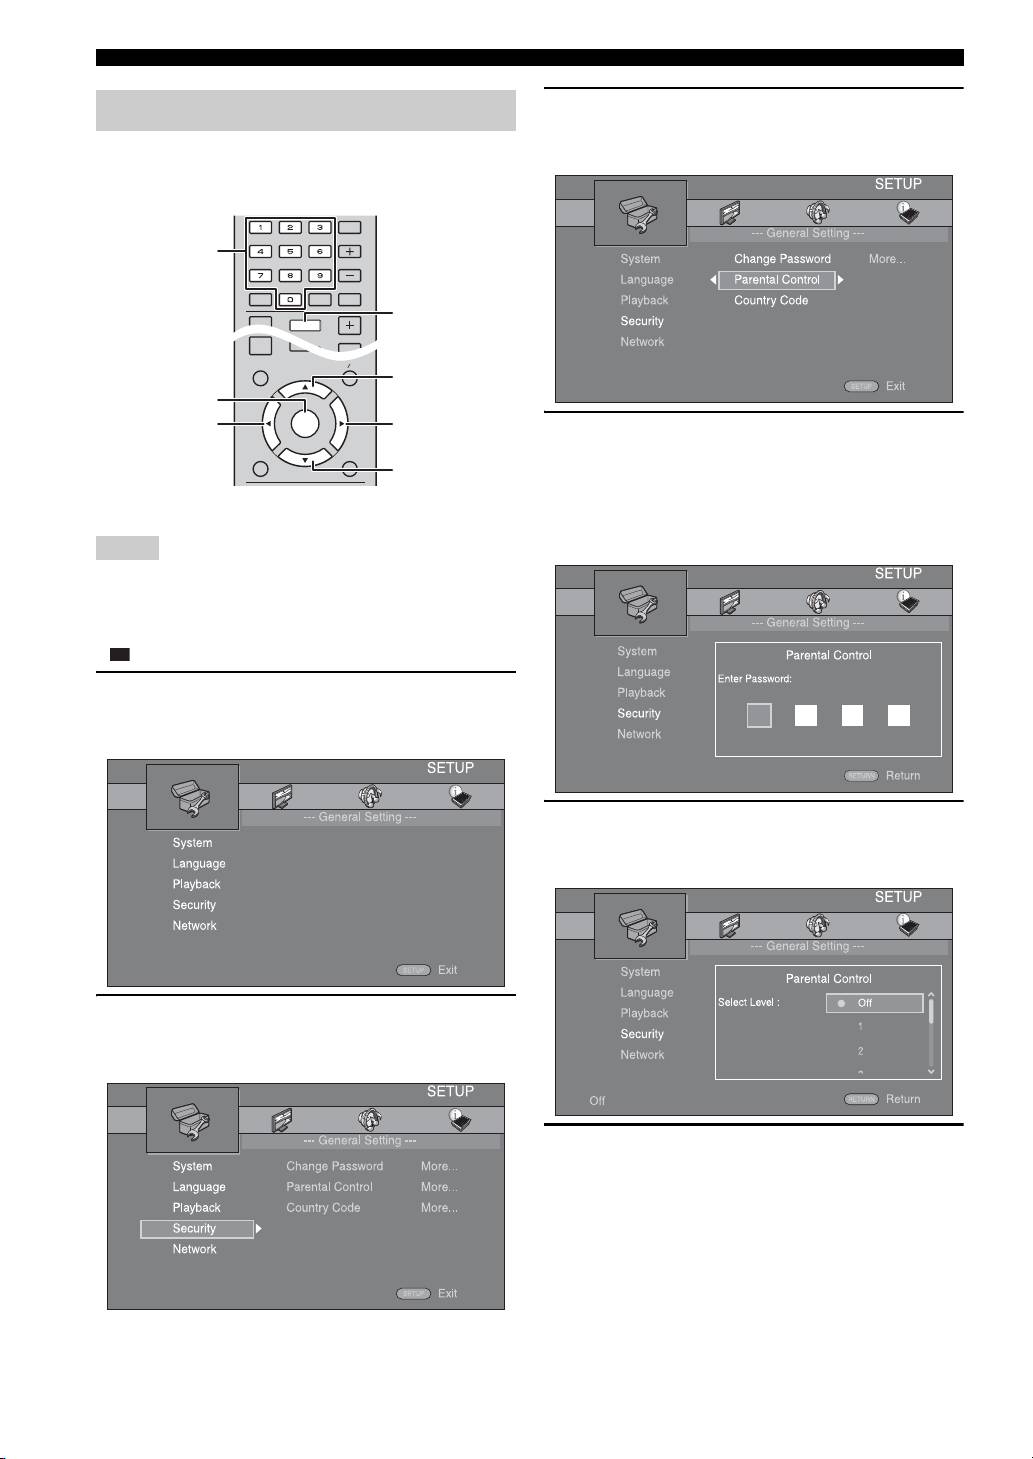
3 Select a menu item.
Operation for SETUP menu
Press 5/a to select [Parental Control], then press
You need to display SETUP menu screen to perform
ENTER or cursor 3.
settings for this unit. The following is the explanation for
basic operations of SETUP menu.
4 Enter your password with Numeric buttons.
– The default password is 0000.
– You cannot move to the next setting screen until
you have input the correct password.
Example: Setting [Parental Control]
– To change the password, refer to “[Change
Password]” (p. 36).
Notes
• Some items cannot be set when the input source is set to other
than Disc/USB/Network. In this case, set the input source to
Disc/USB/Network.
• Some items cannot be set during playback. In this case, press
twice to stop playback completely before setting.
1 Press SETUP to display SETUP menu screen.
Press 2/3 to select [General Setting], then press
ENTER or a .
5 Select a next item.
Press 5/a to select the Parental Control Level for
BD/DVD discs, then press ENTER.
2 Select a Submenu.
Press 5 /a to select [Security], then press ENTER or
cursor 3.
6 Exit the menu screen.
Press 2 to return to the previous menu.
34 En
VOLUME
OPTION
HOME
TOP MENU
POP-UP MENU
ENTER
RETURN ON SCREEN
SLEEP
MUTESEARCHCLEAR
DISPLAY
SETUP
VOLUME
OPTION
HOME
Numeric
SW
buttons
SETUP
5
ENTER
2
3
a

SETUP MENU
[Local Storage]
General Setting
You can display Local Storage information, format Local
Storage, and select [Front USB]/[Rear USB] to save the
The default settings are marked with “
*
”.
BD-Live data.
To format (empty) the “BUDA” folder in the USB
■ System
memory device, select [Information] and press ENTER
[Screen Saver]
when [Format] is focused on the screen.
You can set the screen saver to [On]/[Off].
Front USB, Rear USB
*
When set to [On], this unit will switch to screen saver
y
mode if there is no operation for 3 minutes.
Local Storage is used as an auxiliary memory when a BD disc is
On*, Off
played back.
[Auto Power Off]
[3D Playback Message]
You can set auto power off mode to [On]/[Off] when the
You can turn on or off a warning message concerning 3D
input is selected to Disc/USB/Network. When other inputs
video playback that appears on the TV when this unit is
are selected, auto power off mode can be set by hours or to
turned on.
[Off].
On
*
, Off
Disc/USB/Net: On*, Off
Other Inputs: 1 hour, 2 hours, 4 hours, 8 hours*, Off
■ Language
[Disc Auto Playback]
[OSD]
You can set [Disc Auto Playback] to [On]/[Off]. When set
You can select the language for On Screen Display which
to [On], a disc will play back automatically after loading.
is the messages or menu displayed on the screen such as
On
*
, Off
SETUP menu.
[HDMI Control]
English, , , , ,
Fran
You can set this unit to receive control signal from a TV
, , ,
compatible with the HDMI control function via an HDMI
[Menu]
cable (p. 13).
You can prioritize the language for disc menu.
On, Off
*
English, , , , , ,
y
For details on the HDMI control function, refer to page 30.
, Portuguese, Danish, , Finnish,
SETTINGS
Norwegian, , Korean, Japanese, More
Note
[Audio]
When set to [On], power consumption during standby mode
You can prioritize the audio language for BD/DVD
increases due to the HDMI control function.
playback. For details on setting items, refer to “[Menu]”
(p. 35).
[Load Default]
[Subtitle]
You can reset all settings of this unit to default setting
You can prioritize the language for Subtitle.
except Security setting (p. 36). For details on default
settings, refer to pages 32-39.
English, , , , , ,
[Upgrade]
, Portuguese, Danish, , Finnish,
You can upgrade the software manually from [USB
Norwegian, , Korean, Japanese, More, Off
Storage] or [Network]. For details on software upgrade,
refer to “SOFTWARE UPGRADE” (p. 41).
The default settings in [Language] differ depending on
[Easy Setup]
your model.
You can perform Easy Setup (p. 17).
English
35 En
ç
ais Español Deutsch Italiano
Svenska Nederlandse
Fran
ç
ais Español Deutsch Italiano
Nederlandse Svenska
Fran
ç
ais Español Deutsch Italiano
Nederlandse Svenska

SETUP MENU
■ Playback
[Country Code]
You can set the Country Code you live in. The password
[Closed Caption]
(refer to “[Change Password]” on page 36) needs to be
You can set to display the closed caption (p. 50) when a
entered before the Country Code is set. This setting may
BD/DVD disc with closed caption is played back.
be used for rating of the Parental Control and disc
On, Off
*
playback.
[Angle Mark]
■ Network
You can set to display the Angle Mark ( ) when a BD/
DVD disc with multiple angles is played back.
[Internet Connection]
On
*
You can set to [Enable] when you use BD-Live (p. 27),
, Off
DLNA (p. 22) and software upgrade from the network
[PIP Mark]
(p. 41).
You can set to display the PIP Mark ( ) when a BD
Enable
*
, Disable
disc with picture in picture (p. 27) is played back.
[Information]
On
*
, Off
You can display network information screen. On this
[Secondary Audio Mark]
screen, you can view the information of Interface
You can set to display the Secondary Audio Mark ( )
(Ethernet), Address Type, IP Address, Subnet Mask,
when a BD disc with secondary audio is played back.
Default Gateway, and DNS.
On
*
, Off
[Connection Test]
[Last Memory]
You can perform an internet connection test. If the test is
You can set whether this unit remembers the last playback
failed, please check [IP Setting] (p. 36) and perform the
position of a disc when it is set to standby mode or the disc
test again.
tray is opened.
[IP Setting]
On
*
, Off
You can configure the network settings.
Auto* Select to automatically configure the network
settings of this unit with the DHCP server.
Note
Manual Select to configure the network settings (IP Address,
Some discs are not compatible with this function.
Subnet Mask, Default Gateway, and DNS) manually.
■ Security
y
[Change Password]
• Numeric buttons Enters characters.
You can set the password for changing the Parental
• 2/3 Moves the highlight.
Control Level and Country Code. Refer to “[Parental
• CLEAR Deletes a character.
Control]” (p. 36) and “[Country Code]” (p. 36).
• ENTER Saves the settings and exits from the menu.
[BD-Live Connection]
Notes
You can set access restriction to BD-Live contents.
• The default password is 0000.
Permitted Allows all BD-Live discs to connect the network.
• If you forget the password, refer to “TROUBLESHOOTING”
Partial
Allows only discs with owner certification.
(p. 42) and set all the Security settings to their default settings.
Permitted
*
[Parental Control]
Prohibited Prohibits all BD-Live discs to connect the network.
In some BD/DVD discs, a control level for disc viewing is
set depending on the age of the viewer. You can set the
[DLNA]
Parental Control shown on the screen depending on the
You can set the DLNA (p. 22) to [Enable]/[Disable].
disc content.
When you do not use the DLNA function, set to [Disable].
The password (refer to “[Change Password]” on page 36)
Enable
*
, Disable
needs to be entered before the Parental Control Levels is
[Proxy Setting]
set.
You can set Proxy Setting. Set to [Disable] for normal use.
After you set the Parental Control, when you play back a
Set to [Enable] to set the proxy setting.
disc with level higher than current Parental Control Level,
or you want to change the Parental Control Level, a dialog
Enable Enables proxy host and proxy port setting.
box will pop up to ask you to enter the password.
Disable
*
Sets proxy server to disable. Select this item when
proxy server is not used.
Off*, 1 to 8
Proxy Host Sets proxy host.
Proxy Port Sets proxy port.
36 En
SETUP MENU
[Video Out Select]
Display Setting
You can select the video output resolution from
[Composite], [HDMI Auto], [HDMI 1080p], [HDMI
The default settings are marked with “
*
”.
1080i], [HDMI 720p], [HDMI 480p/576p], and [HDMI
480i/576i]. When set to [HDMI Auto], resolution is set to
■ TV
the maximum resolution according to the connected TV.
[3D Output]
For more details on output formats, refer to “About the
You can select 3D or 2D video output from this unit.
video output formats” (p. 40).
Auto* This unit automatically selects 3D or 2D videos.
Composite, HDMI Auto
*
, HDMI 1080p, HDMI 1080i, HDMI
Off This unit always selects 2D videos.
720p, HDMI 480p/576p, HDMI 480i/576i
Notes
Note
Even if you set [3D Output] to [Auto] and play back a BD 3D
• When you connect your TV and this unit via the VIDEO jack,
disc, this unit selects 2D images depending on the connection and
select [Composite], [HDMI 480p/576p], or [HDMI 480i/576i].
the setting of TV, etc (p. 13).
• To output HD audio (such as Dolby TrueHD or DTS-HD) from
the HDMI terminal, set [Video Out Select] to [HDMI Auto] or
[TV Screen]
more than [HDMI 720p].
You can set the screen aspect ratio of the connected TV,
[TV System]
and adjust the video output.
You can select [TV System] from [PAL], [NTSC] and
If you switch your TV (i.e. because you have bought a
[Multi]. Set the same TV System as your TV set. For more
new one) and the screen aspect ratio of the connected TV
details on output formats, refer to “About the video output
changes, you will have to change the TV Screen setting.
formats” (p. 40).
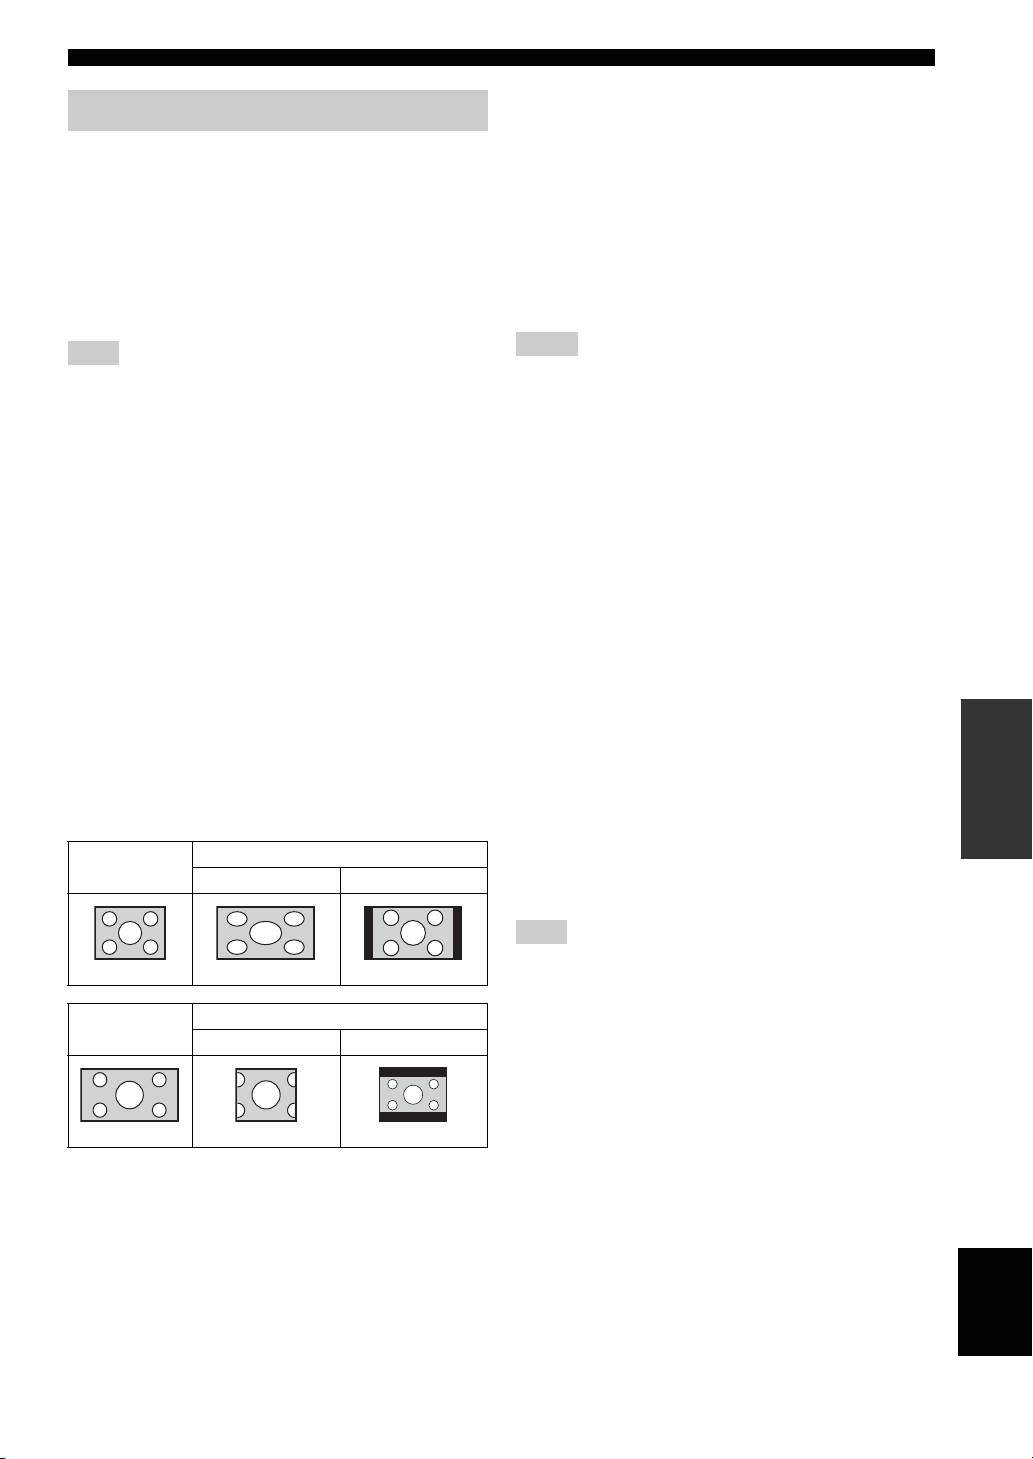
16:9 Full Select this when this unit is connected to a TV with a
16:9 screen. When a 4:3 aspect ratio video is played
NTSC, PAL
*
, Multi (Asia, China, Europe and Russia models)
back, the video is displayed as shown below.
NTSC
*
, PAL, Multi (U.S.A. and Canada models)
16:9 Normal
*
Select this when this unit is connected to a TV with a
16:9 screen. When a 4:3 aspect ratio video is played
[Color Space]
back, the video is displayed as shown below.
You can select the Color Space (p. 50) output from
4:3 Pan Scan Select this when this unit is connected to a TV with a
HDMI. This function is available when this unit is
4:3 screen. When a 16:9 aspect ratio video is played
connected with an HDMI cable.
SETTINGS
back, the video is displayed as shown below.
YCbCr 4:4:4
*
Sets Color Space to YCbCr 4:4:4.
4:3 Letterbox Select this when this unit is connected to a TV with a
YCbCr 4:2:2 Sets Color Space to YCbCr 4:2:2.
4:3 screen. When a 16:9 aspect ratio video is played
back, the video is displayed as shown below.
Full RGB When RGB is set and white and black on the screen
are too faint, select this item. This setting is effective
when a connected component supports RGB 0-255
Original
On 16:9 (wide screen) TV
range.
image size
16:9 Full 16:9 Normal
RGB Outputs video signal at normal signal range.
Note
This function is only available on TVs that support this function.
4:3
[HDMI Deep Color]
When your TV is compatible with Deep Color (p. 50), set
Original
On 4:3 TV
this item according to your TV. This function is available
image size
4:3 Pan Scan 4:3 Letterbox
when this unit is connected with an HDMI cable.
30 bits, 36 bits, Off
*
16:9
English
37 En

SETUP MENU
[HDMI 1080p 24Hz]
[Color Adjust]
This outputs the BD-Video encoded in 24Hz frame rate in
You can adjust Brightness/Saturation/Hue for each color
HDMI 1080p 24Hz. Smoother video playback may be
(Red/Green/Blue/Yellow/Cyan/Magenta). To use this
available with this function. This function is available
function, set [Video Mode] to [Custom]. For details on the
when your TV supports this function, and this unit is
setting items, refer to “[Video Mode]” (p. 38).
connected with an HDMI cable. For more details on
The default settings are 0.
output formats, refer to “About the video output formats”
[Noise Reduction]
(p. 40).
You can set the Noise Reduction to a level of 0 to 3. 0 is
Auto
*
, Off
off, and 3 is the maximum level.
0
*
, 1, 2, 3
Note
[De-interlacing Mode]
This setting is disabled when output resolution is other than
1080p.
You can select how to detect the video signal. Set to
[Auto] for normal use. When horizontal stripping noise
[Lip Sync]
appears on the screen, set this to [Film]/[Video] to remove
You can set/adjust the Lip Sync (p. 50) function.
the noise.
Auto* This unit adjusts the Lip Sync function
automatically.
Auto
*
, Film, Video
Manual You can adjust the Lip Sync function manually. You
can set the delay of the audio for 2D and 3D contents
independently.
2D
3D
Off This unit does not adjust the Lip Sync function.
■ Video Process
[Video Mode]
You can select [Video Mode] below.
Standard* The image is most natural and well-balanced. This
mode suits for normal use.
Vivid The image is more vivid and sharp.
Cinema The image suits for watching movie in dark room.
Custom You can adjust the visual image manually. Press 5 /
a to select the parameter, then press 2 /3 to adjust
the figure.
Brightness
Adjusts the overall brightness of the image.
Saturation
Adjusts the richness of the color in the projected
image.
Hue
Adjusts the tint of the projected image.
Contrast
Adjusts the bright areas (white levels) in the image.
Sharpness
Adjusts the sharpness of objects in the video.
CTI
Smooths out the edges of color images. Color images
are rendered more distinct.
The default settings are 0.
38 En
