YUKON NVMT Spartan 5: инструкция
Раздел: Оптика
Тип:
Инструкция к YUKON NVMT Spartan 5
Оглавление
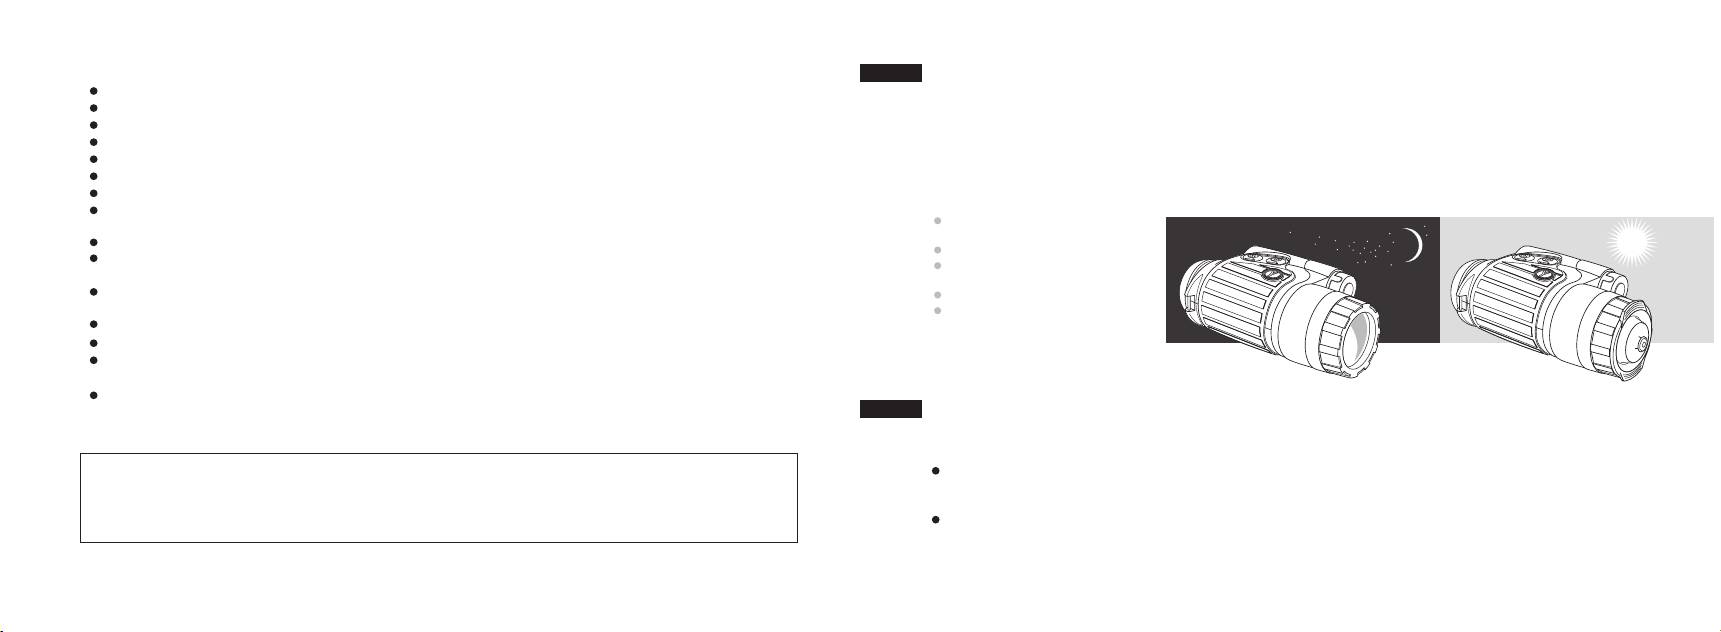
- Прибор не включается... Мелкие темные точки на изображении... Изображение моргает, пульсирует или “снежит”... Изображение не фокусируется... Видимость уменьшается или исчезает...
- Чистите линзы промышленными средствами для чистки линз с многослойным покрытием (можно использовать чистый спирт). Убирайте пыль или грязь с линз, используя мягкую салфетку. Следует всегда хранить прибор NVMT Spartan 5 в чехле в сухом, хорошо вентилируемом помещении,
- Вывинтите окуляр монокуляра (1) против часовой стрелки. Ввинтите окуляр прицела (2), входящий в комплект по часовой стрелке.
- При необходимости нажмите кнопку действия инфракрасного излучения (3), которая расположена рядом с кнопкой включения прибора, для усиления видимости в темных условиях.
- Для установки батареи CR123A отвинтите крышку батарейного отсека. Установите элемент питания В Вашем приборе ночного видения NVMT Spartan 5 используется одна батарея CR123A. Убедитесь, что она установлена в соответствии с указаниями, изложенными в разделе ”Установка батарей”.
- Прибор NVMT Spartan 5 - это прибор, совмещающий в себе ночной монокуляр и прицел одновременно. Ваш прибор ночного видения NVMT Spartan 5 предназначен для длительного использования. Чтобы обеспечить максимальную работоспособность
- КОМПЛЕКТ ПОСТАВКИ
I N S T R U C T I O N S
NVMT Spartan 5 (3x42)
NVMT Spartan 5 (3x42)
Riflescope Kit
Riflescope Kit
www.yukonopticsglobal.com

Прибор не включается...
Проверьте правильность установки батареи, установите ее в соответствии с маркировкой. Убедитесь,
что контакт в контейнере батареи чистый и на нем нет следов коррозии. При необходимости очистите
контакт. Убедитесь, что наружный контактный лепесток не сломан.
Замените батарею, возможно, ее ресурс полностью исчерпан. Проверьте, нажата ли кнопка “ON”.
Мелкие темные точки на изображении...
Эти точки обусловлены технологией изготовления электронно-оптического преобразователя (ЭОП),
установленного в приборе. Они не влияют на работу, надежность и долговечность прибора.
Изображение моргает, пульсирует или “снежит”...
Изображение может моргать или пульсировать при работе в яркой зоне. Закройте объектив крышкой и
войдите в темную зону. Время восстановления прибора зависит от длительности его пребывания в яркой
зоне и может составить от нескольких минут до нескольких часов.
Изображение может моргать в течение первых нескольких секунд после включения прибора даже в темной
зоне, но затем его работа стабилизируется.
Изображение может “снежить” в течение нескольких минут после засветки включенного прибора ярким
источником света (дневной свет, фары автомобиля, костер), а также при работе в полной темноте.
Изображение не фокусируется...
Настройте фокус окуляра и фокус объектива (см. раздел “Использование прибора”). Проверьте, не запотели ли
линзы и не покрыты ли они пылью - почистите наружные поверхности линз мягкой хлопчатобумажной
тканью. Замените батарею, возможно, ее напряжение менее 2,2 В.
Если Вы перенесли прибор с холода в теплое помещение, возможно запотевание внутренних линз -
после пребывания в теплом помещении в течение 2-х часов запотевание исчезнет.
Видимость уменьшается или исчезает...
Яркие источники света, например фары автомобиля, могут привести к уменьшению или исчезновению
видимости и морганию изображения. Выключите бинокль и уберите его с источника света, видимость
восстановится через несколько минут.
48
Когда Вы закончите работу с комплектом NVMT Spartan 5, наденьте крышку на объектив, снимите прибор
ENGLISH
и ЛЦУ с крепления, уложите прибор в чехол.
Если на Вашем приборе горят индикаторы включения прибора (зеленый) и ИК-осветителя (красный),
NVMT Spartan 5 (3x42) Riflescope Kit.......................................................................................1-8
Вам необходимо выключить прибор, нажав соответствующие кнопки.
FRANCAIS
NVMT Spartan 5 (3x42) Komplekt.............................................................................................. 9-16
DEUTSCH
NVMT Spartan 5 (3x42) Komplett...............................................................................................17-24
ESPA OLÑ
ESPANOL
NVMT Spartan 5 (3x42) Conjunto .............................................................................................. 25-32
CESKY
NVMT Spartan 5 (3x42) Sada..................................................................................................... 33-40
Чистите линзы промышленными средствами для чистки линз с многослойным покрытием
(можно использовать чистый спирт).
Убирайте пыль или грязь с линз, используя мягкую салфетку.
РУССКИЙ
Чистите корпус прибора NVMT Spartan 5 мягкой, чистой тканью, слегка пропитанной вазелином.
Прибор ночного видения NVMT Spartan 5 (3x42)................................................................... 41-48
Следует всегда хранить прибор NVMT Spartan 5 в чехле в сухом, хорошо вентилируемом помещении,
подальше от вентиляционных шахт и нагревательных приборов. Температура не должна быть ниже +10 C.
0
Влажность не должна превышать 70%. Если прибор будет храниться более 2-х месяцев,
необходимо извлечь элемент питания.
47

Рисунок 2
SPECIFICATIONS 26141
Length, inch/mm / monocular // riflescope
6.4 / 162 // 10.3 / 261
PACKAGE CONTENTS
Width, inch/mm
3.2 / 82
Height, inch/mm
2.4 / 60
Carrying Case
Weight, oz/kg / monocular // riflescope
17.6 / 0.5 // 24.7 / 0.7
Riflescope eyepiece
Red Dot Laser Pointer
Visual Magnification, x
monocular /riflescope
3 / 1.5
Riflescope Mounting Bracket
Vertical Resolution, lines/mm
36
User Manual
Angular Field of View,
Warranty Registration Card
monocular / riflescope
20 / 20
0 0
Eye Relief, mm
monocular / riflescope
12 / 45
Objective Lens, mm
42
Viewing Range*, m
200
Eyepiece adjustment, diopter
± 4
Operating Voltage, V
3
Built in I.R. Illuminator, yd./m
100 / 100
Tripod mount, inch
1/4
Laser Pointer (LP) Wavelength, nm
633
LP Dispersion angle, mRad
1.0
LP Power, mW
4.0
LP Angle adjustment, angle/degrees
± 2.0
Temperature Range
-22 F to +104 F
0 0
-30 С to +40 С
0 0
Maximum Humidity, %
93
Operating Time, hour
20
For improvement purposes, design of this product is subject to change.
* Maximum distance at which a human figure can be recognized
under ideal viewing conditions; defined as clear conditions
(no fog, dust, etc.) under the light of 1/4 moon (5x10 lux minimum).
-2
1
46

Наведите прибор на интересующий Вас объект и вращением объектива (5) добейтесь нормального
OVERVIEW
качества изображения.
Когда Вы закончите работу с монокуляром NVMT Spartan 5, наденьте крышку на объектив и уложите прибор
NVMT Spartan 5 Riflescope Kit - is a device that can be used as a night vision monocular or a riflescope. A dot of a laser
в чехол.
pointer is used as an aiming reticle of the device. With the laser pointer installed on the night vision or the rifle
Если на Вашем приборе горят индикаторы включения прибора (зеленый) и ИК-осветителя (красный),
can be used independently during the day.
Вам необходимо выключить прибор, нажав соответствующие кнопки.
Night vision monocular has high illuminative and high magnification power. With rifle eyepiece and rifle mount in
place, the device can be used as a night vision riflescope. The kit allows NVMT Spartan to be used in many situations
and for a range of purposes.
Вывинтите окуляр монокуляра (1) против часовой стрелки.
The NVMT Spartan 5 scope is ideal for a wide variety of professional and recreational uses including:
Ввинтите окуляр прицела (2), входящий в комплект по часовой стрелке.
Закрепите ЛЦУ на креплении-кронштейне (3) с помощью прижима (6) и винтов (7).
Wild life observation
Закрепите монокуляр на крепление- кронштейн (3) при помощи двух винтов (4).
Search and rescue
Закрепите крепление- кронштейн для прицела (3) на оружии при помощи винтов (8).
Night hunting and fishing
Закрепите на цевье оружия кнопку включения (9) ЛЦУ.
Nighttime photo / video
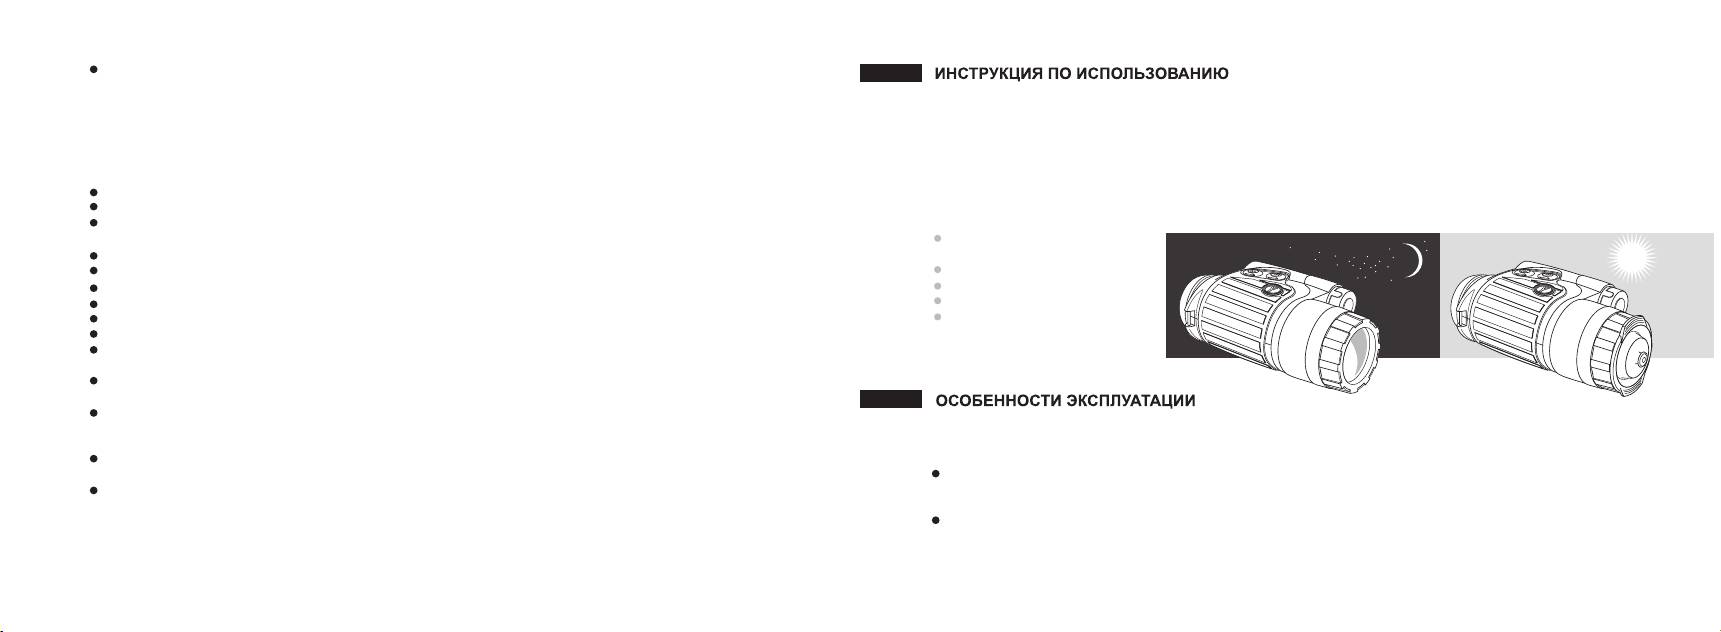
Перед тем как включить прибор, войдите в темную зону.
Equipment Maintenance
Снимите крышку с объектива (10) и вставьте ее в гнездо сбоку.
Включите прибор нажатием кнопки (12) .
Вы можете проверить Ваш прибор, не снимая крышки с объектива в освещенной зоне. Практически
это не выведет из строя ваш прибор.
При необходимости нажмите кнопку действия инфракрасного излучения (11), которая расположена
рядом с кнопкой включения прибора, для усиления видимости в темных условиях.
Наведите Ваш прибор на объект, удаленный на расстоянии около 100 м и вращением окуляра (2)
WARNINGS AND PRECAUTIONS
и объектива (10) добейтесь максимального качества изображения. После данной настройки в незави-
симости от расстояния и других условий не вращайте окуляр.
The NVMT Spartan 5 night vision scope was designed to provide many years of reliable service. To ensure that you get
Наведите прибор на интересующий Вас объект и вращением объектива (10) добейтесь нормального
the most enjoyment out of your NVMT Spartan 5 always obey the following Warnings and Precautions:
качества изображения.
Do not point the NVMT Spartan 5 towards any light source greater than 1 lux. (car headlights, sun, bright lamp, etc.)
После установки прицела на ружье необходимо произвести его пристрелку. Свинтите с ЛЦУ бленду (13)
for an extended period of time. The NVMT Spartan 5 utilizes an internal flash protection system, which minimizes
и с помощью винтов регулировки угла (14) отрегулируйте точку прицеливания. Пристрелка ЛЦУ осущест-
potential damage, but long-term exposure to bright lights can damage the unit. Any damage from user
вляется аналогично прицелам. Завинтите бленду ЛЦУ (13).
mistreatment will void the warranty.
Используйте ЛЦУ при стрельбе, удерживая кнопку включения (9) нажатой в необходимых случаях.
The NVMT Spartan 5 was designed to be self-contained. Do not open the body of the scope or otherwise attempt
to service this device.
45
2

Рисунок 1
Always store the NVMT Spartan 5 in a dry, well-ventilated room.
Keep the NVMT Spartan 5 away from any heating and air conditioning vents or other heating devices.
Keep the NVMT Spartan 5 out of direct sunlight, dust and moisture. Additional precautions include avoiding any sudden
or extreme temperature changes.
Avoid dropping or otherwise shocking the unit. Although designed for rugged outdoor use, the NVMT Spartan 5
incorporates a sophisticated optical system, which can be damaged if misused.
Damage to this device from failure to observe these warnings may void the warranty!
BATTERY INSTALLATION
Your NVMT Spartan 5 runs on one battery - 3V Lithium CR123A. To install, unscrew the battery compartment cover,
insert the battery into the battery compartment so that the positive (+) and negative (-) terminals of the battery
match the markings inside the compartment. Replace the battery cover carefully. Do not over tighten.
LR44
Unscrew the Laser Pointer battery compartment cover (6), insert the LR44 battery into the battery compartment
so that the positive (+) and negative (-) terminals of the battery match the markings inside the compartment.
Replace the battery cover carefully. Do not over tighten.
CR123A
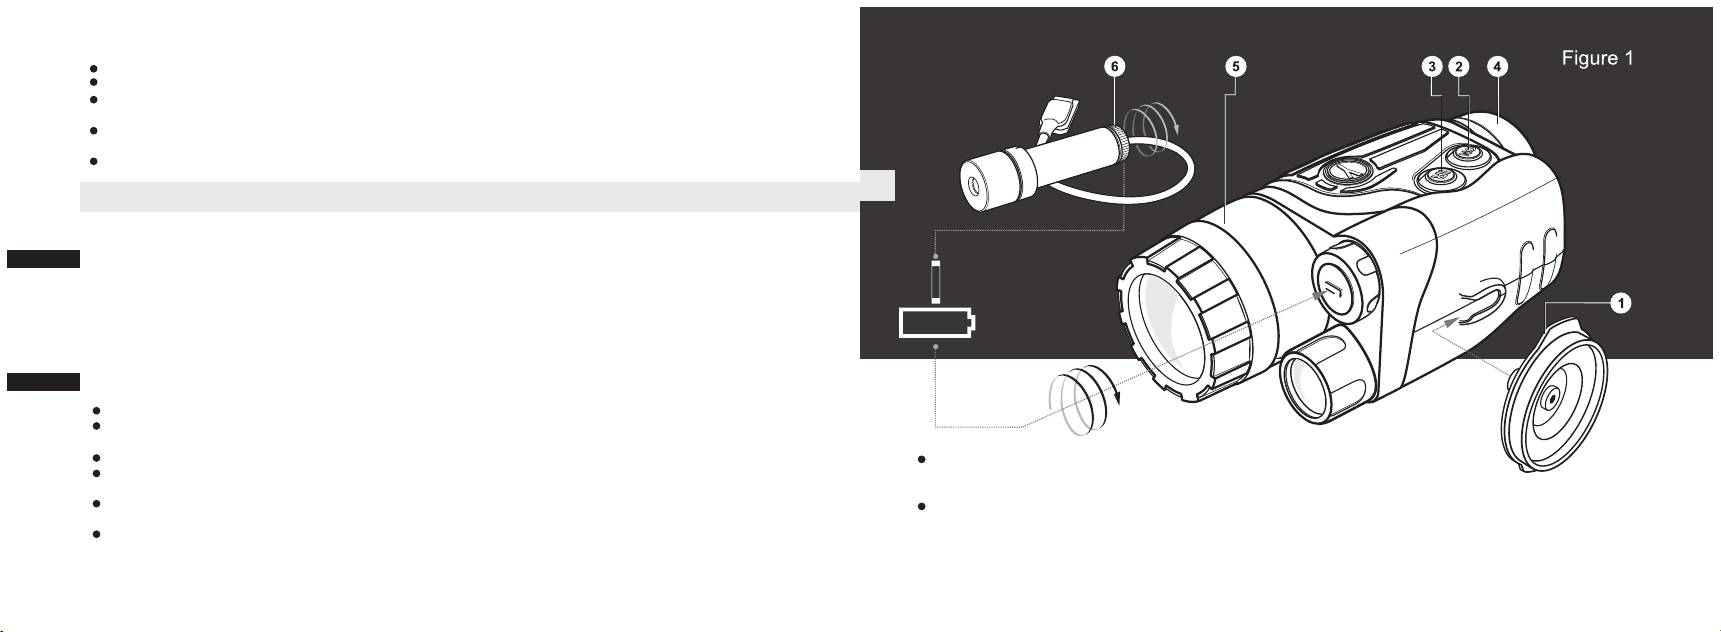
USE AND TESTING
A. Monocular (See Figure 1)
Your NVMT Spartan 5 operates using one CR123A battery. Make sure it has been installed according to instructions found
in the Battery Installation section of this manual.
If you wish to test your night vision device in a lighted area, be sure the lens cap is in place prior to pressing
the “ON” button. The lens cap has a pinhole opening to admit a small amount of light for testing purposes.
Move into a dark area before activating the NVMT Spartan amplifier.
При необходимости нажмите кнопку действия инфракрасного излучения (3),
Remove the lens cap (1) and store in pocket provided.
которая расположена рядом с кнопкой включения прибора, для усиления видимости в темных условиях.
Activate the device by pushing the “ON” button (2).
Наведите Ваш прибор на объект, удаленный на расстоянии около 100 м и вращением окуляра (4)
If the subject to be viewed is in a completely dark area, including low light shadow areas, activate the infrared
и объектива (5) добейтесь максимального качества изображения.
illuminator by pressing the “IR” Button (3) located next to the “ON” button.
После данной настройки в независимости от расстояния и других условий не вращайте окуляр.
3
44
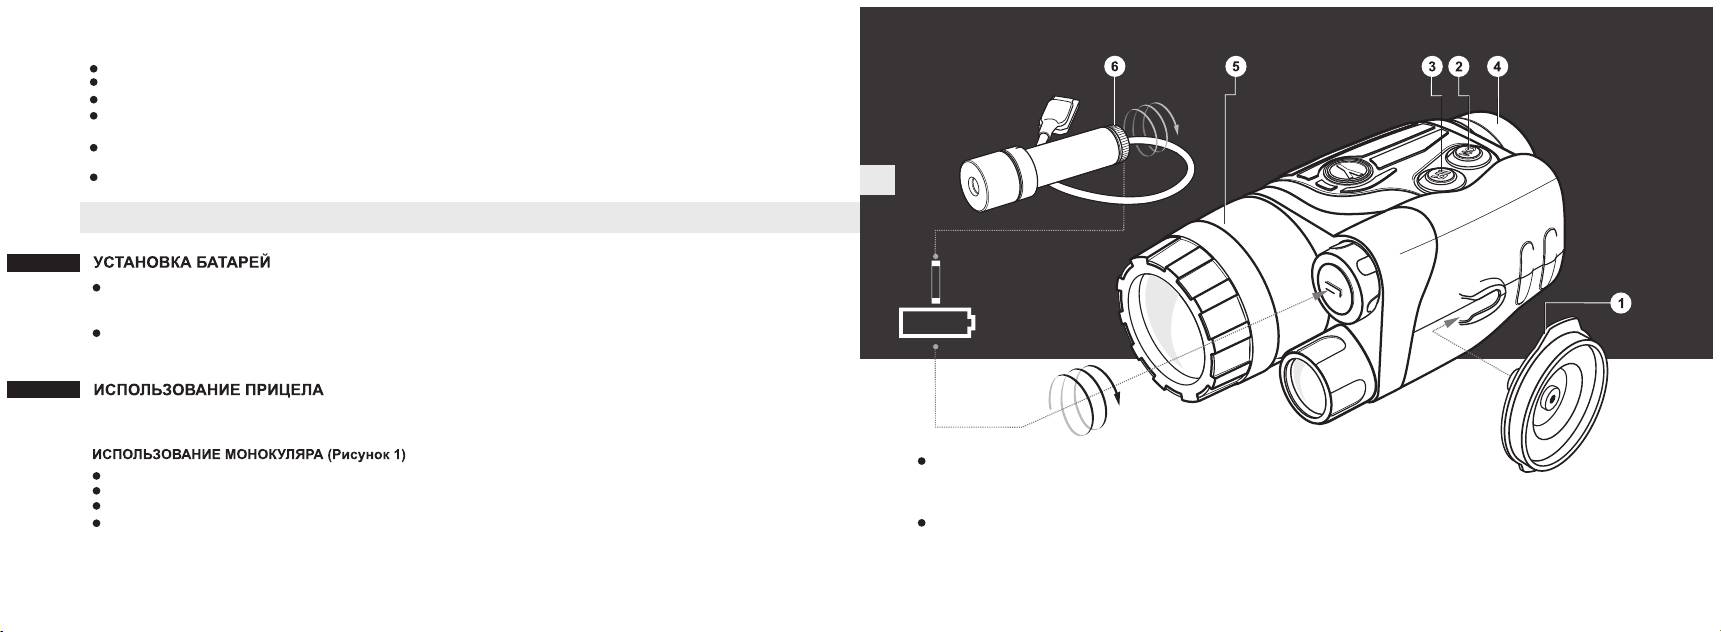
Figure 1
Всегда храните NVMT Spartan 5 в сухом, теплом, хорошо вентилируемом помещении.
Прибор храните вдали от вентиляционных шахт и нагревательных приборов.
Защищайте NVMT Spartan 5 от прямых солнечных лучей, пыли, влаги и резких перепадов температур.
Избегайте ударов и падений прибора. Конструкция прибора включает высококачественные линзы
и зеркала, которые могут быть повреждены в случаях неправильного использования.
Чистку оптических деталей (линз) проводите профессиональными материалами для чистки линз
с многослойными покрытиями.
Корпус прибора NVMT Spartan 5 чистите мягкой чистой тканью, слегка пропитанной синтетическим
чистящим средством.
Повреждение прибора в результате несоблюдения этих указаний ликвидирует гарантию.
Для установки батареи CR123A отвинтите крышку батарейного отсека. Установите элемент питания
LR44
в батарейный отсек таким образом, чтобы "-" и "+" соответствовали маркировке на крышке батарейного
отсека. Установив элемент питания, завинтите крышку отсека.
CR123A
Отвинтите крышку батарейного отсека (6) лазерного целеуказателя (ЛЦУ), установите элементы питания
LR44 в контейнер батарей в соответствии с маркировкой. Закрутите крышку батарейного отсека.
В Вашем приборе ночного видения NVMT Spartan 5 используется одна батарея CR123A.
Убедитесь, что она установлена в соответствии с указаниями, изложенными в разделе ”Установка батарей”.
Direct your NVMT Spartan 5 device at an object at a distance approximately 100 yards.
Перед тем как включить прибор, войдите в темную зону.
Adjust the eyepiece and objective lens diopter setting to focus the unit by rotating
Снимите крышку с объектива (1) и вставьте ее в гнездо сбоку.
the eyepiece (4) and objective lens (5). After the adjustment, do not rotate the
Включите прибор нажатием кнопки (2) .
eyepiece irrespective of the distance and other conditions.
Вы можете проверить Ваш прибор, не снимая крышки с объектива в освещенной зоне.
Direct your NVMT Spartan 5 device at the subject to be viewed and adjust the final focus by rotating the objective lens
Практически это не выведет из строя ваш прибор.
(5) focusing ring until the image quality is optimal.
43
4
The Green LED indicates that the light amplifier unit is on. The Red LED indicates that the IR illuminator is on.
Do not store your NVMT Spartan 5 when any of the indicators are lit. When you finish using your NVMT Spartan 5
Прибор NVMT Spartan 5 - это прибор, совмещающий в себе ночной монокуляр и прицел одновременно.
device, turn off the IR illuminator and light amplifier. Return the lens cap to the objective lens.
В качестве прицельной метки в приборе используется точка лазерного целеуказателя. Лазерный целеуказатель,
установленный на креплении или непосредственно на ружье, может использоваться самостоятельно
в дневное время. Ночной монокуляр имеет высокую светосилу и большое увеличение. Сменив на нем
B. RIFLESCOPE (See Figure 2)
окуляр и закрепив прибор на креплении, входящем в состав комплекта, Вы можете использовать его
в качестве прицела в ночное время. Универсальность комплекта позволяет использовать в различных
Unscrew the eyepiece of the monocular (1) by rotating it counterclockwise.
условиях для различных целей.
Screw the eyepiece of the riflescope (2) clockwise.
Ваш прибор NVMT Spartan 5 идеален для профессионального и любительского применения, включая:
Fasten Red Dot Laser Pointer to the Riflescope Mounting Bracket (3) by clamp (6) and two
screws (7).
Наблюдение в естественной
Fasten the monocular to the Riflescope Mounting Bracket (3) by means of two screws ( 4)
обстановке
Fasten the Riflescope Mounting Bracket (3) on the rifle by two screws (8).
Поиск и спасение
Fasten the Laser Pointer “ON” button (9) to the fore-end of rifle stock.
Ночная охота и рыбалка
Before activating the device come into dark area.
Ночная фото и видео съемка
Remove the objective lens cap (10) and store in a pocket provided.
Ремонт и обслуживание
Activate the device by pushing the “ON” button (12).
оборудования
If you wish to test your night vision device in a lighted area, be sure the lens cap is in place prior to pressing
the “ON” button. The lens cap has a pinhole opening to admit a small amount of light for testing purposes.
If the subject to be viewed is in a completely dark area, including low light shadow areas, activate the infrared
illuminator by pressing the IR Button (11) located next to the “ON” button.
Point your NVMT Spartan 5 device at an object at a distance approximately 100 yards. Adjust the eyepiece and
objective lens diopter setting to focus the unit by rotating the eyepiece (2) and objective lens (10).
Ваш прибор ночного видения NVMT Spartan 5 предназначен
After the adjustment, do not rotate the eyepiece irrespective of the distance and other conditions.
для длительного использования. Чтобы обеспечить максимальную работоспособность
Point your NVMT Spartan 5 device at the subject to be viewed and adjust the final focus by rotating the objective
в течение данного срока, необходимо придерживаться следующих правил:
lens (10) focusing ring until the image quality is optimal.
Никогда не направляйте NVMT Spartan 5 на источник света более 1люкса на длительный период. Интенсивный
After installation of the riflescope to the rifle it is necessary to carry out adjustment/ranging fire. Unscrew
источник света, такой, как автомобильные фары, может вывести из строя прибор на длительный срок.
the cover (13) and adjust the aiming position of the dot by turning the screws (14). Zeroing-in
Любое такое повреждение может также аннулировать гарантию.
the Laser Pointer is identical to adjusting a regular rifle scope. Screw the cover (13).
Ваш NVMT Spartan 5 автономен. Не вскрывайте корпус прибора, а также не пытайтесь ремонтировать прибор.
Если возникает такая необходимость, верните прибор на замену или для ремонта.
5
42

Figure 2
Длина, мм / монокуляра / прицела
162 / 261
КОМПЛЕКТ ПОСТАВКИ
Ширина, мм
82
Высота, мм
60
Чехол
Масса, кг / монокуляра / прицела
0,5 / 0,7
Прибор в сборе
Визуальное увеличение, х
Окуляр прицела
монокуляра / прицела
3 / 1,5
Лазерный целеуказатель
Вертикальное разрешение, лин./мм
36
Крепление к ружью
Угол поля зрения, град.
Инструкция по эксплуатации
монокуляра / прицела
20 / 20
Гарантийный талон
Удаление выходного зрачка, мм
монокуляра / прицела
12 / 45
Световой диаметр объектива, мм
42
Максимальная дистанция наблюдения*, м
200
Предел перефокусировки окуляра, дптр.
±4
Рабочее напряжение, В
3
Дальность действия ИК осветителя, м
100
Размер крепления резьбы к штативу, дюйм
1/4
Длина волны излучения ЛЦУ, нм
633
Угол расходимости ЛЦУ, мрад
1,0
Мощность лазерного излучения ЛЦУ, мВт
4,0
Расход выверки ЛЦУ, угл. град.
±2,0
Температурный диапазон
-30 С ~+40 С
0 0
Максимальная влажность, %
93
Рабочее время, час
до 20
Для улучшения потребительских свойств изделия
в его конструкцию могут вноситься усовершенствования.
* Максимальное расстояние,
на котором может быть опознана человеческая
фигура при идеальных условиях; идеальные условия
(нет тумана, пыли и т.д.) при освещении 1/4 луны (5x10 люкс минимум).
-2
41
6

Illuminate the target by pressing the button (9). You are ready to shoot.
Pulzující nebo mlžící obraz v přístroji...
When you finish your work with NVMT Spartan 5 riflescope, put the lens cap on the objective lens, take the device
Obraz může blikat nebo pulsovat při zapnuti přístroje na intenzivním světlu. Uzavřete objektiv krytem a přemístěte
and Laser Pointer off the Riflescope Mounting Bracket and put all the parts into the carrying case.
se do tmavého prostoru. Doba regenerace přístroje záleží od doby jeho použiti na intenzivním světlu a může trvat od
The Green LED indicates that the light amplifier unit is on. The Red LED indicates that the IR illuminator is on.
několika minut do několika hodin.
Always remember to turn off the entire unit including the IR illuminator and light amplifier when done.
Obraz může blikat během prvních několika sekund po zapnutí přístroje dokonce i v tmavém prostoru, ale však pozděj
Do not store your NVMT Spartan 5 when any of the indicators are lit.
se ustali.
V obrazu může se objevit „sněžení“ během několika minut po zásahu přístroje jasným zdrojem světla (denního světla,
světlometu automobilu), a také v provozu v plné tmě.
CAUTION!
Nelze zaostřit obraz...
Your NVMT Spartan 5 can be used in extreme cold. However, when the unit is brought back into a warm
Zaostřete obraz dle návodu, popsaného v odst. "Použití přístroje".Jestliže obraz se nepodaří zaostřit, vyčistěte optiku,
environment, you MUST wait approximately 5 HOURS before using the unit again. Damage may occur due
která může byt zamlžena nebo zaprášená.
to condensation that may have accumulated on the internal circuitry of the unit.
Vyměňte baterie, u kterých celkové napětí je menší než 2,2V.
V případě přenosu přístroje z chladu do tepla vnitřní část přístroje se může zamlžit. V tomto případě je nutné odložit
použití přístroje na 2 hod.
Vidění se zhoršuje nebo mizí...
Intenzivní světelné zdroje, například reflektory auta, mohou způsobit zhoršení nebo dokonce zmizení vidění
přístrojem nebo blikaní obrazu. V takovém případě vypnete přístroj a odložte mimo zdroje světla, vidění se
MAINTENANCE
normalizuje za několik minut.
Maintaining the NVMT Spartan 5 is simple:
Clean the lens with professional lens cleaning supplies intended for use with multicoated optics.
Blow any dust or dirt off the lenses using dry, compressed air.
Clean the NVMT Spartan 5 housing with a soft, clean cloth.
STORAGE
Always store the NVMT Spartan 5 in its case in a dry, well-ventilated area away from heating/air conditioning vents,
or other heating devices. Temperature should be +10°C. Humidity should not exceed 70%. Remove the
batteries if the device is to be stored for longer than 2 months.
7
40

PÉČE A ÚDRŽBA
TROUBLESHOOTING
Váš NVMT Spartan 5 nepotřebuje zvláštní údržbu. O přístroj pečujete následně:
The scope will not turn on...
Check that the battery is installed properly. Install the battery according to the (+) and (-) polarity, ensuring
that the markings on the battery and battery compartment correspond with one another. Check the battery
Čočky čistěte pouze profesionálními prostředky, určenými k čištění optiky s mnohovrstevnou antireflexrtí
contact to ensure it is clean and free of corrosion; if necessary, clean the contact. Make sure that the external
úpravou.
contact lug is not broken. If necessary, replace the battery as it may be depleted. Also, be sure that the power
Jemný prach či nečistoty je nejlépe "odfouknout" stlačeným suchým vzduchem.
is in the “ON” position when trying to turn on the scope.
K ošetření povrchu přístroje používejte měkký navlhčený hadřík.
Distinct black dots appear on the screen...
These dots are minor cosmetic blemishes resulting from tube production processes and do not interfere with
the reliability or performance of the scope.
The scope flickers, flashes or “snows”...
USKLADNĚNÍ
The scope may flicker or flash when used in a bright environment; to correct this, place the cap over the objective
NVMT Spartan 5 uchovejte vždy v brašnì v suchých, dobøe vìtraných prostorách, v bezpeèné vzdáleností od
lens and enter a dark environment. The scope will restore itself to a natural functioning state in several minutes or
topných tìles, pøi nejmenší teplotì +10°C a vlhkostí maximálnì 70%. V pøípadì že pøístroj nebude používán po
hours, depending on how long the scope had been exposed to the light.
dobu delší nìž 2 mìsíce vyjmete baterie.
The scope may flicker for the first several seconds of use, even when in a dark environment, before the scope
corrects itself and functions properly.
The scope may “snow” for several minutes after being exposed to a bright light source (daylight, a car's headlights,
fire, etc.) even if being operated in complete darkness.
PROBLÉMY
The image is not focused...
Přístroj se nezapíná...
Adjust the focus of the eyepiece and the objective (see Use and Testing). Check that the lenses are not foggy
Zkontrolujte zda baterie jsou vloženy dle správné polarity a vložte je správně. Přesvědčete se že kontakty v
or dusty; if they are, carefully clean the external surfaces of lenses with a soft cotton fabric. Replace the battery if
bateriovém prostoru jsou čísti a nemají korozi, případně je vyčistite.
the total battery charge is less than 2.0 V.
Vyměňte baterie za nové, pravděpodobně jsou úplně vybity. Zkontrolujte jestli je opravdu stisknuté tlačítko ON.
When the unit is brought into a warm environment from a cold one, condensation may appear on the internal lenses;
you must wait two hours before using the unit.
Malé černé body v obraze...
Malé černé body v obraze jsou přípustné a jsou způsobeny technologii výroby elektro-optických měniče. Při
Visibility decreases or disappears...
pozorování v noci body neovlivňují obraz přístroje a jsou viditelné především při zkoušení přístroje za světla se
Bright light sources, such as headlights, may cause visibility to decrease or disappear and the image to flicker.
zakrytým objektivem.
Turn the power off and turn the scope away from the light source; visibility will restore itself in several minutes.
39
8

Obr 2ázek
SPÉCIFICATIONS 26141
Longueur, mm
du monoculaire / du viseur de nuit
162 / 261
CONTENU DE L'EMBALLAGE
Largeur, mm
82
Étui
Hauteur, mm
60
Dispositif au complet
Poids, kg / du monoculaire / du viseur de nuit
0.5 / 0.7
Occulaire du viseur
Grossissement visuel, x
Appareil de laser pour l'indication du but
du monoculaire / du viseur de nuit
Fixation de fusil
3 / 1.5
Résolution verticale, lignes / mm
36
Guide d'utilisation
Champs de vision angulaire, dégré
Carte de garantie
du monoculaire / du viseur de nuit
20 / 20
Eloignement de la pupile de sortie, mm
du monoculaire / du viseur de nuit
12 / 45
Diamètre de la lumière de l'objectif, mm
42
Portée de vue*, m
200
Ajustement de l'oculaire, dioptre
± 4
Tension d'alimentation, volt
3
Illuminateur infra-rouges intégré, m
100
Taille du filetage du nid de fixation, de pouce
1/4
Longueur de l'onde rayonnée de laser, Nm
633
Angle de divergence de laser, mrad
1.0
Puissance du rayonnement de laser, MW
4,0
Divergence de l'ajustage de laser, angle.degré
± 2.0
Écarts de température
-30 C~+40 C
0 0
Humidité maximale, %
93
Durée du fonctionnement, heure
20
Le design de ce produit pourrait-être amené à changer, afin d'améliorer son utilisation.
* Distance maximale pour reconnaître une forme humaine sous conditions
idéales. Conditions idéales: sans brouillard, sans poussière etc.,
sous la lumière de lune (5x10 lux minimum).
-2
9
38
B. POUŽITÍ PŘÍSTROJE S LCU (Obrázek 2)
NOTICE D'UTILISATION
Vyšroubujte okulár (1) přístroje proti směru hodinových ručiček.
L'appareil NVMT Spartan 5 Komplekt est le dispositif qui réunit en soi en même temps un viseuir et un monoculaire
Zašroubujte na místo standardního okuláru doplňkový okulár (2).
de nuit. Le point de l'appareil de laser pour l'indication du but sert d'une marque de viseur. L'appareil de laser pour
Upevnite LCU k redukce (3) použitím upínadla (6) a šroubků (7).
l'indication du but installé sur la fixation ou directement sur le fusil peut être utilisé dans la journée. Le monoculaire
Připevnite monokulár k redukce (3) pomoci dvou šroubků (4).
de nuit a une haute force de la lumière et un grand grossissement. Ayant changé son oculaire et ayant installé
Namontujte vytvořenou sadu monokuláru a LCU pomoci šroubků (8).
le dispositif sur la fixation qui fait partie de l'assortiment, Vous pouvez l'utiliser comme viseur pendant la nuit.
Připevnite tlačítko zap./výp. LCU dle vhodné polohy.
L'universalité de l'assortiment permet de l'utiliser dans les conditions différentes et pour tous les buts.
Před zapnutím přístroje se přemístěte do tmavého prostoru.
Votre appareil NVMT Spartan 5 est idéal pour l'usage professionnel et d'amateur y compris:
Odstraňte kryt objektivu a vložte do speciálního postranního držáku (10). Funkčnost přístroje lze ověřit i za
světla, přitom objektiv musí byt přikrýt ochranným krytem!
Observation dans les conditions
naturelles
Zapněte přístroj stisknutím tlačítka (12).
Recherche et sauvetage
Dle potřeby stisknutím tlačítka (11) aktivujte infračervené přisvícení, které zlepší viditelnost za zvlášť temným
Prise des photos
pozorovácích podmínek.
et filmage nocturne
Pozorujte přístrojem objekt vzdáleny kolem 100 m a otáčením okuláru (2) a objektivu (10) zaostřete obraz.
Chasse et pêche de nuit
Nastaveni okuláru neměňte i pro jiné vzdálenosti pozorování.
Réparation et maintenance
Zaostření obrazu provádějte otáčením objektivu (10).
de l'équipement
Pro nastavení bodu LCU odšroubujte kryt (13) a použijte štelovaní šrouby (14).
Udržujte přitlačeným tlačítko (9) a sledujte světelnou stopu LCU přístrojem. Pro zmenšení bodu LCU
použijte clonící kroužek.
Po ukončení pozorování přikryjte objektiv ochranným krytem. Zkontrolujte vypnutí přístroje ( zelená kontrolka
upozorňuje na zapnutí přístroje, červená na zapnutí infračerveného přisvícení). Svíti-li kontrolka, stisknutím
AVERTISSEMENTS ET PRÉCAUTIONS
příslušného tlačítka vypnete funkci přístroje. Vypnutý přístroj vložte do brašny.
Votre appareil de la vision de nuit NVMT Spartan 5 à été conçu pour donner plusieurs années du service fiable.
Afin d'assurer sa haute performance durant cette période, faites toujours attention aux règles suivantes:
POZOR!
Ne dirigez pas le NVMT Spartan 5 vers une source de la lumière au delà de 1 lux pour une période durable. La source
Váš přístroj lze použít při extrémně nízkých teplotách. Po přenesení do tepla může dojít ke
intensive de la lumière telle que des phares d'automobile peut endommager l'appariel pour une période étendue.
kondenzaci vodních par na jeho optice a elektro-optickém měniči. V takovém případě je nutné odložit
Tout endommagement de ce genre peut aussi annuler la garantie.
další použití přístroje až o 5 hodin!
Votre NVMT Spartan 5 est autonome. N'ouvrez jamais l'emboîtement de l'appareil et n'essayez pas de le réparer.
En cas d'endommagement rendez votre appareil pour la réparation ou remplacer-le.
37
10

Obr 1ázek
Gardez toujours le NVMT Spartan 5 dans un endroit sec.,chaud et bien aéré.
Gardez le NVMT Spartan 5 à l'écart de toute sortie de chauffage/air climatisé ou un autre appareil de chauffage,
lumière directe de soleil , poussière, humidité et changement brusque de température.
Évitez de l'échapper ou heurter autrement l'appareil. Quoique conçu pour une utilisation sous conditions
rigoureuses, le NVMT Spartan 5 contient un système optical avancé aux lentiles et miroirs il est possible de
l'endommager en cas d'abus.
Les endommagements de l'appareil a cause de non suivi de ces indications annulent la garantie.
INSTALLATION DES BATTERIES
Pour l'installation de la batterie CR123A dévissez le couvercle du récipient de batterie. Pour l'installation de la batterie
CR123A dévissez le couvercle du récipient de batterie. Installez l'élément de l'alimentation dans le récipient de batterie
de telle façon que “-” et “+” correspondent au marquage sur le couvercle du récipient de batterie. Ayant
LR44
installé l'élément de l'alimentation, vissez le couvercle du récipient.
Dévissez le couvercle du récipient de batterie (6) de l'appareil de laser pour l'indication du but et installez les éléments
CR123A
de l'alimentation LR44 dans le compartiment des batteries conformément au marquage. Vissez le couvercle
du récipient de batterie.
UTILISATION DU DISPOSITIF
Votre dispositif de la vision nocturne a une batterie CR123A. Assurez-vous qu'elle est installée conformément
aux instructions, citées dans la partie "Installation des batteries".
A. UTILISATION DU MONOCULAIRE (Figure 1)
Avant de brancher le dispositif, entrez dans une zone obscure.
Enlevez le couvercle de l'objectif (1) et insérez-le dans le nid de côté.
Faites marcher le dispositif à l'aide du bouton (2).
Po ukončení pozorování přikryjte objektiv ochranným krytem. Zkontrolujte vypnutí přístroje ( zelená kontrolka
Vous pouvez vérifier Votre dispositif sans enlever le couvercle de l'objectif dans une zone éclairée.
upozorňuje na zapnutí přístroje, červená na zapnutí infračerveného přisvícení). Svíti-li kontrolka, stisknutím
Pratiquement cela ne mettra hors de service votre dispositif.
příslušného tlačítka vypnete funkci přístroje. Vypnutý přístroj vložte do brašny.
11
36
Přístroj uchovávejte v suchých, teplých a větraných prostorech.
Přístroj v žádném případě nevystavujte zdrojům tepla ani přímým slunečním paprskům, prachu a vlhkosti.
Zabraňte pádu a prudkým manipulacím s přístrojem. Nešetrné zacházení může poškodit optické prvky
a vnitřní elektronické obvody.
K čištění optiky použijte pouze profesionální prostředky, určené k čištění optiky s několika násobně vrstvenou
antireflexní úpravou.
Povrch přístroje čistěte měkkým, čistým navlhčeným hadříkem.
NA VÝROBEK POŠKOZENÝ NEDODRŽENÍM VÝŠE UVEDENÝCH UPOZORNENÍ SE NEVZTAHUJE ZÁRUKA!
INSTALACE BATERIE
Odšroubujte kryt bateriového prostoru. Vložte monočlánek CR123A tak, aby minusem se dotýkal krytu bateriového
LR44
prostoru. Zašroubujte kryt bateriového prostoru.
Odšroubujte kryt bateriového prostoru LCU (6) a vložte baterie LR44 podle vyznačené polarity. Zašroubujte
CR123A
kryt bateriového prostoru.
A. POUŽITÍ PŘÍSTROJE (Obrázek 1)
Před zapnutím přístroje se přemístěte do tmavého prostoru.
Odstraňte kryt objektivu a vložte do speciálního postranního držáku (1). Funkčnost přístroje lze ověřit
i za světla, přitom objektiv musí byt přikrýt ochranným krytem!
Zapněte přístroj stisknutím tlačítka (2).
En cas de nécessité pressez le bouton de l'effet du rayonnement infrarouge (3),
Dle potřeby stisknutím tlačítka (3) aktivujte infračervené přisvícení, které zlepší viditelnost za zvlášť temným
qui se trouve à côté du bouton d'enclenchement du dispositif, pour le renforcement
pozorovácích podmínek.
de la vision dans les conditions obscures.
Pozorujte přístrojem objekt vzdáleny kolem 100 m a otáčením okuláru (4) a objektivu (5) zaostřete obraz.
Pointez Votre dispositif sur un objet, éloigné à la distance de 100m et en tournant l'oculaire (4) et l'objectif (5)
Nastaveni okuláru neměňte i pro jiné vzdálenosti pozorování.
obtenez une qualité maximale de l'image. Après ce réglage ne tournez pas l'oculaire indépendamment
Zaostření obrazu provádějte otáčením objektivu (5).
de la distance et des autres conditions.
35
12

Pointez le dispositif sur l'objet qui Vous intéresse et en tournant l'objectif (5) obtenez une qualité normale
POPIS PŘÍSTROJE
de l'image.
Ayant terminé le travail avec le monoculaire NVMT Spartan 5 mettez le couvercle sur l'objectif et placez le dispositif
Přístroj NVMT Spartan 5 Sada je víceúčelové zařízení, sloužící k pozorovaní a orientaci v noci. Noční monokulár má
dans son étui. Si les indicateurs du fonctionnement du dispositif (feu vert) et de l'appareil d'éclairage infrarouge
vysoce světelnou optiku a velké zvětšení. Pro zaměření přístroj používá přídavný zdroj LCU. Přístroj pracuje
(feu rouge) sont allumés, Vous devez débrancher le dispositif à l'aide des boutons de débranchement de l'appareil.
na základě zesílení zbytkového světla, které poskytují zájmena hvězdná obloha a měsíc. Přístroj je vybaven
zdrojem infračerveného světla značně zvyšujícího efektivitu pozorování za zvlášť temných pozorovácích podmínek.
Tělo přístroje má nerovný, drsný povrh a předurčuje jeho použití v extremních podmínkách. Noční přístroj
B. UTILISATION DU VISEUR (Figure 2)
je napájen monočlánkem typu CR123A, s nimiž vystačí po dobu až 20 hodin při provozní teplotě -30°C ~ + 40°C.
Dévissez l'oculaire du monoculaire (1) contre le sens des aiguilles de la montre.
Váš NVMT Spartan 5 je ideální pro profesionální i amatérské použití při:
Vissez l'oculaire du viseur (2) entrant dans l'assortiment, dans le sens des aiguilles de la montre.
Fixez l'appareil de laser pour l'indication du but sur le support (3) à l'aide de la serre (6) et des vis (7).
Pozorování v přírodě
Fixez le monoculaire sur le support (3) à l'aide des deux vis (4).
Jachtingu
Fixez le support pour le viseur (3) sur l'arme à l'aide des vis (8).
Komerčním lovu ryb
Fixez sur le fût de fusil le bouton d'enclenchement (9) de l'appareil de laser pour l'indication du but.
Policejních a pátracích akcích
Avant de faire marcher l'appareil, entrez dans une zone obscure.
Vyhledávání a zachraňování
Enlevez le couvercle de l'objectif (10) et insérez-le dans le nid de côté.
Zajišťování bezpečnosti,
Branchez l'appareil à l'aide du bouton (12).
střežení objektů
Vous pouvez vérifier Votre dispositif sans enlever le couvercle de l'objectif dans une zone éclairée.
Pratiquement cela ne mettra pas hors de service Votre dispositif.
En cas de nécessité pressez le bouton de l'effet du rayonnement infrarouge (11) qui se trouve à côté
du bouton d'enclenchement du dispositif pour le renforcement de la vision dans les conditions obscures.
Pointez Votre dispositif sur l'objet, éloigné à la distance de 100m et en tournant l'oculaire (2) et l'objectif (10)
DŮLEŽITÁ UPOZORNĚNÍ PRO ZAHÁZENI S PŘÍSTROJEM
obtenez la qualité maximale de l'image. Après ce réglage ne tournez pas l'oculaire indépendamment
de la distance et des autres conditions.
Váš noční monokulár NVMT Spartan 5 je produktem moderní technologie a kvalitního zpracování. Následující doporučení
Pointez le dispositif sur l'objet qui Vous intéresse et en tournant l'objectif (10) obtenez une qualité normale
Vám pomohou dodržet podmínky pro firemní záruky a využívat přístroj po mnoho let.
de l'image.
POZOR! Zapínaní přístroje za denního světla bez nasazeného předního krytu objektivu je kategorický
Après l'installation du viseur sur le fusil il est nécessaire de régler son tir. Dévissez de l'appareil de laser
zakázáno. Nikdy nesměřujte NVMT Spartan 5 na světelný zdroj o intenzitě větší než 1 lux. Intenzivní světelné zdroje
pour l'indication du but l'écran pare-lumière (13) et à l'aide des vis de réglage de l'angle(14) réglez le point
(např. přime světlo reflektorů auta) mohou způsobit stálé zničení přístroje. Pamatujte, že nedodržení
de visée. Le réglage de l'appareil de laser pour l'acquisition du but se réalise de même manière que l'installation
uvedeného pravidla vede k anulování záruky.
des viseurs. Vissez l'écran pare-lumière (13) de l'appareil de laser pour l'indication du but.
Nerozebírejte a samostatně neopravujte přístroj. Nastanou-li problémy při použití NVMT Spartan 5, obraťte se
na prodejce, kde v případě oprávněného nároku, nefunkční přístroj bude přijat k opravě nebo vyměněn.
13
34
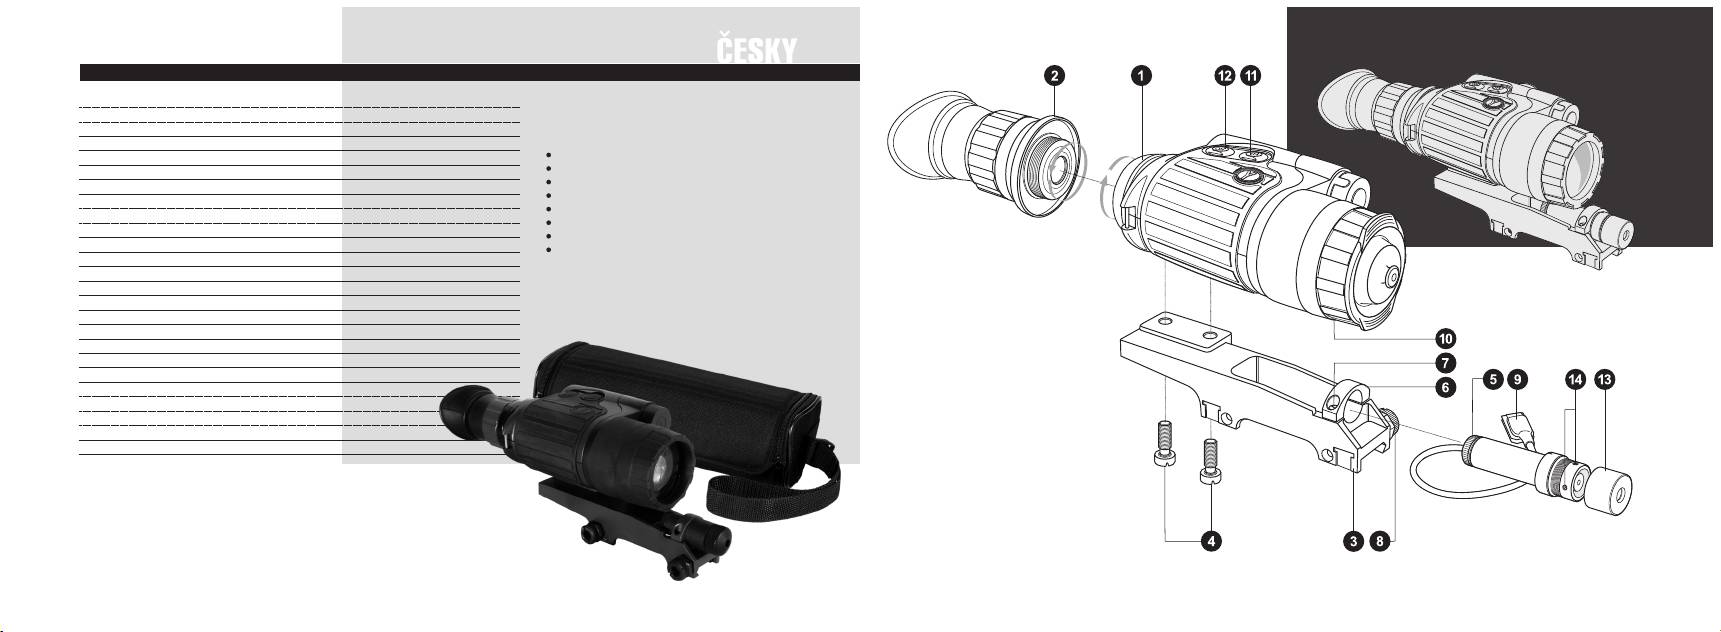
Figure 2
TECHNICKÉ ÚDAJE 26141
Zvětšení, x
KOMPLET
- při použití základního okuláru
3
- při použití doplňkovýho okuláru
1.5
Váš monokulár pro noční vidění NVMT Spartan 5
Vertikální rozlišení, řádků / mm
36
je dodáván v následujícím kompletu:
Zorný úhel
20
0
Brašna
Maximální vzdálenost pozorování, m *
200
Monokulár pro noční vidění NVMT Spartan 5
Oční přizpůsobivost, dioptrie
±4
LCU
Vzdálenost výstupní pupily, mm
Montážní redukce
Doplňkový okulár
- při použití základního okuláru
12
Videoadaptér *
- při použití doplňkovýho okuláru
45
Návod k použití
Napájecí napětí přístroje, V
3
Záruční list
Vlnová délka LCU, nm
633
Korekce LCU, Rad
±2
* na objednávku
Divergence paprsku, mRad
1
Výkon LCU, mW
4
Dosah infračerveného přisvícení, m
100
Závit na stativ
1/4“
Provozní doba, hod.
až 20
Provozní teplota
-30 C ~+40 C
0 0
Maximální vlhkost,%
93
Velikost:
Délka, mm
162 / 261
Šířka, mm
82
Výška, mm
60
Hmotnost, kg
0.5 / 0.7
* Maximální vzdálenost, při které je za ideálních
pozorovacích podmínek rozeznatelná lidská postava:
při svíticí 1 měsíce (osvětlení minimálně 5x10 lux),
-2
bez mlhy a prachu.
33
14

Utilisez appareil de laser pour l'indication du but pendant le tir sans desserrer le bouton d'enclenchement (9)
asegurándose de que los distintivos de polaridad se corresponden en la pila y en el aparato. Compruebe que el
dans les cas nécessaires.
contacto de la batería está limpio y sin corrosión; si es necesario límpielo. Asegúrese que el protector externo
Ayant terminé le travail avec le viseur NVMT Spartan 5, mettez le couvercle sur l'objectif, enlevez le dipositif et l'appareil
del contacto no esté roto. Si es necesario reemplace la batería por otra nueva porque puede estar agotada.
de laser pour l'indication du but de la fixation, placez le dispositif dans son étui.
También asegúrese de que el contacto está en posición “ON” cuando encienda el visor.
Si les indicateurs du fonctionnement du dispositif (feu vert) et de l'appareil d'éclairage infrarouge (feu rouge)
sont allumés, Vous devez débrancher le dispositif à l'aide des boutons de débranchement de l'appareil.
Aparecen puntos negros en la pantalla…
Estos puntos son pequeñas manchas estéticas sin importancia que se producen en el proceso de fabricación del
tubo y no interfieren en la fiabilidad ni en el funcionamiento del visor.
ATTENTION!
Votre appareil peut être utilisé pendant la température assez basse. Mais si après son utilisation au froid vous
El visor parpadea, destella o se ve con nieve...
l'avez apporté dans un endroit chaud il faut attendre 5 heures avant la nouvelle utilisation de l'appareil afin
El visor puede parpadear o destellar cuando se use en un ambiente con luz brillante. Para corregirlo, ponga la
d'éviter l'apparition du buée (l'eau condensée) sur les lentilles et le transformateur électro-optique.
tapa en la lente del objetivo y colóquese en un lugar oscuro. El visor entonces se auto corregirá, lo que podrá tardar
varios minuto e incluso horas dependiendo del cuanto tiempo haya estado expuesto a la luz.
Puede suceder que el visor vuelva a parpadear los primeros segundos de uso incluso aunque se encuentre en un
ambiente oscuro, hasta que se autorregule y empiece a funcionar correctamente.
Puede también suceder que el visor muestre una especie de nieve durante varios minutos después de haber sido
ENTRETIEN
expuesto a una luz brillante como la luz del día, los faros de un coche, fuego, etc., y aunque se esté operando en
L'entretien du NVMT Spartan 5 est très simple:
completa oscuridad.
Nettoyez les lentiles à l'aide de produits de nettoyage conçus pour les lentilles multi-enduites.
La imagen está desenfocada...
Enlever grasse et poussière des lentilles avec de l'air sous pression.
Ajuste el foco del ocular, y el objetivo, (ver punto Uso y Comprabación). Compruebe que las lentes no están
Nettoyez l'extérieur de votre NVMT Spartan 5 avec un tissu doux et propre légérment mouillé de vaseline.
empañadas ni tienen polvo; si lo están, limpie cuidadosamente las superficies externas de las lentes con un
trapo suave de algodón. Sustituya la batería si la carga total de ésta es de 2.0 V o menor.
Si el aparato se lleva de un ambiente cálido a uno frío, puede producirse condensación en las lentes internas.
En ese caso espere dos horas antes de usar el visor.
La visibilidad disminuye o desaparece...
MAGASINAGE
Las fuentes de luz brillante, como los focos, pueden hacer que la visibilidad disminuya o desaparezca y que
Garder toujours votre NVMT Spartan 5 dans son l'étui dans un endroit bien aéré et à l'écart des sorties chauffage/air
la imagen parpadee. Apague el aparato y retírelo de la luz; la visibilidad se autorregulará por sí sola en
climatisé ou autre appareil de chauffage. La température ne devrait pas tomber au-dessous de + 10 C.
0
varios minutos.
L'humidité ne doit pas dépasser 70%. Enlever les piles si l'appareil ne sera pas utilisé pendant plus de deux mois.
15
32

Tenga en cuenta que si haya quedado encendido el indicador verde (indica que el dispositivo está
LES PANNES ÉVENTUELLES ET LE DEPANNAGE
encendido) o el indicador rojo (IR-iluminador) deberá apagar el dispositivo, pulsando los botones apropriados.
Appareil ne fonctionne pas...
Vérifier si la pile est installée correctement, l'installer conformément au marquage. S'assurer que le contact
ATENCIÓN:
dans le compartiment de pile est propre et ne comporte pas de traces de corrosion. Au cas de nécessité nettoyer
Podrá utilizar su NVMT Spartan 5 en condiciones de frío extremo, pero al devolver el instrumento a un ambiente
le contact. Vérifier que la plaque de contact est entière.
de calor, DEBERÁ ESPERAR aproximadamente 5 HORAS antes de volver a utilizarlo. En caso contrario,
Changez la pile, il est possible que l'énergie de la pile soit épuisée. Vérifier que le bouton “ON” est appuyé.
la condensación que se puede haber acumulado en el circuito interno de la unidad puede provocar daños.
La présence des points noirs sur l'image...
Ces points dû à la technologie de farbication du convertisseur optronique (CO) intégré. Ces points n'influencent
pas le fonctionnement, la fiabilité et durée de service du dispositif.
MANUTENCIÓN
Es muy simple mantener el NVMT Spartan 5.
Image clignote, pulse et “neige” sur l'écran...
L'image peut clignoter ou pulser lors de son fonctionnement dans un milieu très lumineux. Fermer l'objectif à l'aide
Limpie las piezas ópticas (lentes) con productos profesionales para la limpieza, especificos para dispositivos
du couvre-objectif et passer dans une zone obscure. Le temps de récupération du dispositif est pleinement lié au
ópticos multicapa.
temps de son fonctionnement dans le milieu lumineux et peut se varier de quelques minutes à plusieures heures.
Limpie el cuerpo del NVMT Spartan 5 con el tejido suave y limpio, impregnado de vaselina.
Bien que l'image puisse connaitre des clignotements dans les premières secondes après la mise en marche du
dispositif, elle s'avére stable ensuite.
L'image peut connaitre l'effet de «neige» quelques premières minutes après l'exposition du dispositif à la lumière
CONSERVACIÓN
vive (lumière de jour, phares d'un véhicule, feu) ainsi que lors de son fonctionnement dans le noir le plus complet.
Guarde el NVMT Spartan 5 en su funda en una lugar seco, bien ventilado y alejado de ventiladores de calefacción /
L'image est floue...
aire acondicionado u otras fuentes de calor. La temperatura no debería ser inferior a los +10°C. La humedad
Régler la focale de l'oculaire et la focale de l'objectif (réf. Usage et Vérification). Vérifier l'absence d'embuée ou de
no debería exceder del 70 %. Retire la batería si el instrumento se va aguardar sin uso durante más de 2 meses.
poussière sur l'oculaire et l'objectif les essuyer avec un chiffon optique à coton. Changez la pile, il est probable
que la tension soit infèrieure à 2,2V.
Si le dispositif a été amené dans un endroit chaud de l'endroit froid, il est probable que les lentilles intérieures
soient embuées gardez le dispositif dans un endroit chaud plus de 2 heures et l'embuage disparaitra.
SOLUCIONADOR DE PROBLEMAS
La visibilité diminue ou disparaisse...
El visor no se enciende…
Les sources de lumière vive, par exemple, les phares d'un véhicule peuvent amener une chute ou la disparition
Compruebe que la batería está correctamente instalada. Instálela de acuerdo con la polaridad (+) y (-),
de la visibilité ou le clignotement de l'image. Mettez le dispositif hors-tension et l'emportez à l'ombre, la visibilité se
rétablira dans quelques minutes.
31
16

Illustración 2
TECHNISCHE KENNDATEN 26141
Länge, mm
des Monokulars / des Nachtsichtvisiers
162 / 261
LIEFERUMFANG
Breite, mm
82
Futteral
Höhe, mm
60
Komplettes Gerät
Gewicht, kg
Visierokular
des Monokulars / des Nachtsichtvisiers
0.5 / 0.7
Laservisiereinrichtung
Befestigung für Gewehr
Visuelle Vergrösserung , x
des Monokulars / des Nachtsichtvisiers
3 / 1.5
Gebrauchsanweisung
Trennschärfe, linien/mm
36
Garantieschein
Sichtfeldwinkel, grad.
des Monokulars / des Nachtsichtvisiers
20 / 20
Entfernung der Austrittspupile, mm
des Monokulars / des Nachtsichtvisiers
12 / 45
Lichtdurchmesser des Objektivs, mm
42
Max. Beobachtungsdistanz, m*
200
Umfokussierungsgrenze des Okulars, dptr.
±4
Betriebsspannung, V
3
Reichweite des Infrarotbeleuchters, m
100
Abmessung der Befestigungsgewinde
am Stativ, Zoll
1/4
Länge der Ausstrahlungswelle,nm
633
Divergenzwinkel, mrad
1.0
Energiefluss der Laserstrahlung,mW
4.0
Ausrichtenverbrauch, wink.grad
±
2.0
Temperaturbereich
-30 C ~+40 C
0 0
Max. Feuchtigkeit, %
93
Betriebszeit, Stunde
bis 20
Änderungen des Designs aufgrund von
verbesserten Gebrauchseigenschaften vorbehalten.
* Màx. Entfernung, auf der eine menschliche Gestalt bei idealen Bedingungen
erkannt werden kann; ideale Bedingungen (kein Nebel, Staub etc.) bei einer
Beleuchtung von ¼ Mond (5x10 lx min.).
-2
17
30
