Kenwood KRC-37: Connecting Wires to Terminals Installation
Connecting Wires to Terminals Installation: Kenwood KRC-37
KRC-394(E2)_U.S r1 02.9.26 7:29 PM Page 26
Connecting Wires to Terminals
Installation
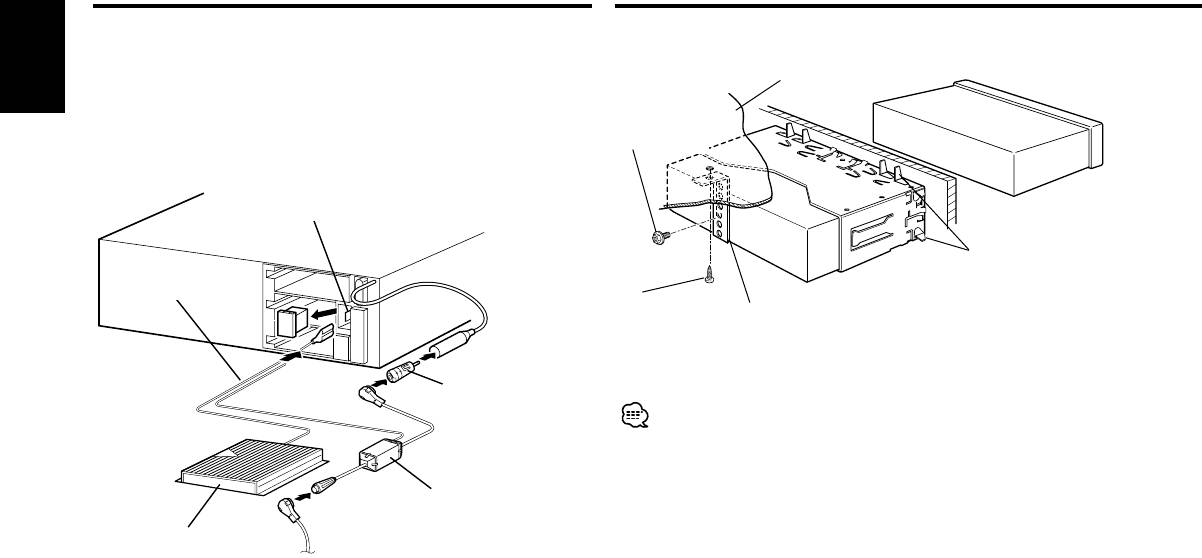
■ Power Control Terminal Connections
■ Installation
The output of the Power Control terminal is switched along with
Firewall or metal support
the power on/off switching of the unit.
English
This terminal can be connected to the P.CON (REMOTE) terminal
of the amplifier, or used as the power supply of the special
Screw (M4X8)
antenna adapter for Volkswagen cars. (MAX. 310 mA)
(commercially
available)
Power Control terminal
(Flat terminal) 4
Bend the tabs of the
mounting sleeve
with a screwdriver or
similar utensil and
attach it in place.
Power control wire 5
Self-tapping
Metal mounting
screw
strap
(commercially
(commercially
available)
available)
Antenna Conversion
Adaptor (ISO–JASO)
(Accessory3) 1
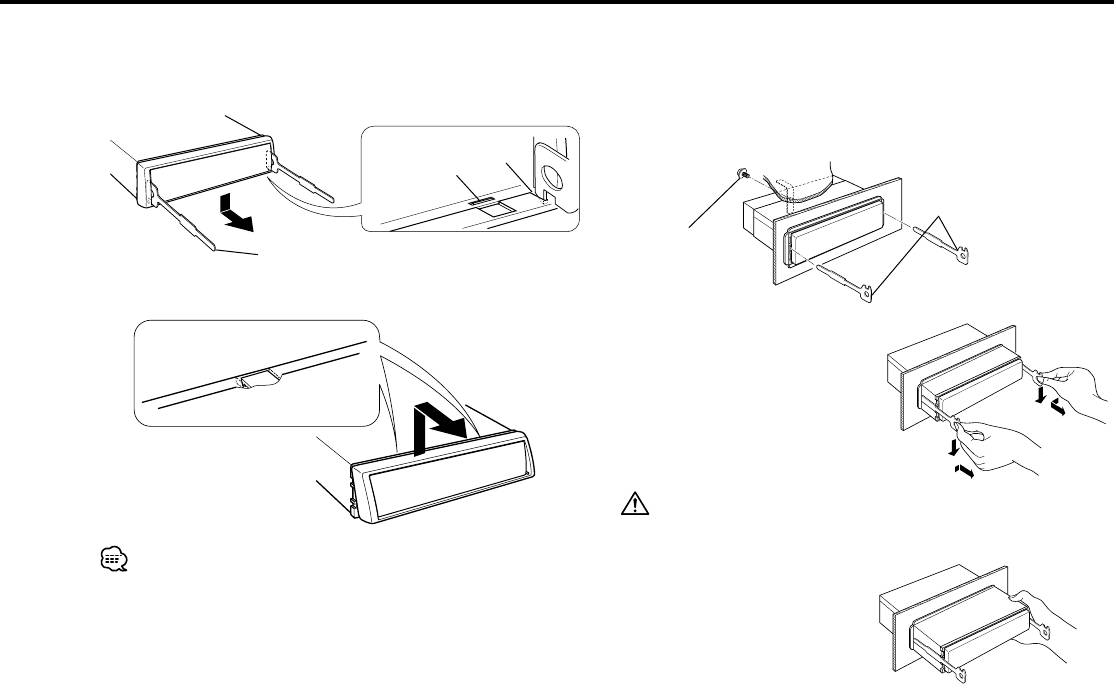
Make sure that the unit is installed securely in place. If the unit is
unstable, it may malfunction (eg, the sound may skip).
Special antenna adapter
(For Volkswagen car)
(Commercially available) 3
Power Amplifier 6
Antenna Cord (ISO) 2
— 26 —— 26 —
KRC-394(E2)_U.S r1 02.9.26 7:29 PM Page 27
■ Removing the hard rubber frame
■ Removing the Unit
1 Refer to the section "Removing the hard rubber frame" and
1 Engage the catch pins on the removal tool and remove the two
then remove the hard rubber frame.
locks on the lower level.
Lower the frame and pull it forward as shown in the figure.
2 Remove the screw (M4×8) on the back panel.
3 Insert the two removal tools deeply into the slots on each side,
as shown.
Catch
Lock
Accessory2 Removal tool
Screw (M4X8)
Accessory2 Removal tool
(commercially
available)
2 When the lower level is removed, remove the upper two
locations.
4 Lower the removal tool
toward the bottom, and pull
out the unit halfway while
pressing towards the inside.
Be careful to avoid injury from the catch pins on the removal tool.
The frame can be removed from the top side in the same manner.
5 Pull the unit all the way out
with your hands, being
careful not to drop it.
— 27 —— 27 —
Оглавление
- CASSETTE RECEIVER
- Contents
- Safety precautions
- Safety precautions About RDS
- General features
- Tuner features General features
- RDS features
- RDS features
- Tuner features
- Tuner features
- External disc control features
- External disc control features
- Menu system
- Menu system
- Menu system
- Accessories
- Connecting Wires to Terminals
- Connecting Wires to Terminals
- Connecting Wires to Terminals Installation
- Troubleshooting Guide
- Troubleshooting Guide
- Specifications
- Cодержание
- Меры предосторожности
- Меры предосторожности O RDS
- Общие характеристики
- Cвойства тюнера Общие характеристики
- Cвойства RDS
- Cвойства RDS
- Cвойства тюнера
- Cвойства тюнера
- Функции управления внешним диском
- Функции управления внешним диском
- Система меню
- Система меню
- Система меню
- Принадлежности
- Подсоединение кабелей к гнездам для подключения
- Подсоединение кабелей к гнездам для подключения Установка
- Поиск и устранение неисправностей
- Поиск и устранение неисправностей
- Технические характеристики
- Treść
- Środki ostrożności
- Środki ostrożności Informacje o RDS
- Ogólne możliwości
- Możliwości tunera Ogólne możliwości
- Możliwości RDS
- Możliwości RDS
- Możliwości tunera
- Możliwości tunera
- Możliwości sterowania zewnętrznymi płytami
- Możliwości sterowania zewnętrznymi płytami
- Menu systemu
- Menu systemu
- Menu systemu
- Akcesoria
- Podłączanie przewodów do końcówek
- Podłączanie przewodów do końcówek Instalacja
- Przewodnik wykrywania i usuwania usterek
- Przewodnik wykrywania i usuwania usterek
- Dane techniczne
- Obsah
- Bezpečnostní pokyny
- Bezpečnostní pokyny O RDS
- Obecné funkce
- Funkce tuneru Obecné funkce
- Funkce RDS
- Funkce RDS
- Funkce tuneru
- Funkce tuneru
- Funkce ovládání externího disku
- Funkce ovládání externího disku
- Systém menu
- Systém menu
- Systém menu
- Příslušenství
- Připojování kabelů ke svorkám
- Připojování kabelů ke svorkám Instalace
- Przewodnik wykrywania i usuwania usterek
- Przewodnik wykrywania i usuwania usterek
- Specifikace


