Dell LATITUDE D400: Removing and Replacing Parts: Dell™Latitude™CS/CS
Removing and Replacing Parts: Dell™Latitude™CS/CS: Dell LATITUDE D400
Back to Contents Page
Removing and Replacing Parts: Dell™Latitude™CS/CS
x
Portable Computers User's
Guide
Replacing a Primary Hard-Disk Drive
NOTICE: To prevent data loss, turn off your computer before you remove the hard-disk drive. Do not remove the hard-disk drive if
the computer is in suspend (or standby) mode or if the drive access indicator is lit. Removing the drive under these conditions will
lead to loss of data.
NOTICE: Hard-diskdrivesareextremelyfragileandmustbehandledcarefullytoavoiddamage.Followtheseguidelines:
l The primary hard-disk drive is installed in a metal carrier to protect the drive and make installation easier. When you remove and
install hard-disk drives, handle the drive carrier, not the drive itself.
l Never press down on the top of the drive.
l Do not drop the drive. Even a slight jar or bump can damage the drive heads and spinning plates, thus rendering the drive
inoperable.
To replace a primary hard-disk drive, perform the following steps:
1. Save any open files, turn off the computer, and remove any installed batteries.
NOTICE: To avoid scratching the top of the computer, make sure that your work surface is clean. You may want to put down a
protective mat before turning over the computer.
2. Remove the old hard-disk drive from the drive bay.
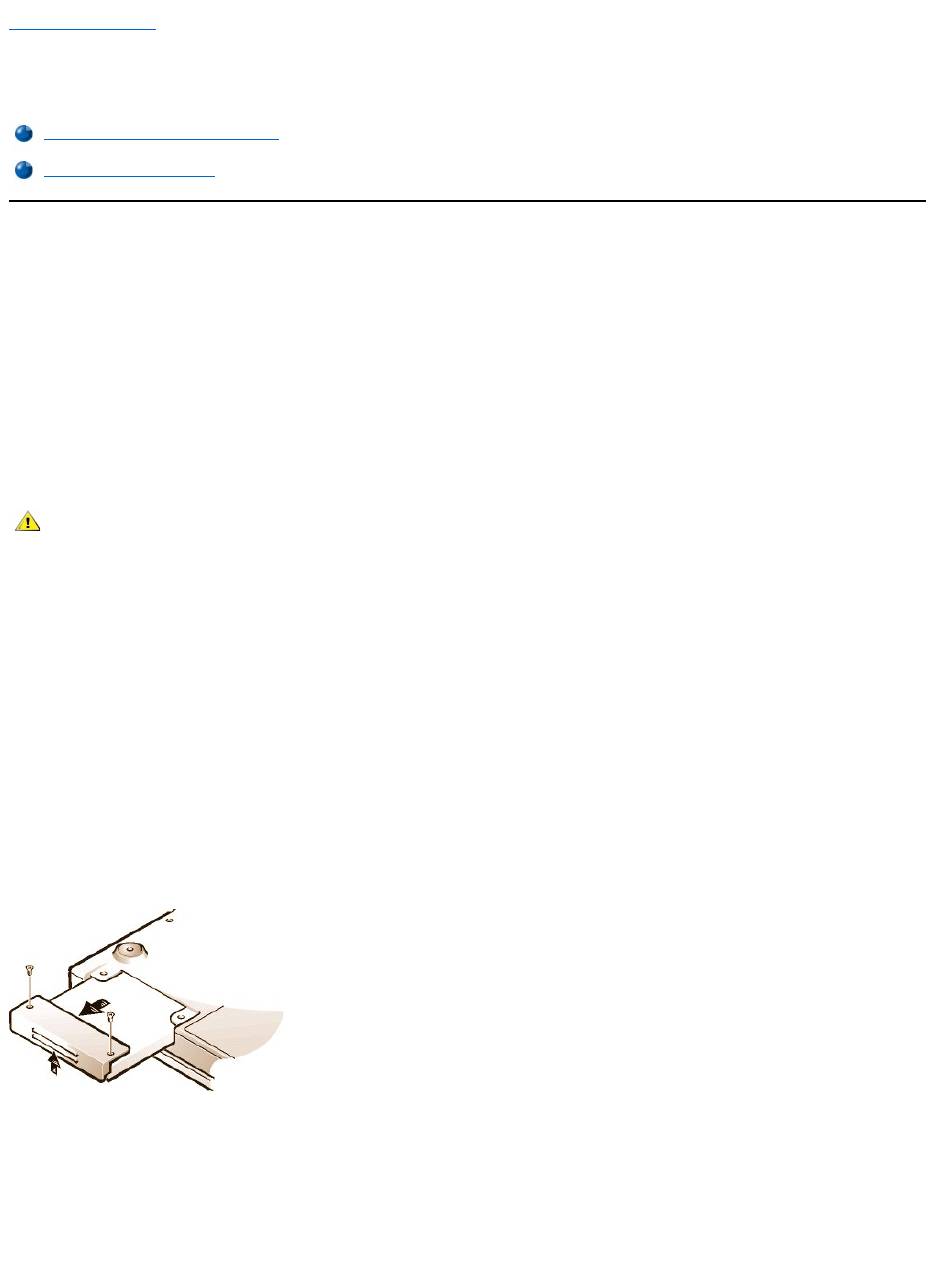
Close the display and turn the computer over. Using a #0 (very small) Phillips-headscrewdriver,removethetwoscrewsinthehard-
disk drive door (see Figure 1). Save the screws for use later in this procedure.
With the computer still upside-down, press upward on the hard-disk drive door until it feels loose; then grasp the door and pull it and the
drive straight out from the side of the computer.
When the hard-disk drive is not in the computer, protect the drive from exposure to static electricity.
Figure 1. Removing a Hard-Disk Drive
3. Remove the new hard-disk drive assembly from its packaging.
Save the original packaging to use when you store or ship the hard-disk drive.
NOTICE: If the hard-disk drive assembly does not slide in easily, pull it out and try again. To avoid damage, do not force the drive
assembly into the bay.
4. Install the new hard-disk drive in the computer.
Insert the drive, connector first and label facing down, into the drive bay. Holding the drive door up slightly, push the drive all the way into the
Replacing a Primary Hard-Disk Drive
Installing a Memory Module
CAUTION: The primary hard-disk drive may be hot to the touch under extreme environmental conditions. If the drive is hot,
allow it to cool before you replace it.
bay. Then press down and in on the drive door until it snaps into position, flush with the computer case.
5. Replace the screws you removed in step 2. Be careful not to overtighten the screws.
If you have installed a new hard-disk drive, follow the directions that came with the drive to partition and logically format the drive and to create an
S2D partition.
Preparing a New Primary Drive
Every primary hard-disk drive must be physically formatted, partitioned, and logically formatted before it can be used to store data. Every primary
hard-disk drive from Dell is physically formatted before it is sent to you. Use the program(s) provided by your operating system to partition and
logically format the hard-disk drive. For more information, see both your operating system and your drive documentation.
Installing Memory Modules
Your system's factory-installed memory can range from 64 megabytes (MB) to a system maximum of 320 MB. Depending on the memory already
installed, you may be able to increase memory by installing a 32-, 64-, or 128-MB synchronous dynamic random-access memory (SDRAM) small-
outline dual-inline memory modules (SODIMMs) in the memory upgrade socket. The maximum achievable memory for your system depends on the
system's original memory configuration.
NOTICE: Dell Latitude CS/CSx portable computers support only SDRAM SODIMMs. Extended-data out (EDO) memory modules are
notsupported.
To upgrade computer memory, you can install or replace a memory module through the memory module cover on the underside of the
computer.To prepare the computer for the removal or installation of a memory module, perform the following steps.
NOTICE: Ground yourself by touching an unpainted metal surface of a connector on the back of the computer. While you work,
periodically touch the connector to dissipate any static electricity that might harm internal components.
1. Turn off the computer and any attached devices.
Do not install memory modules while the computer is in suspend, standby, or suspend-to-disk mode.
2. If the computer is docked, undock it.
3. Disconnect the computer and peripherals from their electrical outlets to reduce the potential for personal injury or shock.
4. Disconnect any telephone or telecommunication lines from the computer.
5. Removethebatteryfromthebatterybay.
To remove or install a memory module, perform the following steps.
NOTICE: To avoid scratching the top of the computer, make sure that your work surface is clean. You may want to put down a
protective mat before turning over the computer.
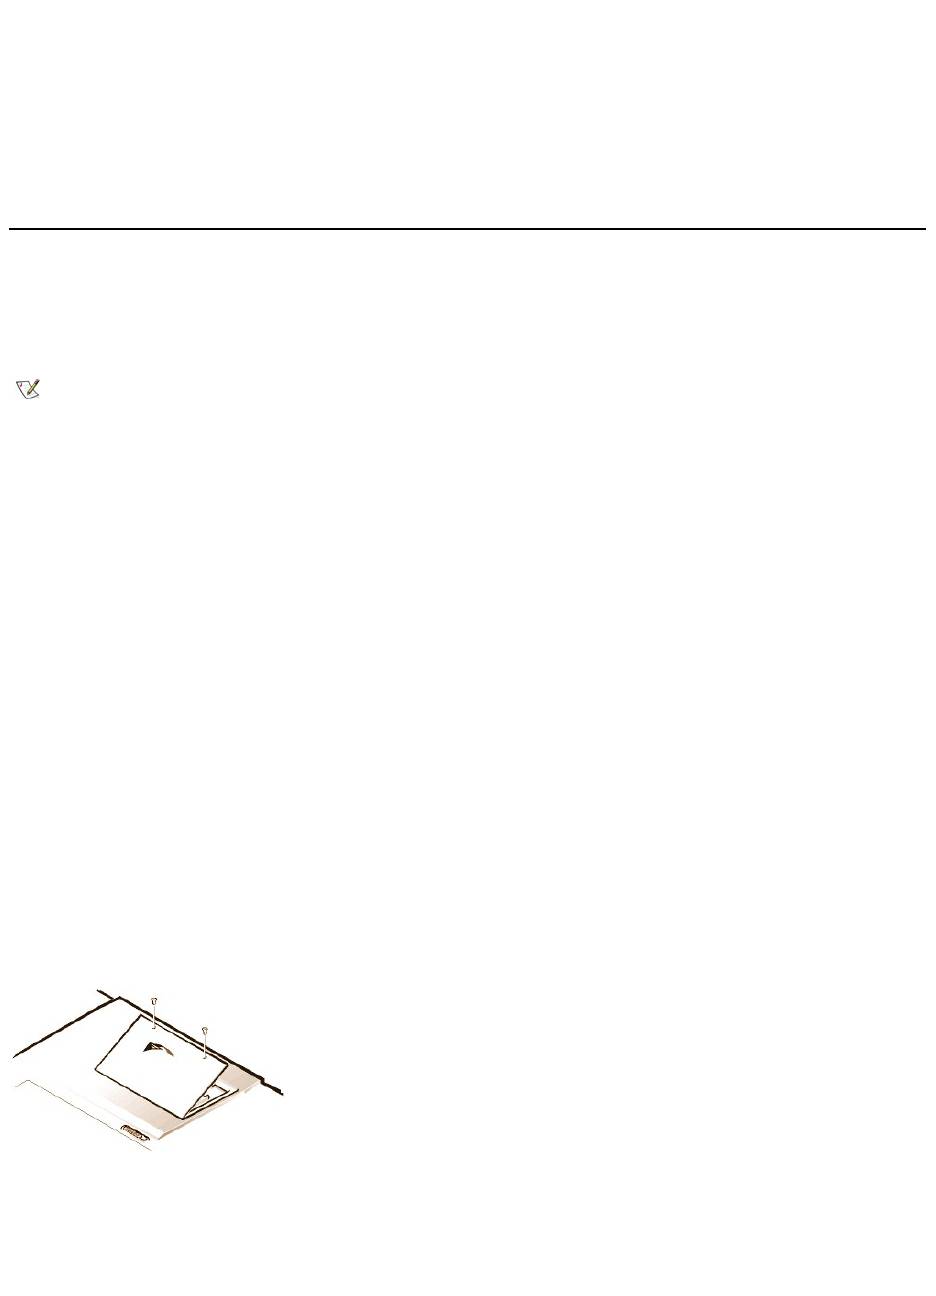
1. Close the display, turn the computer upside down, and remove the memory module cover (see Figure 2).
Use a #1 Phillips-head screwdriver to remove the two screws securing the memory module cover. When the memory module cover pops up
slightly, lift it up and remove it to expose the memory socket or installed memory module beneath.
Figure 2. Removing the Memory Module Cover
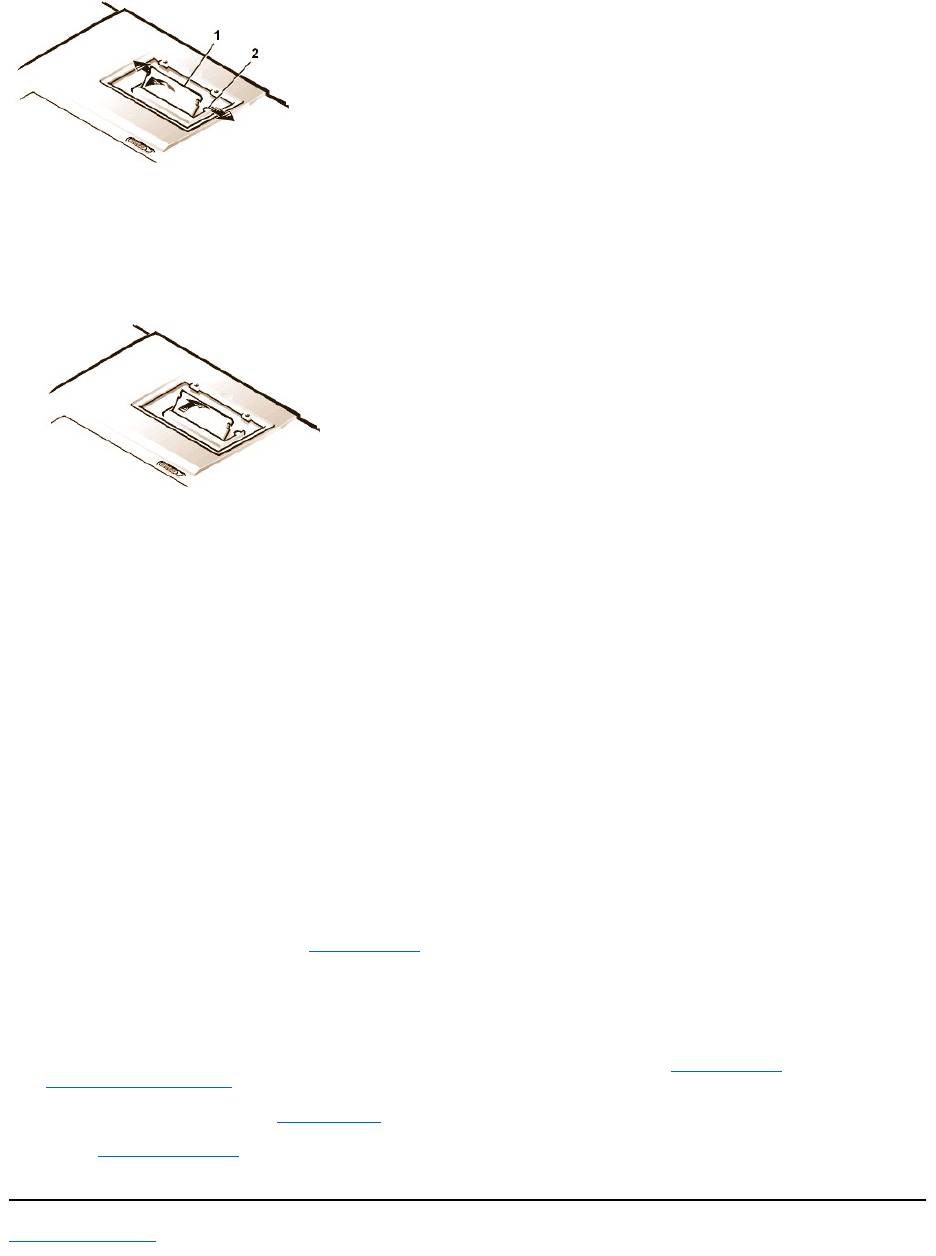
2. If you are replacing a memory module, remove the old one.
Carefully spread apart the inner metal tabs of the memory module socket just far enough for the memory module to disengage from the
socket (it should pop up slightly). Then lift the memory module away from the socket (see Figure 3).
Figure 3. Removing a Memory Module
NOTE: If necessary, print these instructions for reference before proceeding.
3. Ground yourself and unpack the new memory module from the upgrade kit.
4. Install the new memory module in the socket (see Figure 4).
Figure 4. Installing a Memory Module
Memory modules are keyed, or designed to fit into their sockets in only one direction. The socket is notched so that the memory module can
be seated only one way as follows:
a. Align the memory module’s edge connector with the slot in the center of the memory module socket.
b. With the module at a 45-degree angle, press the memory module’s edge connector firmly into the memory module socket.
c. Pivot the memory module down until it clicks into place.
If you do not hear a click as each end of the memory module snaps into the metal tabs, remove the memory module and reinstall it.
5. Replace the memory module cover as follows:
a. Set the memory module cover into the opening, aligning the tabs on one side with the slots in the computer cover.
b. Press the cover down and replace the screws you removed in step 1.
NOTICE: After installation, if the memory module cover does not fit or is difficult to close, you may have installed the memory module
improperly.Removethemoduleandreinstallit.Donotforcethememorymodulecovertoclosebecauseyoumaydamageyour
computer.
6. Reconnect your computer and devices to their electrical outlets and turn them on.
As the computer boots, it detects the presence of additional memory and automatically updates the system configuration information.
7. In one of the following ways, verify that the System Memory option in the System Setup program reflects the newly installed memory:
l Click the Start button, point to Settings, click Control Panel, and click the System icon. The amount of memory installed in the
computer is displayed in the lower-right corner of the General tab window.
l In the System Setup program, the System Memory option appears in the lower-right corner of pages 1, 2, and 4.
If the system memory total is incorrect, the memory module(s) may not be installed properly. Repeat preparatory steps 1 through 5 and
removal and installation steps 1 through 7 until the memory total is correct.
8. Run the System Memory test of the Dell Diagnostics to confirm that all installed memory modules are operating correctly.
9. Use the Suspend-to-Disk utility to update the S2D partition on your hard-disk drive. The S2D partition stores system data while the computer
is in S2D mode.
Back to Contents Page
1
Memory module
2
Metal tabs (2)
Оглавление
- Dell™Latitude™CS/CS
- AC Adapter: Dell™Latitude™CS/CS
- Power Management Settings: Dell™Latitude™CS/CS
- Batteries:Dell™Latitude™CS/CS
- CD-ROM and DVD-ROMDrives:Dell™Latitude™CS/CS
- ContactingDell:Dell™Latitude™CS/CS
- CustomizingYourComputer:Dell™Latitude™CS/CS
- Dell™Diagnostics:DellLatitude™CS/CS
- Diskette Drive: Dell™Latitude™CS/CS
- Display: Dell™Latitude™CS/CS
- Drivers:Dell™Latitude™CS/CS
- ErrorMessagesandFlashCodes:Dell™Latitude™CS/CS
- Connecting External Devices: Dell™Latitude™CS/CS
- GettingHelp:Dell™Latitude™CS/CS
- HelpOverview:Dell™Latitude™CSPortableComputersUser'sGuide
- Introduction:Dell™Latitude™CS/CS
- Keyboard: Dell™Latitude™CS/CS
- External Media Bay: Dell™Latitude™CS/CS
- MediaOptions:Dell™Latitude™CS/CS
- PC Cards: Dell™Latitude™CS/CS
- PoweringYourComputer:Dell™Latitude™CS/CS
- Preface:Dell™Latitude™CS/CS
- Removing and Replacing Parts: Dell™Latitude™CS/CS
- Suspend-to-Disk Utility: Dell™Latitude™CS/CS
- Securing Your Computer: Dell™Latitude™CS/CS
- Using the System Setup Program:Dell™Latitude™CS/CS
- SystemSetupOptions:Dell™Latitude™CS/CS
- TechnicalSpecifications:Dell™Latitude™CS/CS
- SetupandOperation:Dell™Latitude™CS/CS
- Touch Pad: Dell™Latitude™CS/CS
- TravelingWithYourComputer:Dell™Latitude™CS/CS
- TroubleshootingYourComputer:Dell™Latitude™CS/CS
- Installing the Microsoft® Windows® 95 and Windows 98 Operating System Drivers: Dell™Latitude™CS/CS
- Installing the Microsoft® Windows NT® Operating System Drivers: Dell™Latitude™ CS/CS
