Dell LATITUDE D400: инструкция
Раздел: Компьютерная техника, комплектующие, аксессуары
Тип: Ноутбук
Инструкция к Ноутбуку Dell LATITUDE D400
Оглавление
- Dell™ Latitude™ CS/CS Portable Computers User's Guide
- AC Adapter: Dell™ Latitude™ CS/CS x Portable Computers User's Guide
Dell™ Latitude™ CS/CS
x
Portable Computers User's Guide
Information in this document is subject to change without notice.
©
1999 Dell Computer Corporation. All rights reserved.
Reproduction in any manner whatsoever without the written permission of Dell Computer Corporation is strictly forbidden.
Trademarks used in this text:
Dell, Latitude, OptiPlex, Dimension, Inspiron, ExpressCharge
, the
DELL
logo, and
DellWare
are trademarks of Dell Computer Corporation;
Microsoft
,
Windows
,
Windows NT
, and
MS-DOS
are registered trademarks of Microsoft Corporation;
Intel
and
Pentium
are registered trademarks of Intel Corporation.
Other trademarks and trade names may be used in this document to refer to either the entities claiming the marks and names or their products. Dell Computer Corporation
disclaims any proprietary interest in trademarks and trade names other than its own.
Initial release: 25 Jun 1999
Last revised: 04 Nov 1999
Preface
Introduction
Setup and Operation
Powering Your Computer
Traveling With Your Computer
Drivers
Customizing Your Computer
Removing and Replacing Parts
Troubleshooting Your Computer
Technical Specifications
Getting Help
Back to Contents Page
AC Adapter: Dell™ Latitude™ CS/CS x Portable Computers User's Guide
Using the AC Adapter
The AC adapter converts AC power to the DC power required by the computer. The AC adapter kit includes the AC adapter with its attached DC
cable (which inputs power to the computer) as well as an AC power cable that connects to an electrical outlet.
You can connect the AC adapter with your computer either turned on or off.
The AC adapter works with electrical outlets worldwide. However, power connectors vary among countries. Before you use AC power in a foreign
country, you may need to obtain a new power cable designed for use in that country.
If the computer is docked to one of Dell's C/Port Family Advanced Port Replicators (APR) or C/Dock Family Expansion Stations, it obtains power
through the APR or expansion station, which must be connected to an electrical outlet.
Connecting the AC Adapter
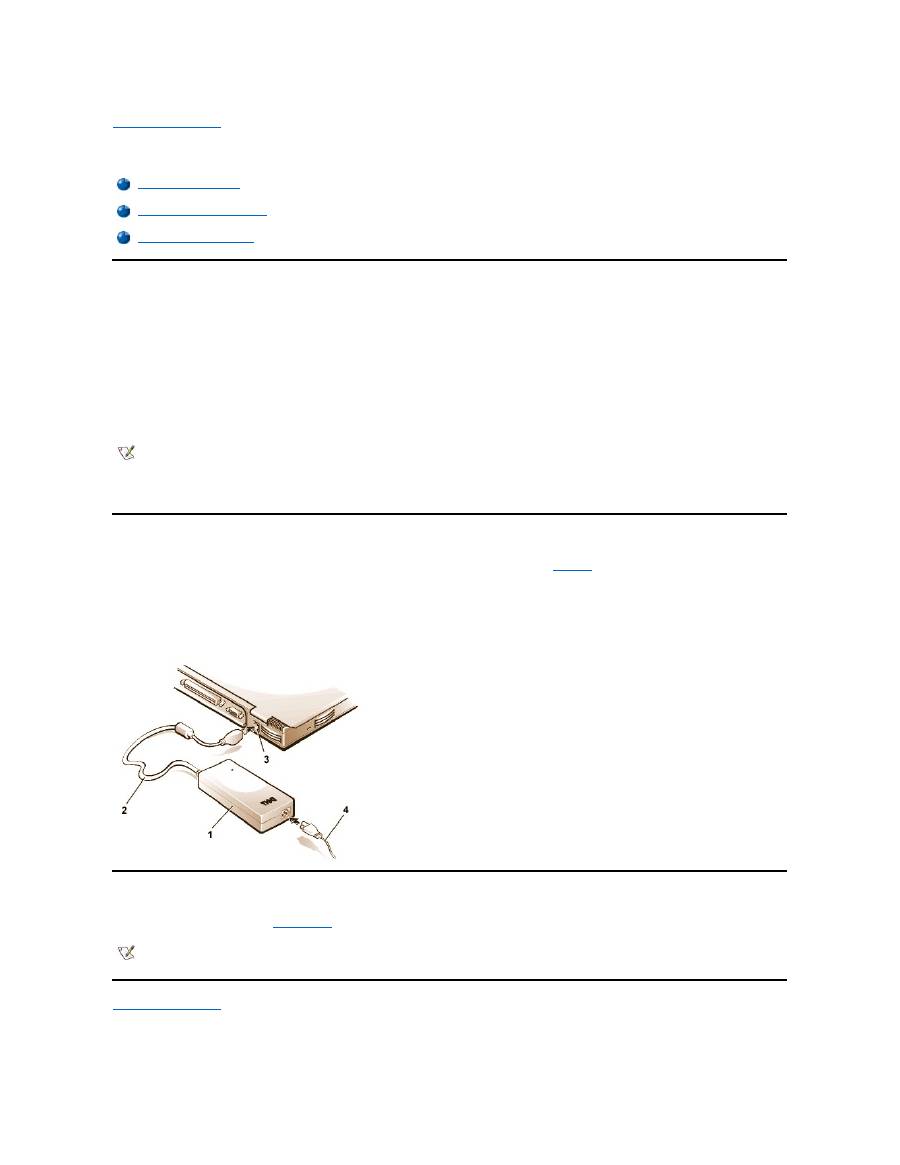
1.
Connect the AC adapter's attached cable into the computer's AC adapter connector (see
Figure 1
).
2. Plug the AC power cable into the other end of the AC adapter.
3. Plug the AC power cable into an electrical outlet.
Figure 1. Connecting the AC Adapter
Turning On the Computer
To turn on the computer, press the
power button
.
Back to Contents Page
Using the AC Adapter
Connecting the AC Adapter
Turning On the Computer
NOTE: If you are running your computer on AC power with a battery installed, the AC adapter charges the battery (if needed) and then
maintains the battery's charge.
NOTICE: The AC adapter should be in a ventilated area, such as on a desktop or on the floor, when used to power the computer or
charge the battery. Do not use the AC adapter in a poorly ventilated environment, such as inside a carrying case.
1
AC adapter
2
AC adapter's attached cable
3
AC adapter connector
4
AC power cable
NOTE: If your computer's operating system is "locked up"
—
that is, it does not respond to commands
—
press and hold down the power
button for at least five seconds to turn off the computer.
Back to Contents Page
Power Management Settings: Dell™ Latitude™ CS/CS x Portable Computers User's Guide
Experimenting With Power Conservation
In general, the lower the value you set for each power conservation feature, the longer the battery's charge lasts. On the other hand, setting high
values tends to optimize the computer's performance.
To evaluate the way that different settings affect how long you can operate the computer on battery power versus the relative efficiency of how the
software performs, experiment as follows:
l
Use the computer with all the options set at their default values.
l
Use the computer with all the options disabled or set to
Off
.
l
Use the computer with all the options set to their minimum or maximum values.
Using Key Combinations
Table 1
identifies the power management key combinations.
Table 1. Key Combinations to Activate/Deactivate Features
*
These key combinations do not function with the Advanced Configuration and Power Interface (ACPI
).
Closing the Display
One way to conserve power on the computer is to close the display when the computer is not in use. When you close the display and an external
Experimenting With Power Conservation
Standby Mode
Using Key Combinations
Suspend-to-Disk Mode
Closing the Display
Power Management Properties for Microsoft Windows 98
Suspend Mode
Power Management Properties for Microsoft Windows NT
NOTE: To use key combinations on an external keyboard, enable the
External Hot Key
option in the System Setup program, and
press <Scroll Lock> instead of <Fn>.
Feature
Activate/Deactivate
Turn off display
To activate, press <Fn><d>.*
To deactivate, move the cursor or press a key on the integrated or external keyboard. (If nothing
happens, the computer may be in
suspend
or
standby
mode. Press the power button to resume
normal operation.)
Turn off hard-disk drive
To activate, press <Fn><h>.*
Automatically deactivates when the hard-disk drive is accessed.
NOTE: If a modular hard-disk drive is installed in the C/Dock media bay, you cannot turn off the
hard-disk drive by pressing <Fn><h>
.
Suspend mode
To activate, press <Fn><Esc>.
To deactivate, press the power button.
Suspend-to-disk mode
To activate, press <Fn><a>. (On a French keyboard, press <Fn><q>.)*
To deactivate, press the power button.

monitor is
not
connected, the computer's display shuts off and the computer enters
suspend
mode (
standby
mode in Microsoft
®
Windows
®
98).
To resume work, open the display. (The computer may take several seconds to resume operation.)
Suspend Mode
If your computer is running the Microsoft Windows 95 or Microsoft Windows NT
®
operating system, suspend mode stops almost all computer
activity, but leaves the computer ready to resume operations immediately in about 20 to 30 seconds. Use suspend mode whenever you leave the
computer unattended.
NOTICE: Windows 95 and Windows NT save data to random-access memory (RAM), not to your hard-disk drive, before entering
suspend mode. If the computer enters suspend mode while running on battery power, data loss from RAM can occur if the battery
discharges completely.
Suspend mode conserves battery power by turning off the microprocessor clock; the display; the hard-disk drive; the CD-ROM, DVD-ROM, or LS-
120 drive module (if installed); the external monitor connector; the external keyboard (if attached); the parallel port; the serial port; the touch pad;
and the diskette drive.
You can enter suspend mode immediately by pressing <Fn><Esc> (or <Scroll Lock><Esc> on an external keyboard if the
External Hot Key
option is enabled in the System Setup program).
When you enter suspend mode, the
power indicator
is not lit.
Resume from suspend mode by pressing the power button. The computer may take several seconds to return to normal operation.
Standby Mode
If your computer is running the Microsoft Windows 98 operating system, standby mode turns off the display, stops the hard-disk drive, and turns off
other internal devices so that the computer uses less battery power. When the computer resumes operation from standby mode, the desktop is
restored exactly as it was before entering standby mode.
NOTICE: Windows 98 saves data to random-access memory (RAM), not to your hard-disk drive, before entering standby mode. If the
computer enters standby mode while running on battery power, data loss from RAM can occur if the battery discharges completely.
You can enter standby mode by pressing <Fn><Esc>.
To resume operation from standby mode, press the power button.
Suspend-to-Disk Mode
Suspend-to-disk (S2D) mode copies all system data to a reserved area
—
the S2D partition
—
on the hard-disk drive and then turns off all power to
the computer. When you resume normal operation, the same programs will be running and the same files will be open that were loaded before you
activated this mode.
Place the computer in S2D mode if you intend to store the computer for longer than 40 days. S2D mode preserves the configuration information
stored in nonvolatile random-access memory (NVRAM). The reserve battery maintains this information, but it may run out of energy after 40 days.
If your system is running under
Advanced Power Management
(APM) mode, and if the
External Hot Key
option is enabled in the System Setup
program, you can enter S2D mode by pressing <Fn><a> (or <Scroll Lock><a> on an external keyboard). On a French keyboard, press <Fn><q>
or <Scroll Lock><q>.*
Resume operation from S2D mode by pressing the power button.
If you connect or remove devices while the computer is in S2D mode, the computer automatically recognizes the newly connected devices when it
resumes normal operation.
Some PC Cards may not operate correctly after resuming from S2D mode. If you encounter problems with a card,
remove and reinsert the card
.
NOTE: If an external monitor is connected when you close the display, the computer does not activate suspend mode. You can still use
the external monitor.
NOTES: On resumption from suspend mode, if a password is set, the computer displays the password prompt screen. At the password
prompt screen, if you do not enter a password within 2 minutes, the computer returns to suspend mode.
Suspend mode is known as standby mode under the Microsoft Windows 98 operating system.
NOTE: S2D mode helps preserve system data by quickly saving it to the hard-disk drive if you are about to run out of battery power.
NOTE: Dell creates an appropriately sized S2D partition before shipping the computer to you. Use the S2D utility to remove the file, to
increase the size of the file, or to add the S2D file if you removed it. For more information about altering or creating an S2D file, see the

* These key combinations may not function with future operating systems.
Power Management Properties for Windows 98
Windows 98 with Advanced Power Management (APM) provides the
Power Management
Properties
window for setting power conservation
features.
To access the
Power Management Properties
window and set the power management features, perform the following steps:
1. Click the
Start
button, point to
Settings
, and click
Control Panel
.
2. Double-click the
Power Management Properties
icon.
The
Power Management Properties
window contains the following tabs:
l
Power Scheme
—
allows you to change individual power management settings or select one of three power mode settings
(
Always On
,
Home/Office Desk
, or
Portable/Laptop
) that each provide a set of default power management settings.
l
Alarms
—
allows you to set the
Low Battery
and
Critical Battery
alarms to alert you when the computer battery falls below a
certain percentage. When you received your computer, the
Low Battery
and
Critical Battery
alarm options were not checked.
Dell recommends that you do not select these options.
l
Power Meter
—
allows you to view the percentage of battery life remaining when your computer is operating on battery power. If
your computer is operating on AC power, the computer displays a message.
l
Advanced
—
allows you to display the
Power Meter
on the Windows 98 taskbar and to display a password prompt when the
computer resumes operation from standby mode.
Power Management Properties for Microsoft Windows NT
Dell provides Softex software compatible with the Power Management Controller, which allows you to suspend and resume your portable
computer without affecting your ability to use the docking station or its media bay.
For information about Softex power management software, see the Softex user
’
s guides at
http://www.dell.com/products/notebook/latitude/NT40.htm
and see your
Dell-Installed Microsoft Windows NT Workstation Setup Guide
.
Back to Contents Page
readme.S2D
file, which can be found in the
Dell Utilities
folder on your hard-disk drive or on the S2D diskette that came with your
computer.
Back to Contents Page
Batteries: Dell™ Latitude™ CS/CS x Portable Computers User's Guide
About the Batteries
Your computer includes a standard (34-watt/hour [WH]) or high-capacity (46-WH) lithium ion battery that provides power when an electrical outlet is
not available. The battery is installed on the underside of the computer and forms part of the bottom of the computer. Lithium ion batteries are
longer lived than conventional batteries and do not require replacement as often. Lithium ion batteries do not have the memory effect that is
exhibited by nickel-metal hydride (NiMH) and nickel-cadmium (NiCD) batteries. You do not need to drain a lithium ion battery completely before
recharging it. A lithium ion battery will not forget at which point it is fully charged. NiMH and NiCD batteries may not charge fully if they are partially
drained then recharged.
Do not place spent batteries with common household waste products. Contact local authorities for the location of a chemical waste collection
program nearest you.
Keep the following information in mind when you are running your computer from the battery:
l
From a fully charged standard battery you can expect between 2.5 and 3 hours of battery life; from a fully charged high-capacity battery, you
can expect up to 50 percent greater battery life. Actual performance varies, depending on which power management features are enabled
and which application programs you are using.
l
The
integrated battery charge gauge
lets you check the charge status of an installed or uninstalled battery at any time.
l
The battery
’
s self-test capability alerts you to battery conditions such as low charge.
l
There is no battery memory effect with lithium ion batteries
—
you can charge the battery whenever you like without fear of reducing its
charge capacity.
l
A battery has a life span of up to 350 full charges and 2000 partial charges, provided it is charged at normal room temperature.
Using the Battery
The battery is partially charged when you receive it. Dell recommends that you charge your battery to full capacity before using it to power the
computer.
If you are powering the computer from a battery, try to conserve battery power. A number of factors affect battery operating time:
l
Power conservation features that you use
l
Type of display and microprocessor installed
l
Use of storage media
l
Number and type of PC Cards and other external devices that you use
l
Kinds of application programs that you run
l
Capacity of the memory modules that you install (the higher the capacity, the more power used)
When you activate
suspend
mode (known as
standby
in the Microsoft
®
Windows
®
98 operating system), the computer can remain in suspend
mode on battery power for approximately one week (if the battery was fully charged before activating suspend or standby mode).
If you are going to store the computer, disconnect all devices and turn off the computer. Remove the battery when you store your computer for an
extended period of time. A battery will drain when not in use during prolonged storage. After a long storage period, recharge the battery fully before
About the Batteries
First Low-Battery Warning
Using the Battery
Second Low-Battery Warning
Charging the Battery
Detecting Battery Problems
Charging a Hot Battery
Battery Disposal
Replacing the Battery
About Battery Power
Battery Charge Gauge
Turning On the Computer
NOTE: The battery is designed to work with Dell Latitude CS/CSx portable computers only. Do not use the battery with other computers,
and do not use batteries from other computers with the Dell Latitude CS/CSx.

you attempt to run your computer from battery power.
Charging the Battery
Each time you connect the computer to an electrical outlet or install a battery in a computer that is connected to an electrical outlet, the computer
checks the battery's charge. The AC adapter charges the battery (if needed) and then maintains the battery's charge.
When installed in a computer connected to an electrical outlet, the battery immediately starts charging. The green power indicator remains steady
while the AC adapter charges the battery. The indicator starts blinking when the express charge cycle is complete. While the indicator is blinking,
the AC adapter provides a trickle charge to bring the battery to full capacity. The indicator continues to blink until you remove the battery or
disconnect the computer from its electrical outlet.
NOTICE: If the battery status indicator flashes alternately green and amber while the computer is connected to an electrical outlet,
disconnect the computer from the outlet and allow the computer and the battery to return to room temperature. Then reconnect the
computer to its electrical outlet and continue charging the battery. If the computer is not allowed to return to room temperature, the
battery stops charging before it reaches full capacity.
If the computer is turned off and connected to an electrical outlet through the AC adapter, it takes the AC adapter about 1 hour and 20 minutes to
fully charge a battery that has been completely discharged. If the computer determines that the battery is near full capacity, the AC adapter skips
the express-charging process and starts trickle-charging the battery. If the computer is on, it takes up to 2.5 hours to charge a fully discharged
battery, depending on which devices you are using and which programs you are running.
Charging a Hot Battery
Before you attempt to charge a battery that is hot (either from recent use or from being in a hot environment), note the following information:
l
A hot battery will not charge when you connect the AC adapter to the computer. This safety feature is important because charging a hot
battery shortens the battery
’
s life span and may damage the battery and the computer.
l
If the battery status indicator flashes alternately green and amber, the battery is too hot to start charging. If this occurs, disconnect the
computer from its electrical outlet and allow it and the battery to return to room temperature. Reconnect the computer to the electrical outlet
and continue charging the battery.
l
If the computer is not allowed to return to room temperature, the battery stops charging before it reaches its full capacity.
Replacing the Battery
NOTICE: To avoid data loss, do not remove the battery while the computer is turned on unless the computer is connected to an
electrical outlet .
To replace a battery in the battery bay, perform the following steps (see
Figure 1
).
1.
If the computer is docked, undock it following your usual undocking procedure. (See the documentation that came with your docking device.)
2.
If the computer is not docked, preserve your data in one of the following ways and then go to step 3.
l
Connect the computer to an electrical outlet.
l
Place the computer in suspend (or standby) mode by pressing <Fn><Esc> (or <Scroll Lock><Esc> on an external keyboard if
the
External Hot Key
option is enabled in the System Setup program).
l
Place the computer in
S2D mode by pressing <Fn><a> (or <Fn><q> on a French keyboard). When the green power indicator
turns off, continue to step 3.
NOTICE: If you choose to replace the battery with the computer in suspend (or standby) mode, you have up to 4 minutes to complete
the battery replacement.
3.
Remove the battery from the battery bay.
NOTE: For maximum battery performance, charge the battery only at normal room temperature.
NOTE: You can leave the battery in the computer as long as you like. The battery's integrated circuitry prevents the battery from
overcharging.
NOTES: If necessary, print these instructions for reference before proceeding.
You cannot replace the battery while the computer is running on battery power. To replace the battery while the computer is running, you
must connect the computer to an electrical outlet or enter
suspend
(or
standby
) mode or
suspend-to-disk
(S2D) mode.
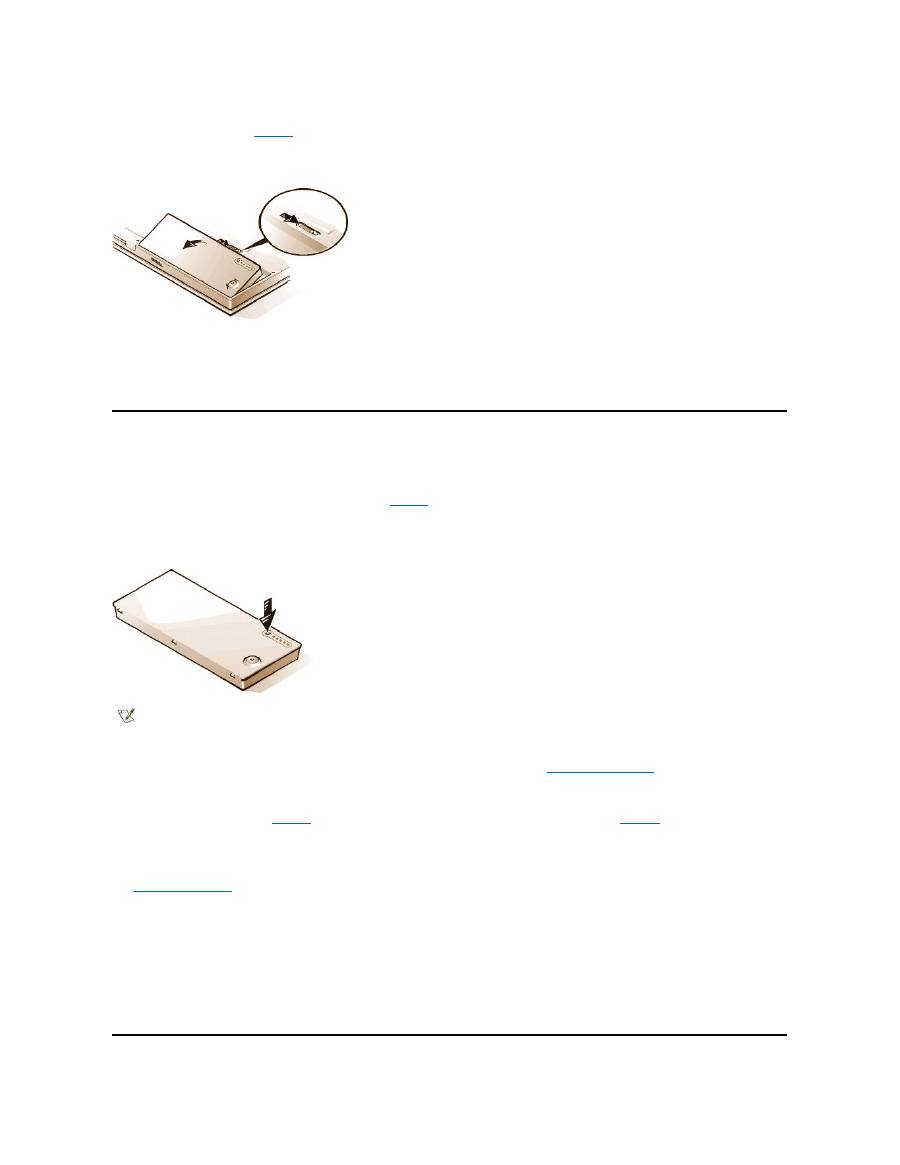
Close the computer display and turn the computer over. Slide the battery bay latch toward the unlock icon, causing the battery to pop up
slightly on one side (see
Figure 1
). Continue to hold the latch in the unlock position with one hand while pivoting the battery up and out of the
bay with the other hand. Release the latch.
Figure 1. Removing a Battery
4.
Position the new battery so that its three alignment tabs fit into the three slots in the outside wall of the computer, and lower the battery into its
compartment. Make sure that the battery snaps into place, flush with the surrounding surface, and make sure that the battery latch is
completely closed before turning the computer over.
5.
If you put the computer into suspend mode or S2D mode in step 2, press the power button to resume normal operation.
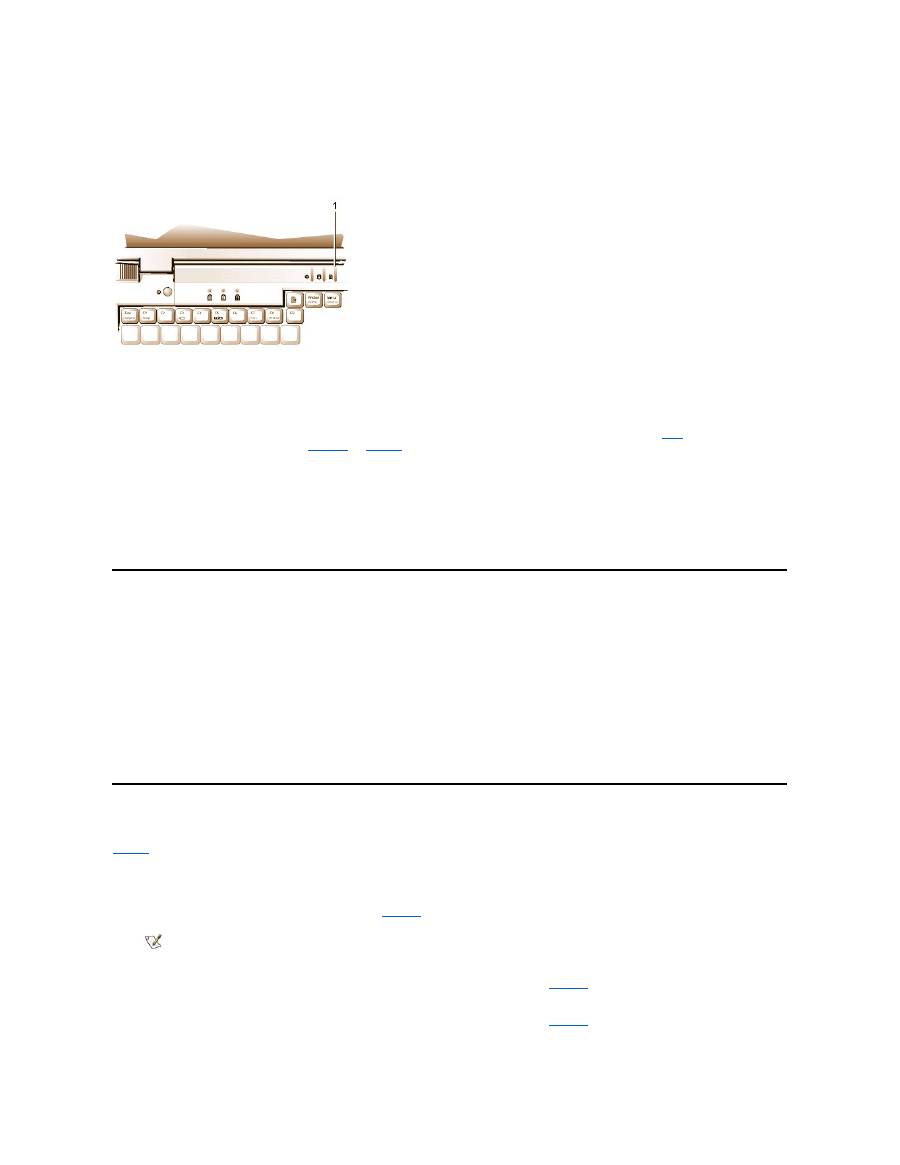
Battery Charge Gauge
The battery charge gauge, located on the battery and accessible on the underside of the computer, consists of five indicators and a test button.
Each indicator represents 20 percent of full charge. If only one indicator lights up, recharge the battery before using it.
To check the charge level, press the battery test button (see
Figure 2
). The appropriate number of indicators lights up for a few seconds to indicate
the amount of charge remaining in the battery. For example, if three indicators light up, your battery has between 40 percent and 60 percent of its
charge left.
Figure 2. Battery Charge Gauge
Percentage of Charge
The
battery charge gauge
uses its five indicator lights to show the percent of charge remaining in the battery:
l
If one indicator lights up, the battery has 1 to 20 percent of its charge remaining.
l
If two indicators light up, the battery has 21 to 40 percent of its charge remaining.
l
If three indicators light up, the battery has 41 to 60 percent of its charge remaining.
l
If four indicators light up, the battery has 61 to 80 percent of its charge remaining.
l
If five indicators light up, the battery has 81 to 100 percent of its charge remaining.
NOTES: An indicator that blinks rapidly indicates a temporary failure or a potentially recoverable failure like overheating. Allow the
battery to cool for several minutes before checking the charge level again.
If the battery has permanently failed or completely discharged, no charge gauge indicators will light when you press the battery test
button. If you install a failed or completely discharged battery in the computer and the
battery status indicator
flashes amber rapidly, the
battery has failed. If the battery status indicator turns solid green, allow the battery to charge overnight and check it the next day. If the
battery is fully discharged, it takes a much longer time than usual to recharge it.
To purchase a new battery,
call Dell
or access the Dell World Wide Web site at
http://www.dell.com
.
Dispose
of the old battery
properly.
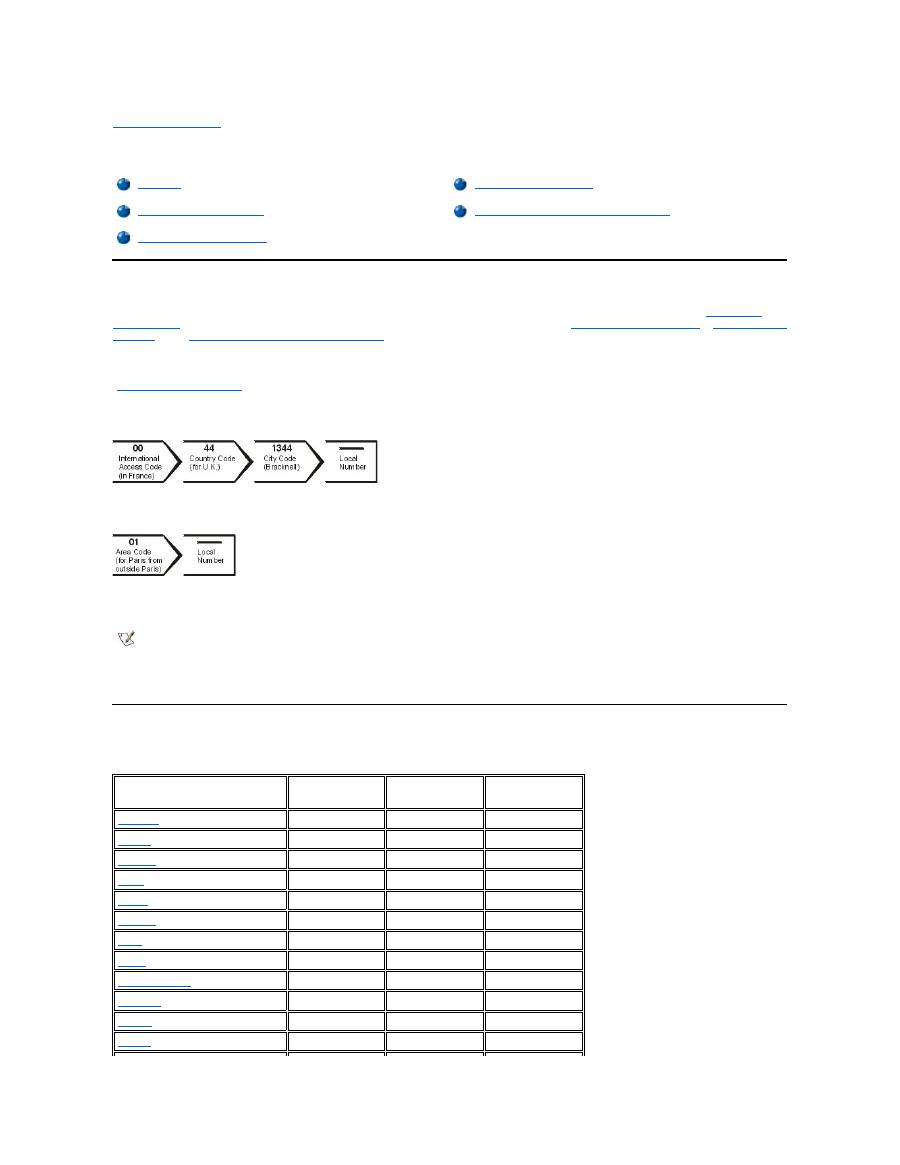
First Low-Battery Warning
The first low-battery warning
—
a blinking amber battery status indicator
—
occurs when you have about 15 minutes of battery life left under current
conditions and the computer is not connected to an electrical outlet.
Figure 3. Battery Status Indicator
NOTICE: When you see a low-battery warning, save your work immediately. Then replace the battery or connect your computer to an
electrical outlet.
Normally, if no input/output (I/O) activity occurs within 75 seconds after the first low-
battery warning, the computer enters
S2D
mode. If the computer
has no S2D partition, the computer enters
suspend
(or
standby
) mode, where it can preserve data for several hours.
Alternatively, you may have set the computer to enter S2D mode after a certain amount of time with no I/O activity. In this case the computer enters
S2D mode before flashing the final low-battery warning.
Once S2D mode is activated, no further power is consumed.
NOTICE: Never turn off the computer while the drive access indicator is on. Doing so could cause data loss. Instead, close all of your
application programs before you turn off the computer.
Second Low-Battery Warning
The second low-battery warning
—
a steady amber battery status indicator
—
occurs when you have about 5 minutes of battery life left under current
conditions and the computer is not connected to an electrical outlet.
After the second low-battery warning, if no further I/O activity occurs within 15 seconds, the computer enters S2D mode. If the computer has no
S2D partition, it enters suspend mode, in which it can preserve data for several hours.
If the computer is already in suspend mode when a final low-battery warning occurs, the computer enters S2D mode immediately. If S2D mode has
been disabled, the computer reenters suspend mode.
NOTICE: To avoid losing data (and possibly corrupting data areas on your hard-disk drive), save your work immediately after a
second low-battery warning. Then connect your computer to an electrical outlet, or place the computer in suspend mode. If the
battery runs completely out of power, the computer shuts off without properly closing any open files.
Detecting Battery Problems
A battery problem may prevent the battery from being charged to its full potential and can lead to unpredictable operation. To obtain a new battery,
call Dell
or access the Dell World Wide Web site at
http://www.dell.com
.
Dell suggests you follow these precautions when using the battery:
l
To avoid installing a defective battery in your computer, first check the battery's charge, indicated by the battery charge indicators on the
battery itself, by pressing the battery test button (see
Figure 2
).
l
If, after you insert the battery in the computer, the computer's battery status indicator (see
Figure 3
) flashes alternately green and amber, the
battery is too hot to charge. Turn off the computer, and let the battery and computer cool to room temperature.
l
If, after you insert the battery in the computer, the computer's battery status indicator (see
Figure 3
) flashes amber for 4 seconds when you
connect or disconnect the AC adapter or when you press the power button, you need to replace the battery.
1
Battery status indicator
NOTE: If the battery has 0 (zero) percent charge, you cannot use the battery test button to check the battery's capacity. The
battery gauge indicators will not light if the battery is completely drained.

l
If, after you insert the battery in the computer, the computer's battery status indicator (see
Figure 3
) flashes rapidly amber, the battery is
defective and needs to be replaced.
Battery Disposal
When your battery no longer holds a charge, call your local waste disposal agency or environmental agency for advice on disposing the computer
’
s
lithium ion battery.
About Battery Power
You automatically conserve battery power each time you connect the computer to an electrical outlet. The battery is even being recharged when
you use AC power. The battery's life expectancy is largely determined by the number of charges it receives, so use an electrical outlet to run the
computer whenever possible.
You can customize power management by individually controlling the computer's
power conservation features
. These features reduce power
consumption by monitoring application programs and computer devices for inactivity and slowing down or stopping some of the computer
’
s
internal devices.
Experiment with power conservation features to achieve the optimum power conservation for your work environment.
Turning On the Computer
To turn on the computer, press the
power button
.
Back to Contents Page
CAUTION: Do not puncture or incinerate the battery.
NOTE
:
This computer is supplied with a lithium ion battery. Lithium ion batteries are longer lived than conventional batteries and do not
require replacement as often. Do not place spent batteries in common household waste products. Contact local authorities for the
location of a chemical waste collection program nearest you. To purchase a new battery,
call Dell
or access the Dell World Wide Web
site at
http://www.dell.com
.
NOTES: When you use power conservation features, you often trade some of the performance of the computer for increased battery
operating time. For example, if you turn off the hard-disk drive, you may experience a delay the next time the computer tries to access
the hard-disk drive.
Other power conservation features, such as
suspend
(or
standby
) mode, stop almost all system activity. They allow you to maximize
power conservation when your work is interrupted.
NOTE: If your computer's operating system is "locked up"
—
that is, it does not respond to commands
—
press and hold down the power
button for at least five seconds to turn off the computer.

Back to Contents Page
CD-ROM and DVD- ROM Drives: Dell™ Latitude™ CS/CS x Portable Computers User's Guide
Using CD-ROM and DVD-ROM Drives
CD-ROM and DVD-ROM drives are read-only devices that can play most commercially available 8- or 12-centimeter (cm) sound and video CDs.
Dell installed the appropriate CD-ROM device drivers on your hard-
disk drive. Dell also installed the drivers that will allow a DVD
-ROM drive to
play most CDs and read data from a DVD.
To use a CD-ROM or DVD-ROM drive, install it in the computer
’
s
external media bay
.
NOTICE:
Protect the CD-ROM and DVD-ROM drives when they are not in the external media bay. Do not squeeze a drive or place
objects on top of it; doing so could damage the drive motor. Keep the drive as clean as possible.
To play a CD or DVD, press the eject button on the face of the CD-ROM or DVD-ROM drive or press <Fn><F10>. When the tray slides out, place
the disc into the tray, label side up. Make sure that the CD or DVD is seated correctly on the spindle by pressing down on the disc until it clicks in
place. Then gently push in the tray.
NOTICE:
If the CD or DVD is not seated correctly, the disc or drive can be damaged.
NOTICE:
Do not use the CD-ROM or DVD-ROM drive while the computer is in motion. Doing so could interrupt the flow of data
between the CD-ROM or DVD-ROM drive and the hard-disk or diskette drive.
When the CD-ROM or DVD-ROM drive is in use, the
drive access indicator
blinks.
If you are using the Microsoft Windows 95 or Windows 98 operating system, disable the autoplay feature while you use the CD-ROM or DVD-ROM
drive. (The autoplay feature can interfere with the computer
’
s
power management
functions.) If Dell installed the operating system, the autoplay
feature has been disabled. If you reinstall the operating system or if you installed it yourself, be sure to disable the autoplay feature if you want to
use the CD-ROM or DVD-ROM drive.
For instructions on changing the
Auto Insert Notification
option, see the operating system user
’
s guide.
Caring for CDs and DVDs
When handling and using CDs and DVDs, follow these precautions:
l
Never use a damaged or warped CD or DVD.
l
Always hold the CD or DVD by its edges. Do not touch the surface of the disc.
l
Use a clean, dry cloth to remove dust, smudges, or fingerprints from the surface of the CD or DVD. When cleaning, wipe from the center of
the CD or DVD to the edge.
l
Never use solvents, such as benzene, record cleaners, or antistatic sprays, to clean the CD or DVD.
l
Do not write on the surface of the CD or DVD.
l
Store CD or DVDs in their containers, placing them in a cool, dry place. Extreme temperatures may damage CDs or DVDs.
l
Do not bend or drop a CD or DVD.
l
Do not place objects on top of a CD or DVD.
Types of Supported Discs
Using CD-ROM and DVD-ROM Drives
Caring for CDs and DVDs
Types of Supported Discs
NOTE: "Reading data" does not refer to playing a movie. However, if you are using the Microsoft
®
Windows
®
95 or Windows 98
operating system, you can play DVD movies in your DVD-ROM drive by installing a zoomed video (ZV) PC Card, such as a hardware
Moving Picture Experts Group (MPEG) decoder, in the upper PC card slot. You must also install the drivers that came with the card.

Your computer's CD-ROM and DVD-ROM drives are able to play the following disc formats:
l
CD-ROM red-book audio discs (CD-DA)
l
CD-ROM yellow-book mode-1 and mode-2 data discs
l
CD-ROM XA (mode-2 form 1 and form 2; without Adaptive Differential Pulse Code modulation [ADPCM])
l
CD-I (mode-2 form 1 and form 2)
l
CD-I Ready
l
CD-Bridge
l
Photo CD, CD-recordable (CD-R) (single and multisession)
l
Video CD
l
CD-rewritable (CD-RW). The 24x CD-ROM and DVD-ROM drives support reading CD-RW discs. This format is supported as read-only;
neither the CD-ROM nor the DVD-ROM drive can write to CD-RW discs.
l
DVD-5 (the DVD-ROM drive supports the DVD-5 format)
Back to Contents Page
Back to Contents Page
Contacting Dell: Dell™ Latitude™ CS/CS x Portable Computers User's Guide
Overview
When you need to contact Dell, use the telephone numbers, codes, and electronic addresses provided in the following sections. "
International
Dialing Codes
" provides the various codes required to make long-distance and international calls. "
Americas Contact Numbers
," "
Europe Contact
Numbers
," and "
Asia and Other Regions Contact Numbers
" provide local telephone numbers, area codes, toll-free numbers, and E-mail
addresses, if applicable, for each department or service available in various countries around the world.
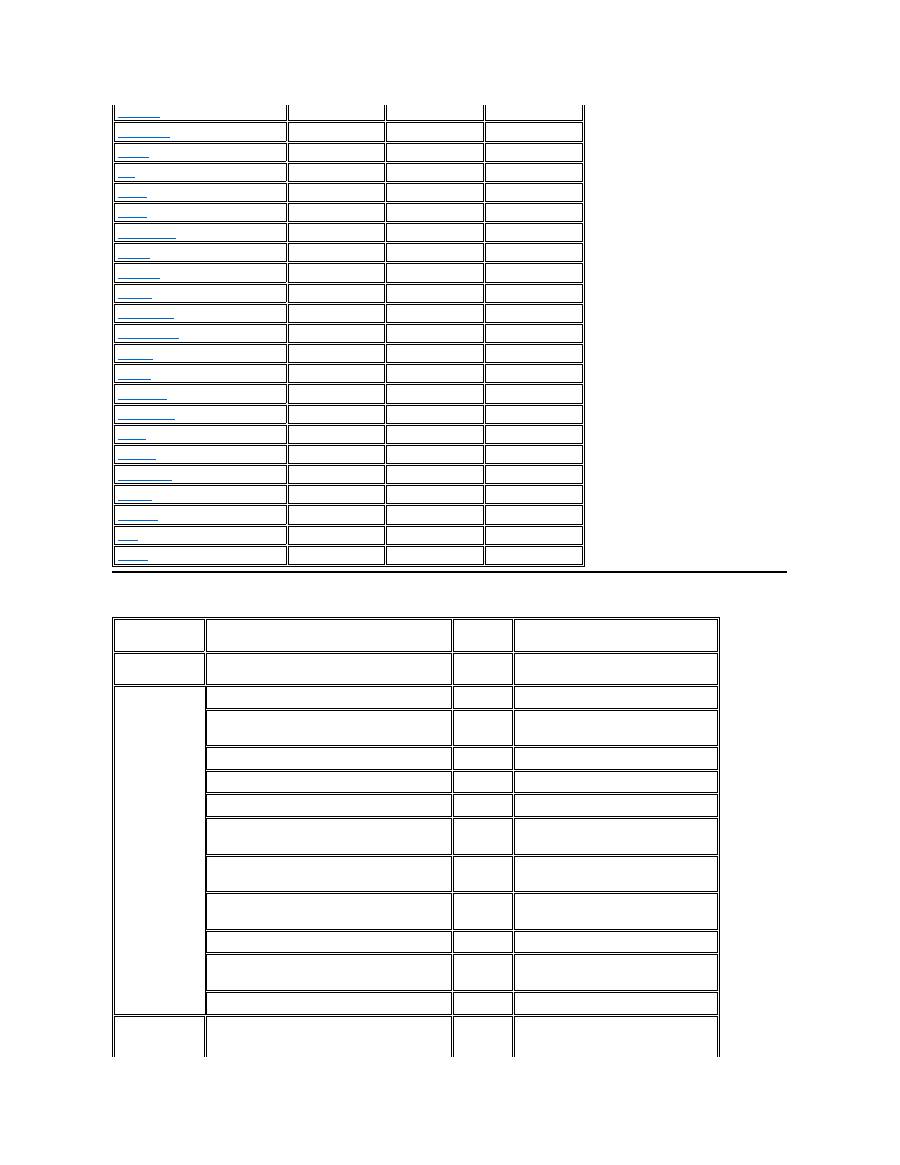
If you are making a direct-dialed call to a location outside of your local telephone service area, determine which codes to use (if any) in
"
International Dialing Codes
," in addition to the local numbers provided in the other sections.
For example, to place an international call from Paris, France to Bracknell, England, dial the international access code for France followed by the
country code for the U.K., the city code for Bracknell, and then the local number as shown in the following illustration:
To place a long-distance call within your own country, use area codes instead of international access codes, country codes, and city codes. For
example, to call Paris, France from Montpellier, France, dial the area code plus the local number as shown in the following illustration:
The codes required depend on where you are calling from as well as the destination of your call; in addition, each country has a different dialing
protocol. If you need assistance in determining which codes to use, contact a local or an international operator.
International Dialing Codes
Click a listed country to obtain the appropriate contact numbers.
Overview
Europe Contact Numbers
International Dialing Codes
Asia and Other Regions Contact Numbers
Americas Contact Numbers
NOTES: Toll-free numbers are for use only within the country for which they are listed. Area codes are most often used to call long
distance within your own country (not internationally)
—
in other words, when your call originates in the same country you are calling.
Have your Express Service Code ready when you call. The code helps Dell's automated-support telephone system direct your call
more efficiently.
Country (City)
International
Access Code
Country Code
City Code
Australia
(Sydney)
0011
61
2
Austria
(Vienna)
900
43
1
Belgium
(Brussels)
00
32
2
Brazil
0021
55
51
Brunei
—
673
—
Canada
(North York, Ontario)
011
—
Not required
Chile
(Santiago)
—
56
2
China
(Xiamen)
—
86
592
Czech Republic
(Prague)
00
420
2
Denmark
(Horsholm)
009
45
Not required
Finland
(Helsinki)
990
358
9
France
(Paris) (Montpellier)
00
33
(1) (4)
Americas Contact Numbers
Germany
(Langen)
00
49
6103
Hong Kong
001
852
Not required
Ireland
(Bray)
16
353
1
Italy
(Milan)
00
39
2
Japan
(Kawasaki)
001
81
44
Korea
(Seoul)
001
82
2
Luxembourg
00
352
—
Macau
—
853
Not required
Malaysia
(Penang)
00
60
4
Mexico
(Colonia Granada)
95
52
5
Netherlands
(Amsterdam)
00
31
20
New Zealand
00
64
—
Norway
(Lysaker)
095
47
Not required
Poland
(Warsaw)
011
48
22
Singapore
(Singapore)
005
65
Not required
South Africa
(Johannesburg)
09/091
27
11
Spain
(Madrid)
07
34
91
Sweden
(Upplands Vasby)
009
46
8
Switzerland
(Geneva)
00
41
22
Taiwan
002
886
—
Thailand
001
66
—
U.K.
(Bracknell)
010
44
1344
U.S.A.
(Austin, Texas)
011
1
Not required
Country (City)
Department Name or Service
Area
Code
Local Number or
Toll-Free Number
Brazil
Sales, Customer Support, Technical Support
toll free: 0800 90 3355
Canada
(North York,
Ontario)
NOTE:
Customers in
Canada call the
U.S.A. for access
to TechConnect
BBS.
Automated Order-Status System
toll free: 1-800-433-9014
AutoTech (Automated technical support)
toll free: 1-800-247-9362
Customer Care (From outside Toronto)
toll free: 1-800-387-5759
Customer Care (From within Toronto)
416
758-2400
Customer Technical Support
toll free: 1-800-847-4096
Sales (Direct Sales
—
from outside Toronto)
toll free: 1-800-387-5752
Sales (Direct Sales
—
from within Toronto)
416
758-2200
Sales (Federal government, education, and
medical)
toll free: 1-800-567-7542
Sales (Major Accounts)
toll free: 1-800-387-5755
TechConnect BBS (Austin, Texas, U.S.A.)
512
728-8528
TechFax
toll free: 1-800-950-1329
Chile
(Santiago)
Sales, Customer Support, and Technical Support
toll free: 1230-020-4823
NOTE:
Customers in
Chile call the
U.S.A. for sales,
customer, and
technical
assistance
Latin America
NOTE:
Customers in
Latin America
call the U.S.A. for
sales, customer,
and technical
assistance.
Customer Technical Support (Austin, Texas,
U.S.A.)
512
728-4093
Customer Service (Austin, Texas, U.S.A.)
512
728-3619
Fax (Technical Support and Customer Service)
(Austin, Texas, U.S.A.)
512
728-3883
Sales (Austin, Texas, U.S.A.)
512
728-4397
SalesFax (Austin, Texas, U.S.A.)
512
728-4600
728-3772
Mexico
(Colonia
Granada)
NOTE:
Customers in
Mexico call the
U.S.A. for access
to the Automated
Order-Status
System and
AutoTech.
Automated Order-Status System (Austin, Texas,
U.S.A.)
512
728-0685
AutoTech (Automated technical support) (Austin,
Texas, U.S.A.)
512
728-0686
Customer Technical Support
525
228-7870
Sales
525
228-7811
toll free: 91-800-900-37
toll free: 91-800-904-49
Customer Service
525
228-7878
Main
525
228-7800
U.S.A.
(Austin, Texas)
Automated Order-Status System
toll free: 1-800-433-9014
AutoTech (Automated technical support)
toll free: 1-800-247-9362
Dell Home and Small Business Group:
Customer Technical Support (Return Material
Authorization Numbers)
toll free: 1-800-624-9896
Customer Service
(Credit Return Authorization Numbers)
toll free: 1-800-624-9897
National Accounts
(systems purchased by established Dell national accounts [have your account number
handy], medical institutions, or value-added resellers [VARs]):
Customer Service and Technical Support (Return
Material Authorization Numbers)
toll free: 1-800-822-8965
Public Americas International
(systems purchased by governmental agencies [local, state, or federal] or
educational institutions):
Customer Service and Technical Support (Return
Material Authorization Numbers)
toll free: 1-800-234-1490
Dell Sales
toll free: 1-800-289-3355
toll free: 1-800-879-3355
Europe Contact Numbers
Spare Parts Sales
toll free: 1-800-357-3355
DellWare
™
toll free: 1-800-753-7201
DellWare FaxBack Service
512
728-1681
Fee-Based Technical Support
toll free: 1-800-433-9005
Sales (Catalogs)
toll free: 1-800-426-5150
Fax
toll free: 1-800-727-8320
TechFax
toll free: 1-800-950-1329
TechConnect BBS
512
728-8528
Dell Services for the Deaf, Hard-of-Hearing, or
Speech-Impaired
toll free: 1-877-DELLTTY
(1-877-335-5889)
Switchboard
512
338-4400
Country (City)
Department Name or Service
Area
Code
Local Number or
Toll-Free Number
Austria
(Vienna)
NOTE:
Customers in
Austria call
Langen,
Germany for
Technical
Support and
Customer Care.
Switchboard
01
491 040
Home/Small Business Sales
01
795676-02
Home/Small Business Sales Fax
01
795676-05
Home/Small Business Customer Care
01
795676-03
Preferred Accounts/Corporate Customer Care
0660-8056
Home/Small Business Technical Support
01
795676-04
Preferred Accounts/Corporate Technical Support
0660-8779
Web site:
support.euro.dell.com/at
E-mail: tech_support_germany@dell.com
Belgium
(Brussels)
Technical Support
02
481 92 88
Customer Care
02
481 91 19
Home/Small Business Sales
toll free: 0800 16884
Corporate Sales
02
481 91 00
Fax
02
481 92 99
Switchboard
02
481 91 00
Web site:
support.euro.dell.com/be
E-mail: tech_be@dell.com
Czech Republic
(Prague)
Technical Support
02
22 83 27 27
Customer Care
02
22 83 27 11
Fax
02
22 83 27 14
TechFax
02
22 83 27 28
Switchboard
02
22 83 27 11
Web site:
support.euro.dell.com/cz
E-mail: czech_dell@dell.com
Denmark
(Horsholm)
NOTE:
Customers in
Denmark call
Sweden for fax
Technical Support
45170182
Customer Care
45170181
Switchboard
45170100
Fax Technical Support (Upplands Vasby, Sweden)
859005594
technical support.
Fax Switchboard
45170117
Web site:
support.euro.dell.com/dk
E-mail: den_support@dell.com
Finland
(Helsinki)
Technical Support
09
253 313 60
Technical Support Fax
09
253 313 81
Customer Care
09
253 313 61
Fax
09
253 313 99
Switchboard
09
253 313 00
Web site:
support.euro.dell.com/fi
E-mail: fin_support@dell.com
France
(Paris/Montpellier)
Technical Support
0803
387 270
Customer Care (Paris)
01
47 62 68 92
Customer Care (Montpellier)
04
67 06 61 96
TechConnect BBS (Montpellier)
04
67 22 53 04
Fax (Montpellier)
04
67 06 60 07
Switchboard (Paris)
01
47 62 69 00
Switchboard (Montpellier)
04
67 06 60 00
Web site:
support.euro.dell.com/fr
E-mail: web_fr_tech@dell.com
Germany
(Langen)
Technical Support
06103
971-200
Technical Support Fax
06103
971-222
Home/Small Business Customer Care
06103
971-530
Corporate Customer Care
06103
971-560
Preferred Accounts Customer Care
06103
971-420
TechConnect BBS
06103
971-666
Switchboard
06103
971-0
Web site:
http://www.dell.de/support
E-mail: tech_support_germany@dell.com
Ireland
(Bray)
NOTE:
Customers in
Ireland call the
U.K. for
Home/Small
Business
customer
assistance.
Technical Support
1-850-543-543
Customer Care
01
204 4026
Home/Small Business Customer Care (Bracknell,
U.K.)
0870 906 0010
Sales
1-850-235-235
SalesFax
01
286 2020
Fax
01
286 6848
TechConnect BBS
01
204 4711
TechFax
01
204 4708
Switchboard
01
286 0500
Web site:
support.euro.dell.com/ie
E-mail: dell_direct_support@dell.com
Italy
(Milan)
Technical Support
2
57782.690
Customer Care
2
57782.555
Sales
2
57782.411
Fax
2
57503530
Switchboard
2
57782.1
Web site:
support.euro.dell.com/it
E-mail: support_italy@dell.com
Luxembourg
NOTE:
Customers in
Luxembourg call
Belgium for
sales, customer,
and technical
assistance.
Technical Support (Brussels, Belgium)
02
481 92 88
Home/Small Business Sales (Brussels, Belgium)
toll free: 080016884
Corporate Sales (Brussels, Belgium)
02
481 91 00
Customer Care (Brussels, Belgium)
02
481 91 19
Switchboard (Brussels, Belgium)
02
481 91 00
Fax (Brussels, Belgium)
02
481 92 99
Web site:
support.euro.dell.com/be
E-mail: tech_be@dell.com
Netherlands
(Amsterdam)
Technical Support
020
581 8838
Customer Care
020
581 8740
Home/Small Business Sales
toll free: 0800-0663
Home/Small Business SalesFax
020
682 7171
Corporate Sales
020
581 8818
Corporate SalesFax
020
686 8003
Fax
020
686 8003
Switchboard
020
581 8818
Web site:
support.euro.dell.com/nl
Norway
(Lysaker)
NOTE:
Customers in
Norway call
Sweden for fax
technical support.
Technical Support
671 16882
Customer Care
671 16881
Switchboard
671 16800
Fax Technical Support (Upplands Vasby, Sweden)
590 05 594
Fax Switchboard
671 16865
Web site:
support.euro.dell.com/no
E-mail: nor_support@dell.com
Poland
(Warsaw)
Technical Support
22
60 61 999
Customer Care
22
60 61 999
Sales
22
60 61 999
Switchboard
22
60 61 999
Fax
22
60 61 998
Web site:
support.euro.dell.com/pl
E-mail: pl_support@dell.com
Spain
(Madrid)
Technical Support
902 100 130
Corporate Customer Care
902 118 546
Home/Small Business Customer Care
902 118 540
TechConnect BBS
91
329 33 53
Corporate Sales
902 100 185
Home/Small Business Sales
902 118 541
Switchboard
91
722 92 00
Web site:
support.euro.dell.com/es
E-mail: es_support@dell.com
Sweden
(Upplands Vasby)
Technical Support
08
590 05 199
Customer Care
08
590 05 169
Fax Technical Support
08
590 05 594

Asia and Other Regions Contact Numbers
Sales
08
590 05 185
Web site:
support.euro.dell.com/se
E-mail: swe_support@dell.com
Switzerland
(Geneva)
Technical Support
0844 811 411
Customer Care
0848 802 802
Switchboard
022
799 01 01
Fax
022
799 01 90
Web site:
support.euro.dell.com/ch
E-mail: swisstech@dell.com
U.K.
(Bracknell)
Technical Support
0870-908-0800
Corporate Customer Care
01344
720206
Home/Small Business Customer Care
0870-906-0010
TechConnect BBS
0870-908-0610
Sales
01344
720000
AutoFax
0870-908-0510
Web site:
support.euro.dell.com/uk
E-mail: dell_direct_support@dell.com
Country (City)
Department Name or Service
Area
Code
Local Number or
Toll-Free Number
Australia
(Sydney)
Customer Technical Support (Dell™ Dimension™
systems only)
1-300-65-55-33
Customer Technical Support (Other systems)
toll free: 1-800-633-559
Customer Care
toll free: 1-800-819-339
Corporate Sales
toll free: 1-800-808-385
Transaction Sales
toll free: 1-800-808-312
Fax
toll free: 1-800-818-341
Brunei
NOTE:
Customers in
Brunei call
Malaysia for
customer
assistance.
Customer Technical Support
(Penang, Malaysia)
810 4966
Customer Service
(Penang, Malaysia)
810 4949
Transaction Sales
(Penang, Malaysia)
810 4955
China
(Xiamen)
Customer Service
toll free: 800 858 2437
Sales
toll free: 800 858 2222
Hong Kong
NOTE:
Customers in
Hong Kong call
Malaysia for
customer
assistance.
Technical Support
toll free: 800 96 4107
Customer Service (Penang, Malaysia)
810 4949
Transaction Sales
toll free: 800 96 4109
Corporate Sales
toll free: 800 96 4108
Japan
(Kawasaki)
Technical Support
toll free: 0088-22-7890
Technical Support (Server)
toll free: 0120-1984-35
Technical Support (Dimension and Inspiron™)
toll free: 0120-1982-56
Technical Support (WorkStation, OptiPlex™, and
Latitude™
)
toll free: 0120-1984-39
Y2K Support
044
556-4298
Customer Care
044
556-4240
Direct Sales
044
556-3344
Commercial Sales
044
556-3430
556-3440
Faxbox Service
03-5972-5840
Switchboard
044
556-4300
Korea
(Seoul)
NOTE:
Customers in
Korea call
Malaysia for
customer
assistance.
Technical Support
toll free: 080-200-3800
Transaction Sales
toll free: 080-200-3600
Corporate Sales
toll free: 080-200-3900
Customer Service (Penang, Malaysia)
810 4949
Fax
394 3122
Switchboard
287 5600
Macau
NOTE:
Customers in
Macau call
Malaysia for
customer
assistance.
Technical Support
toll free: 0800 582
Customer Service (Penang, Malaysia)
810 4949
Transaction Sales
toll free: 0800 581
Malaysia
(Penang)
Technical Support
toll free: 1 800 888 298
Customer Service
04
810 4949
Transaction Sales
toll free: 1 800 888 202
Corporate Sales
toll free: 1 800 888 213
New Zealand
Technical Support
(Dell Dimension systems only)
($2.50 + GST per call)
0900 51010
Technical Support (Other systems)
0800 446 255
Customer Service
0800 444 617
Sales
0800 441 567
Fax
0800 441 566
Singapore
(Singapore)
NOTE:
Customers in
Singapore call
Malaysia for
customer
assistance.
Technical Support
toll free: 800 6011 051
Customer Service (Penang, Malaysia)
04
810 4949
Transaction Sales
toll free: 800 6011 054
Corporate Sales
toll free: 800 6011 053
South Africa
(Johannesburg)
Technical Support
011
709 7710
Customer Care
011
709 7710
Sales
011
706 7700
Fax
011
709 0495
Switchboard
011
709 7700
Web site:
support.euro.dell.com/za
E-mail: dell_za_support@dell.com
Southeast
Asian/Pacific
Countries
(excluding
Australia, Brunei,
China, Hong
Kong, Japan,
Korea, Macau,
Malaysia, New
Zealand,
Singapore,
Customer Technical Support, Customer Service,
and Sales (Penang, Malaysia)
60 4 810-4810
