Dell LATITUDE D400: инструкция
Раздел: Компьютерная техника, комплектующие, аксессуары
Тип: Ноутбук
Инструкция к Ноутбуку Dell LATITUDE D400

Dell™ Latitude™ CS/CS
x
Portable Computers User's Guide
Information in this document is subject to change without notice.
©
1999 Dell Computer Corporation. All rights reserved.
Reproduction in any manner whatsoever without the written permission of Dell Computer Corporation is strictly forbidden.
Trademarks used in this text:
Dell, Latitude, OptiPlex, Dimension, Inspiron, ExpressCharge
, the
DELL
logo, and
DellWare
are trademarks of Dell Computer Corporation;
Microsoft
,
Windows
,
Windows NT
, and
MS-DOS
are registered trademarks of Microsoft Corporation;
Intel
and
Pentium
are registered trademarks of Intel Corporation.
Other trademarks and trade names may be used in this document to refer to either the entities claiming the marks and names or their products. Dell Computer Corporation
disclaims any proprietary interest in trademarks and trade names other than its own.
Initial release: 25 Jun 1999
Last revised: 04 Nov 1999
Preface
Introduction
Setup and Operation
Powering Your Computer
Traveling With Your Computer
Drivers
Customizing Your Computer
Removing and Replacing Parts
Troubleshooting Your Computer
Technical Specifications
Getting Help
Back to Contents Page
AC Adapter: Dell™ Latitude™ CS/CS x Portable Computers User's Guide
Using the AC Adapter
The AC adapter converts AC power to the DC power required by the computer. The AC adapter kit includes the AC adapter with its attached DC
cable (which inputs power to the computer) as well as an AC power cable that connects to an electrical outlet.
You can connect the AC adapter with your computer either turned on or off.
The AC adapter works with electrical outlets worldwide. However, power connectors vary among countries. Before you use AC power in a foreign
country, you may need to obtain a new power cable designed for use in that country.
If the computer is docked to one of Dell's C/Port Family Advanced Port Replicators (APR) or C/Dock Family Expansion Stations, it obtains power
through the APR or expansion station, which must be connected to an electrical outlet.
Connecting the AC Adapter
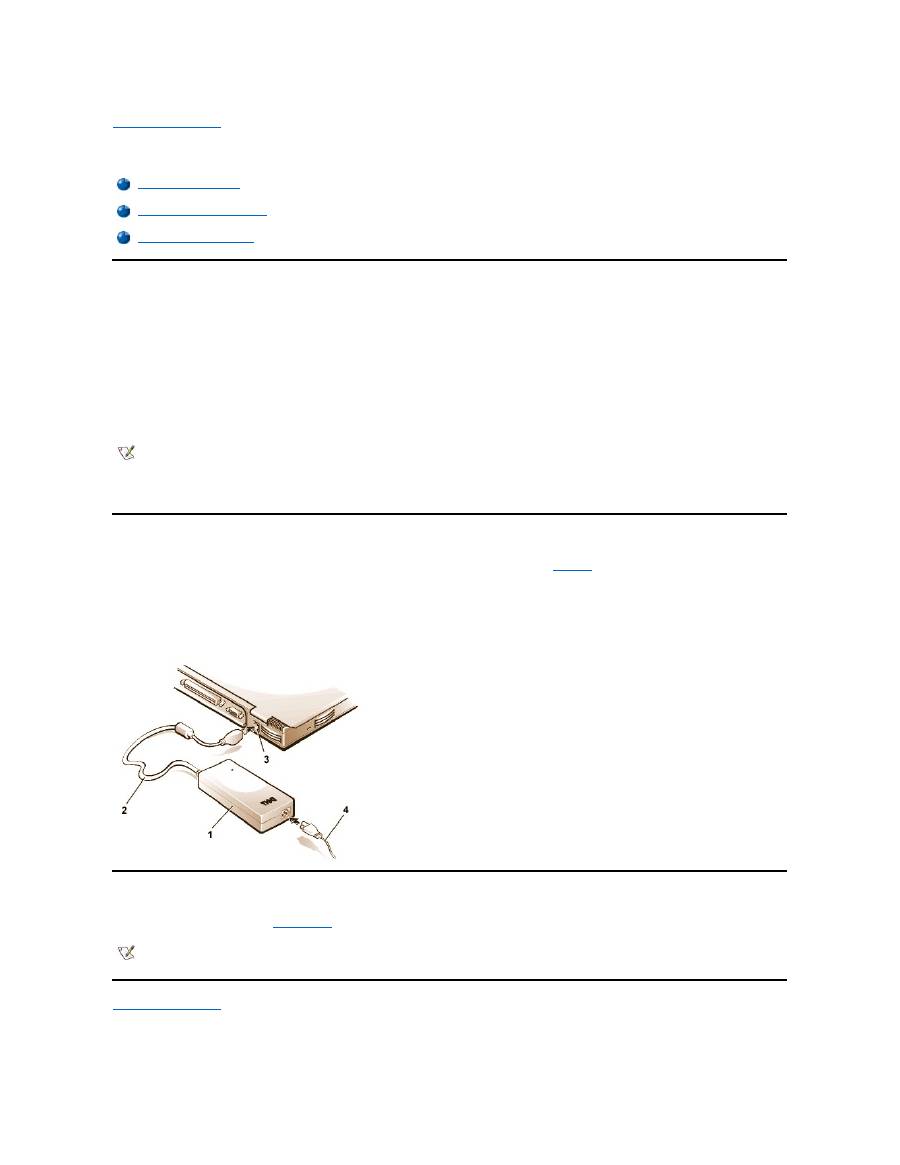
1.
Connect the AC adapter's attached cable into the computer's AC adapter connector (see
Figure 1
).
2. Plug the AC power cable into the other end of the AC adapter.
3. Plug the AC power cable into an electrical outlet.
Figure 1. Connecting the AC Adapter
Turning On the Computer
To turn on the computer, press the
power button
.
Back to Contents Page
Using the AC Adapter
Connecting the AC Adapter
Turning On the Computer
NOTE: If you are running your computer on AC power with a battery installed, the AC adapter charges the battery (if needed) and then
maintains the battery's charge.
NOTICE: The AC adapter should be in a ventilated area, such as on a desktop or on the floor, when used to power the computer or
charge the battery. Do not use the AC adapter in a poorly ventilated environment, such as inside a carrying case.
1
AC adapter
2
AC adapter's attached cable
3
AC adapter connector
4
AC power cable
NOTE: If your computer's operating system is "locked up"
—
that is, it does not respond to commands
—
press and hold down the power
button for at least five seconds to turn off the computer.
Back to Contents Page
Power Management Settings: Dell™ Latitude™ CS/CS x Portable Computers User's Guide
Experimenting With Power Conservation
In general, the lower the value you set for each power conservation feature, the longer the battery's charge lasts. On the other hand, setting high
values tends to optimize the computer's performance.
To evaluate the way that different settings affect how long you can operate the computer on battery power versus the relative efficiency of how the
software performs, experiment as follows:
l
Use the computer with all the options set at their default values.
l
Use the computer with all the options disabled or set to
Off
.
l
Use the computer with all the options set to their minimum or maximum values.
Using Key Combinations
Table 1
identifies the power management key combinations.
Table 1. Key Combinations to Activate/Deactivate Features
*
These key combinations do not function with the Advanced Configuration and Power Interface (ACPI
).
Closing the Display
One way to conserve power on the computer is to close the display when the computer is not in use. When you close the display and an external
Experimenting With Power Conservation
Standby Mode
Using Key Combinations
Suspend-to-Disk Mode
Closing the Display
Power Management Properties for Microsoft Windows 98
Suspend Mode
Power Management Properties for Microsoft Windows NT
NOTE: To use key combinations on an external keyboard, enable the
External Hot Key
option in the System Setup program, and
press <Scroll Lock> instead of <Fn>.
Feature
Activate/Deactivate
Turn off display
To activate, press <Fn><d>.*
To deactivate, move the cursor or press a key on the integrated or external keyboard. (If nothing
happens, the computer may be in
suspend
or
standby
mode. Press the power button to resume
normal operation.)
Turn off hard-disk drive
To activate, press <Fn><h>.*
Automatically deactivates when the hard-disk drive is accessed.
NOTE: If a modular hard-disk drive is installed in the C/Dock media bay, you cannot turn off the
hard-disk drive by pressing <Fn><h>
.
Suspend mode
To activate, press <Fn><Esc>.
To deactivate, press the power button.
Suspend-to-disk mode
To activate, press <Fn><a>. (On a French keyboard, press <Fn><q>.)*
To deactivate, press the power button.

monitor is
not
connected, the computer's display shuts off and the computer enters
suspend
mode (
standby
mode in Microsoft
®
Windows
®
98).
To resume work, open the display. (The computer may take several seconds to resume operation.)
Suspend Mode
If your computer is running the Microsoft Windows 95 or Microsoft Windows NT
®
operating system, suspend mode stops almost all computer
activity, but leaves the computer ready to resume operations immediately in about 20 to 30 seconds. Use suspend mode whenever you leave the
computer unattended.
NOTICE: Windows 95 and Windows NT save data to random-access memory (RAM), not to your hard-disk drive, before entering
suspend mode. If the computer enters suspend mode while running on battery power, data loss from RAM can occur if the battery
discharges completely.
Suspend mode conserves battery power by turning off the microprocessor clock; the display; the hard-disk drive; the CD-ROM, DVD-ROM, or LS-
120 drive module (if installed); the external monitor connector; the external keyboard (if attached); the parallel port; the serial port; the touch pad;
and the diskette drive.
You can enter suspend mode immediately by pressing <Fn><Esc> (or <Scroll Lock><Esc> on an external keyboard if the
External Hot Key
option is enabled in the System Setup program).
When you enter suspend mode, the
power indicator
is not lit.
Resume from suspend mode by pressing the power button. The computer may take several seconds to return to normal operation.
Standby Mode
If your computer is running the Microsoft Windows 98 operating system, standby mode turns off the display, stops the hard-disk drive, and turns off
other internal devices so that the computer uses less battery power. When the computer resumes operation from standby mode, the desktop is
restored exactly as it was before entering standby mode.
NOTICE: Windows 98 saves data to random-access memory (RAM), not to your hard-disk drive, before entering standby mode. If the
computer enters standby mode while running on battery power, data loss from RAM can occur if the battery discharges completely.
You can enter standby mode by pressing <Fn><Esc>.
To resume operation from standby mode, press the power button.
Suspend-to-Disk Mode
Suspend-to-disk (S2D) mode copies all system data to a reserved area
—
the S2D partition
—
on the hard-disk drive and then turns off all power to
the computer. When you resume normal operation, the same programs will be running and the same files will be open that were loaded before you
activated this mode.
Place the computer in S2D mode if you intend to store the computer for longer than 40 days. S2D mode preserves the configuration information
stored in nonvolatile random-access memory (NVRAM). The reserve battery maintains this information, but it may run out of energy after 40 days.
If your system is running under
Advanced Power Management
(APM) mode, and if the
External Hot Key
option is enabled in the System Setup
program, you can enter S2D mode by pressing <Fn><a> (or <Scroll Lock><a> on an external keyboard). On a French keyboard, press <Fn><q>
or <Scroll Lock><q>.*
Resume operation from S2D mode by pressing the power button.
If you connect or remove devices while the computer is in S2D mode, the computer automatically recognizes the newly connected devices when it
resumes normal operation.
Some PC Cards may not operate correctly after resuming from S2D mode. If you encounter problems with a card,
remove and reinsert the card
.
NOTE: If an external monitor is connected when you close the display, the computer does not activate suspend mode. You can still use
the external monitor.
NOTES: On resumption from suspend mode, if a password is set, the computer displays the password prompt screen. At the password
prompt screen, if you do not enter a password within 2 minutes, the computer returns to suspend mode.
Suspend mode is known as standby mode under the Microsoft Windows 98 operating system.
NOTE: S2D mode helps preserve system data by quickly saving it to the hard-disk drive if you are about to run out of battery power.
NOTE: Dell creates an appropriately sized S2D partition before shipping the computer to you. Use the S2D utility to remove the file, to
increase the size of the file, or to add the S2D file if you removed it. For more information about altering or creating an S2D file, see the

* These key combinations may not function with future operating systems.
Power Management Properties for Windows 98
Windows 98 with Advanced Power Management (APM) provides the
Power Management
Properties
window for setting power conservation
features.
To access the
Power Management Properties
window and set the power management features, perform the following steps:
1. Click the
Start
button, point to
Settings
, and click
Control Panel
.
2. Double-click the
Power Management Properties
icon.
The
Power Management Properties
window contains the following tabs:
l
Power Scheme
—
allows you to change individual power management settings or select one of three power mode settings
(
Always On
,
Home/Office Desk
, or
Portable/Laptop
) that each provide a set of default power management settings.
l
Alarms
—
allows you to set the
Low Battery
and
Critical Battery
alarms to alert you when the computer battery falls below a
certain percentage. When you received your computer, the
Low Battery
and
Critical Battery
alarm options were not checked.
Dell recommends that you do not select these options.
l
Power Meter
—
allows you to view the percentage of battery life remaining when your computer is operating on battery power. If
your computer is operating on AC power, the computer displays a message.
l
Advanced
—
allows you to display the
Power Meter
on the Windows 98 taskbar and to display a password prompt when the
computer resumes operation from standby mode.
Power Management Properties for Microsoft Windows NT
Dell provides Softex software compatible with the Power Management Controller, which allows you to suspend and resume your portable
computer without affecting your ability to use the docking station or its media bay.
For information about Softex power management software, see the Softex user
’
s guides at
http://www.dell.com/products/notebook/latitude/NT40.htm
and see your
Dell-Installed Microsoft Windows NT Workstation Setup Guide
.
Back to Contents Page
readme.S2D
file, which can be found in the
Dell Utilities
folder on your hard-disk drive or on the S2D diskette that came with your
computer.
Оглавление
- AC Adapter: Dell™ Latitude™ CS/CS x Portable Computers User's Guide
- Power Management Settings: Dell™ Latitude™ CS/CS x Portable Computers User's Guide
- Batteries: Dell™ Latitude™ CS/CS x Portable Computers User's Guide
- CD-ROM and DVD- ROM Drives: Dell™ Latitude™ CS/CS x Portable Computers User's Guide
- Contacting Dell: Dell™ Latitude™ CS/CS x Portable Computers User's Guide
- Customizing Your Computer: Dell™ Latitude™ CS/CS x Portable Computers User's Guide
- Dell™ Diagnostics: Dell Latitude™ CS/CS x Portable Computers User's Guide
- Diskette Drive: Dell™ Latitude™ CS/CS x Portable Computers User's Guide
- Display: Dell™ Latitude™ CS/CS x Portable Computers User's Guide
- Drivers: Dell™ Latitude™ CS/CS x Portable Computers User's Guide
- Error Messages and Flash Codes: Dell™ Latitude™ CS/CS x Portable Computers User's Guide
- Connecting External Devices: Dell™ Latitude™ CS/CS x Portable Computers User's Guide
- Getting Help: Dell™ Latitude™ CS/CS x Portable Computers User's Guide
- Help Overview: Dell™ Latitude™ CS Portable Computers User's Guide
- Introduction: Dell™ Latitude™ CS/CS x Portable Computers User's Guide
- Keyboard: Dell™ Latitude™ CS/CS x Portable Computers User's Guide
- External Media Bay: Dell™ Latitude™ CS/CS x Portable Computers User's Guide
- Media Options: Dell™ Latitude™ CS/CS x Portable Computers User's Guide
- PC Cards: Dell™ Latitude™ CS/CS x Portable Computers User's Guide
- Powering Your Computer: Dell™ Latitude™ CS/CS x Portable Computers User's Guide
- Preface: Dell™ Latitude™ CS/CS x Portable Computers User's Guide
- Removing and Replacing Parts: Dell™ Latitude™ CS/CS x Portable Computers User's Guide
- Suspend-to-Disk Utility: Dell™ Latitude™ CS/CS x Portable Computers User's Guide
- Securing Your Computer: Dell™ Latitude™ CS/CS x Portable Computers User's Guide
- Using the System Setup Program : Dell™ Latitude™ CS/CS x Portable Computers User's Guide
- System Setup Options: Dell™ Latitude™ CS/CS x Portable Computers User's Guide
- Technical Specifications: Dell™ Latitude™ CS/CS x Portable Computers User's Guide
- Setup and Operation: Dell™ Latitude™ CS/CS x Portable Computers User's Guide
- Touch Pad: Dell™ Latitude™ CS/CS x Portable Computers User's Guide
- Traveling With Your Computer: Dell™ Latitude™ CS/CS x Portable Computers User's Guide
- Troubleshooting Your Computer: Dell™ Latitude™ CS/CS x Portable Computers User's Guide
- Installing the Microsoft ® Windows ® 95 and Windows 98 Operating System Drivers: Dell™ Latitude™ CS/CS x Portable Computers User's Guide
- Installing the Microsoft ® Windows NT ® Operating System Drivers: Dell™ Latitude™ CS/CS x Portable Computers User's Guide
