Dell LATITUDE D400: Display: Dell™Latitude™CS/CS
Display: Dell™Latitude™CS/CS: Dell LATITUDE D400
Back to Contents Page
Display: Dell™Latitude™CS/CS
x
Portable Computers User's Guide
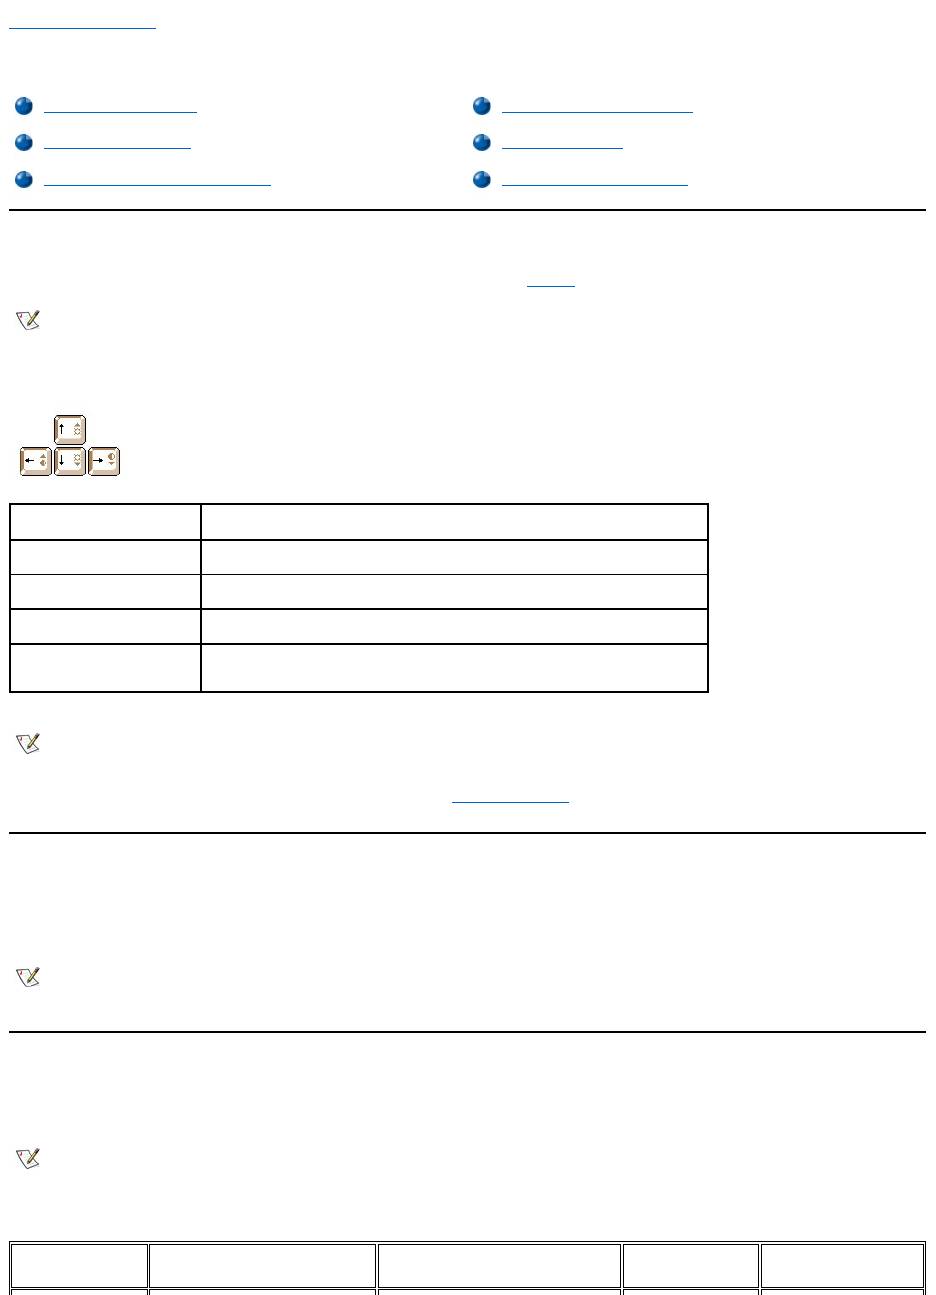
Adjusting the Brightness
To adjust the brightness of the display, you can use the key combinations shown in Table 1.
Table 1. Brightness Key Combinations and Their Functions
Expanded Video Mode
When working in text mode, you can select the font used to display text. Press <Fn><F7> to toggle between regular video mode and expanded
video mode. In expanded video mode, items in resolutions other than 1024 x 768 expand to fill the screen, which is useful if you are working in 800
x 600 resolution on a 13.3-inch extended graphics array (XGA) display.
Video Drivers and Video Resolution
The Dell-installed video drivers work with the operating system to let you customize the video resolution, number of screen colors, and refresh rate
of your display.
Table 2. Combinations of Resolutions and Colors Supported
Adjusting the Brightness
Customizing Video Resolution
Expanded Video Mode
Dual-Display Mode
Video Drivers and Video Resolution
If You Have Display Problems
NOTE: When you run the computer on battery power, set your computer's brightness control to the lowest setting that affords
comfortable viewing. You can extend your battery life by using the minimum brightness setting.
Key Combinations
Function
<Fn> + down arrow
Decreases brightness
<Fn> + up arrow
Increases brightness
<Fn> + right arrow
Has no effect on this computer
<Fn> + left arrow
Has no effect on this computer
NOTES: You cannot change contrast on an active-matrix (thin film transistor [TFT]) display, such as your computer's display. (Contrast
adjustments are only necessary on older passive-matrix displays.)
To use key combinations on an external keyboard, enable the External Hot Key option in the System Setup program and use <Scroll
Lock> instead of <Fn>.
NOTES: You may have difficulty using the display fonts feature with MS-DOS®programs that use downloaded fonts.
For optimum video performance in these cases, do not use expanded video mode.
NOTE: The Dell-installed video drivers are designed to offer the best performance on your computer. Dell recommends that you use
only these drivers with your factory-installed operating system.
Resolution
Colors
Bits
Display Refresh
Rate
External Monitor
Refresh Rate
* In this resolution, the display is set to pan mode. To use 1280 x 1024 resolution, set the external monitor to Plug and Play Monitor as
described in the following procedures.
For Windows 95, perform the following steps:
1. Click the Start,button, point to Settings, and then click Control Panel.
2. Double-click the Display icon.
3. Click the Settings tab, click Advanced Properties, and click the Monitor tab.
4. Click Change..., click Plug and Play Monitor, and click OK twice.
5. Set Display area to 1280 x 1024, and click OK.
For Windows 98, perform the following steps:
1. Click the Start button, point to Settings, and then click Control Panel.
2. Double-click the Display icon.
3. Click the Settings tab, click Advanced..., and click the Monitor tab.
4. Click Change..., click Next, and click Display a list of all the drivers.
5. Click Next, and click Show all hardware.
6. Under Manufacturers, click (Standard monitor types).
7. Under Models, click Plug & Play Monitor; and click Next.
8. Click Next again, click Finish, and click Close.
9. At the Display Properties screen, set Screen area to 1280 x 1024, and click Apply.
10. Click OK , click Yes, and click OK.
To display more colors, select a lower resolution. If you select a resolution and color combination that the computer does not support, the computer
automatically selects the next supported combination.
Customizing Video Resolution
1. Click the Start button, point to Settings, and then click Control Panel.
The Control Panel window appears.
2. Double-click the Display icon.
The Display Properties window appears.
3. Click the Settings tab, and then set the resolution by dragging the slider in the Desktop Area box. In the Color Palette box, choose the
number of colors from the menu provided. For more information, see your operating system documentation.
If you choose a resolution or color palette that is higher than is supported, the settings adjust automatically to the closest possible setting.
4. To change the refresh rate, click the NeoMagic tab, and then follow the instructions on your display.
640 x 480
256
8
60 Hz
60 Hz, 75 Hz, 85 Hz
65,536
(64 K)
16 (High Color)
60 Hz
60 Hz, 75 Hz, 85 Hz
1677721
(16 Million)
24 (True Color)
60 Hz
60 Hz, 75 Hz, 85 Hz
800 x 600
256
8
60 Hz
60 Hz, 75 Hz, 85 Hz
65,536
(64 K)
16 (High Color)
60 Hz
60 Hz, 75 Hz, 85 Hz
1677721
(16 Million)
24 (True Color)
60 Hz
60 Hz, 75 Hz, 85 Hz
1024 x 768
256
8
60 Hz
60 Hz, 70 Hz, 75 Hz, 85
Hz
65,536
(64 K)
16 (High Color)
60 Hz
60 Hz, 70 Hz, 75 Hz, 85
Hz
1677721
(16 Million)
24 (True Color)
60 Hz
60 Hz, 70 Hz, 75 Hz, 85
Hz
1280 x 1024*
256
8
60 Hz
60 Hz
NOTE: You can adjust the refresh rate only on an external monitor. If the NeoMagic tab is inactive, your external monitor adjusts
the refresh rate automatically.

Dual-Display Mode
With Microsoft®Windows®98 and later operating systems, you can use an external monitor as an extension of your display (see your operating
systemdocumentationformoreinformation).Tosetupyourcomputerfordual-display mode, perform the following steps:
1. Connect the external monitor.
2. Click the Start button, point to Settings, and then click Control Panel.
3. In the Control Panel window, double-click the Display icon.
4. In the Display Properties window, click the Settings tab.
5. Change the Colors option to High Color (16 bit).
6. Change the Desktop Area to 1024 by 768 pixels.
7. Click Advanced....
8. Click the NeoMagic tab.
9. Select the Set Dual-Display checkbox and click Apply.
10. Click Yes when prompted to restart your computer.
11. Click the Start button, point to Settings, and then click Control Panel.
12. Double-click Display, and then click the Settings tab.
Two display icons appear in the Settings window.
13. Click the display icon marked "2."
14. When asked if you want to enable this monitor, click Yes.
15. Click Apply, and then click OK.
If You Have Display Problems
If your computer is receiving power, but nothing appears on your display (such as light, text, or graphics) or the display image does not appear as
you would expect, try the following measures to resolve the problem:
1. If the display is blank, you may be in suspend, standby, or suspend-to-disk mode. Press the power button to resume. If the display is blank
and the power indicator is on, the display may have timed out. In this case, press any key on the keyboard to resume normal operation.
2. If the low-battery warning occurs, connect the AC adapter to the computer or replace the battery.
3. Adjust the brightness.
4. If your computer is attached to an external monitor, press <Fn><F8> to switch the video image to the display.
Back to Contents Page
NOTE: It takes several seconds to switch the video image.
Оглавление
- Dell™Latitude™CS/CS
- AC Adapter: Dell™Latitude™CS/CS
- Power Management Settings: Dell™Latitude™CS/CS
- Batteries:Dell™Latitude™CS/CS
- CD-ROM and DVD-ROMDrives:Dell™Latitude™CS/CS
- ContactingDell:Dell™Latitude™CS/CS
- CustomizingYourComputer:Dell™Latitude™CS/CS
- Dell™Diagnostics:DellLatitude™CS/CS
- Diskette Drive: Dell™Latitude™CS/CS
- Display: Dell™Latitude™CS/CS
- Drivers:Dell™Latitude™CS/CS
- ErrorMessagesandFlashCodes:Dell™Latitude™CS/CS
- Connecting External Devices: Dell™Latitude™CS/CS
- GettingHelp:Dell™Latitude™CS/CS
- HelpOverview:Dell™Latitude™CSPortableComputersUser'sGuide
- Introduction:Dell™Latitude™CS/CS
- Keyboard: Dell™Latitude™CS/CS
- External Media Bay: Dell™Latitude™CS/CS
- MediaOptions:Dell™Latitude™CS/CS
- PC Cards: Dell™Latitude™CS/CS
- PoweringYourComputer:Dell™Latitude™CS/CS
- Preface:Dell™Latitude™CS/CS
- Removing and Replacing Parts: Dell™Latitude™CS/CS
- Suspend-to-Disk Utility: Dell™Latitude™CS/CS
- Securing Your Computer: Dell™Latitude™CS/CS
- Using the System Setup Program:Dell™Latitude™CS/CS
- SystemSetupOptions:Dell™Latitude™CS/CS
- TechnicalSpecifications:Dell™Latitude™CS/CS
- SetupandOperation:Dell™Latitude™CS/CS
- Touch Pad: Dell™Latitude™CS/CS
- TravelingWithYourComputer:Dell™Latitude™CS/CS
- TroubleshootingYourComputer:Dell™Latitude™CS/CS
- Installing the Microsoft® Windows® 95 and Windows 98 Operating System Drivers: Dell™Latitude™CS/CS
- Installing the Microsoft® Windows NT® Operating System Drivers: Dell™Latitude™ CS/CS
