Pioneer PDA-V100HD: Rear
Rear: Pioneer PDA-V100HD
Table of contents
- IMPORTANT
- VENTILATION CAUTION STANDBY/ON Button Operating Environment
- Contents
- Chapter 1 Important user information
- Chapter 2 Safety precautions
- Chapter 3 Features Supported Plasma Televisions
- Chapter 4 Supplied accessories
- Chapter 5 Part names
- Rear
- Remote control unit
- Chapter 6 Preparation Installing the unit Preparing the remote control unit
- Operating range of the remote control unit
- Chapter 7 Using the unit Operation modes Operations/Operation restrictions HDMI Control setting
- Connecting the unit to a Pioneer plasma television (see Chapter 8)
- Chapter 8 Using the unit with a Pioneer plasma television
- Chapter 9 Using the unit with other televisions
- Chapter 10 Advanced functions Connecting control cables
- Changing settings Changing HDMI output resolution Selecting the colour system Selecting the INPUT3 source signal Item Description
- Setting the video signal format Setting the audio signal when using HDMI input
- Chapter 11 Using with other components Connections to a television Connections to input components
- Using the HDMI input Connections to a HDMI- supported component About HDMI
- Connections to a component equipped with SCART connector Connections to a component with component connectors
- Chapter 12 Additional information Troubleshooting Problem Possible solution
- Problem Possible solution
- SCART pin assignments
- Specifications
- Operation of the unit’s indicators During normal operation PDP combination mode Independent 1 mode
- Independent 2 mode During setting mode When setting HDMI output resolution (when RESOLUTION button is pressed.) When setting colour system for analog signals (when COLOUR SYSTEM button is pressed.)
- When selecting INPUT 3 source signal (when SIGNAL SELECT button is pressed.) When setting HDMI video signal format (when VIDEO button is pressed.) When setting HDMI audio signal format (when AUDIO button is pressed.) Unsupported settings (when a remote control unit button not supported by currently selected input is pressed.)
Part names
05
10
En
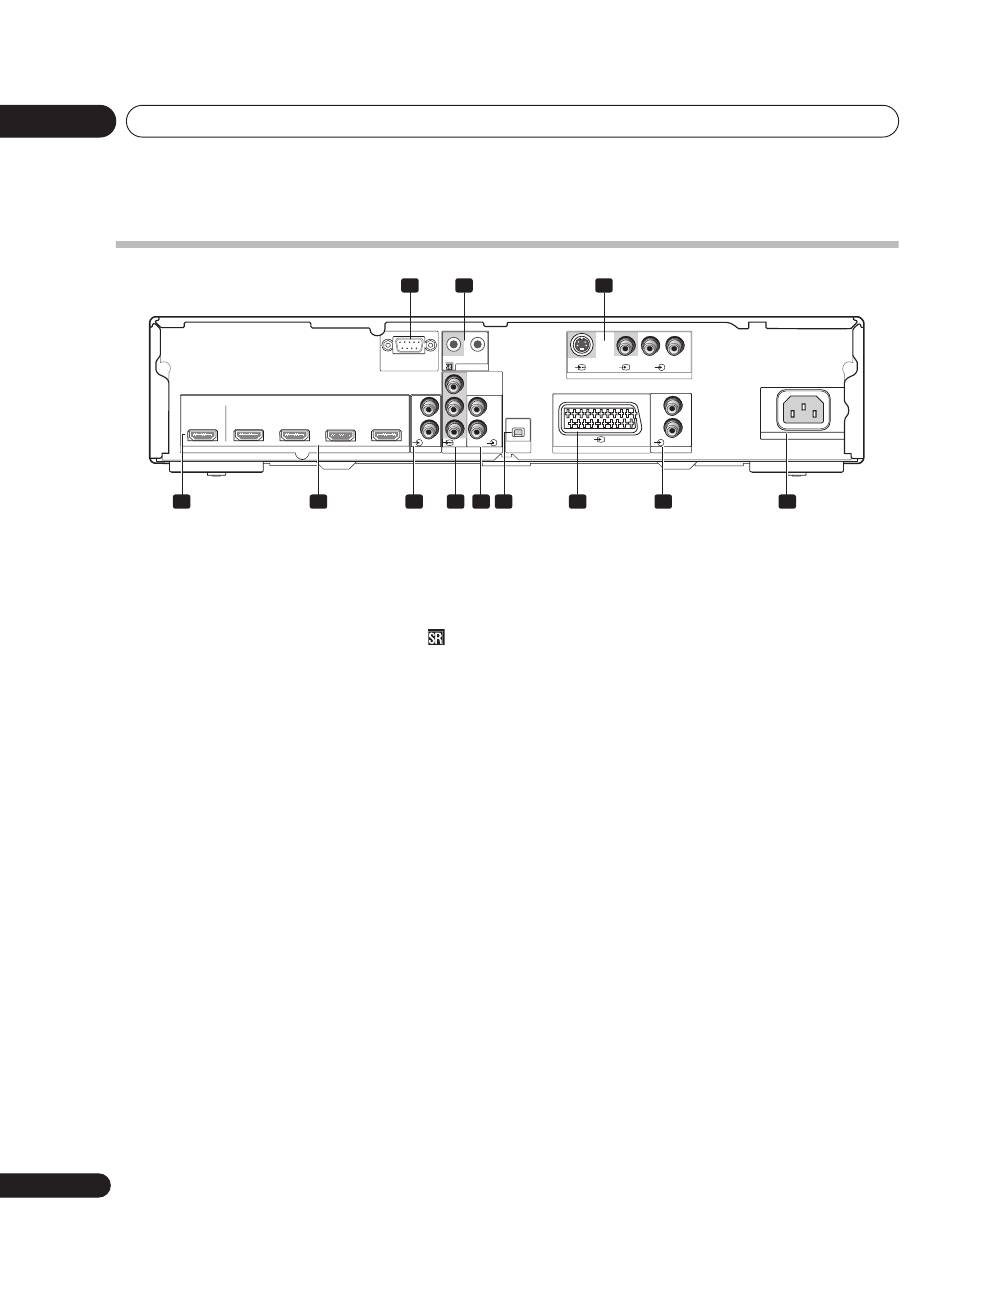
Rear
1
Factory adjust connector
Do not connect anything to this connector.
2
CONTROL IN/OUT connectors
Connect to Pioneer components bearing the
mark.
3
INPUT 5 connectors
(S-VIDEO, VIDEO, AUDIO)
Connect to the output connectors of components such
as Blu-ray disc (BD) players, DVD players, DVD
recorders, Set-Top Box (STB), VCRs, game machines,
camcorders, etc.
4
OUTPUT connector (HDMI)
Connect to the HDMI connector of a television
supporting the High-Definition Multimedia Interface
(HDMI).
5
INPUT 1, INPUT 3, INPUT 4, INPUT 6 connectors
(HDMI)
Connect to the HDMI connector of components
supporting the High-Definition Multimedia Interface
(HDMI), such as BD players, DVD recorders, etc.
6
INPUT 1 connectors (AUDIO)
Connect to a component’s analog audio output
connectors.
7
INPUT 2 connectors
(COMPONENT VIDEO: Y, PB, PR)
Connect to the appropriate output connectors of a BD
player, DVD player, DVD recorder, etc.
8
INPUT 2 connectors (AUDIO)
Connect to audio output connectors of BD player, DVD
player, DVD recorder, etc.
9
HDMI CONTROL switch
Set to
ON
when this unit is connected to a Pioneer
plasma television; set to
OFF
when connected to
another manufacturer’s television.
10 INPUT 3 connector (SCART)
Connect to the appropriate output connector of a BD
player, DVD player, DVD recorder, etc.
11 INPUT 4 connectors (AUDIO)
Connect to a component’s analog audio output
connectors.
12 AC IN
Connect one end of the supplied power cord to this
connector, and the other end to a household AC outlet.
HDMI
OUTPUT
INPUT 1
INPUT 3
INPUT 4
INPUT 6
INPUT 1
INPUT 2
HDMI
CONTROL
SERVICE ONLY
CONTROL
COMPONENT
VIDEO
AUDIO
L
R
L
R
AUDIO
I N
OUT
Y
P
B
P
R
ON/OFF
INPUT 3
INPUT 4
AUDIO
L
R
INPUT 5
S-VIDEO
VIDEO
R-AUDIO-L
AC IN
1
2
3
4
5
6
7
8 9
10
11
12
