Pioneer PDA-V100HD: Operating range of the remote control unit
Operating range of the remote control unit: Pioneer PDA-V100HD
Table of contents
- IMPORTANT
- VENTILATION CAUTION STANDBY/ON Button Operating Environment
- Contents
- Chapter 1 Important user information
- Chapter 2 Safety precautions
- Chapter 3 Features Supported Plasma Televisions
- Chapter 4 Supplied accessories
- Chapter 5 Part names
- Rear
- Remote control unit
- Chapter 6 Preparation Installing the unit Preparing the remote control unit
- Operating range of the remote control unit
- Chapter 7 Using the unit Operation modes Operations/Operation restrictions HDMI Control setting
- Connecting the unit to a Pioneer plasma television (see Chapter 8)
- Chapter 8 Using the unit with a Pioneer plasma television
- Chapter 9 Using the unit with other televisions
- Chapter 10 Advanced functions Connecting control cables
- Changing settings Changing HDMI output resolution Selecting the colour system Selecting the INPUT3 source signal Item Description
- Setting the video signal format Setting the audio signal when using HDMI input
- Chapter 11 Using with other components Connections to a television Connections to input components
- Using the HDMI input Connections to a HDMI- supported component About HDMI
- Connections to a component equipped with SCART connector Connections to a component with component connectors
- Chapter 12 Additional information Troubleshooting Problem Possible solution
- Problem Possible solution
- SCART pin assignments
- Specifications
- Operation of the unit’s indicators During normal operation PDP combination mode Independent 1 mode
- Independent 2 mode During setting mode When setting HDMI output resolution (when RESOLUTION button is pressed.) When setting colour system for analog signals (when COLOUR SYSTEM button is pressed.)
- When selecting INPUT 3 source signal (when SIGNAL SELECT button is pressed.) When setting HDMI video signal format (when VIDEO button is pressed.) When setting HDMI audio signal format (when AUDIO button is pressed.) Unsupported settings (when a remote control unit button not supported by currently selected input is pressed.)
Preparation
06
13
En
English
Caution
Improper use of batteries can result in chemical
leakage or an explosion. Be sure to follow the
instructions below.
• When you replace the batteries, use manganese or
alkaline ones.
• Place the batteries with their terminals
corresponding to the (+) and (–) indicators.
• Do not mix batteries of different types. Different
types of batteries have different characteristics.
• Do not mix old and new batteries. Mixing old and
new batteries can shorten the life of new batteries
or cause chemical leakage in old batteries.
• Remove batteries as soon as they have worn out.
Chemicals that leak from batteries can cause a
rash. If you find any chemical leakage, wipe
thoroughly with a cloth.
• The batteries supplied with this product may have a
shorter life expectancy due to storage conditions.
• If you will not use the remote control unit for an
extended period of time, remove the batteries from
it.
•
WHEN DISPOSING OF USED BATTERIES, PLEASE
COMPLY WITH GOVERNMENTAL REGULATIONS
OR ENVIRONMENTAL PUBLIC INSTITUTION’S
RULES THAT APPLY IN YOUR COUNTRY/AREA.
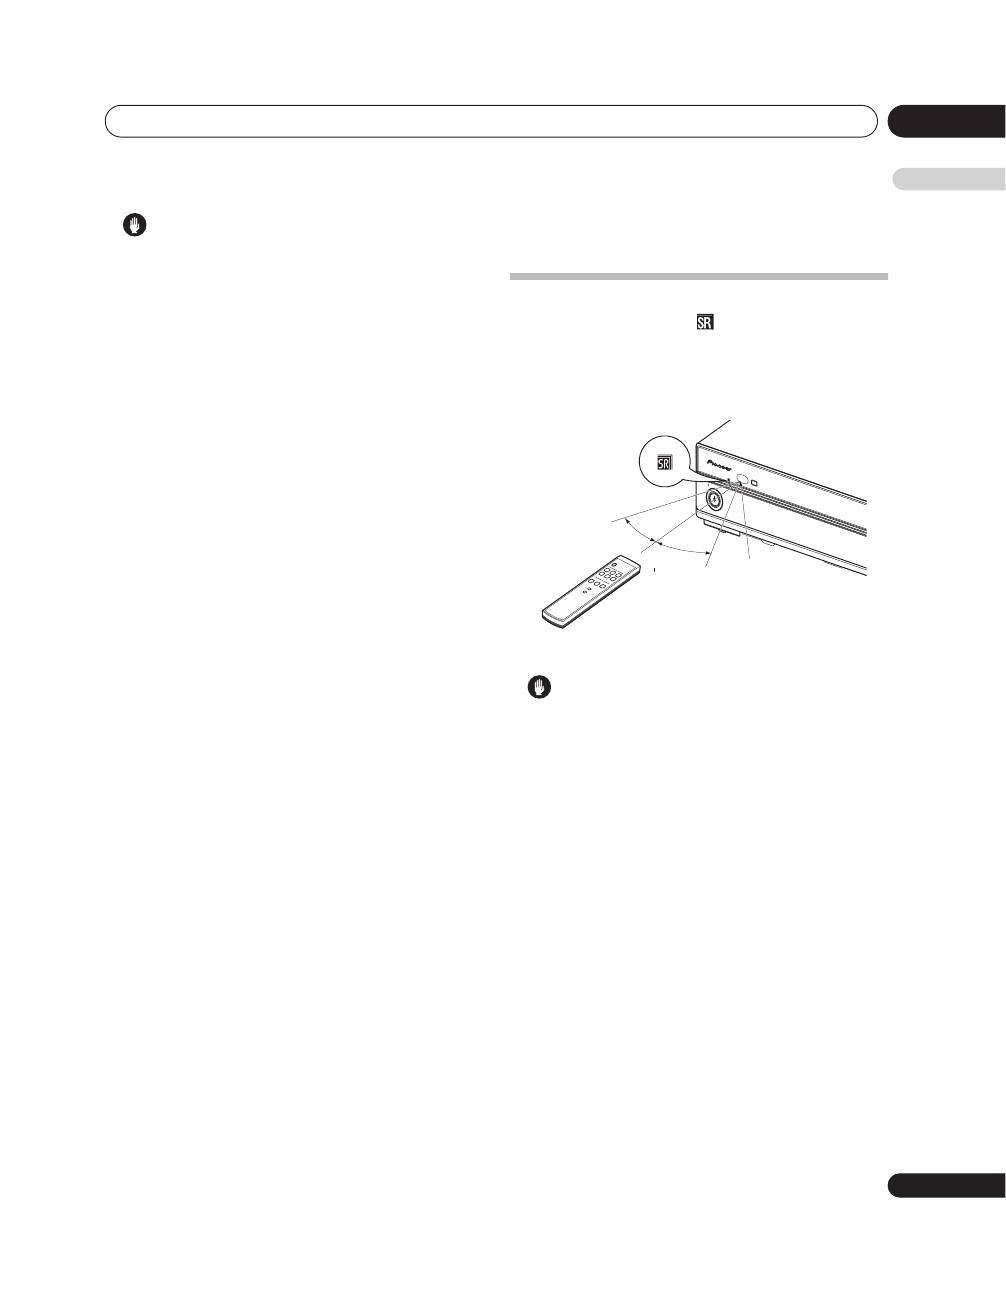
Operating range of the remote
control unit
Operate the remote control unit while pointing it toward
the remote control sensor (
) located at the left of the
front panel of the unit. The distance from the remote
control sensor must be within 7 m and the angle
relative to the sensor must be within 30 degrees in the
right, left, upward, or downward direction.
Caution
• Do not expose the remote control unit to shock. In
addition, do not expose the remote control unit to
liquids, and do not place in an area with high
humidity.
• Do not install or place the remote control unit under
direct sunlight. The heat may cause deformation of
the unit.
• The remote control unit may not work properly if the
remote control sensor of the unit is under direct
sunlight or strong lighting. In such case, change
the angle of the lighting or unit, or operate the
remote control unit closer to the remote control
sensor.
• When any obstacle exists between the remote
control unit and the remote control sensor, the
remote control unit may not function.
• As the batteries become empty, the remote control
unit can function within a shorter distance from the
remote control sensor. Replace the batteries with
new ones early enough.
1
2
3
4
5
6
STAN
DBY
HDM
I CONT
ROL
STAN
DBY/O
N
INPUT
INPUT
30 º
30 º
Remote
control
sensor
7 m
