Kenwood KDC-BT510U – страница 2
Инструкция к Автомагнитоле Kenwood KDC-BT510U

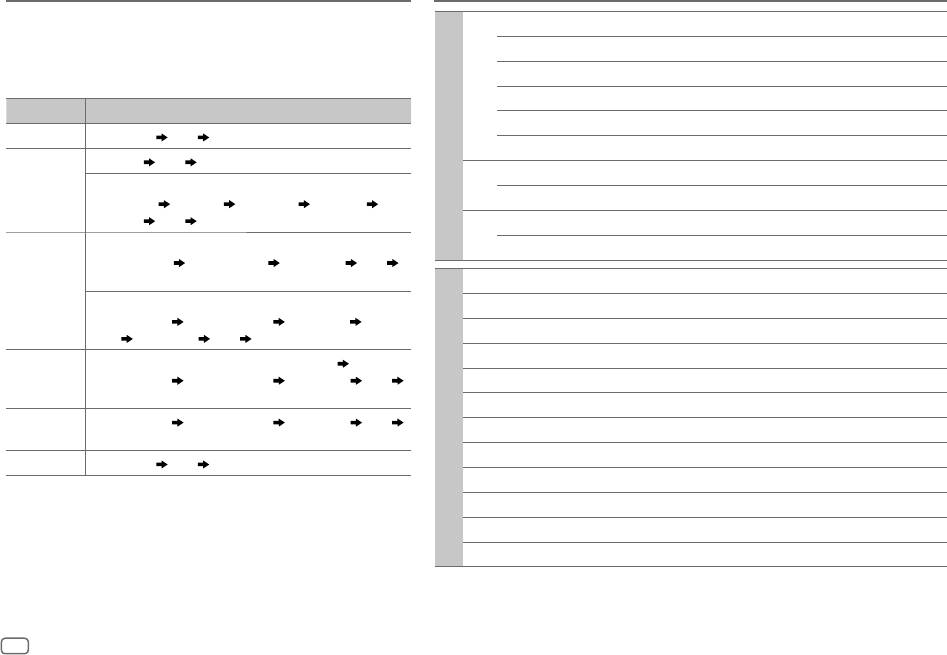
AUDIO SETTINGS
Crossover settings
2-way crossover setting items
Below are the available setting items for 2-way crossover
SPEAKER SIZE
and 3-way crossover.
FRONT SIZE
8CM
/
10CM
/
12CM
/
13CM
/
16CM
/
17CM
/
18CM
/
4×6
/
5×7
/
6×8
/
6×9
/
7×10
SPEAKER SIZE
Selects according to the connected speaker size for
TWEETER
SMALL
/
MIDDLE
/
LARGE
/
NONE
(not connected)
optimum performance.
REAR 8CM
/
10CM
/
12CM
/
13CM
/
16CM
/
17CM
/
18CM
/
4×6
/
5×7
/
6×8
/
6×9
/
7×10
/
NONE
•
The frequency and slope settings are automatically set
(not connected)
for the crossover of the selected speaker.
1
•
When 2-way crossover is selected, if
[NONE]
is selected
SUBWOOFER
*
16CM
/
20CM
/
25CM
/
30CM
/
38CM OVER
/
NONE
(not connected)
for
[TWEETER]
of
[FRONT]
,
[REAR]
and
[SUBWOOFER]
for
X ' OVER
[SPEAKER SIZE]
, the
[X ‘ OVER]
setting of the speaker is not
available.
TWEETER FRQ
1KHZ
/
1.6KHZ
/
2.5KHZ
/
4KHZ
/
5KHZ
/
6.3KHZ
/
8KHZ
/
10KHZ
/
12.5KHZ
• When 3-way crossover is selected, if
[NONE]
is selected
GAIN LEFT
–8
to
0
for
[WOOFER]
of
[SPEAKER SIZE]
, the
[X’OVER]
setting of
GAIN RIGHT
–8
to
0
[WOOFER]
is not available.
FRONT HPF F - HPF FRQ
30HZ
/
40HZ
/
50HZ
/
60HZ
/
70HZ
/
80HZ
/
90HZ
/
100HZ
/
120HZ
/
150HZ
/
X ‘ OVER
180HZ
/
220HZ
/
250HZ/THROUGH
• [FRQ]
/
[F - HPF FRQ]
/
[R - HPF FRQ]
/
[SW LPF FRQ]
/
[HPF FRQ]
/
F - HPF SLOPE
–6DB
/
–12DB
/
–18DB
/
–24DB
[LPF FRQ]
: Adjusts the crossover frequency for the
selected speakers (high pass filter or low pass filter).
F - HPF GAIN
–8
to
0
If
[THROUGH]
is selected, all signals are sent to the
REAR HPF R - HPF FRQ
selected speakers.
•
[F - HPF SLOPE]
/
[R - HPF SLOPE]
/
[SW LPF SLOPE]
/
[HPF SLOPE]
/
R - HPF SLOPE
(Refer
FRONT HPF
settings above.)
[LPF SLOPE]
/
[SLOPE]:
Adjusts the crossover slope.
R - HPF GAIN
Selectable only if a setting other than
[THROUGH]
is
SUBWOOFER
SW LPF FRQ 30HZ
/
40HZ
/
50HZ
/
60HZ
/
70HZ
/
80HZ
/
90HZ
/
100HZ
/
120HZ
/
150HZ
/
selected for the crossover frequency.
LPF
*
1
180HZ
/
220HZ
/
250HZ
/
THROUGH
• [SW LPF PHASE]
/
[PHASE]:
Selects the phase of the speaker
output to be in line with the other speaker output.
SW LPF SLOPE
–6DB
/
–12DB
/
–18DB
/
–24DB
• [GAIN LEFT]
/
[GAIN RIGHT]
/
[F - HPF GAIN]
/
[R - HPF GAIN]
/
SW LPF PHASE
REVERSE
(180°)/
NORMAL
(0°)
[SW LPF GAIN]
/
[GAIN]
:
Adjusts the output volume of the
SW LPF GAIN –8
to
0
selected speaker.
*
1
Selectable only when
[SWITCH PREOUT]
is set to
[SUB-W]
( 4)
and
[SUBWOOFER SET]
is set to
[ON]
.
( 16)
ENGLISH
17
JS_KWD_KDC_BT510U_EN_EN_5.indd 17JS_KWD_KDC_BT510U_EN_EN_5.indd 17 01-Sep-16 11:23:23 AM01-Sep-16 11:23:23 AM
Book Size: B6L (182 mm x 128 mm)
Data Size: B6L (182 mm x 128 mm)
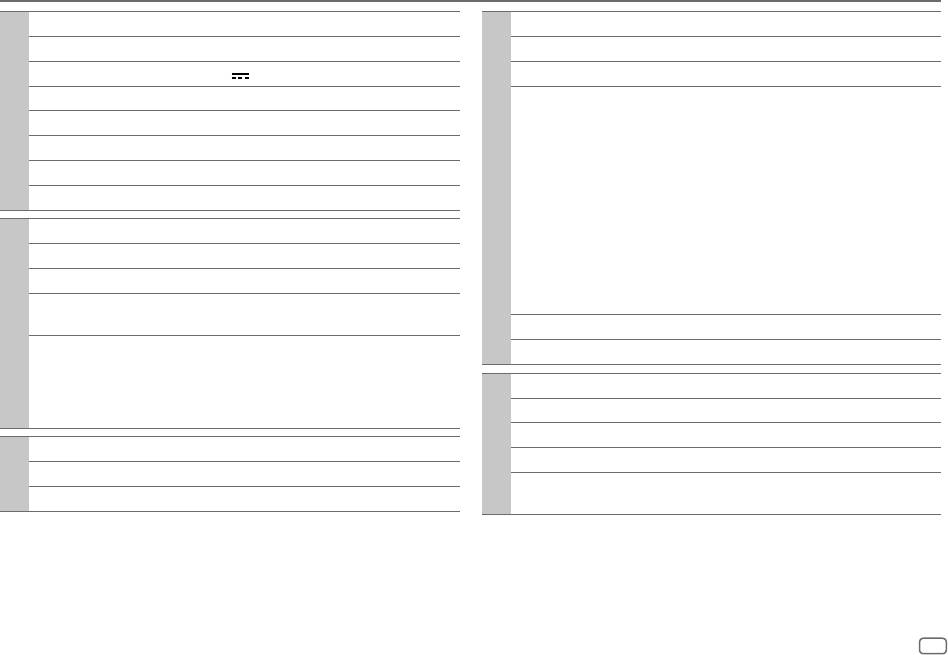
AUDIO SETTINGS
3-way crossover setting items
Digital Time Alignment settings
SPEAKER SIZE
Digital Time Alignment sets the delay time of the speaker output to
create a more suitable environment for your vehicle.
TWEETER
SMALL
/
MIDDLE
/
LARGE
• For more information,
19, Determining the value for [DISTANCE] and [GAIN]
MID RANGE
8CM
/
10CM
/
12CM
/
13CM
/
16CM
/
17CM
/
18CM
/
4×6
/
5×7
/
6×8
/
6×9
of [DTA SETTINGS].
WOOFER
*
2
16CM
/
20CM
/
25CM
/
30CM
/
38CM OVER
/
NONE
(not connected)
X ' OVER
DTA SETTINGS
TWEETER HPF FRQ
1KHZ
/
1.6KHZ
/
2.5KHZ
/
4KHZ
/
5KHZ
/
6.3KHZ
/
8KHZ
/
POSITION
Selects your listening position (reference point).
10KHZ
/
12.5KHZ
ALL
:Not compensating;
FRONT RIGHT:
Front right seat;
FRONT LEFT
:Front left seat;
FRONT ALL
:Front seat
SLOPE
–6DB
/
–12DB
•
[FRONT ALL]
is displayed only when
[2-WAY X’OVER]
is selected.
PHASE
REVERSE
(180°)/
NORMAL
(0°)
( 5)
GAIN –8
to
0
DISTANCE 0CM
to
610CM
:Fine adjust the distance to compensate. (Before
making an adjustment, select the speaker you want to adjust.)
MID RANGE HPF FRQ
30HZ
/
40HZ
/
50HZ
/
60HZ
/
70HZ
/
80HZ
/
90HZ
/
100HZ
/
120HZ
/
150HZ
/
180HZ
/
220HZ
/
250HZ
/
THROUGH
GAIN –8DB
to
0DB
:Fine adjust the output volume of the selected speaker.
HPF SLOPE
–6DB
/
–12DB
(Before making an adjustment, select the speaker you want to adjust.)
LPF FRQ
1KHZ
/
1.6KHZ
/
2.5KHZ
/
4KHZ
/
5KHZ
/
6.3KHZ
/
8KHZ
/
DTA RESET YES
:Resets the settings (
[DISTANCE]
and
[GAIN]
) of the selected
10KHZ
/
12.5KHZ
/
THROUGH
[POSITION]
to default.;
NO
:Cancels.
LPF SLOPE
–6DB
/
–12DB
CAR SETTINGS
Identify your car type and rear speaker location in order to make the
adjustment for
[DTA SETTINGS]
.
PHASE
REVERSE
(180°)/
NORMAL
(0°)
CAR TYPE COMPACT
/
FULL SIZE CAR
/
WAGON
/
MINIVAN
/
SUV
/
GAIN –8
to
0
MINIVAN(LONG)
:Selects the type of vehicle.;
OFF:
Not
WOOFER
*
2
LPF FRQ 30HZ
/
40HZ
/
50HZ
/
60HZ
/
70HZ
/
80HZ
/
90HZ
/
100HZ
/
compensating.
120HZ
/
150HZ
/
180HZ
/
220HZ
/
250HZ
/
THROUGH
R-SP LOCATION
Selects the location of the rear speakers in your vehicle to calculate the
SLOPE
–6DB
/
–12DB
furthest distance from the listening position selected (reference point).
PHASE
REVERSE
(180°)/
NORMAL
(0°)
•
DOOR
/
REAR DECK
:Selectable only when
[CAR TYPE]
is selected as
[OFF]
,
[COMPACT]
,
[FULL SIZE CAR]
,
[WAGON]
or
[SUV]
.
GAIN –8
to
0
•
2ND ROW
/
3RD ROW
:Selectable only when
[CAR TYPE]
is selected
*
2
Selectable only when
[SUBWOOFER SET]
is set to
[ON]
.
( 16)
as
[MINIVAN]
or
[MINIVAN(LONG)]
.
18
ENGLISH
JS_KWD_KDC_BT510U_EN_EN_5.indd 18JS_KWD_KDC_BT510U_EN_EN_5.indd 18 01-Sep-16 11:23:23 AM01-Sep-16 11:23:23 AM
Data Size: B6L (182 mm x 128 mm)
Book Size: B6L (182 mm x 128 mm)
AUDIO SETTINGS
DISPLAY SETTINGS
•
Before making an adjustment for
[DISTANCE]
and
[GAIN]
of
[DTA SETTINGS]
, select the speaker you
want to adjust:
When 2-way crossover is selected:
FRONT LEFT
/
FRONT RIGHT
/
REAR LEFT
/
REAR RIGHT
/
SUBWOOFER
– You can only select
[REAR LEFT]
,
[REAR RIGHT]
and
[SUBWOOFER]
if a setting other than
[NONE]
is
selected for
[REAR]
and
[SUBWOOFER]
of
[SPEAKER SIZE]
.
( 17)
When 3-way crossover is selected:
TWEETER LEFT
/
TWEETER RIGHT
/
MID LEFT
/
MID RIGHT
/
WOOFER
– You can only select
[WOOFER]
if a setting other than
[NONE]
is selected for
[WOOFER]
of
[SPEAKER SIZE]
.
( 18)
Set the dimmer
•
[R-SP LOCATION]
of
[CAR SETTINGS]
is selectable only if:
Press and hold DISP (DIMMER) to turn on or off the
– 2-way crossover is selected.
( 5)
dimmer.
– A setting other than
[NONE]
is selected for
[REAR]
of
[SPEAKER SIZE]
.
( 17)
• If you have set
[DIMMER TIME]
, it will be canceled once you
press and hold this button.
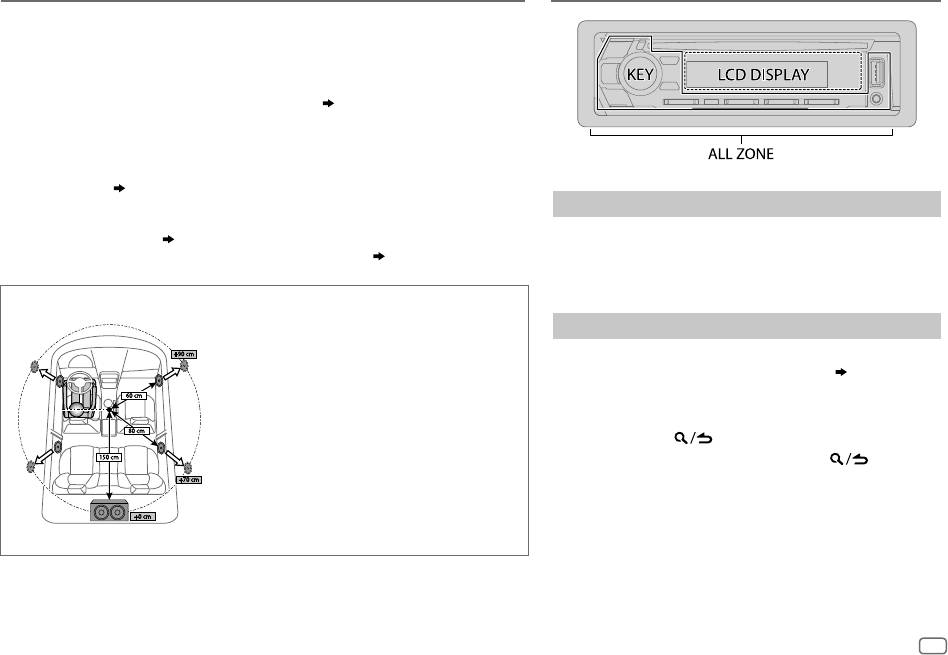
Determining the value for [DISTANCE] and [GAIN] of [DTA SETTINGS]
If you specify the distance from the center of the currently
Other settings
set listening position to every speaker, the delay time will be
automatically computed and set.
1
Press the volume knob to enter
[FUNCTION]
.
1
Determine the center of the currently set listening position
2 Turn the volume knob to select an item
( 20)
, then press
as the reference point.
the knob.
2
Measure the distances from the reference point to the
3 Repeat step 2 until the desired item is selected/activated
speakers.
or follow the instructions stated on the selected item.
3
Calculate the differences between the distance of the
4 Press and hold to exit.
furthest speaker (rear speaker) and other speakers.
To return to the previous setting item, press .
4
Set the
[DISTANCE]
calculated in step
3
for individual
speakers.
5
Adjust
[GAIN]
for individual speakers.
Example: When
[FRONT ALL]
is selected as the listening
position
ENGLISH
19
JS_KWD_KDC_BT510U_EN_EN_5.indd 19JS_KWD_KDC_BT510U_EN_EN_5.indd 19 01-Sep-16 11:23:24 AM01-Sep-16 11:23:24 AM
Book Size: B6L (182 mm x 128 mm)
Data Size: B6L (182 mm x 128 mm)
DISPLAY SETTINGS
TROUBLESHOOTING
Default:
XX
Symptom Remedy
DISPLAY
Sound cannot be heard.
•
Adjust the volume to the optimum level.
DIMMER
Dim the illumination.
•
Check the cords and connections.
ON
:Dimmer is turned on.;
OFF
:Cancels.
“MISWIRING CHECK WIRING
Turn the power off, then check to be sure the
DIMMER TIME
:Set the dimmer on and off time.
THEN PWR ON” appears.
terminals of the speaker wires are insulated properly.
1
Turn the volume knob to adjust the
[ON]
time, then press the knob.
Turn the power on again.
2
Turn the volume knob to adjust the
[OFF]
time, then press the knob.
(Default:
[ON]
:
18:00
;
[OFF]
:
6:00
)
“PROTECTING SEND SERVICE”
Send the unit to the nearest service center.
General
appears.
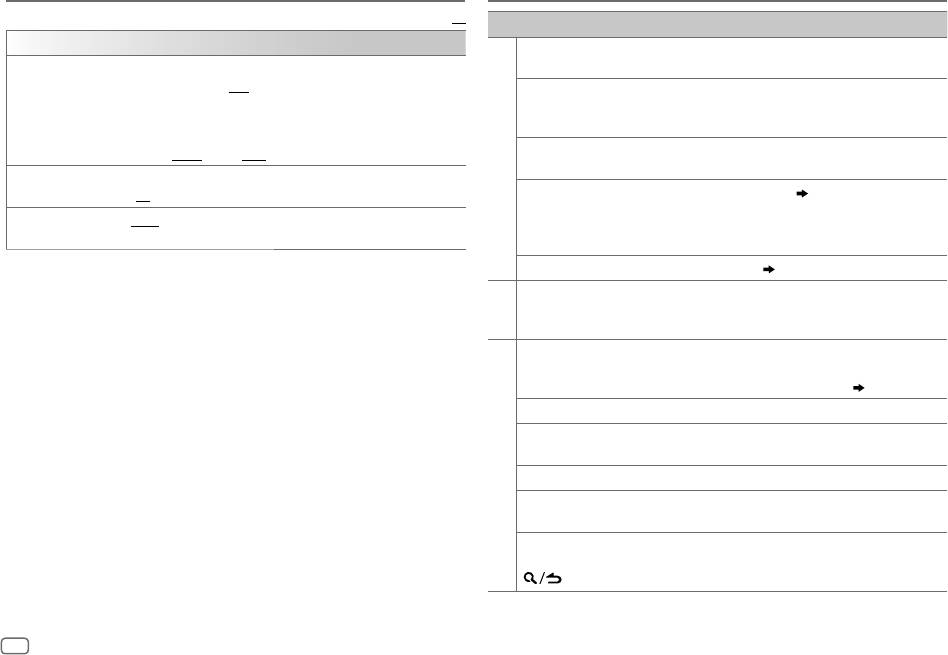
BRIGHTNESS
1
Select a zone. (See the illustration on page 19.)
2
0
to
31
: Select your preferred brightness level for the selected zone.
•
Sound cannot be heard.
Clean the connectors.
( 22)
•
The unit does not turn on.
TEXT SCROLL AUTO
/
ONCE
:Select whether to scroll the display information automatically,
•
Information shown on the
or scroll only once.;
OFF
:Cancels.
display is incorrect.
The unit does not work at all. Reset the unit.
( 3)
•
Radio reception is poor.
Connect the antenna firmly.
•
Static noise while listening
Radio
to the radio.
Disc cannot be ejected.
Press and hold
M
to forcibly eject the disc. Be careful
not to drop the disc when it is ejected. If this does not
solve the problem, reset the unit.
( 3)
Noise is generated. Skip to another track or change the disc.
Tracks do not play back as you
Playback order is determined when files are recorded.
intended them to play.
“READING” keeps flashing. Do not use too many hierarchical levels or folders.
CD/USB /iPod
Elapsed playing time is not
This is caused by how the tracks are recorded.
correct.
“LOADING” appears when you
This unit is still preparing the iPod/iPhone music list.
enter search mode by pressing
It may take some time to load, try again later.
.
20
ENGLISH
JS_KWD_KDC_BT510U_EN_EN_5.indd 20JS_KWD_KDC_BT510U_EN_EN_5.indd 20 01-Sep-16 11:23:25 AM01-Sep-16 11:23:25 AM
Data Size: B6L (182 mm x 128 mm)
Book Size: B6L (182 mm x 128 mm)
TROUBLESHOOTING
Symptom Remedy
Symptom Remedy
Correct characters are not
•
This unit can only display uppercase letters, numbers,
•
Sound cannot
•
Reconnect the Android device.
displayed (e.g. album
and a limited number of symbols.
be heard during
•
If in
[HAND MODE]
, launch any media player application
name).
•
Depending on the display language you have selected
playback.
on the Android device and start playback.
( 5)
, some characters may not be displayed correctly.
•
Sound output only
•
If in
[HAND MODE]
, relaunch the current media player
from the Android
application or use another media player application.
“NA FILE” Make sure the disc contains supported audio files.
( 23)
device.
•
Restart the Android device.
“NO DISC” Insert a playable disc into the loading slot.
•
If this does not solve the problem, the connected Android
device is unable to route the audio signal to unit.
( 23)
“TOC ERROR” Make sure the disc is clean and inserted properly.
Cannot playback at
•
Make sure KENWOOD MUSIC PLAY APP is installed on the
“PLEASE EJECT” Reset the unit. If this does not solve the problem, consult
[BROWSE MODE]
.
Android device.
( 7)
your nearest service center.
•
Reconnect the Android device and select the appropriate
“READ ERROR” Copy the files and folders onto the USB device again. If this
control mode.
does not solve the problem, reset the USB device or use
ANDROID
•
If this does not solve the problem, the connected Android
another USB device.
device does not support
[BROWSE MODE]
.
( 23)
“NO DEVICE” Connect a USB device, and change the source to USB again.
“NO DEVICE” or
•
Switch off the developer options on the Android device.
“READING” keeps
•
Reconnect the Android device.
CD/USB /iPod
“COPY PRO” A copy-protected file is played.
flashing.
•
If this does not solve the problem, the connected Android
“UNSUPPORTED DEVICE”
•
Check whether the connected device is compatible with
device does not support
[BROWSE MODE]
.
( 23)
appears.
this unit and ensure the file systems are in supported
Playback is intermittent
Turn off the power saving mode on the Android device.
formats.
( 23)
or sound skips.
•
Reattach the device.
“ANDROID ERROR”/
•
Reconnect the Android device.
“UNRESPONSIVE DEVICE”
Make sure the device is not malfunction and reattach the
“NADEVICE”
•
Restart the Android device.
appears.
device.
No Bluetooth device is
•
Search from the Bluetooth device again.
“USB HUB IS NOT
This unit cannot support a USB device connected via a
detected.
•
Reset the unit.
( 3)
SUPPORTED” appears.
USB hub.
Bluetooth pairing
•
Make sure you have entered the same PIN code to both
“NO MUSIC” Connect a USB device that contains playable audio files.
cannot be made.
the unit and Bluetooth device.
“iPod ERROR”
•
Reconnect the iPod.
Bluetooth®
•
Delete pairing information from both the unit and the
•
Reset the iPod.
Bluetooth device, then perform pairing again.
( 10)
ENGLISH
21
JS_KWD_KDC_BT510U_EN_EN_5.indd 21JS_KWD_KDC_BT510U_EN_EN_5.indd 21 01-Sep-16 11:23:26 AM01-Sep-16 11:23:26 AM
Book Size: B6L (182 mm x 128 mm)
Data Size: B6L (182 mm x 128 mm)
TROUBLESHOOTING
REFERENCES
Symptom Remedy
Maintenance
Cleaning the unit
Echo or noise is heard
•
Adjust the microphone unit’s position.
( 10)
Wipe off dirt on the faceplate with a dry silicone or soft cloth.
during a phone
•
Check the
[ECHO CANCEL]
setting.
( 12)
conversation.
Cleaning the connector
Phone sound quality
•
Reduce the distance between the unit and the Bluetooth device.
Detach the faceplate and clean the
is poor.
•
Move the car to a place where you can get a better signal reception.
connector gently with a cotton swab,
being careful not to damage the
Voice calling method is
•
Use voice calling method in a more quiet environment.
connector.
not successful.
•
Reduce the distance from the microphone when you speak the
Connector (on the reverse
name.
side of the faceplate)
•
Make sure the same voice as the registered voice tag is used.
Handling discs
Sound is being
•
Reduce the distance between the unit and the Bluetooth audio
•
Do not touch the recording surface of the disc.
interrupted or skipped
player.
•
Do not stick tape etc. on the disc, or use a disc with tape stuck on it.
during playback of a
•
Turn off, then turn on the unit and try to connect again.
•
Do not use any accessories for the disc.
Bluetooth audio player.
•
Other Bluetooth devices might be trying to connect to the unit.
•
Clean from the center of the disc and move outward.
•
Clean the disc with a dry silicone or soft cloth. Do not use any solvents.
The connected Bluetooth
•
Check whether the connected Bluetooth audio player supports
•
When removing discs from this unit, pull them out horizontally.
audio player cannot be
Audio/Video Remote Control Profile (AVRCP). (Refer to the
•
Remove burrs from the center hole and disc edge before inserting a disc.
controlled.
instructions of your audio player.)
Bluetooth®
•
Disconnect and connect the Bluetooth player again.
More information
“DEVICE FULL” The number of registered devices has reached its limit. Retry after
For: – Latest firmware updates and latest compatible item list
deleting an unnecessary device.
( 13, DEVICE DELETE)
– KENWOOD original application
“N/A VOICE TAG” Make sure the same voice as the registered voice tag is used.
– Any other latest information
Visit <www.kenwood.com/cs/ce/>.
“NOT SUPPORT” The connected phone does not support Voice Recognition feature or
phonebook transfer.
General
“NO ENTRY”/“NO PAIR” There is no registered device connected/found via Bluetooth.
•
This unit can only play the following CDs:
“ERROR” Try the operation again. If “ERROR” appears again, check if the device
supports the function you have tried.
“NO INFO”/“NO DATA” Bluetooth device cannot get the contact information.
•
For detailed information and notes about the playable audio files, visit
<www.kenwood.com/cs/ce/audiofile/>.
“HF ERROR XX”/
Reset the unit and try the operation again. If this does not solve the
“BT ERROR”
problem, consult your nearest service center.
22
ENGLISH
JS_KWD_KDC_BT510U_EN_EN_5.indd 22JS_KWD_KDC_BT510U_EN_EN_5.indd 22 01-Sep-16 11:23:27 AM01-Sep-16 11:23:27 AM
Data Size: B6L (182 mm x 128 mm)
Book Size: B6L (182 mm x 128 mm)

REFERENCES
Playable files
About Android device
•
Playable audio file:
•
This unit supports Android OS 4.1 and above.
For disc: MP3 (.mp3), WMA (.wma), AAC (.aac)
•
Some Android devices (with OS 4.1 and above) may not fully support Android
For USB mass storage class device: MP3 (.mp3), WMA (.wma), AAC (.aac), WAV (.wav), FLAC (.flac)
Open Accessory (AOA) 2.0.
•
Playable disc media: CD-R/CD-RW/CD-ROM
•
If the Android device supports both mass storage class device and AOA 2.0, this
•
Playable disc file format: ISO 9660 Level 1/2, Joliet, Long file name
unit always playback via AOA 2.0 as priority.
•
Playable USB device file system: FAT12, FAT16, FAT32
Even when audio files comply with the standards listed above, playback may be impossible depending on
About Bluetooth
the types or conditions of media or device.
•
Depending on the Bluetooth version of the device, some Bluetooth devices may
AAC files encoded in (.m4a) format by iTunes cannot be played on this unit.
not be able to connect to this unit.
•
This unit may not work with some Bluetooth devices.
Unplayable discs
•
Signal conditions vary, depending on the surroundings.
•
Discs that are not round.
•
Discs with coloring on the recording surface or discs that are dirty.
•
Recordable/ReWritable discs that have not been finalized.
•
8cm CD. Attempting to insert using an adapter may cause malfunction.
About USB devices
•
You cannot connect a USB device via a USB hub.
•
Connecting a cable whose total length is longer than 5m may result in abnormal playback.
•
This unit cannot recognize a USB device whose rating is other than 5V and exceeds 1.5A.
About iPod/iPhone
•
Via USB:
Made for
– iPod touch (5th and 6th generation)
– iPod nano (7th generation)
– iPhone 4S, 5, 5S, 5C, 6, 6 Plus, 6S, 6S Plus, SE
•
Via Bluetooth:
Made for
– iPod touch (5th and 6th generation)
– iPhone 4S, 5, 5S, 5C, 6, 6 Plus, 6S, 6S Plus, SE
•
You cannot operate iPod if “KENWOOD” or “ ” is displayed on iPod.
•
Depending on the version of the operating system of the iPod/iPhone, some functions may not operate
on this unit.
ENGLISH
23
JS_KWD_KDC_BT510U_EN_EN_5.indd 23JS_KWD_KDC_BT510U_EN_EN_5.indd 23 01-Sep-16 11:23:28 AM01-Sep-16 11:23:28 AM
Book Size: B6L (182 mm x 128 mm)
Data Size: B6L (182 mm x 128 mm)
REFERENCES
SPECIFICATIONS
Change the display information
FM Frequency Range 87.5 MHz — 108.0 MHz (50 kHz space)
Each time you press
DISP
, the display information changes.
•
If the information is unavailable or not recorded, “NO TEXT”, “NO INFO”, or other
Usable Sensitivity (S/N=26dB) 0.71μV/75Ω
information (eg. station name, playing time) appears.
Quieting Sensitivity (DINS/N=46dB) 2.0μV/75Ω
Frequency Response (±3dB) 30 Hz — 15 kHz
Source name Display information
Signal-to-Noise Ratio (MONO) 64 dB
STANDBY Source name
Clock (back to the beginning)
Tuner
Stereo Separation (1kHz) 40dB
TUNER Frequency
Clock (back to the beginning)
MW
Frequency Range 531kHz — 1611kHz (9kHz space)
(For FM Radio Data System stations only)
(AM)
Usable Sensitivity (S/N=20dB) 28.2μV
Station name Radio text Radio text+ Title/Artist
Frequency
Clock (back to the beginning)
LW
Frequency Range 153kHz — 279kHz (9kHz space)
(AM)
CD or USB
(For CD-DA)
Usable Sensitivity (S/N=20dB) 50.0μV
Disc name/Artist Track title/Artist Playing time Clock
(back to the beginning)
Laser Diode GaAIAs
(For MP3/WMA/AAC/WAV/FLAC files)
Digital Filter (D/A) 8 times over sampling
Track title/Artist Album title/Artist Folder name File
Spindle Speed 500rpm — 200rpm (CLV)
name
Playing time Clock (back to the beginning)
Wow & Flutter Below measurable limit
iPod USB/
When
[MODE OFF]
/
[BROWSE MODE]
is selected
( 8)
:
iPodBT or
Track title/Artist
Album title/Artist Playing time Clock
Frequency Response (±1dB) 20Hz — 20kHz
ANDROID
(back to the beginning)
Total Harmonic Distortion (1kHz) 0.01%
BT AUDIO Track title/Artist
Album title/Artist Playing time Clock
Signal-to-Noise Ratio (1kHz) 105 dB
(back to the beginning)
CD player
Dynamic Range 90dB
AUX Source name
Clock (back to the beginning)
Channel Separation 85dB
MP3 Decode Compliant with MPEG-1/2 Audio Layer-3
WMA Decode Compliant with Windows Media Audio
AAC Decode AAC-LC “.aac” files
24
ENGLISH
JS_KWD_KDC_BT510U_EN_EN_5.indd 24JS_KWD_KDC_BT510U_EN_EN_5.indd 24 01-Sep-16 11:23:28 AM01-Sep-16 11:23:28 AM
Data Size: B6L (182 mm x 128 mm)
Book Size: B6L (182 mm x 128 mm)
SPECIFICATIONS
USB Standard USB1.1, USB2.0 Full Speed
Maximum Output Power 50W×4
File System FAT12/16/32
Full Bandwidth Power 22W×4 (at less than 1% THD)
Maximum Supply Current DC5V
1.5A
Speaker Impedance 4Ω—8Ω
MP3 Decode Compliant with MPEG-1/2 Audio Layer-3
Tone Action Band 1: 62.5Hz±9dB
USB
Band 2: 100Hz±9dB
WMA Decode Compliant with Windows Media Audio
Band 3: 160 Hz±9dB
AAC Decode AAC-LC “.aac” files
Band 4: 250 Hz±9dB
Band 5: 400 Hz±9dB
WAV Decode Linear-PCM
Band 6: 630Hz±9dB
FLAC Decode FLAC file (Up to 48kHz/24bit)
Audio
Band 7: 1kHz±9dB
Band 8: 1.6kHz±9dB
Version Bluetooth 3.0
Band 9: 2.5kHz±9dB
Band 10: 4kHz±9dB
Frequency Range 2.402GHz — 2.480GHz
Band 11: 6.3kHz±9dB
Output Power +4dBm (MAX), 0dBm (AVE) Power Class 2
Band 12: 10kHz±9dB
Maximum Communication
Line of sight approx. 10m (32.8ft)
Band 13: 16kHz±9dB
Range
Preout Level/Load (CD) 2500mV/10kΩ
Bluetooth
Profile HFP 1.6 (Hands-Free Profile)
Preout Impedance ≤600Ω
A2DP (Advanced Audio Distribution Profile)
AVRCP 1.5 (Audio/Video Remote Control Profile)
Operating Voltage 14.4V (10.5V—16V allowable)
SPP (Serial Port Profile)
Maximum Current Consumption 10A
PBAP (Phonebook Access Profile)
Operational Temperature Range –10°C—+60°C
Frequency Response (±3dB) 20Hz—20kHz
General
Installation Size (W×H×D) 182mm×53mm×158mm
Input Maximum Voltage 1000mV
Net Weight (includes Trimplate,
1.3kg
Auxiliary
Input Impedance 30kΩ
Mounting Sleeve)
Subject to change without notice.
ENGLISH
25
JS_KWD_KDC_BT510U_EN_EN_5.indd 25JS_KWD_KDC_BT510U_EN_EN_5.indd 25 01-Sep-16 11:23:34 AM01-Sep-16 11:23:34 AM
Book Size: B6L (182 mm x 128 mm)
Data Size: B6L (182 mm x 128 mm)
INSTALLATION/CONNECTION
Warning
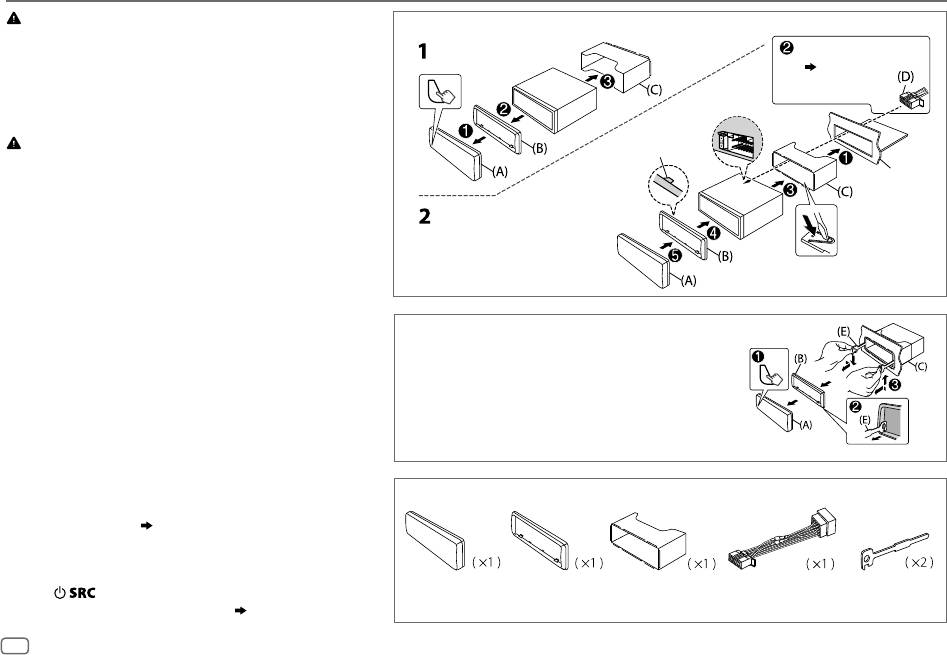
Installing the unit (in-dash mounting)
•
The unit can only be used with a 12V DC power supply, negative ground.
•
Disconnect the battery’s negative terminal before wiring and mounting.
Do the required wiring.
•
Do not connect Battery wire (yellow) and Ignition wire (red) to the car
( 27)
chassis or Ground wire (black) to prevent a short circuit.
•
Insulate unconnected wires with vinyl tape to prevent a short circuit.
•
Be sure to ground this unit to the car’s chassis again after installation.
Caution
Hook on the top side
•
For safety’s sake, leave wiring and mounting to professionals. Consult the
car audio dealer.
Orientate the trim
Dashboard of
•
Install this unit in the console of your vehicle. Do not touch the metal
plate as illustrated
your car
parts of this unit during and shortly after use of the unit. Metal parts such
before fitting.
as the heat sink and enclosure become hot.
•
Do not connect the
[
wires of speakers to the car chassis or Ground wire
(black), or connect them in parallel.
Bend the appropriate tabs to hold the
•
Mount the unit at an angle of less than 30º.
mounting sleeve firmly in place.
•
If your vehicle wiring harness does not have the ignition terminal,
connect Ignition wire (red) to the terminal on the vehicle’s fuse box
which provides 12 V DC power supply and is turned on and off by the
How to remove the unit
ignition key.
1
Detach the faceplate.
•
Keep all cables away from heat dissipate metal parts.
2
Fit the catch pin on the extraction keys into the holes on
•
After the unit is installed, check whether the brake lamps, blinkers,
both sides of the trim plate, then pull it out.
wipers, etc. on the car are working properly.
3
Insert the extraction keys deeply into the slots on each side,
•
If the fuse blows, first make sure the wires are not touching car’s chassis,
then follow the arrows as shown on the illustration.
then replace the old fuse with one that has the same rating.
Basic procedure
1
Remove the key from the ignition switch, then disconnect the
[
terminal of the car battery.
Part list for installation
2
Connect the wires properly.
See Wiring connection.
( 27)
3
Install the unit to your car.
See Installing the unit (in-dash mounting).
4
Connect the
[
terminal of the car battery.
5
Press to turn on the power.
(A)
Faceplate
(B)
Trim plate
(C)
Mounting
(D)
Wiring harness
(E)
Extraction
6
Detach the faceplate and reset the unit.
( 3)
sleeve
key
26
ENGLISH
JS_KWD_KDC_BT510U_EN_EN_5.indd 26JS_KWD_KDC_BT510U_EN_EN_5.indd 26 01-Sep-16 11:23:34 AM01-Sep-16 11:23:34 AM
Data Size: B6L (182 mm x 128 mm)
Book Size: B6L (182 mm x 128 mm)
INSTALLATION/CONNECTION
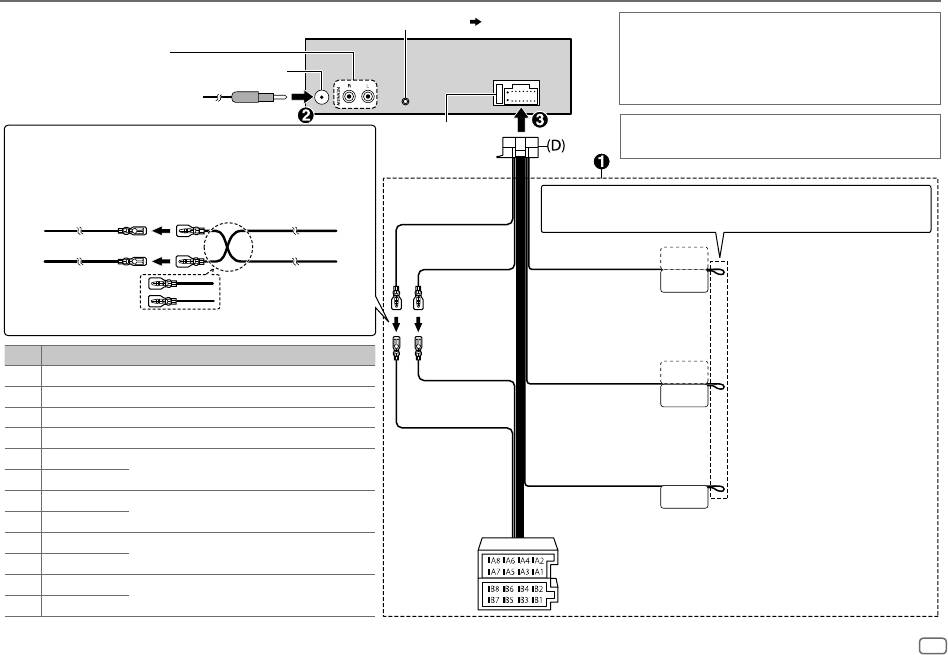
Wiring connection
Microphone input jack
( 10)
If your car does not have an ISO terminal:
We recommend installing the unit with a commercially
Rear/Subwoofer output
available custom wiring harness specific for your car and leave
For 3-way crossover:
Antenna terminal
this job to professionals for your safety. Consult your car audio
Woofer output
dealer.
Fuse (10A)
When connecting to an external amplifier, connect its ground
Connecting the ISO connectors on some VW/Audi or Opel
wire to the car’s chassis to avoid damaging the unit.
(Vauxhall) automobiles
You may need to modify the wiring of the supplied wiring harness as
illustrated below.
If no connections are made, do not let the wire come out from
Yellow (Battery wire)
A7 (Red) Ignition wire (Red)
the tab.
UnitVehicle
STEERING WHEEL
Red (Ignition wire)
Light blue/yellow
REMOTE INPUT
To the steering wheel remote control
A4 (Yellow)
Battery wire (Yellow)
(Steering remote
REMOTE CONT
adapter
control wire)
Default wiring
Pin
Color and function (for ISO connectors)
Red (A7)
ANT CONT
A4 Yellow
:
Battery
Blue/White
To the power control terminal when
using the optional power amplifier
A5 Blue/White
:
Power control
(Power control wire/
P. CONT
or to the antenna control terminal in
Antenna control wire)
A7 Red
:
Ignition (ACC)
Yellow (A4)
the vehicle
A8 Black
:
Earth (ground) connection
B1
Purple
]
:
Rear speaker (right)
Brown
B2
Purple/black
[
For 3-way crossover: Tweeter (right)
To connect the Kenwood navigation
(Mute control wire)
MUTE
system, refer your navigation
B3
Gray
]
:
Front speaker (right)
manual
B4
Gray/black
[
For 3-way crossover: Mid range speaker (right)
B5
White
]
:
Front speaker (left)
B6
White/black
[
For 3-way crossover: Mid range speaker (left)
B7
ISO connectors
Green
]
:
Rear speaker (left)
B8
Green/black
[
For 3-way crossover: Tweeter (left)
ENGLISH
27
JS_KWD_KDC_BT510U_EN_EN_5.indd 27JS_KWD_KDC_BT510U_EN_EN_5.indd 27 01-Sep-16 11:23:35 AM01-Sep-16 11:23:35 AM
Book Size: B6L (182 mm x 128 mm)
Data Size: B6L (182 mm x 128 mm)
INHALT
VOR DER INBETRIEBNAHME
VOR DER INBETRIEBNAHME 2
WICHTIG
•
Um richtige Verwendung sicherzustellen, lesen Sie die Bedienungsanleitung vor der Verwendung des Produkts sorgfältig durch. Es ist besonders wichtig, dass Sie die als
GRUNDLAGEN 3
Warnung und Vorsicht gekennzeichneten Hinweise in dieser Anleitung lesen und beachten.
•
Bitte bewahren Sie die Anleitung an sicherer Stelle und griffbereit zum Nachschlagen auf.
ERSTE SCHRITTE 3
1 Wählen Sie die
WARNUNG
Anzeigesprache und brechen
•
Bedienen Sie keine Funktion, die Ihre Aufmerksamkeit vom Straßenverkehr ablenkt.
Sie die Demonstration ab
2 Stellen Sie die Uhrzeit und das
Vorsicht
Datum ein
Lautstärkeeinstellung:
3 Festlegen der
•
Stellen Sie die Lautstärke so ein, dass Sie immer noch Geräusche von außerhalb des Fahrzeugs hören können, um Unfälle zu vermeiden.
Anfangseinstellungen
•
Senken Sie die Lautstärke vor dem Abspielen digitaler Tonquellen, um Beschädigung der Lautsprecher durch plötzliche Tonspitzen zu vermeiden.
Allgemeines:
RADIO 5
•
Vermeiden Sie Verwendung des externen Geräts, wenn dieses das sichere Fahren behindern kann.
•
Stellen Sie sicher, dass alle wichtigen Daten gesichert sind. Wir übernehmen keine Haftung für jeglichen Verlust aufgenommener Daten.
CD/USB/iPod/ANDROID 7
•
Stellen Sie sicher, dass keine Metallgegenstände (wie etwa Münzen oder Werkzeuge) ins Innere des Geräts gelangen und Kurzschlüsse verursachen.
•
Wenn ein Disc-Fehler durch Kondensationsbildung auf der Laserlinse auftritt, werfen Sie die Disc aus und warten Sie eine Zeit lang, bis die Kondensation getrocknet ist.
AUX 9
•
Die USB-Kennung ist auf dem Hauptgerät angegeben. Zum Betrachten nehmen Sie die Frontblende ab.
( 3)
•
Je nach dem Typ des Fahrzeugs wird die Antenne automatisch ausgeschoben, wenn Sie die Einheit mit angeschlossenem Antennensteuerkabel
( 27)
einschalten. Schalten
BLUETOOTH® 10
Sie beim Parken in einem Bereich mit niedriger Decke die Einheit aus oder stellen Sie die Quelle auf STANDBY.
AUDIOEINSTELLUNGEN 16
Wie Sie diese Anleitung lesen
DISPLAY-EINSTELLUNGEN 19
•
Die Bedienung wird im Wesentlichen anhand der Tasten auf der Frontblende erläutert.
FEHLERSUCHE 20
•
Englischsprachige Anzeigen werden zur Erklärung verwendet. Sie können die Anzeigesprache im
[FUNCTION]
-Menü wählen.
( 5)
•
[XX]
zeigt die gewählten Punkte an.
ZUR BEZUGNAHME 22
•
( XX)
zeigt an, das Bezugsinformationen auf der angegebenen Seitennummer vorhanden sind.
Wartung
Weitere Informationen
TECHNISCHE DATEN 24
EINBAU/ANSCHLUSS 26
2
DEUTSCH
JS_KWD_KDC_BT510U_EN_GE.indd 2JS_KWD_KDC_BT510U_EN_GE.indd 2 1/9/2016 9:36:03 AM1/9/2016 9:36:03 AM
Book Size: B6L (182 mm x 128 mm)
Data Size: B6L (182 mm x 128 mm)
GRUNDLAGEN
ERSTE SCHRITTE
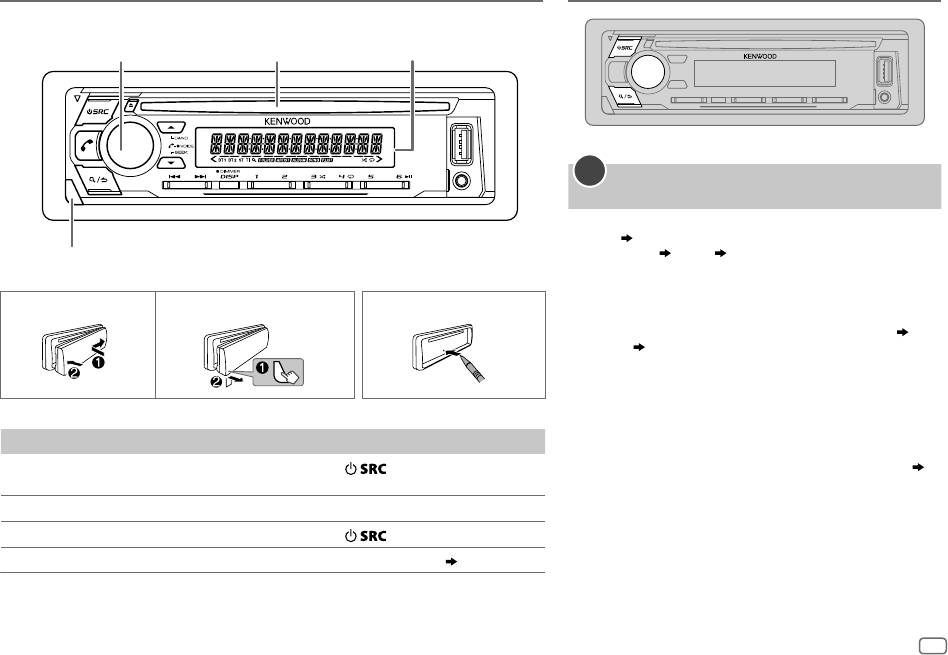
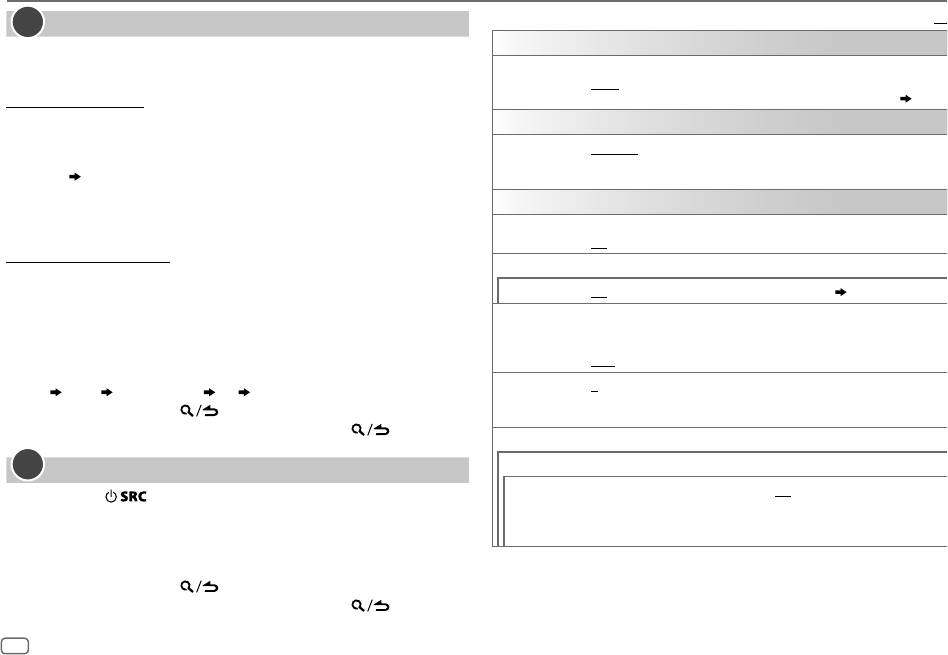
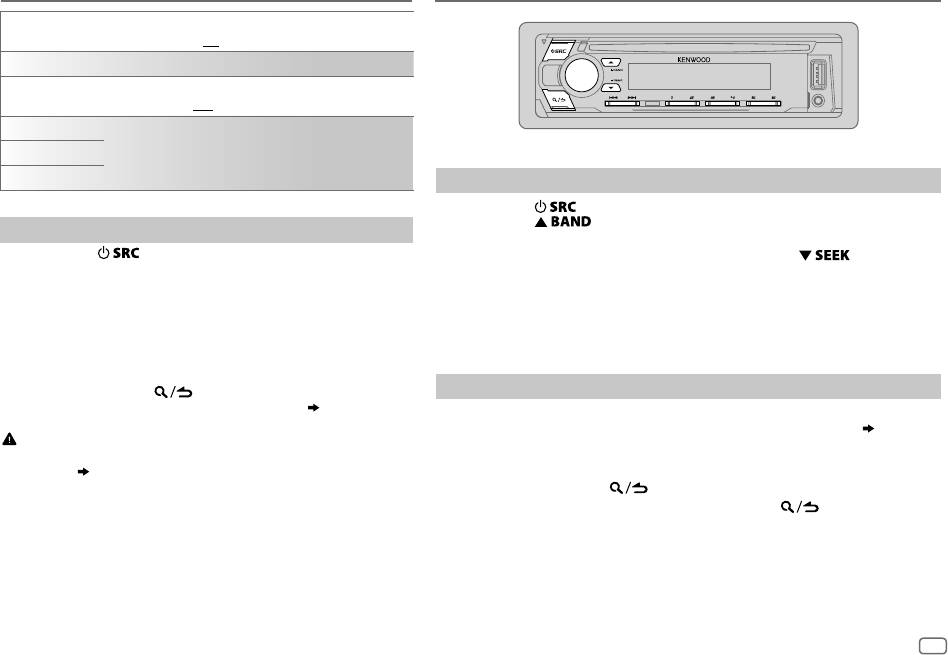
Frontblende
Lautstärke-Regler
Ladeschlitz Displayfenster
1
Wählen Sie die Anzeigesprache und brechen
Sie die Demonstration ab
Beim ersten Einschalten des Geräts (oder wenn
[FACTORY RESET]
auf
[YES]
,
5
gestellt ist), erscheint Folgendes im Display:
Abnehmen-Taste
“SEL LANGUAGE”
“PRESS” “VOLUME KNOB”
1 Drehen Sie den Lautstärke-Regler zum Wählen von
[ENG]
(Englisch),
[RUS]
(Russisch) oder
[SPA]
(Spanisch), und
drücken Sie dann den Regler.
RücksetzenAnbringen Abnehmen
[ENG]
ist für das ursprüngliche Setup gewählt.
Dann erscheint folgendes in der Anzeige: “CANCEL DEMO”
“PRESS”
“VOLUME KNOB”.
2 Drücken Sie den Lautstärke-Regler.
[YES]
ist für das ursprüngliche Setup gewählt.
3 Drücken Sie den Lautstärke-Regler erneut.
“DEMO OFF” erscheint.
Danach zeigt das Display den gewählten Übergangstyp:
Zum Auf der Frontblende
“2-WAY X ’ OVER” oder “3-WAY X ’ OVER”
Einschalten
Drücken Sie .
•
Zum Ändern des Übergangstyps siehe “Übergangstyp ändern”. (
5
)
•
Zum Ausschalten halten Sie die Taste gedrückt.
Einstellen der Lautstärke
Drehen Sie den Lautstärke-Regler.
Quelle auswählen
Drücken Sie wiederholt.
Ändern der Display-Information
Drücken Sie
DISP
wiederholt.
( 24)
DEUTSCH
3
JS_KWD_KDC_BT510U_EN_GE.indd 3JS_KWD_KDC_BT510U_EN_GE.indd 3 1/9/2016 9:36:04 AM1/9/2016 9:36:04 AM
Book Size: B6L (182 mm x 128 mm)
Data Size: B6L (182 mm x 128 mm)
ERSTE SCHRITTE
Standard:
XX
2
Stellen Sie die Uhrzeit und das Datum ein
AUDIO CONTROL
1
Drücken Sie den Lautstärke-Regler, um auf
[FUNCTION]
zu schalten.
2 Drehen Sie den Lautstärke-Regler zum Wählen von
[CLOCK]
, und drücken
SWITCH
(Gilt nicht, wenn 3-Wege-Übergang gewählt ist.)
Sie dann den Regler.
PREOUT
REAR
/
SUB-W
: Wählt, ob hintere Lautsprecher oder ein Subwoofer an die Line-Out-
Zum Einstellen der Uhr
Buchsen an der Rückseite angeschlossen sind (über einen externen Verstärker).
( 27)
3 Drehen Sie den Lautstärke-Regler zum Wählen von
[CLOCK ADJUST]
, und
TUNER SETTING
drücken Sie dann den Regler.
4 Drehen Sie den Lautstärke-Regler, um die Einstellungen vorzunehmen,
PRESET TYPE
NORMAL
:Speichert einen Sender für jede Sendespeichertaste in jedem Frequenzband
und drücken Sie dann den Regler.
(FM1/FM2/FM3/MW/LW).;
MIX
:Speichert einen Sender für jede Sendespeichertaste
Stunde Minute
ungeachtet des Frequenzbands.
5 Drehen Sie den Lautstärke-Regler zum Wählen von
[CLOCK FORMAT]
, und
drücken Sie dann den Regler.
SYSTEM
6 Drehen Sie den Lautstärke-Regler zum Wählen von
[12H]
oder
[24H]
, und
KEY BEEP
(Gilt nicht, wenn 3-Wege-Übergang gewählt ist.)
drücken Sie dann den Regler.
ON
:Aktiviert den Tastenberührungston.;
OFF
:Deaktiviert.
Zum Einstellen des Datums
SOURCE SELECT
7 Drehen Sie den Lautstärke-Regler zum Wählen von
[DATE FORMAT]
, und
drücken Sie dann den Regler.
BUILT-IN AUX
ON
:Aktiviert Sie AUX in der Quellenwahl.;
OFF
:Deaktiviert.
( 9)
8 Drehen Sie den Lautstärke-Regler zum Wählen von
[DD/MM/YY]
oder
[MM/DD/YY]
, und drücken Sie dann den Regler.
P-OFF WAIT
Nur zutreffend, wenn der Demonstrationsmodus ausgeschaltet ist.
9 Drehen Sie den Lautstärke-Regler zum Wählen von
[DATE SET]
, und
Stellt die Zeitdauer ein, bis das Gerät automatisch ausschaltet (im Standby-Modus), um
drücken Sie dann den Regler.
Batteriestrom zu sparen.
10 Drehen Sie den Lautstärke-Regler, um die Einstellungen vorzunehmen,
20M
: 20 Minutes ;
40M
: 40 Minutes ;
60M
: 60Minutes;
– – –
:Hebt auf
und drücken Sie dann den Regler.
CD READ 1
:Hiermit wird automatisch zwischen Discs mit Audiodateien und Musik-CDs
Tag Monat Jahr oder Monat Tag Jahr
unterschieden.;
2
:Hiermit wird die Wiedergabe zwangsweise als Musik-CD durchgeführt. Es
11 Halten Sie zum Beenden gedrückt.
kommt kein Ton, wenn eine Disc mit Audiodateien abgespielt wird.
Zum Zurückschalten zum vorherigen Einstellelement drücken Sie .
F/W UPDATE
3
UPDATE SYSTEM
Festlegen der Anfangseinstellungen
F/W UP xxxx
YES
:Startet die Aktualisierung der Firmware.;
NO
:Hebt auf (Aktualisierung wird nicht
1
Drücken Sie wiederholt, um auf STANDBY zu schalten.
ausgeführt).
2 Drücken Sie den Lautstärke-Regler, um auf
[FUNCTION]
zu schalten.
Einzelheiten darüber, wie Sie die Firmware aktualisieren können, besuchen Sie
3 Drehen Sie den Lautstärke-Regler, um einen Gegenstand zu treffen
<www.kenwood.com/cs/ce/>.
(siehe folgende Tabelle), und drücken Sie dann den Regler.
4 Wiederholen Sie Schritt 3, bis der gewünschte Gegenstand gewählt oder
aktiviert ist.
5 Halten Sie zum Beenden gedrückt.
Zum Zurückschalten zum vorherigen Einstellelement drücken Sie .
4
DEUTSCH
JS_KWD_KDC_BT510U_EN_GE.indd 4JS_KWD_KDC_BT510U_EN_GE.indd 4 1/9/2016 9:36:04 AM1/9/2016 9:36:04 AM
Data Size: B6L (182 mm x 128 mm)
Book Size: B6L (182 mm x 128 mm)
ERSTE SCHRITTE
RADIO
FACTORY RESET YES
:Setzt die Einstellungen auf Standardwerte zurück (ausgenommen
gespeicherte Sender).;
NO
:Hebt auf
CLOCK
CLOCK DISPLAY
ON
:Die Uhrzeit wird im Display angezeigt, auch wenn das Gerät
ausgeschaltet wird.;
OFF
:Hebt auf.
ENGLISH
Wählen Sie die Anzeigesprache für das
[FUNCTION]
-Menü und die Musik-
РУССКИЙ
Information, wo zutreffend.
Als Standard ist
[ENGLISH]
ausgewählt.
ESPANOL
Suche nach einem Sender
1
Drücken Sie wiederholt zum Wählen von TUNER.
2 Drücken Sie wiederholt, um FM1/FM2/FM3/MW/LW zu wählen.
Übergangstyp ändern
3 Drücken Sie S/T, um einen Sender zu suchen.
1
Drücken Sie wiederholt, um auf STANDBY zu schalten.
•
Zum Ändern des Suchverfahrens für S/T
: Drücken Sie wiederholt.
2 Die Zifferntasten 4 und 5 gedrückt halten, um auf
AUTO1
: Sucht automatisch nach einem Sender.
Übergangswahl zu schalten.
AUTO2
: Suchen Sie nach einem Festsender.
Der aktuelle Übergangstyp erscheint.
MANUAL
: Sucht manuell nach einem Sender.
3 Drehen Sie den Lautstärke-Regler zum Wählen von “2WAY” oder
•
Zum Speichern eines Senders
: Halten Sie eine der Zifferntasten (
1
bis
6
) gedrückt.
“3WAY”, und drücken Sie dann den Regler.
•
Zum Auswählen eines gespeicherten Senders
: Drücken Sie eine der Zifferntasten
4 Drehen Sie den Lautstärke-Regler zum Wählen von “YES” oder
(
1
bis
6
).
“NO”, und drücken Sie dann den Regler.
Der gewählte Übergangstyp erscheint.
•
Zum Abbrechen halten Sie gedrückt.
Andere Einstellungen
•
Zum Anpassen der gewählten Übergangseinstellungen
( 17, 18)
.
1
Drücken Sie den Lautstärke-Regler, um auf
[FUNCTION]
zu schalten.
2 Drehen Sie den Lautstärke-Regler zum Wählen eines Gegenstands
( 6)
, und
Vorsicht
drücken Sie dann den Regler.
Wählen Sie einen Übergangstyp entsprechend der Art des Anschlusses der
3 Wiederholen Sie Schritt 2, bis der gewünschte Gegenstand gewählt/aktiviert ist,
Lautsprecher.
( 27)
oder folgen Sie den Anweisungen auf dem gewählten Gegenstand.
Wenn Sie einen falschen Typ wählen:
4 Halten Sie zum Beenden gedrückt.
•
Die Lautsprecher können beschädigt werden.
Zum Zurückschalten zum vorherigen Einstellelement drücken Sie .
•
Der Ausgangstonpegel kann sehr hoch oder niedrig sein.
DEUTSCH
5
JS_KWD_KDC_BT510U_EN_GE.indd 5JS_KWD_KDC_BT510U_EN_GE.indd 5 1/9/2016 9:36:04 AM1/9/2016 9:36:04 AM
Book Size: B6L (182 mm x 128 mm)
Data Size: B6L (182 mm x 128 mm)
RADIO
Standard:
XX
Verfügbarer Programmtyp für
[PTY SEARCH]
TUNER SETTING
SPEECH
:
NEWS
,
AFFAIRS
,
INFO
(Information),
SPORT
,
EDUCATE
,
DRAMA
,
CULTURE
,
SCIENCE
,
VARIED
,
WEATHER
,
FINANCE
,
CHILDREN
,
SOCIAL
,
RELIGION
,
LOCAL SEEK
ON
: Sucht nur Sender mit gutem Empfang. ;
OFF
: Hebt auf.
PHONE IN
,
TRAVEL
,
LEISURE
,
DOCUMENT
•
Die vorgenommenen Einstellungen gelten nur für die gewählte Quelle/den gewählten
MUSIC
:
POP M
(Musik),
ROCK M
(Musik),
EASY M
(Musik),
LIGHT M
(Musik),
Sender. Wenn Sie die Quelle/den Sender gewechselt haben, müssen Sie die Einstellungen
CLASSICS
,
OTHER M
(Musik),
JAZZ
,
COUNTRY
,
NATION M
(Musik),
OLDIES
,
erneut vornehmen.
FOLK M
(Musik)
AUTO
YES
:Beginnt automatisch die Speicherung von 6 Sendern mit gutem Empfang.;
NO
:Hebt auf.
Das Gerät sucht den Programmtyp, der unter
[SPEECH]
oder
[MUSIC]
kategorisiert ist,
MEMORY
•
Nur wählbar, wenn
[NORMAL]
für
[PRESET TYPE]
gewählt ist.
( 4)
wenn gewählt.
MONO SET
ON
:Verbessern Sie den FM (UKW)-Empfang (aber der Stereoeffekt kann verloren gehen).;
•
[LOCAL SEEK]
/
[MONO SET]
/
[NEWS SET]
/
[REGIONAL]
/
[AF SET]
/
[TI]
/
[PTY SEARCH]
ist
OFF
:Hebt auf.
nur wählbar, wenn der Wellenbereich FM1/FM2/FM3 ist.
•
Wenn die Lautstärke während des Empfangs von Verkehrsinformationen oder
NEWS SET ON
: Das Gerät schaltet kurzzeitig auf das Nachrichtenprogramm, falls verfügbar. ;
Nachrichtensendungen eingestellt wird, wird die eingestellte Lautstärke automatisch
OFF
:Hebt auf.
gespeichert. Wird die Verkehrsfunk-Funktion oder die Nachrichtensendung das
REGIONAL ON
: Schaltet auf einen anderen Sender in der spezifischen Region nur mit der “AF”-Steuerung.;
nächste Mal aufgerufen, wird diese Einstellung übernommen.
OFF
:Hebt auf.
AF SET ON
: Sucht automatisch einen anderen Sender auf, der das gleiche Programm im gleichen
Radio Data System-Netzwerk sendet und einen besseren Empfang aufweist, falls der aktuelle
Empfang schlecht ist.;
OFF
:Hebt auf.
TI ON
:Erlaubt es, das Gerät kurzzeitig auf Verkehrsinformation schalten, wenn verfügbar
(“TI” leuchtet auf).;
OFF
:Hebt auf.
PTY SEARCH
1
Drehen Sie den Lautstärke-Regler zum Wählen des verfügbaren Programmtyps, und
drücken Sie dann den Regler.
2
Drehen Sie den Lautstärke-Regler zum Wählen der PTY-Sprache (
ENGLISH
/
FRENCH
/
GERMAN
), und drücken Sie dann den Regler.
3
Drücken Sie
S
/
T
zum Starten des Suchlaufs.
CLOCK
TIME SYNC
ON
:Synchronisiert die Zeit des Geräts mit der Radio Data System-Senderzeit.;
OFF
:Hebt auf.
6
DEUTSCH
JS_KWD_KDC_BT510U_EN_GE.indd 6JS_KWD_KDC_BT510U_EN_GE.indd 6 1/9/2016 9:36:05 AM1/9/2016 9:36:05 AM
Data Size: B6L (182 mm x 128 mm)
Book Size: B6L (182 mm x 128 mm)
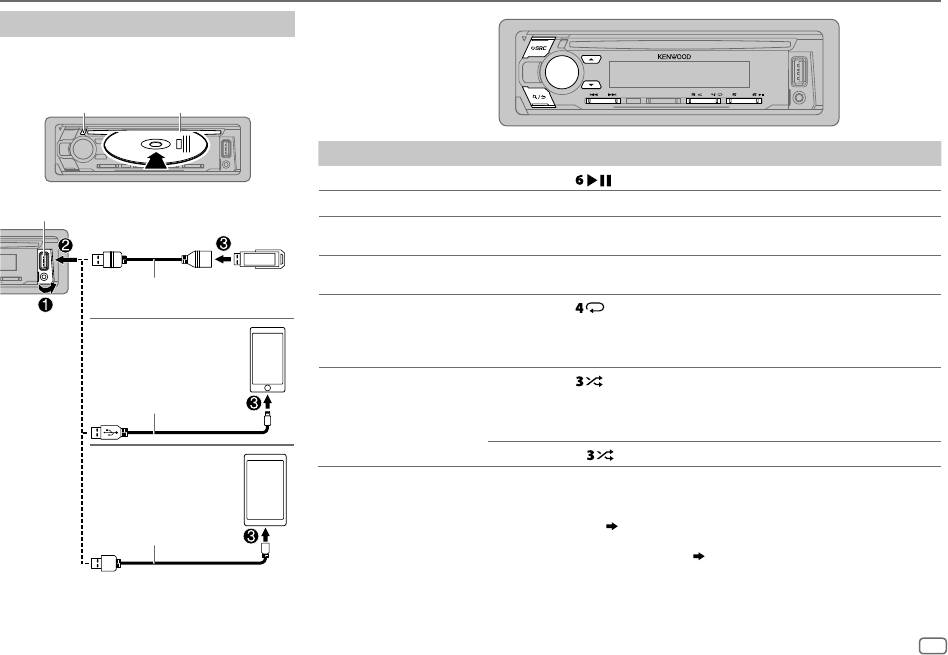
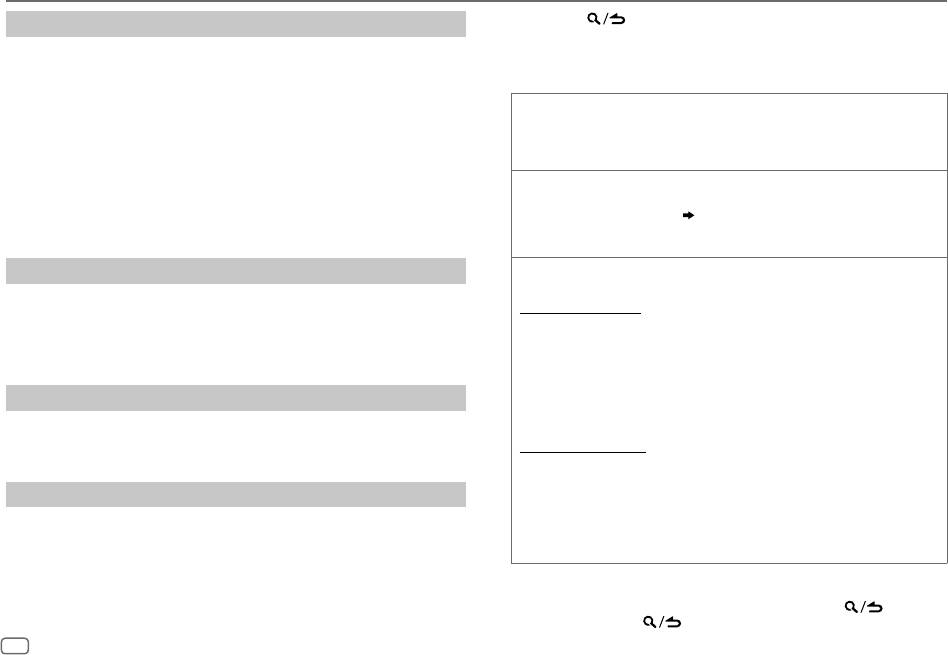
CD/USB/iPod/ANDROID
Starten Sie die Wiedergabe
Die Quelle schaltet automatisch um, und die
Wiedergabe startet.
CD
M
Disc auswerfen
Beschriftungsseite
Zum Auf der Frontblende
Wiedergabe/Pause
Drücken Sie
.
Vorspulen/Rückspulen
*
4
USB-Eingangsterminal
Halten Sie S/T gedrückt.
Auswählen eines Tracks/
Drücken Sie
S/T.
USB
einer Datei
Auswählen eines
Drücken Sie J/K.
Ordners
*
5
CA-U1EX (max.: 500mA)
(optionales Zubehörteil)
Wiederholte
Drücken Sie wiederholt.
Wiedergabe
*
6
TRACK REPEAT
/
ALL REPEAT
: Audio-CD
iPod/iPhone
FILE REPEAT
/
FOLDER REPEAT
/
ALL REPEAT
: MP3/WMA/AAC/WAV/FLAC-Datei
FILE REPEAT
/
FOLDER REPEAT
/
REPEAT OFF
: iPod oder ANDROID
KCA-iP102/KCA-iP103
(optionales Zubehör)
1
Zufallswiedergabe
*
6
*
oder
Drücken Sie wiederholt.
Zubehör von iPod/iPhone
*
2
DISC RANDOM
/
RANDOM OFF
: Audio-CD
FOLDER RANDOM
/
RANDOM OFF
: MP3/WMA/AAC/WAV/FLAC-Datei, iPod oder
ANDROID
Halten Sie die gedrückt, um
ALL RANDOM
zu wählen.
*
7
ANDROID
*
3
*
3
Wenn ein Android-Gerät angeschlossen wird, wird “Press [VIEW] to install KENWOOD MUSIC PLAY APP” angezeigt. Gehen Sie zur Installation der Anwendung
gemäß den Anweisungen vor. Sie können auch vor dem Verbinden die neueste Version der KENWOOD MUSIC PLAY-Anwendung auf Ihrem Android-Gerät
installieren. Für die neueste Information besuchen Sie <www.kenwood.com/cs/ce/>.
Micro-USB 2.0-Kabel
*
2
*
4
Bei ANDROID: Trifft nur zu, wenn
[BROWSE MODE]
gewählt ist.
( 8)
(im Handel erhältlich)
*
5
Bei CD: Nur für MP3/WMA/AAC-Dateien. Dies funktioniert nicht bei iPod/ANDROID.
*
6
Bei iPod/ANDROID: Trifft nur zu, wenn
[MODE OFF]
/
[BROWSE MODE]
gewählt ist.
( 8)
*
7
Bei CD: Nur für MP3/WMA/AAC-Dateien.
*
1
KCA-iP102 : 30-poliger Typ, KCA-iP103 : Lightning-Typ
*
2
Lassen Sie bei Nichtgebrauch nicht das Kabel im Auto liegen.
DEUTSCH
7
JS_KWD_KDC_BT510U_EN_GE.indd 7JS_KWD_KDC_BT510U_EN_GE.indd 7 1/9/2016 9:36:05 AM1/9/2016 9:36:05 AM
Book Size: B6L (182 mm x 128 mm)
Data Size: B6L (182 mm x 128 mm)
CD/USB/iPod/ANDROID
1 Drücken Sie .
Wählen Sie den Steuermodus
2 Drehen Sie den Lautstärke-Regler zum Wählen eines Ordners/einer Liste,
Während iPod USB als Quelle gewählt ist, drücken Sie 5 wiederholt.
und drücken Sie dann den Regler.
MODE ON
: Steuern Sie den iPod mit dem iPod selber. Sie können aber weiterhin
3 Drehen Sie den Lautstärke-Regler zum Wählen einer Datei, und drücken
Wiedergabe/Pause, Datei-Überspringen, Vorspulen oder Zurückspulen von
Sie dann den Regler.
Dateien von dieser Einheit steuern.
MODE OFF
: Steuern Sie den iPod von dieser Einheit.
Schnellsuche
(gilt nur für CD, USB und ANDROID-Quelle)
Wenn Sie viele Dateien haben, können Sie diese schnell durchsuchen.
Während ANDROID als Quelle gewählt ist, drücken Sie 5 wiederholt.
Drehen Sie den Lautstärke-Regler schnell, um die Liste schnell zu
BROWSE MODE
: Steuern Sie das Android-Gerät von dieser Einheit über die im Android-
durchsuchen.
Gerät installierte Anwendung KENWOOD MUSIC PLAY.
HAND MODE
: Steuern Sie das Android-Gerät vom Android-Gerät selber über andere
Suchlauf überspringen
(gilt nur für iPod USB und ANDROID-Quelle)
im Android-Gerät installierte Media-Player-Anwendungen. Sie können
Drücken Sie S/T, um mit einem vorgegebenen Überspringen-
aber weiterhin Wiedergabe/Pause und Datei-Überspringen von dieser
Suchverhältnis zu suchen.
( 9, [SKIP SEARCH])
Einheit steuern.
•
Wenn
S
/
T
gedrückt gehalten wird, wird Suchlauf mit einem Verhältnis
von 10
%
ausgeführt.
Wählen Sie das Musiklaufwerk
Alphabetische Suche
(gilt nur für iPod USB und ANDROID-Quelle)
Sie können eine Datei anhand des Anfangsbuchstabens suchen.
Während USB als Quelle gewählt ist, drücken Sie 5 wiederholt.
Für iPod USB-Quelle
Im folgenden Laufwerk gespeicherte Titel werden abgespielt.
1 Drehen Sie den Lautstärke-Regler schnell für Zeichensuche.
•
Wählen Sie internen oder externen Speicher für ein Smartphone
2 Drehen Sie den Lautstärke-Regler zum Wählen des Buchstabens.
(Massenspeicherklasse).
• Wählen Sie “
”, um ein anderes Zeichen als die Buchstaben A bis Z oder
•
Gewähltes Laufwerk bei Gerät mit mehreren Laufwerken.
*
die Zahlen 0 bis 9 zu suchen.
3 Drücken Sie S/T, um auf die Eingabeposition
Hören Sie TuneIn Radio/TuneIn Radio Pro/Aupeo
umzuschalten.
• Sie können bis zu 3 Zeichen eingeben.
Beim Hören von TuneIn Radio, TuneIn Radio Pro oder Aupeo schließen Sie das iPod/
4 Drücken Sie den Lautstärke-Regler zum Starten der Suche.
iPhone am USB-Eingang des Geräts an.
Für ANDROID-Quelle
•
Das Gerät gibt den Ton von diesen Anwendungen aus.
1 Drücken Sie J/K, um auf Zeichensuche zu schalten.
2 Drehen Sie den Lautstärke-Regler zum Wählen des Buchstabens.
^A^
: Großbuchstaben (A bis Z)
Auswählen einer Datei aus einem Ordner/einer Liste
_A_
: Kleinbuchstaben (a bis z)
Beim iPod/ANDROID nur gültig, wenn
[MODE OFF]
/
[BROWSE MODE]
gewählt ist.
-0-
: Zahlen (0 bis 9)
:
***
Andere Zeichen als die Buchstaben A bis Z oder die Zahlen 0 bis 9
3 Drücken Sie den Lautstärke-Regler zum Starten der Suche.
•
Zum Zurückkehren zum Grundordner/ersten Datei/Top-Menü drücken
5
.
(Gilt nicht
für BT AUDIO-Quelle.)
•
Zum Zurückschalten zum vorherigen Einstellelement drücken Sie .
•
Zum Abbrechen halten Sie gedrückt.
8
DEUTSCH
JS_KWD_KDC_BT510U_EN_GE.indd 8JS_KWD_KDC_BT510U_EN_GE.indd 8 1/9/2016 9:36:05 AM1/9/2016 9:36:05 AM
Data Size: B6L (182 mm x 128 mm)
Book Size: B6L (182 mm x 128 mm)

CD/USB/iPod/ANDROID
AUX
Vorbereitung:
Einstellungen zur Verwendung der
Wählen Sie
[ON]
für
[BUILT-IN AUX]
für
[SOURCE SELECT]
.
( 4)
KENWOOD Remote-Anwendung
Beginnen Sie zu hören
KENWOOD Remote-Anwendung ist darauf ausgelegt, die Bedienung des KENWOOD
Auto-Receivers vom iPhone/iPod (über USB-Eingang).
1
Schließen Sie einen tragbaren Audioplayer (im Handel erhältlich) an.
Vorbereitung:
Auxiliary-Eingabebuchse
Installieren Sie vor dem Verbinden die neueste Version der
Tragbarer Audioplayer
KENWOOD Remote-Anwendung auf Ihrem Gerät. Für die neueste Information besuchen
Sie <www.kenwood.com/cs/ce/>.
Sie können die Einstellungen auf gleiche Weise vornehmen wie bei Verbindung über
Bluetooth.
( 15)
Andere Einstellungen
3,5-mm-Stereo-Ministecker mit “L”-förmigem
Anschluss (im Handel erhältlich)
1
Drücken Sie den Lautstärke-Regler, um auf
[FUNCTION]
zu schalten.
2 Drehen Sie den Lautstärke-Regler, um einen Gegenstand zu treffen
2 Drücken Sie wiederholt zum Wählen von AUX.
(siehe folgende Tabelle), und drücken Sie dann den Regler.
3 Schalten Sie den tragbaren Audioplayer ein und starten Sie die
3 Wiederholen Sie Schritt 2, bis der gewünschte Gegenstand gewählt
Wiedergabe.
oder aktiviert ist.
4 Halten Sie zum Beenden gedrückt.
Zum Zurückschalten zum vorherigen Einstellelement drücken Sie .
Den AUX-Namen einstellen
Beim Hören eines am Gerät angeschlossenen tragbaren Audioplayer...
Standard:
XX
1 Drücken Sie den Lautstärke-Regler, um auf
[FUNCTION]
zu schalten.
USB
2 Drehen Sie den Lautstärke-Regler zum Wählen von
[SYSTEM]
, und
drücken Sie dann den Regler.
MUSIC DRIVE DRIVE CHANGE
:Das nächste Laufwerk (
[DRIVE 1]
bis
[DRIVE 4]
) wird automatisch
3 Drehen Sie den Lautstärke-Regler zum Wählen von
[AUX NAME SET]
, und
gewählt, und die Wiedergabe startet.
drücken Sie dann den Regler.
Wiederholen Sie Schritt
1
bis
3
, um die folgenden Laufwerke zu wählen.
4 Drehen Sie den Lautstärke-Regler zum Wählen eines Gegenstands, und
drücken Sie dann den Regler.
SKIP SEARCH 0.5%
/
1%
/
5%
/
10%
: Beim Hören einer iPod USB- oder ANDROID-Quelle wird das
AUX
(Standard)/
DVD
/
PORTABLE
/
GAME
/
VIDEO
/
TV
Überspringen-Suchverhältnis für alle Dateien gewählt.
5 Halten Sie zum Beenden gedrückt.
Zum Zurückschalten zum vorherigen Einstellelement drücken Sie .
DEUTSCH
9
JS_KWD_KDC_BT510U_EN_GE.indd 9JS_KWD_KDC_BT510U_EN_GE.indd 9 1/9/2016 9:36:05 AM1/9/2016 9:36:05 AM
Book Size: B6L (182 mm x 128 mm)
Data Size: B6L (182 mm x 128 mm)
BLUETOOTH®
BLUETOOTH — Verbindung
Zum erstmaligen Registrieren und Anschließen eines Bluetooth-Geräts
Unterstützte Bluetooth-Profile
1
Drücken Sie , um die Einheit einzuschalten.
–
Hands-Free Profile (HFP)
2 Suchen und wählen Sie den Modellnamen dieser Einheit (KDC-BT5**U) auf dem Bluetooth-
–
Advanced Audio Distribution Profile (A2DP)
Gerät.
–
Audio/Video Remote Control Profile (AVRCP)
“PAIRING” “PASS XXXXXX” Gerätename “PRESS” “VOLUME KNOB” erscheint im Display.
–
Serial Port Profile (SPP)
• Bei einigen Bluetooth-Geräten müssen Sie möglicherweise den PIN-Code (Personal Identification
–
Phonebook Access Profile (PBAP)
Number) sofort nach der Suche eingeben.
Unterstützte Bluetooth-Codecs
3 Drücken Sie den Lautstärke-Regler zum Starten des Pairing-Vorgangs.
–
Sub-Band-Codec (SBC)
“PAIRING OK” erscheint, wenn das Pairing fertig ist.
–
Erweiterte Audio-Codierung (AAC)
Wenn der Pairing-Vorgang ausgeführt ist, wird die Bluetooth-Verbindung automatisch hergestellt. “BT1” und/
oder “BT2” im Displayfenster leuchtet auf.
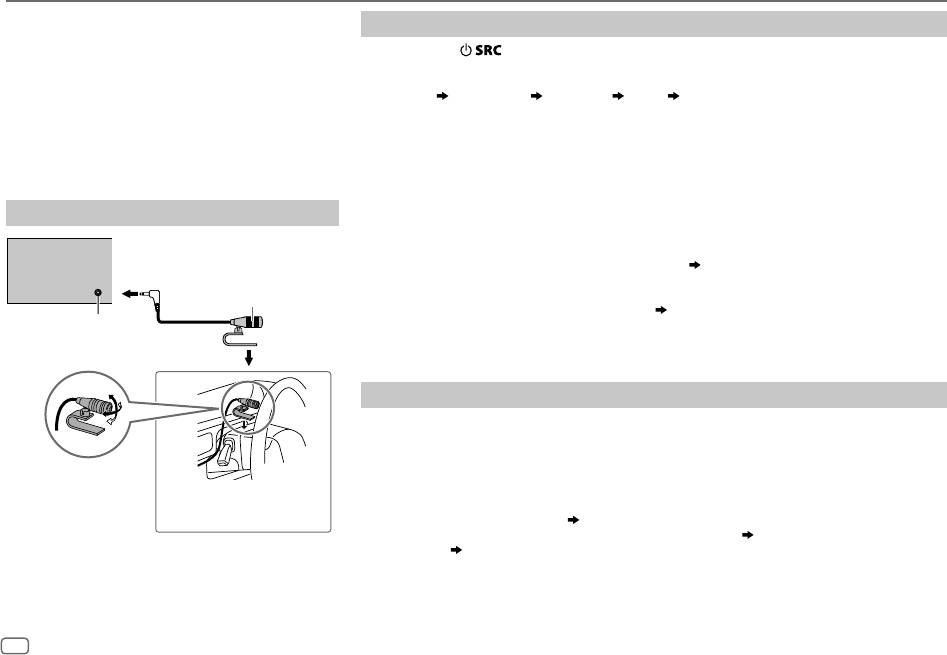
Schließen das Mikrofon an
•
Diese Einheit unterstützt Secure Simple Pairing (SSP).
•
Bis zu fünf Geräte können insgesamt registriert (gepairt) werden.
Geräterückseite
•
Wenn das Pairing ausgeführt ist, bleibt das Bluetooth-Gerät in der Einheit registriert, auch wenn Sie die
Einheit zurücksetzen. Zum Löschen des gekoppelten Geräts,
13, [DEVICE DELETE]
.
Mikrofon
•
Es können maximal zwei Bluetooth-Telefone und ein Bluetooth-Audiogerät zur Zeit angeschlossen werden.
(mitgeliefert)
Während BT AUDIO als Quelle eingestellt ist, können Sie die Verbindung zu fünf Bluetooth-Audiogeräten
herstellen und zwischen diesen Geräten umschalten.
( 14)
Mikrofoneingangsbuchse
•
Manche Bluetooth-Geräte können nicht in der Lage sein, nach dem Pairing die Verbindung automatisch
herzustellen. Schließen Sie das Gerät manuell an die Einheit an.
•
Weitere Information siehe Bedienungsanleitung Ihres Bluetooth-Geräts.
Auto Pairing
Wenn Sie Ihr iPhone/iPod touch/Android-Gerät an den USB-Eingang anschließen, wird automatisch eine Pairing-
Anforderung (über Bluetooth) aktiviert.
Drücken Sie den Lautstärke-Regler einmal zum Pairing, nachdem Sie den Gerätenamen bestätigt
haben.
Stellen Sie den Mikrofonwinkel ein
Automatische Pairing-Anforderung wird nur aktiviert, wenn:
Sichern Sie das Kabel mit Kabelklemmen
–
Die Bluetooth-Funktion des angeschlossenen Geräts eingeschaltet ist.
(nicht mitgeliefert), wenn erforderlich.
–
[AUTO PAIRING]
auf
[ON]
gestellt ist.
( 14)
–
Die KENWOOD MUSIC PLAY-Anwendung wird auf dem Android-Gerät
( 7)
installiert, und
[BROWSE MODE]
wird gewählt.
( 8)
10
DEUTSCH
JS_KWD_KDC_BT510U_EN_GE.indd 10JS_KWD_KDC_BT510U_EN_GE.indd 10 1/9/2016 9:36:05 AM1/9/2016 9:36:05 AM
Data Size: B6L (182 mm x 128 mm)
Book Size: B6L (182 mm x 128 mm)


