Pioneer VSX-520-S: Using the component video jacks Connecting other audio components
Using the component video jacks Connecting other audio components: Pioneer VSX-520-S
Table of contents
- IMPORTANT VENTILATION CAUTION
- Operating Environment
- Contents
- Flow of settings on the receiver
- Chapter 1: Before you start
- Before you start01 Ventilation
- Chapter 2: Controls and displays
- Controls and displays02 Operating range of remote control
- Controls and displays 02 Display
- Controls and displays02
- Remote control
- Controls and displays02
- Controls and displays 02
- Chapter 3: Connecting your equipment Placing the speakers
- Hints on the speaker placement
- Connecting the speakers
- Making cable connections
- HDMI cables About HDMI Analog audio cables
- Digital audio cables About video outputs connection
- Connecting a TV and playback components Connecting using HDMI Connecting your component with no HDMI terminal
- Connecting a satellite receiver Connecting an HDD/DVD or other digital set-top box recorder, VCR and other video sources
- Using the component video jacks Connecting other audio components
- Connecting antennas
- Plugging in the receiver
- Chapter 4: Basic Setup Automatically setting up for surround sound (MCACC)
- Basic Setup04
- Chapter 5: Listening to your system Basic playback
- Auto playback Listening in surround sound
- Listening to your system 05
- Using Front Stage Surround Advance Listening in stereo
- Using Stream Direct Better sound using Phase Control Using the Sound Retriever
- Using surround back channel processing Listening with Acoustic Calibration EQ
- Setting the Audio options Setting the Up Mix function
- Setting What it does Option(s)
- Setting What it does Option(s)
- Choosing the input signal Using the headphone
- Chapter 6: The System Setup menu Using the System Setup menu Manual speaker setup
- Speaker setting
- Crossover network Channel level Speaker distance
- The Input Assign menu The Pre Out Setting
- Chapter 7 Using the tuner Listening to the radio Saving station presets
- Using the tuner07
- An introduction to RDS
- Using the tuner07 Displaying RDS information
- Chapter 8: Making recordings Making an audio or a video recording
- Chapter 9: Other connections
- Connecting Optional Bluetooth ADAPTER
- Other connections09
- Chapter 10: Additional information Troubleshooting Problem Remedy
- Problem Remedy
- Additional information 10
- HDMI Symptom Remedy
- Resetting the main unit
- Specifications Cleaning the unit
Connecting your equipment03
Important
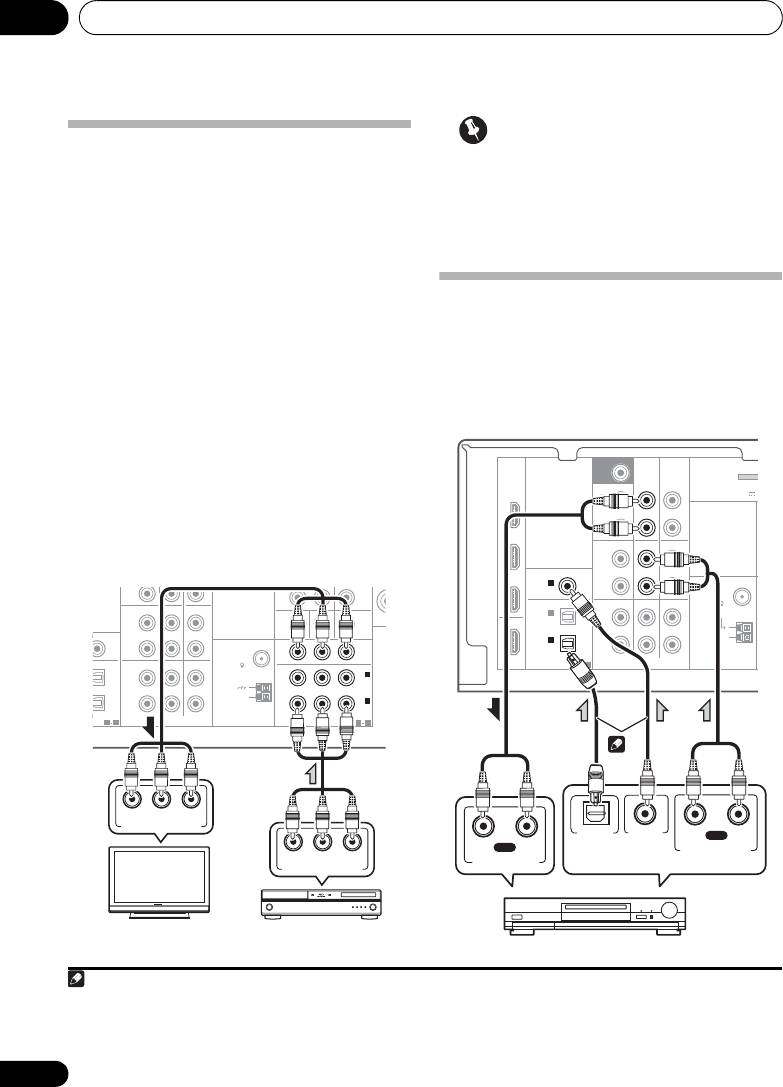
Using the component video jacks
• If you connect any source component to
Component video should deliver superior
the receiver using a component video
picture quality when compared to composite
input, you must also have your TV
video. A further advantage (if your source and
connected to this receiver’s COMPONENT
TV are both compatible) is progressive-scan
VIDEO OUT jacks.
video, which delivers a very stable, flicker-free
picture. See the manuals that came with your TV
and source component to check whether they
Connecting other audio
are compatible with progressive-scan video.
components
• If necessary, assign the component video
The number and kind of connections depends
inputs to the input source you’ve connected.
1
on the kind of component you’re connecting.
This only needs to be done if you didn’t connect
Follow the steps below to connect a CD-R, MD,
according to the following defaults:
2
DAT, tape recorder or other audio component.
• COMPONENT VIDEO IN 1 – BD
• COMPONENT VIDEO IN 2 – DVD
See The Input Assign menu on page 42 for
• For the audio connection, refer to
Connecting your component with no HDMI
terminal
on page 22.
24
En
R
PRE OUT
CD
CD-R/TAPE
DVR/VCR
L
SSIGNABLE
IN
IN
MONITOR OUT
DVD IN BD IN
ANTENNA
P
R
P
B
Y
MONITOR
R
FM
OUT
UNBAL
TV/SAT
DVD BD
75
L
IN
2
DVD
(
)
IN
IN
AM
R
LOOP
IN
1
(
BD
)
SSIGNABLE
ASSIGNABLE
1 2
AUDIO
COMPONENT VIDEO
1 2
MONITOR
OUT
P
R YPB
COMPONENT VIDEO IN
P
R YPB
COMPONENT VIDEO OUT
TV
BD player
Note
SURR BACK /
FRONT
BD
HEIGHT
L
(
Single
)
OUT
R
CD
DVR/VCR
L
IN
IN
R
TV/SAT
DVD BD
IN
L
IN
IN
R
1 Note that you must connect digital components to analog audio jacks if you want to record to/from digital components (like
an MD) to/from analog components.
2 If the connection was made using an optical or a coaxial cable, you’ll need to tell the receiver which digital input you connected
the component to (see Choosing the input signal on page 38).
M
SUBWOOFER
PRE OUT
CD-R/TAPE
DVR/VCR
ADAPTER
(
OUTPUT 5 V
DVD
PRE OUT
CD-R/TAPE
COAXIAL
ASSIGNABLE
TV/SAT
IN
1
ANTENNA
(
CD
)
FM
UNBAL
OPTICAL
75
IN
2
OUT
(
DVR/VCR
)
AM
IN
1
LOOP
(
CD-R/TAPE
)
ASSIGNABLE
HDMI
1 2
AUDIO
1
OPTICAL
COAXIAL
RL
PLAY
RL
REC
DIGITAL AUDIO OUT
ANALOG AUDIO OUT
ANALOG AUDIO IN
2
Select one
CD-R, MD, DAT, Tape recorder, etc.
VSX-520_SYXCN_En.book 24 ページ 2010年4月12日 月曜日 午後7時13分24
