Pioneer VSX-520-S: Flow of settings on the receiver
Flow of settings on the receiver: Pioneer VSX-520-S
Table of contents
- IMPORTANT VENTILATION CAUTION
- Operating Environment
- Contents
- Flow of settings on the receiver
- Chapter 1: Before you start
- Before you start01 Ventilation
- Chapter 2: Controls and displays
- Controls and displays02 Operating range of remote control
- Controls and displays 02 Display
- Controls and displays02
- Remote control
- Controls and displays02
- Controls and displays 02
- Chapter 3: Connecting your equipment Placing the speakers
- Hints on the speaker placement
- Connecting the speakers
- Making cable connections
- HDMI cables About HDMI Analog audio cables
- Digital audio cables About video outputs connection
- Connecting a TV and playback components Connecting using HDMI Connecting your component with no HDMI terminal
- Connecting a satellite receiver Connecting an HDD/DVD or other digital set-top box recorder, VCR and other video sources
- Using the component video jacks Connecting other audio components
- Connecting antennas
- Plugging in the receiver
- Chapter 4: Basic Setup Automatically setting up for surround sound (MCACC)
- Basic Setup04
- Chapter 5: Listening to your system Basic playback
- Auto playback Listening in surround sound
- Listening to your system 05
- Using Front Stage Surround Advance Listening in stereo
- Using Stream Direct Better sound using Phase Control Using the Sound Retriever
- Using surround back channel processing Listening with Acoustic Calibration EQ
- Setting the Audio options Setting the Up Mix function
- Setting What it does Option(s)
- Setting What it does Option(s)
- Choosing the input signal Using the headphone
- Chapter 6: The System Setup menu Using the System Setup menu Manual speaker setup
- Speaker setting
- Crossover network Channel level Speaker distance
- The Input Assign menu The Pre Out Setting
- Chapter 7 Using the tuner Listening to the radio Saving station presets
- Using the tuner07
- An introduction to RDS
- Using the tuner07 Displaying RDS information
- Chapter 8: Making recordings Making an audio or a video recording
- Chapter 9: Other connections
- Connecting Optional Bluetooth ADAPTER
- Other connections09
- Chapter 10: Additional information Troubleshooting Problem Remedy
- Problem Remedy
- Additional information 10
- HDMI Symptom Remedy
- Resetting the main unit
- Specifications Cleaning the unit
VSX-520_SYXCN_En.book 6 ページ 2010年4月12日 月曜日 午後7時13分
Flow of settings on the receiver
The unit is a full-fledged AV receiver equipped
The colors of the steps indicate the following:
with an abundance of functions and terminals.
It can be used easily after following the
Required setting item
procedure below to make the connections and
settings.
Setting to be made as necessary
1
Before you start
• Checking what’s in the box (page 7)
4
Power On
• Loading the batteries (page 7)
Make sure you’ve set the video input on your TV to
this receiver. Check the manual that came with
the TV if you don’t know how to do this.
2
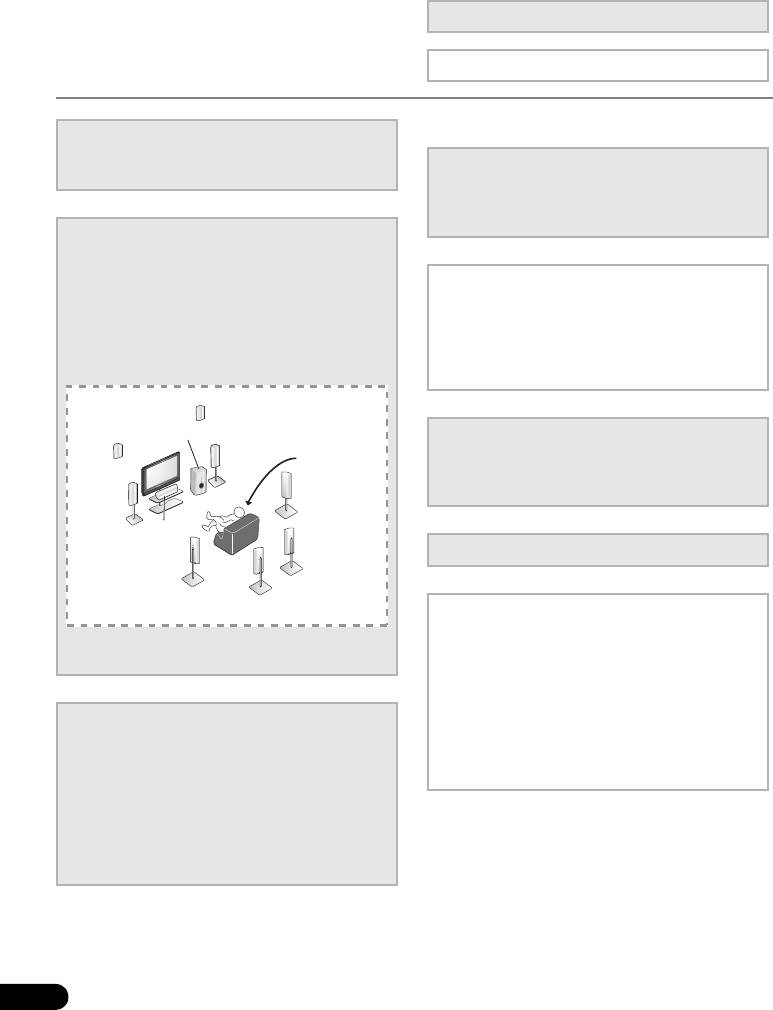
Connecting the speakers
Where you place the speakers will have a big
effect on the sound. Place your speakers as
5
The Pre Out Setting (page 42)
shown below for the best surround sound effect.
(When connecting the front height speakers.)
• Placing the speakers (page 16)
• Connecting the speakers (page 18)
The Input Assign menu (page 42)
• Connect the surround back or front height
(When using connections other than the
speakers (page 19)
recommended connections.)
*Front Height
Right (FHR)
*Front Height
Left (FHL)
Subwoofer (SW)
6
Use the automatic MCACC setup to set
Front
Listening
up your system
Right (R)
position
• Automatically setting up for surround sound
Surround
Front
Right (SR)
(MCACC) (page 27)
Left (L)
Center (C)
*Surround Back
7
Basic playback (page 29)
Right (SBR)
Surround
Left (SL)
*Surround Back
Left (SBL)
8
Adjusting the sound as desired
•Using the various listening modes
You can connect only one of either the surround back
• Using the Sound Retriever (page 33)
speaker or the front height speaker.
• Better sound using Phase Control (page 33)
• Using surround back channel processing
(page 34)
3
Connecting the components
• Setting the Up Mix function (page 35)
For surround sound, you’ll want to hook up
• Setting the Audio options (page 35)
using a digital connection from the BD/DVD
• Choosing the input signal (page 38)
player to the receiver.
• Manual speaker setup (page 39)
• About video outputs connection (page 21)
• Connecting a TV and playback components
(page 22)
• Connecting antennas (page 25)
• Plugging in the receiver (page 26)
6
En
