Pioneer DDJ-S1: Playing tracks and outputting the sound Monitoring sound with headphones Quitting the system
Playing tracks and outputting the sound Monitoring sound with headphones Quitting the system: Pioneer DDJ-S1
Table of contents
- DJ Controller
- Operating Environment POWER-CORD CAUTION
- IMPORTANT
- The Safety of Your Ears is in Your Hands ESTABLISH A SAFE LEVEL: BE SURE TO OBSERVE THE FOLLOWING GUIDELINES:
- IMPORTANT
- For Europe
- Contents
- Before start What’s in the box Installing the software Before installing the software About the installation procedure About the driver software (Windows) Installation Procedure (Windows) About the Serato DJ software
- Installation procedure (Mac OS X)
- Checking the version of the driver software About the driver software and setting utility software
- Basic Operation 3 Connect this unit to your computer via a USB cable. Connections 1 Connect headphones to one of the [PHONES] terminals. 4 Turn on the computer’s power. 5 Connect the power plug to the AC adapter. 2 Connect powered speakers, a power amplifier, components, etc., to the [MASTER OUT 1] or [MASTER OUT 2] terminals.
- 6 Connect the AC adapter. 7 Slide the [ON/OFF] switch to the [ON] side. 8 Turn on the power of the devices connected to the output terminals (powered speakers, power amplifier, components, etc.).
- Starting the system Launching Serato DJ
- Importing tracks Loading tracks and playing them
- Playing tracks and outputting the sound Monitoring sound with headphones Quitting the system
- Part names and functions Browser section Deck section
- Mixer section Microphone/External input control section Front panel Effect section
- About the AC adapter Safety instructions Mounting the power plug
- Power plug
- Additional information Acquiring the manual Downloading the latest version of these operating instructions About trademarks and registered trademarks Cautions on copyrights Specifications Downloading the Serato DJ software manual
- For U.S.A. and Canada
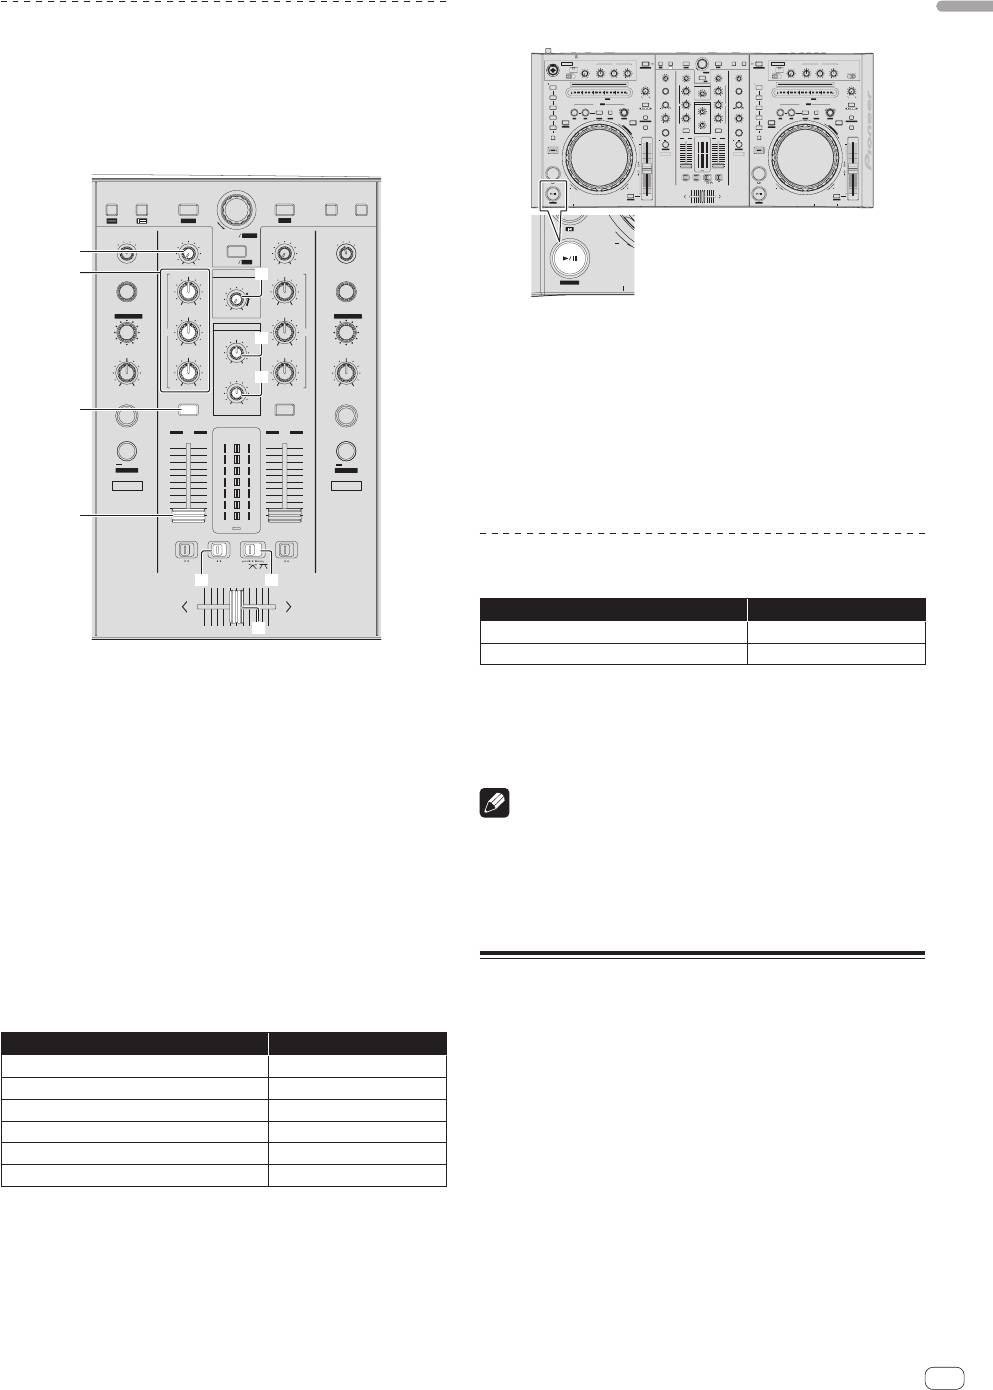
2 Press the [PLAY/PAUSE f (STUTTER)] button to
English
Playing tracks and outputting the sound
play the track.
The following describes the procedure for outputting the channel 1
OFF
ON
MIC 1
EQ
LOAD
CRATES FILES BROWSE PREPAREBACK
LOAD PREPARE
LOAD
OFFON
TALK
OVER
LEVEL
LOW
MID
HI
INST.DOUBLES
1
ZOOM
SAVE
INST.DOUBLES
2
MIC 2 / AUX
LEVEL
LOW
MID
EQ
FX CH SELECT
BMASTER
TRIM
BROWSE
AREA
TRIM
FX CH SELECT
BMASTER
OFFON
OVER
TALK
HI
SELECT
INPUT
AUXMIC 2
sound as an example.
HOT CUE
MIC 1
MAXMIN
MAXMIN
MAXMIN
MIN
MAX
A
/AUX
MIC
A
MIC
MAXMIN
PANEL
REC
/AUX
MAXMIN
HOT CUE
MAXMIN
MAXMIN
MAXMIN
MIN
MAX
SAMPLER
1
SPEED ADJUST
BRAKING
EFFECT SELECT
HI
MASTER
HI
EFFECT SELECT
SAMPLER
1
SPEED ADJUST
BRAKING
LEVEL
! Set the volume of the devices (power amplifier, powered speakers,
2
NEEDLE SEARCH /
ROLL
MINMAX
MID
MAXMIN
MINMAX
MID
2
NEEDLE SEARCH /
ROLL
3
IN
OUT
RELOOP /EXIT SELECT AUTO
LOOP/ GRID
JOG MODE
PARAMETER
HEADPHONES
PARAMETER
VINYL
EQ EQ
JOG MODE
MINMAX
MIXING
MINMAX
3
IN
OUT
RELOOP /EXIT SELECT AUTO
LOOP/ GRID
VINYL
etc.) connected to the [MASTER OUT 1] and [MASTER OUT 2]
2X1/2X
TEMPO
RANGE
LEVEL / DEPTH
LOW
MASTERCUE
LOW
LEVEL / DEPTH
2X1/2X
TEMPO
4
CENSOR
SET
TAP CLEAR LOCK
SLIDE
4
RANGE
SLIP
SET TAP CLEAR LOCK SLIDE
KEY LOCK
TEMPO RESET
REVERSE
G
R
I
MINMAX
MINMAX
LEVEL
MINMAX
CENSOR
SLIP
TEMPO RESET
terminals to an appropriate level. Note that loud sound will be output
5
MINMAX
A
D
KEY LOCK
D
SAMPLER MODE
U
J
S
REVERSE
G
R
T
ON / OFF
CUE
MAXMIN
CUE
ON / OFF
5
I
D
A
D
S
U
T
J
TAP/ AU TO
1
12
LEVEL
SAMPLER MODE
MASTER
2
10
10
TAP/ AU TO
if the volume is set too high.
SHIFT
FX MODE FX MODE
8
FX1
7
9
6
6
7
8
9
5
FX2
SHIFT
3
4
5
2
1
0
0
2
3
4
1
0
C.F.REV
0
CUE
FADER START
FADER START
CUE
ONOFF
C.F.REV
THRU
ONOFFONOFF
FWDREV
FWDREV
CRATES FILES BROWSE PREPAREBACK
LOAD PREPARE
SYNC
TEMPO
STUTTER
SYNC OFF
SYNC
TEMPO
PHONES
STUTTER
MIC/AUX THRU
SYNC OFF
MIC 2
ZOOM
SAVE
FX CH SELECT
TRIM
BROWSE
AREA
TRIM
FX CH SELECT
2MASTER
2MASTER
1
MIC
1
MIC
/AUX
/AUX
REV
4
MAXMIN
PANEL
REC
MAXMIN
5
EFFECT SELECT
HI
MASTER
7
HI
EFFECT SELECT
LEVEL
STUTTER
PHONES
BEATS
MINMAX
MINMAX
MAXMIN
BEATS
/
PARAMETER
MID
MID
/
PARAMETER
HEADPHONES
EQ EQ
MIXING
MINMAX
8
MINMAX
3 Move the channel fader away from you.
LEVEL / DEPTH
LOW
LOW
LEVEL / DEPTH
MASTERCUE
LEVEL
9
4 Turn the [TRIM] control.
MINMAX
MINMAX
Adjust [TRIM] so that the orange indicator on the channel level indicator
ON / OFF
ON / OFF
MAXMIN
6
CUE
CUE
lights at the peak level.
1
LEVEL
2
12
MASTER
TAP
10
10
5 Turn the [MASTER LEVEL] control to adjust the audio
9
9
TAP
AUTO
8
8
FX MODE
7
7
AUTO
FX MODE
level of the speakers.
6
6
5
5
FX1
FX2
Adjust the sound level output from the [MASTER OUT 1] and [MASTER
4
4
3
3
2
2
OUT 2] terminals to an appropriate level.
1
1
a
0
0
C.F.REV
FADER START
FADER START
ONOFF
Monitoring sound with headphones
C.F.REV
THRU
ONOFFONOFF
b
c
Set the positions of the controls, etc., as shown below.
Names of controls, etc. Position
d
HEADPHONES MIXING control Center
HEADPHONES LEVEL control Turned fully counterclockwise
4 TRIM control
1 Press the headphones [CUE] button for the channel 1.
5 EQ (HI, MID, LOW) controls
2 Turn the [HEADPHONES LEVEL] control.
6 Headphones CUE button
Adjust the sound level output from the headphones to an appropriate
level.
7 MASTER LEVEL control
8 HEADPHONES MIXING control
Note
This unit and the Serato DJ software include a variety of functions
9 HEADPHONES LEVEL control
enabling individualistic DJ performances. For details on the respective
a Channel fader
functions, see the Serato DJ software manual.
! The Serato DJ software manual can be downloaded from “Serato.
b C.F. REV switch
com”. For details, see Downloading the Serato DJ software manual (p.
20).
c Crossfader curve selector switch
d Crossfader
Quitting the system
1 Set the positions of the controls, etc., as shown
below.
1 Quit [Serato DJ].
Names of controls, etc. Position
When the software is closed, a message for confirming that you want to
close it appears on the computer’s screen. Click [Yes] to close.
MASTER LEVEL control Turned fully counterclockwise
TRIM control Turned fully counterclockwise
2 Slide the [ON/OFF] switch to the [OFF] side.
EQ (HI, MID, LOW) controls Center
3 Disconnect the USB cable from your computer.
Channel fader Moved forward
C.F. REV switch [OFF] position
Crossfader curve selector switch [THRU] position
En
15


