Pioneer DDJ-S1: Importing tracks Loading tracks and playing them
Importing tracks Loading tracks and playing them: Pioneer DDJ-S1
Table of contents
- DJ Controller
- Operating Environment POWER-CORD CAUTION
- IMPORTANT
- The Safety of Your Ears is in Your Hands ESTABLISH A SAFE LEVEL: BE SURE TO OBSERVE THE FOLLOWING GUIDELINES:
- IMPORTANT
- For Europe
- Contents
- Before start What’s in the box Installing the software Before installing the software About the installation procedure About the driver software (Windows) Installation Procedure (Windows) About the Serato DJ software
- Installation procedure (Mac OS X)
- Checking the version of the driver software About the driver software and setting utility software
- Basic Operation 3 Connect this unit to your computer via a USB cable. Connections 1 Connect headphones to one of the [PHONES] terminals. 4 Turn on the computer’s power. 5 Connect the power plug to the AC adapter. 2 Connect powered speakers, a power amplifier, components, etc., to the [MASTER OUT 1] or [MASTER OUT 2] terminals.
- 6 Connect the AC adapter. 7 Slide the [ON/OFF] switch to the [ON] side. 8 Turn on the power of the devices connected to the output terminals (powered speakers, power amplifier, components, etc.).
- Starting the system Launching Serato DJ
- Importing tracks Loading tracks and playing them
- Playing tracks and outputting the sound Monitoring sound with headphones Quitting the system
- Part names and functions Browser section Deck section
- Mixer section Microphone/External input control section Front panel Effect section
- About the AC adapter Safety instructions Mounting the power plug
- Power plug
- Additional information Acquiring the manual Downloading the latest version of these operating instructions About trademarks and registered trademarks Cautions on copyrights Specifications Downloading the Serato DJ software manual
- For U.S.A. and Canada
Importing tracks
The following describes the typical procedure for importing tracks.
! There are various ways to import tracks with the Serato DJ software. For details, see the Serato DJ software manual.
! If you are already using Serato DJ software (Scratch Live, ITCH or Serato DJ Intro) and have already created track libraries, the track libraries you
have previously created can be used as such.
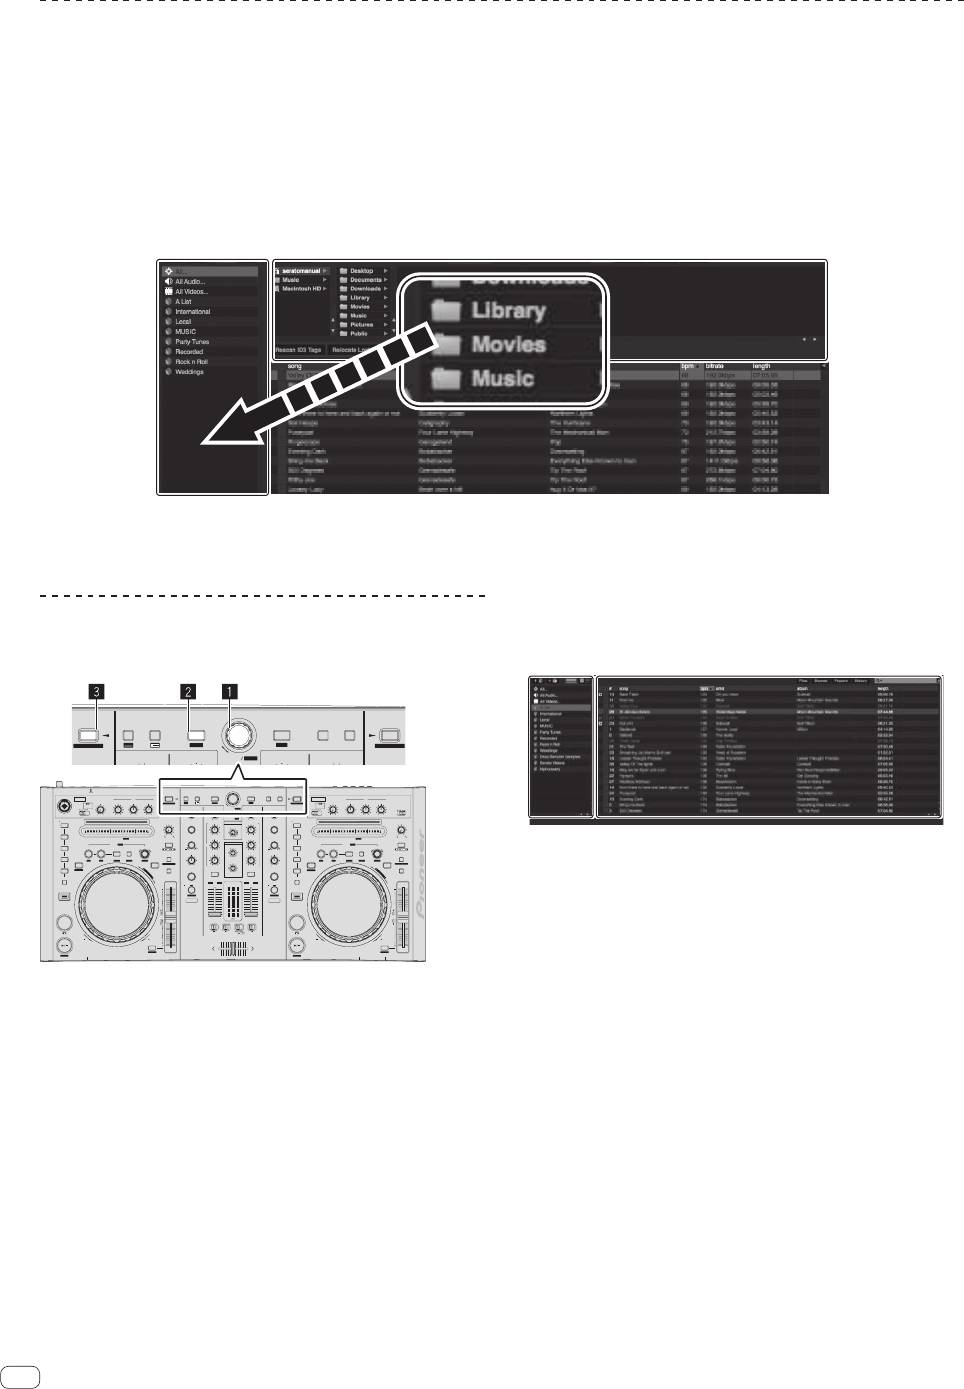
1 Click the [Files] key on the Serato DJ software screen to open the [Files] panel.
The contents of your computer or the peripheral connected to the computer are displayed in the [Files] panel.
2 Click the folder on the [Files] panel containing the tracks you want to add to the library to select it.
3 On the Serato DJ software screen, drag and drop the selected folder to the crates panel.
A crate is created and the tracks are added to the library.
a
b
a [Files] panel
b Crates panel
Loading tracks and playing them
The following describes the procedure for loading tracks into deck [1] as
an example.
LOAD
CRATES FILES BROWSE PREPAREBACK
LOAD
1
2
INST.DOUBLES
INST.DOUBLES
FX CH SELECT
TRIM
OFF
ON
MIC 1
EQ
LOAD
1
CRATES FILES BROWSE PREPAREBACK
LOAD PREPARE
LOAD
LEVEL
LOW
MID
HI
INST.DOUBLES
ZOOM
SAVE
INST.DOUBLES
2
MIC 2 / AUX
LEVEL
LOW
EQ
OFFON
MID
OVER
TALK
FX CH SELECT
OFFON
TALK
HI
SELECT
INPUT
MIC 1
MAXMIN
MAXMIN
MAXMIN
MIN
MAX
A
BMASTER
TRIM
BROWSE
AREA
FX CH SELECT
A
OVER
AUXMIC 2
/AUX
MIC
TRIM
BMASTER
/AUX
MIC
HOT CUE
MAXMIN
MAXMIN
MAXMIN
MIN
MAX
SAMPLER
SPEED ADJUST
BRAKING
EFFECT SELECT
HI
MAXMIN
PANEL
1
MASTER
REC
HI
MAXMIN
EFFECT SELECT
SAMPLER
HOT CUE
BRAKING
LEVEL
1
SPEED ADJUST
2
NEEDLE SEARCH /
ROLL
PARAMETER
MIN MAX
MID
MAXMIN
MINMAX
JOG MODE
MID
PARAMETER
2
NEEDLE SEARCH /
ROLL
JOG MODE
3
IN
OUT
RELOOP /EXIT SELECT AUTO
LOOP/ GRID
VINYL
EQ EQ
HEADPHONES
MIXING
3
IN
OUT
RELOOP /EXIT SELECT AUTO
LOOP/ GRID
VINYL
2X1/2X
RANGE
TEMPO
LEVEL / DEPTH
MIN MAX
LOW
MINMAX
LOW
LEVEL / DEPTH
4
MASTERCUE
2X1/2X
TEMPO
4
RANGE
CENSOR
SET
TAP CLEAR LOCK
SLIDE
TEMPO RESET
LEVEL
SET TAP CLEAR LOCK SLIDE
REVERSE
G
SLIP
KEY LOCK
MINMAX
MIN MAX
MINMAX
MINMAX
CENSOR
G
SLIP
5
R
I
D
KEY LOCK
TEMPO RESET
D
A
U
J
ON / OFF
T
S
CUE
MAXMIN
ON / OFF
R
I
D
SAMPLER MODE
CUE
5
REVERSE
D
A
SAMPLER MODE
U
J
T
S
TAP/ AUTO
1
MASTER
LEVEL
2
10
12
TAP/ AUTO
SHIFT
FX MODE FX MODE
9
10
7
8
9
FX1
6
7
8
SHIFT
5
4
5
6
FX2
2
3
3
4
1
2
1
0
0
C.F.REV
0
0
CUE
FADER START
FADER START
CUE
ONOFF
C.F.REV
THRU
ONOFFONOFF
FWDREV
FWDREV
SYNC OFF
SYNC
TEMPO
STUTTER
PHONES
STUTTER
MIC/AUX THRU
SYNC OFF
SYNC
TEMPO
MIC 2
14
En
A
BMASTER
MIC
LOAD PREPARE
ZOOM
SAVE
BROWSE
AREA
FX CH SELECT
A
BMASTER
MIC
2 Press the rotary selector, move the cursor to the
library on the computer’s screen, then turn the rotary
selector and select the track.
a
TRIM
b
a Library
b Crates panel
3 Press the [LOAD (INST.DOUBLES)] button to load the
selected track onto the deck.
1 Rotary selector
2 BACK (LIBRARY) button
3 LOAD (INST.DOUBLES) button
1 Press this unit’s [BACK (LIBRARY)] button, move the
cursor to the crates panel on the computer’s screen, then
turn the rotary selector to select the crate, etc.


