Asus ITX-220: 5 Router Setup
5 Router Setup: Asus ITX-220

iPBX30 User Manual
Chapter 5
5 Router Setup
This chapter describes how to congure the basic settings for your
router so that the computers on your LAN can communicate with
each other and have access to the Internet. The network setup
consists of LAN and WAN congurations.
5.1 LANConguration
5.1.1 LAN IP Address
If you are using iPBX30 with multiple PCs on your LAN, you must
connect your LAN to the Ethernet ports on the built-in Ethernet
switch. You must assign a unique IP address to each device
residing on your LAN. The LAN IP address that identifies the
iPBX30 as a node on your network must be in the same subnet as
the PCs on your LAN. The default LAN IP address for the iPBX30 is
192.168.1.1.
Denition: A network node can be thought of as any
interface where a device connects to the network,
such as the
iPBX30
’s LAN port and the network
interface cards on your PCs.
You can change the default IP address to reect the true IP address
that you want to use with your network.
5.1.2 LANCongurationParameters
The table below describes the conguration parameters available
for LAN IP conguration.
27
Chapter 5
iPBX30 User Manual
Table 5.1 LAN Conguration Parameters
Settings Description
Host Name For identication purpose only.
IP Address The LAN IP address of the iPBX30. This IP
address is used by your computers to identify
the iPBX30’s LAN port. Note that the public IP
address assigned to you by your ISP is not your
LAN IP address. The public IP address identies
the WAN port on the iPBX30 to the Internet.
Subnet Mask The LAN subnet mask identifies which parts of
the LAN IP Address refer to your network as a
whole and which parts refer specically to nodes
on the network. Your device is precongured with
a default subnet mask of 255.255.255.0.
5.1.3 ConguringtheLANIPAddress
Follow these steps to change the default LAN IP address.
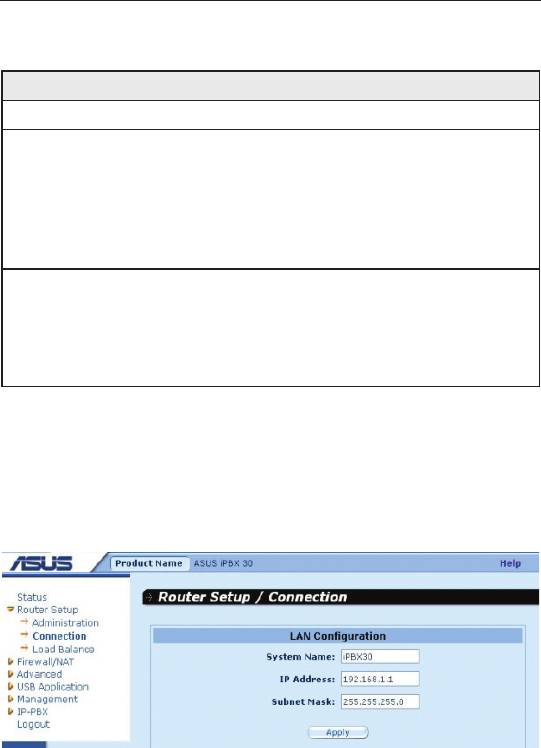
1. Click the
Router Setup -> Connection
menu to open the
Connection conguration page.
Figure 5.1 Network Setup Conguration- LAN Conguration
2. (Optional) Enter the host name for iPBX30. Note that the host
name is used for identication purpose only.
3. Enter the LAN IP address and subnet mask for the iPBX30 in
the space provided.
4. Proceed to the WAN Configuration section for instructions on
setting up the WAN port if you have not yet done so.
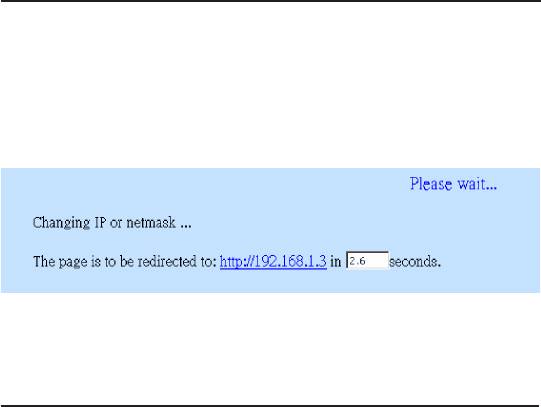
5. Click "
Apply
" to save the settings. If you were using an Ethernet
28
iPBX30 User Manual
Chapter 5
connection for the current session, and changed the IP address
or subnet mask, the connection will be terminated.
6. You will see the following message displayed as shown below.
7. You will be prompted to log back into the Web UI Management
once the timer elapses.
5.2 WAN/DMZConguration
This section describes how to congure WAN/DMZ settings for the
WAN interface on the iPBX30 that communicates with your ISP.
You’ll learn to congure the IP address, DHCP and DNS server for
your WAN in this section.
DMZ (short for demilitarized zone) is a host or a small network that
sits between a trustful internal network, such as a corporate private
LAN, and an untrusted external network, such as the Internet.
Typically, the DMZ contains devices accessible to the Internet
trafc, such as Web servers, FTP servers, SMTP (e-mail) servers
and DNS servers. The DMZ contains no corporate confidential
information. In the event that the DMZ is compromised, no other
company information will be exposed.
Note: Only static IP connection mode is supported for DMZ.
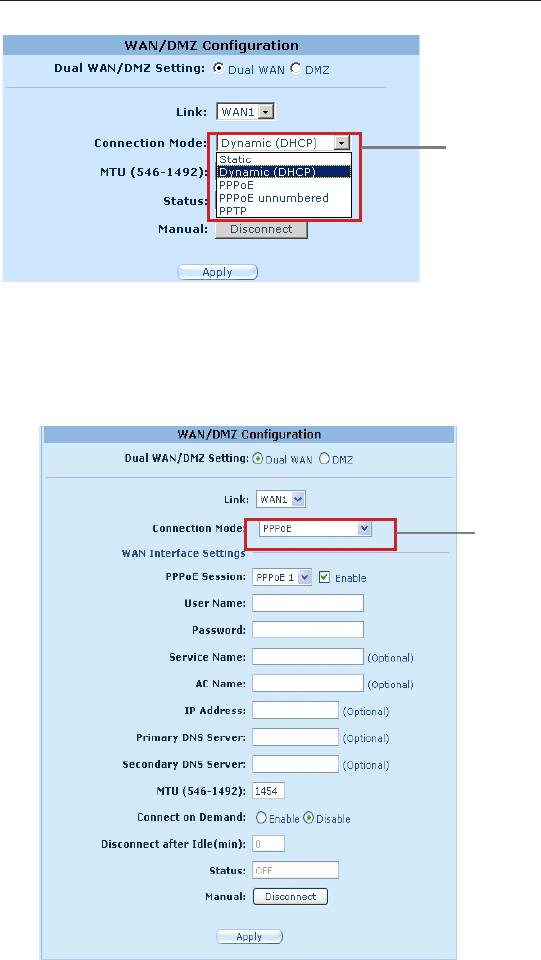
5.2.1 WAN Connection Mode
The iPBX30 supports five WAN connection modes – static IP,
dynamic IP, PPPoE (multi-session), PPPoE unnumbered, and
PPTP. You may select one of the WAN connection modes required
by your ISP from the Connection Mode drop-down list in the
Network Setup Conguration page.
29
Chapter 5
iPBX30 User Manual
Connection
Mode drop-
down list.
Figure 5.2 Network Setup Conguration Page-WAN Conguration
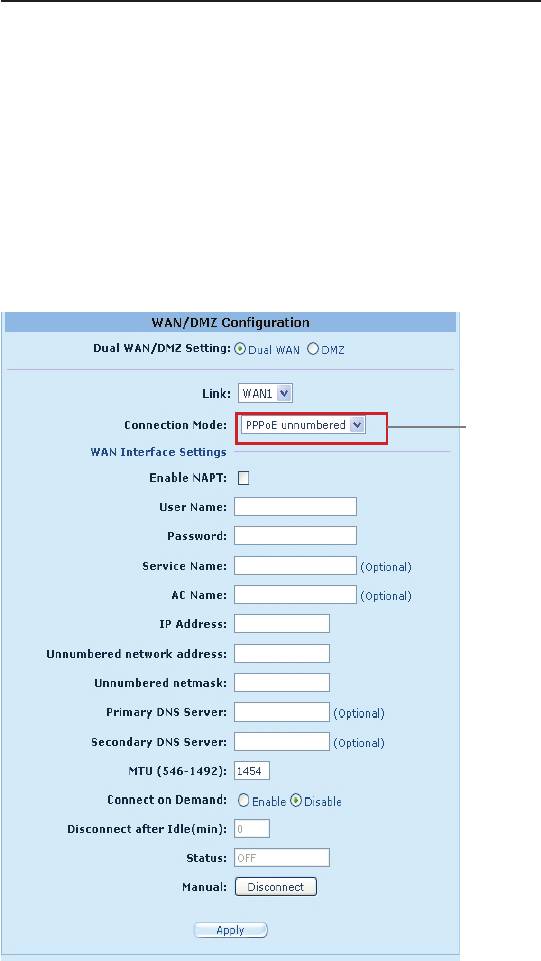
5.2.2 PPPoE
PPPoE connection is most often used by ADSL service providers.
Connection
Mode drop-
down list.
Figure 5.3. WAN – PPPoE Conguration
30

iPBX30 User Manual
Chapter 5
5.2.2.1 WANPPPoECongurationParameters
The table below describes the conguration parameters available
for the PPPoE connection mode.
Table 5.2. WAN PPPoE Conguration Parameters
Setting Description
Link Select a port to congure. Available options are WAN1, WAN2
or DMZ.
Connection
Select PPPoE from the connection mode drop-down list.
Mode
PPPoE
Select the PPPoE session ID for this PPPoE session. Note
that only two simultaneous PPPoE sessions are supported.
Session
Enable Check or uncheck this box to activate or de-activate this
PPPoE session.
User
Enter the username and password you use to log into your
ISP. (Note: this is different from the information you used to
N a m e a n d
log into the software application.)
Password
Service
Enter the service name provided by your ISP. Service name is
optional but may be required by some ISPs.
Name
AC Name Enter the access concentrator name provided by your ISP.
Access concentrator name is optional but may be required by
some ISPs.
IP Address If your ISP allows you to always obtain the same IP address
for your WAN, enter it here.
Primary /
IP address of the primary and/or secondary DNS are optional
as PPPoE will automatically detect the DNS IP addresses
Secondary
configured at your ISP. However, if there are other DNS
DNS Server
servers you would rather use, enter the IP addresses here.
MTU You may specify the maximum size of the transmitted packet.
For PPPoE, the range of MTU is from 546 to 1492. The
default value is 1454.
Disconnect
Enter the inactivity timeout period at which you want to
disconnect the Internet connection when there is no trafc. A
after idle
value of 0 means no activity time out. Note that SNTP service
(min.)
may interfere with this function if there are activities from the
service.
31

Chapter 5
iPBX30 User Manual
Setting Description
Connect on
Click on the Enable or Disable radio button to enable or
disable this option.
Demand
Status On: PPPoE connection is active.
Off: No PPPoE connection is active.
Connecting: iPBX30 is trying to connect to your ISP using
PPPoE connection mode.
Manual
Click the Disconnect or Connect button to disconnect or
connect using the PPPoE connection mode.
Disconnect/
Connect
5.2.2.2 ConguringPPPoEforWAN
Follow the instructions below to congure PPPoE settings:
1. Click the
Router Setup -> Connection
menu to open the
Network Setup conguration page.
2. Select which WAN port (WAN1/WAN2) to congure for PPPoE
connection mode.
3. Select
PPPoE
from the WAN Connection Mode drop-down list.
4. Select
PPPoE session ID
from the PPPoE session ID drop-
down list. Currently, two sessions are supported for each WAN
port.
5. Enter the service name if required by your ISP.
6. (Optional) Enter the service name or AC name, or both, if
required by your ISP.
7. (Optional) If your ISP allows you to always obtain the same IP
address for your WAN, enter it in the IP Address eld; otherwise,
skip this step.
8. (Optional) Enter the IP addresses for the primary and/or
secondary DNS servers if you want to use your preferred DNS
servers; otherwise, skip this step.
9. (Optional) Change the MTU value if necessary. If you do
not know what value to enter, leave it as is. For dynamic IP
32
iPBX30 User Manual
Chapter 5
connection mode, the range of MTU is from 546 to 1492. The
default value is 1454.
10.Enter the appropriate connection settings for “
Disconnect after
Idle (min)
” and “
Connect on Demand
”.
11.Click "
Apply
" to save the settings.
5.2.3 PPPoE Unnumbered
Some of the ADSL service providers may offer PPPoE unnumbered
service. Choose this connection mode if your ISP provides such
service.
Connection
Mode drop-
down list.
Figure 5.4. WAN – PPPoE Unnumbered Conguration
33

Chapter 5
iPBX30 User Manual
5.2.3.1 WANPPPoEUnnumberedCongurationParameters
The table below describes the conguration parameters available
for PPPoE Unnumbered connection mode.
Table 5.3. WAN PPPoE Unnumbered Conguration Parameters
Setting Description
Link Select a port to configure. Available options are WAN1,
WAN2 or DMZ.
Connection
Select PPPoE Unnumbered from the connection mode
drop-down list. Traditionally, each network interface must
Mode
have a unique IP address. However, an unnumbered
interface does not have to have a unique IP address. This
means that when this option is selected, the WAN and the
LAN use the same IP address. Network resources are
therefore conserved because fewer network IP addresses
are used and routing table is smaller.
Enable NAPT Check or uncheck this box to enable NAPT for this
connection.
User Name and
Enter the username and password you use to log into your
ISP. (Note: this is different from the information you used to
Password
log into Web UI Management.)
Service Name Enter the service name provided by your ISP. Service name is
optional but may be required by some ISPs.
AC Name Enter the access concentrator name provided by your ISP.
Access concentrator name is optional but may be required
by some ISPs.
IP Address Enter a static IP address here for the PPPoE unnumbered
connection. This IP address must be provided by your
service provider.
Unnumbered
Enter the network address provided by your ISP.
Network
Address
Primary /
IP address of the primary or secondary DNS are optional
as PPPoE will automatically detect the DNS IP addresses
Secondary DNS
configured at your ISP. However, if there are other DNS
Server
servers you would rather use, enter the IP addresses here.
34

iPBX30 User Manual
Chapter 5
Setting Description
MTU You may specify the maximum size of the transmitted
packet. For PPPoE, the range of MTU is from 546 to 1492.
The default value is 1454.
Disconnect after
Enter the inactivity timeout period at which you want to
Idle (min.)
disconnect the Internet connection when there is no trafc.
A value of 0 means no activity time out. Note that SNTP
service may interfere with this function if there are activities
from the service.
Connect on
Click on the Enable or Disable radio button to enable or
disable this option.
Demand
Status On: PPPoE unnumbered connection is active.
Off: No PPPoE unnumbered connection is active.
Connecting: iPBX30 is trying to connect to your ISP using
PPPoE unnumbered connection mode.
Manual
Click the Disconnect or Connect button to disconnect or
connect using the PPPoE unnumbered connection mode.
Disconnect/
Connect
5.2.3.2 ConguringPPPoEUnnumberedforWAN
Follow the instructions below to configure PPPoE unnumbered
settings:
1. Click the
Router Setup -> Connection
menu to open the
Network Setup conguration page.
2. Select which WAN port (WAN1/WAN2) to congure for PPPoE
unnumbered connection mode.
3. Select
PPPoE Unnumbered
from the WAN Connection Mode
drop-down list.
4. Check
NAPT
box if NAT is to be used for this connection.
5. Enter user name and password provided by your ISP
6. (Optional) Enter the service name and/or AC name if required by
your ISP.
7. Enter the IP address, unnumbered network address, and
unnumbered netmask provided by your ISP.
35
Chapter 5
iPBX30 User Manual
8. (Optional) Enter the IP addresses for the primary or secondary
DNS servers, or both, if you want to use your preferred DNS
servers; otherwise, skip this step.
9. (Optional) Change the MTU value if necessary. If you do
not know what value to enter, leave it as is. For dynamic IP
connection mode, the range of MTU is from 546 to 1492. The
default value is 1454.
10.Enter appropriate connection settings for
Disconnect after Idle
(min)
and
Connect on Demand
.
11.Click
Apply
to save the settings.
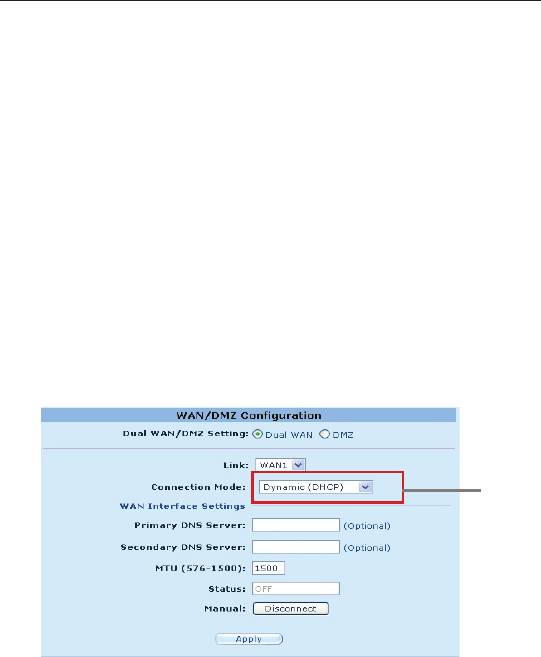
5.2.4 Dynamic IP
Dynamic IP is most often used by the cable modem service
providers.
Connection
Mode drop-
down list.
Figure 5.5. WAN – Dynamic IP (DHCP client) Conguration
5.2.4.1 ConguringDynamicIPforWAN
Follow the instructions below to congure dynamic IP settings:
1. Open the
Network Setup
configuration page by clicking the
Router Setup -> Connection
menu.
2. Select which WAN port (WAN1/WAN2) to congure for dynamic
connection mode.
3. Select
Dynamic
from the Connection Mode drop-down list. Note
that the IP addresses for the primary and/or the secondary DNS
servers are automatically assigned by the DHCP server of your
36
iPBX30 User Manual
Chapter 5
ISP.
4. (Optional) Change the MTU value if necessary. If you do
not know what value to enter, leave it as is. For dynamic IP
connection mode, the range of MTU is from 576 to 1500. The
default value is 1500.
5. Click
Apply
to save the settings.
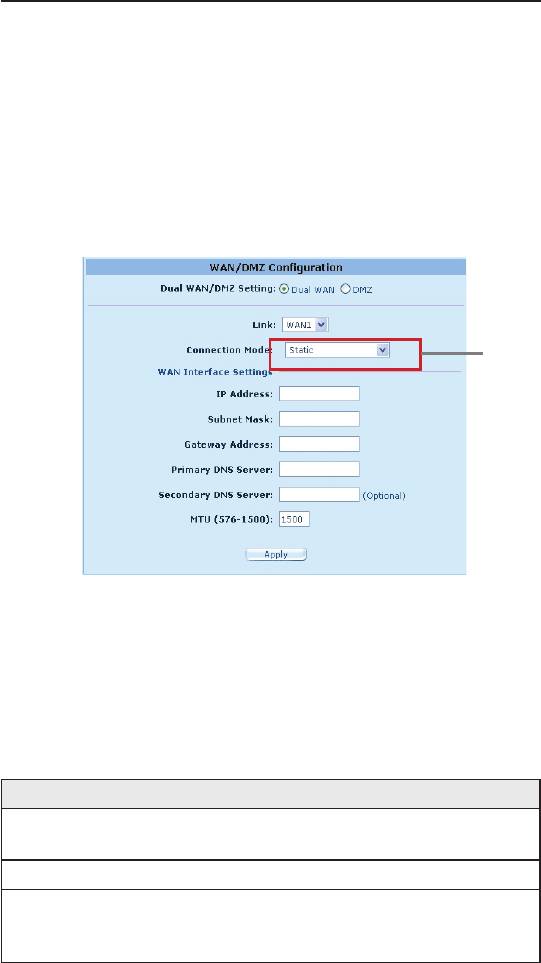
5.2.5 Static IP
Connec-
tion Mode
drop-down
list.
Figure 5.6. WAN – Static IP Conguration
5.2.5.1 WANorDMZStaticIPCongurationParameters
The table below describes the conguration parameters available
for static IP connection mode.
Table 5.4. WAN Static IP Conguration Parameters
Setting Description
Select a port to congure. Available options are WAN1/
Link
WAN2 or WAN/DMZ.
Connection Mode Select Static from the connection mode drop-down list.
WAN/DMZ IP address. Please note that WAN IP
IP Address
address is a public IP address provided by your ISP
while DMZ IP address is a private IP address.
37

Chapter 5
iPBX30 User Manual
Setting Description
WAN/DMZ subnet mask. Typically, it is set as
Subnet Mask
255.255.255.0.
Gateway IP address provided by your ISP. It must be in
Gateway Address
the same subnet as the WAN on the
iPBX30
.
Primary/ Secondary
You must at least enter the IP address of the primary
DNS Server
DNS server. Secondary DNS server is optional
You may specify the maximum size of the transmitted
MTU
packet. For static IP connection, the range of MTU is
from 576 to 1500. The default value is 1500.
5.2.5.2 ConguringStaticIPforWANorDMZ
Follow the instructions below to congure static IP settings:
1. Click the
Router Setup -> Connection
menu to open the
Network Setup
conguration page.
2. Select which WAN port (WAN1/WAN2) or DMZ port to congure
for the static connection mode.
3. Select
Static
from the Connection Mode drop-down list.
4. Enter WAN IP address in the IP Address eld. This information
should be provided by your ISP.
5. Enter Subnet Mask for the WAN. This information should be
provided by your ISP. Typically, it is 255.255.255.0.
6. Enter gateway address provided by your ISP in the space
provided.
7. Enter the IP address of the primary DNS server. This information
should be provided by your ISP. Secondary and third DNS
servers are optional.
8. (Optional) Change the MTU value if necessary. If you do
not know what value to enter, leave it as it is. For static IP
connection mode, the range of MTU is from 576 to 1500. The
default value is 1500.
9. Click
Apply
to save the settings
38

iPBX30 User Manual
Chapter 5
5.2.6 PPTP
Some service providers require user to login using PPTP
connection.
5.2.6.1 WANPPTPCongurationParameters
The table below describes the conguration parameters available
for PPTP connection mode.
Table 5.5. WAN PPTP Conguration Parameters
Setting Description
Link Select a port to configure. Available options are WAN1,
WAN2 or DMZ.
Connection
Select PPTP from the connection mode drop-down list.
Mode
WAN Interface
Select how WAN IP address is to be configured – static
IP
(manually set the IP address) or dynamic (obtained
automatically from the DHCP server).
Static Choose this connection mode if the WAN IP is a fixed IP
provided by your ISP.
IP Address Enter the WAN IP address provided by your ISP.
Subnet Mask Enter the subnet mask for the WAN IP provided by your ISP.
Gateway
Enter the gateway IP address for the WAN provided by your
ISP.
Address
Dynamic
Select this connection mode if your WAN IP address is
obtained automatically from your ISP’s DHCP server.
(DHCP)
User Name and
Enter the username and password you use to log into your
Password
ISP. (Note: this is different from the information you used to
log into the software application.)
Server IP
Enter the PPTP server IP address provided by your ISP.
Address
MTU You may specify the maximum size of the transmitted packet.
For PPTP, the range of MTU is from 546 to 1460. The default
value is 1460.
Connect on
Click on the Enable or Disable radio button to enable or
disable this option.
Demand
39

Chapter 5
iPBX30 User Manual
Setting Description
Disconnect after
Enter the inactivity timeout period at which you want to
Idle (min)
disconnect the Internet connection when there is no trafc.
A value of 0 means no activity time out. The SNTP service
may interfere with this function if there are activities from the
service.
Status On: PPTP connection is active.
Off: No PPTP connection is active.
Connecting:
iPBX30
is trying to connect to your ISP using
PPTP connection mode.
Manual
Click the Disconnect or Connect button to disconnect or
connect using the PPTP connection mode.
Disconnect/
Connect
Figure 5.7. WAN – PPTP Conguration
40

iPBX30 User Manual
Chapter 5
5.2.6.2 ConguringPPTPforWAN
Follow the instructions below to congure the PPTP settings:
1. Click the
Router Setup ->Connection
menu to open the
Network Setup conguration page.
2. Select which WAN port (WAN1/WAN2) to configure for PPTP
connection mode.
3. Select
PPTP
from the
WAN Connection Mode
drop-down list.
4. Select how WAN IP is to be obtained – static or dynamic. If
your ISP provides a xed IP address, select
Static
in the WAN
Interface IP drop-down list. Consult with your ISP if you have no
idea.
5. Enter IP address, subnet mask and gateway IP address for your
WAN if your WAN IP is to be set manually.
6. Enter user name and password provided by your ISP.
7. Enter PPTP server IP address provided by your ISP.
8. (Optional) Change the MTU value if necessary. If you do not
know what value to enter, leave it as is. For PPTP connection
mode, the range of MTU is from 546 to 1460. The default value
is 1460.
9. Check MPPE box if the packet is to be encrypted with this
protocol.
10.Enter the appropriate connection settings for
Disconnect after
Idle (min)
and
Connect on Demand
.
11.Click
Apply
to save the settings.
5.3 WAN Load Balancing and Line Back Up
iPBX30 supports load balancing and line back up on the WAN
connection. This function is available only when “
Dual-WAN
” is
selected in the Router Connection conguration page (accessible
by clicking the
Router Setup ->Connection
menu).
WAN load balancing distributes communication activities across
the two WANs on iPBX30 based on the precongured bandwidth
requirement on the WANs. Another feature supported is fail-over for
41

Chapter 5
iPBX30 User Manual
the WAN ports. If one of the WAN links is down, iPBX30 will direct
the trafc destined for the downed WAN port to the still active WAN
port.
The line back up function is another feature supported to ensure
uninterrupted Internet access. When the primary WAN link is down,
the Internet access is automatically switched to the backup WAN
link.
5.3.1 WAN Load Balancing and Line Back Up
CongurationParameters
The table below describes the conguration parameters available
for WAN load balancing and line back up.
Table 5.6. WAN Load Balancing and Line Back Up
Conguration Parameters
Setting Description
Load Balance Select one of the three available options:
Disable: disable both the WAN load balancing and line
back up functionalities.
Auto Mode: select this option if load balancing is desired.
The algorithm used for the load balancing is weighted
round robin. This option includes the functionality off line
backup. It is recommended that this option be selected.
Line Backup: select this option if line backup is needed. In
the existing implementation, the primary link is always set
to WAN1 and the backup link is always set to WAN2.
W A N 1 / W A N 2
Enter the ratio of the traffic amount that you want to
Bandwidth
distribute between the WANs. The number should be
between 0 to 100%. For example, 80% for WAN1 and 20%
for WAN2 means 80% of the traffic is directed to WAN1
and 20% of the trafc is directed to WAN2.
C o n n e c t i v i t y
Click Enable or Disable radio button to enable or disable
Check
this feature. Connectivity check is used to monitor the link
status for the WAN ports. If this option is disabled, iPBX30
will not perform fail-over; this means that if one of the WAN
links is down, the trafc directed to the downed link will not
be re-directed to the active link. It is recommended that you
keep this option enabled. However, if the gateway or the
specic network device that will be checked for connectivity
does not respond to ping, you
42
iPBX30 User Manual
Chapter 5
Setting Description
C o n n e c t i v i t y
will need to disable this feature. Otherwise,
iPBX30
will
Check (Cont.)
make incorrect judgment regarding the WAN link status
and thus affect the behavior of the load balancing or line
back up.
C o n n e c t i v i t y
The interval that
iPBX30
will check for the WAN link
Check Interval
status. The allowable value is 1 to 60 seconds.
C o n n e c t i v i t y
Enter the IP address of the specific network device that
Check IP Address
the trafc will pass through. This eld is optional. Normally,
(WAN1)
you don’t need to provide any IP address here, unless you
know the trafc must pass a specic network device.
C o n n e c t i v i t y
Enter the IP address of the specific network device that
Check IP Address
the trafc will pass through. This eld is optional. Normally,
(WAN2)
you don’t need to provide any IP address here, unless you
know the trafc must pass a specic network device.
5.3.2 Setting Up WAN Load Balancing and Line
Back Up
Figure 5.8. Load Balancing Conguration
43

Chapter 5
iPBX30 User Manual
Follow the instructions below to set up WAN load balancing:
1. Click the
Router Setup ->Load Balance
menu to open the
Load Balancing conguration page.
2. Select
Auto Mode
in the Load Balance eld.
3. Enter the ratio of the trafc amount that you want to distribute
between the two WANs. The allowable value is from 0 to 100%.
The sum of the two numbers is 100%.
4. Select whether you need to enable or disable connectivity
check. If this option is enabled, please also enter the following:
a) Enter the connectivity check interval.
b) (Optional) Enter the connectivity check IP address for WAN1
and/or WAN2.
5. Click
Apply
to save the settings.
5.3.3 Setting Up WAN Line Back Up
Follow the instructions below to set up line backup:
1. Click the
Router Setup ->Load Balance
menu to open the
Load Balancing conguration page.
2. Select “
Line Backup
” in the Load Balance eld.
3. Select whether you need to enable or disable connectivity
check. If this option is enabled, please also enter the following:
a) Enter the connectivity check interval.
b) (Optional) Enter the connectivity check IP address for WAN1
and/or WAN2.
4. Click
Apply
to save the settings.
44
Оглавление
- List of Figures
- List of Tables
- Chapter 1 Introduction
- Chapter 2 Getting to Know your iPBX30
- 3 Quick Start Guide
- 4 Using the Web UI Management
- 5 Router Setup
- 6 DHCPServerConguration
- 7 Routing
- 8 ConguringDDNS
- 9 ConguringFirewallandNAT
- 10 USB Application
- 11 System Management
- 12 SIP IP-PBX
- 13 IP Addresses, Network Masks, and Subnets
- 14 Troubleshooting
- 15 Index
