Asus ITX-220: 3 Quick Start Guide
3 Quick Start Guide: Asus ITX-220

Chapter 3
iPBX30 User Manual
3 Quick Start Guide
This chapter provides basic instructions for connecting the iPBX30
to a computer or a network and to the Internet.
• Part 1 provides instructions to set up the hardware.
• Part 2 describes how to configure Internet properties on your
computer(s).
• Part 3 shows you how to congure basic settings on the iPBX30
to get your LAN connected to the Internet.
This chapter assumes that you have already established ADSL
or cable modem service with your Internet service provider (ISP).
These instructions provide a basic configuration that should be
compatible with your home or small ofce network setup. Refer to
the subsequent chapters for additional conguration instructions.
Note: To verify that your setup is working properly,
refer to “3.3.2 Testing Your Setup”.
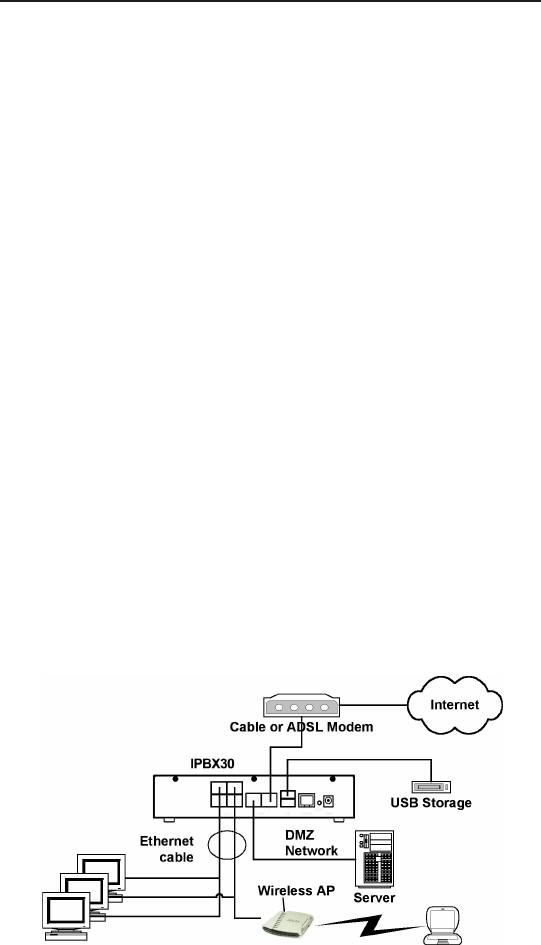
3.1 Part 1 — Connecting the Hardware
This section instructs you on how to connect the device to an ADSL
or a cable modem (which in turn is connected to a phone jack or a
cable outlet), the power outlet, and your computer or network.
Warning: Before you begin, power off all devices,
including your computer(s), your LAN hub/ switch (if
applicable), and the iPBX30.
Follow the steps that follow for specic instructions.
3.1.1 Step 1. Connecting an ADSL or a cable
modem
For the iPBX30: Connect one end of the Ethernet cable to the port
labeled WAN on the rear panel of the device. Connect the other
end to the Ethernet port on the ADSL or cable modem.
12
iPBX30 User Manual
Chapter 3
3.1.2 Step 2. Connecting computers or a Network.
If your LAN has no more than four computers, use Ethernet cables
to connect computers directly to the built-in switch on the device.
You should attach one end of the Ethernet cable to any of the port
labeled 1 – 4 on the rear panel of the router and connect the other
end to the Ethernet port of a computer.
If your LAN has more than four computers, attach one end of an
Ethernet cable to a hub or a switch (probably an uplink port; refer to
the hub or switch documentations for instructions) and the other to
the Ethernet switch port (labeled 1 – 4) on the iPBX30.
You can use either crossover or straight-through Ethernet cables to
connect the built-in switch and computers, hubs or switches as the
built-in switch allows connections with either type of cables.
3.1.3 Step 3. Attaching the AC adapter.
Attach the AC adapter to the POWER input jack on the back of the
device and plug in the adapter to a wall outlet or a power strip.
3.1.4 Step 4. Powering on iPBX30, the ADSL or cable
modem and power up your computers
Plug the AC adapter to the power input jack of iPX30. Turn on your
ADSL or cable modem. Turn on and boot up your computer(s) and
any LAN devices such as wireless AP, hubs or switches.
Figure 3.1 Hardware Connections Overview
13

Chapter 3
iPBX30 User Manual
You should verify the status of the LEDs as indicated in the table below.
Table 3.1 LED Indicators
LED Status
POWER Solid green indicating that the device is ON.
If this light is not on, check if the AC adapter is
attached to the iPBX30, and if it is plugged into a
power source.
LAN LEDs S oli d gr een i ndi cat ing tha t the device c an
communicate with your LAN.
Flashing when the device is sending or receiving
data to or from your LAN computer(s).
WAN So lid green in dic ati ng th at t he de vic e has
successfully established a connection with your
ISP.
Flashing when the device is sending or receiving
data to/from the Internet.
3.2 Part2—ConguringYourComputers
This section provides instructions for conguring the network settings
on your computers to work with the iPBX30.
3.2.1 Before you begin
By default, the iPBX30 automatically assigns all required network
settings (e.g. IP address, DNS server IP address, default gateway
IP address) to your PCs. You need only to congure your PCs to
accept the network settings provided by the iPBX30.
Note: In some cases, you may want to configure
network settings manually to some or all of your
computers rather than allow the iPBX30 to do so.
See page 18 for instructions.
• If you have connected your PC via Ethernet to the iPBX30,
follow the instructions that correspond to the operating
system installed on your PC.
14

iPBX30 User Manual
Chapter 3
3.2.2 Windows® XP PC:
1. In the Windows task bar, click the <
Start
> button, and then click
Control Panel.
2. Double-click the
Network
Connections icon.
3. In the LAN or High-Speed Internet window, right-click on icon
corresponding to your network interface card (NIC) and select
Properties
. (Often this icon is labeled Local Area Connection).
The Local Area Connection dialog box displays with a list of
currently installed network items.
4. Ensure that the check box to the left of the item labeled Internet
Protocol TCP/IP is checked, and click <
Properties
> button.
5. In the Internet Protocol (TCP/IP) Properties dialog box, click
the radio button labeled
Obtain an IP address automatically
.
Also click the radio button labeled
Obtain DNS server address
automatically
.
6. Click <
OK
> button twice to conrm your changes, and close the
Control Panel.
3.2.3 Windows® 2000 PC:
First, check for the IP protocol and, if necessary, install it:
1.In the Windows task bar, click the <
Start
> button, point to
Settings, and then click
Control Panel
.
2. Double-click the
Network and Dial-up Connections
icon.
3. In the Network and Dial-up Connections window, right-click the
Local Area Connection
icon, and then select
Properties
.
The Local Area Connection Properties dialog box displays
a list of currently installed network components. If the list
includes Internet Protocol (TCP/IP), then the protocol has
already been enabled. Skip to step 10.
4. If Internet Protocol (TCP/IP) does not display as an installed
component, click <
Install
> button.
5. In the Select Network Component Type dialog box, select
Protocol, and then click <
Add
> button.
15

Chapter 3
iPBX30 User Manual
6. Select
Internet Protocol (TCP/IP)
in the Network Protocols list,
and then click <
OK
> button.
You may be prompted to install les from your Windows 2000
installation CD or other media. Follow the instructions to install
the les.
7. If prompted, click <
OK
> button to restart your computer with the
new settings.
Next, congure the PCs to accept IP addresses assigned by
the iPBX30:
8. In the Control Panel, double-click the
Network and Dial-up
Connections
icon.
9. In Network and Dial-up Connections window, right-click the
Local Area Connection
icon, and then select
Properties
.
10.In the Local Area Connection Properties dialog box, select
Internet Protocol (TCP/IP)
, and then click <
Properties
>
button.
11.In the Internet Protocol (TCP/IP) Properties dialog box, click the
radio button labeled
Obtain an IP address automatically
. Also
click the radio button labeled
Obtain DNS server address
automatically
.
12.Click <
OK
> button twice to conrm and save your changes, and
then close the Control Panel.
3.2.4 Windows® 95, 98, and ME PC
1. In the Windows task bar, click the <
Start
> button, point to
Settings
, and then click
Control Panel
.
2. Double-click the Network icon.
In the Network dialog box, look for an entry started with “
TCP/
IP ->
” and the name of your network adapter, and then click
<
Properties
> button. You may have to scroll down the list to
nd this entry. If the list includes such an entry, then the TCP/
IP protocol has already been enabled. Skip to step 8.
3. If Internet Protocol (TCP/IP) does not display as an installed
component, click <
Add
> button.
16

iPBX30 User Manual
Chapter 3
4. In the Select Network Component Type dialog box, select
Protocol, and then click <
Add
> button.
5. Select Microsoft in the Manufacturers list box, and then click
TCP/IP in the Network Protocols list, box and then click <
OK
>
button.
You may be prompted to install les from your Windows 95, 98
or Me installation CD or other media. Follow the instructions to
install the les.
6. If prompted, click <OK> button to restart your computer with the
new settings.
Next, congure the PCs to accept IP information assigned by
the iPBX30:
7. In the Control Panel, double-click the Network icon.
8. In the Network dialog box, select an entry started with “
TCP/
IP ->
” and the name of your network adapter, and then click
<
Properties
> button.
9. In the TCP/IP Properties dialog box, click the radio button
labeled
Obtain an IP address automatically
.
10.In the TCP/IP Properties dialog box, click the “
Default
Gateway
” tab. Enter
192.168.1.1
(the default LAN port IP
address of the iPBX30) in the “
New gateway
” address field
and click <
Add
> button to add the default gateway entry.
11. Click <
OK
> button twice to confirm and save your changes,
and then close the Control Panel.
12. If prompted to restart your computer, click <
OK
> button to do
so with the new settings.
3.2.5 Windows® NT 4.0 workstation:
First, check for the IP protocol and, if necessary, install it:
1. In the Windows NT task bar, click the <
Start
> button, point to
Settings
, and then click
Control Panel
.
2. In the Control Panel window, double click the
Network
icon.
3. In the Network dialog box, click the
Protocols
tab.
17

Chapter 3
iPBX30 User Manual
The Protocols tab displays a list of currently installed network
protocols. If the list includes TCP/IP Protocol, then the protocol
has already been enabled. Skip to step 9.
4. If TCP/IP does not display as an installed component, click
<
Add
> button.
5. In the Select Network Protocol dialog box, select TCP/IP, and
then click <
OK
> button.
You may be prompted to install files from your Windows NT
installation CD or other media. Follow the instructions to install
the les.
After all les are installed, a window displays to inform you that
a TCP/IP service called DHCP can be set up to dynamically
assign IP information.
6. Click <
Yes
> button to continue, and then click <
OK
> button if
prompted to restart your computer.
Next, congure the PCs to accept IP addresses assigned by
the iPBX30:
7. Open the
Control Panel
window, and then double-click the
Network
icon.
8. In the Network dialog box, click the
Protocols
tab.
9. In the Protocols tab, select
TCP/IP
, and then click <
Properties
>
button.
10.In the Microsoft TCP/IP Properties dialog box, click the radio
button labeled
Obtain an IP address from a DHCP server
.
11. Click <
OK
> button twice to confirm and save your changes,
and then close the Control Panel.
3.2.6 Assigning static IP addresses to your PC
In some cases, you may want to assign IP addresses to some or all
of your PCs directly (often called “statically”), rather than allowing
the iPBX30 to assign them. This option may be desirable (but not
required) if:
• You have obtained one or more public IP addresses that
you want to always associate with specic computers (for
18

iPBX30 User Manual
Chapter 3
example, if you are using a computer as a public web
server).
• You maintain different subnets on your LAN.
However, during the first time configuration of your iPBX30, you
must assign an IP address in the 192.168.1.0 network for your PC,
for example, 192.168.1.2, in order to establish connection between
the iPBX30 and your PC as the default LAN IP on iPBX30 is pre-
configured as 192.168.1.1. Enter 255.255.255.0 for the subnet
mask and 192.168.1.1 for the default gateway. These settings may
be changed later to reect your true network environment.
On each PC to which you want to assign static information, follow
the instructions on pages 15 through 18 relating only to checking
for and/or installing the IP protocol. Once it is installed, continue to
follow the instructions for displaying each of the Internet Protocol
(TCP/IP) properties. Instead of enabling dynamic assignment of the
IP addresses for the computer, DNS server, and default gateway,
click the radio buttons that enable you to enter the information
manually.
Note: Your PCs must have IP addresses that place
them in the same subnet as the
iPBX30
’s LAN port.
If you manually assign IP information to all your LAN
PCs, you can follow the instructions in Chapter 5 to
change the LAN port IP address accordingly.
3.3Part3—QuickCongurationoftheiPBX30
In this section, you log into the Web UI Management on the iPBX30
and configure the basic settings for your router. Your ISP should
provide you with the necessary information to complete this step.
Note the intent here is to quickly get the iPBX30 up and running,
instructions are concise. You may refer to corresponding chapters
for more details.
3.3.1 Setting Up the iPBX30
Follow these instructions to setup the iPBX30:
12.Before accessing the Web UI Management in iPBX30, make
sure that the HTTP proxy setting is disabled in your browser. In
IE, click “Tools” -> “Internet Options...” -> “Connections” tab ->
“LAN settings...” and then uncheck “Use proxy server for your
19
Chapter 3
iPBX30 User Manual
LAN ...”
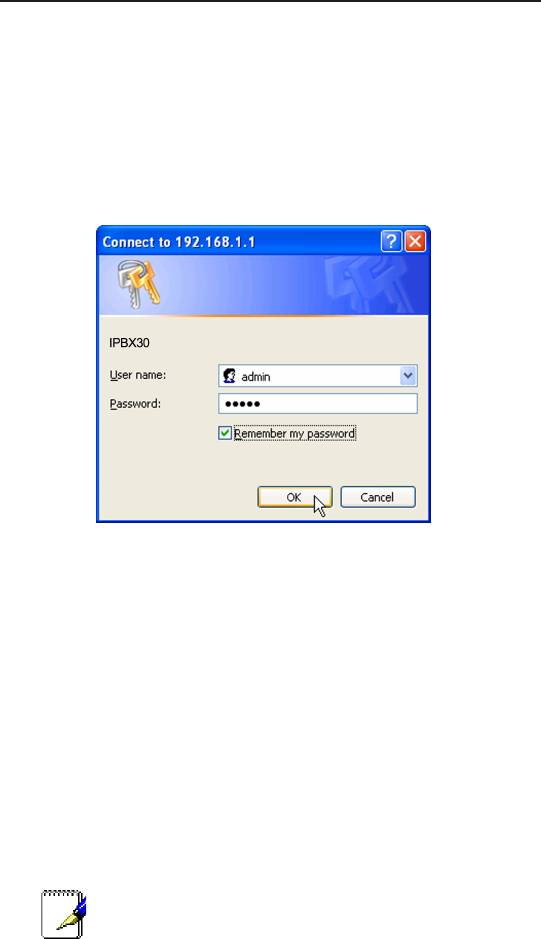
13.On any PC connected to one of the four LAN ports on the
iPBX30, open your Web browser, and type the following URL in
the address/location box, and press <Enter>:
http://192.168.1.1
This is the predened IP address for the LAN port on the iPBX30.
Figure 3.2 Login Screen
If you encounter problems connecting to the iPBX30, check the
following items:
a.Check if your PC is congured to accept IP address assignment
from the iPBX30.
b.Set the IP address of your PC to any IP address in the
192.168.1.0 network, such as 192.168.1.2.
14.Enter your username and password, and then click "OK" to
enter the Web UI Management. The rst time you log into this
program, use these defaults:
Default Username: admin
Default Password: admin
You can change the password at any time (see
section 11.2).
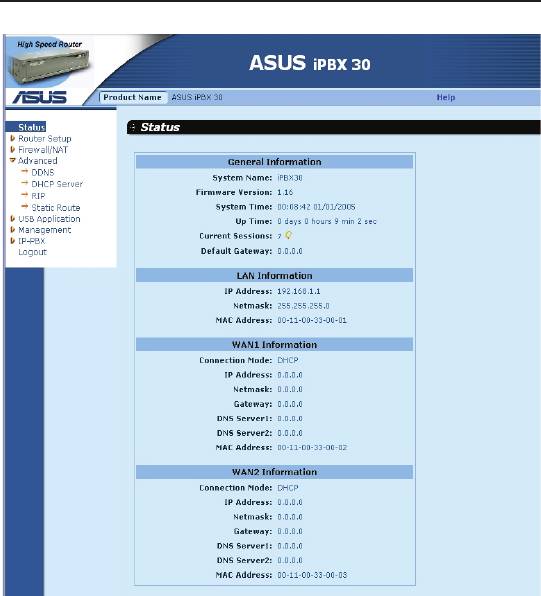
The System Information page appears each time you log into the
Web UI Management (shown in Figure 3.3).
20
iPBX30 User Manual
Chapter 3
Figure 3.3 System Status Page
15. Follow the instructions described in Chapter 5 “Router Setup” to
set up the LAN and WAN settings for iPBX30.
After completing the basic configuration for iPBX30, read the
following section to determine if you can access the Internet.
3.3.2 Testing Your Setup
At this point, the iPBX30 should enable any computers on your LAN
to use the iPBX30’s ADSL or cable modem connection to access
the Internet.
To test the Internet connection, open your web browser, and type
the URL of any external website (such as
http://www.asus.com
).
The LED labeled WAN should be blinking rapidly and may appear
solid as the device connects to the site. You should also be able to
21

Chapter 3
iPBX30 User Manual
browse the web site through your web browser.
If the LEDs do not illuminate as expected or the web page is not
displayed, see Appendix 12 for troubleshooting suggestions.
3.3.3 Default Router Settings
In addition to handling the DSL connection to your ISP, the iPBX30
can provide a variety of services to your network. The device is pre-
congured with default settings for use with a typical home or small
ofce network.
The table below lists some of the most important default settings;
these and other features are described fully in the subsequent
chapters. If you are familiar with network configuration settings,
review them to verify that they meet the needs of your network.
Follow the instructions to make changes if necessary. If you are
unfamiliar with these settings, try using the device without making
any modication, or contact your ISP for assistance.
Before you modifying any settings, review Chapter 4 for general
information about accessing and using the Web UI Management
program. We strongly recommend that you contact your ISP prior to
changing the default conguration.
Table 3.2 Default Settings Summary
Option Default Setting Explanation/Instruction
DHCP
DHCP server enabled
The iPBX30 maintains a pool of
with the following pool
private IP addresses for dynamic
(Dynamic Host
of addresses:
assignment to your LAN computers.
Configuration
To use this service, you must
Protocol)
192.168.1.100 through
have set up your computers to
192.168.1.200
accept IP information dynamically,
as described in section 3.2. See
section 6.1 for an explanation of the
DHCP service.
LAN Port IP
Static IP address:
This is the IP address of the LAN
port on the iPBX30. The LAN
Address
192.168.1.1
port connects the device to your
subnet mask:
Ethernet network. Typically, you will
not need to change this address.
255.255.255.0
See section 5.1 for instructions.
22
Оглавление
- List of Figures
- List of Tables
- Chapter 1 Introduction
- Chapter 2 Getting to Know your iPBX30
- 3 Quick Start Guide
- 4 Using the Web UI Management
- 5 Router Setup
- 6 DHCPServerConguration
- 7 Routing
- 8 ConguringDDNS
- 9 ConguringFirewallandNAT
- 10 USB Application
- 11 System Management
- 12 SIP IP-PBX
- 13 IP Addresses, Network Masks, and Subnets
- 14 Troubleshooting
- 15 Index
