Pioneer VSX-921: Selecting the Speaker system About the audio connection About the video converter
Selecting the Speaker system About the audio connection About the video converter: Pioneer VSX-921
Table of contents
- IMPORTANT
- Contents
- Before you start
- Remote control
- Connecting your equipment
- Placing the speakers Connecting the speakers
- Bi-amping your speakers Installing your speaker system
- Selecting the Speaker system About the audio connection About the video converter
- About HDMI
- Connecting your TV and playback components Connecting your DVD player with no HDMI output
- Connecting an HDD/DVD recorder, BD recorder and other video sources
- Connecting a satellite/cable receiver or other set-top box Connecting other audio components
- MULTI-ZONE setup Sub Zone Input functions available Sub Zone Input functions available Connecting AM/FM antennas
- Connecting to the network through LAN interface Connecting to a wireless LAN Plugging in the receiver
- Basic Setup Canceling the demo display Automatically conducting optimum sound tuning (Full Auto MCACC)
- Operation Mode Setup
- Operable functions/ Descriptions Page
- Basic playback Playing a source Listening in surround sound Playing an iPod
- Listening to the radio Playing a USB device
- Playback with HOME MEDIA GALLERY inputs Bluetooth ADAPTER for Wireless Enjoyment of Music
En
9
02
Connecting your equipment
Bi-wiring your speakers
Your speakers can also be bi-wired if they sup-
port bi-amping.
!
With these connections, the
Speaker System
setting makes no difference.
CAUTION
!
Don’t connect different speakers from the
same terminal in this way.
!
When bi-wiring as well, heed the cautions for
bi-amping shown above.
%
To bi-wire a speaker, connect two
speaker cords to the speaker terminal on
the receiver.
Selecting the Speaker system
The front height terminals can be used for front
wide and Speaker B connections, in addition to
for the front height speakers. Also, the surround
back terminals can be used for bi-amping and
ZONE 2 connections, in addition to for the sur-
round back speakers. Make this setting accord-
ing to the application.
Front height setup
*Default setting
1 Connect a pair of speakers to the front
height speaker terminals.
See
Standard surround connection
on page 8 .
2 If necessary, select ‘Normal(SB/FH)’
from the Speaker System menu.
See
Speaker system setting
on Operating
Instructions in CD-ROM to do this.
Front wide setup
1 Connect a pair of speakers to the front
height speaker terminals.
See
Standard surround connection
on page 8 .
2 Select ‘Normal(SB/FW)’ from the
Speaker System menu.
See
Speaker system setting
on Operating
Instructions in CD-ROM to do this.
Speaker B setup
You can listen to stereo playback in another
room.
1 Connect a pair of speakers to the front
height speaker terminals.
See
Standard surround connection
on page 8 .
2 Select ‘Speaker B’ from the
Speaker System menu.
See
Speaker system setting
on Operating
Instructions in CD-ROM to do this.
Bi-Amping setup
Bi-amping connection of the front speakers for
high sound quality with 5.1-channel surround
sound.
1 Connect bi-amp compatible speakers
to the front and surround back speaker
terminals.
See
Bi-amping your speakers
on page 8 .
2 Select ‘Front Bi-Amp’ from the
Speaker System menu.
See
Speaker system setting
on Operating
Instructions in CD-ROM to do this.
ZONE 2 setup
With these connections you can simultaneously
enjoy 5.1-channel surround sound in the main
zone with stereo playback on another compo-
nent in ZONE 2.
1 Connect a pair of speakers to the
surround back speaker terminals.
See
Standard surround connection
on page 8 .
2 Select ‘ZONE 2’ from the
Speaker System menu.
See
Speaker system setting
on Operating
Instructions in CD-ROM to do this.
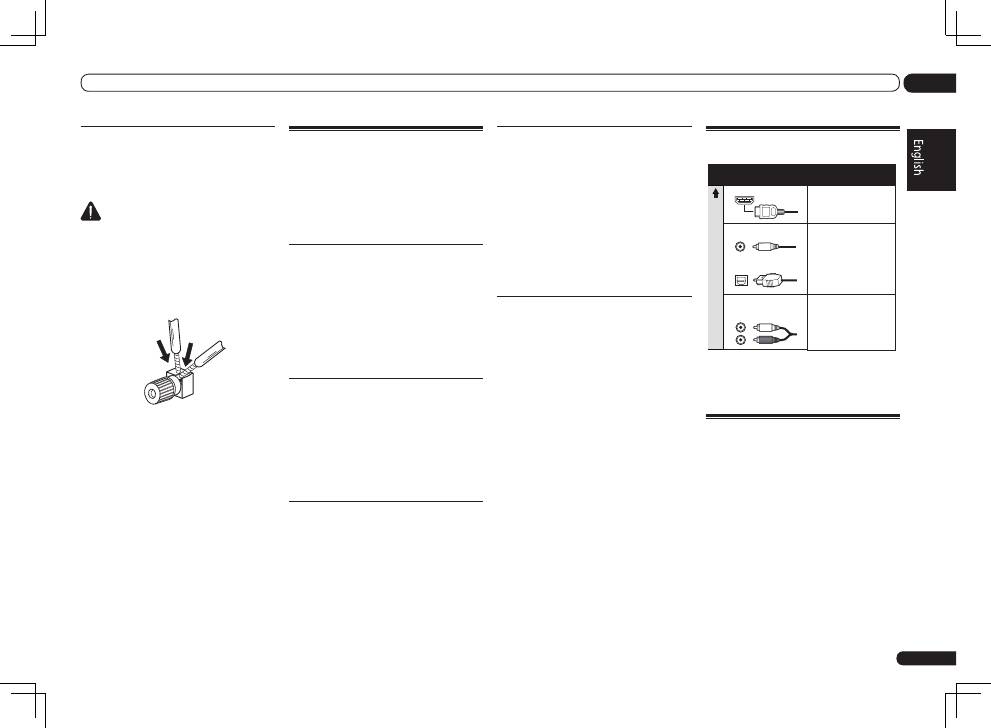
About the audio connection
Transferable audio
signals
Sound signal priorit
y
HDMI
HD audio
Digital (Coaxial)
Conventional digital audio
RCA (Analog)
(
White
/
Red
)
Conventional analog audio
Digital (Optical)
Types of cables and
terminals
!
With an HDMI cable, video and audio signals
can be transferred in high quality over a single
cable.
About the video converter
The video converter ensures that all video
sources are output through all of the
MONITOR
VIDEO OUT
jacks. The only exception is HDMI:
since this resolution cannot be downsampled,
you must connect your monitor/TV to the
receiver’s HDMI output when connecting this
video source.
If several video components are assigned to the
same input function (see
The Input Setup menu
on Operating Instructions in CD-ROM), the
converter gives priority to HDMI, component,
then composite (in that order).
