Pioneer VSX-420-K: Connecting the speakers
Connecting the speakers: Pioneer VSX-420-K
Table of contents
- IMPORTANT
- Operating Environment
- Contents
- Flow of settings on the receiver
- Chapter 1: Before you start Checking what’s in the box Installing the receiver Loading the batteries
- Chapter 2: Controls and displays Front panel
- Operating range of remote control unit Display
- Controls and displays 02
- Remote control
- Controls and displays 02
- Controls and displays02
- Chapter 3: Connecting your equipment Placing the speakers
- Connecting the speakers
- Making cable connections
- About video outputs connection
- Connecting a TV and Blu-ray Disc player
- Connecting a TV and DVD player
- Connecting your component with no HDMI terminal
- Connecting an HDD/DVD recorder, VCR and other video components
- Connecting a satellite receiver Connecting the multichannel or other digital set-top box analog outputs
- Connecting other audio components Connecting to the front panel audio mini jack
- Connecting antennas
- Connecting an IR receiver Plugging in the receiver
- Chapter 4: Listening to your system Basic playback
- Choosing the input signal Auto playback Listening in surround sound
- Listening in stereo
- Using Front Stage Surround Using Stream Direct Advance Using the Sound Retriever
- Using Phase Control
- Setting the Audio options Setting What it does Option(s)
- Setting What it does Option(s)
- analog inputs Using the headphone
- Chapter 5: The System Setup menu Using the System Setup menu Manual speaker setup
- Channel level Crossover network
- Speaker Distance The Input Assign menu
- Chapter 6: Using the MULTI-ZONE feature MULTI-ZONE listening
- Using the MULTI-ZONE controls Button What it does
- Chapter Using the tuner Listening to the radio Saving station presets
- An introduction to RDS
- Displaying RDS information
- Chapter 8: Making recordings Making an audio or a video recording
- Chapter 9: Additional information Troubleshooting Problem Remedy
- Problem Remedy
- HDMI Symptom Remedy Resetting the main unit
- Specifications Cleaning the unit
Connecting your equipment03
Be sure to complete all connections before
connecting this unit to the AC power source.
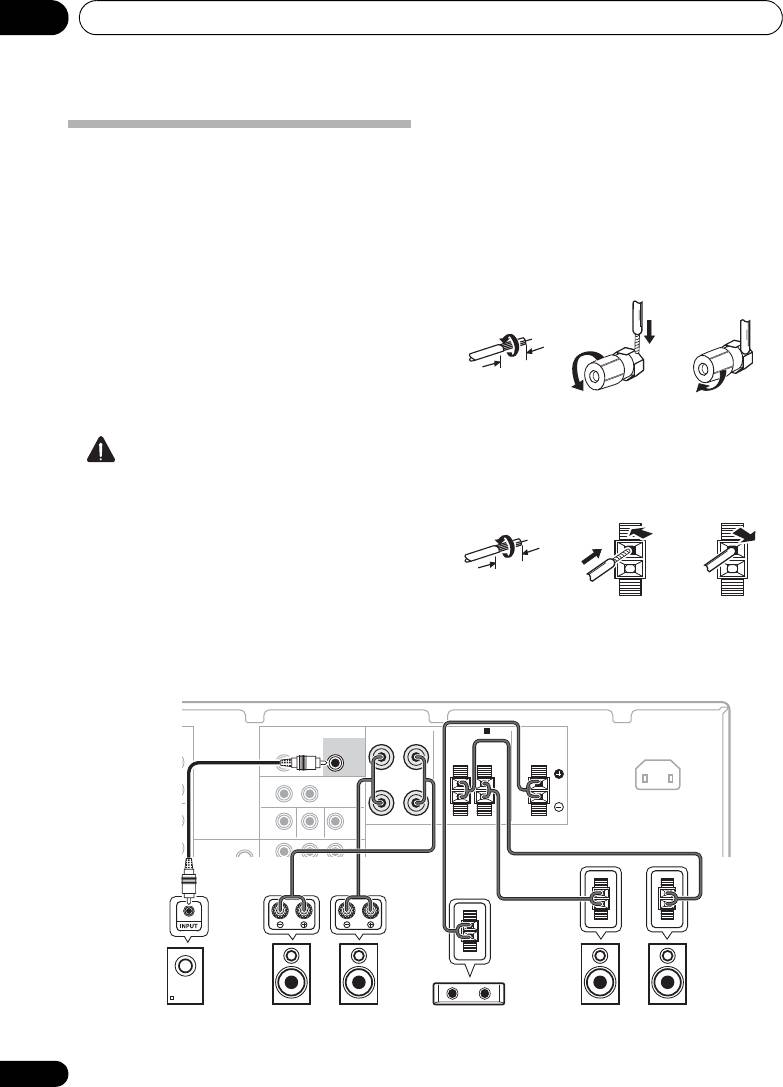
Connecting the speakers
The receiver will work with just two stereo
Bare wire connections
speakers (the front speakers in the diagram)
Front speaker terminals:
but using at least three speakers is
recommended, and a complete setup is best
1 Twist exposed wire strands together.
for surround sound.
2 Loosen terminal and insert exposed wire.
Make sure you connect the speaker on the
3 Tighten terminal.
right to the right (R) terminal and the speaker
on the left to the left (L) terminal. Also make
123
sure the positive and negative (+/–) terminals
on the receiver match those on the speakers.
If you’re not using a subwoofer, change the
front speaker setting (see Speaker setting on
page 33) to LARGE.
Center and surround speaker terminals:
1 Twist exposed wire strands together.
CAUTION
2 Push open the tabs and insert exposed wire.
• These speaker terminals carry
3 Release the tabs.
HAZARDOUS LIVE voltage. To prevent
the risk of electric shock when connecting
or disconnecting the speaker cables,
disconnect the power cord before touching
any uninsulated parts.
• Make sure that all the bare speaker wire is
twisted together and inserted fully into the
speaker terminal. If any of the bare speaker
wire touches the back panel it may cause
the power to cut off as a safety measure.
14
En
10 mm
12 3
10 mm
AUDIO
FRONT
SPEAKERS A
ZONE2 OUT
SUBWOOFER
RL
L R
PRE OUT
SURROUND CENTER
L
MONITOR OUT BD/TV IN DVD/SAT IN
ANTENNA
P
R
B
YP
R
MONITOR
FM
OUT
T
FRONT
SPEAKERS A
SUBWOOFER
RL
IN
PRE OUT
SURROUND CENTER
AC IN
RL
RL
L
OUT
DVR/VCR VIDEO
IN
R
IN
SW
L
R
C
SL
SR
Powered subwoofer
Front speakers
Center speaker
Surround speakers
VSX-420_SY_En.book 14 ページ 2010年3月19日 金曜日 午前9時37分
