Pioneer VSX-420-K: Connecting other audio components Connecting to the front panel audio mini jack
Connecting other audio components Connecting to the front panel audio mini jack: Pioneer VSX-420-K
Table of contents
- IMPORTANT
- Operating Environment
- Contents
- Flow of settings on the receiver
- Chapter 1: Before you start Checking what’s in the box Installing the receiver Loading the batteries
- Chapter 2: Controls and displays Front panel
- Operating range of remote control unit Display
- Controls and displays 02
- Remote control
- Controls and displays 02
- Controls and displays02
- Chapter 3: Connecting your equipment Placing the speakers
- Connecting the speakers
- Making cable connections
- About video outputs connection
- Connecting a TV and Blu-ray Disc player
- Connecting a TV and DVD player
- Connecting your component with no HDMI terminal
- Connecting an HDD/DVD recorder, VCR and other video components
- Connecting a satellite receiver Connecting the multichannel or other digital set-top box analog outputs
- Connecting other audio components Connecting to the front panel audio mini jack
- Connecting antennas
- Connecting an IR receiver Plugging in the receiver
- Chapter 4: Listening to your system Basic playback
- Choosing the input signal Auto playback Listening in surround sound
- Listening in stereo
- Using Front Stage Surround Using Stream Direct Advance Using the Sound Retriever
- Using Phase Control
- Setting the Audio options Setting What it does Option(s)
- Setting What it does Option(s)
- analog inputs Using the headphone
- Chapter 5: The System Setup menu Using the System Setup menu Manual speaker setup
- Channel level Crossover network
- Speaker Distance The Input Assign menu
- Chapter 6: Using the MULTI-ZONE feature MULTI-ZONE listening
- Using the MULTI-ZONE controls Button What it does
- Chapter Using the tuner Listening to the radio Saving station presets
- An introduction to RDS
- Displaying RDS information
- Chapter 8: Making recordings Making an audio or a video recording
- Chapter 9: Additional information Troubleshooting Problem Remedy
- Problem Remedy
- HDMI Symptom Remedy Resetting the main unit
- Specifications Cleaning the unit
Connecting your equipment03
Note
Connecting other audio
• Note that you must connect digital
components
components to analog audio jacks if you
The number and kind of connections depends
want to record to/from digital components
on the kind of component you’re connecting.
(like an MD) to/from analog components.
Follow the steps below to connect a CD-R, MD,
DAT, tape recorder or other audio component.
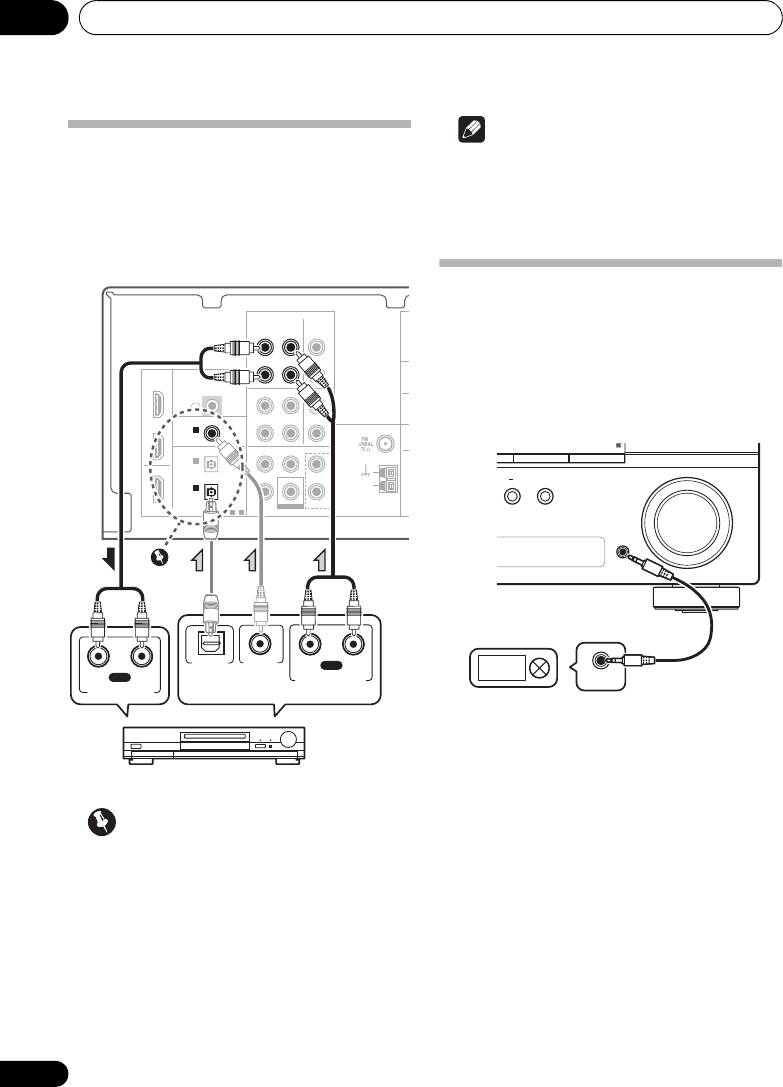
Connecting to the front panel
audio mini jack
Front audio connections are accessed via the
front panel using the INPUT SELECTOR or
PORTABLE button on the remote control. Use
a stereo mini-jack cable to connect a digital
audio player, etc.
Important
• If the connection was made using an
optical or a coaxial cable, you’ll need to
press SIGNAL SEL button to select the
input signal corresponding to the audio
components (see Choosing the input signal
on page 26).
22
En
AUDIO
OUT
CD-R/TAPE CD
IN IN
L
HDMI
R
BD/TV
IN
IR
OUT
DVR/VCR
IN
DVD/SAT
IN
IN
L
DVD/SAT
COAXIAL
ASSIGNABLE
MO
IN
IN 1
ANTENNA
R
(CD)
OPTICAL
CENTERSURROUND
FRONT
IN 2
L
OUT
(DVD/SAT)
AM
IN 1
R
LOOP
ASSIGNABLE
SUBWOOFER
BD/TV IN
DIGITAL
1
-
2
BD/TV MULTI CH IN
C
AUDIO
OUT
CD-R/TAPE
IN
L
R
COAXIAL
IN 1
(CD)
OPTICAL
IN 1
(BD/TV)
DIGITAL
OPTICAL
COAXIAL
RL
PLAY
RL
REC
DIGITAL AUDIO OUT
ANALOG AUDIO OUT
ANALOG AUDIO IN
Select one
CD-R, MD, DAT, Tape recorder, etc.
PRESET
+
ENTER
ZONE
MASTER
ON/OFF
SPEAKERS
VOLUME
PORTABLE
AUDIO OUT
Digital audio player, etc.
VSX-420_SY_En.book 22 ページ 2010年3月19日 金曜日 午前9時37分
