Pioneer AVD-W7900: For viewing LCD comfortably Changing the wide screen size Installing the display unit Changing the picture adjustment Installing and removing the display unit
For viewing LCD comfortably Changing the wide screen size Installing the display unit Changing the picture adjustment Installing and removing the display unit: Pioneer AVD-W7900
Table of contents
- IMPORTANT SAFEGUARDS
- Precautions
- Before You Start About this unit
- For viewing LCD comfortably Changing the wide screen size Installing the display unit Changing the picture adjustment Installing and removing the display unit
- Removing the display unit Resetting the microprocessor
- Basic Operations Power ON/OFF Turning the unit off Display unit Selecting a source Changing the wide screen mode Operating this unit
- Switching the dimmer setting Setup
- Selecting the video format
- Connection and installation Connections
- Connection Diagram
- Installation Mounting with flush mounting bracket
- Additional Information Using the display correctly Liquid crystal display (LCD) screen Handling the display Keeping the display in good condition
- Small fluorescent tube
- Specifications
Section
02
Before You Start
object or the like. This can cause system
For viewing LCD comfortably
breakdown.
Due to its construction, the viewing angle of
! Be careful not to touch terminals on the dis-
the LCD screen is limited. You can adjust it by
play unit or on the cable. Doing so may cause
changing either screen size or picture adjust-
connection failures. If any terminals are dirty,
ment.
wipe them with a clean dry cloth.
Changing the wide screen size
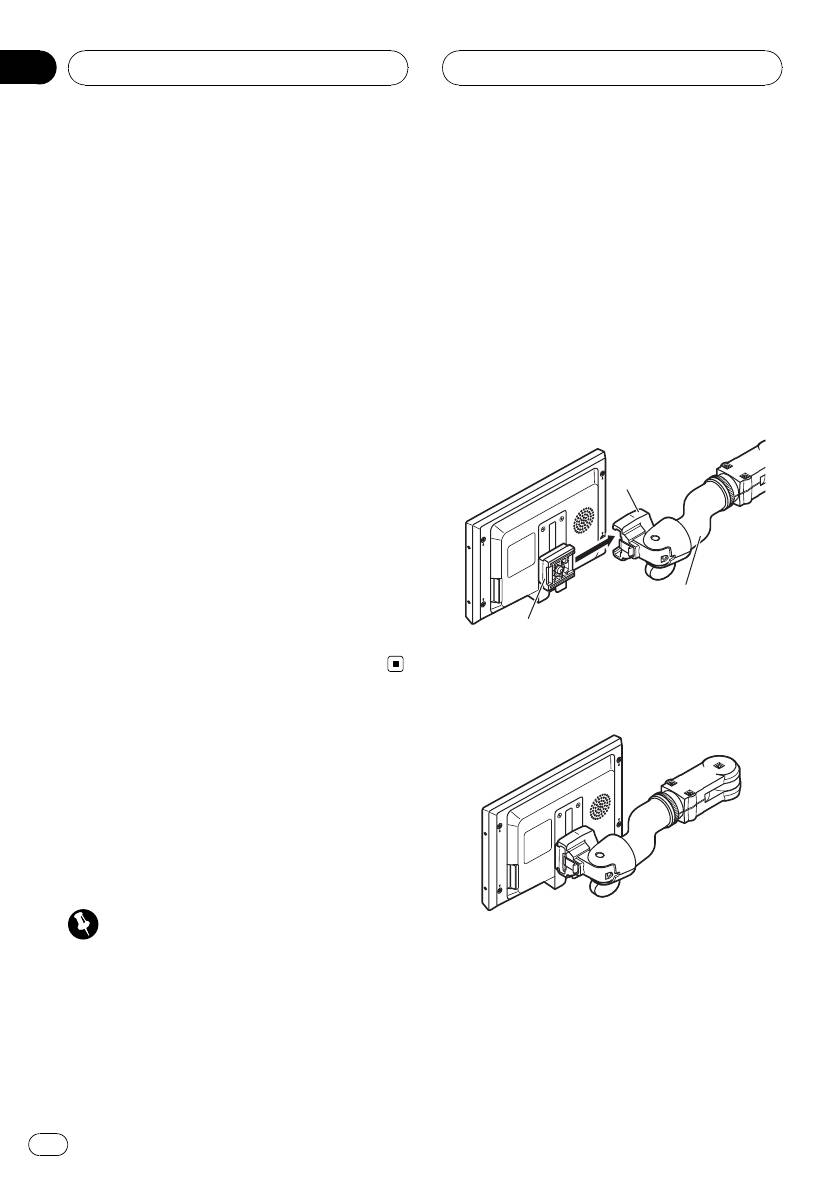
Installing the display unit
By changing the screen size from 4:3 to 16:9,
1 Align the bracket into the grooves of
you can adjust the screen so that the screen
the base.
can fit to the video image you are playing.
For details concerning operation, refer to
Changing the wide screen mode on page 8.
Base
Changing the picture adjustment
You can make the best adjustment to the pic-
ture display by changing BRIGHTNESS,
CONTRAST, COLOR and HUE. You can also
Mounting arm
dim or enlight the overall picture image using
(sold separately)
DIMMER.
Bracket
For details concerning operation, refer to
Changing the picture adjustment on page 9.
2 Slide the display unit until it clicks into
place.
Installing and removing
the display unit
The mounting arm described below is sold se-
parately. For more information on the installa-
tion, refer to the mounting kit owner’s manual
or consult your nearest dealer.
Important
! To prevent failure, be sure to turn the ignition
switch or system power OFF before installing
or removing the display unit. Also take care
not to grip the screen or buttons too firmly
and not to drop the display unit.
! Do not let any water get on the terminals on
the display unit or on the cable and do not
allow the terminals to be shorted by a metal
6
En


