Yamaha RX-V663 Black: Remote control features
Remote control features: Yamaha RX-V663 Black
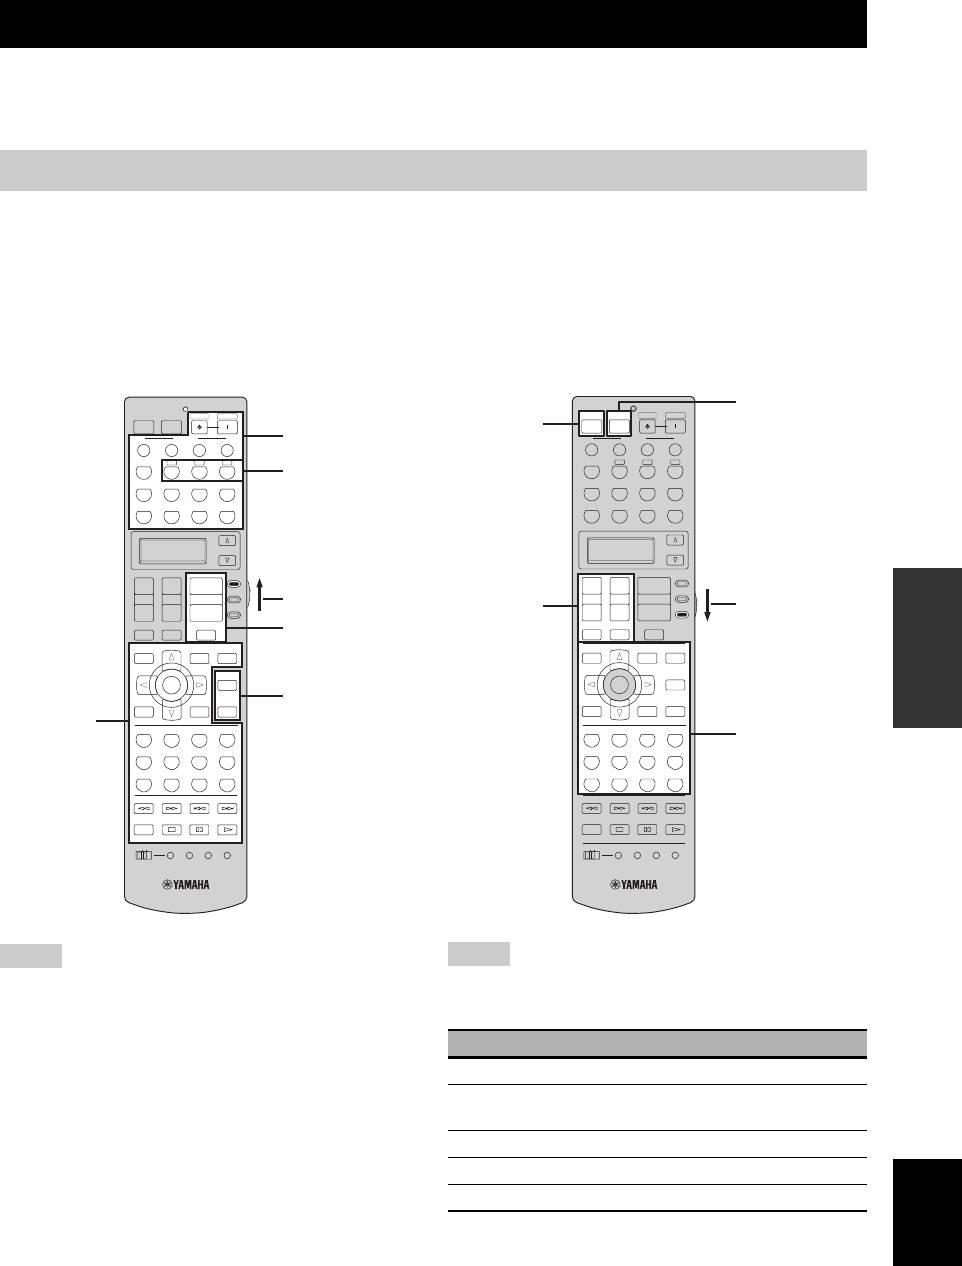
REMOTE CONTROL FEATURES
Remote control features
In addition to controlling this unit, the remote control can also operate other audiovisual components made by Yamaha
and other manufacturers. To control your TV or other components, you must set up the appropriate remote control code
for each input source (see page 93).
Controlling this unit, a TV, or other components
■ Controlling this unit
■ Controlling a TV
Set the operation mode selector to
F
AMP to control this
Set the operation mode selector to
F
TV to control your
unit.
TV. To control your TV, you must set the appropriate
remote control code for
5DTV/CBL
or
5PHONO
(see
page 93). When you set the remote control codes for both
5DTV/CBL
and
5PHONO
, priority is given to the one
set for
5DTV/CBL
.
*2
POWER
POWER
STANDBY
POWER
POWER
POWER
STANDBY
POWER
TV
AV
*1
TV
AV
SCENE
*1
SCENE
1234
1234
TUNER
CBA
TUNER
CBA
*3
V
-
AUX/DOCK
DTV/CBL
CD
MD/CD-R
V
-
AUX/DOCK
DTV/CBL
CD
MD/CD-R
DVD
DVR
VCR
PHONO
DVD
DVR
VCR
PHONO
SELECT
SELECT
AMP
AMP
+
+
+
+
+
+
SOURCE
SOURCE
OPERATION
TV VOL TV CH
VOLUME
Set to AMP
TV VOL TV CH
VOLUME
ADVANCED
TV
*1
TV
Set to TV
–
––
–
––
TV MUTE
TV INPUT
MUTE
*1
TV MUTE
TV INPUT
MUTE
LEVEL
PRESET/CH
SET MENU
LEVEL
PRESET/CH
SET MENU
TITLE
MENU
AUDI O
TITLE
MENU
AUDIO
BAND
SRCH MODE
BAND
SRCH MODE
PURE DIRECT
PURE DIRECT
ENTER
ENTER
A/B/C/D/E
A/B/C/D/E
STRAIGHT
*1
STRAIGHT
RETURN
DISPLAY
RETURN
DISPLAY
*2
MEMORY
MEMORY
CLASSICAL
LIVE/CLUB
ENTERTAIN
MOVIE
CLASSICAL
LIVE/CLUB
ENTERTAIN
MOVIE
1
2
3
4
1
2
3
4
*2
STEREO
ENHANCER
SUR. DECODE
PARAMETER
STEREO
ENHANCER
SUR. DECODE
PARAMETER
5
6
7
8
5
6
7
8
MULTI CH IN
SLEEP
MULTI CH IN
SLEEP
9
0
+
10
ENT
9
0
+
10
ENT
INFO EON MODE- PTY SEEK- START
INFO EON MODE- PTY SEEK-START
REC
REC
OFF
ON
MACRO
LEARN
CLEAR
RENAME
OFF
ON
MACRO
LEARN
CLEAR
RENAME
Notes
Notes
*1
*1
These buttons always control this unit regardless of the
These buttons always control your TV regardless of the
operation mode selector position.
operation mode selector position.
*2
These buttons control this unit only when the component
Remote control Digital TV/Cable TV
operation mode selector is set to
F
AMP.
*3
5
A, B, or C, is the optional component control area button.
TV POWER Turns on or off the power.
You can control the desired component without changing the
TV VOL +/– Increases or decreases the volume
input source of this unit.
level.
TV CH +/– Changes the channel number.
TV MUTE Mutes the audio output.
English
TV INPUT Changes the input source.
*2
These buttons control your TV only when the operation mode
selector is set to
F
TV. For details, see the “TV” column on
page 92.
91 En
Remote control features
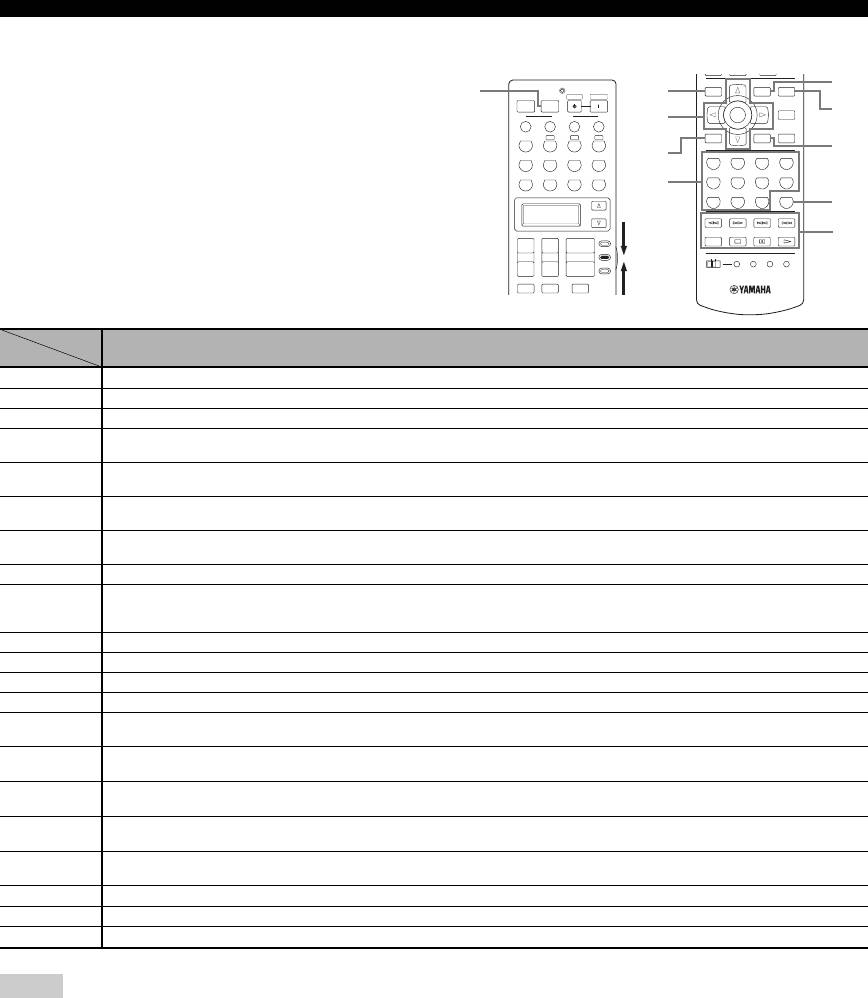
■ Controlling other components
Set the operation mode selector to
F
SOURCE to control
LEVEL
PRESET/CH
SET MENU
[6]
other components selected with the input selector buttons
[1]
POWER
STANDBY
POWER
[2]
TITLE
MENU
AUDIO
POWER
BAND
SRCH MODE
TV
AV
PURE DIRECT
(
5
). You must set the appropriate remote control code for
SCENE
ENTER
[7]
[3]
1234
A/B/C/D/E
STRAIGHT
each input source in advance (see page 93). The following
TUNER
CBA
RETURN
DISPLAY
MEMORY
[8]
table shows the function of each control button used to
V
-
AUX/DOCK
DTV/CBL
CD
MD/CD-R
[4]
CLASSICAL
LIVE/CLUB
ENTERTAIN
MOVIE
1
2
3
4
DVD
DVR
VCR
PHONO
STEREO
ENHANCER
SUR. DECODE
PARAMETER
control other components assigned to each input selector
[5]
5
6
7
8
MULTI CH IN
SLEEP
button (
5
). Be advised that some buttons may not
9
0
+
10
ENT
[9]
SELECT
INFO EON MODE- PTY SEEK-START
correctly operate the selected component.
AMP
[10]
REC
+
+
+
SOURCE
y
TV VOL TV CH
VOLUME
OFF
ON
MACRO
LEARN
CLEAR
RENAME
TV
–
––
The remote control has 12 modes (control areas) to control
TV MUTE
TV INPUT
MUTE
components so that the remote control can operate up to 12
different components.
DVD player/
Cable TV/
MD recorder/
VCR
TV LD player CD player
Tape deck Tuner
DVD recorder
Satellite tuner
CD recorder
[1] AV P O W E R
Power
*1
Power
*1
Power
*1
VCR power
*2
Power
*1
Power
*1
Power
*1
Power
*1
Power
*1
[2] TITLE Title Title Title Title Band
[3] ENTER Menu enter Menu select Menu select
Preset up
PRESET/CH k Menu up Menu up Menu up
(1 to 8)
Preset down
PRESET/CH n Menu down Menu down Menu down
(1 to 8)
Preset down
A/B/C/D/E l Menu left Menu left Menu left
(A to E)
Preset up
A/B/C/D/E h Menu right Menu right Menu right Direction A/B
(A to E)
[4] RETURN Return Return Return Return Memory
[5] 1-9, 0, +10
Preset stations (1 to
Numeric buttons Numeric buttons Numeric buttons Numeric buttons Numeric buttons Numeric buttons Numeric buttons
8) / Numeric
buttons
[6] MENU Menu Menu Menu Sound mode
[7] AUDIO Audio Audio
[8] DISPLAY Display Display Display Display Display Display
[9] ENT Enter Enter/recall Enter Enter
[10] ll
Search
Search
DVR search
DVR search
Search
Search
Search
Search
Information
backward
backward
backward
*2
backward
*2
backward
backward
backward
backward
DVR search
DVR search
hh Search forward Search forward
Search forward Search forward Search forward Search forward EON
forward
*2
forward
*2
DVR skip
DVR skip
Chapter/Skip
Program type
b Skip backward
Skip backward Skip backward Direction back
backward
*2
backward
*2
backward
seek mode
DVR skip
DVR skip
Chapter/Skip
Direction
Program type
a Skip forward
Skip forward Skip forward
forward
*2
forward
*2
forward
forward
seek mode
Disc skip (player)
REC
Rec
DVR rec
*2
DVR rec
*2
Disc skip Rec Rec
Rec (recorder)
s Stop Stop
DVR stop
*2
DVR stop
*2
Stop Stop Stop Stop
e Pause Pause
DVR pause
*2
DVR pause
*2
Pause Pause Pause Pause
p Play Play
DVR play
*2
DVR play
*2
Play Play Play Play
Notes
*1
This button is operational only when the original remote control supplied with the component has a POWER button.
*2
These buttons operate your VCR or DVR when you set the appropriate remote control code for DVR (see page 93).
92 En
Remote control features
■ Selecting a component to be controlled
You can select a component to be controlled
Setting remote control codes
independently of the input source selected with the input
You can control other components by setting the
selector buttons.
appropriate remote control codes. Codes can be set up for
each control area. For a complete list of available remote
Press
6
SELECT k / n repeatedly to select the
control codes, refer to “List of remote control codes” at
desired component.
the end of this manual.
The name of the component to be controlled appears in the
The following table shows the default component
display window (
6
) on the remote control.
(Library: component category) and the remote control
code for each control area.
SELECT
Remote control code default settings
Component
Default
Control area
Manufacturer
category
code
■ Controlling optional components
TUNER TUNER Yamaha 2602
(Option mode)
A TAPE Yamaha 2700
“OPTN” is an optional component control area that can be
programmed with remote control functions independently
B LD Yamaha 2200
from any input source. This area is useful for
C TUNER Yamaha 2607
programming commands that are to be used only as a part
V-AU X /
of a macro function or for components that do not have a
TUNER Yamaha 2606
DOCK
valid remote control code.
DTV/CBL TV – –
To select the option mode, press
6
CD CD Yamaha 2300
SELECT k
/
n
repeatedly until “OPTN” appears in the display
MD/CD-R CD-R Yamaha 2400
window (
6
) on the remote control.
DVD DVD Yamaha 2100
OPERATION
ADVANCED
DVR DVR Yamaha 2807
SELECT
VCR VCR – –
PHONO TV – –
Note
Note
You cannot set a remote control code for the optional area. See
You may not be able to operate your Yamaha component even if a
page 95 to program buttons operated within this component
Yamaha remote control code is preset as listed above.
control area.
In this case, try setting another Yamaha remote control code.
1 Set the operation mode selector to
F
SOURCE and then press an input selector
button (
5
) to select the control area you
want to set up.
TUNER
CBA
AMP
V
-
AUX/DOCK
DTV/CBL
CD
MD/CD-R
SOURCE
TV
DVD
DVR
VCR
PHONO
English
93 En
Remote control features
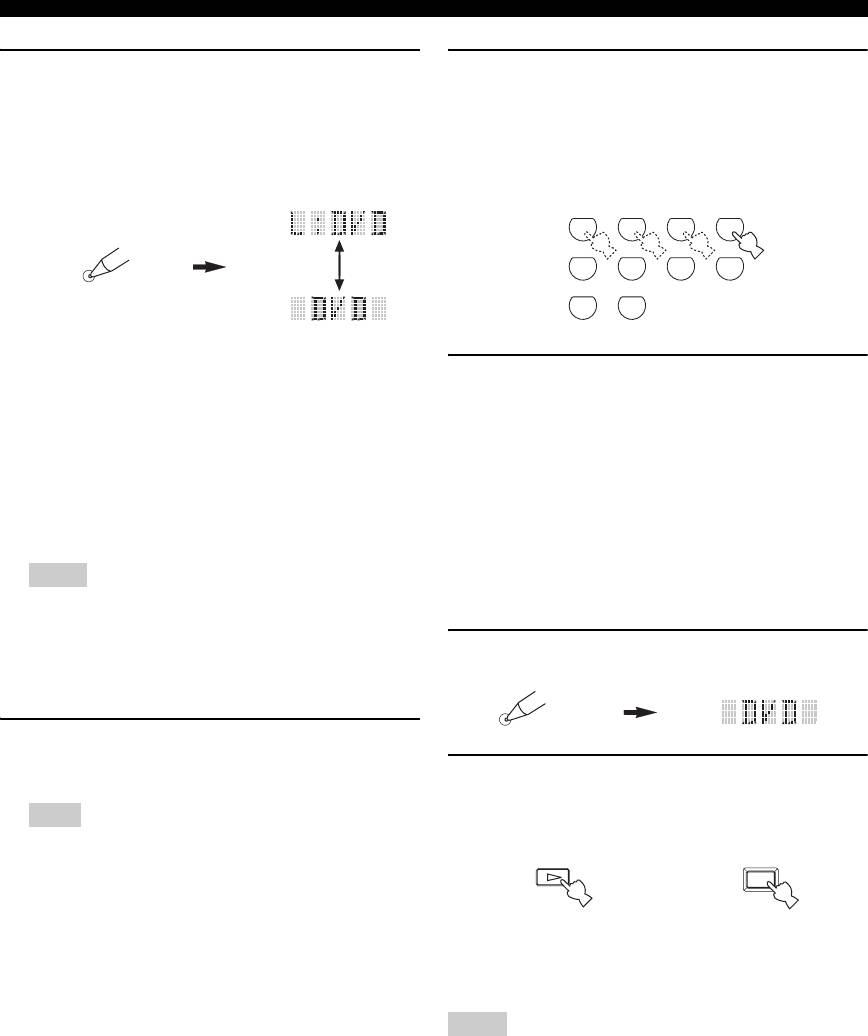
2 Press and hold
C
LEARN for about 3
4 Press the numeric buttons (
A
) to enter the
seconds using a ballpoint pen or similar
four-digit remote control code for the
object.
component you want to use.
The library name (e.g. L;DVD) and the name of the
For a complete list of available remote control codes,
selected control area (e.g. DVD) appear alternately in
refer to “List of remote control codes” at the end of
the display window (
6
) on the remote control.
this manual.
CLASSICAL
LIVE/CLUB
ENTERTAIN
MOVIE
1
2
3
4
STEREO
ENHANCER
SUR. DECODE
PARAMETER
LEARN
5
6
7
8
MULTI CH IN
9
0
y
• You can set a remote control code of a different type of
5 Press
9
ENTER to set the number.
component to an control area. Press
9
l / h repeatedly
“OK” appears in the display window (
6
) on the
to change the library (component category).
Library choices: L;DVD, L;DVR, L;LD, L;CD, L;CDR,
remote control if setting was successful.
L;MD, L;TAP (tape), L;TUN (tuner),
“NG” appears in the display window (
6
) on the
L;AMP, L;TV, L;CAB (cable),
remote control if the setting was unsuccessful. In this
L;SAT (satellite), L;VCR
case, start over from step 3.
• If you want to setup for another control area, press the
y
input selector button, or press
6
SELECT k / n
If you continuously want to set up another code for another
repeatedly to select the control area.
component, press the input selector button (
5
), or
Notes
6
SELECT k / n repeatedly to select the component, then
repeat steps 2 through 5.
• Be sure to press and hold
C
LEARN for at least 3
seconds, otherwise the learning process will start.
• If you do not complete each of the following steps within
6 Press
C
LEARN again to exit from the setup
30 seconds, the setting mode will be automatically
mode.
canceled. In this case, start over from step 2.
LEARN
3 Press
9
ENTER.
The four-digit code set for the selected component
7 Press
B
p or
3
AV POWER to confirm
appears in the display window (
6
).
whether you can control your component
Note
using the remote control.
“0000” appears in the display window (
6
) if no code has
POWER
been set.
or
AV
y
If operation is not possible and the manufacturer of your
component has more than one code, try each of them until
you find the correct one.
Notes
• “ERROR” appears in the display window (
6
) on the remote
control if you press a button not indicated in the respective step,
or when you press more than one button simultaneously.
• The supplied remote control does not contain all possible codes
for commercially available audio and video components
(including Yamaha components). If operation is not possible
with any of the remote control codes, program the new remote
control function using the learn feature (see “Programming
codes from other remote controls” on page 95) or use the
remote control supplied with the component.
• Functions programmed using the learn feature take priority over
remote control code functions.
94 En
Remote control features
Programming codes from other
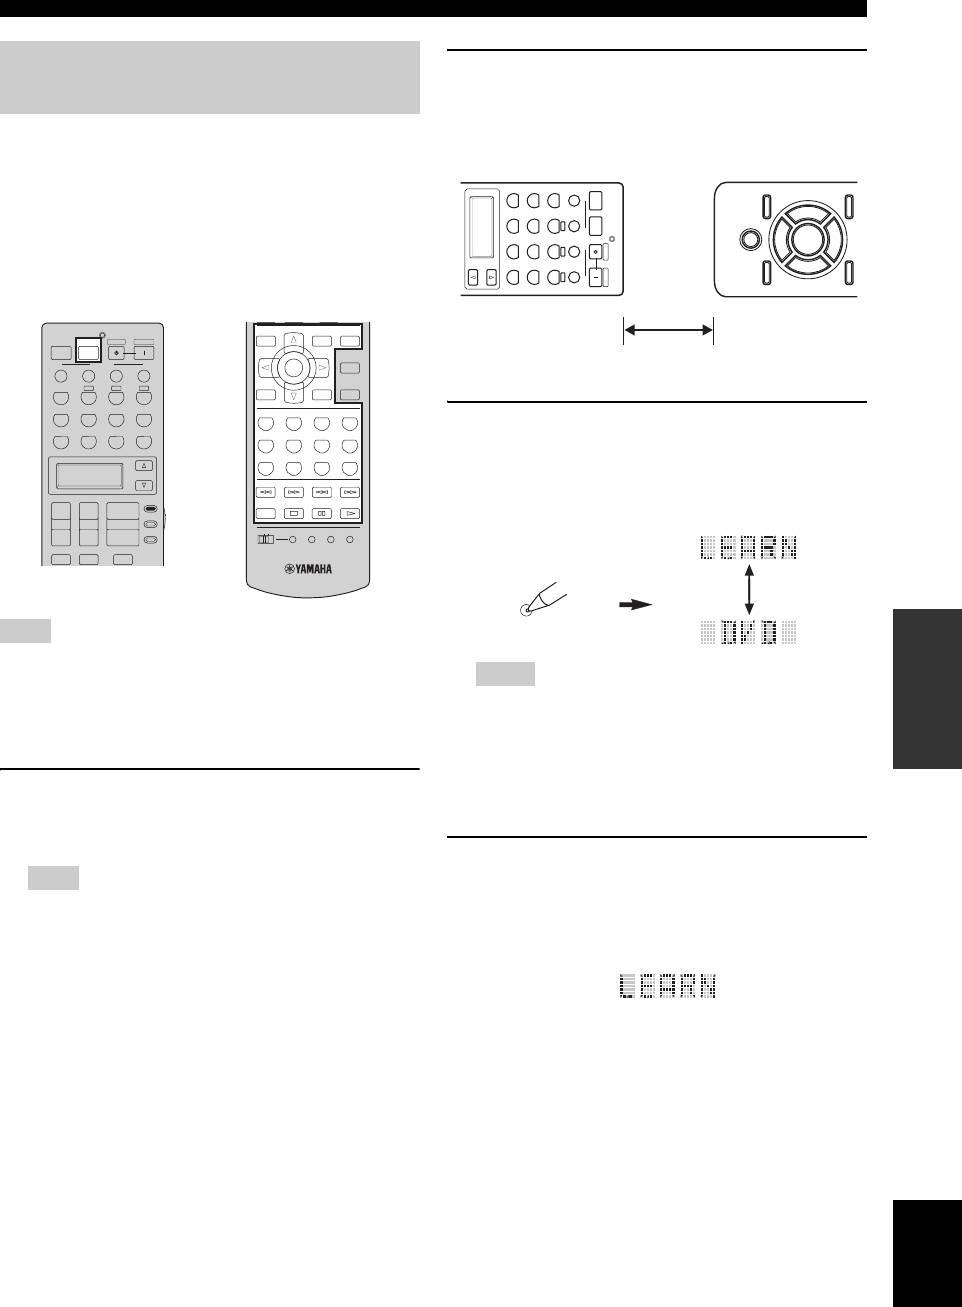
2 Place this remote control about 5 to 10 cm
(2 to 4 in) apart from the other remote control
remote controls
on a flat surface so that their infrared
You can program remote control codes from other remote
transmitters are aimed at each other.
controls. Use the learn feature if you want to program
functions not included in the basic operations covered by
-
AUX/DOCK
V
DVD
TUNER
POWER
1234
TV
the remote control codes, or an appropriate remote control
DVR
DTV/CBL
POWER
AV
code is not available. You can program the function of
SCENE
VCR
CD
STANDBY
other remote control to the buttons in the highlighted areas
in the following illustration. The buttons can be
SELECT
PHONO
MD/CD-R
POWER
CBA
programmed independently for each control area.
Other remote control
LEVEL
PRESET/CH
SET MENU
POWER
POWER
STANDBY
POWER
TITLE
MENU
AUDIO
TV
AV
BAND
SRCH MODE
5 to 10 cm
PURE DIRECT
SCENE
ENTER
1234
A/B/C/D/E
TUNER
CBA
STRAIGHT
RETURN
DISPLAY
MEMORY
V
-
AUX/DOCK
DTV/CBL
CD
MD/CD-R
CLASSICAL
LIVE/CLUB
ENTERTAIN
MOVIE
1
2
3
4
3 Press
C
LEARN using a ballpoint pen or
DVD
DVR
VCR
PHONO
STEREO
ENHANCER
SUR. DECODE
PAR A ME TE R
5
6
7
8
similar object.
MULTI CH IN
SLEEP
9
0
+
10
ENT
“LEARN” and the name of the selected control area
SELECT
INFO EON MODE- PTY SEEK- START
(e.g. “DVD”) appear alternately in the display
AMP
+
+
+
SOURCE
REC
window (
6
) on the remote control.
TV VOL TV CH
VOLUME
TV
OFF
ON
MACRO
LEARN
CLEAR
RENAME
–
––
TV MUTE
TV INPUT
MUTE
LEARN
Note
OPERATION
ADVANCED
The remote control transmits infrared rays. If the other remote
Notes
control also uses infrared rays, this remote control can learn most
of its functions. However, you may not be able to program some
• Do not press and hold
C
LEARN. If you hold it down for
special signals or extremely long transmissions. Refer to the
more than 3 seconds, the remote enters the remote control
operating instructions for the other remote control.
code setting mode.
• If you do not complete each of the following steps within
1 Set the operation mode selector to
30 seconds, the learning mode will be automatically
canceled. In this case, start over from step 3.
F
SOURCE and then press an input selector
button (
5
) to select a an control area.
4 Press the button for which you want to
Note
program the new function.
“LEARN” appears in the display window (
6
) on the
Make sure that the operation mode selector is set to
F
remote control.
SOURCE. When you set the operation mode selector to
F
AMP and program a remote control codes from other
remote controls, the programmed key cannot operate the
amplifier function of this unit.
English
95 En
Remote control features
5 Press and hold the button you want to
Changing source names in the
program on the other remote control until
display window
“OK” appears in the display window (
6
) on
You can change the name of the input source that appears
the remote control.
in the display window (
6
) on the remote control if you
“NG” appears in the display window (
6
) on the
want to use a different name than the factory preset. This
remote control if learning was unsuccessful. In this
feature is useful when you have set an control area to
case, start over from step 4.
control a different component.
V
DVD
-
AUX/DOCK
TUNER
1234
TV
POWER
1 Set the operation mode selector to
F
AMP or
DVR
DTV/CBL
AV
POWER
SCENE
F
SOURCE and then press an input selector
VCR
CD
STANDBY
SELECT
PHONO
MD/CD-R
POWER
button (
5
) to select the control area you
CBA
want to rename.
Other remote control
The name of the selected control area appears in the
display window (
6
).
AMP
SOURCE
TUNER
CBA
TV
y
V
-
AUX/DOCK
DTV/CBL
CD
MD/CD-R
• If you want to program another function, repeat steps 4
or
and 5.
DVD
DVR
VCR
PHONO
AMP
• If you continuously want to program another function for
another component, press
6
SELECT k / n to select the
SOURCE
component, and then repeat steps 4 and 5.
TV
6 Press
C
LEARN again to exit the learning
mode.
LEARN
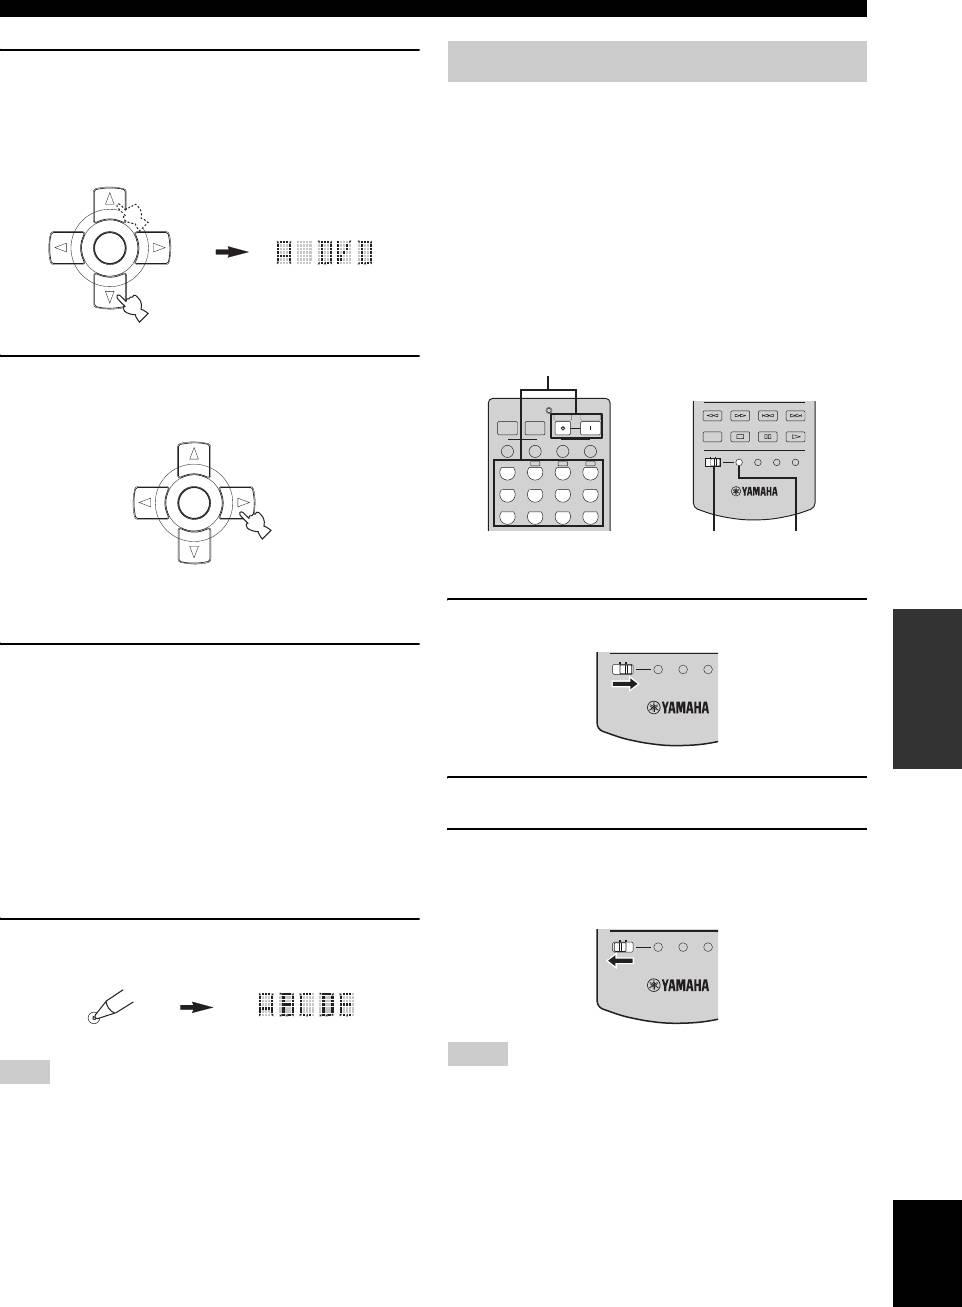
2 Press
C
RENAME using a ballpoint pen or
Notes
similar object.
• “ERROR” appears in the display window (
6
) on the remote
RENAME
control if you press a button not indicated in the respective step,
or when you press more than one button simultaneously.
• This remote control can learn approximately 200 functions.
Note
However, depending on the signals learned, “FULL” may
If you do not complete each of the following steps within 30
appear in the display before you program 200 functions. In this
seconds, the renaming mode will be automatically canceled.
case, clear unnecessary programmed functions to make room
In this case, start over from step 2.
for further learning.
• Learning may not be possible in the following cases:
– when the batteries in the remote control for this unit or other
components are weak.
– when the distance between the two remote controls is too
great or too small.
– when the remote control infrared windows are not facing each
other at the appropriate angle.
– when the remote control is exposed to direct sunlight.
– when the function to be programmed is continuous or
uncommon.
96 En
Remote control features
3 Press
9
k / n to select and enter a character.
Macro programming features
Pressing
9
n changes the character as follows:
The macro programming feature makes it possible to
A to Z, 1 to 9, 0, + (plus), – (hyphen), ; (semicolon),
perform a series of operations with the press of a single
/ (slash), and space.
button. For example, when you want to play a CD,
Pressing
9
k changes the characters in reverse order.
normally you would turn on the components, select the
PRESET/CH
CD input, and press the play button to start playback. The
macro programming feature lets you perform all of these
operations simply by pressing the CD macro button. The
ENTER
buttons listed as macro buttons below are factory set with
A/B/C/D/E
macro programs. You can also program your own macros
(see page 99).
■ MACRO operations
Macro buttons
4 Press
9
h to move the cursor to the next
position.
INFO EON MODE- PTY SEEK- START
POWER
POWER
STANDBY
POWER
TV
AV
PRESET/CH
SCENE
REC
1234
OFF
ON
MACRO
LEARN
CLEAR
RENAME
TUNER
CBA
V
-
AUX/DOCK
DTV/CBL
CD
MD/CD-R
ENTER
DVD
DVR
VCR
PHONO
A/B/C/D/E
MACRO ON/OFF MACRO
y
Press
9
l to move the cursor to the previous position.
1 Set the
C
MACRO ON/OFF selector to ON.
OPERATION
ADVANCED
9
OFF
ON
MACRO
LEARN
CLEAR
5 Press
ENTER to set the new name.
“OK” appears in the display window (
6
) on the
remote control if renaming was successful.
“NG” appears in the display window (
6
) on the
remote control if renaming was unsuccessful. In this
case, start over from step 3.
2 Press the desired macro button.
y
If you continuously want to rename another control area,
press the input selector button (
5
), or press
3 Set the
C
MACRO ON/OFF selector to OFF
6
SELECT k / n repeatedly to select the component, then
when you finish to using the macro
repeat steps 3 through 5.
programming operation.
6 Press
C
RENAME again to exit the renaming
OFF
ON
MACRO
LEARN
CLEAR
mode.
RENAME
Notes
Note
• While the remote control is running a macro program, it does
“ERROR” appears in the display window (
6
) on the remote
not accept any other operation until it has completed running
control if you press a button not indicated in the respective step,
the program (the transmission indicator stops flashing).
or when you press more than one button simultaneously.
• Continue to aim the remote control at the component the macro
is operating until the macro operation is complete.
English
97 En

Remote control features
■ Default macro functions
Pressing
To automatically transmit these signals in order
macro button
First Second Third
STANDBY STANDBY
—
—
POWER
POWER
(*1)
POWER
(*2)
—
TV
TUNER
TUNER
(*3)
—
A
A
—
B B
—
C C
—
V
-
AUX/DOC
—
—
POWER
(*1)
(CD area) (*4)
(MD/CD-R area) (*4)
(DVD area) (*4)
(DVR area) (*4)
(VCR area) (*4)
—
*1
You can turn on some components (including Yamaha components) connected to this unit by connecting them to the AC OUTLETS
on the rear panel of this unit. Power control may not be synchronized with this unit depending on the component.
For details, refer to the operating instructions for the connected component.
*2
When the remote control code for your TV is set up for either
5DTV/CBL
or
5PHONO
(see page 93), you can turn on the power of
your TV without selecting an input source. The remote control code set up for
5DTV/CBL
takes priority over the one for
5PHONO
.
*3
When
5
TUNER is selected as the input source, this unit plays the last station received before the unit was set in the standby mode.
*4
Playback can be started for any Yamaha remote control-compatible CD player, CD recorder, DVD player, or DVD recorder. When
using macros to operate other components, you will need to program the play button on the control area of that component (see
page 95) or set a remote control code (see page 93).
98 En
K
V
-
AUX/DOC
K
DTV/CB
L
DTV/CB
L
CD CD
MD/CD-
R
MD/CD-
R
DVD DVD
DVR DVR
VCR VCRVCR
PHONO PHONO
Remote control features
■ Programming macro operations
Note
You can program your own macro and use the macro
“AGAIN” appears in the display window (
6
programming feature to transmit several remote control
) if you press a
button other than a macro button.
commands in sequence at the press of a button. Be sure to
set up remote control codes or perform learning operations
before programming the macro.
3 Press the buttons for the functions you want
to include in the macro operation in
Notes
sequence.
• The default macro is not cleared when a new macro is
You can set up to 10 steps (10 functions). After you
programmed for a button. The default macro can be used again
have set 10 steps, “FULL” appears and the remote
when the programmed macro is cleared.
control automatically exits the macro mode. The
• It is not possible to add a new signal (macro step) to the default
following example is for programming the following
macro. Programming a macro changes all macro contents.
procedure:
• We do not recommend programming continuous operations
Step 1 (“MCR 1”): Press POWER.
such as volume control in a macro.
Step 2 (“MCR 2”): Press DVD.
Step 3 (“MCR 3”): Press AUDIO.
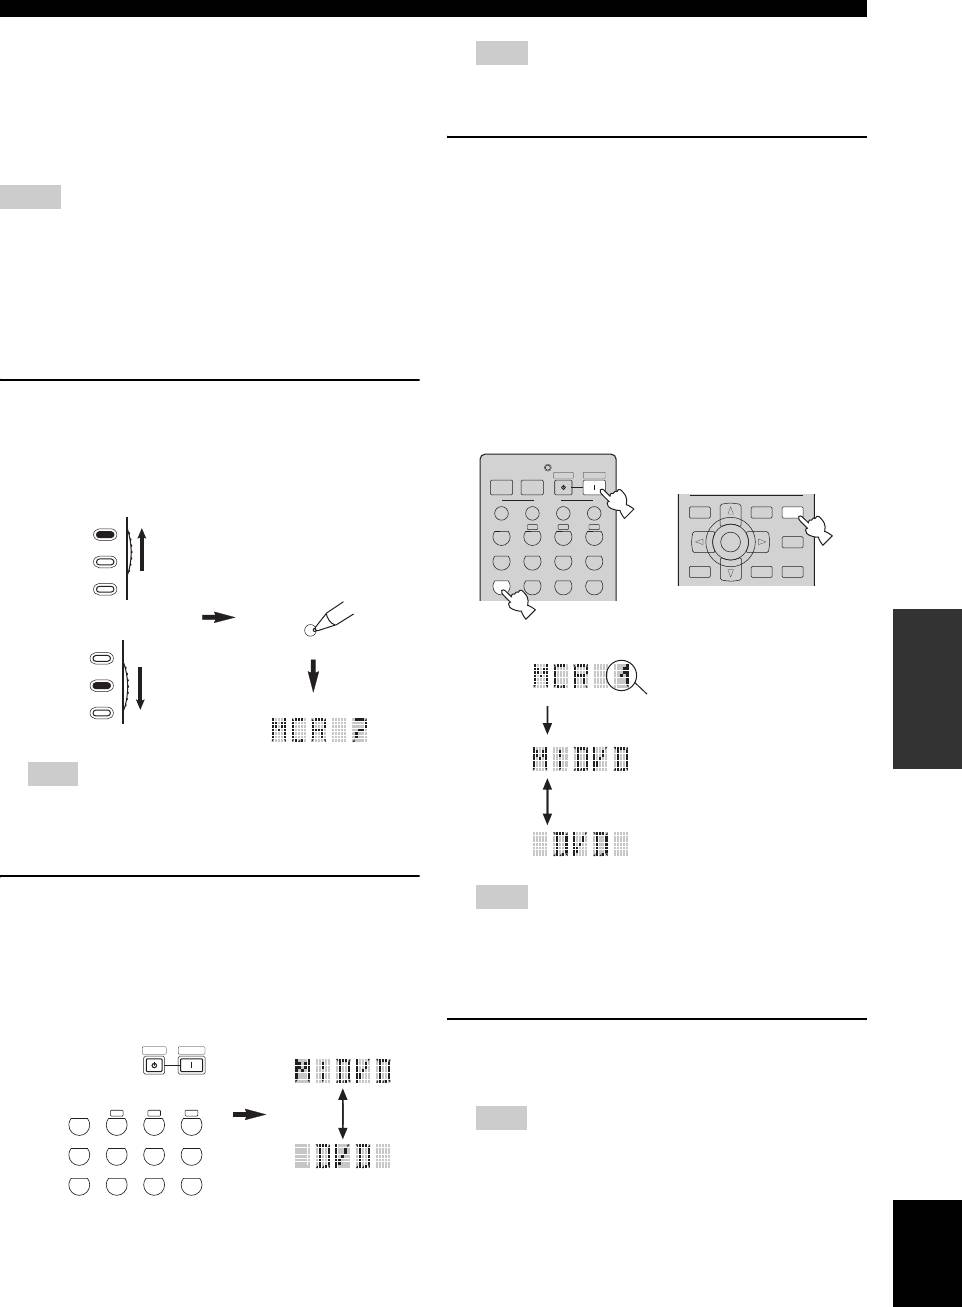
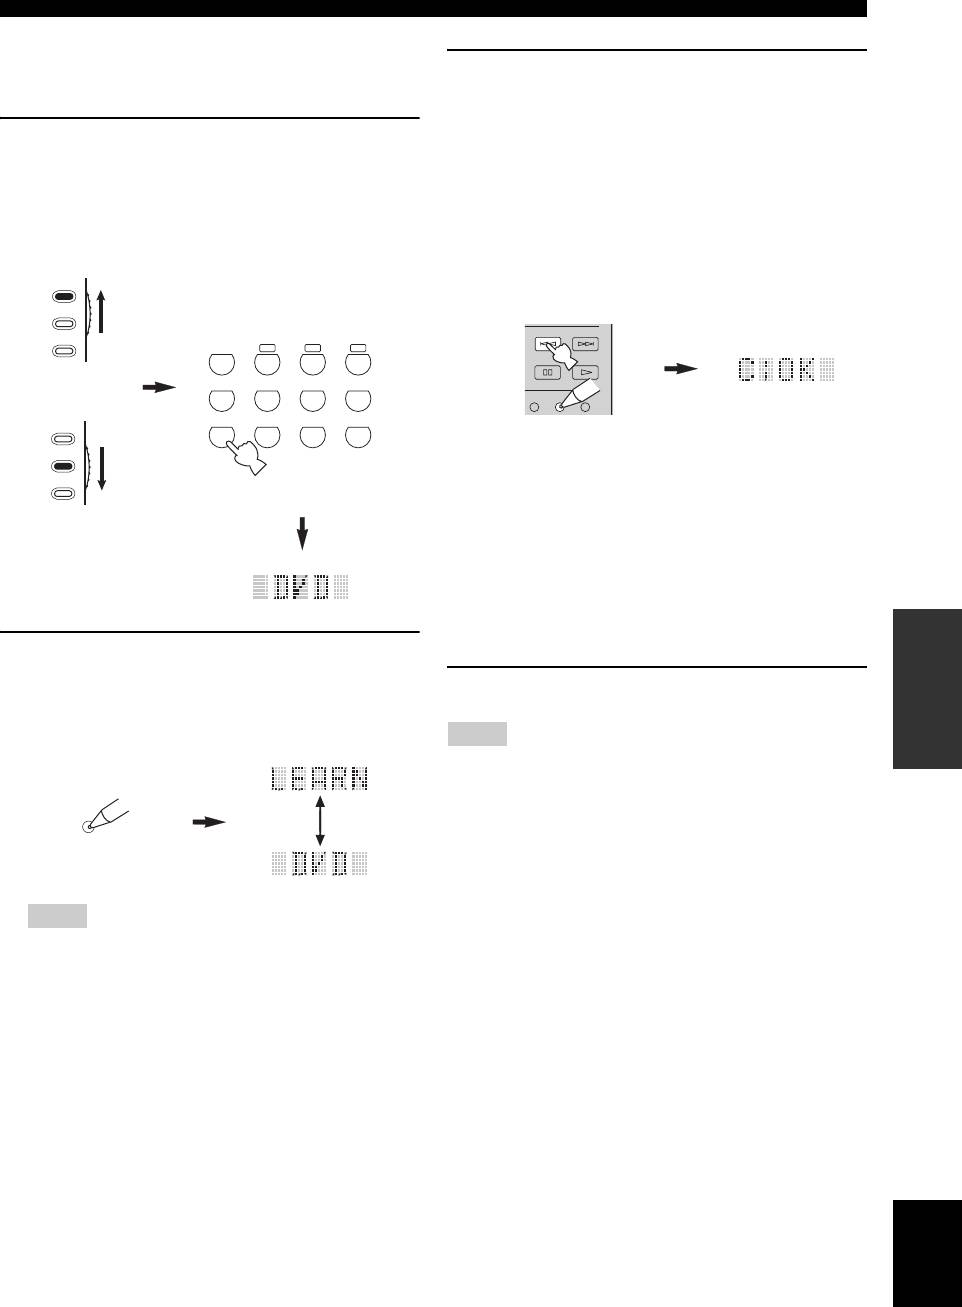
1 Set the operation mode selector to
F
AMP or
F
SOURCE and then press
C
MACRO using
MCR 1: POWER
a ballpoint pen or similar object.
“MCR ?” appears in the display window (
6
) on the
POWER
POWER
STANDBY
POWER
TV
AV
remote control.
SCENE
1
LEVEL
PRESET/CH
SET MENU
1234
TITLE
MENU
AUDIO
AMP
BAND
SRCH MODE
TUNER
CBA
PURE DIRECT
3
ENTER
SOURCE
V
-
AUX/DOCK
DTV/CBL
CD
MD/CD-R
A/B/C/D/E
STRAIGHT
RETURN
DISPLAY
TV
DVD
DVR
VCR
PHONO
MEMORY
2
MCR 3: AUDIO
or
MACRO
MCR 2: DVD
OPERATION
ADVANCED
AMP
SOURCE
Indicates the
TV
number of macro
steps entered
Note
Flashes alternately so you can
If you do not complete each of the following steps within 30
set the next step
seconds, the macro programming mode will be
automatically canceled. In this case, start over from step 1.
2 Press the macro button you want to use to
Note
operate the macro.
To change the selected control area, press
6
SELECT k / n
.
The macro button name (e.g. “M;DVD”) and the
Pressing the input selector buttons will program a macro step,
selected component name (e.g. “DVD”) appear
whereas
6
SELECT k / n
only changes the selected control
alternately in the display window (
6
) on the remote
area.
control.
4 Press
C
MACRO again using a ballpoint pen
STANDBY
POWER
or similar object when the operation
sequence you want to program is complete.
TUNER
CBA
Note
V
-
AUX/DOCK
DTV/CBL
CD
MD/CD-R
“ERROR” appears in the display window (
6
) if you press
DVD
DVR
VCR
PHONO
more than one button simultaneously.
English
99 En
Remote control features
Clearing configurations
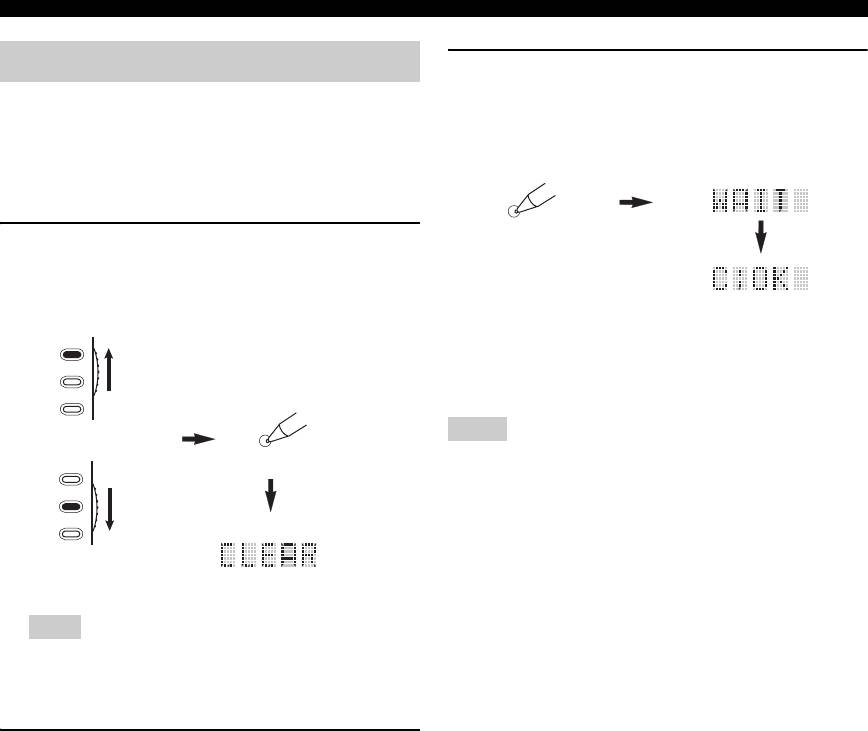
3 Press and hold
C
CLEAR again for about 3
seconds.
You can clear all changes made in each function set, such
“WAIT” appears in the display window (
6
). If
as learned functions, macros, renamed control area names
clearing was successful, “C;OK” appears in the
and setup remote control ID.
display window (
6
) on the remote control.
■ Clearing function sets
CLEAR
1 Set the operation mode selector to
F
AMP or
F
SOURCE and then press
C
CLEAR by
using a ballpoint pen or similar object.
“CLEAR” appears in the display window (
6
).
y
AMP
Once you have cleared a learned function for a button, the button
SOURCE
reverts to the factory setting (or to the manufacturer setting, if you
have set remote control codes).
TV
CLEAR
Notes
or
• “L;ALL” and “FCTRY” may take about 30 seconds to
AMP
complete.
SOURCE
• “C;NG” appears in the display window (
6
) if clearing was
TV
unsuccessful. In this case start over from step 2.
• “ERROR” appears in the display window (
6
) if you press a
button not indicated in the respective step, or if you press more
than one button simultaneously.
Note
If you do not complete each of the following steps within 30
seconds, the clearing mode will be automatically canceled.
In this case, start over from step 1.
2 Press
9
k / n to select the clear mode.
L;CD (etc.) (L; Name of an control area)
Clears all learned functions in the respective
control area. The name of a component is
shown after a semicolon (;). Press an input
selector button to select the control area.
L;AMP Clears all learned functions for controlling the
amplifier functions of this unit.
L;ALL Clears all learned functions.
M;ALL Clears all programmed macros.
RNAME Clears all renamed source names.
FCTRY Clears all remote functions and returns the
remote to the factory settings.
100 En
Remote control features
■ Clearing a learned function
You can clear the function learned for a certain button in
3 Press and hold
C
CLEAR using a ballpoint
each control area.
pen or similar object and then press the
button you want to clear for about 3 seconds.
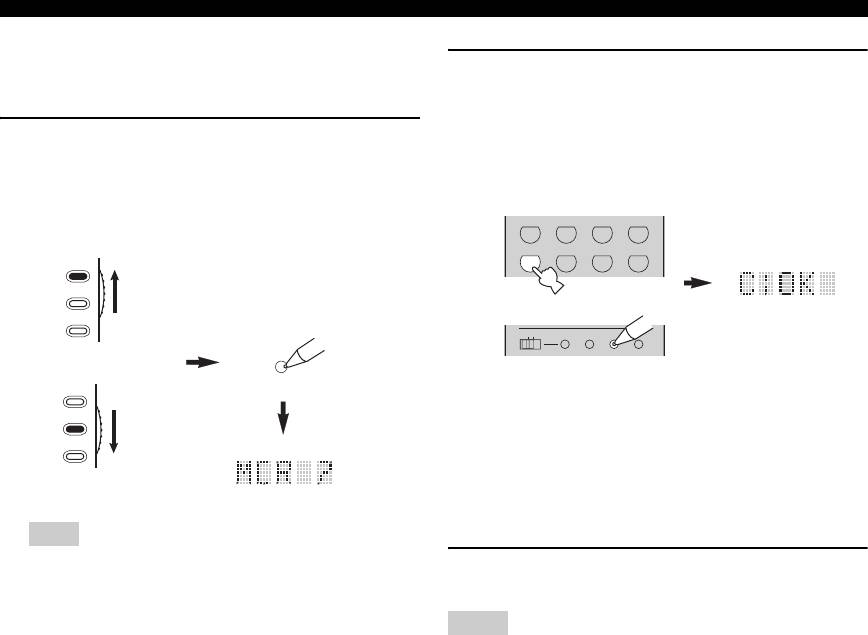
1 Set the operation mode selector to
F
AMP or
“C;OK” appears in the display window (
6
) if
F
SOURCE and then press an input selector
clearing was successful. Once “C;OK” appears in the
button (
5
) to select the control area
display window (
6
) on the remote control, release
containing the function you want to clear.
the ballpoint pen or similar object used to press
The selected component name appears in the display
C
CLEAR to exit the clearing mode. The remote
window (
6
).
control returns to the learning mode.
AMP
SOURCE
MODE- PTY SEEK- START
TV
TUNER
CBA
or
V
-
AUX/DOCK
DTV/CBL
CD
MD/CD-R
LEARN
CLEAR
RENAME
DVD
DVR
VCR
PHONO
AMP
SOURCE
TV
y
• If you continuously want to clear another function, repeat
step 3.
• If you continuously want to clear another function for
another component, press
6
SELECT k / n to select the
control area, then repeat step 3.
• Once you clear a learned function, the button reverts to the
factory setting (or to the manufacturer setting if you have
OPERATION
set remote control codes).
ADVANCED
2 Press
C
LEARN using a ballpoint pen or
similar object.
4 Press
C
LEARN again to exit.
“LEARN” and the selected component name
(e.g. “DVD”) appear alternately in the display
Notes
window (
6
).
• “C;NG” appears in the display window (
6
) on the remote
control if clearing was unsuccessful. In this case, start over from
step 2.
LEARN
• “ERROR” appears in the display window (
6
) on the remote
control if you press more than one button simultaneously.
Notes
• Do not press and hold
C
LEARN. If you hold it down for
more than 3 seconds, the remote control enters the remote
control code setting mode.
• If you do not complete each of the following steps within
30 seconds, the learning mode will be automatically
canceled. In this case, start over from step 2.
English
101 En
Remote control features
■ Clearing a macro function
You can clear the function programmed for a certain
2 Press and hold
C
CLEAR using a ballpoint
macro button.
pen or similar object, then press the macro
button you want to clear for about 3 seconds.
1 Set the operation mode selector to
F
AMP or
“C;OK” appears in the display window (
6
) on the
F
SOURCE and then press
C
MACRO using
remote control if clearing was successful.
a ballpoint pen or similar object.
“MCR ?” appears in the display window (
6
) on the
V
-
AUX/DOCK
DTV/CBL
CD
MD/CD-R
remote control.
DVD
DVR
VCR
PHONO
AMP
SOURCE
TV
OFF
ON
MACRO
LEARN
CLEAR
RENAME
MACRO
or
AMP
SOURCE
y
• If you continuously want to clear another function, repeat
TV
step 2.
• Once you clear a programmed function, the button reverts
to the factory setting (or to the manufacturer setting if you
have set remote control codes).
Note
If you do not complete each of the following steps within 30
3 Press
C
MACRO again to exit the macro
seconds, the macro programming mode will be
programming mode.
automatically canceled. In this case, start over from step 1.
Notes
• “C;NG” appears in the display window (
6
) on the remote
control if clearing was unsuccessful. In this case, start over from
step 2.
• “ERROR” appears in the display window (
6
) on the remote
control if you press more than one button simultaneously.
102 En
Оглавление
- Caution: Read this before operating your unit.
- Contents
- Features
- Notice
- Getting started
- Quick start guide
- Connections
- Optimizing the speaker setting for your listening room (YPAO)
- Selecting the SCENE templates
- Playback
- Sound field programs
- Using audio features
- FM/AM tuning
- Radio Data System tuning (Europe and Russia models only)
- Using iPod™
- Using Bluetooth™ components
- Recording
- Advanced sound configurations
- Customizing this unit (MANUAL SETUP)
- Remote control features
- Using multi-zone configuration
- Advanced setup
- Troubleshooting
- Resetting the system
- Glossary
- Sound field program information
- Specifications
- Index
- Предупреждение: Внимательно изучите это перед использованием аппарата.
- Содержание
- Описание
- Уведомление
- Начало работы
- Краткое руководство пользователя
- Подключения
- Оптимизация настройки колонок для комнаты для прослушивания (YPAO)
- Выборе шаблонов SCENE
- Воспроизведение
- Программы звукового поля
- Использование аудиофункций
- Настройка радиопрограмм диапазона ЧМ/AM
- Функция настройки Системы Радиоданных (Только модели для Европы и России)
- Использование iPod™
- Использование компонентов Bluetooth™
- Запись
- Дополнительные конфигурации звучания
- Настройка данного аппарата (MANUAL SETUP)
- Функции пульта ДУ
- Использование многозонной конфигурации
- Дополнительные настройки
- Возможные неисправности и способы по их устранению
- Перезагрузка системы
- Справочник
- Информация программы звукового поля
- Технические характеристики
- Предметный указател


