Yamaha RX-V663 Black: Advanced setup
Advanced setup: Yamaha RX-V663 Black
ADVANCED SETUP
Advanced setup
This unit has additional menus that are displayed in the front panel display. The advanced setup menu offers additional
operations to adjust and customize the way this unit operates. Change the initial settings (indicated in bold under each
parameter) to reflect the needs of your listening environment.
Notes
• The settings you make are reflected next time you press
K
MAIN ZONE ON/OFF to turn on this unit (see page 29).
•Only
K
MAIN ZONE ON/OFF,
L
SYSTEM OFF,
M
TONE CONTROL and the
N
PROGRAM selector are effective while you
are using the advanced setup menu.
• No other operations can be made while you are using the advanced setup menu.
• The advanced setup menu is only available in the front panel display.
■ Speaker impedance SP IMP.
Using the advanced setup
Use this feature to set the speaker impedance of this unit
so that it matches that of your speakers.
Choices: 8ΩMIN, 6ΩMIN
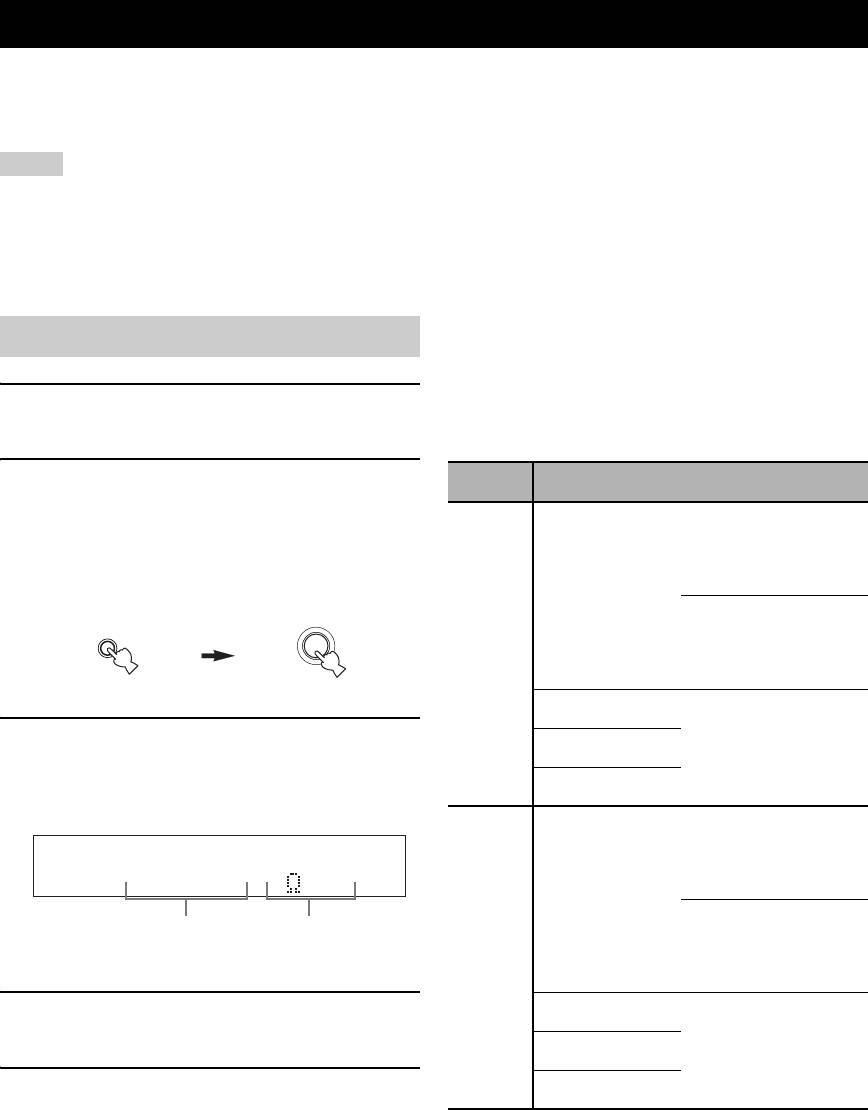
1 Press
L
SYSTEM OFF on the front panel to
• Select “8ΩMIN” to set the speaker impedance to 8 Ω.
set this unit to the standby mode.
• Select “6ΩMIN” to set the speaker impedance to 6 Ω.
2 Press and hold
M
TONE CONTROL and
SP IMP. Speaker Impedance level
then press
K
MAIN ZONE ON/OFF to turn
If you use one set (A or B),
on this unit.
the impedance of each
This unit turns on, and the advanced setup menu
speaker must be 8 Ω or
appears in the front panel display.
higher.
Front
If you use two sets (A and
TONE CONTROL
While holding
MAIN ZONE
B), the impedance of each
down
ON/OFF
8ΩMIN
speaker must be 16 Ω or
higher.
*
Center
The impedance of each
3 Rotate the
N
PROGRAM selector to select
Surround
speaker must be 8 Ω or
the parameter you want to adjust.
higher.
The name of the selected parameter appears in the
Surround back
front panel display.
If you use one set (A or B),
the impedance of each
speaker must be 4 Ω or
higher.
SPIMP.-8MIN
Front
If you use two sets (A and
Currently selected
Currently selected
B), the impedance of each
parameter
parameter setting
6ΩMIN
speaker must be 8 Ω or
higher.
4 Press
M
TONE CONTROL repeatedly to
Center
change the selected parameter setting.
The impedance of each
Surround
speaker must be 6 Ω or
higher.
5 Press
L
SYSTEM OFF to save the new
Surround back
setting and set this unit to the standby mode.
*
The Canada model cannot use two separate speaker systems
y
(A and B) simultaneously when “SP IMP.” is set to “8ΩMIN”.
The settings you made are reflected next time you turn on
this unit.
106 En
Advanced setup
See page 106 for the operation of the advanced setup.
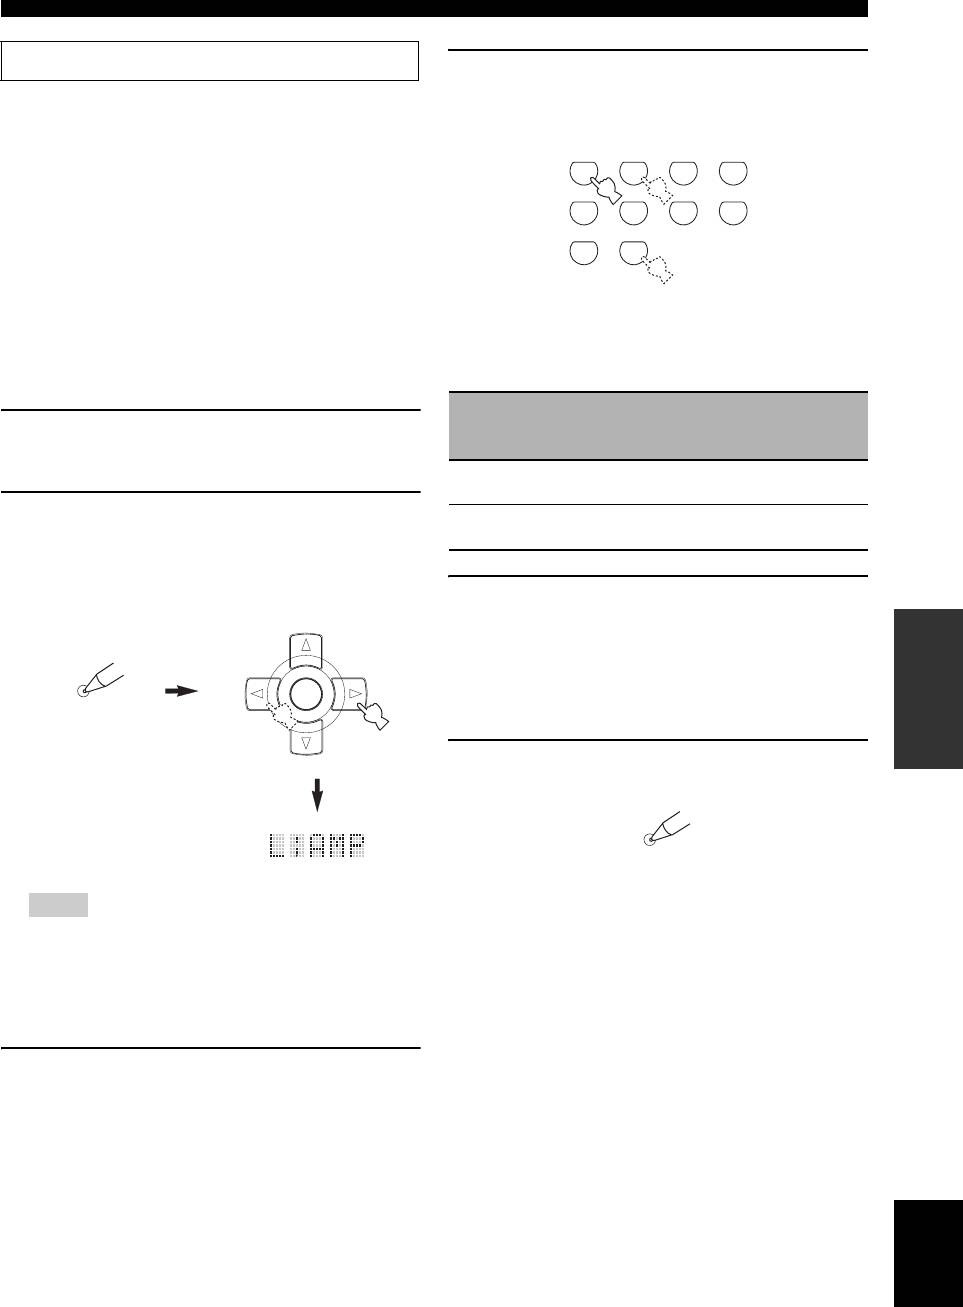
4 Press the numeric buttons (
A
) to enter the
four-digit remote control code for the input
■ Remote control AMP ID REMOTE AMP
area you want to use.
Use this feature to set the AMP ID of this unit for remote
control recognition. This feature is useful when you
CLASSICAL
LIVE/CLUB
ENTERTAIN
MOVIE
operate this unit and the other Yamaha receivers/
1
2
3
4
amplifiers in the same room separately.
STEREO
ENHANCER
SUR. DECODE
PARAMETER
5
6
7
8
Choices: ID1, ID2
• Select “ID1” when the remote control AMP ID code is
MULTI CH IN
9
0
set to “2201”.
• Select “ID2” when the remote control AMP ID code is
set to “2202”.
Remote control AMP ID codes
Setting remote control AMP ID codes
Select one of the following codes to set the remote control
You need to set the remote control AMP ID code for the
AMP ID code for the input area you want to use.
remote control.
AMP ID code
Remote
1 Set the operation mode selector to
F
AMP or
(remote control
Function
control AMP
setting)
ID
F
SOURCE.
2201
To operate this unit using the
ID1
(initial setting)
default code.
(initial setting)
2 Press and hold
C
LEARN for about 3
2202 To operate this unit using an
ID2
seconds using a ballpoint pen or similar
alternative code.
object and then press
9
l / h repeatedly
until “L;AMP” appears in the display window
5 Press
9
ENTER to set the number.
(
6
) on the remote control.
“OK” appears in the display window (
6
) if setting
PRESET/CH
OPERATION
ADVANCED
was successful.
“NG” appears in the display window (
6
) if the
LEARN
setting was unsuccessful. In this case, start over from
ENTER
step 1.
A/B/C/D/E
6 Press
C
LEARN again to exit from the setup
mode.
LEARN
Notes
• Be sure to press and hold
C
LEARN for at least 3
seconds, otherwise the learning process will start.
• If you do not complete each of the following steps within
30 seconds, the setting mode will be automatically
canceled. In this case, start over from step 1.
3 Press
9
ENTER.
The four-digit code set for the selected input area
appears in the display window (
6
) on the remote
control.
English
107 En
Advanced setup
See page 106 for the operation of the advanced setup.
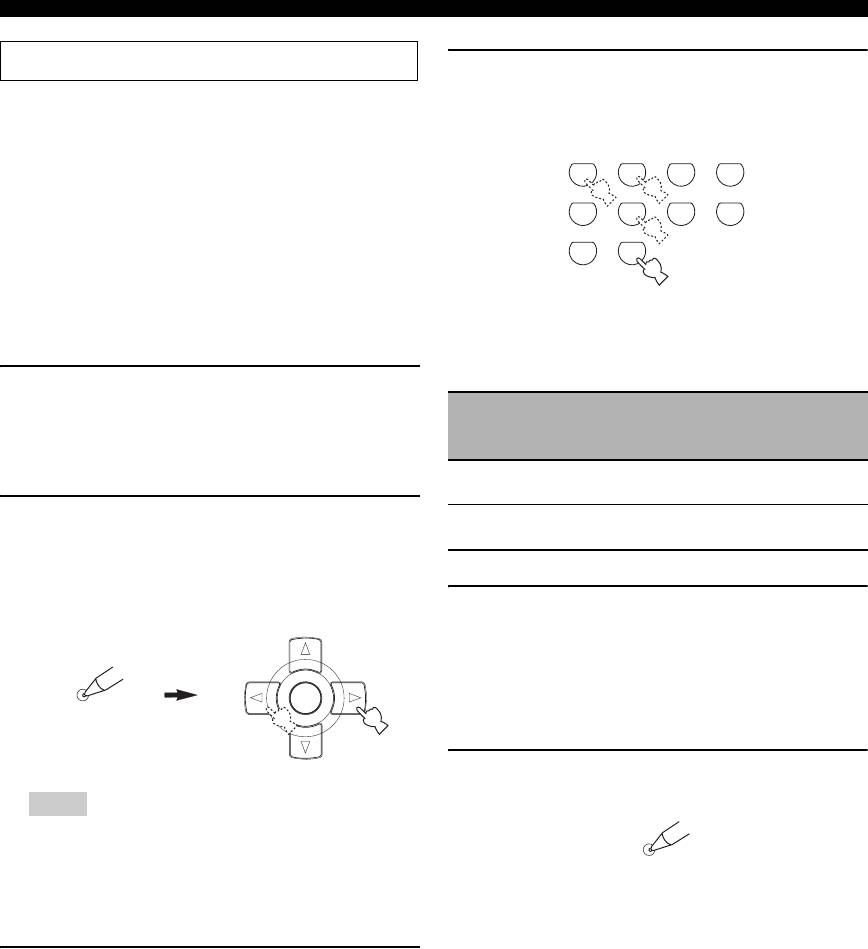
4 Press the numeric buttons (
A
) to enter the
four-digit remote control code for the input
■ Remote control TUNER ID REMOTE TU
area you want to use.
Use this feature to set the TUNER ID of this unit for
remote control recognition.
CLASSICAL
LIVE/CLUB
ENTERTAIN
MOVIE
Choices: ID1, ID2
1
2
3
4
• Select “ID1” when the remote control TUNER ID code
STEREO
ENHANCER
SUR. DECODE
PARAMETER
5
8
is set to “2602”.
6
7
• Select “ID2” when the remote control TUNER ID code
MULTI CH IN
9
0
is set to “2610”.
Setting remote control TUNER ID codes
You need to set the remote control TUNER ID library
Remote control tuner ID codes
code for the remote control.
Select one of the following codes to set the remote control
tuner ID code for the input area you want to use.
1 Set the operation mode selector to
F
AMP or
F
SOURCE and then press
5
TUNER on
Tuner ID code
Remote
(remote control
Function
control
the remote control to select the tuner to
setting)
tuner ID
change the remote control ID.
2602
To operate this unit using the
ID1
(initial setting)
default code.
(initial setting)
2 Press and hold
C
LEARN for about 3
2610 To operate this unit using an
ID2
seconds using a ballpoint pen or similar
alternative code.
object and the
9
l / h repeatedly until
“L;TUN” and “TUNER” appear in the display
5 Press
9
window (
6
ENTER to set the number.
) on the remote control.
PRESET/CH
“OK” appears in the display window (
6
) if setting
was successful.
“NG” appears in the display window (
6
) if the
LEARN
ENTER
setting was unsuccessful. In this case, start over from
A/B/C/D/E
step 1.
6 Press
C
LEARN again to exit from the setup
mode.
Notes
• Be sure to press and hold
C
LEARN for at least 3
LEARN
seconds, otherwise the learning process will start.
• If you do not complete each of the following steps within
30 seconds, the setting mode will be automatically
canceled. In this case, start over from step 1.
3 Press
9
ENTER.
The four-digit code set for the selected input area
appears in the display window (
6
) on the remote
control.
108 En

Advanced setup
■ Tuner frequency step TU
See page 106 for the operation of the advanced setup.
(Asia and General models only)
Use this feature to set the tuner frequency step according
■ Bi-amplifier setting BI-AMP
to the frequency spacing in your area.
Use this feature to activate or deactivate the bi-amplifier
Choices: AM10/FM100, AM9/FM50
function (see page 16).
• Select “AM10/FM100” for North, Central and South
Choices: ON, OFF
America.
• Select “ON” if you want to activate the bi-amplifier
• Select “AM9/FM50” for all other areas.
function. “SUR.B L/R SP” is set to “NONE”
automatically, and this unit outputs the front channel
■ Parameter initialization INIT
audio signals at the SURROUND BACK/BI-AMP
Use this feature to reset the parameters of this unit to the
speaker terminals.
initial factory settings. You can select the category of
• Select “OFF” if you want to deactivate the bi-amplifier
parameters to be initialized.
function.
Choices: DSP PARAM, VIDEO, ALL, CANCEL
• Select “DSP PARAM” to initialize all the parameters
Note
of the sound field programs (see page 64).
When “BI-AMP” is set to “ON”, you can only select “FRONT
• Select “VIDEO” to initialize the parameters in
B”, “ZONE B”, or “NONE” in “EXTRA SP ASSIGN” (see
“VIDEO SET” (see page 88) and “OSD SHIFT” in
page 76).
“DISPLAY SET” (see page 87).
■ SCENE IR code setting SCENE IR
• Select “ALL” to initialize all the parameters of this
unit.
Use this feature to output the remote control signals at the
• Select “CANCEL” to cancel the initialization
REMOTE OUT jack automatically when this unit is in the
procedure.
SCENE mode.
Choices: ON, OFF
Note
• Select “ON” when the component connected to the
Use “INITIALIZE” in the sound field program menu to initialize
REMOTE OUT jack is the Yamaha component and has
the parameters of the desired program (see page 64).
the capability of the SCENE control signals. This unit
OPERATION
ADVANCED
automatically sends the remote control signals to the
component.
• Select “OFF” when the component connected to the
REMOTE OUT jack is not the Yamaha component and
does not have the capability of the SCENE control
signals.
Note
If noises are output when you operate the SCENE function, set
“SCENE IR” to “OFF”.
English
109 En
Оглавление
- Caution: Read this before operating your unit.
- Contents
- Features
- Notice
- Getting started
- Quick start guide
- Connections
- Optimizing the speaker setting for your listening room (YPAO)
- Selecting the SCENE templates
- Playback
- Sound field programs
- Using audio features
- FM/AM tuning
- Radio Data System tuning (Europe and Russia models only)
- Using iPod™
- Using Bluetooth™ components
- Recording
- Advanced sound configurations
- Customizing this unit (MANUAL SETUP)
- Remote control features
- Using multi-zone configuration
- Advanced setup
- Troubleshooting
- Resetting the system
- Glossary
- Sound field program information
- Specifications
- Index
- Предупреждение: Внимательно изучите это перед использованием аппарата.
- Содержание
- Описание
- Уведомление
- Начало работы
- Краткое руководство пользователя
- Подключения
- Оптимизация настройки колонок для комнаты для прослушивания (YPAO)
- Выборе шаблонов SCENE
- Воспроизведение
- Программы звукового поля
- Использование аудиофункций
- Настройка радиопрограмм диапазона ЧМ/AM
- Функция настройки Системы Радиоданных (Только модели для Европы и России)
- Использование iPod™
- Использование компонентов Bluetooth™
- Запись
- Дополнительные конфигурации звучания
- Настройка данного аппарата (MANUAL SETUP)
- Функции пульта ДУ
- Использование многозонной конфигурации
- Дополнительные настройки
- Возможные неисправности и способы по их устранению
- Перезагрузка системы
- Справочник
- Информация программы звукового поля
- Технические характеристики
- Предметный указател


