Yamaha RX-V663 Black: Optimizing the speaker setting for your listening room (YPAO)
Optimizing the speaker setting for your listening room (YPAO): Yamaha RX-V663 Black
OPTIMIZING THE SPEAKER SETTING FOR YOUR LISTENING ROOM (YPAO)
Optimizing the speaker setting for your listening room (YPAO)
This unit employs the YPAO (Yamaha Parametric Room Acoustic Optimizer) technology which lets you avoid
troublesome listening-based speaker setup and achieves highly accurate sound adjustments automatically. The supplied
optimizer microphone collects and this unit analyzes the sound your speakers produce in your actual listening
environment.
Using AUTO SETUP
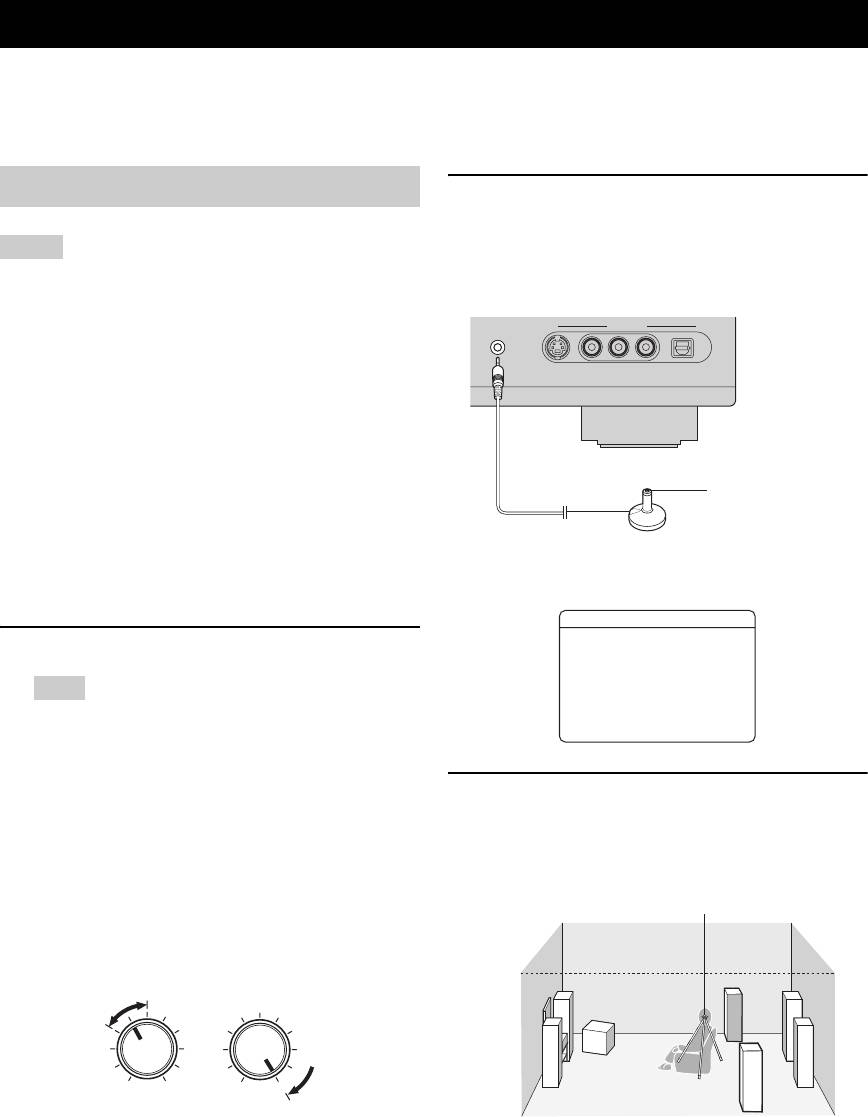
2 Connect the supplied optimizer microphone
to the OPTIMIZER MIC jack on the front
panel.
Notes
“MIC ON View OSD menu” appears in the front
• Be advised that it is normal for loud test tones to be output
panel display.
during the “AUTO SETUP” procedure.
• To achieve the best results, make sure the room is as quiet as
OPTIMIZER MIC
VIDEO AUX
possible while the “AUTO SETUP” procedure is in progress. If
there is too much ambient noise, the results may not be
S VIDEO
VIDEO AUDIO
LR
OPTICAL
satisfactory.
y
• Initial settings are indicated in bold.
• You can run “AUTO SETUP” using the system menu that
appears in the OSD or in the front panel display. This manual
uses the OSD illustrations to explain the “AUTO SETUP”
Omni-directional
procedure.
microphone
• Before performing operations, set the operation mode selector
on the remote control to
F
AMP.
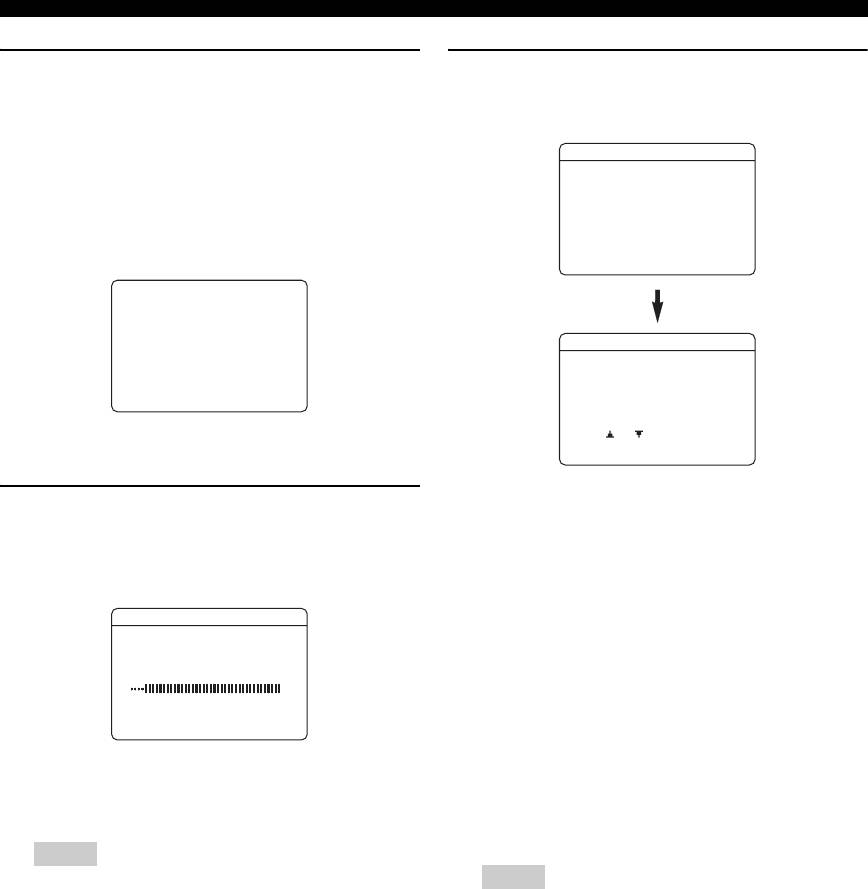
The following menu screen appears on the video
• This unit uses the speakers connected to the FRONT A speaker
monitor.
terminals as the front speakers for the adjustment.
AUTOSETUP
. EXTRASPASSIGN
1 Make sure of the following check points.
>ZONE2 FRONTB
ZONEBPRESENCE
NONE
SETUP;;;;;;;AUTO
Note
EQ;;;;;;;NATURAL
START
[
Before starting the automatic setup, check the following
[]/[]:Up/Down
[
[]/[]:Select
[
[
check points.
❏ Speakers are connected appropriately.
❏ Headphones are disconnected from this unit.
3 Place the optimizer microphone at your
❏ This unit and the video monitor are turned on.
normal listening position on a flat level
❏ This unit is selected as the video input source of
surface with the omni-directional
the video monitor.
microphone heading upward.
❏ The connected subwoofer is turned on and the
Optimizer microphone
volume level is set to about half way (or slightly
less).
❏ The crossover frequency controls of the
connected subwoofer is set to the maximum.
VOLUME
CROSSOVER
HIGH CUT
MIN
MAX
MIN MAX
Controls of a subwoofer (example)
y
❏ The room is sufficiently quiet.
It is recommended that you use a tripod (etc.) to affix the
y
optimizer microphone at the same height as your ears would
If you connect two subwoofers to this unit, the volume level
be when you are seated in your listening position. You can
of each subwoofer is set to slightly less.
use the attached screw of a tripod (etc.) to fix the optimizer
microphone to the tripod (etc.).
32 En

Optimizing the speaker setting for your listening room (YPAO)
4 Press
9
l / h to select the desired setting
Notes
for “EXTRA SP ASSIGN” and then press
9
n.
• “RELOAD” or “UNDO” is available only when you have
previously run “AUTO SETUP” and confirmed the results.
Extra speaker assignment
• “RELOAD” or “UNDO” is not available when you change
the setting of “BI-AMP” in the advanced setup (see
EXTRA SP ASSIGN
page 109) or “EXTRA SP ASSIGN” in “BASIC MENU”
Selects the function of the speakers connected to the
(see page 76).
EXTRA SP terminals.
Choices: FRONT B, ZONE2, ZONE B,
6 Press
9
PRESENCE, NONE
l / h to select the desired setting of
“EQ”.
• When you use the alternative front speaker
PREPARATION
system (see page 43)
Parametric equalizer type EQ
Select “FRONT B”.
Parametric equalizer adjusts the level of the specified
• When you use the Zone 2 speakers (see
frequency bands. This unit automatically selects the
crucial frequency bands for the listening room and
page 104)
adjusts the level of the selected frequency bands to
Select “ZONE2” to set the function of the speakers
create a cohesive sound field in the room. You can
to the Zone 2 speakers. This unit drives the Zone 2
select the type of the parametric equalizer adjustment
speakers by using the internal amplifier.
from the following choices.
• When you want to use another front
Choices: NATURAL, FLAT, FRONT
speaker system in Zone B
• Select “NATURAL” to average out the frequency
Select “ZONE B”.
response of all speakers with higher frequencies
being all speakers to achieve more natural sound.
• When you use the presence speakers (see
Recommended if the FLAT setting sounds a little
page 13)
harsh.
Select “PRESENCE” to set the function of the
• Select “FLAT” to average the frequency response
speakers to the presence speakers.
of all speakers. Recommended if all of your
speakers are of similar quality.
• When you do not use the EXTRA SP
• Select “FRONT” to adjust the frequency response
terminals
of each speaker in accordance with the sound of
Select “NONE” to deactivate the EXTRA SP
your front speakers. Recommended if your front
terminals.
speakers are of much higher quality than your other
speakers.
Note
If you select “ON” in “BI-AMP” (see page 109), you cannot
select “PRESENCE” or “ZONE2” in “EXTRA SP ASSIGN”.
5 Press
9
l / h to select “SETUP” and then
press
9
n.
Choices: AUTO, RELOAD, UNDO, DEFAULT
• Select “AUTO” to automatically run the entire
“AUTO SETUP” procedure.
• Select “RELOAD” to reload the last “AUTO
SETUP” settings and override the previous
settings.
• Select “UNDO” to undo the last “AUTO SETUP”
settings and restore the previous settings.
• Select “DEFAULT” to reset the “AUTO SETUP”
parameters to the initial factory settings.
English
33 En
Optimizing the speaker setting for your listening room (YPAO)
7 Press
9
n to select “START” and then press
9 Make sure that the following screen appears
9
ENTER to start the setup procedure.
and then press
9
ENTER to display the
The following message appears in the OSD.
result screen.
When this unit starts the automatic setup procedure,
AUTOSETUP
loud test tones are output at the speakers.
For more accurate measurements, keep quiet and
Measurement Complete
move to the wall where speakers are not around. We
recommend that you leave the listening room during
Press [ENTER]
the automatic setup procedure.
NOTICE
Loudtesttonesare
output.
AUTOSETUP
Pleasekeepquiet
orleavetheroom.
. RESULT
SP : 3/4/0.1
Press[ENTER]
DIST: 4.50/5.30m
LVL : -9.0/+6.5dB
>
SET CANCEL
Once you perform the next operation, this unit starts
[ ]/[ ]:Up/Down
[ENTER]:Detail
the automatic setup procedure.
The results displayed under “RESULT” are as
8 Press
9
ENTER to start the automatic setup
follows:
procedure.
Number of speakers SP
The following screen appears in the OSD and setup
Displays the number of speakers connected to this
procedure starts in 10 seconds.
unit in the following order:
Front/Back/Subwoofer
AUTOSETUP
Speaker distance DIST
MeasurementStart
in 9seconds
Displays the speaker distance from the listening
position in the following order:
Closest speaker distance/Farthest speaker distance
[RETURN]:Cancel
Speaker level LVL
Loud test tones are output from each speaker during
Displays the speaker output level in the following
the auto setup procedure. Once all items are set, the
order:
“RESULT” display appears in the OSD.
Lowest speaker output level/Highest speaker output
level
Notes
Notes
• During the automatic setup procedure, do not perform any
operation on this unit.
• The signal output at the SUBWOOFER PRE OUT 2 jack
• We recommend that you get out of the room while this unit
is the same as the one output at the SUBWOOFER PRE
is in the auto setup procedure. It takes approximately 3
OUT 1 jack. Therefore, even if you connect two
minutes for this unit to complete the auto setup procedure.
subwoofers, the number of the connected subwoofer is
indicated as “0.1”.
y
• If “E-10:INTERNAL ERROR” appears during the testing
Press
9
k to cancel the automatic setup procedure.
procedure, restart from step 4.
• If you selected other than “AUTO” in step 5, no test tones
are output.
• If an error occurs during the “AUTO SETUP” procedure,
the setup procedure is canceled and an error screen
appears. For details, see “If an error screen appears” on
page 36.
• When this unit detects potential problems during the
“AUTO SETUP” procedure, “WARNING” and the
number of warning messages appears in the above of
“RESULT” (see page 36).
• Depending on the listening environment, “SWFR
PHASE:REV” appears during the automatic procedure
and “SUBWOOFER PHASE” in “SOUND MENU” (see
page 78) is automatically set to “REVERSE”.
34 En
Optimizing the speaker setting for your listening room (YPAO)
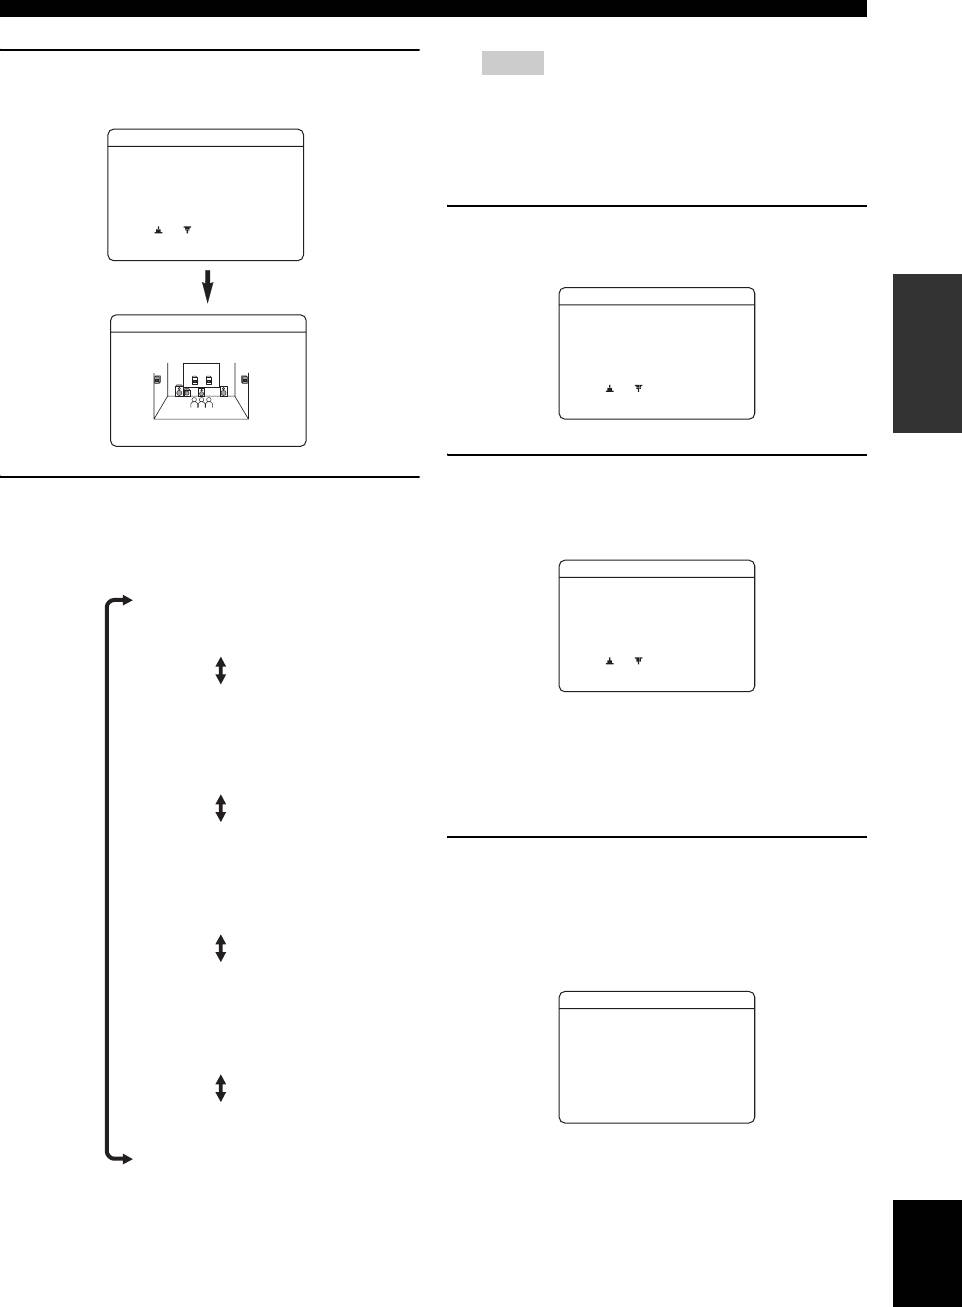
10 Press
9
ENTER to display the setup results
Notes
in detail.
• The distances displayed in the “DISTANCE” results may
be longer than the actual distance depending on the
AUTOSETUP
characteristics of your subwoofer.
• In the “EQ” results, different values may be set for the
. RESULT
SP : 3/4/0.1
same frequency to provide finer adjustments.
DIST: 4.50/5.30m
LVL : -9.0/+6.5dB
>
SET CANCEL
12 Press
9
ENTER to return to the top
[ ]/[ ]:Up/Down
[ENTER]:Detail
result display.
PREPARATION
AUTOSETUP
RESULT WIRING
RESULT
SP : 3/4/0.1
DIST: 4.50/5.30m
FRONT L;;;;;;;OK
LVL : -9.0/+6.5dB
. SET CANCEL
>
[ ]/[ ]:Up/Down
[ENTER]:Enter
[ ]/[ ]:Select
[
[
[ENTER]:Return
13 Make sure the pointer is pointing at “SET”
11 Press
9
l / h repeatedly to toggle between
and “CANCEL” and then press
9
l / h to
the setup result displays.
select “SET” or “CANCEL”.
Press
9
k / n to toggle between the parameters in a
results.
AUTOSETUP
Results of the speaker
RESULT
SP : 3/4/0.1
connection and wiring
DIST: 4.50/5.30m
(WIRING)
LVL : -9.0/+6.5dB
. SET CANCEL
>
[ ]/[ ]:Up/Down
[ENTER]:Enter
Results of the speaker distance
Choices: SET, CANCEL
from the listening position
• Select “SET” to confirm the “AUTO SETUP”
(DISTANCE)
results.
• Select “CANCEL” to cancel the “AUTO SETUP”
results.
Results of the setting of each
14 Press
9
ENTER to confirm your selection.
speaker size
The following screen appears. Disconnect the
(SIZE)
optimizer microphone from this unit to exit from
“SET MENU”. The optimizer microphone is
sensitive to heat. Keep it away from direct sunlight
and do not place it on top of this unit.
Results of the parametric
AUTOSETUP
equalizer of each speaker
(EQ)
AUTOSETUPComplete
Disconnect Microphone
PRESS [ENTER]
[MENU]:Exit
y
Results of the speaker output level
(LEVEL)
If you change speakers, speaker positions, or the layout of your
listening environment, run “AUTO SETUP” again to recalibrate
your system.
y
English
If you are not satisfied with the results or want to manually
adjust each parameter, use “MANUAL SETUP” (see
page 71).
35 En
Optimizing the speaker setting for your listening room (YPAO)
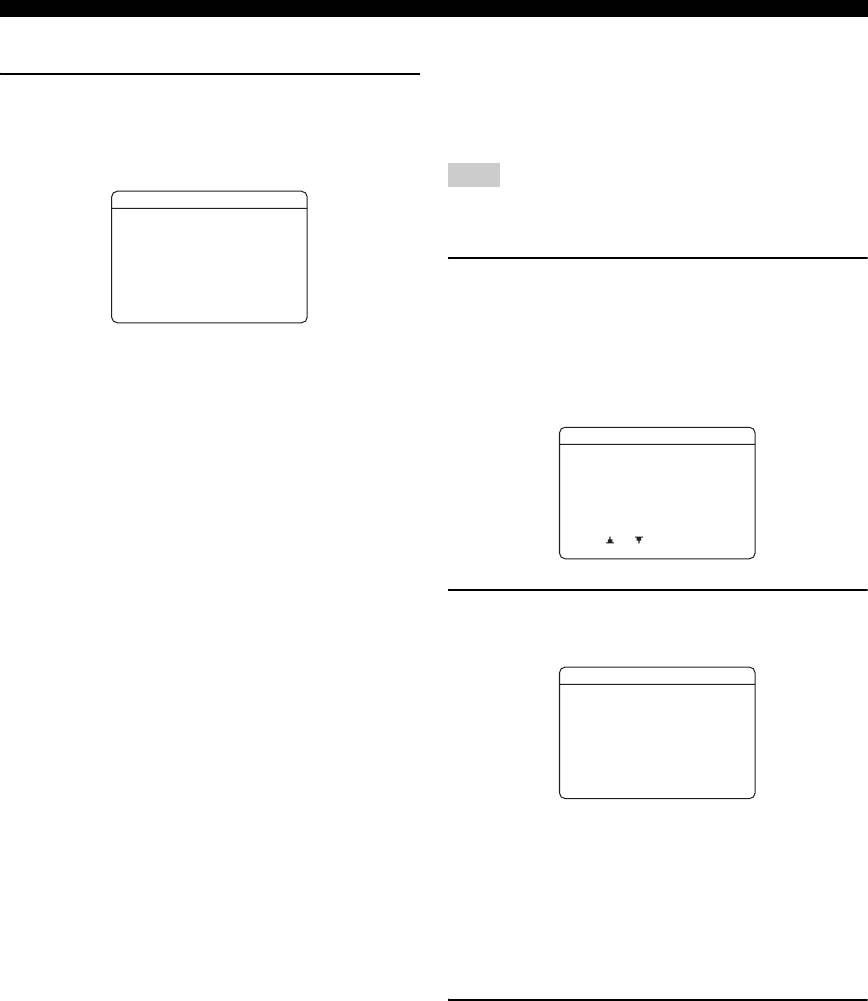
■ If an error screen appears
■ If “WARNING” appears
When this unit detects potential problems during the
Press
9
k / n / l / h to select “RETRY” or
“AUTO SETUP” procedure, “WARNING” appears in the
“EXIT” and then press
9
ENTER.
top result display. Check the warning messages to correct
The following display is an example when “E-9:USER
your speaker settings.
CANCEL” appears in the OSD.
Note
ERROR
Warnings differ from errors in that warnings do not cancel the
. E-9:USER CANCEL
“AUTO SETUP” procedure.
Don't operate
any function
1 Make sure the pointer is pointing at
>RETRY EXIT
[ ]/[ ]:Select
[
[
“WARNING” and then press
9
ENTER to
[ENTER]:Enter
display the detailed information about the
Choices: RETRY, EXIT
warning.
• Select “RETRY” to retry the “AUTO SETUP”
The number on the right of “WARNING” indicates
procedure.
the number of warning messages.
• Select “EXIT” to exit from the “AUTO SETUP”
procedure.
AUTOSETUP
y
. WARNING(3)
RESULT
If “E-5:NOISY” appears, “PROCEED” also appears in the
SP : 3/4/0.1
DIST: 4.50/5.30m
choices. When you select “PROCEED”, this unit continues the
LVL : -9.0/+6.5dB
measurements and settings, but the settings may not be optimal.
>SET CANCEL
[ ]/[ ]:Up/Down
[ENTER]:Detail
2 Press
9
l / h repeatedly to toggle between
the warning displays.
WARNING
W-1:OUTOFPHASE
Reverse Channel
FL --
CENTER
PL PR
SL SR
SBL SBR
[ ]/[ ]:Select
[
[
[ENTER]:Return
y
• For details about each warning message, see the “AUTO
SETUP” section in “Troubleshooting” on page 116.
• When the corresponding warning message is not
applicable to a speaker, “––” is displayed instead.
• If “SWFR: TOO LOUD” or “SWFR: TOO LOW” appears
in the “W-3: LEVEL ERROR” display, adjust the volume
level of the subwoofer(s).
3 Press
9
ENTER to return to the top result
display.
36 En
Оглавление
- Caution: Read this before operating your unit.
- Contents
- Features
- Notice
- Getting started
- Quick start guide
- Connections
- Optimizing the speaker setting for your listening room (YPAO)
- Selecting the SCENE templates
- Playback
- Sound field programs
- Using audio features
- FM/AM tuning
- Radio Data System tuning (Europe and Russia models only)
- Using iPod™
- Using Bluetooth™ components
- Recording
- Advanced sound configurations
- Customizing this unit (MANUAL SETUP)
- Remote control features
- Using multi-zone configuration
- Advanced setup
- Troubleshooting
- Resetting the system
- Glossary
- Sound field program information
- Specifications
- Index
- Предупреждение: Внимательно изучите это перед использованием аппарата.
- Содержание
- Описание
- Уведомление
- Начало работы
- Краткое руководство пользователя
- Подключения
- Оптимизация настройки колонок для комнаты для прослушивания (YPAO)
- Выборе шаблонов SCENE
- Воспроизведение
- Программы звукового поля
- Использование аудиофункций
- Настройка радиопрограмм диапазона ЧМ/AM
- Функция настройки Системы Радиоданных (Только модели для Европы и России)
- Использование iPod™
- Использование компонентов Bluetooth™
- Запись
- Дополнительные конфигурации звучания
- Настройка данного аппарата (MANUAL SETUP)
- Функции пульта ДУ
- Использование многозонной конфигурации
- Дополнительные настройки
- Возможные неисправности и способы по их устранению
- Перезагрузка системы
- Справочник
- Информация программы звукового поля
- Технические характеристики
- Предметный указател


