Pioneer PD-D9MK2-K: Chapter 2 Connecting up Connecting to an amplifier Using the remote sensor of another Pioneer component
Chapter 2 Connecting up Connecting to an amplifier Using the remote sensor of another Pioneer component: Pioneer PD-D9MK2-K
Table of contents
- IMPORTANT
- POWER-CORD CAUTION IMPORTANT: THE MOULDED PLUG
- Contents
- Chapter 1 Before you start
- What’s in the box Inserting the battery
- Disc/content format playback compatibility About WMA Disc compatibility table About DualDisc playback
- Chapter 2 Connecting up Connecting to an amplifier Using the remote sensor of another Pioneer component
- Connecting up 02 Plugging in
- Chapter 3 Controls and displays Front panel Display
- Remote control
- Chapter 4 Getting started Switching on Playing discs
- Getting started 04 Other playback features Button What it does Button What it does
- Chapter 5 Other settings and features Listening to Pure Audio Using Legato Link Pro Using the SACD/CD Dimming the display Displaying disc information
- Chapter 6 Additional information Hints on installation Taking care of your player and discs
- Additional information06 Cleaning the pickup lens Cleaning discs Condensation Moving the player Cleaning the unit’s exterior
- Troubleshooting Problem Remedy
- Glossary Specifications
- Accessories
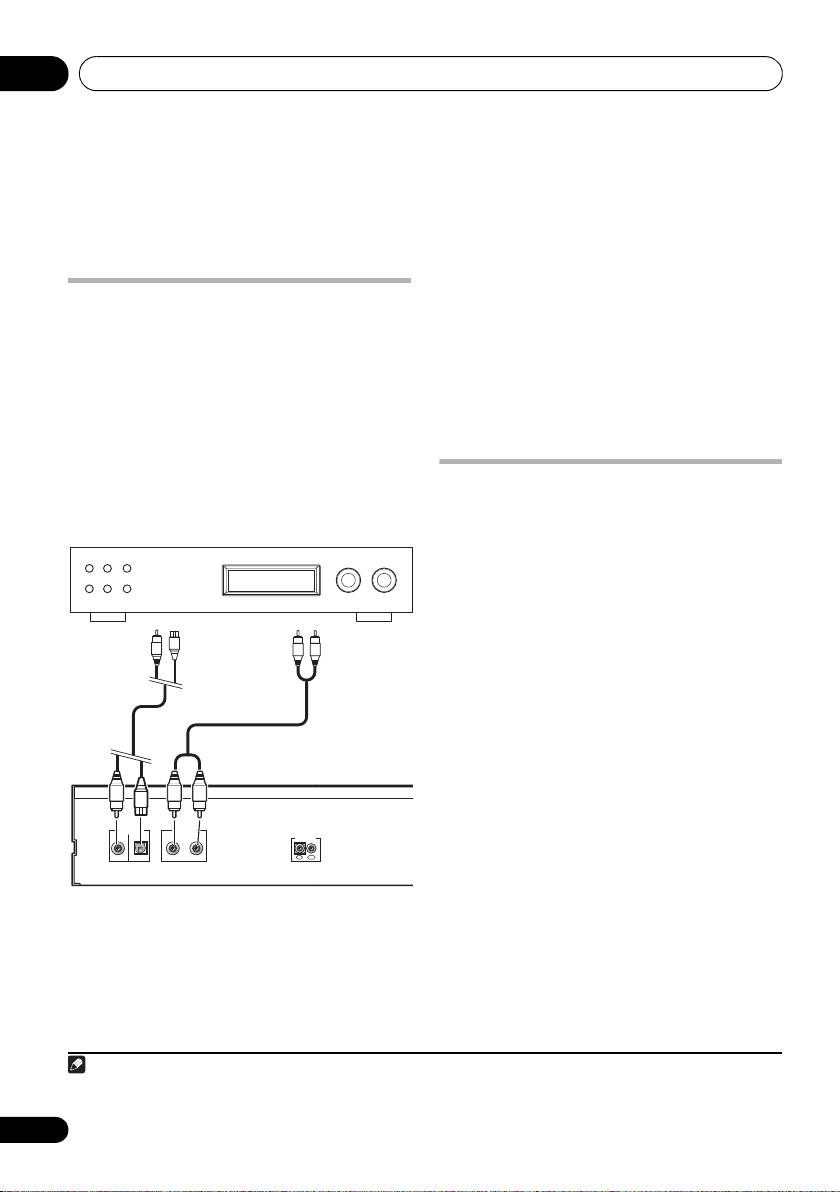
Connecting up02
Chapter 2
Connecting up
For a coaxial connection, use a coaxial cable
Connecting to an amplifier
(not supplied) to connect the COAXIAL
DIGITAL OUT jack to a coaxial input on your
You can connect this player to your amplifier or
amplifier.
receiver using the analog outputs or one of the
digital outputs.
• Note that SACD audio is not output
through these jacks, so this connection
If you connect using one of the digital outputs,
should be in addition to, rather than
you should also connect the 2 channel analog
instead of, an analog connection.
outputs for compatibility with all discs.
1 Connect the analog LINE OUT jacks on this
player to a set of analog audio inputs on your
Using the remote sensor of
amplifier.
another Pioneer component
Many Pioneer components have SR CONTROL
jacks which can be used to link components
together. This allows you to use the remote
sensor of just one component, which is useful
if you want to put several components out of
view (for example, in a closed shelf space).
When you use a remote control, the control
signal is passed along the chain to the
1
appropriate component.
• Note that if you use this feature, make sure
that you also have at least one set of analog
audio jacks connected to another
component for grounding purposes.
1 Decide which component you want to use
the remote sensor of.
When you want to control any component in
the chain, this is the remote sensor at which
you’ll point the corresponding remote control.
2 Connect one of the digital outputs to the
corresponding digital input on your amplifier.
For an optical connection, use an optical cable
(not supplied) to connect the OPTICAL
DIGITAL OUT jack to an optical input on your
amplifier.
8
En
Amplifier or receiver
To digital input
To digital input
To audio input
(coaxial)
(optical)
(analog)
DIGITAL OUT
LINE OUT
RL
CONTROL
COAXIAL
OPTICAL
IN
OUT
This player
Note
PD-D9MK2_SYXJ5.book 8 ページ 2009年4月15日 水曜日 午後6時9分
1 If you have connected a remote control to the CONTROL IN jack (using a mini-plug cable), you won’t be able to control this
unit using the remote sensor.
