Pioneer PDP-42MVE1: VIDEO WALL POSITION DIVIDER AUTO ID DISP. MODE
VIDEO WALL POSITION DIVIDER AUTO ID DISP. MODE: Pioneer PDP-42MVE1
Table of contents
- Precautions Important Information Warnings and Safety Precaution
- To avoid damage and prolong operating life:
- Important Information Caution
- Contents Contents of the Package
- How to use the safety metal fittings and the screws for safety metal fittings Ventilation Requirements for enclosure mounting Installation
- Creating a video wall Cable Management
- Caution on when the plasma monitor is installed vertically How to use the remote control
- Front View Part Names and Function
- Rear View/ Terminal Board
- Remote Control
- Basic Operations POWER VOLUME MUTING DISPLAY DIGITAL ZOOM AUTO SET UP OFF TIMER
- SCREEN SIZE Operation WIDE Operations
- SCREEN SIZE Operation with Computer Signals
- Menu Operations OSD (On Screen Display) Controls Setting the language for the menus
- Menu Tree
- Main menu
- Picture Settings Menu
- SOUND Settings Menu SCREEN Settings Menu
- Option1 Settings Menu
- Information
- Option2 Settings Menu STANDBY/ON indicator ABL (Auto Brightness Limiter)
- ORBITER Adjust the ORBITER function manually INVERSE
- SCREEN WIPER Setting the time for SCREEN WIPER SOFT FOCUS
- Option3 Settings Menu PRESENT TIME
- PROGRAM TIMER
- Information
- VIDEO WALL POSITION DIVIDER AUTO ID DISP. MODE
- SCREEN P. ON DELAY (Power on delay) ABL LINK
- REPEAT TIMER Advanced OSD Settings Menu Color System Settings Menu Source Information Menu
- mini D-Sub 15-pin connector (Analog) DVI-D 24-pin connector (Digital) Pin Assignments
- Table of Signals Supported Supported resolution
- What is HDCP/HDCP technology?
- Troubleshooting
- Specifications
English
OSD (On Screen Display) Controls
25
En
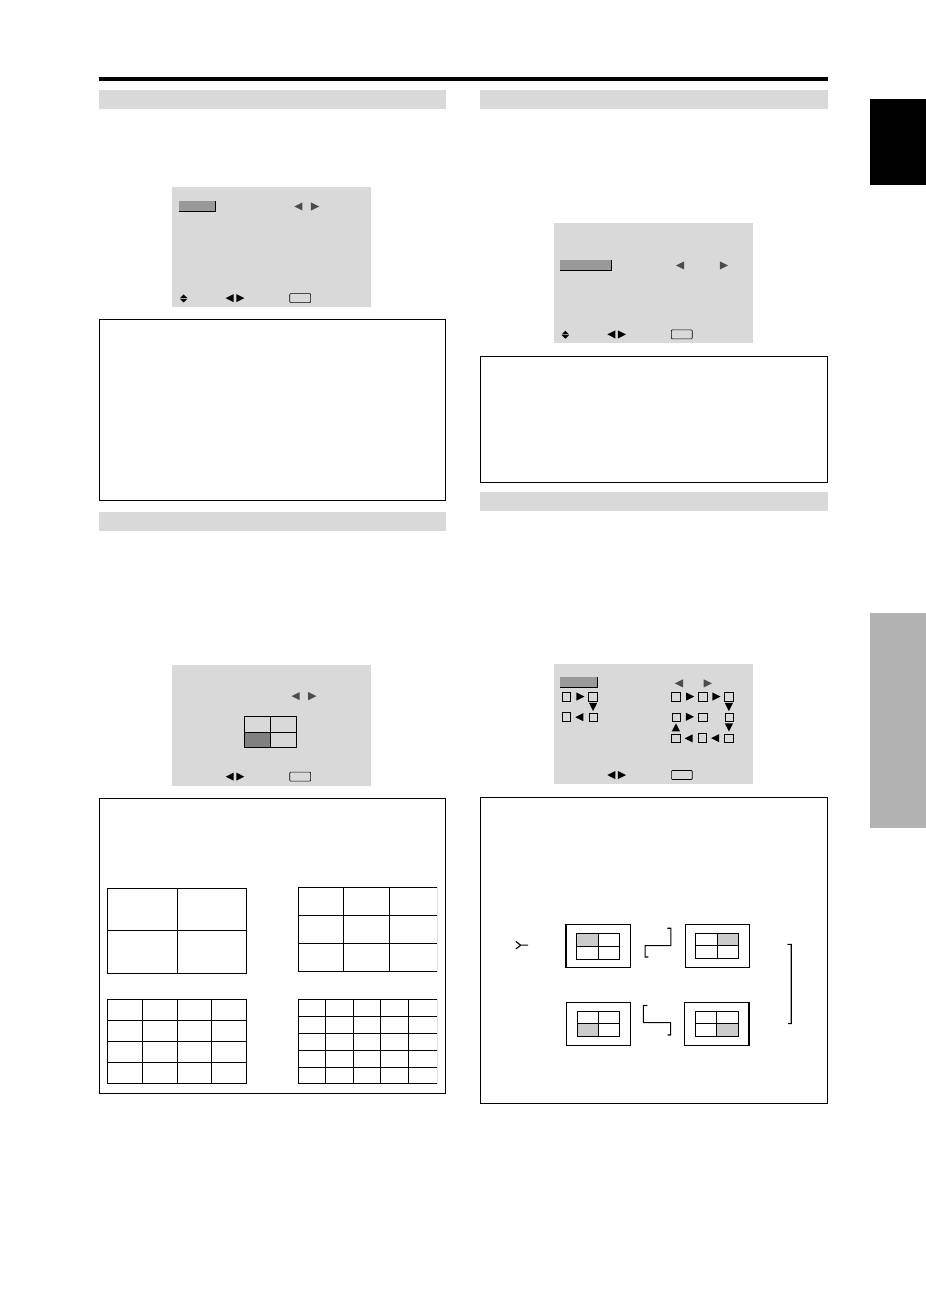
VIDEO WALL POSITION
Set the position of each display.
Example: Setting “4”
On “VIDEO WALL” menu, select “POSITION”, then press
the MENU/SET button.
The “VIDEO WALL POSITION” screen appears.
Select “NO. 4” of “POSITION NO.”.
VIDEO WALL POSITION
POSITION NO.
4
ADJ.
EXIT RETURN
Information
VIDEO WALL POSITION settings
1 Screen:
There is no need to set POSITION.
4 Screens
9 Screens
16 Screens
25 Screens
NO. 7
NO. 8
NO. 9
NO. 10
NO. 11
NO. 12
NO. 13
NO. 14
NO. 15
NO. 16
NO. 17
NO. 18
NO. 19
NO. 20
NO. 21
NO. 22
NO. 23
NO. 24
NO. 25
NO. 26
NO. 27
NO. 28
NO. 29
NO. 30
NO. 31
NO. 32 NO. 33 NO. 34 NO. 35 NO. 36
NO. 37 NO. 38 NO. 39 NO. 40 NO. 41
NO. 42 NO. 43 NO. 44 NO. 45 NO.46
NO. 47 NO. 48 NO. 49 NO. 50 NO. 51
NO. 52 NO. 53 NO. 54 NO. 55 NO. 56
DIVIDER
Set the 4-25 video wall.
Example: Setting “4”
On “DIVIDER” of “VIDEO WALL” menu, select “4”.
VIDEO WALL
DIVIDER
POSITION
DISP. MODE
AUTO ID
SCREEN
P. ON DELAY
ABL LINK
REPEAT TIMER
:
4
: NORMAL
: OFF
: OFF
: OFF
: OFF
SEL.
ADJ.
EXIT RETURN
Information
DIVIDER settings
OFF, 1:
1 Screen (Matrix display function does not work)
4:
4 Screens (2
×
2 video wall)
9:
9 Screens (3
×
3 video wall)
16:
16 Screens (4
×
4 video wall)
25:
25 Screens (5
×
5 video wall)
* When you select 4-25, set the VIDEO WALL
POSITION.
AUTO ID
This feature automatically sets the ID numbers of multiple
displays connected to each other.
Example: Setting “ON”
Set the ID number for the No. 1 display on ID NUMBER
menu.
On “AUTO ID” of “VIDEO WALL” menu, select “ON”,
then press the MENU/SET button.
AUTO ID
:
ON
1
2
4
3
1
2
8
9
3
4
6
5
7
WIRED CABLE
CONNECTION TURN
ADJ.
EXIT RETURN
AUTO ID
Information
AUTO ID settings
ON:
Enables Auto ID function. In the case shown below,
display 1 will be set as ID 1, display 2 as ID2, etc.
This can be set only when a 2
×
2 or 3
×
3 video wall is
selected.
REMOTE
IN
REMOTE
IN
REMOTE
OUT
REMOTE
OUT
REMOTE
IN
REMOTE
OUT
REMOTE
OUT
REMOTE
IN
No.1 No.2
No.3
No.4
No.1 No.2
No.3
No.4
No.1 No.2
No.3
No.4
No.1 No.2
No.3
No.4
Display 1
Display 2
Display 4
Display 3
OFF:
Disables Auto ID function.
DISP. MODE
Select the screen mode from between two options
(NORMAL, ADJUST).
Example: Setting “ADJUST”
On “DISP. MODE” of “VIDEO WALL” menu, select
“ADJUST”.
VIDEO WALL
DIVIDER
POSITION
DISP. MODE
AUTO ID
SCREEN
P. ON DELAY
ABL LINK
REPEAT TIMER
: 1
:
ADJUST
: OFF
: OFF
: OFF
: OFF
SEL.
ADJ.
EXIT RETURN
Information
DISP. MODE settings
NORMAL:
Combines enlarged screens and creates
multiple screens.
ADJUST:
Corrects misalignment of combined screen
portions and creates multiple screens
NO. 1
NO. 2
NO. 4
NO. 3
