Pioneer PDP-42MVE1: Picture Settings Menu
Picture Settings Menu: Pioneer PDP-42MVE1
Table of contents
- Precautions Important Information Warnings and Safety Precaution
- To avoid damage and prolong operating life:
- Important Information Caution
- Contents Contents of the Package
- How to use the safety metal fittings and the screws for safety metal fittings Ventilation Requirements for enclosure mounting Installation
- Creating a video wall Cable Management
- Caution on when the plasma monitor is installed vertically How to use the remote control
- Front View Part Names and Function
- Rear View/ Terminal Board
- Remote Control
- Basic Operations POWER VOLUME MUTING DISPLAY DIGITAL ZOOM AUTO SET UP OFF TIMER
- SCREEN SIZE Operation WIDE Operations
- SCREEN SIZE Operation with Computer Signals
- Menu Operations OSD (On Screen Display) Controls Setting the language for the menus
- Menu Tree
- Main menu
- Picture Settings Menu
- SOUND Settings Menu SCREEN Settings Menu
- Option1 Settings Menu
- Information
- Option2 Settings Menu STANDBY/ON indicator ABL (Auto Brightness Limiter)
- ORBITER Adjust the ORBITER function manually INVERSE
- SCREEN WIPER Setting the time for SCREEN WIPER SOFT FOCUS
- Option3 Settings Menu PRESENT TIME
- PROGRAM TIMER
- Information
- VIDEO WALL POSITION DIVIDER AUTO ID DISP. MODE
- SCREEN P. ON DELAY (Power on delay) ABL LINK
- REPEAT TIMER Advanced OSD Settings Menu Color System Settings Menu Source Information Menu
- mini D-Sub 15-pin connector (Analog) DVI-D 24-pin connector (Digital) Pin Assignments
- Table of Signals Supported Supported resolution
- What is HDCP/HDCP technology?
- Troubleshooting
- Specifications
English
OSD (On Screen Display) Controls
14
En
Picture Settings Menu
Adjusting the picture
The contrast, brightness, sharpness, color and tint can be
adjusted as desired.
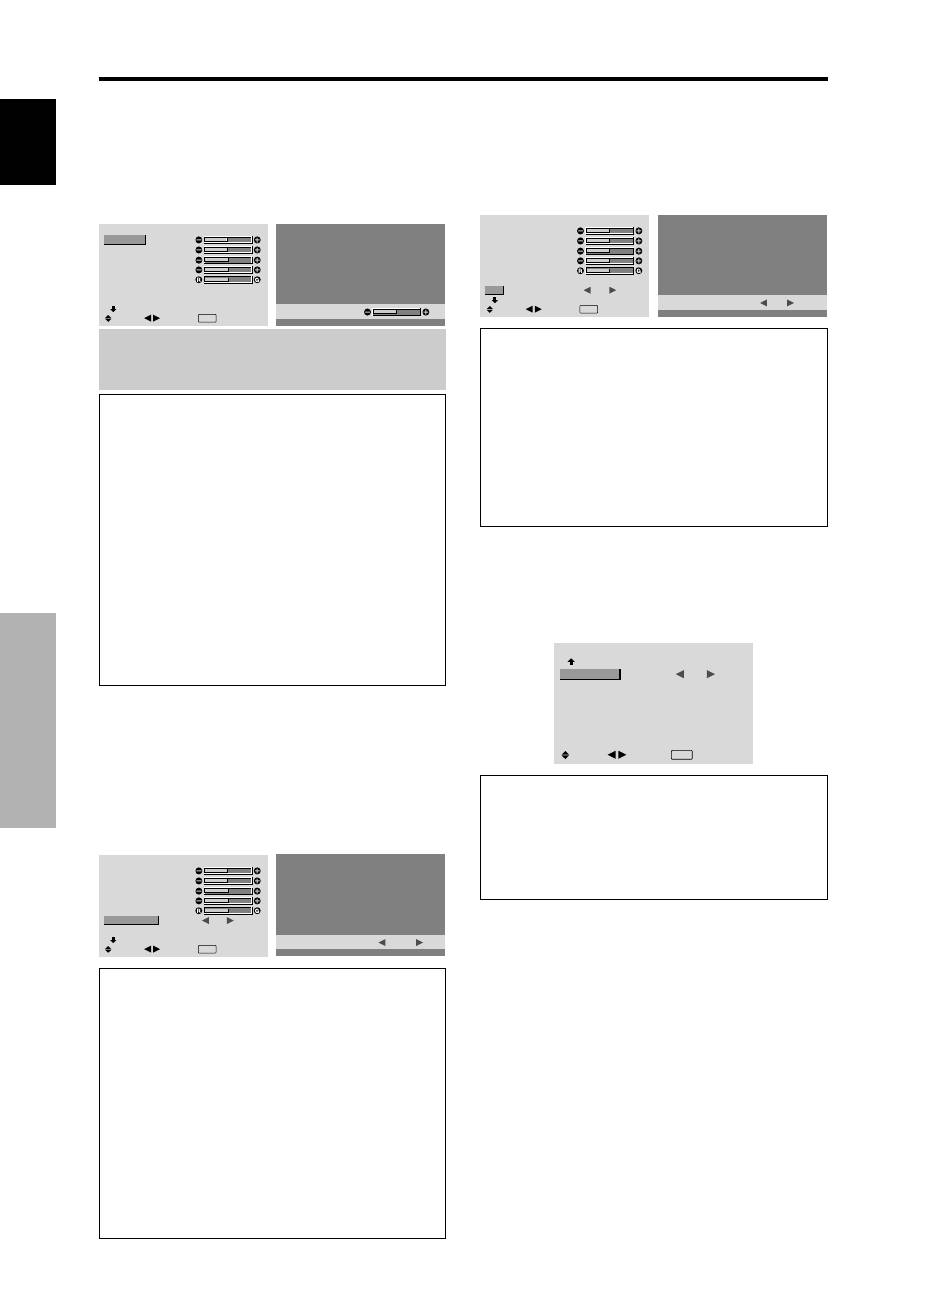
Example: Adjusting the contrast
On “CONTRAST” of “PICTURE” menu, adjust the contrast.
PICTURE
1 / 2
CONTRAST
BRIGHTNESS
SHARPNESS
COLOR
TINT
AV SELECTION
DNR
NEXT PAGE
: STD
: OFF
SEL.
ADJ.
EXIT RETURN
CONTRAST
5 2
Note:
If “CAN NOT ADJUST” appears ...
When trying to enter the PICTURE submenu, make sure
AV SELECTION is not set to DEFAULT.
Information
Picture adjustment screen
CONTRAST:
Changes the picture’s white level.
BRIGHTNESS:
Changes the picture’s black level.
SHARPNESS:
Changes the picture’s sharpness.
Adjusts picture detail of VIDEO display.
COLOR:
Changes the color density.
TINT:
Changes the picture’s tint. Adjust for natural
colored skin, background, etc.
Adjusting the computer image
Only the contrast and brightness can be adjusted when
a computer signal is connected.
Restoring the factory default settings
Select “DEFAULT” under the “AV SELECTION”
settings.
Setting the picture modes according to the
brightness of the room
There are four picture modes that can be used effectively
according to the environment in which you are viewing
the display.
Example: Setting the “MOVIE 1” mode
On “AV SELECTION” of “PICTURE” menu, select
“MOVIE 1”.
PICTURE
1 / 2
CONTRAST
BRIGHTNESS
SHARPNESS
COLOR
TINT
AV SELECTION
DNR
NEXT PAGE
:
STD
: OFF
SEL.
ADJ.
EXIT RETURN
AV SELECTION
:
MOVIE 1
Information
Types of AV SELECTIONS
MOVIE 1, 2:
Set this mode when watching video in a
dark room.
This mode provides darker, finer pictures, like the
screen in movie theaters.
For a darker image, select MOVIE 2.
STD:
Set this mode when watching video in a bright room.
This mode provides pictures with distinct differences
between light and dark sections.
DYNAMIC:
This mode provides brighter pictures than
STD.
DEFAULT:
Use this to reset the picture to the factory
default settings.
Reducing noise in the picture
Use these settings if the picture has noise due to poor
reception or when playing video tapes on which the picture
quality is poor.
Example: Setting “HIGH”
On “DNR” of “PICTURE” menu, select “HIGH”.
PICTURE
1 / 2
CONTRAST
BRIGHTNESS
SHARPNESS
COLOR
TINT
AV SELECTION
DNR
NEXT PAGE
: STD
:
OFF
SEL.
ADJ.
EXIT RETURN
DNR
:
HIGH
Information
DNR
* “DNR” stands for Digital Noise Reduction.
* This function reduces noise in the picture.
Types of noise reduction
There are three types of noise reduction. Each has a
different level of noise reduction.
The effect increases stronger in the order of LOW, MID
and High.
OFF:
Turns the noise reduction function off.
Setting the color temperature
Use this procedure to set color tone produced by the plasma
display.
Example: Setting “HIGH”
On “COLOR TEMP.” of “PICTURE” menu, select “HIGH”.
PICTURE
2 / 2
PREVIOUS PAGE
COLOR TEMP.
GAMMA
LOW TONE
C.DETAIL ADJ.
:
HIGH
: 2
: AUTO
SEL.
ADJ.
EXIT RETURN
Information
Setting the color temperature
LOW:
Redder
MID LOW:
Slightly red
MID:
Standard (slightly bluer)
HIGH:
Bluer

English
OSD (On Screen Display)
Controls
15
En
Adjusting the color to the desired level
Use this procedure to adjust the white balance for each
color temperature to achieve the desired color quality.
Example: Adjusting the “R.HIGH” of “HIGH” color
temperature
Set “ADVANCED OSD” to “ON” in the main menu (1/
2), then perform the following operations.
On “COLOR TEMP.” of “PICTURE” menu, select “HIGH”,
then press the MENU/SET button.
The “WHITE BALANCE” screen appears.
On “R.HIGH”, adjust the white balance.
WHITE BALANCE
COLOR TEMP. HIGH
R.HIGH
G.HIGH
B.HIGH
R.LOW
G.LOW
B.LOW
RESET
: OFF
SEL.
ADJ.
EXIT RETURN
R.HIGH
7 0
Information
Adjusting the white balance
R/G/B.HIGH:
White balance adjustment for white level
R/G/B.LOW:
White balance adjustment for black level
RESET:
Resets settings to the factory default values.
Use
and
buttons to select “ON”, then press the
MENU/SET button.
Restoring the factory default settings
Select “RESET” under the WHITE BALANCE menu.
Changing the Gamma Curve
This feature adjusts the brightness of the midtone areas
while keeping shadows and highlights unchanged.
Example: Setting “3”
Set “ADVANCED OSD” to “ON” in the MAIN MENU
(1/2), then perform the following operations.
On “GAMMA” of “PICTURE” menu, select “3”.
PICTURE
2 / 2
PREVIOUS PAGE
COLOR TEMP.
GAMMA
LOW TONE
C.DETAIL ADJ.
: MID
:
3
: AUTO
SEL.
ADJ.
EXIT RETURN
Information
GAMMA settings
The picture becomes darker as the number increases
(in the sequence of 1, 2, 3, 4).
Making the Low Tone adjustments
This feature allows more detailed tone to be reproduced
especially in the dark area.
Example: Setting “2”
Set “ADVANCED OSD” to “ON” in the MAIN MENU
(1/2), then perform the following operations.
On “LOW TONE” of “PICTURE” menu, select “2”.
PICTURE
2 / 2
PREVIOUS PAGE
COLOR TEMP.
GAMMA
LOW TONE
C.DETAIL ADJ.
: MID
: 2
:
2
SEL.
ADJ.
EXIT RETURN
Information
LOW TONE settings
AUTO:
Will automatically appraise the picture and
make adjustments.
1:
Will apply the dither method suitable for still pictures.
2:
Will apply the dither method suitable for motion
pictures.
3:
Will apply the error diffusion method.
Adjusting the colors
Use this procedure to adjust hue and color density for red,
green, blue, yellow, magenta and cyan.
You can accentuate the green color of trees, the blue of
the sky, etc.
Example: Adjusting the color detail adj for blue
Set “ADVANCED OSD” to “ON” in the MAIN MENU
(1/2), then perform the following operations.
On “PICTURE” menu, select “C. DETAIL ADJ”, then press
the MENU/SET button.
The “C. DETAIL ADJ” screen appears.
On “BLUE” of “C. DETAIL ADJ”, adjust the color detail.
C.DETAIL ADJ.
RED
GREEN
BLUE
YELLOW
MAGENTA
CYAN
RESET
: OFF
SEL.
ADJ.
EXIT RETURN
M
G
R
B
C
Y
C
R
B
G
Y
M
Information
C. DETAIL ADJ settings
RED:
Makes red’s adjustment
GREEN:
Makes green’s adjustment
BLUE:
Makes blue’s adjustment
YELLOW:
Makes yellow’s adjustment
MAGENTA:
Makes magenta’s adjustment
CYAN:
Makes cyan’s adjustment
RESET:
Resets settings to the factory default value.
Use
and
buttons to select “ON”, then press the
MENU/SET button.
