Dell Precision 470 – страница 2
Инструкция к Компьютеру Dell Precision 470
Оглавление
- Примечания, уведомления и предупреждения Сокращения и аббревиатуры
- Содержание
- Источники информации Что требуется найти? Информация находится здесь
- Что требуется найти? Информация находится здесь
- Что требуется найти? Информация находится здесь
- Что требуется найти? Информация находится здесь
- Установка компьютера Dell Precision 670 1 2
- 3
- Для видеоплат для подключения одного и двух мониторов с одним разъемом Два адаптера VGA Y'кабеля Два адаптера DVI Y'кабеля
- Видеоплата для подключения двух мониторов с одним разъемом DVI и одним разъемом VGA Видеоплата для подключения двух мониторов с двумя разъемами DVI
- 4 5
- 6
- Установка компьютера Dell Precision 470 1 2
- 3
- 4 5
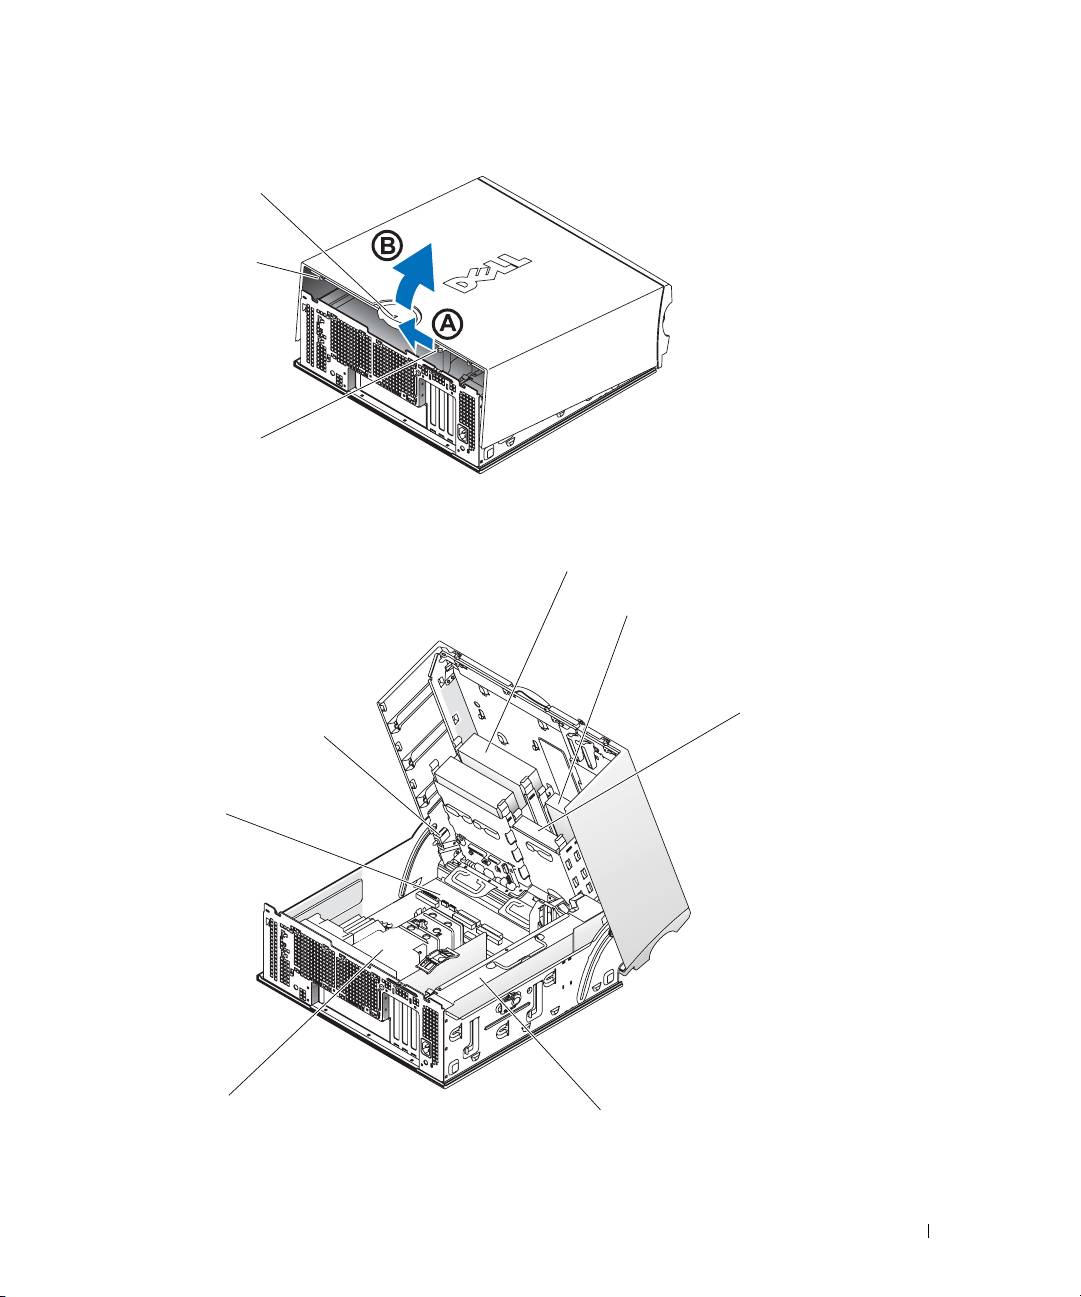
- 6 Поздравляем! Установка для компьютера Dell Precision 470 завершена. Снятие крышки компьютера
- Компьютер Dell Precision
- Внутреннее устройство компьютера Dell Precision™ 670
- Компьютер Dell Precision 470 Внутреннее устройство компьютера Dell Precision™ 470
- Уход за компьютером Устранение неисправностей Разрешение проблем несовместимости программного обеспечения и оборудования Microsoft Windows
- Windows 2000
- Использование функции восстановления системы Windows XP Создание точки восстановления Восстановление более раннего состояния компьютера
- Использование последней работоспособной конфигурации Другие возможности решения конфликтов программного обеспечения и оборудования Когда использовать программу Dell Diagnostics
- Перед началом тестирования Запуск программы Dell Diagnostics
- Системные индикаторы Индикатор питания
- Индикатор питания Звуковые сигналы
- Код Причина Код Причина Сообщения об ошибках
- Индикаторы диагностики
- Коды индикаторов диагностики перед выполнением проверки POST Индикаторы Описание проблемы Варианты решения
- Индикаторы Описание проблемы Варианты решения
- Индикаторы Описание проблемы Варианты решения
- Индикаторы Описание проблемы Варианты решения
- Индикаторы Описание проблемы Варианты решения
- Индикаторы Описание проблемы Варианты решения
- Индикаторы Описание проблемы Варианты решения Обзор модулей памяти
- Часто задаваемые вопросы Как сделать... Решение Источник информации
- Как сделать... Решение Источник информации
- Указатель
- 250 Указатель
Dell Precision 470 Computer
cover release latch
security cable slot
padlock ring
Inside the Dell Precision 470 Computer
CD/DVD drive(s)
floppy drive (optional)
hard drive(s)
chassis intrusion switch
system board
processor
airflow shroud
power supply
Quick Reference Guide 21

Caring for Your Computer
To help maintain your computer, follow these suggestions:
• To avoid losing or corrupting data, never turn off your computer when the hard drive light is on.
• Schedule regular virus scans using anti-virus software.
• Manage hard drive space by periodically deleting unnecessary files and defragmenting the
drive.
• Back up files on a regular basis.
• Periodically clean your monitor screen, mouse, and keyboard (see your
User’s Guide
for
more information).
www.dell.com | support.dell.com
Solving Problems
Follow these tips when troubleshooting your computer:
• If you added or removed a computer part before the problem started, review the installation
procedures and ensure that the part is correctly installed.
• If a peripheral device does not work, ensure that the device is properly connected.
• If an error message appears on the screen, write down the exact message. This message may
help technical support diagnose and fix the problem(s).
• If an error message occurs in a program, consult the program’s documentation.
• If the recommended action in the troubleshooting section is to see a section in your
User’s Guide
, go to
support.dell.com
(on another computer if necessary) to access
your
User’s Guide
.
Resolving Software and Hardware Incompatibilities
If a device is either not detected during the operating system setup or is detected but incorrectly
configured, you can use the Hardware Troubleshooter to resolve the incompatibility.
®
Microsoft Windows
XP
To resolve incompatibilities using the Hardware Troubleshooter:
1
Click the
Start
button and click
Help and Support
.
2
Ty p e
hardware troubleshooter
in the
Search
field and click the arrow to start the search.
3
Click
Hardware Troubleshooter
in the
Search Results
list.
4
In the
Hardware Troubleshooter
list, click
I need to resolve a hardware conflict on my
computer
, and click
Next
.
22 Quick Reference Guide

To resolve incompatibilities using the Hardware Troubleshooter:
1
Click the
Start
button and click
Help
.
2
Click
Troubleshooting and Maintenance
on the
Contents
tab, click
Windows XP
troubleshooters
, and then click
Hardware
.
3
In the
Hardware Troubleshooter
list, click
I need to resolve a hardware conflict on my
computer
and click
Next
.
Windows 2000
To resolve incompatibilities using Device Manager:
1
Click the
Start
button, point to
Settings
, and then click
Control Panel
.
2
In the
Control Panel
window, double-click
System
.
3
Click the
Hardware
tab.
4
Click
Device Manager
.
5
Click
View
and click
Resources by connection
.
6
Double-click
Interrupt request (IRQ)
.
Incorrectly configured devices are indicated by a yellow exclamation point (
!
) or a red
X
if the
device has been disabled.
7
Double-click any device marked with an exclamation point to display the
Properties
window.
The
Device
status area in the
Properties
window reports the cards or devices that need to
be reconfigured.
8
Reconfigure the devices or remove the devices from the Device Manager. See the
documentation that came with the device for information on configuring the device.
To resolve incompatibilities using the Hardware Troubleshooter:
1
Click the
Start
button and click
Help
.
2
Click
Troubleshooting and Maintenance
on the
Contents
tab, click
Windows 2000
troubleshooters
, and then click
Hardware
.
3
In the
Hardware Troubleshooter
list, click
I need to resolve a hardware conflict on my
computer
and click
Next
.
Using System Restore in Windows XP
®
®
The Microsoft
Windows
XP operating system provides System Restore to allow you to return
your computer to an earlier operating state (without affecting data files) if changes to the
hardware, software, or other system settings have left the computer in an undesirable
operating state.
NOTICE: Make regular backups of your data files. System Restore does not monitor your data files or
recover them.
Quick Reference Guide 23

Creating a Restore Point
1
Click the
Start
button and click
Help and Support
.
2
Click
System Restore
.
3
Follow the instructions on the screen.
Restoring the Computer to an Earlier Operating State
NOTICE: Before you restore the computer to an earlier operating state, save and close all open files and
close all open programs. Do not alter, open, or delete any files or programs until the system restoration
is complete.
1
Click the
Start
button, point to
All Programs
→
Accessories
→
System Tools
, and then click
System Restore
.
www.dell.com | support.dell.com
2
Ensure that
Restore my computer to an earlier time
is selected, and click
Next
.
3
Click a calendar date to which you want to restore your computer.
The
Select a Restore Point
screen provides a calendar that allows you to see and select
restore points. All calendar dates with available restore points appear in bold.
4
Select a restore point and click
Next
.
If a calendar date has only one restore point, then that restore point is automatically selected.
If two or more restore points are available, click the restore point that you prefer.
5
Click
Next
.
The
Restoration Complete
screen appears after System Restore finishes collecting data, and
then the computer automatically restarts.
6
After the computer restarts, click
OK
.
To change the restore point, you can either repeat the steps using a different restore point, or
you can undo the restoration.
Using Last Known Good Configuration
1
Restart your computer and press <F8> when the message
Please select the
operating system to start
appears.
2
Highlight
Last Known Good Setting,
press <Enter>, press <l>, and then select your
operating system when prompted.
24 Quick Reference Guide

Other Options to Help Resolve Additional Device or Software Conflicts
NOTICE: The following processes erase all of the information on your hard drive.
• Reinstall your operating system using the operating system CD.
NOTE: The operating system CD is optional and may not ship with every computer.
During the operating system reinstallation, you can select to delete the existing partitions and
reformat your hard drive.
• Reinstall all drivers, beginning with the chipset, using the optional
Drivers and Utilities
CD.
When to Use the Dell Diagnostics
If you experience a problem with your computer, run the Dell Diagnostics before you contact Dell
for technical assistance. The test results provide important information for Dell's service and
support personnel.
NOTICE: Only use the Dell Diagnostics to test your Dell™ computer. Using this program with other
computers can cause incorrect computer responses or result in error messages.
The Dell Diagnostics allow you to:
• Perform quick checks or extensive tests on one or all devices.
• Choose how many times a test is run.
• Display or print test results or save them in a file.
• Suspend testing if an error is detected or terminate testing if a certain number of errors occur.
• Access online
Help
screens that describe the tests and how to run them.
• Read status messages that tell you whether tests completed successfully.
• Receive error messages if problems are detected.
Before You Start Testing
CAUTION: Before you begin any of the procedures in this section, follow the safety instructions in the
Product Information Guide.
• Turn on your printer if one is attached.
• Enter system setup, review your computer’s configuration information, and then enable all of
your computer’s components and devices, such as connectors.
Quick Reference Guide 25

Running the Dell Diagnostics
It is recommended that you print these procedures before you begin.
1
Open the Dell Diagnostics on your hard drive or from the
Drivers and Utilities
CD.
From your hard drive
:
a
Shut down and restart the computer.
b
When
F2 = Setup
appears in the upper-right corner of the screen, press
<Ctrl><Alt><F10>.
®
®
If you wait too long and the Microsoft
Windows
logo appears, continue to wait until
you see the Windows desktop. Then shut down your computer and try again. After the
system boots to the Dell Diagnostics, go to step 2.
www.dell.com | support.dell.com
From the Drivers and Utilities CD
:
a
Shut down and restart the computer.
b
When
F2 = Setup
appears in the upper-right corner of the screen, press <F12>.
If you wait too long and the Microsoft Windows logo appears, continue to wait until you
see the Windows desktop. Then shut down your computer and try again.
NOTE: This feature changes the boot sequence for one time only. On the next start-up, the computer
boots according to the devices specified in system setup.
The
Boot Device Menu
appears.
c
Insert the
Drivers and Utilities
CD.
d
Change the
Boot Sequence
to use the IDE CD-ROM device as the first device in the
boot sequence.
The Dell Diagnostics Menu appears.
e
Select
Dell 32-bit Diagnostics
from the numbered list. If multiple versions are
listed, select the version appropriate for your computer.
2
When the
Dell Diagnostics
main menu appears, select the type of test you want to perform.
26 Quick Reference Guide

System Lights
These lights on the front of the computer can indicate a computer problem.
Power Light Hard-Drive Light Cause Corrective Action
Solid green N/A Power is on, and the computer is
No corrective action is required.
operating normally.
Blinking green Blank The computer is in the suspended
Press the power button, move the
state (Windows XP).
mouse, or press a key on the keyboard
to wake the computer. See "Power
Management" in the User’s Guide for
more information.
Blinks green
N/A A configuration error exists. Check the diagnostic lights to see if
several times and
the specific problem is identified. See
then turns off
the User’s Guide for more information.
Solid yellow N/A The Dell Diagnostics is running a
If the Dell Diagnostics is running,
test, or a device on the system
allow the testing to complete.
board may be faulty or
Check the diagnostic lights to see if
incorrectly installed.
the specific problem is identified.
If the computer does not boot, contact
Dell for technical assistance.
Blinking yellow Blank A power supply or system board
Check the diagnostic lights to see if
failure has occurred.
the specific problem is identified. See
"Power Problems" in the User’s Guide.
Blinking yellow Solid green A system board or VRM failure
Check the diagnostic lights to see if
has occurred.
the specific problem is identified.
Solid green and a
N/A A problem was detected while the
See "Beep Codes" on page 28 for
beep code
BIOS was executing.
instructions on diagnosing the beep
during POST
code. Also, check the diagnostic lights
to see if the specific problem
is identified.
Solid green power
N/A The monitor or the graphics card
Check the diagnostic lights to see if
light and no beep
may be faulty or incorrectly
the specific problem is identified. Also,
code and no video
installed.
see "Video Problems" in the
during POST
User’s Guide.
Solid green power
N/A An integrated system board device
Check the diagnostic lights to see if
light and no beep
may be faulty.
the specific problem is identified. If
code but the
the problem is not identified, contact
computer locks
Dell for technical assistance.
up during POST
Quick Reference Guide 27

Beep Codes
Your computer might emit a series of beeps during start-up if the monitor cannot display errors or
problems. This series of beeps, called a beep code, identifies a problem. One possible beep code
(code 1-3-1) consists of one beep, a burst of three beeps, and then one beep. This beep code tells
you that the computer encountered a memory problem.
If your computer beeps during start-up:
1
Write down the beep code on the Diagnostic Checklist (see your
User’s Guide
).
2
Run the Dell Diagnostics to identify a more serious cause.
3
Contact Dell for technical assistance.
www.dell.com | support.dell.com
Code Cause Code Cause
1-1-2 Microprocessor register failure 3-3-4 Video Memory Test failure
1-1-3 NVRAM read/write failure 3-4-1 Screen initialization failure
1-1-4 ROM BIOS checksum failure 3-4-2 Screen retrace failure
1-2-1 Programmable interval timer failure 3-4-3 Search for video ROM failure
1-2-2 DMA initialization failure 4-2-1 No timer tick
1-2-3 DMA page register read/write failure 4-2-2 Shutdown failure
1-3 Video Memory Test failure 4-2-3 Gate A20 failure
1-3-1
Memory not being properly identified
4-2-4 Unexpected interrupt in protected
through
or used
mode
2-4-4
3-1-1 Slave DMA register failure 4-3-1 Memory failure above address
0FFFFh
3-1-2 Master DMA register failure 4-3-3 Timer-chip counter 2 failure
3-1-3 Master interrupt mask register failure 4-3-4 Time-of-day clock stopped
3-1-4 Slave interrupt mask register failure 4-4-1 Serial or parallel port test failure
3-2-2 Interrupt vector loading failure 4-4-2 Failure to decompress code to
shadowed memory
3-2-4 Keyboard Controller Test failure 4-4-3 Math-coprocessor test failure
3-3-1 NVRAM power loss 4-4-4 Cache test failure
3-3-2 Invalid NVRAM configuration 4-3-4 Time-of-day clock stopped
28 Quick Reference Guide
Error Messages
NOTE: If the message is not listed, see the documentation for either the operating system or the program
that was running when the message appeared.
If an error occurs during start-up, a message may be displayed on the monitor identifying the
problem. See "Error Messages" in your
User’s Guide
for suggestions on resolving any problems.
Diagnostic Lights
CAUTION: Before you begin any of the procedures in this section, follow the safety instructions
located in the Product Information Guide.
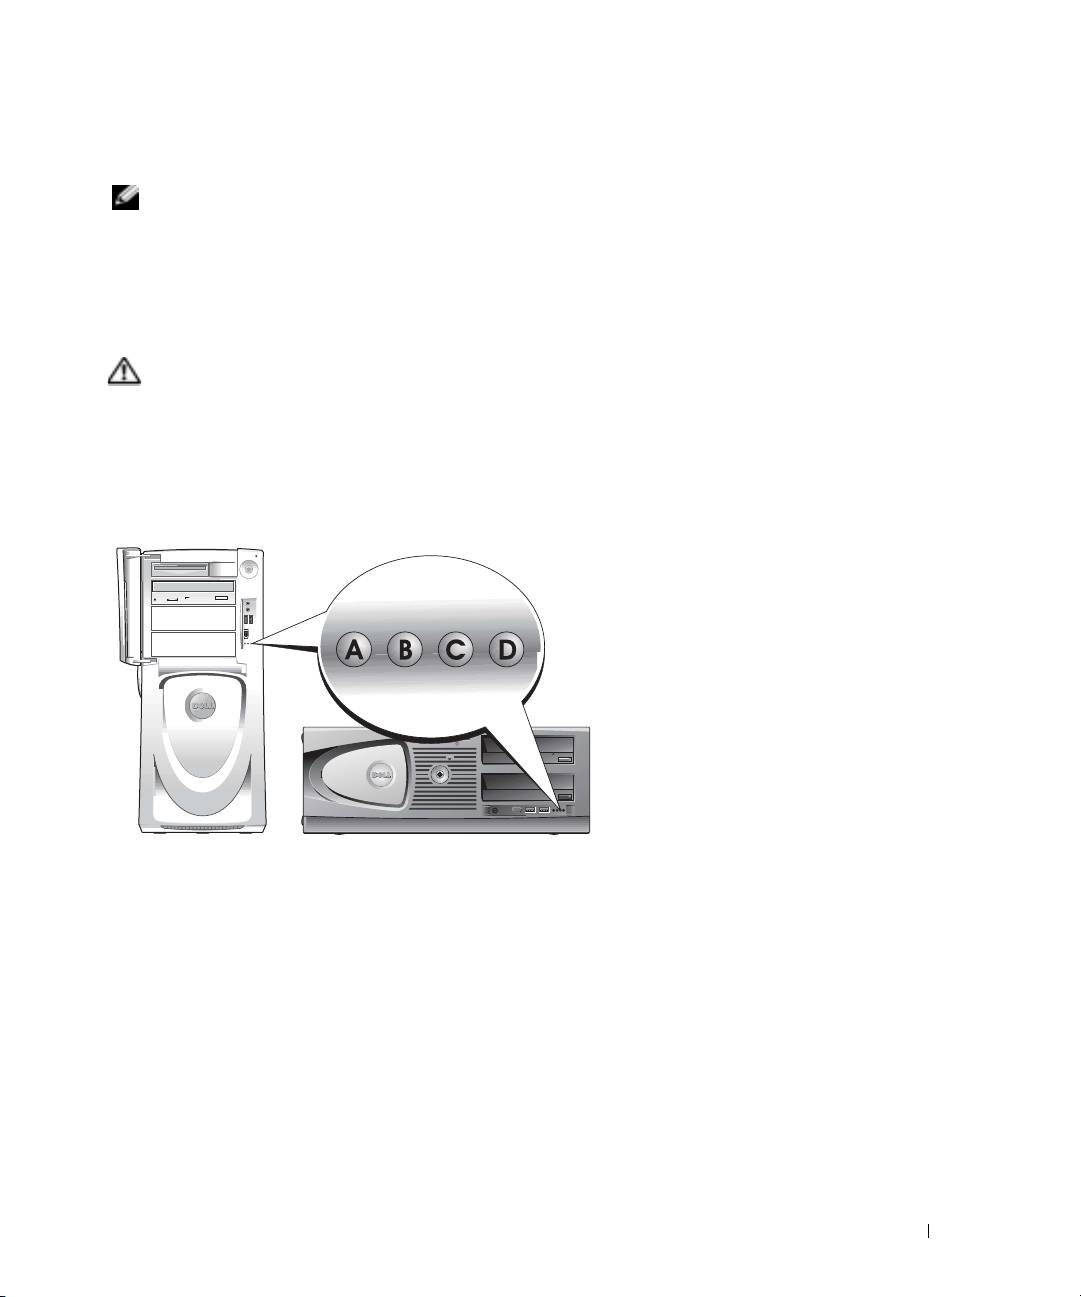
To help you troubleshoot a problem, your computer has four lights labeled "A," "B," "C," and "D" on
the front panel. The lights can be yellow, green, or off. When the computer starts normally, the
lights flash. After the computer starts, all four lights display solid green. If the computer
malfunctions, the color and sequence of the lights identify the problem.
Quick Reference Guide 29
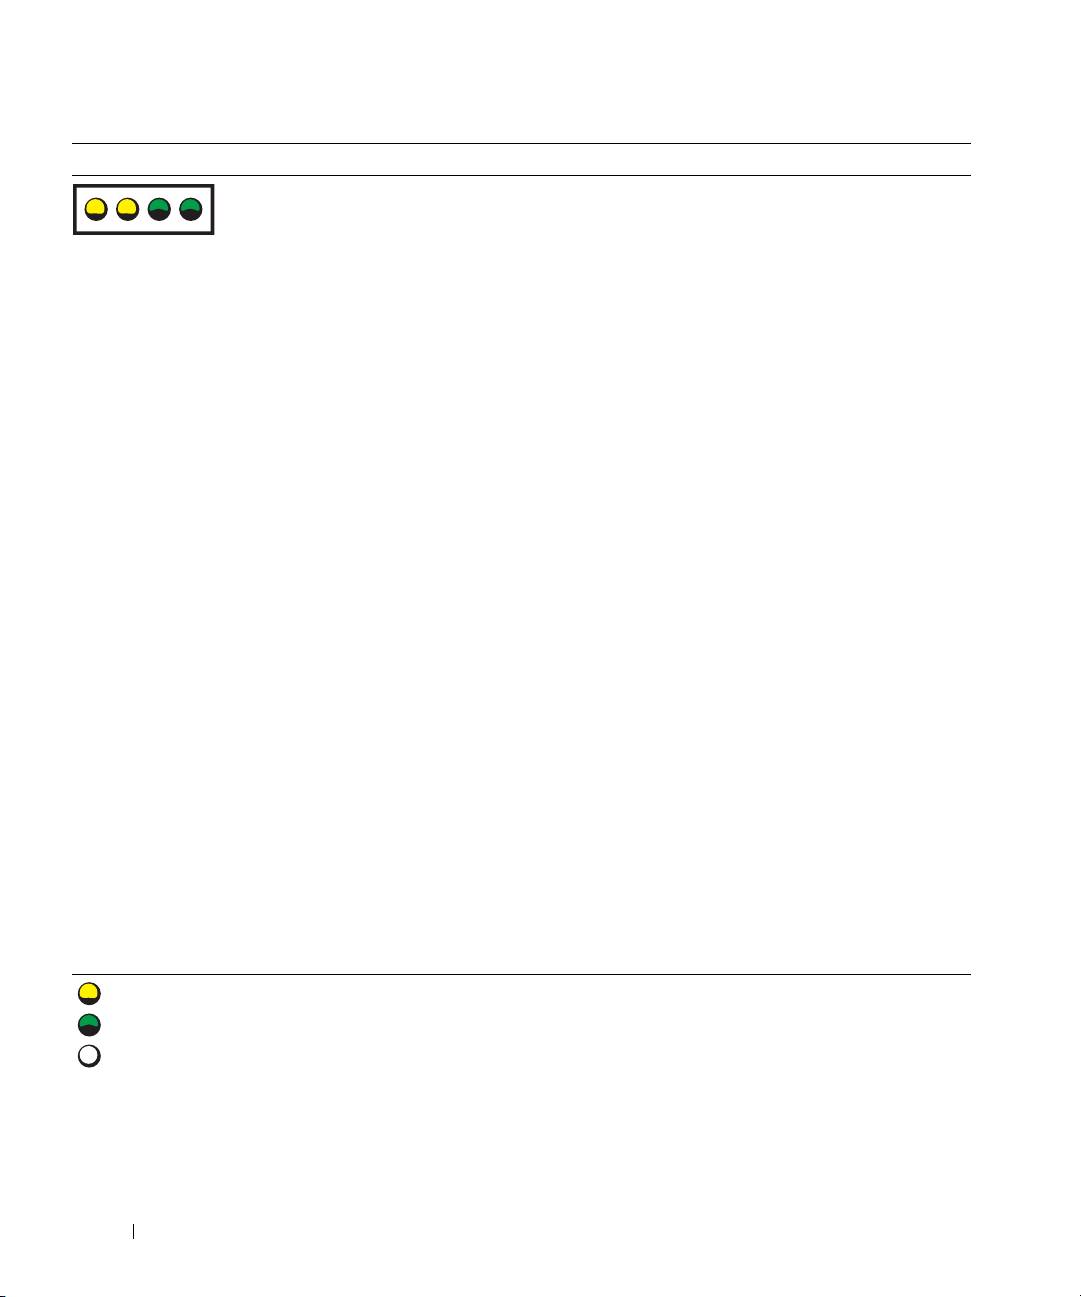
Diagnostic Light Codes Before POST
Light Pattern Problem Description Suggested Resolution
off
No electrical power is
Connect the computer to an electrical outlet. Ensure
supplied to the computer.
that the front-panel power light is on. If the power light
off
is off, ensure that the computer is connected to a
ABCD
off
working electrical outlet and then press the
off
power button.
If the problem is still not resolved, contact Dell for
technical assistance.
yellow
The computer is in a normal
Press the power button to turn the computer on.
off condition; the computer
off
If the computer does not turn on, ensure that the front-
www.dell.com | support.dell.com
is connected to an
panel power light is on. If the power light is off, ensure
ABCD
off
electrical outlet.
that the computer is connected to a working electrical
off
outlet and then press the power button.
If the problem is still not resolved, contact Dell for
technical assistance.
yellow
The computer is in a reduced
Use one of the appropriate methods to "wake up" the
power or "sleep" state.
computer. See "Advanced Features" in the User’s Guide.
yellow
If the problem is not resolved and you are trying to wake
ABCD
off
the computer with a USB mouse or keyboard, substitute
off
the mouse or keyboard with a working PS/2 mouse or
keyboard and then try to wake the computer.
yellow
The BIOS is not executing. Ensure that the processor is seated correctly and restart
the computer.
yellow
If the problem is still not resolved, contact Dell for
ABCD
yellow
technical assistance.
off
off
A possible power supply or
Perform the procedure in "Power Problems" in the
power cable failure
User’s Guide.
yellow
has occurred.
If the problem is still not resolved, contact Dell for
ABCD
off
technical assistance.
off
off
A possible system board
Contact Dell for technical assistance.
failure has occurred.
off
ABCD
yellow
off
= yellow
= green
= off
30 Quick Reference Guide
Light Pattern Problem Description Suggested Resolution
yellow
A processor and/or VRM
Perform the procedure in "Processor Problems" in the
mismatch exists.
User’s Guide.
off
ABCD
yellow
off
green
A possible VRM 0 failure
Contact Dell for technical assistance.
has occurred.
yellow
ABCD
yellow
off
yellow
A possible VRM 1 failure
Perform the procedure in "Processor Problems" in the
has occurred.
User’s Guide.
green
ABCD
yellow
green
green
A possible VRM 0 and VRM 1
Contact Dell for technical assistance.
failure has occurred.
green
ABCD
yellow
off
= yellow
= green
= off
Diagnostic Light Codes During POST
Light Pattern Problem Description Suggested Resolution
yellow
A possible processor failure has occurred. Reinstall the processor and restart
the computer.
yellow
ABCD
green
yellow
= yellow
= green
= off
Quick Reference Guide 31
Light Pattern Problem Description Suggested Resolution
yellow
Memory modules are detected, but a
1 Reseat the memory
modules to ensure
memory failure has occurred.
that your computer is successfully
yellow
communicating with the memory.
ABCD
green
2
Restart the computer.
green
3
If the problem still exists, remove all
the memory modules and install
one memory module in
connector DIMM_1.
4
Restart the computer.
The following message appears:
Alert! Operating in Debug
www.dell.com | support.dell.com
Mode. Please Populate
Memory in Pairs for
Normal Operation
.
5
Press <F1> to boot to the
operating system.
6
Run the Dell Diagnostics
(see page 26)
.
7
If the memory module passes, shut
down the computer, remove the
memory module, and then repeat the
process with the remaining memory
modules until a memory error occurs
during start-up or diagnostic testing.
If the first memory module tested is
defective, repeat the process with the
remaining modules to ensure that the
remaining modules are not defective.
8
When the defective memory module
is identified,
contact Dell
for
a replacement.
NOTE: If necessary, the computer can
operate in debug mode until new memory
modules are installed.
= yellow
= green
= off
32 Quick Reference Guide
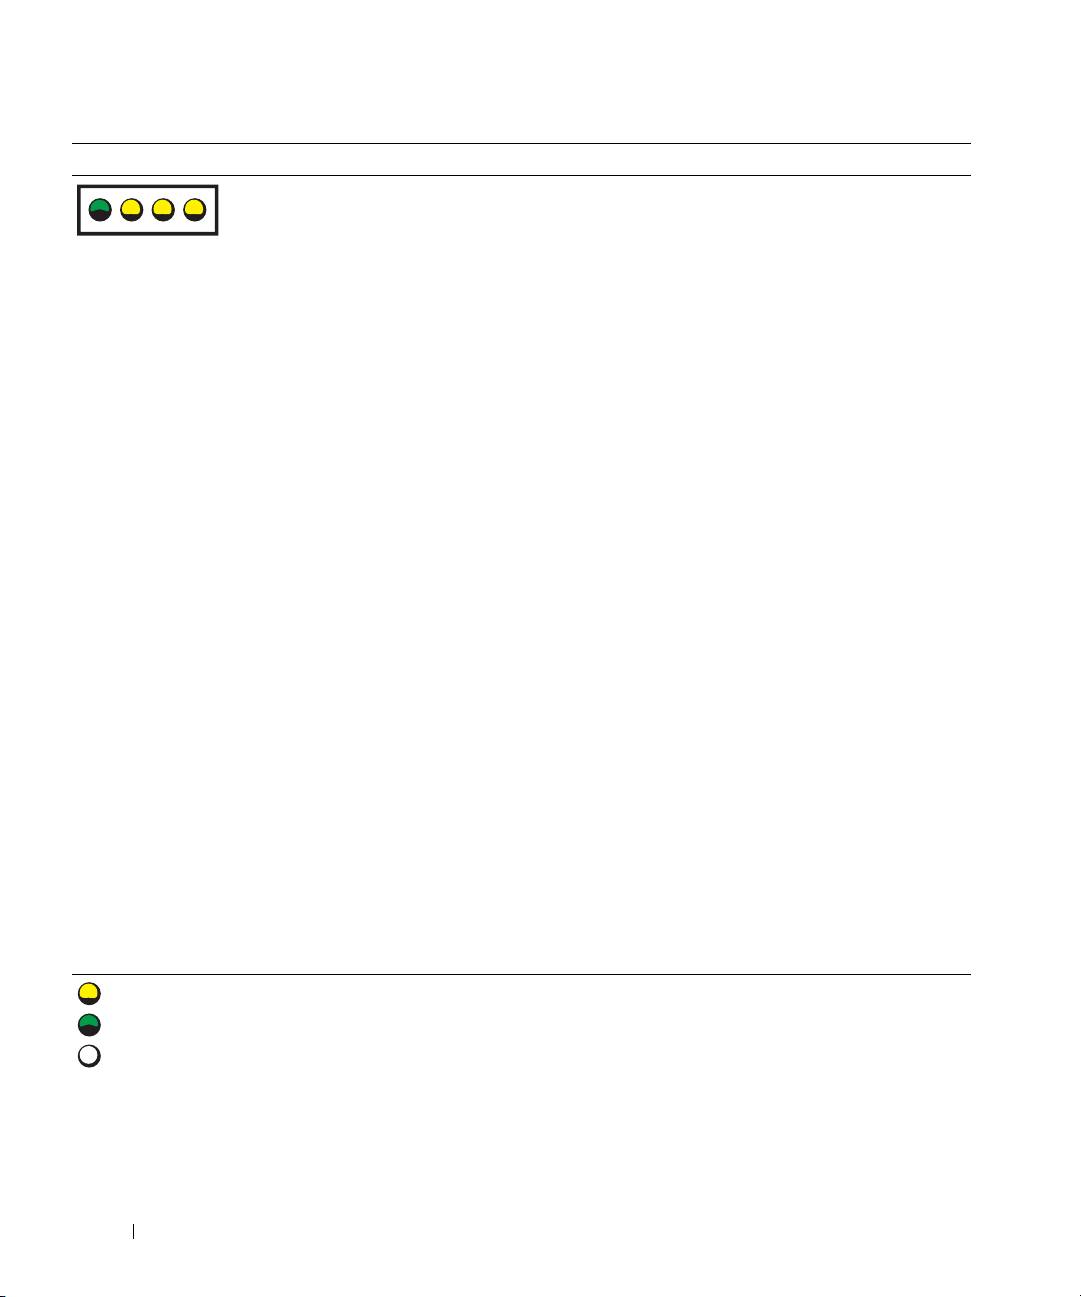
Light Pattern Problem Description Suggested Resolution
yellow
A possible expansion card failure
1
Determine if a conflict exists by
has occurred.
removing a card
(not the graphics
green
card) and then restarting
ABCD
yellow
the computer.
yellow
2
If the problem persists, reinstall the
card that you removed, remove a
different card, and then restart
the computer.
3
Repeat this process for each card. If
the computer starts normally,
troubleshoot the last card removed
from the computer for resource
conflicts (see your
User’s Guide
).
4
If the problem persists,
contact Dell
.
yellow
A possible graphics card failure
• If the computer has a graphics card,
has occurred.
remove the card,
reinstall it
, and then
green
restart the computer.
ABCD
yellow
• If the problem still exists, install a
green
graphics card that you know works and
restart the computer.
• If the problem persists or the
computer has integrated graphics,
contact Dell
.
yellow
A possible floppy or hard drive failure
Reseat all power and data cables and
has occurred.
restart the computer.
green
ABCD
green
yellow
yellow
A possible USB failure has occurred. Reinstall all USB devices, check cable
connections, and then restart
green
the computer.
ABCD
green
green
= yellow
= green
= off
Quick Reference Guide 33
Light Pattern Problem Description Suggested Resolution
green
No memory modules are detected. 1 Reseat the memory modules
to
ensure that your computer is
yellow
successfully communicating with
ABCD
yellow
the memory.
yellow
2
Restart the computer.
3
If the problem still exists, remove
all the memory modules and
install one memory module in
connector DIMM_1.
4
Restart the computer.
The following message appears:
www.dell.com | support.dell.com
Alert! Operating in Debug
Mode. Please Populate
Memory in Pairs for
Normal Operation
.
5
Press <F1> to boot to the
operating system.
6
Run the Dell Diagnostics.
7
If the memory module passes, shut
down the computer, remove the
memory module, and then repeat the
process with the remaining memory
modules until a memory error occurs
during start-up or diagnostic testing.
If the first memory module tested is
defective, repeat the process with the
remaining modules to ensure that the
remaining modules are not defective.
8
When the defective memory module
is identified,
contact Dell
for
a replacement.
NOTE: If necessary, the computer can
operate in debug mode until new memory
modules are installed.
= yellow
= green
= off
34 Quick Reference Guide
Light Pattern Problem Description Suggested Resolution
green
System board failure has occurred. Contact Dell for technical assistance.
yellow
ABCD
yellow
green
green
Memory modules are detected, but a
• Ensure that no
special memory
memory configuration or compatibility
module
requirements exist (see
yellow
error exists.
"Memory Overview" in the
ABCD
green
User’s Guide
).
yellow
• Verify that the
memory modules
that
you are installing are compatible with
your computer.
• Reinstall the memory modules and
restart the computer.
• If the problem persists,
contact Dell
.
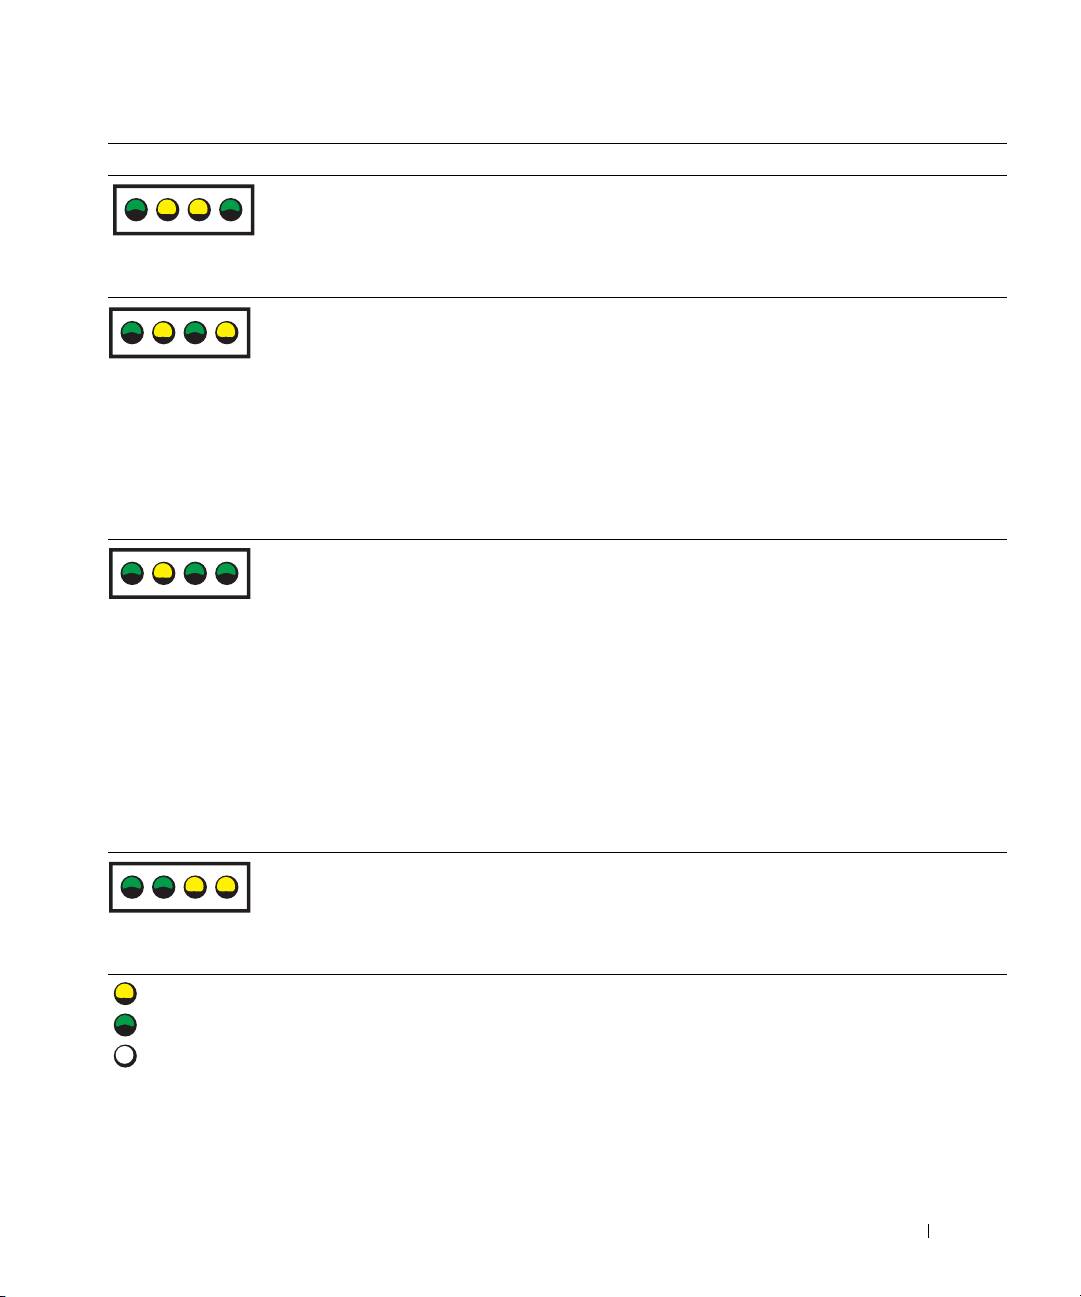
green
A possible expansion card failure
1
Determine if a conflict exists by
has occurred.
removing a card
(not a graphics card)
yellow
and restarting the computer.
ABCD
green
2
If the problem persists, reinstall the
green
card that you removed, remove a
different card, and then restart
the computer.
3
Repeat this process for each card. If
the computer starts normally,
troubleshoot the last card removed
from the computer for resource
conflicts (see
your
User’s Guide
).
If the problem persists, contact Dell.
green
A possible system board resource and/or
Perform the procedures in your
hardware failure has occurred.
User’s Guide.
green
If the problem persists, contact Dell.
ABCD
yellow
yellow
= yellow
= green
= off
Quick Reference Guide 35
Light Pattern Problem Description Suggested Resolution
green
Another failure has occurred.
• Ensure that the cables are properly
connected to the system board from
green
the hard drive, CD drive, and
ABCD
green
DVD drive.
yellow
• If the problem persists,
contact Dell
.
green
The computer is in a normal operating
None.
green
condition after POST.
green
ABCD
green
www.dell.com | support.dell.com
= yellow
= green
= off
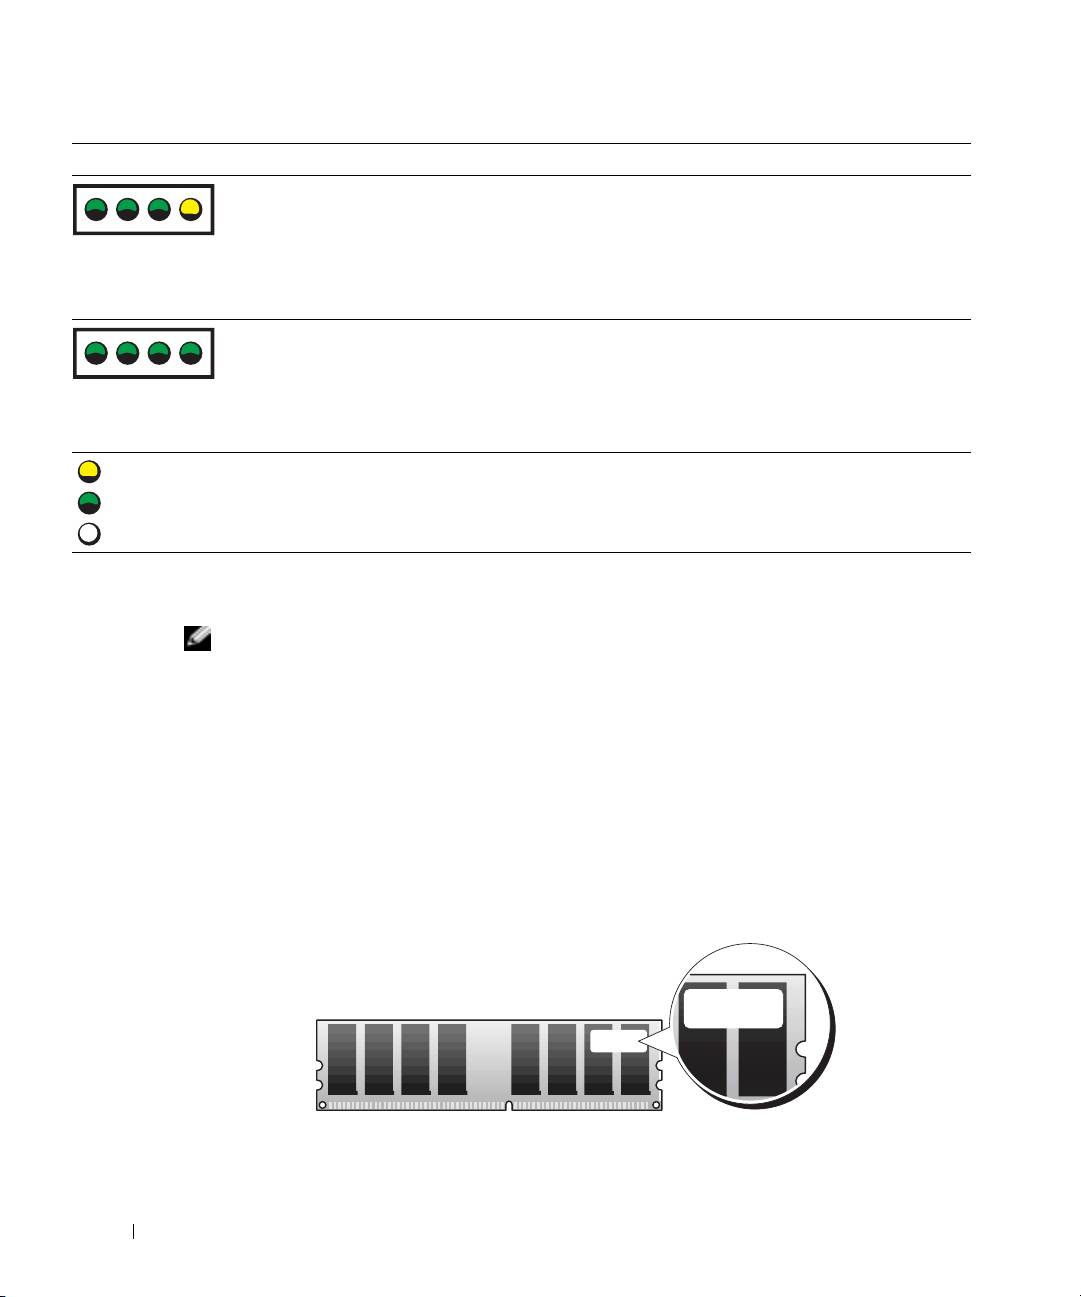
Memory Overview
NOTE: Your computer supports ECC and registered memory.
• Memory modules should be installed in
pairs of matched size, speed, and rank (1R is single
rank and 2R is dual rank)
. See the label on the memory module to determine its size, speed
rank, and organization. Be sure that your memory module labels match.
Example: 256MB 1Rx8 PC2-3200R-333-10:
• Size = 256 MB
• Speed = 3200
• Rank = 1R
• Organization = x8
256MB 2R XX XXX
36 Quick Reference Guide

• Memory modules can be single rank (1R) or dual rank (2R) and should be installed in the
following order:
• The highest rank memory module in DIMM_1 and DIMM_2
• Equal or lower rank memory modules in DIMM_3 and DIMM_4
• Single rank (1R) memory modules in DIMM_5 and DIMM_6
• If only two memory modules are installed, they must be installed in DIMM_1 and DIMM_2.
These connectors are located on the outside edge of the board.
• Memory modules should be installed in the following order: connectors DIMM_1 and
DIMM_2, DIMM_3 and DIMM_4, and then DIMM_5 and DIMM_6.
If dual-rank modules are installed in DIMM_3 and DIMM_4, then DIMM_5 and DIMM_6
cannot be used.
• Dual-rank memory modules are not supported in DIMM_5 and DIMM_6.
NOTE: Memory purchased from Dell is covered under your computer warranty.
NOTICE: If you remove your original memory modules from the computer during a memory upgrade,
keep them separate from any new modules that you may have, even if you purchased the new modules
from Dell. If possible, do not pair an original memory module with a new memory module. Otherwise, your
computer may not start properly. You should install your original memory modules in pairs in connectors
DIMM_1 and DIMM_2, connectors DIMM_3 and DIMM_4, and then DIMM_5 and DIMM_6.
NOTICE: If you install more than 4 GB of memory, you must also install a fan to cool the computer. If you
do not install a fan, you will get an error message stating that you must install a fan or remove
some memory.
Quick Reference Guide 37

Frequently Asked Questions
How Do I... Solution Where to Find Additional Information
Set up my computer to use
If your computer has the required
To locate additional information
two monitors?
graphics card to support dual-monitor
about using dual monitors, see the
setup, then look in your box for a
graphics card documentation on the
Y-cable. The cable has a single
Drivers and Utilities CD.
connector on one end (plug this
connector into the back panel) and
branches into two connectors (plug
these connectors in the monitor
cables). For the Dell Precision 670
www.dell.com | support.dell.com
computer, see "Setting Up Your Dell
Precision 670 Computer" on page 9
and for the Dell Precision 470
computer, see "Setting Up Your Dell
Precision 470 Computer" on page 15.
Connect my monitor when the
If your graphics card has a
For the Dell Precision 670 computer,
monitor cable connector doesn’t
DVI connector but your monitor has
see "Connect the monitor" on
seem to fit the connector on the
a VGA connector, then you need to
page 10 and for the Dell Precision 470
back of my computer?
use an adapter. An adapter should be
computer, see "Connect the monitor"
included in the box.
on page 16.
Connect my speakers? If you have a sound card installed,
See the documentation that came
connect the speakers to the
with your speakers for
connectors on the card. For the Dell
more information.
Precision 670 computer, see "Connect
the speakers" on page 13 and for the
Dell Precision 470 computer, see
"Connect the speakers" on page 17.
Find the right connectors for my
Your Dell Precision 670 computer has
See the front and back view graphics
USB or IEEE 1394 devices?
two front panel and six back panel
of your computer in your User’s
USB 2.0 compliant connectors. It also
Guide. For help with locating your
has two 6-pin serial IEEE 1394
User’s Guide, see "Dell Precision™
connectors. See "Setting Up Your Dell
Mobile Workstation User’s Guide" on
Precision 670 Computer" on page 9.
page 6.
Your Dell Precision 470 computer has
two front panel and six back
panel USB 2.0 connectors. It is
also available with an add-in
PCI IEEE 1394 card. See "Setting Up
Your Dell Precision 470 Computer"
on page 15.
38 Quick Reference Guide

How Do I... Solution Where to Find Additional Information
Locate information about the
Yo u r User’s Guide has a specifications
Go to the Dell Support website at
hardware and other technical
table that provides more detailed
support.dell.com and use one of the
specifications for my computer?
information about your computer
following support tools: read white
and the hardware. To locate your
papers on the latest technology or
User’s Guide, see "Finding
communicate with other Dell users at
Information" on page 5.
the Dell forum chat room.
Install new memory? Your User’s Guide has a memory
For help with locating your User’s
section that provides detailed
Guide, see "Finding Information" on
information about your
page 5.
computer’s memory.
See "Memory Overview" on page 36.
Find documentation for my
The following documentation is
If you lose your documentation, it is
computer?
available for your computer:
available on the Dell Support website
• User’s Guide
at support.dell.com.
• Product Information Guide
• System Information Label
• Service Manual
To locate these documents, see
"Finding Information" on page 5.
Quick Reference Guide 39

www.dell.com | support.dell.com
40 Quick Reference Guide
