Beurer HTE 50: 6 Operation
6 Operation: Beurer HTE 50
19
6 Operation
Important
• Straighten the mains cable [9] if it
becomes twisted.
• Do not pull, twist or kink the mains
cable [9]; do not pull or lay it across/on
sharp, pointy objects or hot surfaces.
• Do not clamp the mains cable [9], for
example in drawers, doors or between the
heating plates [1, 2].
Warning
• Stand on a dry, electrically non-conductive
surface.
• Ensure that your hands are dry!
• Your hair must be dry!
• Depending on the temperature setting and
duration of use, the unit can become very
hot. If the unit is hot, touch it only by its
handle [6] – burn and fire hazard!
• Do not touch the heating plates [1, 2]!
• Do not touch the attachments as long as
they are still hot!
• Do not clamp any objects between the
heating plates [1, 2] and the barrel and the
curling tong.
• Switch the unit off immediately if it is
defective or malfunctioning.
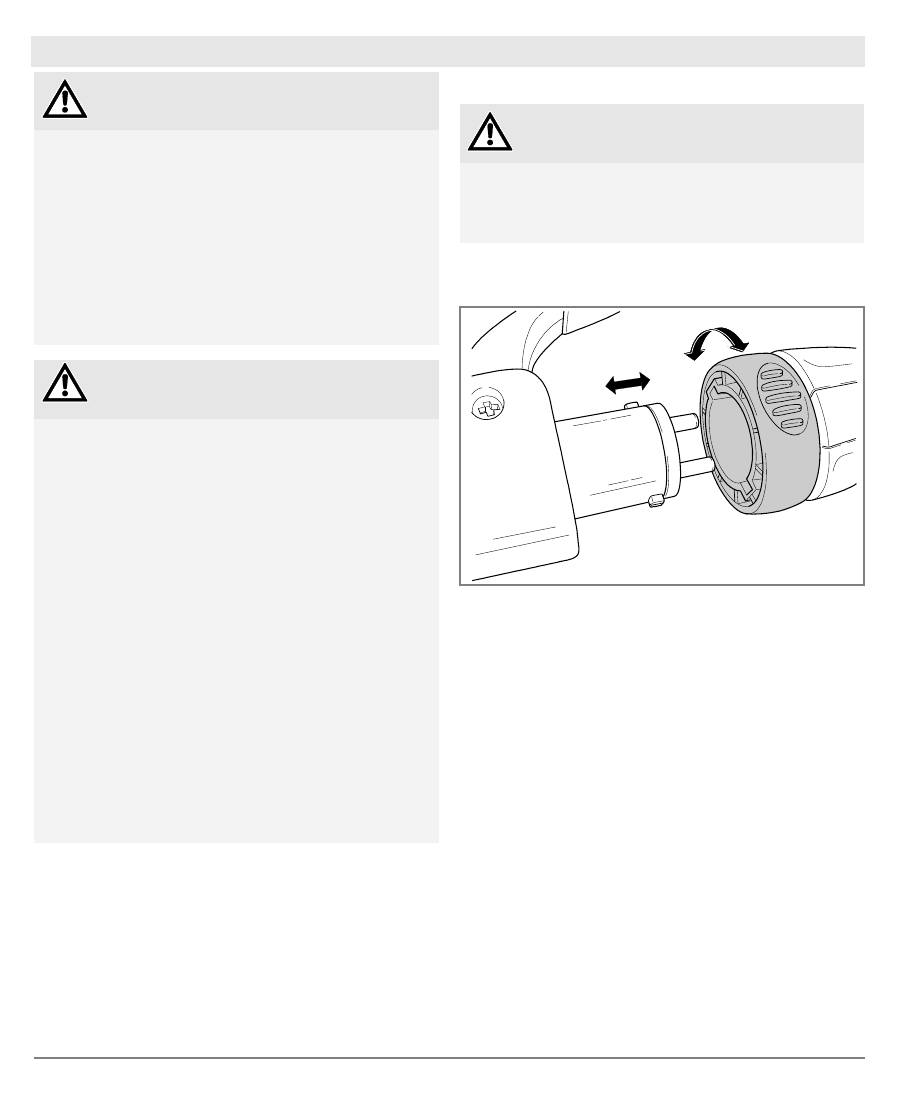
Changing attachments
Warning
• When the attachment is in place on the
unit, always let it cool down before
removing it – burn hazard!
• Select the right attachment [12, A, B, C] for
the desired hairstyle.
• Turn the lock ring [10] clockwise until it
stops. The attachment is unlocked.
• Remove the attachment from the handle [6].
• Align the selected attachment as shown in
the figure.
• Push the selected attachment carefully into the
handle [6], without jamming the two metal pins.
• Turn the lock ring [10] anti-clockwise until it
stops. The attachment is locked.
• Check whether the attachment is firmly
connected with the handle.
• Lay the multi-function styler or place it with
the stand unfolded [13] onto a stable,
horizontal and non-combustible surface or
hold the multi-function styler in your hand to
let it cool.
20
Adjusting the temperature
You can set the temperature at two levels
using the slide switch [5]. We recommend the
following temperature settings:
Level
Hair type
1: Low
Fine, fragile, coloured or
bleached hair
2: High
Normal and thick hair
Note
• The higher the selected temperature, the
more quickly you get the desired result.
• Select the desired temperature level via the
slide switch [5].
• The multi-function styler is ready for use in a
few minutes.
Shaping hair
Preparing hair
• Dry your hair completely before using the
multi-function styler.
• Your hair should be clean and free of styling
products.
• Comb your hair with a wide-toothed comb to
untangle it.
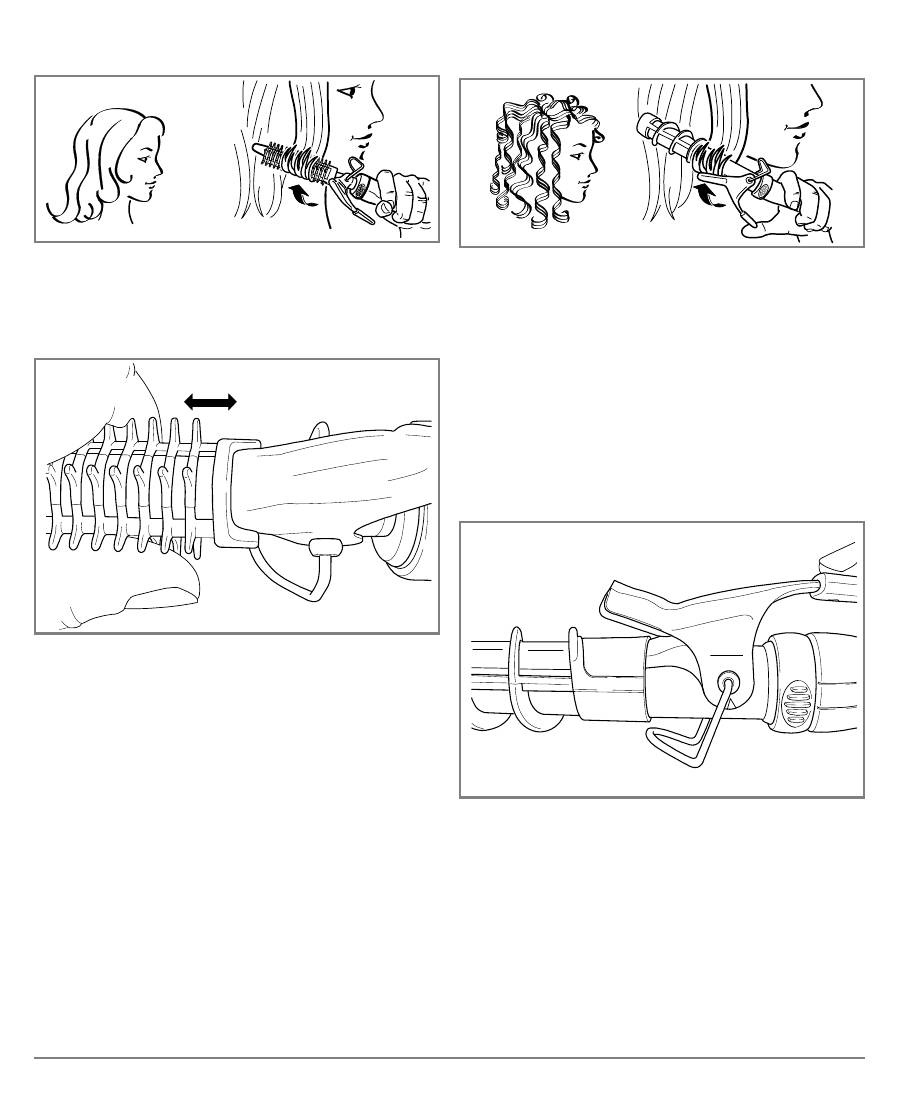
Shaping curls/waves
You can shape your hair with the curling irons
[A, B, C]:
• Divide your hair into individual strands with
a width of about 2 cm. Hold the strands taut.
• Press the lever of the curling iron to open
the curling tong.
• Place the hair strand ends between the
barrel and the curling tong of the curling
iron.
• Close the curling tong to hold the hair
strands in place.
• Wind the strands toward your head onto the
curling iron.
• Leave the curling iron in your hair for about
8 to 10 seconds. This way you will obtain
the best results without overstraining or
damaging your hair.
• Open the curling tong and carefully pull the
barrel out of the curl.
Shaping hair ends
• Place the hair strand ends between the
barrel and the curling tong of the curling
iron.
• Close the curling tong to hold the hair
strands in place.
• You can shape the ends by twisting the
curling iron either outward or inward before
you pull it out over the ends.
21
Using the brush attachment
You can use the brush attachment [E] with the
curling iron [B]:
• Check whether the curling iron [B] has
cooled down.
• Carefully push on the brush attachment [E],
with the notch facing upward, onto the cold
curling iron [B] as far as it will go.
• Divide your hair into individual strands. Hold
the strands taut.
• Wind the hair strands onto the brush.
• Wait about 10 seconds before you unwind
the hair strands again.
Using the spiral attachment
You can use the spiral attachment [D] with the
curling iron [A]:
• Check whether the curling iron [A] has
cooled down.
• Push the spiral attachment [D] with the
grooves on the attachment upwards to the
centre onto the closed, cold curling tongs
[A].
• Press the lever of the curling iron to open
the curling tong.
• Carefully push on the spiral attachment [D]
onto the cold curling iron [A] as far as it will
go.
• Close the curling tong.
• Divide your hair into individual strands.
Hold the strands taut.
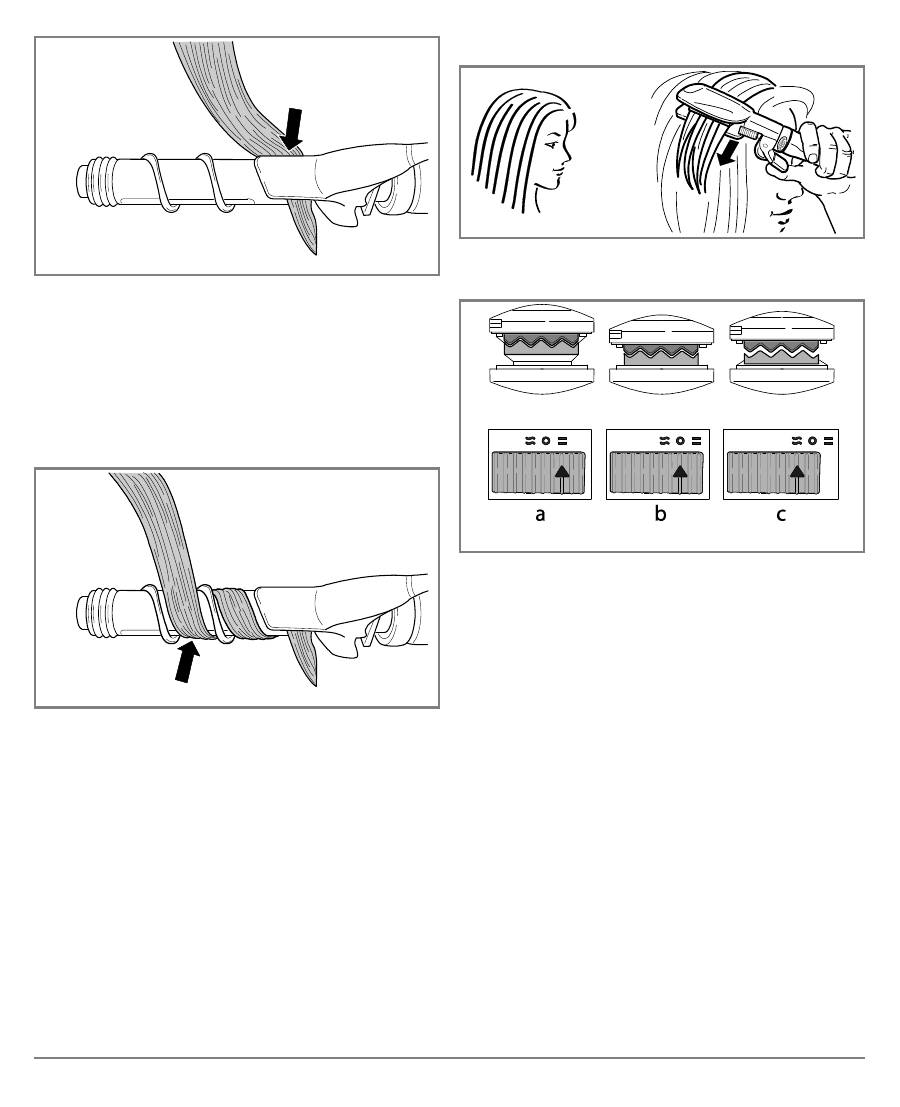
22
• Press the lever of the curling iron [A] to
open the curling tong.
• Place the hair strand ends between the
barrel and the curling tong of the curling
iron [A].
• Close the curling tong to hold the hair
strands in place.
• Wind the strands toward your head around
the spiral attachment [D]. Always ensure
that the hair strands are wound up as
shown in the figure.
• Wait for about 10 seconds before you
unwind the hair strands again.
• Open the curling tong and pull the hair
strands out of the curling tong.
Using the straightening iron
• Attach the straightening/crimping
attachment [12] to the multi-function styler.
• Slide the selector switch [11] into the
"Straighten" position [a]. Now the
straightening iron [G] can be used.
• Divide your hair into individual strands with a
width of about 3 cm. Hold the strands taut
and place them between the straightening
iron [G] at the roots.
• Move the straightener slowly and smoothly
from the roots to the ends. Do not keep the
straightener at any one place for longer than
8 to 10 seconds. This way you will obtain
the best results without overstraining or
damaging your hair.
• You can shape the ends by twisting the
straightener either outward or inward before
you pull it out over the ends.
Straighten Closed Crimp
Оглавление
- D Deutsch
- 2 Zeichenerklärung
- 5 Gerätebeschreibung
- 6 Bedienen
- 7 Gerät reinigen und pflegen
- 8 Technische Daten
- 10 Garantie und Service
- G English
- 2 Signs and symbols
- 5 Unit description
- 6 Operation
- 7 Cleaning and care of the unit
- 8 Technical specifications
- F Français
- 2 Symboles utilisés
- 5 Description de l'appareil
- 6 Utilisation
- 7 Nettoyage et entretien de l'appareil
- 8 Caractéristiques techniques
- E Español
- 2 Aclaración de los símbolos
- 5 Descripción del aparato
- 6 Manejo
- 7 Limpieza y cuidado del aparato
- 8 Datos técnicos
- I Italiano
- 2 Significato dei simboli
- 5 Descrizione dell'apparecchio
- 6 Funzionamento
- 7 Pulizia e cura dell'apparecchio
- 8 Dati tecnici
- T Türkçe
- 2 İşaretlerin açıklaması
- 5 Cihaz açıklaması
- 6 Kullanım
- 7 Cihaz temizliği ve bakımı
- 8 Teknik veriler
- r Русский
- 2 Пояснения к символам
- 5 Описание прибора
- 6 Применение
- 7 Очистка прибора и уход за ним
- 8 Технические характеристики
- 9 Утилизация
- 10 Гарантия
- Q Polski
- 2 Objaśnienia do rysunków
- 5 Opis urządzenia
- 6 Obsługa
- 7 Czyszczenie i konserwacja urządzenia
- 8 Dane techniczne
- O Nederlands
- 2 Verklaring van de tekens
- 5 Beschrijving van het toestel
- 6 Bedienen
- 7 Toestel reinigen en onderhouden
- 8 Technische gegevens
- P Português
- 2 Explicação dos símbolos
- 5 Descrição do dispositivo
- 6 Utilizar
- 7 Limpar e conservar o aparelho
- 8 Dados técnicos
- K Ελληνικά
- 2 Επεξήγηση σημάτων
- 5 Περιγραφή συσκευής
- 6 Χειρισμός
- 7 Καθαρισμός και περιποίηση της συσκευής
- 8 Τεχνικά χαρακτηριστικά


