Beurer KS 800: инструкция
Раздел: Узкоспециализированное и бизнес оборудование
Тип: Весы ювелирные
Инструкция к Весам ювелирным Beurer KS 800
Оглавление
KS 800
D
Rezeptwaage
I
Bilancia-ricettario
Gebrauchsanleitung
Instruzioni per l’uso
G
Recipe scale
T
Tarif terazisi
Instruction for Use
Kullanma Talimatı
F
Balance à recettes
r
Рецептурные весы
Mode d’emploi
Инструкция по применению
E
Báscula con recetas
Q
Waga recepturowa
Instrucciones para el uso
Instrukcja obsługi
BEURER GmbH
Söflinger Str. 218
•
89077 Ulm (Germany)
www.beurer.com
•
Mail: kd@beurer.de
DEUTSCH
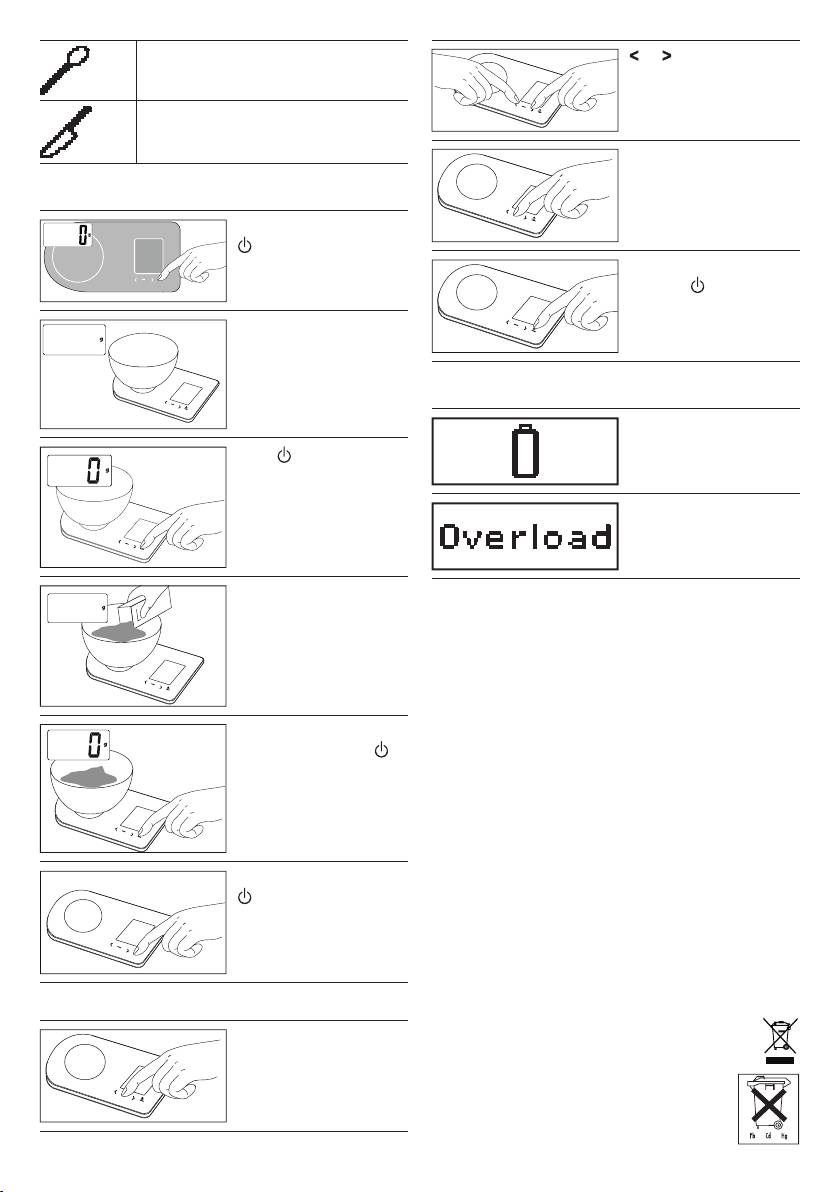
1. Inbetriebnahme
Nach Beenden des Rezeptes wird die Waage aus-
geschaltet und das Rezept automatisch gelöscht.
Wechsel zum Timer während eines Rezeptschrit-
tes:
–
-Taste drücken,
–
weiteres Vorgehen siehe Kapitel „Timer einstellen“,
– -Taste drücken,
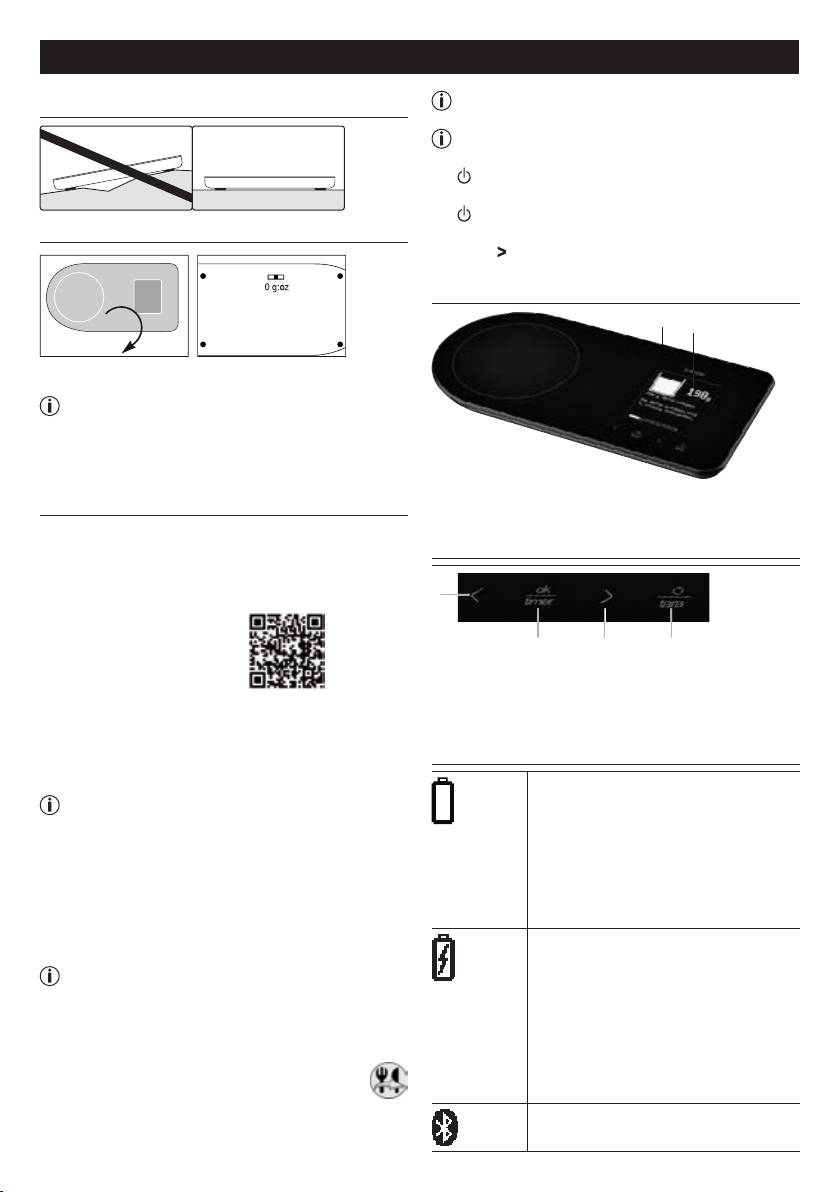
Waage auf einen ebenen und festen Untergrund stellen.
– zurück zum Rezeptschritt durch Drücken der
Taste
.
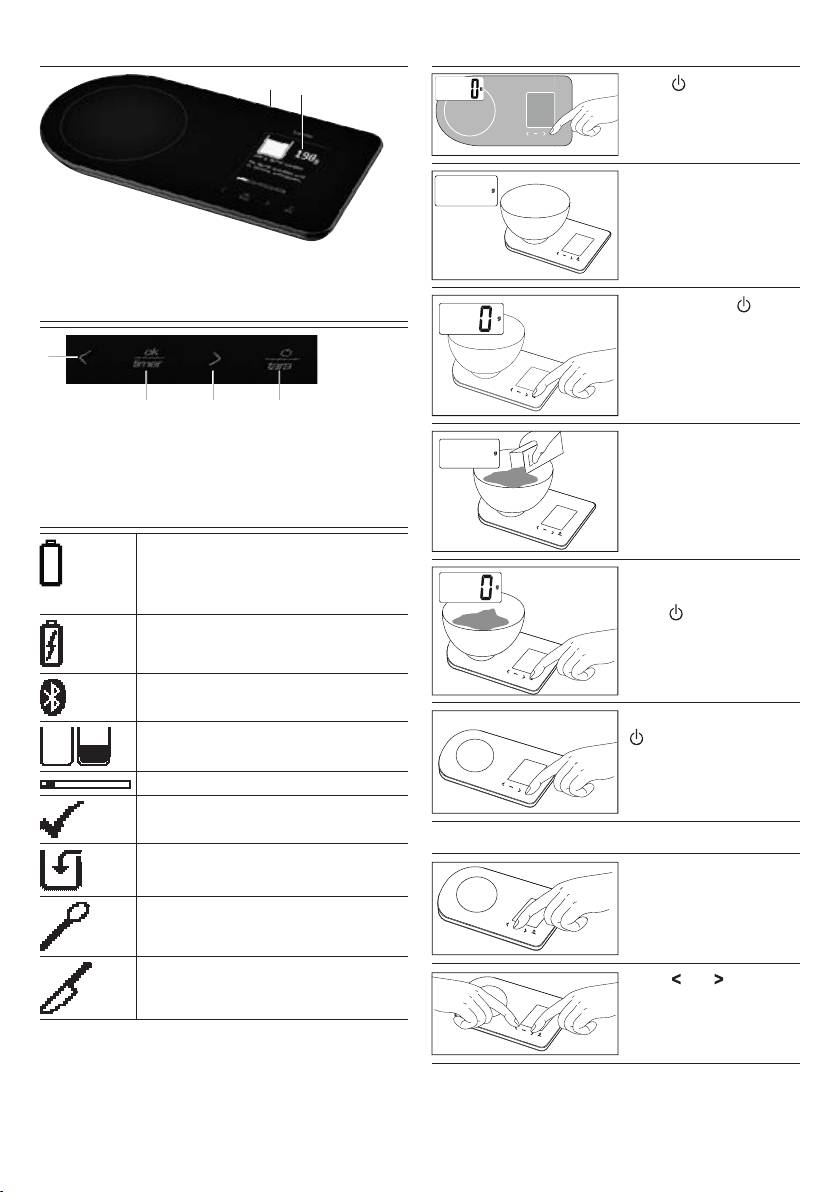
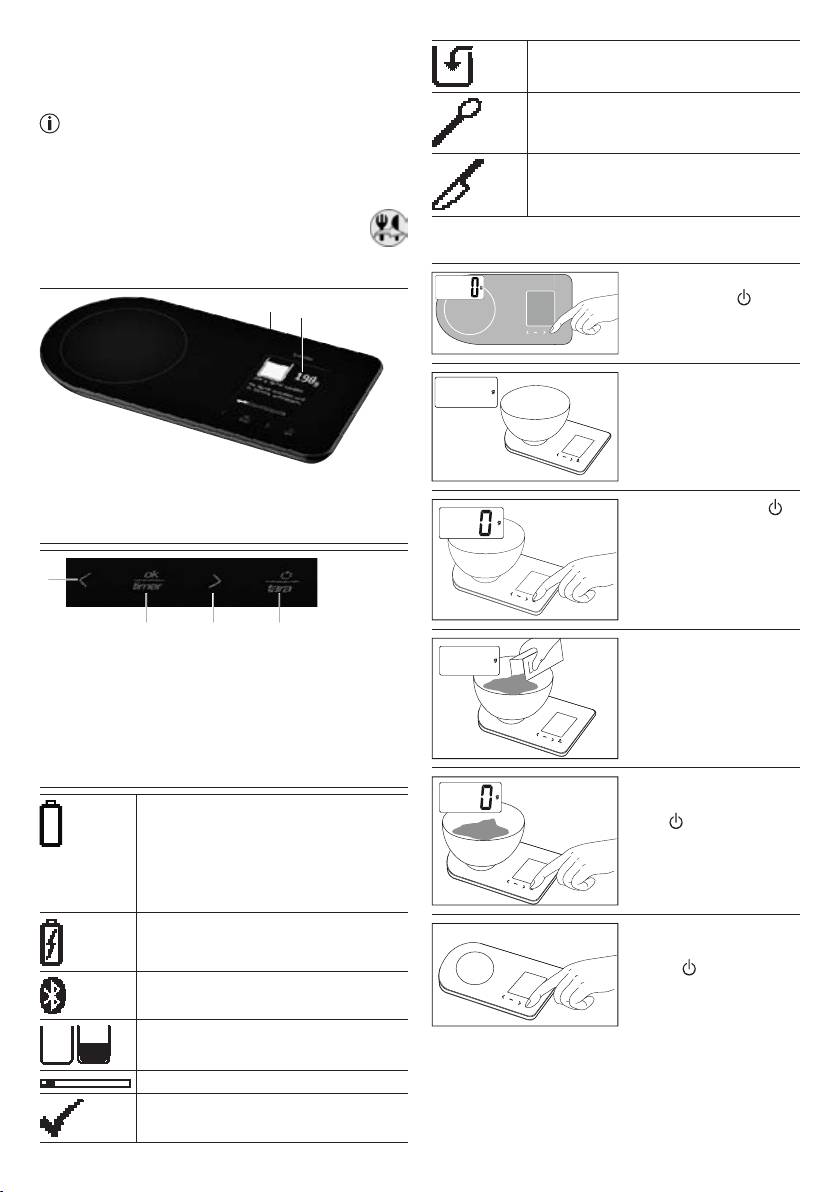
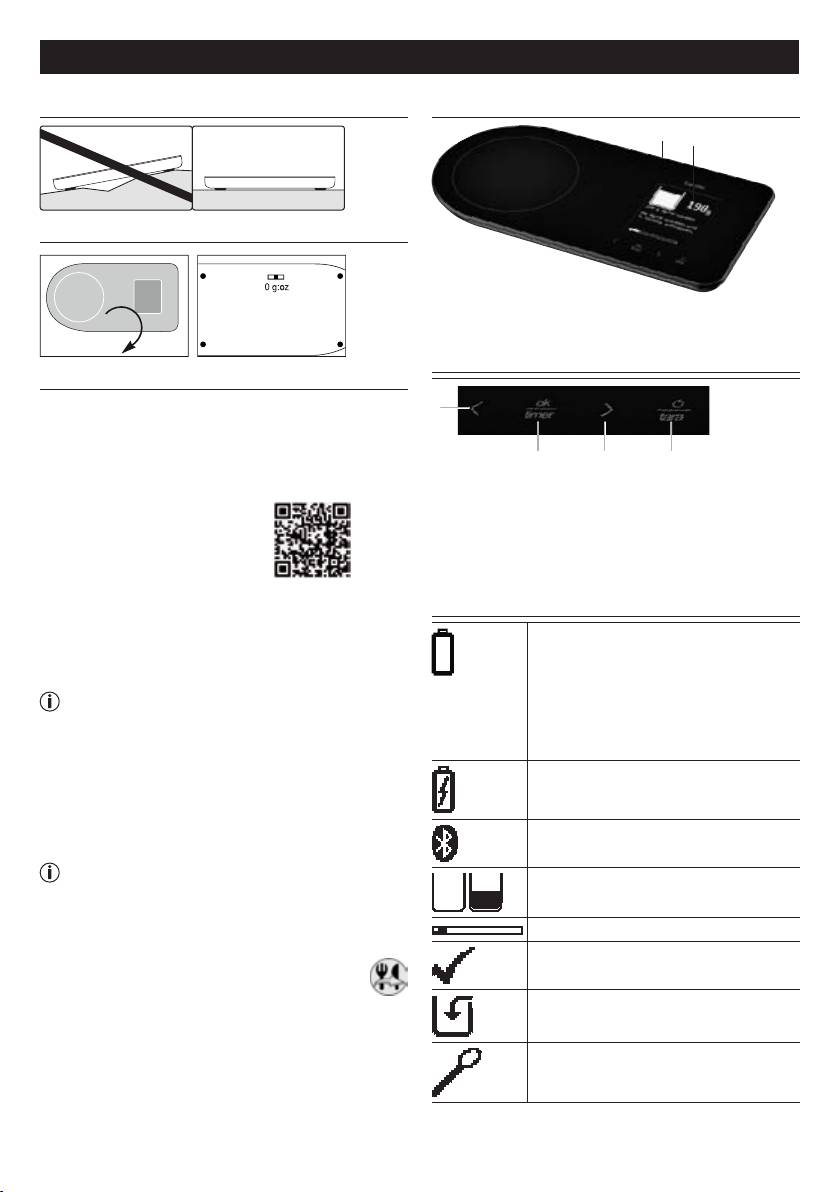
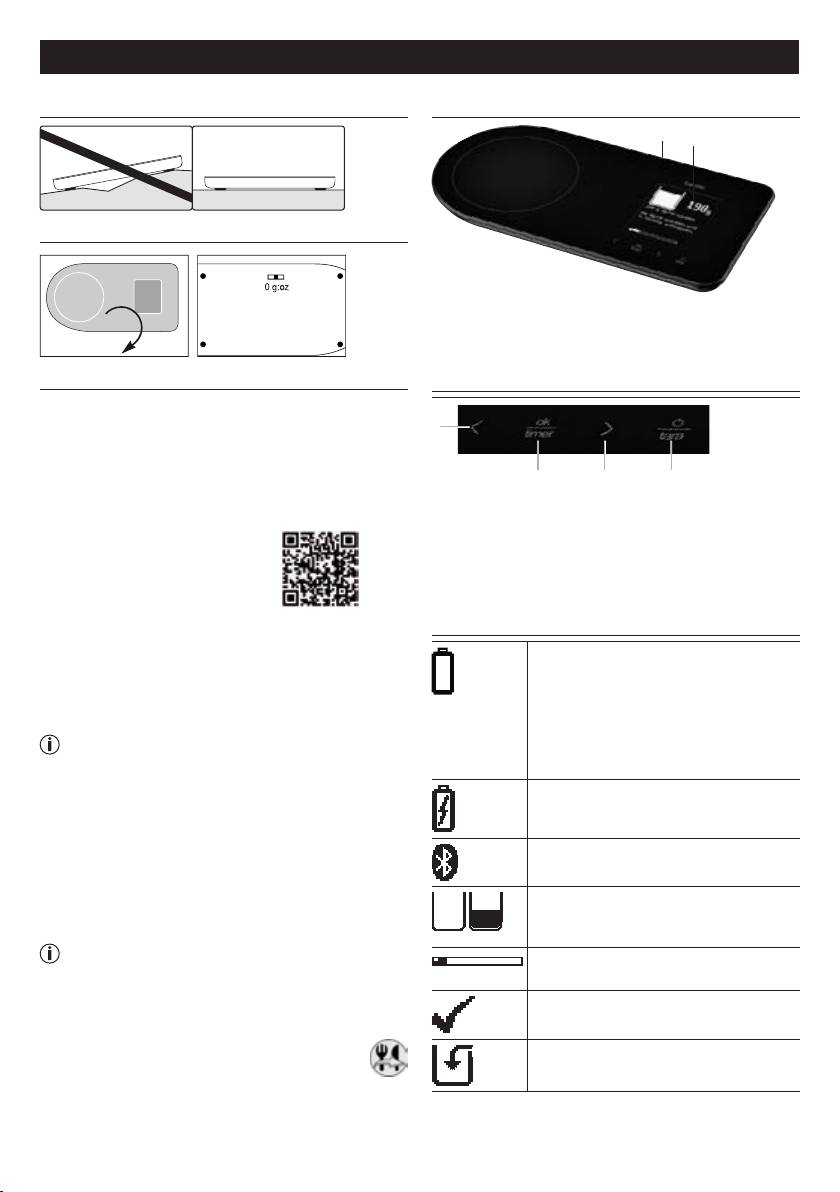
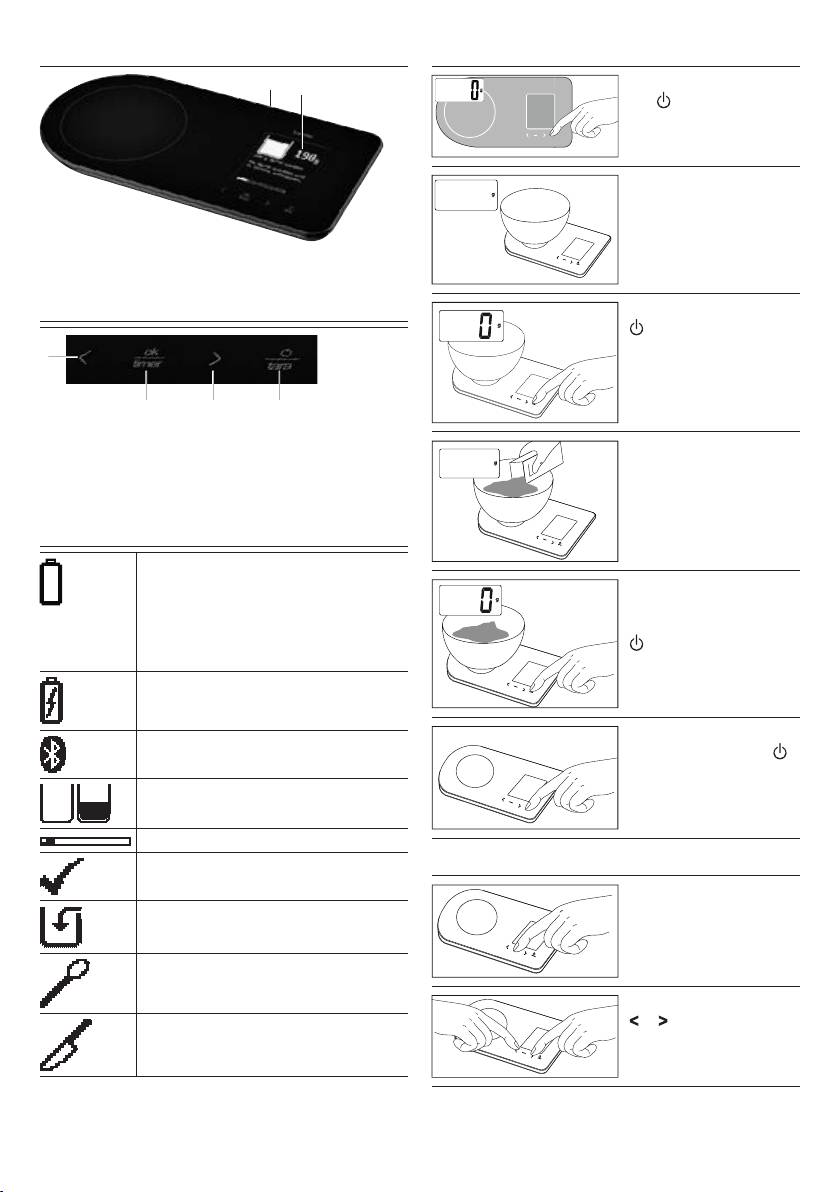
3. Gerätebeschreibung
1
2
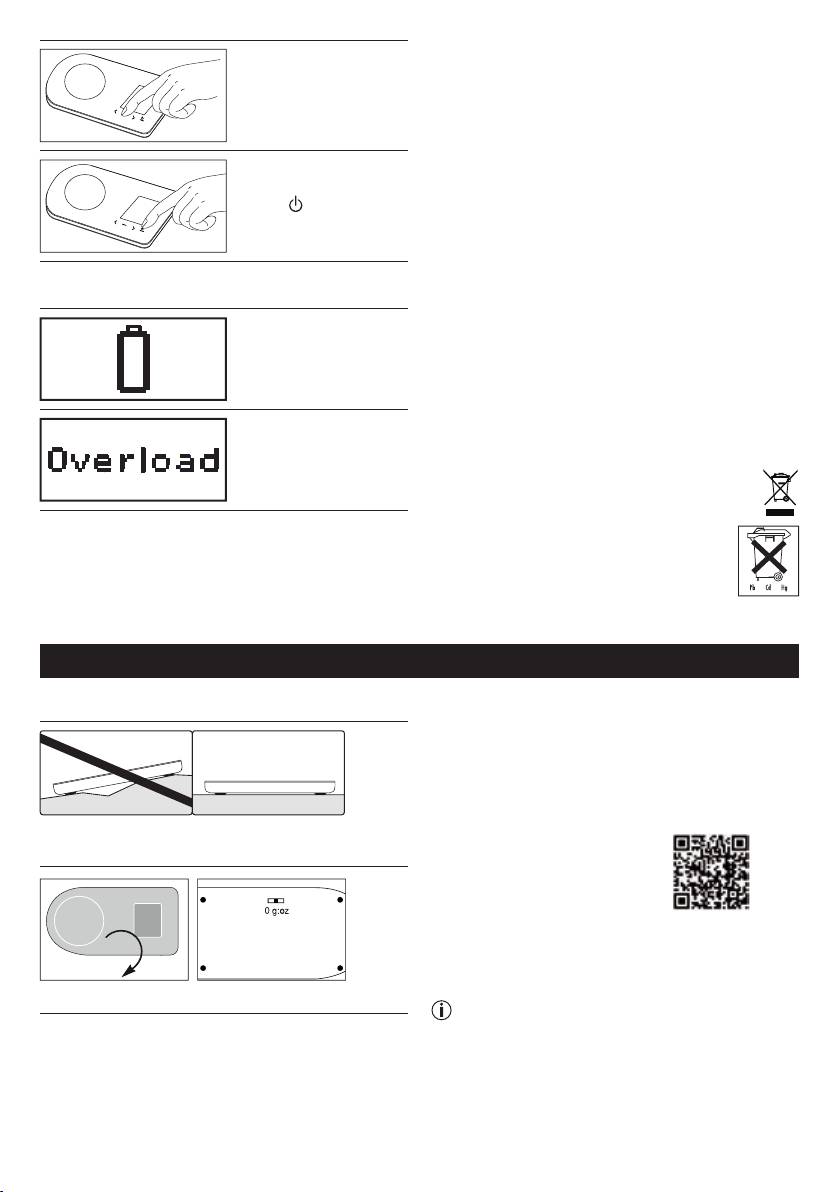
0 ➞ g:oz
Einheit einstellen.
– Lassen Sie die Waage auch im ausgeschalteten
Zustand in dieser Einheit. Nur wenn die Waage
sehr lange (einige Monate) nicht benutzt wird
empfiehlt es sich, die Waage auf „0“ zu stellen.
Akku vor der ersten Anwendung für ca. 4 Stunden mit
dem mitgelieferten USB-Kabel aufladen.
1 Akku-Ladebuchse zum Aufladen des Akkus per
mitgeliefertem USB-Kabel.
2. Inbetriebnahme mit App
2 Display
Systemvoraussetzungen
Ein Smartphone/Tablet, kompatibel mit Bluetooth®
1
4.0. wie z.B. iPhone 4S, 5.
Liste der kompatiblen Geräte:
2 3 4
1 Rezept: Schritt zurück
3 Rezept: Schritt vor
Timer: einstellen
Timer: einstellen
Um die einzelnen Rezepte von der App auf die Waage
2 Rezept: Bestätigen des
4 ON/OFF
schicken zu können, muss diese verbunden werden.
Rezeptschrittes
Tara-Funktion
Gehen Sie dabei wie folgt vor:
Timer: einschalten
•
Blue tooth in den Einstellungen des Smartphones
aktivieren.
Die KS 800 Küchenwaage besitzt einen
Hinweis: Bluetooth Smart Geräte, wie diese
integrierten Lithium-Ionen Akku. Wenn
Waage, sind in den allgemeinen Einstellungen in
das Symbol „Akku leer“ erscheint,
der Bluetooth Geräteliste nicht sichtbar. Blue-
muss der Akku mit dem mitgelieferten
tooth Smart Geräte können nur von speziel-
USB-Kabel für ca. 4 Stunden aufgela-
len Apps oder in den Apps vom Gerätehersteller
den werden. Dabei muss die Waage auf
angezeigt werden.
die Einheit g oder oz gestellt sein (Waa-
•
„Rezeptwaage“-App im Appstore installieren.
genrückseite).
•
App starten.
Akku wird geladen.
•
Waage einschalten.
Ladesymbol wechselt dabei mit Bat-
Hinweis: Damit während der Inbetriebnahme
teriesymbol während dem laden. Der
eine Blue tooth-Verbindung aktiv gehalten wer-
Ladevorgang ist beendet, wenn Sym-
den kann, bleiben Sie mit dem Smartphone in der
bol nicht mehr wechselt und volles
Nähe der Küchenwaage.
Batteriesymbol angezeigt wird.
• AppanwendenundRezeptauswählen.
Die Waage kann auch im ausgeschal-
• NachAuswahldesRezepts,Tast
e „zur Waage
teten Zustand geladen werden, wobei
senden“ drücken.
kein Symbol erscheint.
•
Auf der Waage „ok“ drücken und alle weiteren
Rezept wird per Blue tooth übermittelt.
Rezeptschritte mit „ok“ bestätigen.
2
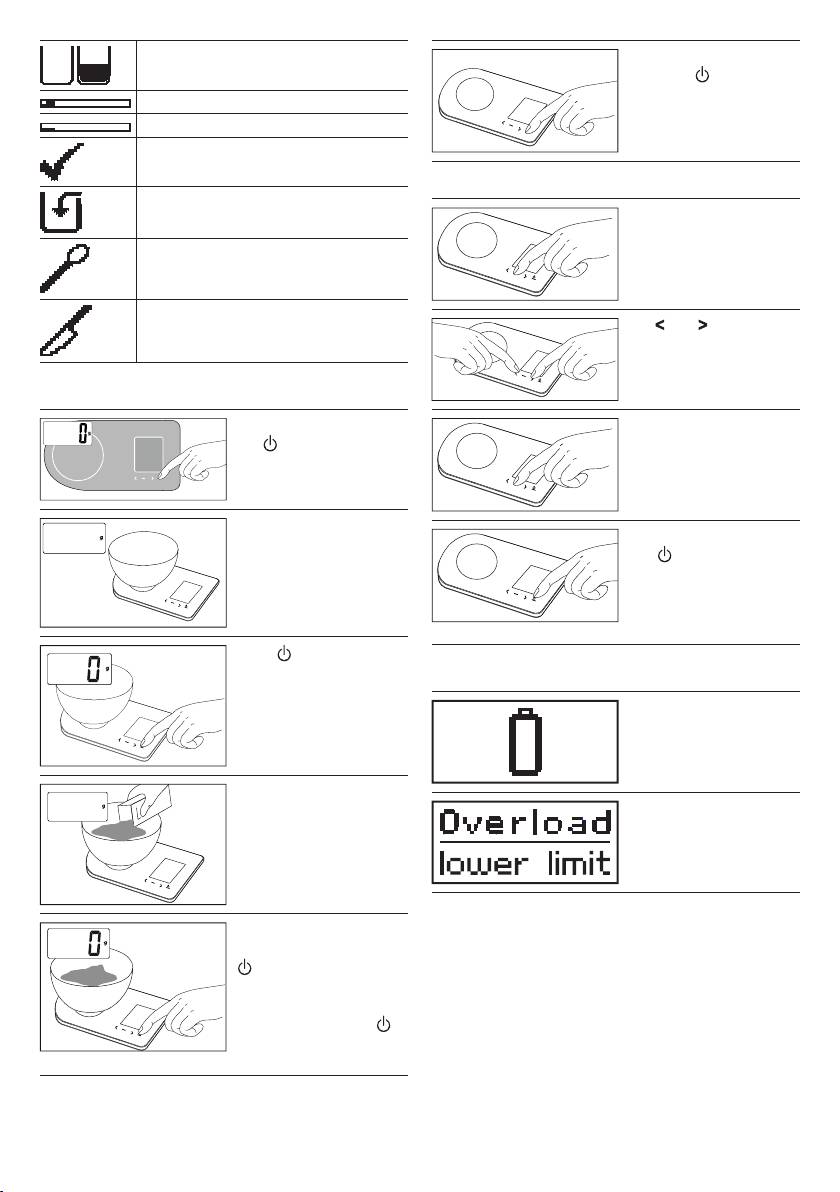
Füllstandsanzeige bei Wiegevorgang
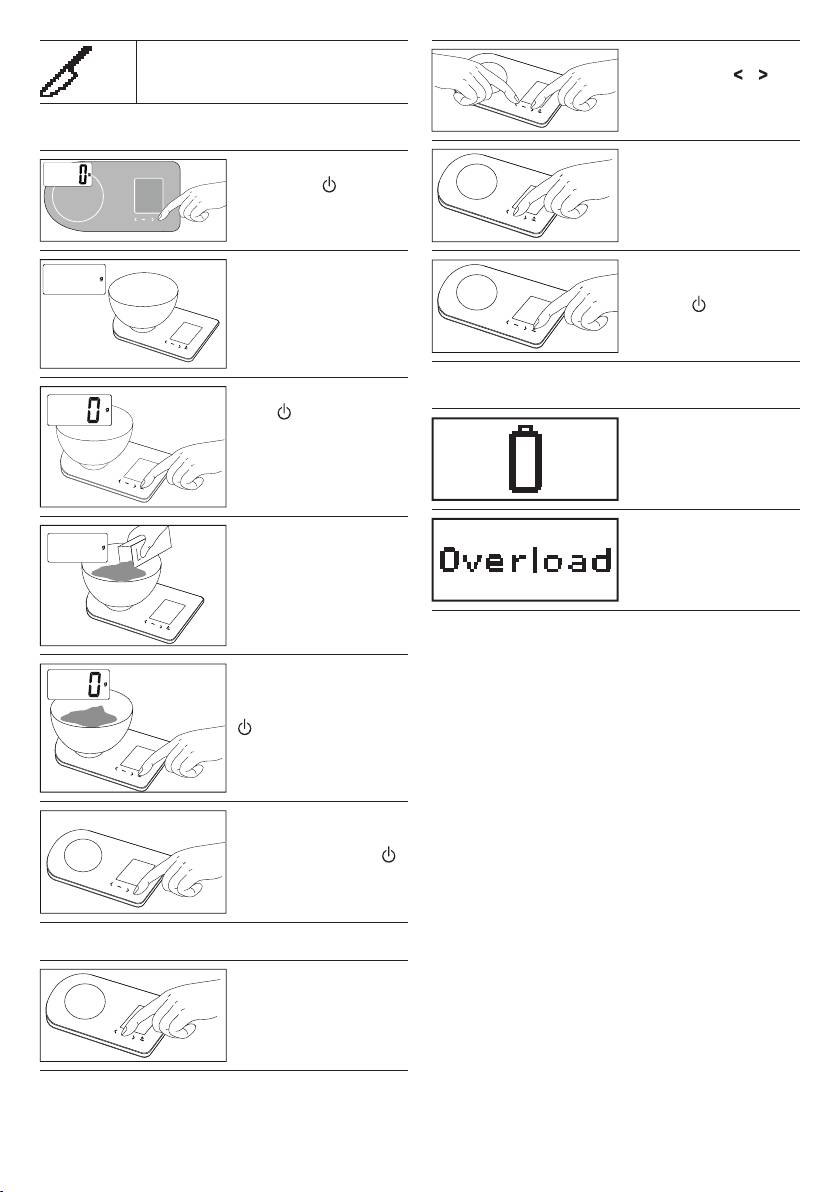
Um Waage auszu-
während des Rezeptes.
schalten,
-Taste für
3 Sekunden gedrückt
Fortschrittsbalken / Rezept
halten.
timer
ok
Rezeptschritt noch nicht bestätigt
tara
Rezeptschritt abgeschlossen, es folgt
nächster Schritt
Timer einstellen
Zugabeschritt, z.B. Zucker
„Timer“-Taste drücken.
Handlungsschritt, z.B. Hefeteig gehen
tara
timer
ok
lassen
tara
Vorbereiten-Schritt, z.B. Äpfel schälen
Mit und gewünschte
Zeit einstellen.
tara
timer
ok
tara
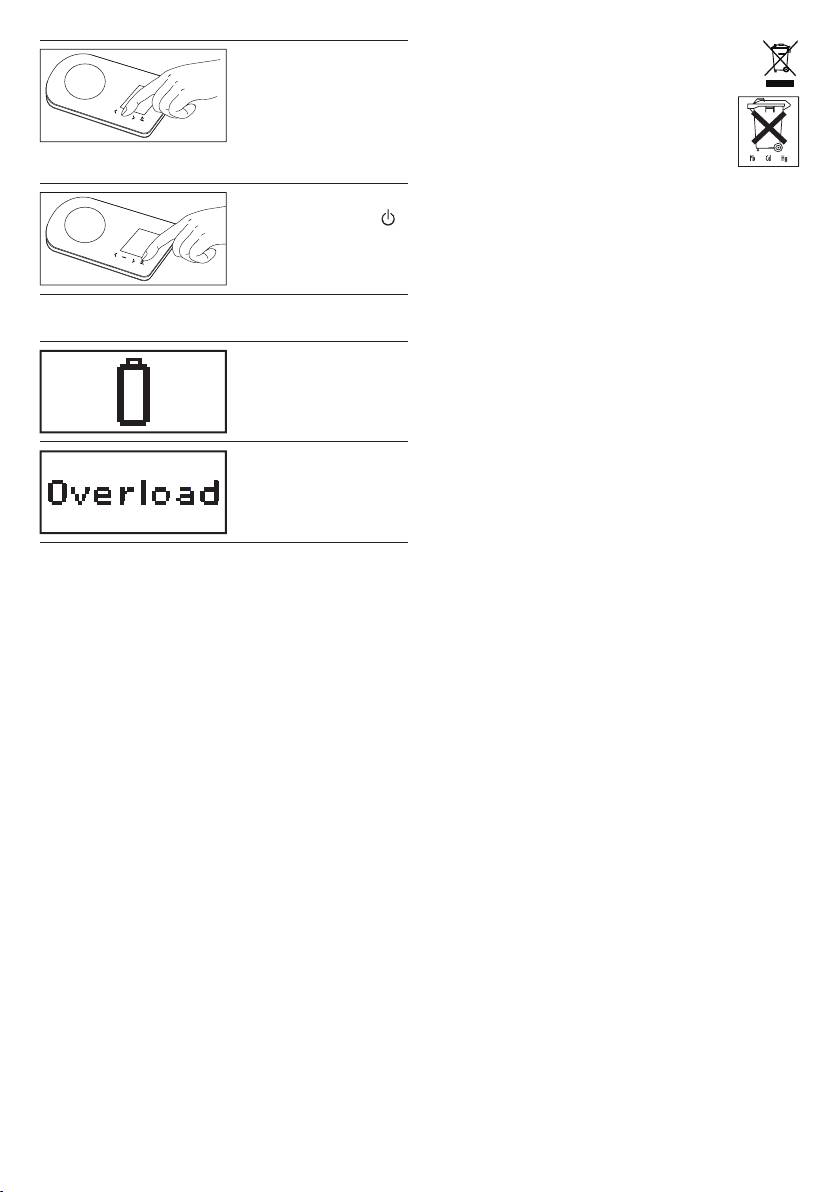
4. Wiegen / Timer
Um Waage einzuschal-
Mit „ok“ Timer star-
ten
drücken. War-
ten und stoppen. Nach
ten bis
0 im Display
tara
Ablauf des Timers ertö-
ok
taratimer
erscheint.
timer
ok
nen Tonsignale.
tara
Gefäß aufstellen.
Um Timer auszuschal-
37
ten,
-Taste drücken.Im
tara
Wiegemodus schaltet die
timer
ok
Waage automatisch nach
timer
ok
tara
tara
5 Minuten aus, im Rezept-
modus nach 10 Minuten.
„tara / “-Taste drücken.
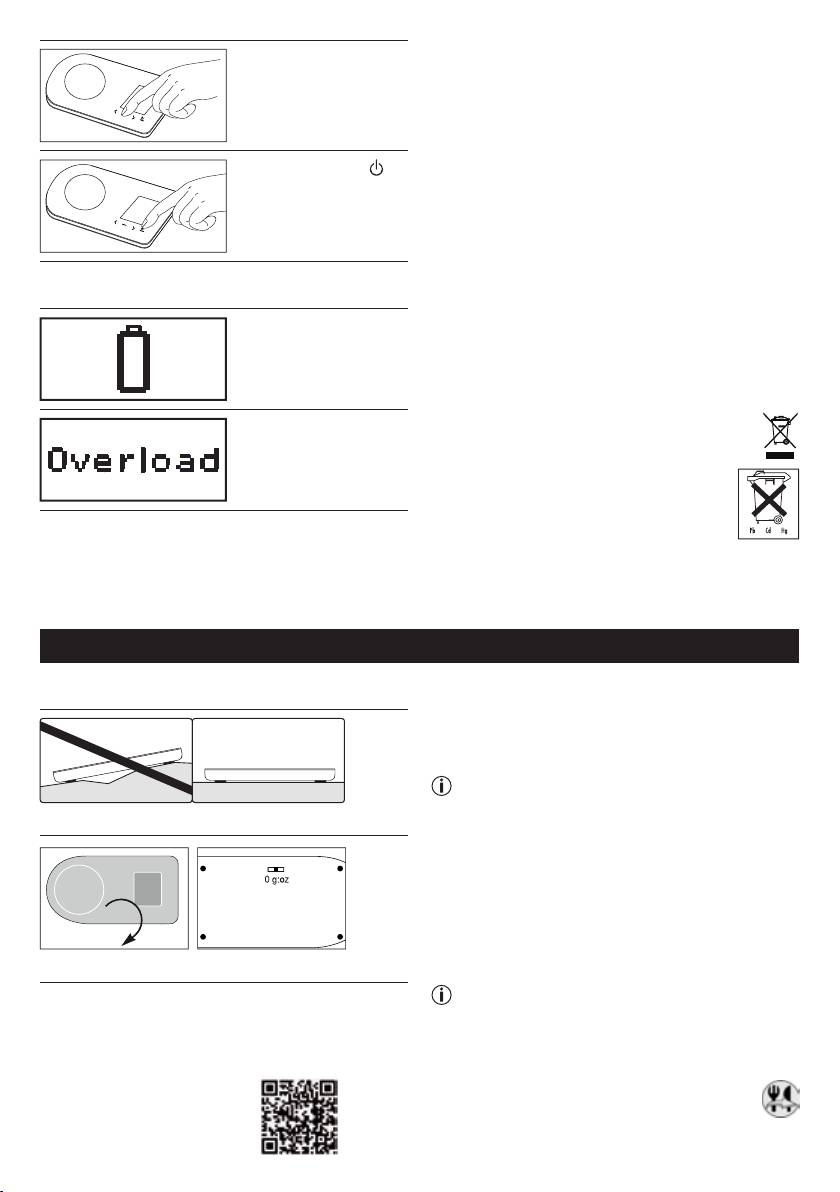
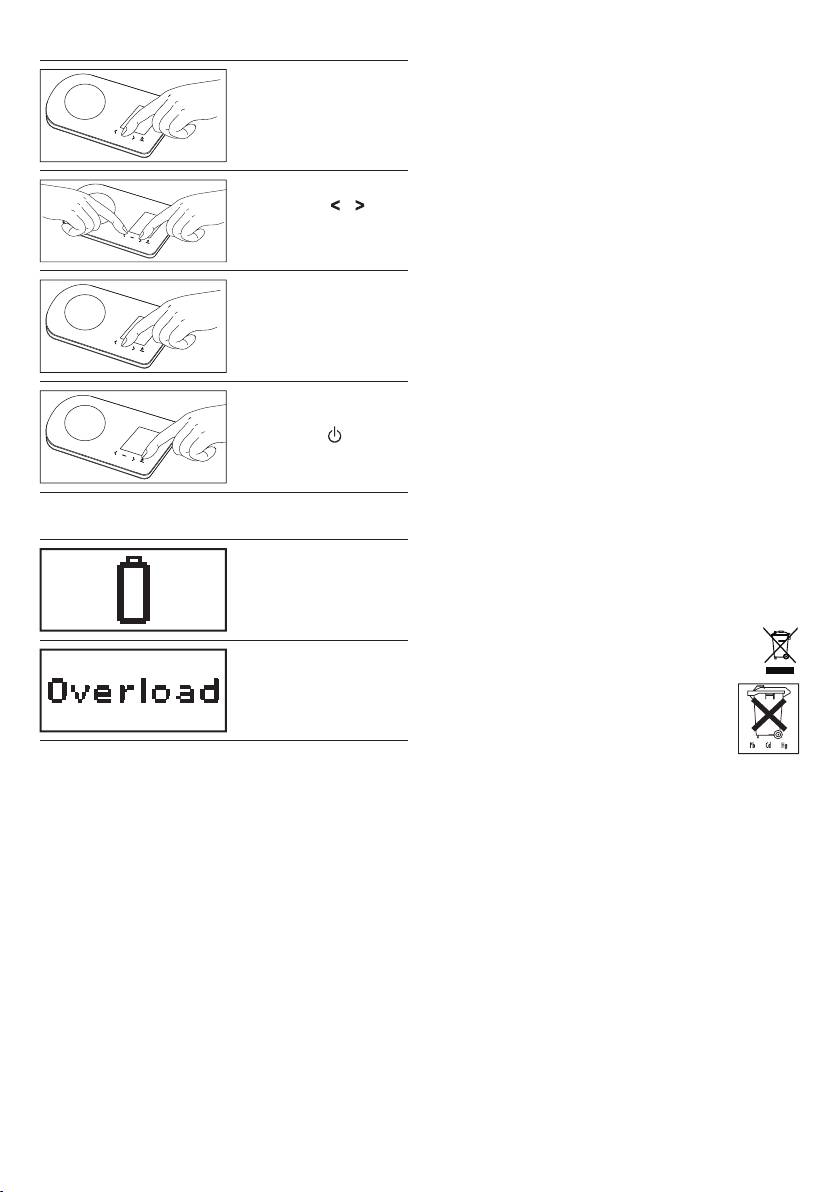
5. Fehlermeldungen
Batterie leer.
timer
ok
tara
Wiegegut auflegen.
Maximale Tragkraft über-
500
schritten (5 kg) bzw.
unterschritten (-1 kg).
timer
ok
tara
6. Wichtige Hinweise
Zuwiegen weiterer
Zutaten – erneut „tara /
• Die Waage verwendet Blue tooth Smart (Low
“-Taste drücken.
Energy) und sendet über das Frequenzband
Die Waage summiert die
2,4 GHz.
tarierten Gewichte auf.
•
Der Akku sollte mindestens 2 x pro Jahr aufgeladen
tara
timer
ok
Bei 0 g erneut „tara /
“
werden, um seine Kapazität zu erhalten.
tara
drücken um die Liste zu
•
Lithium-Ionen-Akku (3,7 V / 500 mAh).
löschen.
•
Ladezeit ca. 4 Stunden über USB-Anschluss am
Computer oder über USB-Netz-Adapter.
•
Belastbarkeit beträgt max. 5 kg, Einteilung 1g.
•
Die Genauigkeit der Waage kann durch starke elek-
tromagnetische Felder (z.B. Mobiltelefone) beein-
trächtigt werden.
3
•
Nicht für den gewerblichen Einsatz vorgesehen.
entfernt (Gerät aufschrauben) und ebenfalls fachge-
•
Sie sollten die Waage vor Stößen, Feuchtigkeit,
recht entsorgt werden.
Staub, Chemikalien, starken Temperaturschwan-
kungen und zu nahen Wärmequellen (Öfen, Hei-
7. Garantie
zungskörper) schützen.
Sie erhalten 5 Jahre Garantie ab Kaufdatum auf Mate-
•
Aufbewahrung: Stellen Sie keine Gegenstände auf
rial- und Fabrikationsfehler des Produktes.
die Waage, wenn sie nicht benutzt wird.
Die Garantie gilt nicht:
•
Reinigung: Sie können die Waage mit einem ange-
•
im Falle von Schäden, die auf unsachgemäßer
feuchteten Tuch reinigen, auf das Sie bei Bedarf
Bedienung beruhen,
etwas Spülmittel auftragen können. Tauchen Sie die
•
für Verschleissteile,
Waage niemals in Wasser. Spülen Sie sie auch nie-
•
für Mängel, die dem Kunden bereits bei Kauf
mals unter fließendem Wasser ab.
bekannt waren,
•
Reparaturen dürfen nur vom Kundenservice oder
•
bei Eigenverschulden des Kunden.
Händlern durchgeführt werden.
Die gesetzlichen Gewährleistungen des Kunden
Wir garantieren hiermit, dass dieses Produkt der euro-
bleiben durch die Garantie unberührt. Für Geltend-
päischen R&TTE Richtlinie 1999/5/EC entspricht.
machung eines Garantiefalles innerhalb der Garantie-
Kontaktieren Sie bitte die genannte Serviceadresse,
zeit ist durch den Kunden der Nachweis des Kaufes
um detailliertere Angaben – wie zum Beispiel die CE-
zu führen. Die Garantie ist innerhalb eines Zeitraumes
Konformitätserklärung – zu erhalten.
von 5 Jahren ab Kaufdatum gegenüber der Beurer
GmbH, Söflingerstraße 218, 89077 Ulm, Germany,
Bitte entsorgen Sie das Gerät gemäß der
geltend zu machen. Der Kunde hat im Garantiefall das
Elektro- und Elektronik Altgeräte Verordnung
Recht zur Reparatur der Ware bei unseren eigenen
WEEE (Waste Electrical and Electronic Equip-
oder bei von uns autorisierten Werkstätten. Weiter-
ment). Bei Rückfragen wenden Sie sich bitte
gehende Rechte werden dem Kunden (aufgrund der
an die für die Entsorgung zuständige
Garantie) nicht eingeräumt.
kommunale Behörde. Der Akku muss zuvor
ENGLISH
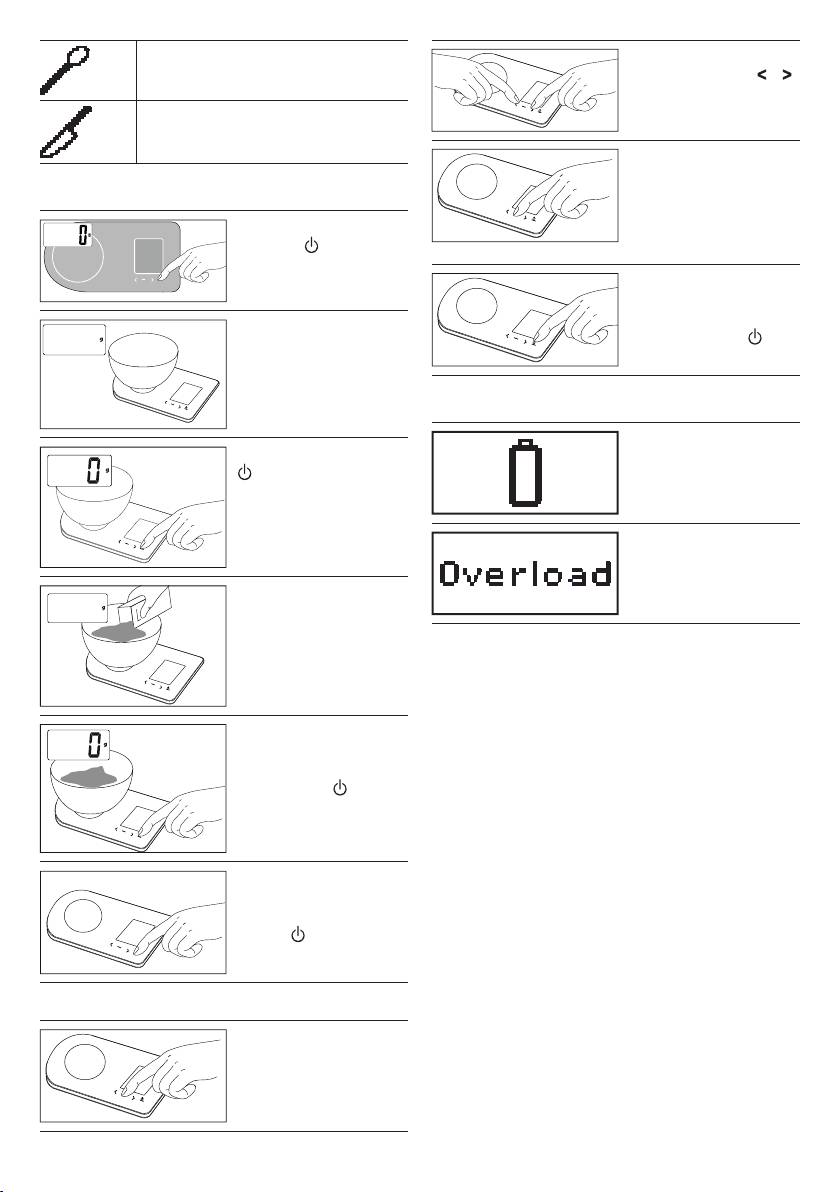
1. Getting started
In order to send the individual recipes from the app
to the scale, the two must be connected. To do this,
proceed as follows:
•
Activate Blue tooth in the smartphone settings.
Note: Bluetooth Smart devices, such as this
scale, are not visible in the general settings of the
Bluetooth device list. Bluetooth Smart devices
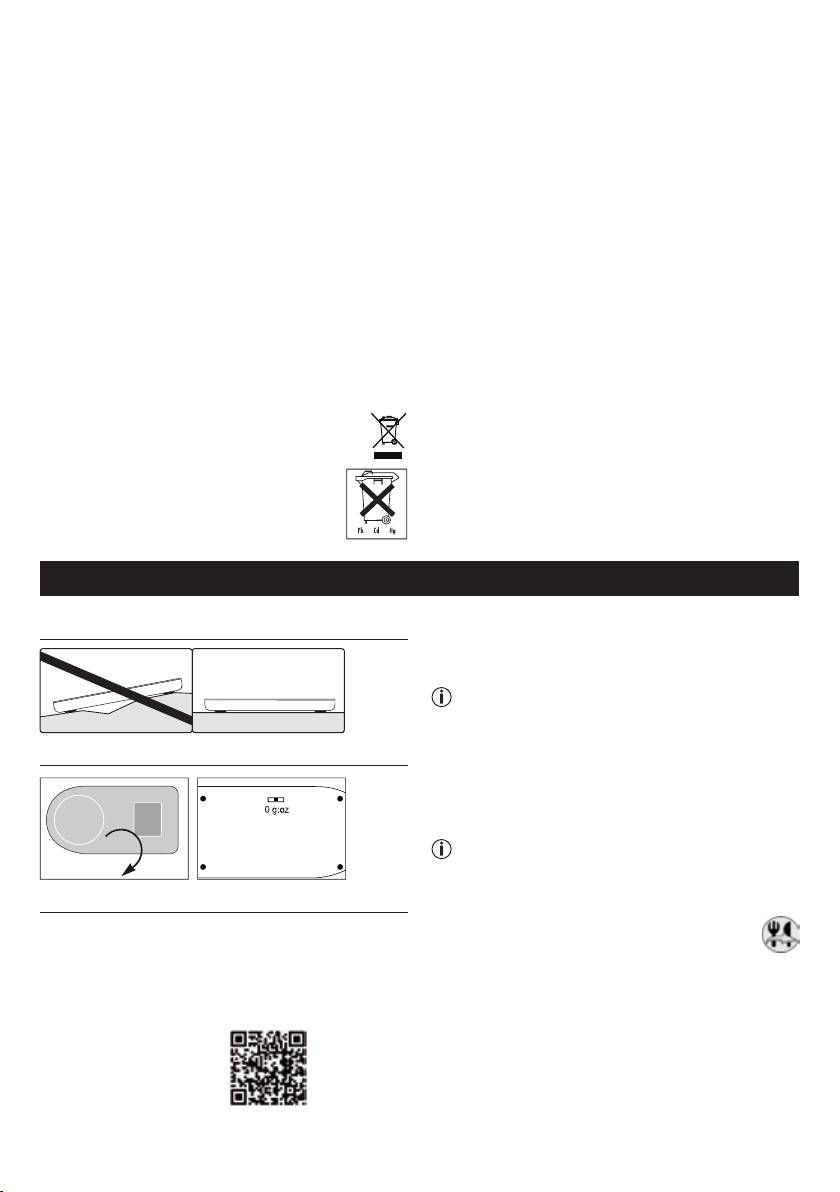
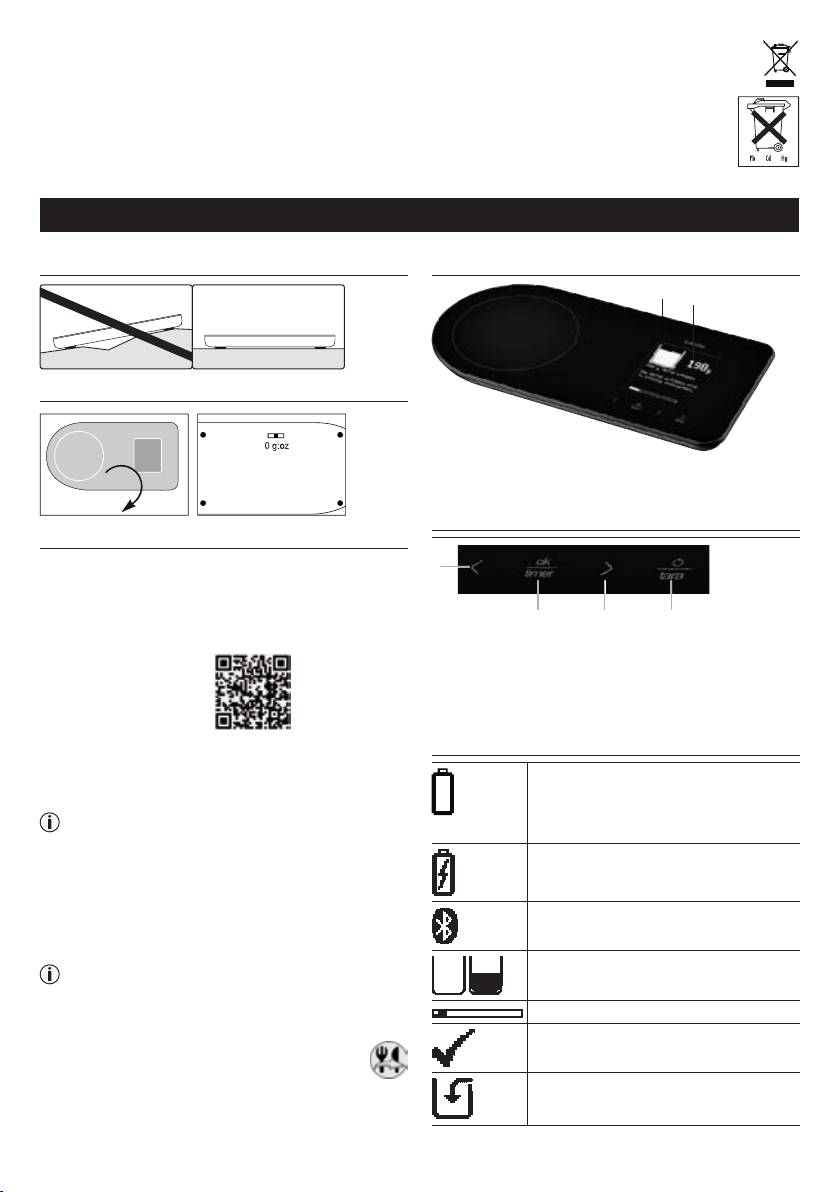
Place the scale on a secure, flat surface.
are visible only in special apps or in device manu-
facturer apps.
•
Install the “recipe scale“ app in the app store.
•
Launch the app.
•
Turn scale on.
Note: Keep the smartphone close to the kitchen
0 ➞ g:oz
scale in order to maintain an active Blue tooth
connection during initial use.
Adjusting the unit.
•
Use the app and select the recipe.
•
After selecting the recipe, press the “send to
2. Initial use with the app
scale“ button.
System requirements
A smartphone/tablet, compatible with Bluetooth® 4.0
such as the iPhone 4S and 5.
List of compatible devices:
4
3. Unit description
4. Weighing / Timer
1
2
Press to switch on the
scale. Wait until
0 is dis-
played.
ok
taratimer
Position the container.
37
timer
ok
tara
1 Battery charging socket for charging the battery
with the USB cable provided
2 Display
Press the “tara / ” but-
ton.
1
timer
ok
tara
2 3 4
1 Recipe: Previous step
3 Recipe: Next step
Place the material to be
Timer: Setting the time
Timer: Setting the time
500
weighed on the scale.
2 Recipe: Confirming the
4 ON/OFF
recipe step
Tare function
Timer: Switching on
timer
ok
tara
The KS 800 kitchen scale features an inte-
grated lithium-ion battery. If the low bat-
To weigh additional
tery symbol appears, the battery must be
ingredients, press the
charged using the USB cable provided.
“tara /
” button again.
Battery charging.
tara
timer
ok
tara
Recipe is being transferred via Blue-
tooth.
Press and hold the
Fill level display for weighing during
-button for 3 seconds.
the recipe.
Progress bar/recipe
timer
ok
tara
Recipe step completed, next step fol-
lows
Setting the timer
Ingredients step, e.g. sugar
Press the “timer” button.
Action step, e.g. letting the dough rise
tara
timer
ok
tara
Preparation step, e.g. peeling the
Press and to set the
apples
desired time.
tara
timer
ok
tara
5
•
Strong electromagnetic fields (e.g. cell phones) may
Press “ok” to start and
impair the accuracy of the scale.
stop the timer. Sounds
•
Not intended for commercial use.
tara
are emitted after the
•
Protect your personal scales from impact with hard
timer
ok
timer has finished.
tara
objects, moisture, dust, chemicals, toiletries, liquid
cosmetics, great temperature fluctuation and close-
ness to sources of heat (open fires, radiators).
Press and hold the
•
Storage: Do not place any objects on the scale
button for 3 seconds.
when not in use.
tara
timer
ok
•
Cleaning: You can clean the scale with a damp
tara
cloth and a little washing up liquid, if required.
Never immerse the scale in water or rinse it under
running water.
5. Error messages
•
Repairs may only be performed by Customer
Service or by accredited retailers.
Empty battery.
We hereby guarantee that this product complies with
the European R&TTE Directive 1999/5/EC. Please con-
tact the specifi ed service address to obtain further
information, such as the CE Declaration of Conformity.
Please dispose of the blanket in accordance
Maximum weigh-
with the directive WEEE (Waste Electrical and
ing capacity exceeded
Electronic Equipment). If you have any queries,
(5 kg).
please refer to the local authorities respon-
sible for waste disposal.
6. Important instructions
•
The scale uses Blue tooth Smart (low-energy) and
transmits via the 2.4 GHz frequency band.
•
Max. capacity 5 kg, Graduation 1g.
FRANÇAIS
1. Mise en service
Pour envoyer les recettes de l‘application sur la
balance, la balance doit être connectée. Pour ce faire,
procédez comme suit:
•
Activer le Blue tooth dans les paramètres du smart-
phone.
Remarque: Les appareils Bluetooth Smart,
comme cette balance, ne sont pas visibles dans
Posez la balance sur un sol plat et dur.
les paramètres généraux de la liste des péri-
phériques Bluetooth. Les appareils Bluetooth
Smart ne sont visibles que via des applications
spécifiques ou les applications du fabricant de
l‘appareil.
•
Installer l‘application «Balance à recettes» depuis
0 ➞ g:oz
l‘Appstore.
•
Démarrer l‘application.
Régler l’unité.
•
Allumer et éteindre la balance.
Remarque: durant la mise en service, laissez le
2. Mise en service avec l‘application
smartphone à proximité de la balance de cuisine
pour que la connexion Blue tooth puisse rester
Conditions du système
active.
Un smartphone/une tablette, compatible Bluetooth® 4.0
• Utiliserl‘applicationetchoisirunerecette.
par ex. iPhone 4S, 5.
•
Après avoir choisi une recette, appuyer sur le
Liste des appareils compatibles :
bouton «envoyer vers la balance».
6

3. Description de l’appareil
4. Pesée / Minuteur
1
Pour allumer la balance,
2
appuyer sur
. Attendre
jusqu‘à ce que
0 s‘af-
ok
taratimer
fiche à l‘écran.
Installer le récipient.
37
timer
ok
1 Recharge de la batterie via le câble USB fourni.
tara
2 Écran
Appuyer sur la touche
« tara /
».
1
2 3 4
timer
ok
tara
1 Recette: étape précé-
3 Recette: étape sui-
dente
vante
Déposer le produit à
Minuteur: régler l’heure
Minuteur: régler l’heure
peser.
500
2 Recette: confirmer
4 ON/OFF
l’étape de la recette
Fonction tare
Minuteur: allumer
timer
ok
tara
La balance de cuisine KS 800 pos-
sède une batterie lithium-ion intégrée.
Lorsque le symbole de changement
Pour peser un autre
de la batterie apparaît, la batterie doit
ingrédient, appuyer à
être rechargée à l‘aide du câble USB
nouveau sur la touche
fourni.
« tara /
».
La batterie est rechargée.
tara
timer
ok
tara
La recette est transférée par Blue tooth.
Pour éteindre la balance,
maintenir la touche
Indication du niveau de remplissage
enfoncée pendant
lors de la pesée pendant la réalisation
3 secondes.
timer
ok
tara
de la recette.
Barre d‘avancement / Recette
Terminer une étape de la recette, pas-
Réglage du minuteur
ser à l‘étape suivante
Appuyer sur la touche
Étape d‘ajout d‘un ingrédient, par ex.
« timer ».
de sucre
tara
timer
ok
tara
Étape d‘action, par ex. laisser lever la
pâte
Utiliser et pour régler
Étape de préparation, par ex. peler les
le temps souhaité.
pommes
tara
timer
ok
tara
7
•
La précision de la balance peut être perturbée par
Mettre en marche ou
les champs électromagnétiques puissants (comme
arrêter le minuteur
ceux qui sont émis par les téléphones mobiles).
tara
avec « ok ». Un signal
•
Non prévue pour un usage industriel.
timer
ok
sonore retentit à la fin du
tara
•
N’exposez pas le pèse-personne aux coups, à l’hu-
décompte du minuteur.
midité, à la poussière, aux produits chimiques ou
aux fortes variations de température; éloignez-le
Pour éteindre le minu-
des sources de chaleur (four, radiateur etc.).
teur, appuyer sur la
•
Stockage : quand la balance est inutilisée, aucun
tara
touche
pendant
timer
ok
objet ne doit être posé sur le plateau.
3 secondes.
tara
•
Nettoyage: vous pouvez nettoyer la balance avec
un chiffon hude sur lequel vous déposerez si besoin
est quelques gouttes de liquide vaisselle. Ne plon-
5. Messages d’erreur
gez jamais la balance dans l’eau. Ne la nettoyez
jamais sous l’eau courante.
Batterie vide.
•
Toute réparation doit être réalisée par le service
après-vente ou par des revendeurs agréés.
Nous garantissons par la présente que ce produit est
conforme à la directive européenne R&TTE 1999/5/CE.
Veuillez contacter l’adresse du SAV indiquée afi n
Poids maximal dépassé
d’obtenir de plus amples détails, comme par exemple
(5 kg).
la déclaration de conformité CE.
Veuillez éliminer l’appareil suivant la directive
relative aux vieux appareils électriques et
électroniques WEEE (Déchets des équipe-
ments électriques et électroniques). Pour
6. Remarques importantes
toute question, veuillez vous adresser aux
•
Le pèse-personne utilise la technologie Blue tooth
autorités de la commune compétentes pour
Smart Low Energy) et émet sur la bande de fréquence
le traitement des déchets.
des 2,4 GHz.
•
Résistance jusqu’à 5 kg, Graduation 1 g.
ESPAÑOL
1. Puesta en marcha
2. Puesta en funcionamiento con apli-
cación
Requisitos del sistema
Un smartphone/una tablet, compatible con Blue-
tooth® 4.0 equipos compatibles, como p. ej.
el iPhone 4S, 5.
Colocar la báscula sobre una superficie plana y esta-
Lista de los aparatos compatibles:
ble.
Para poder enviar las recetas desde la aplicación a la
báscula esta debe estar conectada. Proceda para ello
0 ➞ g:oz
de la siguiente manera:
•
Activar Blue tooth en los ajustes del smartphone.
Ajustar la unidad.
Nota: Por regla general, los aparatos con Blue-
tooth Smart, como esta báscula, no se visualizan
en la lista de aparatos con Bluetooth de la con-
figuración general. Los aparatos con Bluetooth
Smart solo se pueden visualizar mediante aplica-
ciones especiales o en las aplicaciones del fabri-
cante del aparato.
8
•
Instalar la aplicación „Rezeptwaage“ (báscula con
Paso de adición de ingrediente, p. ej.
recetas) de la tienda de aplicaciones.
azúcar
•
Iniciar la aplicación.
•
Conexión y desconexión de la báscula.
Paso de elaboración, p. ej. dejar repo-
Nota: Para que durante la puesta en funciona-
sar la masa
miento pueda mantenerse activa una conexión
Blue tooth, permanezca con el smartphone cerca
Paso de preparación, p. ej. pelar man-
de la báscula de cocina.
zanas
•
Navegar por la aplicación y seleccionar una receta.
•
Tras seleccionar la receta, pulsar el botón
“enviar a la báscula”.
4. Pesado / Temporizador
3. Descripción del aparato
Para encender la
balanza, pulsar
. Espe-
1
2
rar hasta que en la pan-
ok
taratimer
talla se visualice
0.
Colocar el recipiente.
37
timer
ok
tara
1 Toma de carga de la batería para cargar la batería
con el cable USB incluido en el suministro.
Pulsar la tecla “tara / ”.
2 Pantalla
1
timer
ok
tara
2 3 4
Colocar los ingredientes
1 Receta: retroceder un
3 Receta: avanzar un
a pesar.
500
paso
paso
Temporizador: ajustar
Temporizador: ajustar
la hora
la hora
2 Receta: Confirmar el
timer
ok
4 ON/OFF
tara
paso de receta
Función de pesaje con
Temporizador: encender
tara
Pesar más ingredientes:
volver a pulsar la tecla
La báscula de cocina KS 800 está pro-
“tara /
”.
vista de una batería integrada de iones
de litio. Si se muestra el símbolo de
cambio de batería deberá cargarse la
tara
batería con el cable USB incluido en el
timer
ok
tara
suministro.
Se carga la batería.
Para apagar la balanza,
mantener pulsada
la tecla
durante
La receta se transfiere vía Blue tooth.
3 segundos.
timer
ok
tara
Indicador de nivel en el proceso de
pesaje durante la receta.
Barra de progreso / receta
Paso de receta finalizado, continúa
con el siguiente paso
9
Ajustar el temporizador
6. Indicaciones importantes
•
La báscula utiliza Blue tooth Smart (Low Energy)
Pulsar la tecla “timer”.
y emite a través de la banda de frecuencia de 2,4
GHz.
tara
timer
ok
•
La capacidad de carga es de máx. 5 kg,
tara
Precisión 1 g.
•
La precisión de la balanza puede verse afectada
Ajustar el tiempo
por campos electromagnéticos intensos (p.ej.
deseado con
y .
teléfonos móviles).
tara
•
Dispositivo no previsto para el uso industrial.
timer
ok
tara
•
Proteja la báscula contra golpes, humedad, polvo,
productos químicos, grandes variaciones de tem-
peratura y evite colocarla en las proximidades de
Iniciar y parar el tempo-
fuentes de calor (estufas, calefacción).
rizador con “ok”. Expi-
•
Almacenamiento: no coloque objetos sobre la
tara
rado el tiempo ajustado
timer
ok
balanza cuando no se encuentre en uso.
se escucharán señales
tara
•
Limpieza: la balanza puede limpiarse con un paño
acústicas
húmedo, aplicando en caso necesario un poco de
Para apagar el tempori-
detergente líquido. No sumerja nunca la balanza, ni
zador, mantener pul-
la lave bajo un chorro de agua.
tara
sada la tecla
durante
•
Las reparaciones deben ser efectuadas exclusiva-
timer
ok
3 segundos.
mente por el servicio técnico o por el representante
tara
autorizado.
Este producto cumple con la Directiva europea
1999/5/CE sobre equipos radioeléctricos y equipos
5. Avisos de errores
terminales de telecomunicación (RTTE). Póngase en
Pilas agotadas.
contacto con la dirección de servicio técnico mencio-
nada para obtener información más detallada al res-
pecto como, por ejemplo, la declaración de conformi-
dad de la CE.
Sír vase eliminar los desechos del aparato de
Capacidad de carga
acuerdo con la Prescripción para la Eliminación
máxima superada (5 kg).
de Desechos de Aparatos Eléctricos y Electró-
nicos en Desuso WEEE (Waste Electrical
and Electronic Equipment). En caso de
dudas o consultas sírvase dirigirse a las
autoridades competentes para la elimina-
ción de desechos.
10
ITALIANO
1. Messa in funzione
3. Descrizione dell’apparecchio
1
2
Posizionare la bilancia su un fondo piano e solido.
1 Connettore di carica batteria per la ricarica della
batteria tramite il cavo USB fornito in dotazione.
0 ➞ g:oz
2 Display
Impostazione dell’unità.
1
2. Messa in servizio con app
Requisiti del sistema
2 3 4
Uno smartphone/tablet compatibile con Bluetooth®
1 Ricetta: passaggio
3 Ricetta: passaggio suc-
4.0 come iPhone 4S o 5.
precedente
cessivo
Elenco dei dispositivi compatibili:
Timer: impostazione
Timer: impostazione
dell‘ora
dell‘ora
2 Ricetta: conferma del
4 ON/OFF
passaggio della ricetta
Funzione tara
Per trasferire singole ricette dall‘app alla bilancia, è
Timer: accensione
necessario stabilire una connessione. Procedere nel
La bilancia da cucina KS 800 è dotata
modo seguente:
di una batteria ricaricabile agli ioni di
•
Attivare il Blue tooth nelle impostazioni dello
litio integrata. Quando viene visualiz-
smartphone.
zato il simbolo di sostituzione batteria,
Nota: gli apparecchi Bluetooth Smart, come
è necessario caricare la batteria rica-
questa bilancia, non sono visibili nelle impostazi-
ricabile tramite il cavo USB fornito in
oni generali nell‘elenco di apparecchi Bluetooth.
dotazione.
Gli apparecchi Bluetooth Smart possono essere
La batteria ricaricabile viene caricata.
visualizzati solo mediante app specifiche o nelle
app del produttore dell‘apparecchio.
•
Installare l‘app „Rezeptwaage“ nell‘AppStore.
•
Avviare l‘app.
La ricetta viene inviata tramite Blue-
•
Accendere la bilancia.
tooth.
Nota: per mantenere una connessione Blue tooth
Indicatore di livello per la pesata
attiva durante la messa in servizio, restare con
durante la ricetta.
lo smartphone nelle vicinanze della bilancia da
cucina.
Barre di avanzamento/ricetta
•
Utilizzare l‘app e scegliere la ricetta.
Passaggio ricetta chiuso, segue pas-
•
Dopo aver scelto la ricetta, premere il pul-
saggio successivo
sante “invia alla bilancia”.
Passaggio aggiunta, ad es. zucchero
Passaggio trattamento, ad es. lasciare
lievitare la pasta
11
Passaggio preparazione, ad es. sbuc-
Impostare l‘ora deside-
ciare le mele
rata premendo
e .
tara
timer
ok
tara
4. Pesatura / Timer
Avviare e interrompere
Per accendere la bilan-
il timer con il pulsante
cia premere
. Atten-
tara
“ok”. Al termine del timer
dere finché non appare
ok
timer
ok
taratimer
vengono emessi dei
tara
0 sul display.
segnali acustici.
Posizionare il recipiente.
Per spegnere il timer,
37
premere per 3 secondi il
tara
pulsante
.
timer
ok
tara
timer
ok
tara
Premere il pulsante
5. Messaggi di erroree
“tara /
”.
Batterie esauste.
timer
ok
tara
Superamento della por-
Posizionare il prodotto
tata massima (5 kg).
da pesare.
500
timer
ok
tara
6. Avvertenze importanti
•
La bilancia utilizza Blue tooth Smart (Low Energy) e
Taratura di ulteriori ingre-
invia i dati con una banda di frequenza di 2,4 GHz.
dienti – premere nuova-
•
Portata max. 5 kg, Graduazione 1 g.
mente il pulsante “tara /
•
La presenza di forti campi elettromagnetici (es. tele-
”.
foni cellulari) può influire negativamente sulla preci-
tara
sione della bilancia.
timer
ok
tara
•
Non adatta all’utilizzo commerciale.
•
Tenere la bilancia al riparo da urti, umidità, polvere,
Per spegnere la bilan-
prodotti chimici, forti variazioni di temperatura e
cia, tenere premuto per
prossimità a fonti di calore (stufe, radiatori).
3 secondi il pulsante
.
•
Conservazione: non porre oggetti sulla bilancia
quando non viene utilizzata.
timer
ok
tara
•
Pulizia: pulire la bilancia con un panno umido e, se
necessario, con un po’ di detersivo. Non immergere
mai la bilancia in acqua, nè lavarla sotto l’acqua
Impostazione del timer
corrente.
•
Le riparazioni possono essere effettuate solo dal
Premere il pulsante
servizio di assistenza o dai rivenditori autorizzati.
“timer”.
tara
timer
ok
tara
12
Con la presente garantiamo che il prodotto è con-
Smaltire l’apparecchio secondo la direttiva sui
forme alla direttiva (CE) R&TTE 1999/5/CE. Per ulteriori
rifiuti di apparecchiature elettriche ed elettroni-
informazioni, ad esempio per richiedere la dichiara-
che, detta anche WEEE (Waste Electrical and
zione di conformità CE, rivolgersi al servizio di assi-
Electronic Equipment). In caso di domande
stenza indicato.
si prega di rivolgersi all’autorità locale
competente in materia di smaltimento.
TÜRKÇE
1. İlk çalıştırma
3. Cihaz Açıklaması
1
2
Teraziyi düz ve sağlam bir yüzey üzerine koyun.
1 Aküyü birlikte gönderilen USB kablosu ile şarj
etmek için akü şarj burcu.
0 ➞ g:oz
2 Ekran
Birimi ayarlama.
1
2. Uygulama ile kullanım
Sistem gereksinimleri
2 3 4
Bluetooth® 4.0 uyumlu akıllı telefon/tablet. Örn.
1 Tarif: Önceki adım
3 Tarif: Sonraki adım
iPhone 4S, 5.
Zamanlayıcı: Saati
Zamanlayıcı: Saati
Uyumlu cihazların listesi:
ayarlama
ayarlama
2 Tarif: Tarif adımını onay-
4 ON/OFF
lama
Tara fonksiyonu
Münferit tarifleri uygulamadan (App) teraziye gönder-
Zamanlayıcı: açma
mek için terazinin bağlanması gerekir. Bunun için aşa-
KS 800 mutfak terazisi entegre bir lit-
ğıdakileri yapın:
yum-iyon akü içerir. Akü değişimi sem-
•
Akıllı telefon ayarlarında Blue tooth‘u etkinleştirin.
bolü görününce akünün, birlikte verilen
Not: Bu terazi gibi Bluetooth Smart cihazları,
USB kablosu ile şarj edilmesi gerek.
genel ayarlarda Bluetooth cihaz listesinde görün-
Akü şarj edilir.
mezler. Bluetooth Smart cihazlar yalnız özel
uygulamalar veya cihaz üreticisinin uygulamaları
aracılığıyla görüntülenir.
•
Appstore‘dan „Tarif terazisi“ uygulamasını indirin.
Tarif Blue tooth üzerinden aktarılır.
•
Uygulamayı başlatın.
•
Teraziyi açın ve kapatın.
Tarifin tartılması sırasında dolum sevi-
Not: Kullanım sırasında Blue tooth bağlantısının
yesi göstergesi.
etkin tutulabilmesi için akıllı telefonu mutfak tera-
zisinin yanından uzaklaştırmayın.
İlerleme çubuğu / Tarif
•
Uygulamayı uygulayın ve tarifi seçin.
Tarif adımı tamamlandı, sonraki adım
•
Tarifi seçtikten sonra “teraziye gönder” düğ-
mesine basın.
Ekleme adımı, örn. şeker
13
Uygulanacak adım, örn. yulaf hamuru-
ve ile istenen zaman
nun mayalanmasını bekle
ayarlanır.
tara
timer
ok
tara
Hazırlık adımı, örn. elmaları soy
“ok” ile zamanlayıcı
başlatılır ve durduru-
4. Tartma / Zamanlayıcı
tara
lur. Zamanlayıcı sona
timer
ok
erdiğinde sesli sinyal
tara
Teraziyi açmak için
duyulur.
düğmesine basın.
Ekranda
0 görününceye
Zamanlayıcıyı kapat-
ok
taratimer
kadar bekleyin.
mak için
düğmesini
tara
3 saniye basılı tutun.
timer
ok
Kabı üzerine koyma.
tara
37
5. Hata mesajları
timer
ok
tara
Pil boş.
“tara / ” düğmesine
basın.
Maksimum taşıma
kapasitesinin üzerine
timer
ok
tara
çıktınız (5 kg).
Tartılacak nesneyi
koyma.
6. Önemli bilgiler
500
•
Terazi Blue tooth Smart (Low Energy) kullanır ve 2,4
GHz frekans bandı üzerinden gönderim yapar.
•
Yükleme kapasitesi maks. 5 kg, Ölçeklendirme 1 g.
timer
ok
tara
•
Terazinin hassasiyeti, güçlü elektro manyetik alan-
lardan (örneğin mobil telefonlardan) etkilenebilir.
•
Ticari amaçlı kullanım için öngörülmemiştir.
İlave malzeme tartmak
•
Eraziyi darbelere, neme, toza, kimyasal maddelere,
için – yeniden “tara /
”
sıcaklık değişikliklerine ve ısı kaynaklarına (soba,
düğmesine basın.
kalorifer) karşı koruyunuz.
•
Muhafaza: Terazi kullanılmadığı zaman, onun üze-
tara
rine başka maddeler koymayınız.
timer
ok
tara
•
Temizlik: Üzerine gerekirse biraz sıvı temizlik mad-
desi konulmuş bir nemli bez ile teraziyi temizleye-
bilirsiniz. Teraziyi hiç bir zaman suya sokmayınız.
Teraziyi kapatmak için
Teraziyi asla akar suda yıkamayınız.
düğmesini 3 saniye
•
Onarımlar ancak Müşteri Servisince veya yetkili
basılı tutun.
satıcılar tarafından yapılabilir.
timer
ok
Bu ürünün Avrupa R&TTE Yönetmeliği 1999/5/EC’ye
tara
uygun olduğunu garanti ederiz. Detaylı bilgilere (örne-
ğin CE – Uygunluk Beyanı) ulaşmak için lütfen belirti-
len servis adresine başvurun.
Zamanlayıcının ayarlanması
Lütfen aleti, sayılı AT – WEEE’nin
“Timer” düğmesine
(Waste Electrical and Electronic Equipment –
basın.
Atık elektrikli ve elektronik donanım) elektro ve
tara
elektronik eski aletler yönetmeliği uyarınca
timer
ok
tara
ilgili toplama, ayırma veya geri dönüşüm
tesislerine veriniz. Konuyla ilgili sorularınız
olması halinde, yerel idarelerin ilgili birimle-
rine müracaat ediniz.
14
РУССКИЙ
1. Ввод в эксплуатацию
3. Описание прибора
1
2
Установить весы на прочную ровную поверхность.
1 Зарядный разъем для подзарядки аккумулятор-
ной батареи при помощи входящего в комплект
0 ➞ g:oz
USB-кабеля.
Установите единицу измерения.
2 Дисплей
2. Ввод в эксплуатацию при помощи
1
приложения
Системные требования
2 3 4
Смартфон/планшетный компьютер, совместимый
1 Рецепт: к предыду-
3 Рецепт: к следующему
с Bluetooth® 4.0 например, iPhone 4S и 5.
щему пункту
пункту
Список совместимых устройств:
Таймер: настройка
Таймер: настройка
времени
времени
2 Рецепт: подтвержде-
4 ВКЛ/ВЫКЛ
ние пункта рецепта
функция тары
Таймер: включение
Для того чтобы отправлять отдельные рецепты из
приложения в весы, необходимо установить связь
Кухонные весы KS 800 оснащены
между устройствами. Для этого выполните следу-
встроенной литий-ионной аккуму-
ющие действия:
ляторной батареей. При появлении
•
Активируйте в настройках смартфона функцию
на дисплее символа замены батареи
Blue tooth.
необходимо подзарядить аккумуля-
Примечание: Устройства Bluetooth Smart,
торную батарею при помощи входя-
такие как эти весы, не отображаются в
щего в комплект USB-кабеля.
общих настройках списка устройств Blu-
Аккумуляторная батарея заряжа-
etooth. Устройства Bluetooth Smart могут
ется.
отображаться только с помощью специальных
приложений или в приложениях изготовителя
Идет передача рецепта по Blue tooth.
устройства.
•
Установите через Appstore приложение
Rezeptwaage («Рецептурные весы»).
Индикатор уровня заполнения
•
Запустите приложение.
при взвешивании с соблюдением
•
Включение и выключение весов.
рецепта.
Примечание: для того чтобы во время ввода
Столбиковая диаграмма прогресса/
в эксплуатацию Blue tooth-соединение остава-
рецепт
лось активным, держите смартфон на доста-
Пункт рецепта завершен, начина-
точно близком расстоянии от кухонных весов.
ется следующий пункт
•
Выберите рецепт при помощи приложения.
•
Выбрав рецепт, нажмите кнопку «отпра-
Добавка, например сахара
вить на весы».
15
Пункт выполнения действия, напри-
Установите время с
мер поднятие дрожжевого теста
помощью кнопок
и .
tara
timer
ok
tara
Пункт подготовки, например очистка
яблок
Запускайте или оста-
навливайте таймер
4. Взвешивание / Таймер
tara
с помощью « ok ». По
timer
ok
истечении времени
tara
Для включения весов
таймера раздаются
нажмите
. Подо-
звуковые сигналы.
ждите, пока на дисплее
ok
taratimer
не появится
0.
Для выключения
таймера в течение
tara
3 секунд держите
Установите чашу.
timer
ok
нажатой кнопку
.
tara
37
timer
ok
tara
5. Сообщения об ошибках
Батарейка разряжена.
Нажмите кнопку « tara /
».
timer
ok
Превышен максималь-
tara
ный вес
(5 кг).
Положите продукт для
взвешивания.
500
6. Важные указания
timer
ok
•
Весы работают с Blue tooth Smart Low Energy) и
tara
отправляют сигнал в частотном диапазоне 2,4
ГГц.
Для взвешивания
•
Максимальная нагрузка составляет 5 кг, Цена
остальных компонен-
деления 1 г.
тов снова нажмите
•
Точность весов может пострадать из-за воздей-
кнопку « tara /
».
ствия сильного электромагнитного поля (напри-
мер, от мобильного телефона).
tara
timer
ok
•
Не предназначены для промышленного исполь-
tara
зования.
•
Весы следует беречь от сотрясений, влаги,
Для выключения весов
пыли, химических веществ, сильных перепадов
в течение 3 секунд
температуры и держать вдали от источников
держите нажатой
тепла (печи, нагревательные приборы).
кнопку
.
timer
ok
•
Хранение: по окончании работы с весами уби-
tara
райте с них все предметы.
•
Чистка: весы можно протирать влажной тряп-
кой, при необходимости с применением мою-
Настройка таймера
щего средства. Не окунайте весы в воду.
Hажмите кнопку
Никогда не мойте весы под проточной водой.
« timer ».
•
Ремонт должен производиться только сервис-
tara
ной службой или авторизованными торговыми
timer
ok
tara
представителями.
Настоящим мы гарантируем, что данное изде-
лие соответствует европейской директиве R&TTE
16
(Директива ЕС по средствам радиосвязи и теле-
Товар не подлежит обязательной сертификации
коммуникационному оконечному оборудованию)
Срок эксплуатации изделия: мин 5 лет
1999/5/EC. Обратитесь в сервисный центр по ука-
Фирма-изготовитель: Бойрер Гмбх,
занному адресу для получения подробных сведе-
Софлингер штрассе 218,
ний – например, о соответствии директивам ЕС.
89077-УЛМ, Германия
Фирма-импортер: OOO Бойрер
Утилизация прибора должна осуществляться
109451 г. Москва, ул.
в соответствии с требованиями директивы
Перерва 62, корп. 2, офис 3
„Старые электроприборы и электрообору-
Сервисный центр: 109451 г. Москва, ул.
дование“ (WEEE, Waste Electrical and
Перерва 62, корп. 2
Electronic Equipment). Для получения
Тел(факс) 495—658 54 90
необходимых сведений обращайтесь в
bts-service@ctdz.ru
соответствующий орган местного само-
управления.
Дата продажи
7. Гарантия
Мы предоставляем гарантию на дефекты матери-
алов и изготовления на срок 36 месяцев со дня
Подпись продавца
продажи через розничную сеть.
Гарантия не распространяется:
Штамп магазина
–
на случаи ущерба, вызванного неправильным
использованием,
–
на быстроизнашивающиеся части (батарейки),
Подпись покупателя
–
на дефекты, о которых покупатель знал в
момент покупки,
–
на случаи собственной вины покупателя.
POLSKI
1. Uruchomienie
Aby możliwe było wysyłanie poszczególnych receptur
z aplikacji do wagi, należy ustanowić dla nich połą-
czenie. Należy stosować się do następujących pole-
ceń:
•
Włącz funkcję Blue tooth w ustawieniach smartfonu.
Wskazówka: Urządzenia Bluetooth Smart, takie
Ustawić wagę na twardym i płaskim podłożu.
jak niniejsza waga, nie są widoczne w ogól-
nych ustawieniach na liście urządzeń Bluetooth.
Urządzenia Bluetooth Smart można wyświetlić
tylko za pomocą specjalnych aplikacji lub w apli-
kacjach producenta urządzenia.
•
Zainstaluj aplikację „Rezeptwaage” ze sklepu App-
0 ➞ g:oz
store.
•
Uruchom aplikację.
Ustawianie jednostki.
•
Włączyć i wyłączyć wagę.
Wskazówka: Aby podczas uruchomienia połą-
2. Uruchomienie z aplikacją
czenie Blue tooth pozostało aktywne, nie należy
oddalać się ze smartfonem od wagi kuchennej.
Wymagania systemowe
•
Zastosuj aplikację i wybierz recepturę.
Smartfon/tablet zgodny z technologią Bluetooth® 4.0
•
Po wybraniu receptury naciśnij przycisk
np. iPhone 4S 5.
„prześlij do wagi”.
Lista kompatybilnych urządzeń:
17
3. Opis urządzenia
4. Ważenie / Minutnik
1
Aby włączyć wagę, naci-
2
śnij
.
Poczekaj, aż na wyświe-
ok
taratimer
tlaczu pojawi się
0.
Ustaw naczynie.
37
timer
ok
1 Gniazdo ładujące do ładowania akumulatorów
tara
poprzez dostarczony kabel USB.
2 Wyświetlacz
Naciśnij przycisk „tara /
”.
1
timer
ok
tara
2 3 4
1 Receptura: Krok wstecz
3 Receptura: Krok dalej
Nałóż ważony towar.
Minutnik: Ustawianie
Minutnik: Ustawianie
godziny
godziny
500
2 Receptura: Uruchomie-
4 Przełącznik WŁ/WYŁ
nie kroku receptury
Funkcja doważania
Minutnik: Włączyć
(tara)
timer
ok
tara
Waga kuchenna KS 800 jest
wyposażona w zintegrowany akumu-
Doważanie kolejnych
lator litowo-jonowy. Gdy pojawi się
składników: ponownie
symbol wymiany akumulatora, należy
nacisnąć przycisk „tara /
naładować akumulator za pomocą
”.
dostarczonego kabla USB.
tara
Trwa ładowanie akumulatora.
timer
ok
tara
Aby wyłączyć wagę,
Receptura jest przesyłana przez
przytrzymaj przycisk
połączenie Blue tooth.
przez 3 sekundy.
Wskaźnik poziomu naładowania pod-
timer
ok
tara
czas ważenia w trakcie receptury.
Wskaźnik postępu/receptura
Krok receptury wykonany, następuje
Ustawianie minutnika
kolejny krok
Naciśnij przycisk „timer”.
Krok dodawania, np. cukru
tara
timer
ok
tara
Krok czynności, np. pozostawienie
ciasta drożdżowego do wyrośnięcia
Za pomocą przycisku
i ustaw odpowiedni
Krok przygotowania, np. obieranie
tara
czas.
jabłek
timer
ok
tara
18
Urządzenie należy utylizować zgodnie z
Minutnik można urucho-
rozporządzeniem dotyczącym zużytych
mić lub zatrzymać za
urządzeń elektronicznych i elektrycznych WEEE
tara
pomocą przycisku „ok”.
(Waste Electrical and Electronic Equipment).
timer
ok
Po upływie ustawionego
tara
Przy zapytaniach prosimy zwracać się do
czasu na minutniku roz-
urzędów odpowiedzialnych za utylizację.
legnie się sygnał dźwię-
kowy.
Aby wyłączyć minutnik,
przytrzymaj przycisk
tara
przez 3 sekundy.
timer
ok
tara
5. Komunikaty błędów
Zużyta bateria.
Przekroczono maksy-
malną nośność (5 kg).
6. Ważne wskazówki
•
W wadze zastosowano technologię Blue tooth
Smart (Low Energy) i wykorzystano pasmo często-
tliwości 2,4 GHz.
•
Maksymalne obciążenie wynosi 5 kg,
Dokładność 1 g.
•
Na dokładność wagi mogą negatywnie wpływać
silne pola elektromagnetyczne (np. telefony komór-
kowe).
•
Waga nie jest przeznaczona do użytku komercyj-
nego.
•
Wagę należy chronić przed uderzeniami, wilgocią,
kurzem, chemikaliami, dużymi wahaniami tempera-
tur oraz za blisko stojącymi źródłami ciepła (piece,
kaloryfery).
•
Przechowywanie: Nie należy stawiać żadnych
przedmiotów na wagę, jeżeli nie jest ona używana.
•
Czyszczenie: Wagę można czyścić zwilżoną ście-
reczką, na którą w razie potrzeby można nałożyć
trochę płynu do mycia naczyń. Nigdy nie wolno
zanurzać wagi w wodzie. Nie wolno jej również
nigdy płukać pod bieżącą wodą.
•
Naprawy mogą być wykonywane tylko przez dział
obsługi klienta lub autoryzowanych sprzedawców.
Gwarantujemy, że niniejszy produkt spełnia wymogi
europejskiej dyrektywy R&TTE 1999/5/WE. W celu
uzyskania szczegółowych informacji – takich jak na
przykład deklaracja zgodności CE – należy zgłosić się
pod wskazany adres serwisu.
19

50.258 - 0614 Irrtum und Änderungen vorbehalten
7
20
