Pioneer X-HM10-S: Listening to the iPod, iPhone or iPad (X-HM20 only) (continued)
Listening to the iPod, iPhone or iPad (X-HM20 only) (continued): Pioneer X-HM10-S
Table of contents
- Operating Environment VENTILATION CAUTION
- ENGLISH Introduction Accessories CONTENTS
- Precautions n General n Volume control Controls and indicators n Front panel
- n Speaker system n Remote control n Display
- System connections n Aerial connection n Speaker connection n Connecting iPod or iPhone to TV
- n AC power connection n Connecting a TV, etc. n Battery installation n Test of the remote control
- General control Setting the clock (Remote control only)
- Setting the clock (Remote control only) (continued) Listening to the iPod, iPhone or iPad
- Listening to the iPod, iPhone or iPad (X-HM20 only) (continued)
- Listening to the iPod, iPhone or iPad (X-HM20 only) (continued)
- Listening to a CD or MP3/WMA disc
- Advanced CD or MP3/WMA disc playback
- Advanced CD or MP3/WMA disc MP3/WMA folder mode (only for MP3/ playback (continued) WMA files)
- MP3/WMA folder mode (only for MP3/ Listening to USB mass storage WMA files) (continued) device/MP3 player
- Listening to USB mass storage device/MP3 player (continued) Advanced USB playback
- Listening to the radio
- Using the Radio Data System (RDS)
- Using the Radio Data System (RDS) (continued)
- Using the Radio Data System (RDS) Timer and sleep operation (Remote (continued) control only)
- Timer and sleep operation (Remote control only) (continued)
- Timer and sleep operation (Remote Headphones control only) (continued)
- Troubleshooting chart
- Troubleshooting chart (Continued)
- Specifications
- Notice
Listening to the iPod, iPhone or iPad (X-HM20 only) (continued)
n iPod and iPhone adaptor connection
(Docking Station)
Note:
Please use the adaptor supplied with your iPod or iPhone
unit.
iPhone
iPhone
Capacity
Adaptor No.
Description
12 iPhone 4GB & 8GB & 16GB
15 iPhone 3G,
8GB & 16GB & 32GB
iPhone 3GS
19 iPhone 4 16GB & 32GB
n To insert adaptor for iPod or iPhone
(Docking Station)
1
Open the docking station for iPod and iPhone by pulling
up.
2 Insert the adaptor for iPod and iPhone into unit and
connect your iPod or iPhone.
l
Sound will only switch from iPhone to the main unit after
authentication process is completed in approximately 10
seconds.
l
Incoming calls will pause the playback.
Caution:
l
Once the calls are answered, the conversation can only be
1
Unplug all accessories from the iPod or iPhone before
heard through the built-in iPhone speaker. Turn on the
iPhone speaker or undock the iPhone to start conversation.
inserting it into the dock.
2
3
Simply remove the iPod or iPhone from the docking station or
iPad from USB terminal. It is safe to do so even during playback.
4
5
6
7
8
9
En-11
11/5/25 X-HM10_20_En.fm
iPhone
iPhone (bottom)
Dock connector
Adaptor for iPhone
Connector for iPhone
Dock for iPhone
n To remove adaptor for iPod or iPhone
(Docking Station)
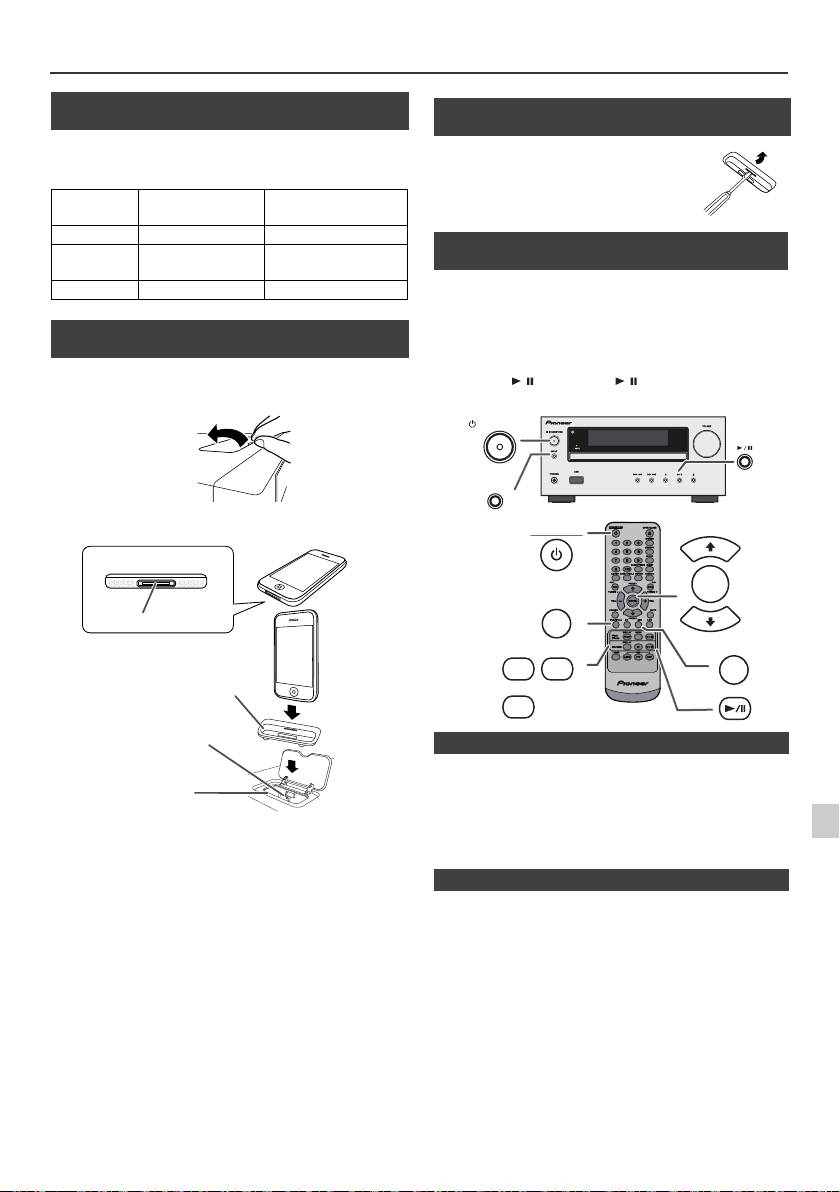
Insert the tip of a screwdriver (“–” type,
small) into the adaptor hole as shown
and lift upward to remove.
n iPod or iPhone playback
(Docking Station)
1
Press the STANDBY/ON button to turn the power on.
2
Press the iPod/iPhone button on the remote control or
INPUT button repeatedly on the main unit to select iPod
function.
3
Insert iPod or iPhone unit in iPod dock of main unit.
4
Press the / (iPod/iPhone / ) button to start playback.
STANDBY/ON
INPUT
STANDBY/ON
PRESET
ENTER
iPod/iPhone
PRESET
DISPLAY
MENU
USB
iPod/
TV OUT
iPhone
DISPLAY
CD/USB
n iPhone playback
n To disconnect iPod, iPhone or iPad
