Pioneer VSX-520-K: Remote control
Remote control: Pioneer VSX-520-K
Table of contents
- IMPORTANT IMPORTANT: THE MOULDED PLUG
- Information for users on collection and disposal of old equipment and used batteries Operating Environment
- Contents
- 08 Making recordings
- Flow of settings on the receiver
- Chapter 1: Before you start Checking what’s in the box Installing the receiver Loading the batteries
- Ventilation
- Chapter 2: Controls and displays Front panel
- Operating range of remote control
- Display
- Controls and displays02
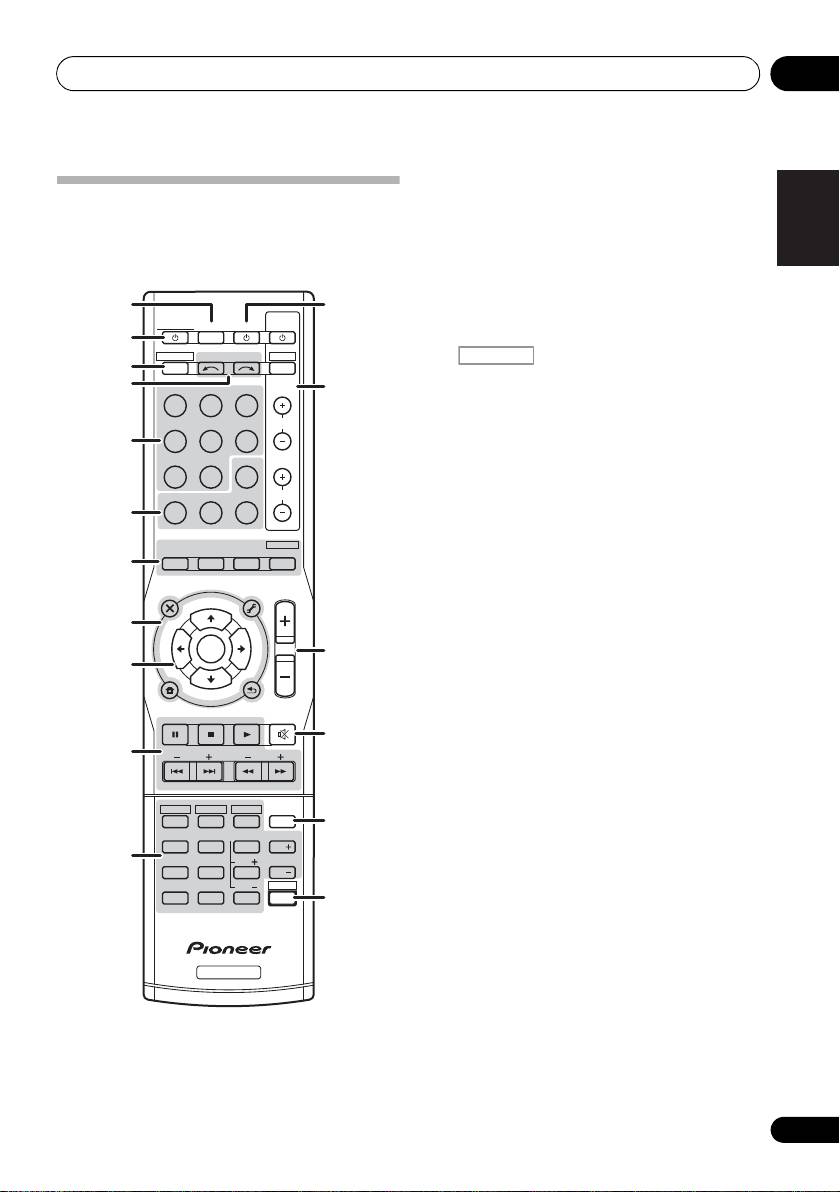
- Remote control
- Controls and displays02
- Controls and displays 02
- Chapter 3: Connecting your equipment Placing the speakers
- Hints on the speaker placement
- Connecting the speakers
- Making cable connections
- HDMI cables About HDMI Analog audio cables
- Digital audio cables About video outputs connection Video cables
- Connecting a TV and playback components Connecting using HDMI Connecting your component with no HDMI terminal
- Connecting a satellite receiver Connecting an HDD/DVD or other digital set-top box recorder, VCR and other video sources
- Using the component video jacks Connecting other audio components
- Connecting antennas
- Plugging in the receiver
- Chapter 4: Basic Setup Automatically setting up for surround sound (MCACC)
- Basic Setup04
- Chapter 5: Listening to your system Basic playback
- Auto playback Listening in surround sound
- Using the Advanced surround effects
- Using Front Stage Surround Advance Listening in stereo
- Using Stream Direct Better sound using Phase Control Using the Sound Retriever
- Using surround back channel processing Listening with Acoustic Calibration EQ
- Setting the Audio options Setting the Up Mix function
- Setting What it does Option(s)
- Setting What it does Option(s)
- Choosing the input signal Using the headphone
- Chapter 6: The System Setup menu Using the System Setup menu Manual speaker setup
- Speaker setting
- Crossover network Channel level Speaker distance
- The Input Assign menu The Pre Out Setting
- Chapter Using the tuner Listening to the radio Saving station presets
- Listening to station presets Naming preset stations
- An introduction to RDS Searching for RDS programs
- Displaying RDS information
- Chapter 8: Making recordings Making an audio or a video recording
- Chapter 9: Other connections Wireless music play Remote control operation
- Connecting Optional Bluetooth ADAPTER
- Listening to Music Contents of Bluetooth wireless technology device with Your System
- Chapter 10: Additional information Troubleshooting Problem Remedy
- Problem Remedy
- Problem Remedy
- HDMI Symptom Remedy
- Important information regarding the HDMI connection Resetting the main unit
- Specifications Cleaning the unit
Controls and displays 02
13
En
English
Français
Español
1
SLEEP
Press to change the amount of time
Remote control
before the receiver switches into standby (30
As for operating other devices, the remote
min – 60 min – 90 min – Off). You can check
control codes for the Pioneer products are
the remaining sleep time at any time by
preset. The settings cannot be changed.
pressing SLEEP once.
1
12
2
RECEIVER
TV
RECEIVER
SOURCESLEEP
CONTROL
Switches the receiver between standby and on.
2
RECEIVER
INPUT SELECT
DTV/TV
3
3
INPUT
Switches the remote to control the receiver
4
BD DVD
TV
13
(used to select the white commands above
the number buttons (MIDNIGHT, etc)). Also
DVR CD
CD-R
CH
use this button to set up surround sound
5
(page 39) or Audio parameters (page 35).
ADAPTER
TUNER
EQ
4 INPUT SELECT
PHASE
S.RETRIEVER SIGNAL SEL
VOL
Use to select the input source.
6
5 MULTI CONTROL buttons
AUTO/
STEREO/
BD MENU
DIRECT
A.L.C.
STANDARD
ADV SURR
Press to select control of other components.
7
6 Receiver control buttons
AUDIO
TUNER EDIT
MASTER
PARAMETER
TOOLS
VOLUME
MENU
TOP
T
U
N
E
MENU
EQ
8
T
P
Press to switch on/off Acoustic Calibration
E
R
S
E
E
ENTER
S
R
E
T
14
EQ setting (page 34).
P
9
HOME
PHASE
MENU
T
U
N
E
BAND
SETUP
RETURN
Press to switch on/off Phase Control
PTY SEARCH
MUTE
(page 33).
15
10
BASS
TRE
S. RETRIEVER
Press to restore CD quality sound to
compressed audio sources (page 33).
HDD
DVD
VCR
1
2
3
DISP
16
SIGNAL SEL
SB CH
CH SELECT
4
5
6
CH
Use to select an input signal (page 38).
11
MIDNIGHT
SPEAKERS
LEV
7
8
9
CH
7 Listening mode buttons
DIMMER
LEV
SHIFT
CLR
0
ENTER
17
+
10
AUTO/DIRECT
Switches between Auto surround mode
(Auto playback on page 30) and Stream
Direct playback. Stream Direct playback
RECEIVER
bypasses the tone controls for the most
accurate reproduction of a source
(page 33).
RECEIVER
VSX-520_SYXCN_En.book 13 ページ 2010年4月12日 月曜日 午後7時13分
