Pioneer XC-HM70-S: Front Panel
Front Panel: Pioneer XC-HM70-S
Table of contents
- VENTILATION CAUTION IMPORTANT Operating Environment
- Condensation
- Contents Accessories
- Before you start General Loading the batteries
- Controls and Displays Remote control
- Front Panel
- Connecting your equipment Aerial connection
- Speaker connection Using other subwoofer Connecting a TV, etc.
- Connecting to the network through LAN interface AC power connection
- General control To turn the power on Setting the clock Auto power down setup
- Enhancing your system
- Listening to a CD or MP3/ Disc playback WMA disc Various disc functions
- Advanced CD or MP3/WMA disc playback Programmed play (CD)
- Programmed play (MP3/WMA) MP3/WMA folder mode (only for MP3/WMA files)
- Procedure to playback MP3/WMA disc with folder mode on
- Listening to the iPod, iPhone or iPad Supported iPod, iPhone and iPad models: Connecting your iPod/iPhone To remove adaptor for iPod or iPhone To insert iPad adaptor
- Playing an iPod, iPhone or iPad Basic playback controls
- Listening to USB mass storage device/MP3 player Connecting a USB device Playing a USB device
- Playback with NETWORK feature Listening to Internet radio stations
- Playing back audio files stored on components on the network Network setup menu Playing back your favorite songs
- Network connection requirements About network playback
- Glossary
- Listening to the radio Improving FM sound Saving station presets Listening to station presets Naming preset stations Changing the noise cut mode
- Using the Radio Data System (RDS) An introduction to RDS Displaying RDS information Searching for RDS programs
- Timer and sleep operation Sleep operation Setting the wake-up timer Turning the wake-up timer on/off
- Additional Information
- Additional Information
- Additional Information
- About playable music file formats Category Extension Stream About status messages Status messages Descriptions
- Specifications About iPod/iPhone/iPad Disclaimer for Third Party Content
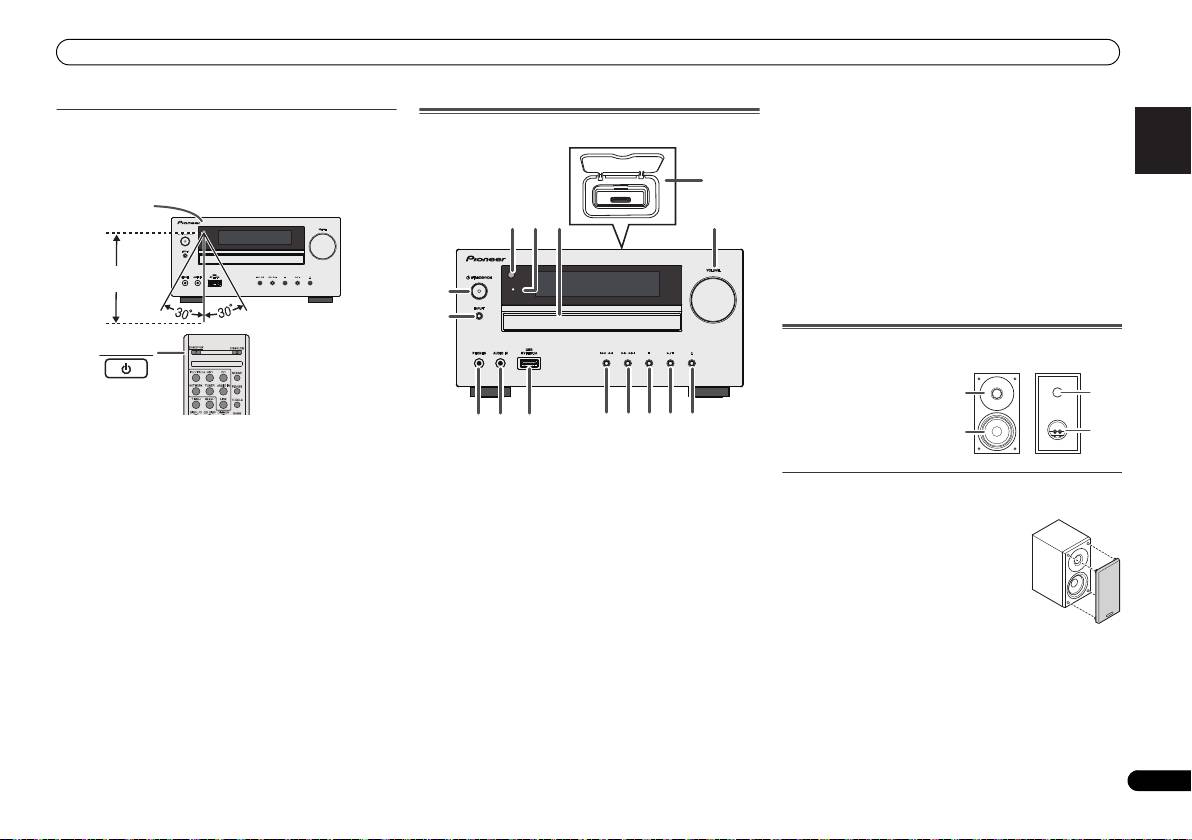
Controls and Displays
10 USB Terminal
English Français Español Italiano
Test of the remote control
Front Panel
Use to connect your USB mass storage device or Apple iPad
Check the remote control after checking all the connections.
as an audio source (page 19).
Point the remote control directly at the remote sensor on the
11 Tune Down, Skip Down Button
unit. The remote control can be used within the range shown
Selects the desired track or folder to be played back.
below:
12 Tune Up, Skip Up Button
Selects the desired track or folder to be played back.
13 Stop Button
TIMER
Use to stop the playback.
14 Play or Pause Button
Stops playback or resumes playback from the pause point.
15 Disc Tray Open/Close Button
Use to open or close the disc tray (page 13).
Speaker system (X-HM70 only)
STANDBY/ON
Deutsch
1 Remote Sensor
Receives the signals from the remote control.
2 Timer Indicator
Speaker grilles are removable
Lights when the timer is set (page 26).
Nederlands
3 Disc Tray
Place the disc, label side up (page 13).
4 iPod or iPhone Docking Station
Dock iPod/iPhone (page 17).
5 Volume Control
Use to set the listening volume (page 11).
6 STANDBY/ON Button
Switches the receiver between standby and on (page 11).
7 INPUT Button
Selects the input source (page 12).
8 Headphone Socket
Use to connect headphones. When the headphones are
connected, there is no sound output from the speakers
(page 12).
9 AUDIO IN Socket
Use to connect an auxiliary component using a stereo
minijack cable (page 12).
7
En
Remote sensor
7 m
4
1
3
52
6
TIMER
7
8 11 12 13 14 15
9
10
1 Dome-Tweeter
2 Woofer
3 Bass Reflex Duct
4 Speaker Terminal
1
3
2
4
Make sure nothing comes into contact
with the speaker diaphragms when you
remove the speaker grilles.
X-HM70_En.fm 7 ページ 2011年8月2日 火曜日 午後4時46分
