Pioneer VSX-1021: Deleting the AVNavigator Remote control
Deleting the AVNavigator Remote control: Pioneer VSX-1021
Table of contents
- IMPORTANT VENTILATION CAUTION Operating Environment
- Contents Flow of settings on the receiver
- Before you start
- Deleting the AVNavigator Remote control
- Connecting your equipment
- Placing the speakers Connecting the speakers
- Bi-amping your speakers Installing your speaker system
- Selecting the Speaker system About the audio connection About the video converter
- About HDMI
- Connecting your TV and playback components
- Connecting an HDD/DVD recorder, BD recorder and other video sources
- Connecting a satellite/cable receiver or other set-top box Connecting other audio components
- MULTI-ZONE setup Sub Zone Input functions available Sub Zone Input functions available Connecting AM/FM antennas
- Connecting to the network through LAN interface Connecting to a wireless LAN Plugging in the receiver
- Basic Setup
- Operation Mode Setup
- Operable functions/
- Basic playback
- Playing a USB device
- Playback with HOME MEDIA GALLERY inputs Bluetooth ADAPTER for Wireless Enjoyment of Music
En
5
01
Before you start
!
Interactive Manual
– Automatically displays
the pages explaining the functions that have
been operated on the receiver. It is also
possible to operate the receiver from the
Interactive Manual.
!
Glossary
– Displays glossary pages.
!
MCACC Appli
– Displays Advanced
MCACC measurement results vividly on the
computer.
There are special operating instructions
for MCACC Application. These instructions
are included in the AVNavigator
Interactive Manual
’s menus. Refer to them
when using MCACC Application.
!
Software Update
– Allows various types of
software to be updated.
!
Settings
– Used to make various
AVNavigator settings.
!
Detection
– Used to detect the receiver.
Note
To use the AVNavigator of another model, first
uninstall (delete) this receiver’s AVNavigator,
then install the AVNavigator of the other model.
Deleting the AVNavigator
You can use the following method to uninstall
(delete) the AVNavigator from your PC.
%
Delete from the Control Panel of the
PC.
From the Start menu, click “Program”
d
“PIONEER CORPORATION”
d
“AVNavigator(VSX-1021 or VSX-921)”
d
“Uninstall”.
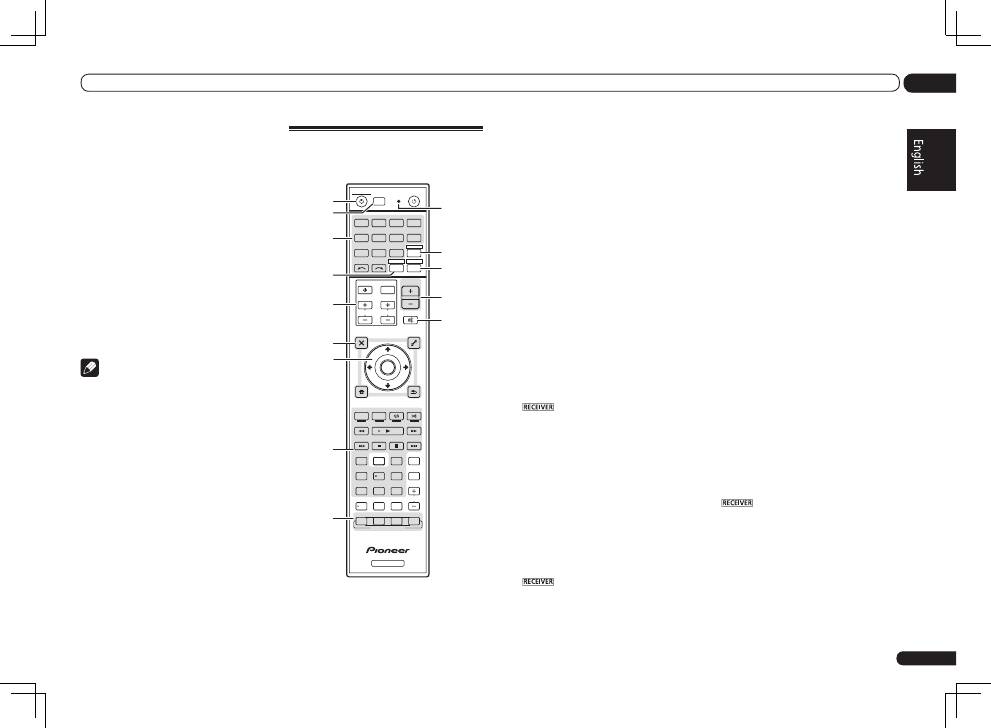
Remote control
This section explains how to operate the remote
control for the receiver.
RECEIVER
D.ACCESS
CH LEVEL A.ATT
LISTENING MODE
DIMMER
SIGNAL SEL MCACC SLEEP
TV / DTV
MPX
PQLS
PHASE CTRL
STATUS
PGM
iPod CTRL
HOME
MENU
TUNE
TUNE TOOLS
LIST
CH
TV CONTROL
INPUT
INPUT SELECT
iPod
USB
SAT
TUNER
VIDEO
TV CTRL
ZONE 2
ADPT
CD
TV
RCU SETUP
SOURCE
RECEIVER MULTI
OPERATION
BDR
BD
DVD
DVR
HMG
HDMI
RECEIVER
MUTE
MASTER
VOLUME
VOL
PRESET
TOP MENU
BAND
GUIDE
T.EDIT
VIDEO
PARAMETER
AUDIO
PARAMETER
ENTER
PRESET
RETURN
PTY
SEARCH
MENU
AUTO / ALC /
DIRECT
STEREO STANDARD ADV SURR
AUDIO
INFO
CLASS
ENTER
DISP
HDD
DVD
5
4
6
8
0
7
9
1
3
/ CLR
CH
22
S.RETRIEVER
2
1
2,3
4
5
9
10
6
7
8
11
13
12
14
15
The remote has been conveniently color-coded
according to component control using the follow-
ing system:
!
White
– Receiver control, TV control
!
Blue
– Other controls (See the Operating
Instructions in CD-ROM for detail.)
1
u
RECEIVER
This switches between standby and on for this
receiver.
2 MULTI OPERATION
Use this button to perform multi operations.
3 RCU SETUP
Use to input the preset code when making
remote control settings and to set the remote
control mode.
4 Input function buttons
Press to select control of other components.
Use
INPUT SELECT
c
/
d
to select the input
function (page 19).
5 ZONE 2
Switch to perform operations in
ZONE 2
.
6 TV CONTROL buttons
These buttons are dedicated to control the TV
assigned to the
TV CTRL
button.
7 Receiver setting buttons
Press
first to access:
!
AUDIO PARAMETER
– Use to access the
Audio options.
!
VIDEO PARAMETER
– Use to access the
Video options.
!
HOME MENU
– Use to access the Home
Menu.
!
RETURN
– Press to confirm and exit the
current menu screen.
8
i
/
j
/
k
/
l
/ENTER
Use the arrow buttons when setting up your
surround sound system and the Audio or Video
options.
9 Receiver Control buttons
Press
first to access:
!
PHASE CTRL
– Press to switch on/off Phase
Control.
!
STATUS
– Press to check selected receiver
settings.
!
PQLS
– Press to select the PQLS setting.
!
S.RETRIEVER
– Press to restore CD quality
sound to compressed audio sources.
!
SIGNAL SEL
– Use to select an input signal.
!
MCACC
– Press to switch between MCACC
presets.
!
SLEEP
– Use to put the receiver in sleep
mode and select the amount of time before
sleep.
!
CH LEVEL
– Press repeatedly to select a
channel, then use
k
/
l
to adjust the level.
!
A.ATT
– Attenuates (lowers) the level of an
analog input signal to prevent distortion.
!
DIMMER
– Dims or brightens the display.
10 LISTENING MODE controls
!
AUTO/ALC/DIRECT
– Switches between
Auto Surround, Auto Level Control mode and
Stream Direct mode.
!
STEREO
– Press to select stereo playback
mode.
!
STANDARD
– Press for Standard decoding
and to switch various modes (
2
Pro Logic,
Neo:6, etc.) (page 19).
!
ADV SURR
– Use to switch between the
various surround modes (page 19).
11 Remote control LED
Lights when a command is sent from the
remote control.
12 TV CTRL
Set the preset code of your TV’s manufacturer
when controlling the TV.
13
Switches the remote to control the receiver
(used to select the white commands).
Switch to perform operations in the main zone.
Also use this button to set up surround sound.
14 MASTER VOLUME +/–
Use to set the listening volume.
15 MUTE
Mutes the sound or restores the sound if it has
been muted (adjusting the volume also restores
the sound).
