JVC KD-DV7402: Selecting a preset sound mode
Selecting a preset sound mode: JVC KD-DV7402
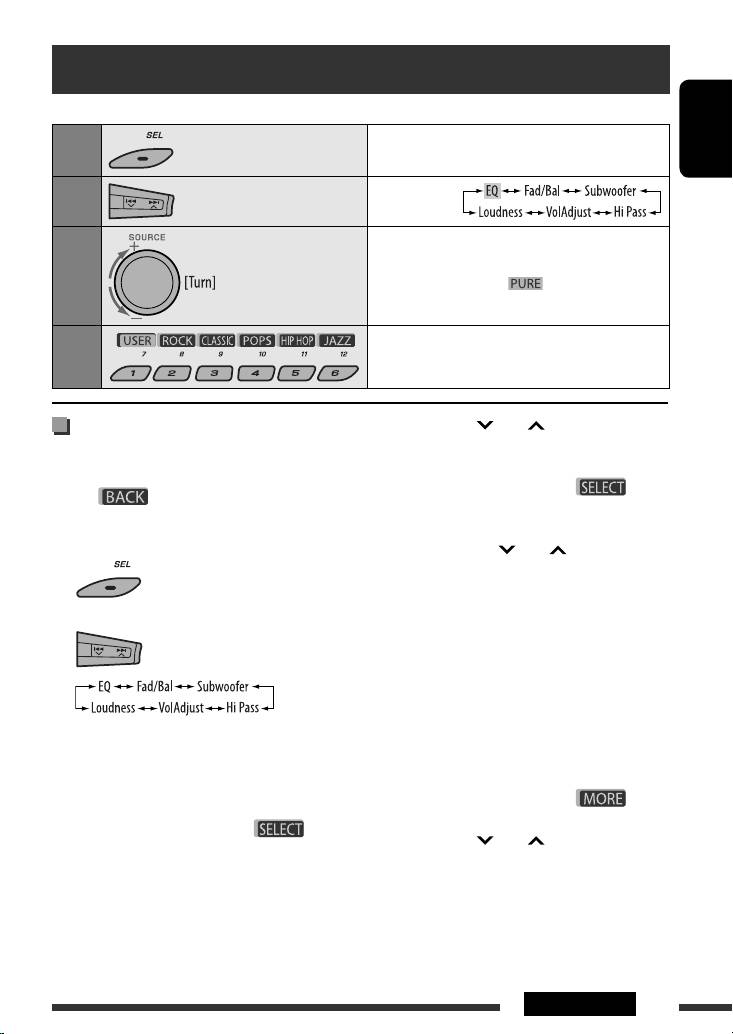
Selecting a preset sound mode
You can select a preset sound mode suitable to the music genre (iEQ: intelligent equalizer).
Enter the setting menu.
1
ENGLISH
Select “EQ.”
2
Select “On.”
3
• If “Bypass” is selected, you can listen to the original
sound mode recorded. lights up on the
display.
Select a preset sound mode.
4
4 /¢ : between the left and
Adjusting the sound
right speakers. [L6 to R6]
You can adjust the sound characteristics to your
B Subwoofer
preference.
1 Press number button 1 ( ) to
• When
is shown on the display, you can
move to the “Subwoofer” adjustment
move back to the previous screen by pressing number
display.
button 3 or 6.
2 Use 4 /¢ to select a cutoff
1
frequency to the subwoofer.
• Off *: All signals are sent to the
subwoofer.
2
• 55Hz: Frequencies higher than 55 Hz
are cut off.
• 85Hz: Frequencies higher than 85 Hz
are cut off.
• 120Hz: Frequencies higher than 120 Hz
• For “EQ” setting, see above.
are cut off.
3 Turn the control dial to adjust the
subwoofer output level. [0 to 8]
3 Adjust the selected setting item.
4 Press number button 1 ( ) to
A Fad/Bal (Fader/Balance)
move to another setting level.
1 Press number button 1 ( )
4 /¢ : select the quality of
to move to the “Fad/Bal” adjustment
LPF. [–12dB/oct or –24dB/oct]
display.
Control dial: Turn the control dial to select
2 Adjust the speaker output balance by
the subwoofer phase. [0deg (normal) or
pressing:
180deg (reverse)]
5 / ∞: between the front and rear
speakers. [F6 to R6]
Continued on the next page
43SETTINGS
EN34-43_KD-DV7402_003A_f.indd 43EN34-43_KD-DV7402_003A_f.indd 43 1/28/08 4:07:40 PM1/28/08 4:07:40 PM
* If “Off” is selected in step 2, you can only
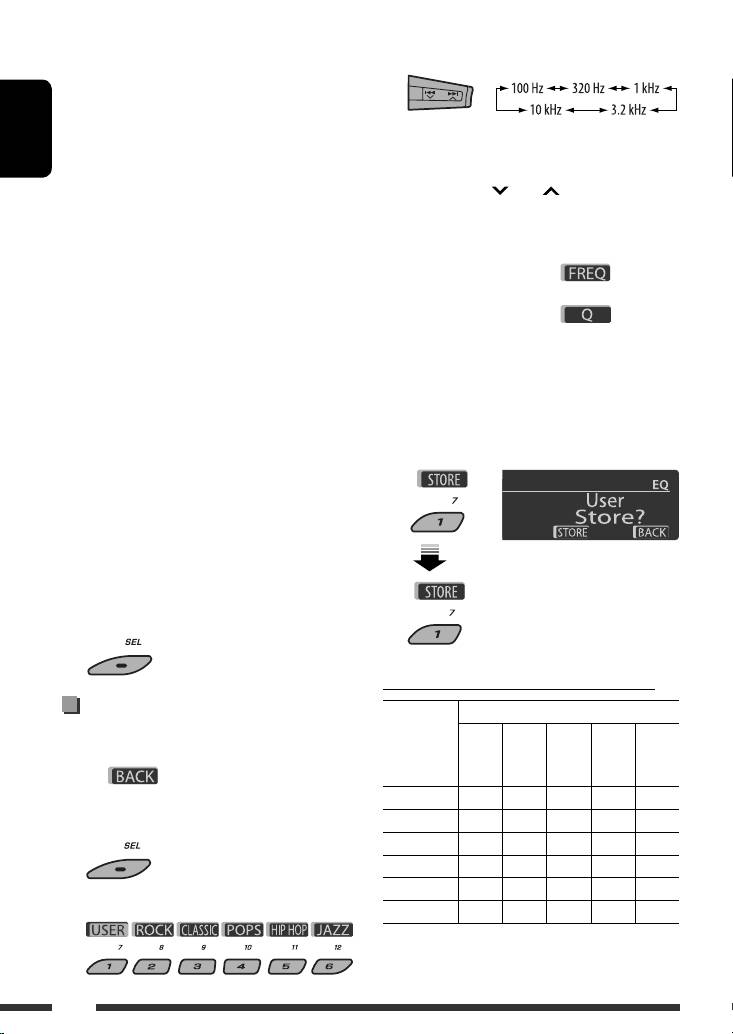
3 Select a frequency range to adjust.
adjust the subwoofer phase.
C Hi Pass (Hi Pass Filter)
Turn the control dial to select the cutoff
frequency to the front/rear speakers. Set this
4 Adjust the sound elements of the selected
to match the LPF setting.
ENGLISH
frequency range.
• Off: All signals are sent to the front/rear
1 Press 4 /¢ to select the
speakers.
frequency band, then press 5 / ∞ to
• 62Hz: Frequencies lower than 62 Hz are
enhanced level for the selected frequency
cut off.
band. [–6 to +6]
• 95Hz: Frequencies lower than 95 Hz are
2 Press number button 5 ( ), then turn
cut off.
the control dial to select the frequency.
• 135Hz: Frequencies lower than 135 Hz are
3 Press number button 5 ( ), then turn
cut off.
the control dial to select the quality slope (Q).
D VolAdjust, [–5 to +5]
Turn the control dial to adjust the input level
of each source (except FM).
5 Repeat steps 3 and 4 to adjust the other
Adjust to match the input level of the FM
frequency bands.
sound level.
• Before making an adjustment, select the
6 Store the adjustments.
source you want to adjust.
E Loudness, [Off or On]
Turn the control dial to select “Off” or
“On.” When “On” is selected, low and high
frequencies sound are boosted to produce a
well-balanced sound at low volume level.
4 Exit from the setting.
Preset value setting for each sound mode
Storing your own sound modes
Preset value
You can adjust the sound modes and store your own
Sound
adjustments in memory.
mode
Band 1
(100 Hz)
Band 2
(320 Hz)
Band 3
(1 kHz)
Band 4
Band 5
(10 kHz)
• When is shown on the display, you can
(3.2 kHz)
move back to the previous screen by pressing number
USER 00000
button 6.
ROCK +3 +2 0 +1 +1
1
CLASSIC +2 +2 0 +1 0
POPS 0 +1 0 +1 +2
HIP HOP +4 +1 –2 0 +1
2 Select a sound mode.
JAZZ +3 +2 +1 +2 +2
44
EN44-51_KD-DV7402_003A_5.indd 44EN44-51_KD-DV7402_003A_5.indd 44 1/22/08 11:13:41 AM1/22/08 11:13:41 AM
Оглавление
- Playable disc type
- Preparation
- Basic operations
- Listening to the radio
- Disc operations
- Listening to the USB device
- Dual Zone operations
- Listening to the Bluetooth ® devices
- Listening to the CD changer
- Listening to the DAB tuner
- Listening to the iPod
- Listening to the other external components
- Selecting a preset sound mode
- General settings — PSM
- Disc setup menu
- Bluetooth settings
- Maintenance
- More about this unit
- Troubleshooting
- Specifications
- Type de disque compatible
- Préparation
- Opérations de base
- Écoute de la radio
- Opérations des disques
- Écoute du périphérique USB
- Fonctionnement sur Deux Zones
- Écoute d’un périphérique Bluetooth ®
- Écoute du changeur de CD
- Écoute du tuner DAB
- Écoute de iPod
- Écoute d’un autre appareil extérieur
- Sélection d’un mode sonore préréglé
- Réglages généraux—PSM
- Menu de réglage du disque
- Réglages Bluetooth
- Entretien
- Pour en savoir plus à propos de cet autoradio
- Guide de dépannage
- Spécifications
- Тип воспроизводимых дисков
- Подготовка
- Основные операции
- Прослушивание радио
- Операции с дисками
- Прослушивание устройства USB
- Операции в режиме “Dual Zone”
- Прослушивание устройств Bluetooth®
- Прослушивание с устройства автоматической смены компакт-дисков
- Прослушивание тюнера DAB
- Прослушивание проигрывателя iPod
- Прослушивание с других внешних устройств
- Выбор запрограммированного режима звучания
- Общие настройки—PSM
- Меню настройки диска
- Настройки Bluetooth
- Обслуживание
- Дополнительная информация о приемнике
- Устранение проблем
- Технические характеристики
