JVC GC-XA1 BE: инструкция
Раздел: Фотоаппараты
Тип:
Инструкция к JVC GC-XA1 BE
ACTION CAMERA
English
GC-XA1 BE
Basic User Guide
• Before use, be sure to read “Safety Precautions” (p.2)
and “Cautions” (p.3) to use the product correctly.
• Malfunction due to water immersion and other damages
caused by misuse by the customer is not covered by
warranty.
• Before use, be sure to read the “Detailed User Guide” in
the built-in memory with the camera.
• For more details on the operations, refer to the “Detailed
User Guide” in the built-in memory.
TM
Complies with
IDA Standards
DB102150

Safety Precautions
•The battery pack and the camcorder with
CAUTION:
battery installed should not be exposed to
•To prevent shock, do not open the cabinet.
excessive heat such as direct sunlight, re
No user serviceable parts inside.
or like.
Refer servicing to qualied personnel.
CAUTION:
NOTES:
•When the equipment is installed in a cabinet
• The rating plate and safety caution are on the
or on a shelf, make sure that it has sufcient
bottom of the unit.
space on all sides to allow for ventilation (10
• The serial number plate is on the battery
cm or more on both sides, on top and at the
mount of the camera.
rear).
•When discarding batteries, environmental
CAUTION:
problems must be considered and the local
The mains plug shall remain readily operable.
rules or laws governing the disposal of these
• Remove the mains plug immediately if the
batteries must be followed strictly.
camcorder functions abnormally.
•Do not point the lens directly into the sun.
This can cause eye injuries, as well as lead to
WARNING:
the malfunctioning of internal circuitry.
•The camcorder should not be exposed to
There is also a risk of re or electric shock.
excessive heat such as direct sunshine, re
•Do not use a tripod on unsteady or unlevel
or the like.
surfaces. It could tip over, causing serious
damage to the unit.
─────────────────────────────────────────────
If a malfunction occurs, stop using the camcorder immediately and consult your local JVC dealer.
─────────────────────────────────────────────
SOME DO’S AND DON’TS ON THE SAFE USE OF EQUIPMENT
This equipment has been designed and manufactured to meet international safety
standards but, like any electrical equipment, care must be taken if you are to obtain the best
results and safety is to be assured.
DO read the operating instructions before you attempt to use the equipment.
DO ensure that all electrical connections (including the mains plug, extension leads and
interconnections between pieces of equipment) are properly made and in accordance with
the manufacturer’s instructions. Switch off and withdraw the mains plug when making or
changing connections.
DO consult your dealer if you are ever in doubt about the installation, operation or safety of
your equipment.
DO be careful with glass panels or doors on equipment.
DON’T continue to operate the equipment if you are in any doubt about it working normally,
or if it is damaged in any way — switch off, withdraw the mains plug and consult your dealer.
DON’T remove any xed cover as this may expose dangerous voltages.
DON’T leave equipment switched on when it is unattended unless it is specically stated
that it is designed for unattended operation or has a standby mode. Switch off using the
switch on the equipment and make sure that your family knows how to do this. Special
arrangements may need to be made for inrm or handicapped people.

DON’T use equipment such as personal stereos or radios so that you are distracted from
the requirements of road safety. It is illegal to watch television whilst driving.
DON’T listen to headphones at high volume, as such use can permanently damage your
hearing.
DON’T obstruct the ventilation of the equipment, for example with curtains or soft
furnishings. Overheating will cause damage and shorten the life of the equipment.
DON’T use makeshift stands and NEVER x legs with wood screws — to ensure complete
safety always t the manufacturer’s approved stand or legs with the xings provided
according to the instructions.
DON’T allow electrical equipment to be exposed to rain or moisture.
ABOVE ALL
• NEVER let anyone especially children push anything into holes, slots or any other opening
in the case — this could result in a fatal electrical shock;
• NEVER guess or take chances with electrical equipment of any kind — it is better to be
safe than sorry!
Rated Current Consumption: 680mA
CAUTION:
— Read Before Use —
Notes on this equipment
• The camcorder shall not be exposed to excessive heat such as direct sunshine, re or the
like.
The built-in battery may explode if it gets heated up.
─────────────────────────────────────────────
If a malfunction occurs, stop using the camcorder immediately and consult your local JVC dealer.
• The battery is not charged when purchased. Charge the battery before using it for the rst
─────────────────────────────────────────────
time.
• Do not drop this unit or subject it to excessive shock or vibration.
• Before recording, be sure to conduct a trial recording.
• Store the recorded data periodically on computer.
JVC shall not be liable for any damage or loss of data.
• Do not press against the surface of the screen with force or subject it to strong impact.
Doing so may damage or break the screens.
• When using the unit in a low temperature environment (-10°C or below), the operating time
may be shortened, or it may not function properly.
Waterproof Function
This camera is equipped with a waterproof function.
This camera can make recordings in marine water and fresh water.
We recommend to select [Blue(marine)]/[Green(marine)] in White Balance for underwater
scene.
The waterproof is tested in accordance with JVC test standard and it does not assure damage-
free or trouble-free operation.
The waterproof cannot be guaranteed if the camcorder is subject to impact.
Consult with the dealer if the camcorder is subject to impact.
Water proof Function : IEC Standard publication 529 IPX8.
• The cover for the ports must be rmly closed.
• Do not use this product in water deeper than 5m.
• Do not use in the following locations:
Place with higher water pressure than specied, in hot springs or water of 40°C or higher.
• Supplied accessories are not waterproof.
■ Malfunction due to water immersion (IPX8 5m, 30minutes) and other damages caused by
misuse by the customer is not covered by warranty.
Before use, be sure to read the “Detailed User Guide” in the built-in memory with the
camcorder.
— Maintenance After Use —
•After use in water or a dusty environment,
rinse the camera as soon as possible with still fresh water in basin.
•Always keep the lens clean and wipe the water droplets off the camera with a soft and dry
cloth.
•Air-dry the camera completely in a shaded area.
■ The waterproof of the ports are not guaranteed in all environments or conditions.
(IPX8 5m, 30minutes)
Dear Customer, [European Union]
WirelessLAN
This apparatus is in conformance with the valid
˙
This device is a 2.4 GHz wideband transmission system
European directives and standards regarding
(transceiver), intended for use in all EU member states
electromagnetic compatibility and electrical safety.
and ETFA countries, except in France and Italy where
European representative of JVC KENWOOD Corporation
restrictive use applies.
is: JVC Technical Services Europe GmbH
˙
In Italy the end-user should apply for a license at
the national spectrum authorities in order to obtain
Postfach 10 05 04
authorization to use the device for setting up outdoor
61145 Friedberg
radio links and/or for supplying public access to
Germany
telecommunications and/or network services.
Cautions
˙
This device may not be used for setting up outdoor
radio links in France and in some areas the RF output
A copy of the Declaration of Conformity with regard to
power may be limited to 10mW EIRP in the frequency
the R&TTE Directive 1999/5/EC can be downloaded
range of 2454 - 2483.5 MHz For detailed information
from the following Web sites.
the end-user should contact the national spectrum
authority in France.
http://www3.jvckenwood.com/ecdoc/
Information for Users on
Disposal of Old Equipment
[European Union only]
Hearby, JVC declares that this unit GC-XA1BE is in
This symbol indicates that the product with this symbol should not be
compliance with the essential requirements and
disposed as general household waste.
other relevant provision of Directive 1999/5/EC.
If you want to dispose of this equipment, please do not use the
ordinary dust bin! There is a separate collection system for these
This unit GC-XA1BE is made in China.
products.

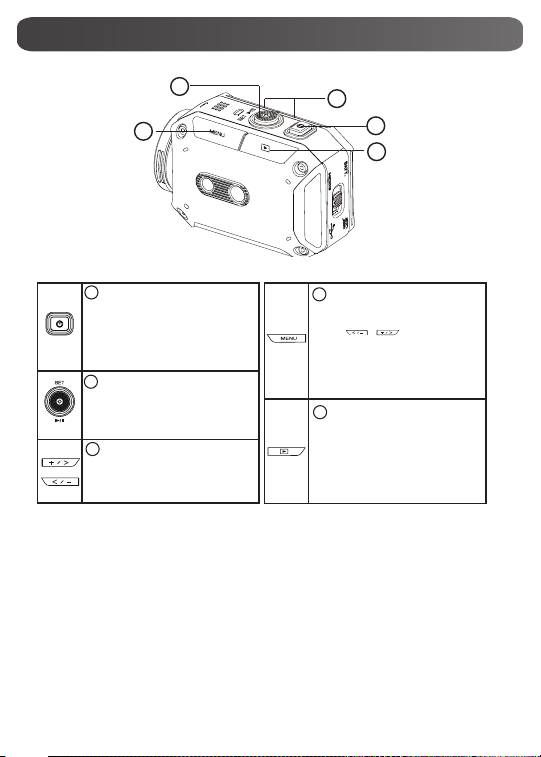
Tour of Your Camera
[Record]/[SET]/[Play]/[Pause] Button
[Tele]/[Next] Button
Power Button
Speaker
Microphone
[Wide]/[Previous]
Button
Power/Charge
Light
LCD Monitor
Lens
[MENU]/[Delete]
Button
[Playback]/[Exit] Button
Battery Slot (inside)
HDMI Mini Connector (inside)
Port/Slot Cover Latch
SD Slot (inside)
Mini USB 2.0 Port (Inside)
Tripod Mounting
Socket
Tripod Mounting
Socket
Strap Hook
Protect from dropping with
a strap or similar measures
5
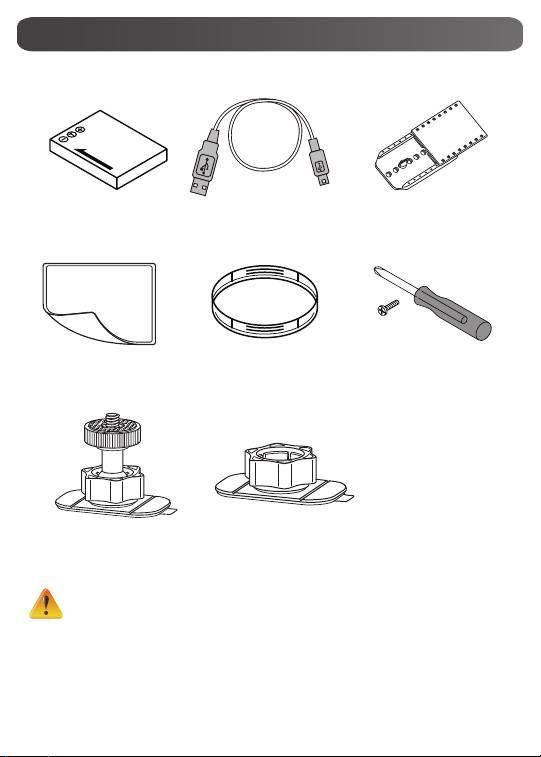
Accessories part
BN-VH105 Battery USB cable
Goggle mount
LCD protect lm
Lens protector x2 Screw and screwdriver
Flexible mount
Flexible mount base
Notice:
1. Remove any dirt or moisture before attaching accessories.
2. The exible mount, once attached, cannot be removed.
3. For best results do not use lens protector in water.
6
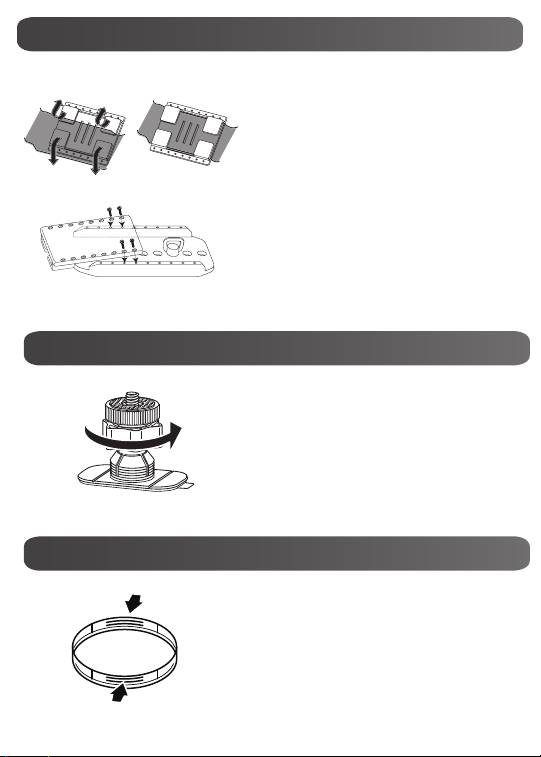
Accessories part
Attaching goggle mount
1. Lift the tabs on the rubber side and insert
the belt.
2. Secure with four screws.
Replacing flexible mount
Replacing flexible mount
Turn the knob in the direction indicated.
(Remove the mount when it is completely
loose.)
Removing lens protector
Removing lens cover
Press in on the protrusions to remove the lens
protector from the camera.
7
Getting Started
8
3
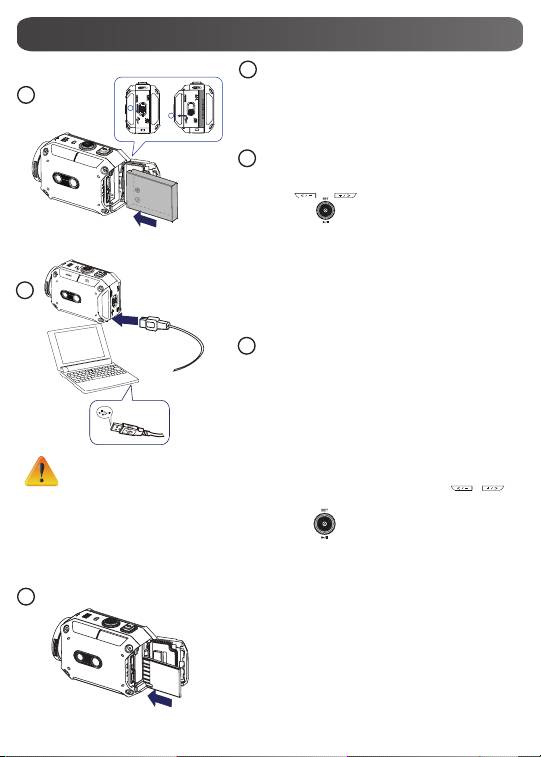
Insert the memory card
1. Slide the latch and open the cover.
2. Insert the SD card (Optional) into the slot until
it locks properly.
3. To remove the SD card, press inward to release
it and gently pull it out.
1
Load the battery
1. Slide the latch and open the cover.
1
2. Insert the battery according to the correct
2
polarity marks (+ or -).
3. Close the cover rmly for waterproof use.
1
2
3
How to set the clock
Using one with an output higher
1. Press the MENU button
than 5V riskd breakdown.
2. Select [Time Setting] and then press /
for Year, Month, Day, Hour, and Minute.
3. Press [SET ] to go for next.
How to view the Detailed User Guide
1. Connect the camera to a computer.
2. Open DV Drive, then double click
[ Start for EU.pdf ]
Note: Adobe Reader must be installed to read
PDF les.
Get from Adobe’s web site http://adobe.com/.
Supported SD card
SD/ SDHC/ SDXC (up to 64GB, class 4 or above)
-TOSHIBA -SanDisk
2
Charge the Li-ion battery
1. Connect USB cable.
2. Press
/ to select [Adapter], then
press [SET ]
3. A blinking light will indicate active charging.
4. In adapter charging mode, the full charging time
for a depleted battery is about 3.5 hours and the
light will turn off automatically after the charging
is completed.
5. In PC USB charging mode, a longer charging
time is required.
3
1
To access menu
• Press to open the option menu.
• Use / to change
between the options. (e.g.
VIDEO/PHOTO MODE,
WIFI, RESOLUTION, WHITE
BALANCE).
To review videos/
photos
• Press to go to the Playback
Mode. You can view or delete
the recorded les.
9
2
4
5
To power on
• Hold it for 2 second.
• After idling for 5 minutes,
the camera will turn off
automatically.
To record
• In Video Mode, press to take
video. In Photo Mode, press to
take photo.
To zoom in or out
• +:Zoom In. -:Zoom out.
1
2
3
4
5
Record & Play
10
1
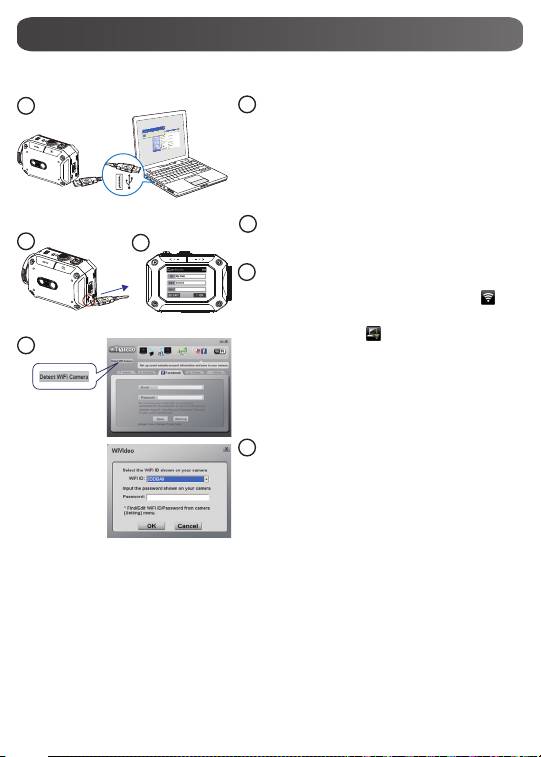
WiVideo is the software to connect the camera with PC.
PC: Install WiVideo
• Use camera to install [WiVideo] on
PC by plugging USB cable. If there is
no Auto-Installation, please go to [My
Computer]→[WiVideo] for installation.
2
PC: Unplug the USB cable
3
Camera: Enable WiFi to PC
• Press [MENU] Button → Select [ WiFi ],
then press [SET] Button to enter its menu.
• Select [ WiFi to PC ] to turn on Wi-Fi. The
camera screen will show the Wi-Fi ID and
Password.
• (The default password is 0000. Wi-Fi ID and
password can be edited on WiVideo via USB
connection.)
4
WiFi to PC
PC: Connect to Camera
• Click [Detect Wi-Fi Camera] to search
camera.
• Enter the Wi-Fi ID and Password shown on
camera to the WiVideo window.
®
NOTE: WiVideo is for Windows
based systems only.
1
2
3
4
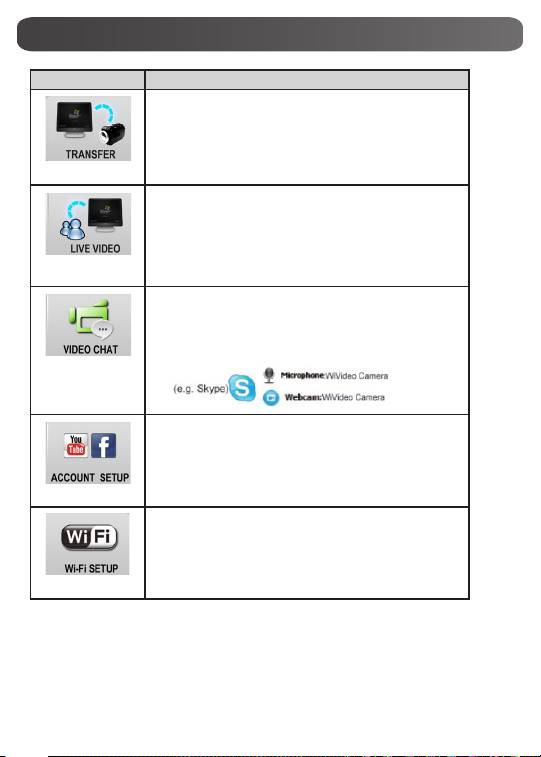
WiVideo Function
Active Mode Function
Manage video and photo les
• Transfer les from camera to PC.
• Delete les in your camera.
WiFi/USB
Watch live video
• Watch live streaming from your camera on your PC.
• Use this camera as a remote home monitor.
WiFi
Wireless webcam for Skype/MSN
• Change the video/audio setting of your Skype/MSN.
• Select WiVideo Camera, which indicates your
camera.
WiFi
Account Setting
• Set up your social website account information
and save to your camera
.
USB
WiFi Setup
•
Congure and synchronize your WiFi prole on your
camera.
•
Name your camera and create your security password.
USB
®
NOTE: WiVideo is for Windows
based systems only.
11
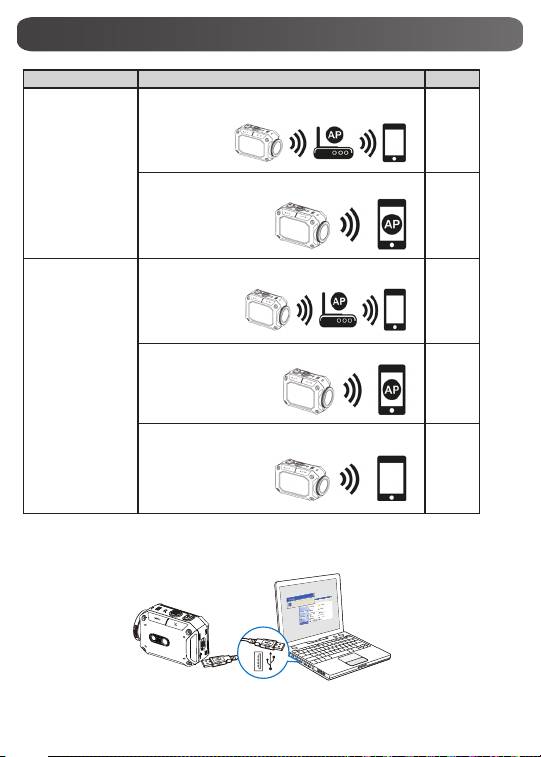
WiFi Modes to Mobile
System Mode Page
Connect via AP
13
Android
Connect via Mobile Hotspot
14
Connect via AP
15
Connect via Mobile Hotspot
16
iPhone/iPad
Connect Directly to Camera
17
NOTE: Before proceed any connection between Mobile and Camera, please connect
to PC via USB cable and set up Wi-Fi prole with WiVideo (Enter SSID and Password).
®
NOTE: WiVideo is for Windows
based systems only.
12
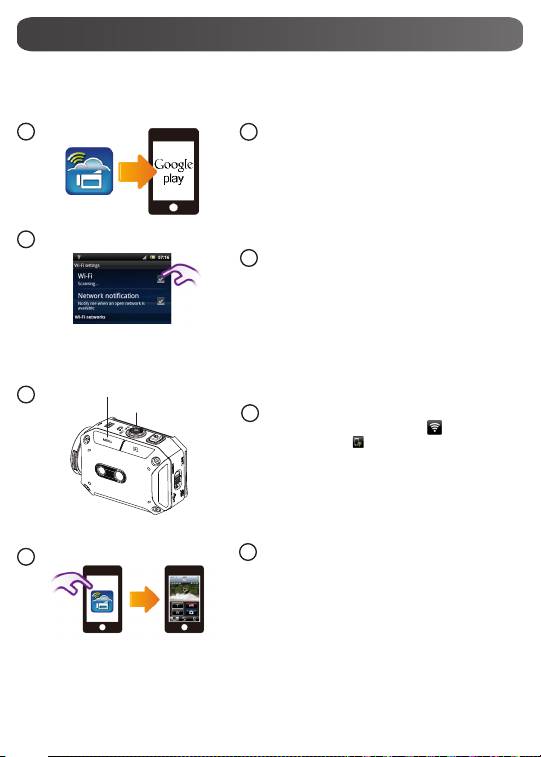
Mobile: Install WiVideo
• WiVideo is a software to connect wireless
between camera and mobile/tablet.
• Download WiVideo APP from Google Play
onto mobile/tablet.
Mobile: Connect to Access Point
• Go to [Settings] → [Wireless & network]
→ [Wi-Fi settings] → [Wi-Fi]
(Enable WiFi and connect to AP)
Camera: Connect to Same AP
• Press [MENU] → select [ WiFi ]→ choose
[WiFi to Mobile ] to scan available AP
→connect camera to the same AP
Note: Refer to the detailed User Guide section 7
to set up hotspot password into Camera.
13
4
Mobile: Launch WiVideo APP
• Press [WiVideo] APP icon → detecting
cameras → enter the password (The default
is 0000 and it can be edited via WiVideo APP
Setup) → start preview and remote control.
1
2
3
WiFi to Mobile (Android: AP Mode)
[MENU] Button
[SET] Button
1
2
3
4
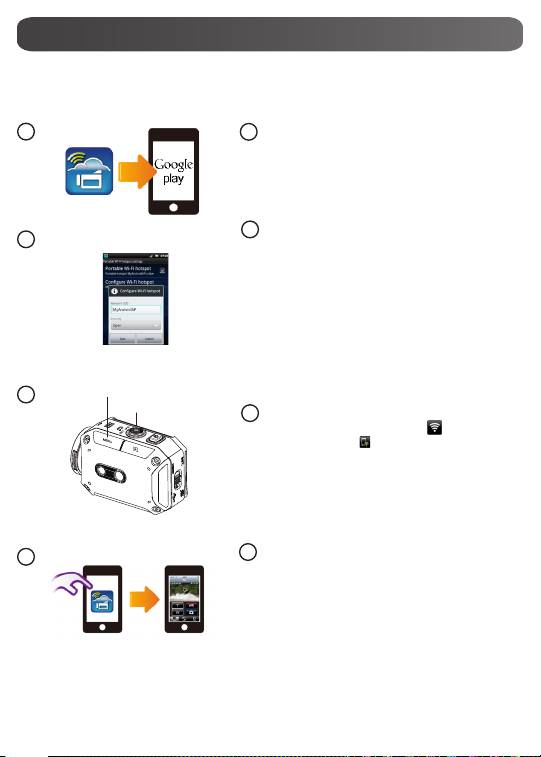
Mobile: Install WiVideo
• WiVideo is a software to connect wireless
between camera and mobile/tablet.
• Download WiVideo APP from Google Play
onto mobile/tablet.
Mobile: Enable Mobile Hotspot/AP
• Go to [Settings] → [Wireless & network]
→ Enable mobile hotspot/AP
Note: Operation may vary, please refer to each
individual model.
Note: Be aware of using Hotspot service may not
be provided in some countries.
Camera: Connect to Hotspot/AP
• Press [MENU] → select [ WiFi ]→ choose
[WiFi to Mobile ] to scan available AP
→connect camera to mobile hotspot/AP
Note: Refer to the detailed User Guide
section 7 to set up hotspot password into
Camera.
14
4
Mobile: Launch WiVideo APP
• Press [WiVideo] APP icon → detecting
cameras → enter the password (The default
is 0000 and it can be edited via WiVideo APP
Setup) → start preview and remote control.
1
2
3
WiFi to Mobile (Android: Mobile Hotspot Mode)
[MENU] Button
[SET] Button
1
2
3
4
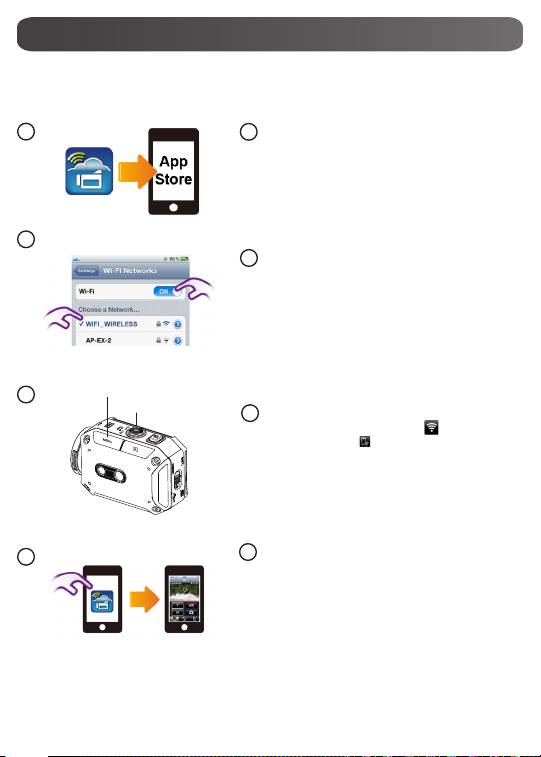
Mobile: Install WiVideo
• WiVideo is a software to connect wireless
between camera and mobile/tablet.
• Download WiVideo APP from App Store onto
iPhone/ iPad.
Mobile: Connect to Access Point
• Go to [Settings] → [WiFi ]
→ Enable WiFi and connect to AP
Camera: Connect to Same AP
• Press [MENU] → select [ WiFi ] → choose
[WiFi to Mobile ] to scan available AP
→connect camera to the same AP
Note: Refer to the detailed User Guide
section 7 to set up AP password into Camera.
15
4
Mobile: Launch WiVideo APP
• Press [WiVideo] APP icon → detecting
cameras → enter the password (The default
is 0000 and it can be edited via WiVideo APP
Setup) → start preview and remote control.
1
2
3
WiFi to Mobile (iPhone/iPad: AP Mode)
[MENU] Button
[SET] Button
1
2
3
4
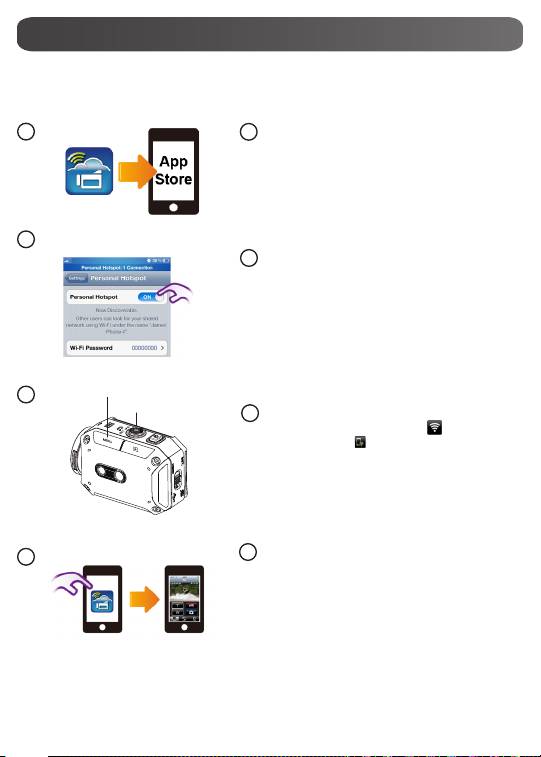
Mobile: Install WiVideo
• WiVideo is a software to connect wireless
between camera and mobile/tablet.
• Download WiVideo APP from App Store onto
iPhone/iPad.
Mobile: Enable Personal Hotspot
• Go to [Settings] → [WiFi ]
→ Enable [Personal Hotspot]
Note: Be aware of using Hotspot service may not
be provided in some countries.
Camera: Connect to Hotspot
• Press [MENU] → select [ WiFi ]→ choose
[WiFi to Mobile ] to scan available AP
→connect camera to mobile hotspot/AP
Note: Refer to the detailed User Guide section 7
to set up hotspot password into Camera.
16
4
Mobile: Launch WiVideo APP
• Press [WiVideo] APP icon → detecting
cameras → enter the password (The default
is 0000 and it can be edited via WiVideo APP
Setup) → start preview and remote control.
1
2
3
WiFi to Mobile (iPhone/iPad: Mobile Hotspot Mode)
[MENU] Button
[SET] Button
1
2
3
4
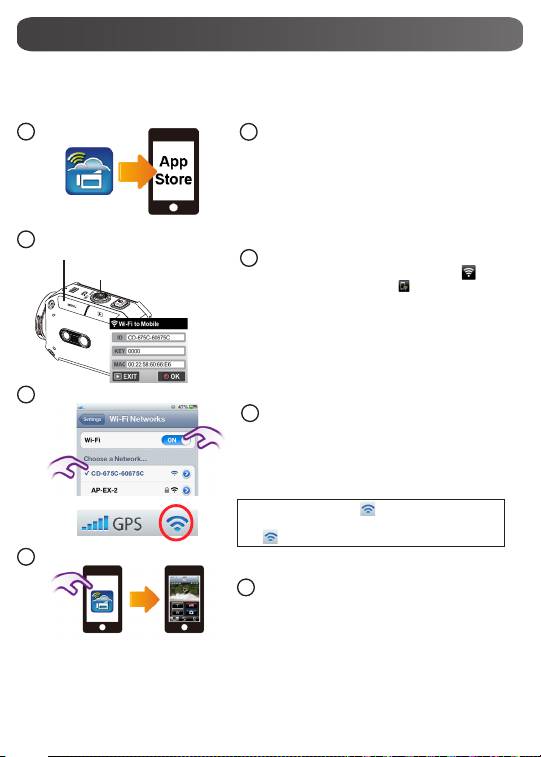
Mobile: Install WiVideo
• WiVideo is a software to connect wireless
between camera and mobile/tablet.
• Download WiVideo APP from App Store onto
your iPhone/ iPad.
Camera: Enable Direct Mode
• Press [MENU] → select [ WiFi ] →
choose [WiFi to Mobile ] →select [Direct
Mode]→camera ID shown on the screen
Mobile: Connect to Camera
• Go to [Settings] → [WiFi]
→ Select camera ID to connect
Note: Once the icon [
]shows, the Direct
Mode connection is activated. It will take a while
for [
] to show up.(More than 1 minute)
17
4
Mobile: Remote Control Camera
• Press [WiVideo] APP icon → detecting
cameras → enter the password (The default
is 0000 and it can be edited via WiVideo APP
Setup) → start preview and remote control.
1
2
3
WiFi to Mobile (iPhone/iPad: Direct Mode)
[MENU] Button
[SET] Button
1
2
3
4

Trouble Shooting
Problem/Situation Remediation/Solution
Cannot turn on the camera/ The
Battery pack is weak or depleted. Recharge the battery pack.
power turns off suddenly.
Camera cannot be turned on
Please make sure that you use the JVC original power adapter and
after plugging power adapter.
connect it to the power outlet correctly.
Wi-Fi icon does not appear after
Battery is low. Recharge the battery pack.
activating Wi-Fi.
Please remove the battery/unplug the adapter. Then, insert the
The camera is frozen.
battery/plug the adapter and turn on the camera again.
“DV” indicates the internal memory of the camera.
When the camera is connected
to the PC via USB cable, many
“Removable Disk” indicates the external memory (memory card
Autoplay windows may pop out.
installed in the camera).
They indicate the disks of the
“WiVideo” indicates the bundled program. Please double-click it to
camera.
start installation automatically.
The password conguration does not match to the AP device you
want to connect.
The camera is not in the wireless network service area or weak
network signal. Please make sure the Access Point is able to access
the Internet.
The LCD shows “Connection
Failed”.
The camera does not support the type of encryption used on the
AP device.
The social websites update their websites without notice. Please visit
the website to update your account setting or upgrade your camera
rmware.
The camera disables any Wi-Fi connection three minutes after
shooting starts. Use the menu to re-enable it.
Reconnect in a clear radio environment. Remember that the
Wi-Fi connections break off.
communication speed drops, interfering with connection, if the
receiver is too far away, there is something in between blocking
communications, or there is a microwave or wireless equipment in
use nearby.
Connecting a USB cable stops
photography. Photography is
Only time lapse and endless recording are available with a USB cable
not possible with a USB cable
connected. (Endless recording is limited to 720p 30 fps.)
connected.
There is no HDMI output. HDMI output is disabled during recording.
The thermometer icon appears. Turn off the camera and allow it time to cool down.
18
Outdoor use limited to 10mW eirp within the band 2412-2472MHz
