JVC KD-G807: инструкция
Раздел: Авто, мото оборудование и транспорт
Тип: Автомагнитола

Характеристики, спецификации
Инструкция к Автомагнитоле JVC KD-G807
ENGLISH
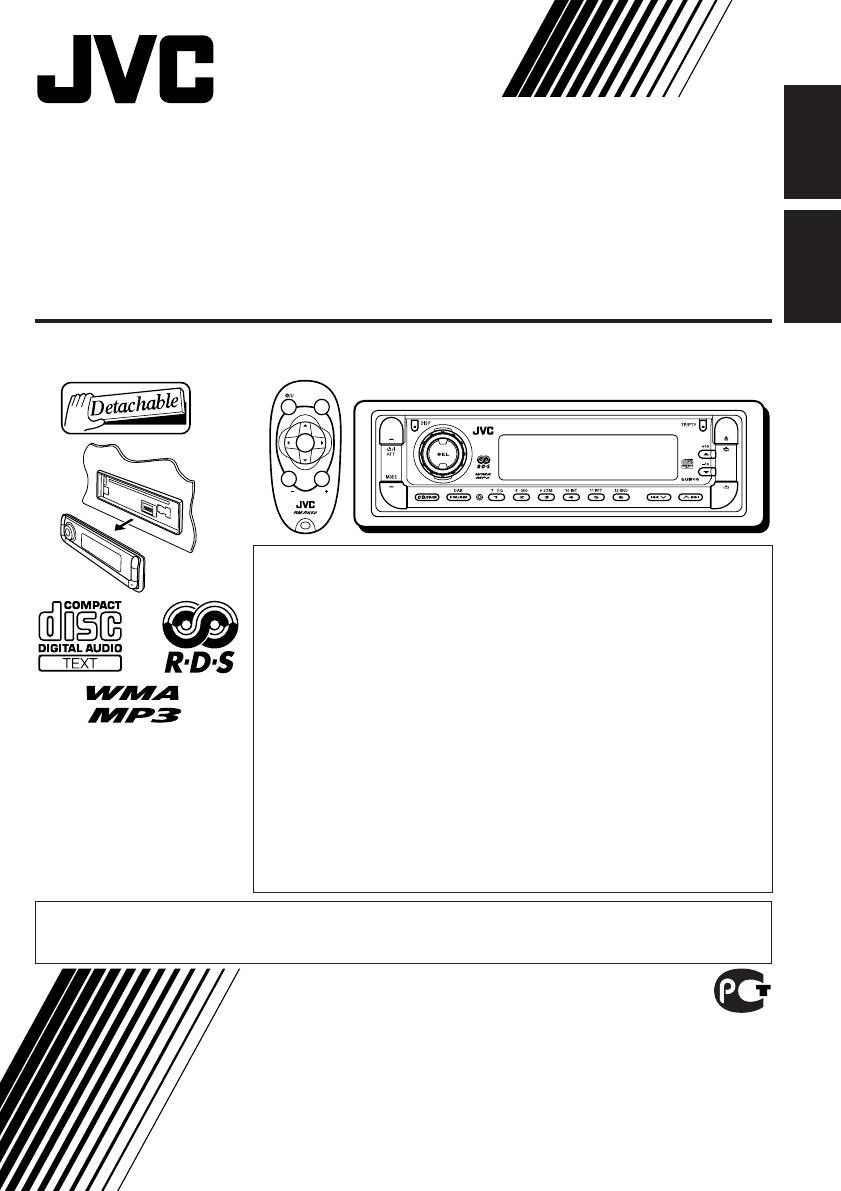
CD RECEIVER
РЕСИВЕР С ПРОИГРЫВАТЕЛЕМ КОМПАКТ-ДИСКОВ
РУCCKИЙ
KD-G807
ATT
SOUND
U
KD-G807
R
SOURCE
F
D
VOL
VOL
В соответствии с Законом Российской Федерации “О защите прав
потребителей” срок службы (годности) данного товара “по истечении
которого он может представлять опасность для жизни, здоровья
потребителя, причинять вред его имуществу или окружающей среде”
составляет семь (7) лет со дня производства. Этот срок является
временем, в течение которого потребитель данного товара может
безопасно им пользоваться при условии соблюдения инструкции по
эксплуатации данного товара, проводя необходимое обслуживание,
включающее замену расходных материалов и/или соответствующее
ремонтное обеспечение в специализированном сервисном центре.
For installation and
Дополнительные косметические материалы к данному товару,
connections, refer to the
поставляемые вместе с ним, могут храниться в течение двух (2) лет со
separate manual.
дня его производства.
Указания по установке и
Срок службы (годности), кроме срока хранения дополнительных
косметических материалов, упомянутых в предыдущих двух пунктах, не
выполнению
затрагивает никаких других прав потребителя, в частности, гарантийного
соединений приводятся
свидетельства JVC, которое он может получить в соответствии с законом
в отдельной
о правах потребителя или других законов, связанных с ним.
инструкции.
• This unit is equipped with the display demonstration. To cancel it, see page 8.
• Данное устройство имеет функцию демонстрации на экране дисплея. Порядок ее отмены
смотрите на странице 8.
INSTRUCTIONS
ИНСТРУКЦИИ ПО ЭКСПЛУАТАЦИИ
GET0200-001A
[EE]
Cover001A_KD-G807[EE]f.p65 1/15/04, 2:05 PM3
IMPORTANT FOR LASER PRODUCTS
1. CLASS 1 LASER PRODUCT
2. CAUTION: Do not open the top cover. There are no user serviceable parts inside the unit; leave all
servicing to qualified service personnel.
ENGLISH
3. CAUTION: Visible and invisible laser radiation when open and interlock failed or defeated. Avoid
direct exposure to beam.
4. REPRODUCTION OF LABEL: CAUTION LABEL, PLACED OUTSIDE THE UNIT.
How to reset your unit
CAUTION:
NEVER insert your finger in
Press the reset button on
between the control panel and the
the control panel using a
unit, as it may get caught or hurt.
ball-point pen or similar tool.
(See page 40.)
This will reset the built-in
microcomputer.
Note:
Your preset adjustments—such as preset channels or sound
adjustments—will also be erased.
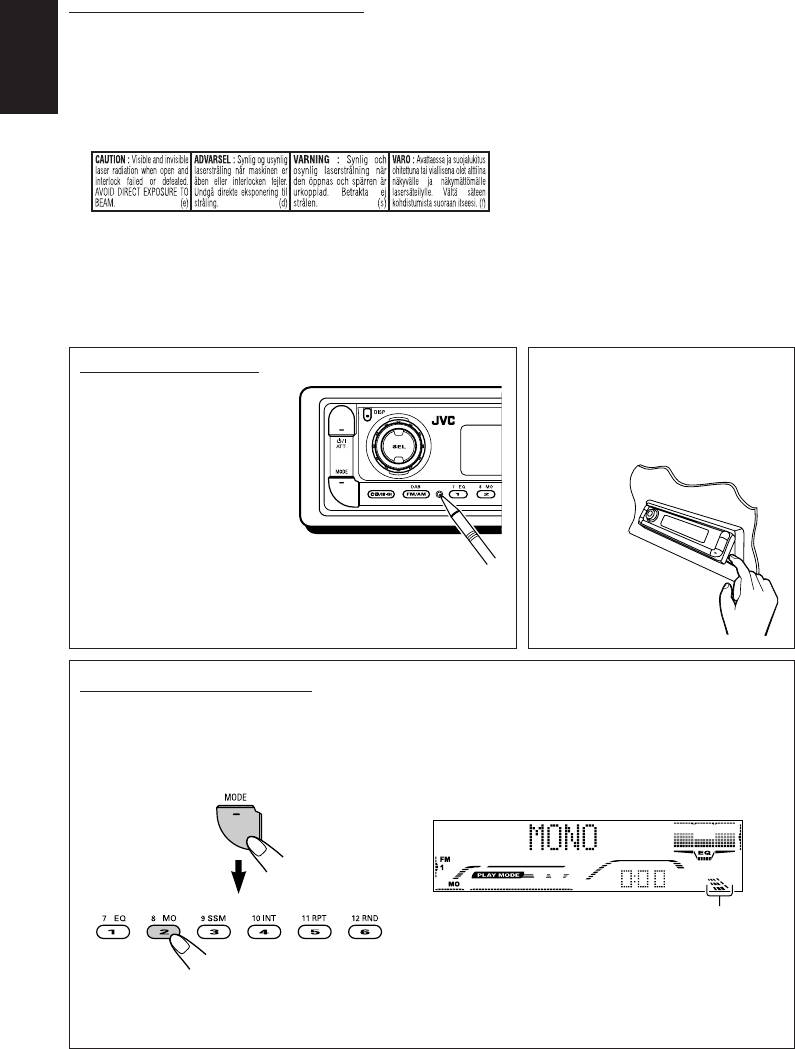
How to use the MODE button
If you press MODE, the unit goes into functions mode, then the number buttons and 5/∞ buttons
work as different function buttons.
Ex.: When number button 2 works as MO (monaural) button.
Time countdown indicator
To use these buttons for original functions again after pressing MODE, wait for 5 seconds
without pressing any of these buttons until the functions mode is cleared.
• Pressing MODE again also clears the functions mode.
2
EN02-03_KD-G807[EE]f.p65 1/15/04, 2:07 PM2

Thank you for purchasing a JVC product. Please read all instructions carefully before operation,
to ensure your complete understanding and to obtain the best possible performance from the unit.
CONTENTS
ENGLISH
How to reset your unit ............................... 2
SOUND ADJUSTMENTS ................... 31
How to use the MODE button ................... 2
Adjusting the sound .................................. 31
Selecting preset sound modes
LOCATION OF THE BUTTONS ............ 4
(iEQ: intelligent equalizer) ...................... 32
Control panel ............................................. 4
Storing your own sound adjustments ........ 33
Remote controller ...................................... 5
Preparing the remote controller ................ 6
OTHER MAIN FUNCTIONS ................ 34
Changing the general settings (PSM) ....... 34
BASIC OPERATIONS ....................... 7
Assigning names to CDs ........................... 39
Turning on the power ................................ 7
Changing the control panel angle ............. 40
Canceling the display demonstration ........ 8
Detaching the control panel ...................... 41
Setting the clock ........................................ 9
CD CHANGER OPERATIONS .............. 42
RADIO OPERATIONS ...................... 10
Playing discs ............................................. 42
Listening to the radio ................................. 10
Selecting the playback modes .................. 45
Storing stations in memory ....................... 11
Tuning in to a preset station ...................... 13
EXTERNAL COMPONENT OPERATIONS ... 47
Playing an external component ................. 47
RDS OPERATIONS ......................... 14
What you can do with RDS ....................... 14
DAB TUNER OPERATIONS ................ 48
Other convenient RDS functions and
Tuning in to an ensemble and one of the
adjustments ............................................ 19
services .................................................. 48
Storing DAB services in memory .............. 49
CD OPERATIONS ........................... 21
Tuning in to a preset DAB service ............. 50
Playing a CD ............................................. 21
What you can do more with DAB .............. 51
Locating a track or a particular portion
on a CD .................................................. 22
ADDITIONAL INFORMATION ............. 52
Selecting CD playback modes .................. 23
Playing a CD Text ...................................... 24
TROUBLESHOOTING ...................... 53
Prohibiting disc ejection ............................ 24
MAINTENANCE ............................. 56
MP3/WMA INTRODUCTION .............. 25
Handling discs ........................................... 56
What are MP3/WMA? ............................... 25
SPECIFICATIONS ........................... 57
How are MP3/WMA files recorded and
played back? .......................................... 25
MP3/WMA OPERATIONS .................. 26
Playing a disc ............................................ 26
Locating a file or a particular portion
on a disc ................................................. 27
Selecting the playback modes .................. 29
BEFORE USE
*For safety....
*Temperature inside the car....
• Do not raise the volume level too much, as this will
If you have parked the car for a long time in hot or
block outside sounds, making driving dangerous.
cold weather, wait until the temperature in the car
• Stop the car before performing any complicated
becomes normal before operating the unit.
operations.
3
EN02-03_KD-G807[EE]f.p65 1/15/04, 2:07 PM3
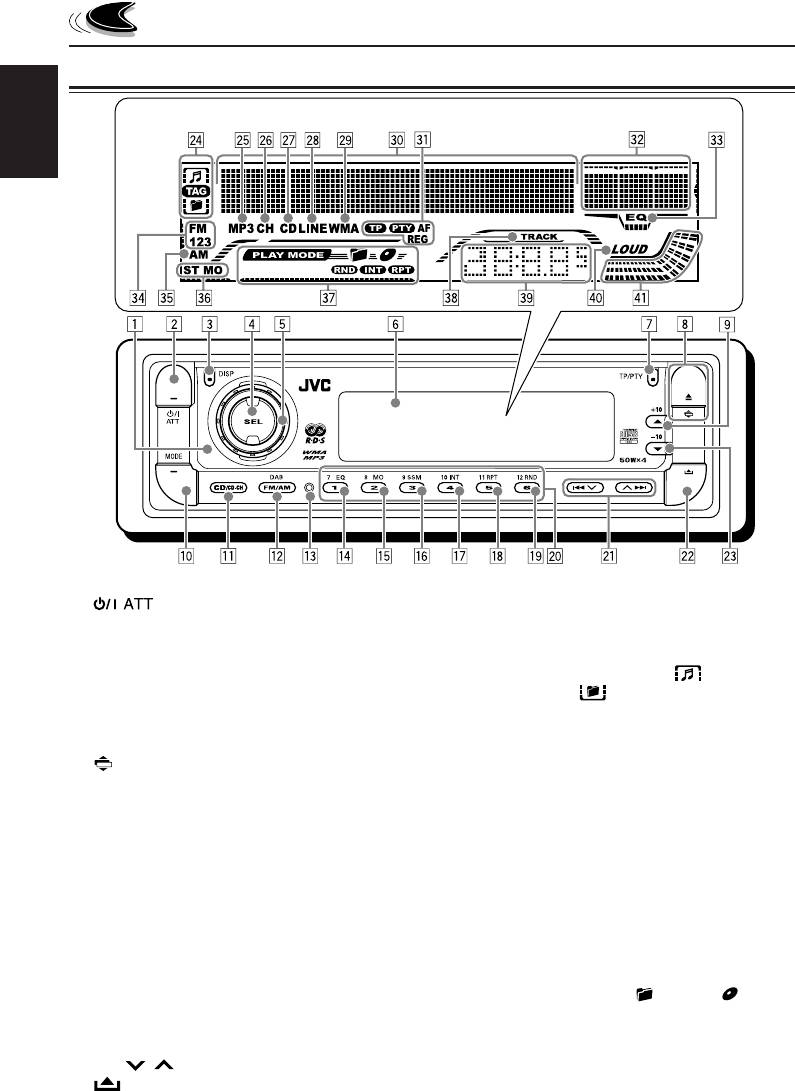
LOCATION OF THE BUTTONS
Control panel
Display window
ENGLISH
KD-G807
1 Remote sensor
d ∞ (down) button
2 (standby/on attenuator) button
–10 button
3 DISP (display) button
4 SEL (select) button
Display window
5 Control dial
f Disc information indicators— (track/file),
6 Display window
TAG (ID3 Tag), (folder)
7 TP/PTY (traffic programme/programme type)
g MP3 indicator
button
h CH (CD changer) indicator
8 0 (eject) button
j CD indicator
(angle) button
k LINE indicator
9 5 (up) button
l WMA indicator
+10 button
/ Main display
p MODE button
z RDS indicators—TP, PTY, AF, REG
q CD/CD-CH (CD changer) button
x Equalizer pattern indicator
w FM/AM DAB button
Audio level indicator
e Reset button
c EQ (equalizer) indicator
r EQ (equalizer) button
v FM band indicators—FM1, FM2, FM3
t MO (monaural) button
b AM band indicator
y SSM (Strong-station Sequential Memory)
n Tuner reception indicators—ST (stereo), MO
button
(monaural)
u INT (intro) button
m Play mode indicators— (folder), (disc),
i RPT (repeat) button
RND (random), INT (intro), RPT (repeat)
o RND (random) button
, TRACK indicator
; Number buttons
. Source/clock display
a 4 / ¢ buttons
P LOUD (loudness) indicator
s (control panel release) button
Q Audio level indicator
Volume level indicator
4
EN04-06_KD-G807[EE]f.p65 1/15/04, 2:08 PM4
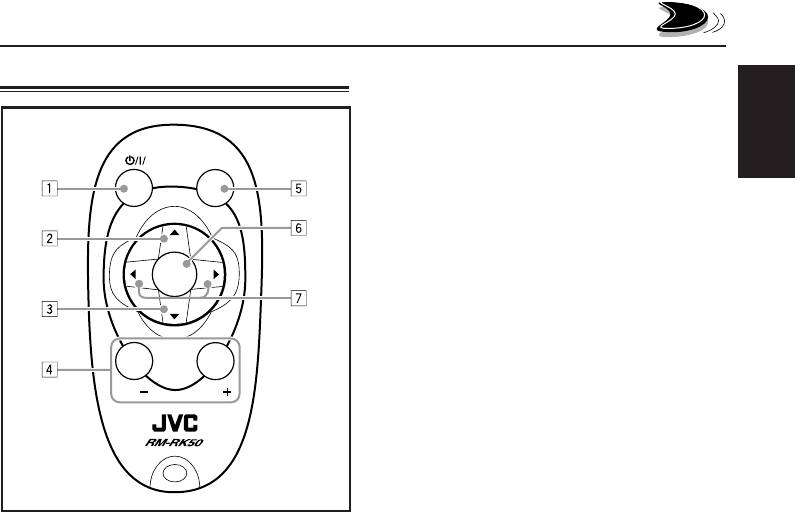
3 • Selects the preset stations (or services)
Remote controller
while listening to the radio (or the DAB
tuner).
Each time you press the button, the preset
station (or service) number increases, and
ATT
SOUND
ENGLISH
the selected station (or service) is tuned in.
• Skips to the first file of the previous folder
while listening to an MP3 or a WMA disc.
Each time you press the button, you can
U
move to the previous folder and start playing
the first file.
R
SOURCE
F
• While playing an MP3 disc on an MP3-
D
compatible CD changer;
– Skips to the previous disc if pressed
briefly.
– Skips to the previous folder if pressed and
VOL
VOL
held.
Note:
While playing a CD on a CD changer, this
always skips to the previous disc.
4 Functions the same as the control dial on the
main unit.
Note:
These buttons do not function for the
preferred setting mode (PSM) adjustment.
1 • Turns on the unit if pressed when the unit is
5 Selects the sound mode (iEQ: intelligent
turned off.
equalizer).
• Turns off the unit if pressed and held until
Each time you press the button, the sound
“SEE YOU” appears on the display.
mode (iEQ) changes.
• Drops the volume level in a moment if
pressed briefly.
6 Selects the source.
Press again to resume the volume.
Each time you press the button, the source
changes.
2 • Selects the band while listening to the radio
(or the DAB tuner).
7 • Searches for stations while listening to the
Each time you press the button, the band
radio.
changes.
• Selects services while listening to the DAB
• Skips to the first file of the next folder while
tuner if pressed briefly.
listening to an MP3 or a WMA disc.
• Searches for ensembles while listening to
Each time you press the button, you can
the DAB tuner if pressed and held.
move to the next folder and start playing the
• Fast-forwards or reverses the track/file if
first file.
pressed and held while listening to a disc.
• While playing an MP3 disc on an MP3-
• Skips to the beginning of the next track/file
compatible CD changer;
or goes back to the beginning of the current
– Skips to the next disc if pressed briefly.
(or previous) tracks/files if pressed briefly
– Skips to the next folder if pressed and
while listening to a disc.
held.
Note:
While playing a CD on a CD changer, this
always skips to the next disc.
5
EN04-06_KD-G807[EE]f.p65 1/15/04, 2:08 PM5

3. Return the battery holder.
Preparing the remote controller
Insert again the battery holder by pushing it
until you hear a clicking sound.
Before using the remote controller:
• Aim the remote controller directly at the remote
sensor on the main unit. Make sure there is no
ENGLISH
obstacle in between.
(back side)
WARNING:
Remote sensor
• Store the battery in a place where children
cannot reach.
• Do not expose the remote sensor to strong
If a child accidentally swallows the battery,
light (direct sunlight or artificial lighting).
consult a doctor immediately.
• Do not recharge, short, disassemble, or heat the
Installing the battery
battery or dispose of it in a fire.
Doing any of these things may cause the battery
When the controllable range or effectiveness of
to give off heat, crack, or start a fire.
the remote controller decreases, replace the
• Do not leave the battery with other metallic
battery.
materials.
Doing this may cause the battery to give off
1. Remove the battery holder.
heat, crack, or start a fire.
1) Push out the battery holder in the direction
• When throwing away or saving the battery,
indicated by the arrow using a ball-point
wrap it in tape and insulate; otherwise, the
pen or a similar tool.
battery may start to give off heat, crack, or start
2) Remove the battery holder.
a fire.
• Do not poke the battery with tweezers or similar
tools.
Doing this may cause the battery to give off
heat, crack, or start a fire.
(back side)
CAUTION:
DO NOT leave the remote controller in a place
(such as dashboards) exposed to direct sunlight
for a long time. Otherwise, it may be damaged.
2. Place the battery.
Slide the battery into the holder with the +
side facing upwards so that the battery is
fixed in the holder.
Lithium coin
battery (product
number: CR2025)
6
EN04-06_KD-G807[EE]f.p65 1/15/04, 2:08 PM6
Оглавление
- CONTENTS
- LOCATION OF THE BUTTONS
- BASIC OPERATIONS
- RADIO OPERATIONS
- RDS OPERATIONS
- CD OPERATIONS
- MP3/WMA INTRODUCTION
- MP3/WMA OPERATIONS
- SOUND ADJUSTMENTS
- OTHER MAIN FUNCTIONS
- CD CHANGER OPERATIONS
- EXTERNAL COMPONENT OPERATIONS
- DAB TUNER OPERATIONS
- ADDITIONAL INFORMATION
- TROUBLESHOOTING
- MAINTENANCE
- SPECIFICATIONS
- СОДЕРЖАНИЕ
- РАСПОЛОЖЕНИЕ КНОПОК
- ОСНОВНЫЕ ОПЕРАЦИИ
- ОПЕРАЦИИ С РАДИОПРИЕМНИКОМ
- ОПЕРАЦИИ С RDS
- ОПЕРАЦИИ С КОМПАКТ-ДИСКАМИ
- ОБЩИЕ CВЕДЕHИЯ И ДИCKAХ MP3 И WMA
- ОПЕРАЦИИ С ДИСКАМИ MP3 И WMA
- НАСТРОЙКА ЗВУКА
- ДРУГИЕ ГЛАВНЫЕ ФУНКЦИИ
- ОПЕРАЦИИ С ВНЕШНИМ КОМПОНЕНТОМ
- ОПЕРАЦИИ С ТЮНЕРОМ DAB
- ДОПОЛНИТЕЛЬНАЯ ИНФОРМАЦИЯ
- ВЫЯВЛЕНИЕ НЕИСПРАВНОСТЕЙ
- ТЕХНИЧЕСКОЕ ОБСЛУЖИВАНИЕ
- ТЕХНИЧЕСКИЕ ХАРАКТЕРИСТИКИ
- Please reset your unit


