JVC SP-F303E: инструкция
Раздел: Бытовая, кухонная техника, электроника и оборудование
Тип: Акустика
Инструкция к Акустику JVC SP-F303E

English
– 1 –
LVT1047-001A
[E]
SP-F303
INSTRUCTIONS
BEDIENUNGSANLEITUNG
MANUEL D’INSTRUCTIONS
GEBRUIKSAANWIJZING
MANUAL DE INSTRUCCIONES
ISTRUZIONI
BRUKSANVISNING
VEJLEDNING
KÄYTTÖOHJE
INSTRUKCJA OBSŁUGI
SATELLITEN-LAUTSPRECHER-SYSTEM
SYSTEME HAUT-PARLEURS SATELLITE
SATELLIET LUIDSPREKERSYSTEEM
SYSTEMA DE ALTAVOZ DE SATÉLITE
SISTEMA DI ALTOPARLANTI SATELLITI
SATELLITHÖGTALARSYSTEM
SATELLIT HØJTTALERSYSTEM
SATELLIITTIKAIUTINJÄRJESTELMÄ
SYSTEM GŁOŚNIKÓW SATELITARNYCH
KÜLSŐ HANGFALRENDSZER
SATELITNÍ REPRODUKTOROVÁ SOUSTAVA
САТЕЛЛИТНАЯ АКУСТИЧЕСКАЯ СИСТЕМА
SATELLITE SPEAKER SYSTEM
—
Consists of SP-F303F and SP-F303C
Bestehend aus SP-F303F und SP-F303C
Se compose de SP-F303F et SP-F303C
Bestaat uit SP-F303F en SP-F303C
Consta de SP-F303F y SP-F303C
L’impianto è formato da SP-F303F e SP-F303C
Består av SP-F303F och SP-F303C
Består of SP-F303F og SP-F303C
Sisältää seuraavat osat: SP-F303F ja SP-F303C
Zestaw przyrzadów
SP-F303
F a
SP-F303
C
A készülék SP-F303F és SP-F303C egységekből áll
Sestava komponentů SP-F303F a SP-F303C
Составлен из компонентов SP-F303F и SP-F303C
HASZNÁLATI UTASÍTÁS
PŘÍRUČKA OBSLUZE
ИНСТРУЦИИ ПО ЭКСППУАТАЦИИ
#SP-F303-E-p01-6.p65
01/16/3, 7:35 pm
1
• To improve the sound field
If the speakers are facing a solid wall or glass
door, etc., it is recommended to furnish the wall
with materials that absorb sounds, for example
by hanging up thick curtains, to prevent
reflections and standing waves.
• To use the speakers without any trouble
– Do not reproduce sounds at so high a volume that they
are distorted; otherwise, the speakers may be damaged
by internal heat buildup.
– When moving the speakers, do not pull the speaker cords;
otherwise, the speakers may fall over, causing damage or
injury.
– When holding a satellite speaker, do not grasp the
speaker (upper) portion, but always grasp the leg (lower)
portion of the satellite speaker.
5
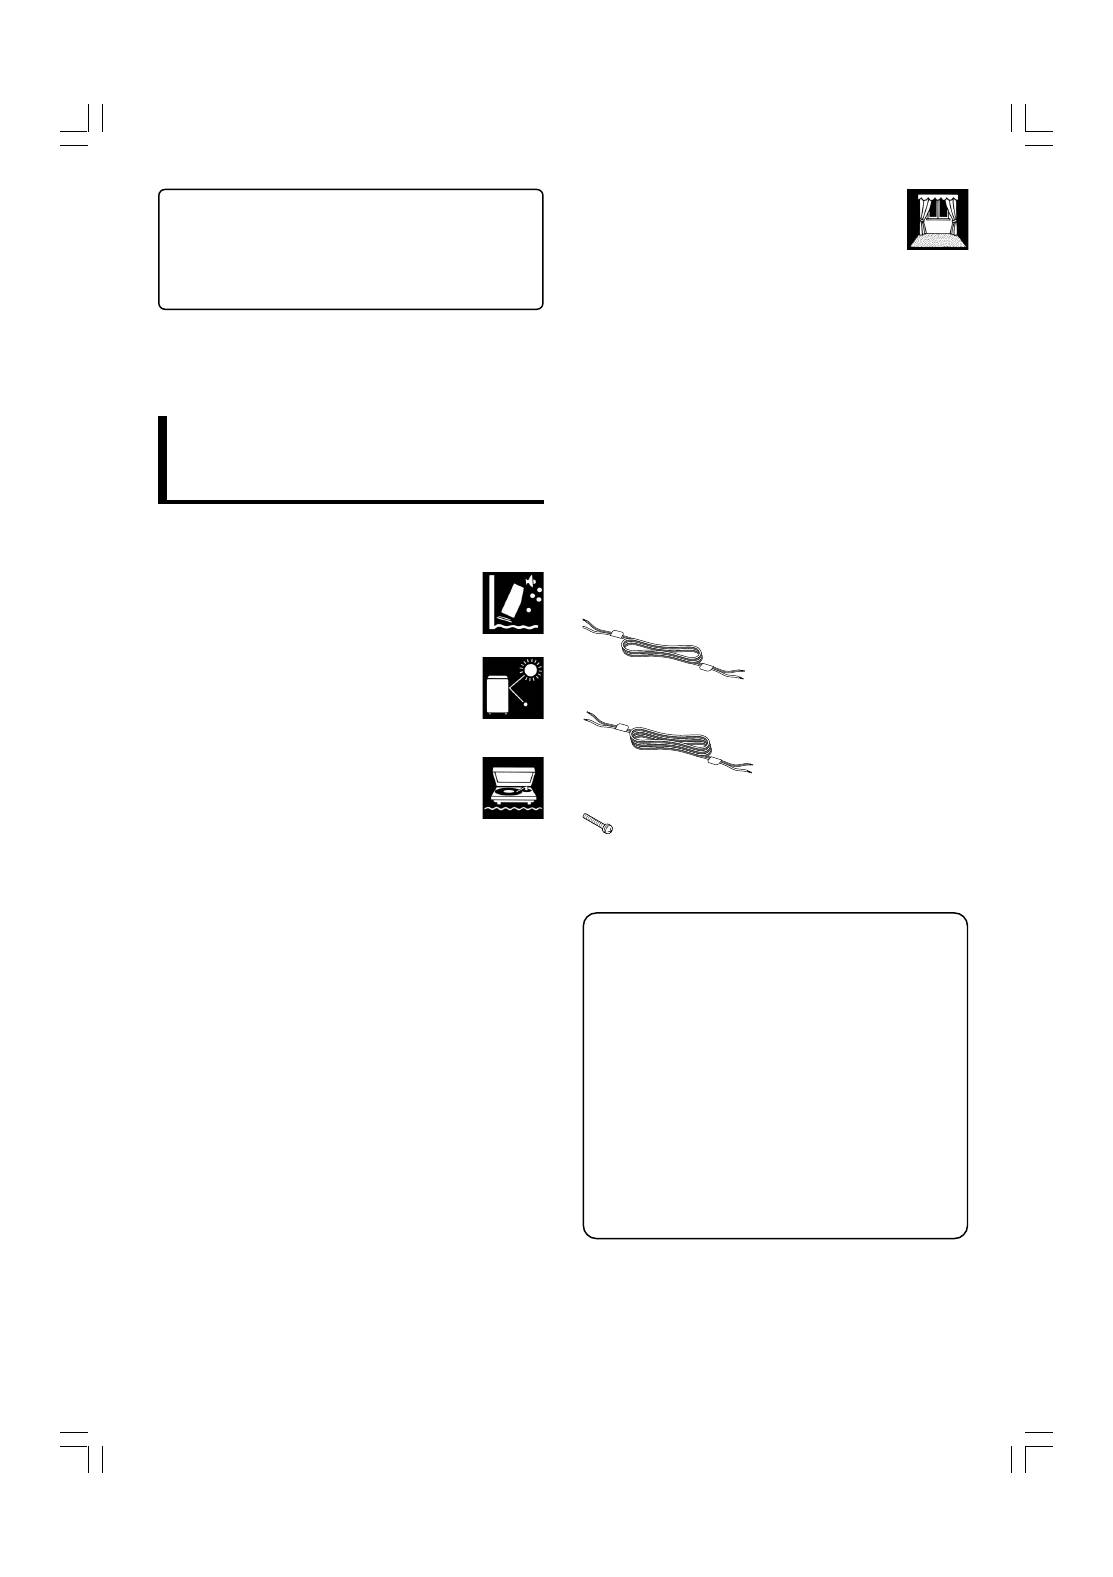
Checking the supplied Accessories
Check to be sure you have the following supplied accessories.
The number in parenthesis indicates the quantity of the piece
supplied.
• Speaker cords
• Screws (with washer)
M4 x 25 mm (16)
If any of the items above are missing, contact your dealer
immediately.
Speaker and Speaker cords—
to improve the sound quality
When connecting the speaker cords
Make sure to match the polarity (
ª
and
·
); otherwise,
the sound will lose the surround effect.
After connecting, check that the exposed cores are fully
inserted into the terminal.
When using other speaker cords
Observe the following;
• Buy thick speaker cords rather than thin cords, and make
them as short as possible for connection.
• Use speaker cords of the same length for both left and
right speakers.
• Do not use long speaker cords; otherwise, the sound
quality may deteriorate.
Contents
Page
Warnings, Cautions and Others ......................................... 1
Assembly ........................................................................... 2
Connection ......................................................................... 5
General Layout of Speakers .............................................. 6
Specifications ..................................................................... 6
Thank you for purchasing a JVC speaker system.
Before you begin using these speakers, please read the
instructions carefully to be sure you get the best possible
performance. If you have any questions, consult your JVC
dealer.
Warnings, Cautions and Others
5
Precautions for installation
• Do not install the speakers on an uneven surface or in a
place subject to vibration; otherwise, they may fall over,
causing damage or injury.
– Take the occurrence of earthquakes or other
physical shocks into consideration when
selecting the installation place, and secure
the speakers thoroughly.
• To prevent deformation or discoloration of the
cabinet, do not install the speakers where they
are exposed to direct sunlight or high humidity,
and avoid installation near air conditioning
outlets.
• Speaker vibrations may cause howling. Place
the speakers as far away from the player as
possible.
• The speakers are magnetically shielded to avoid color
distortions on TVs. However, if not installed properly, it may
cause color distortions. So, pay attention to the following
when installing the speakers.
– When placing the speakers near a TV set, turn off the
TV’s main power switch or unplug it before installing the
speakers.
Then wait at least 30 minutes before turning on the TV’s
main power switch again.
Some TVs may still be affected even though you have
followed the above. If this happens, move the speakers
further away from the TV.
• Tuner reception may become noisy or hissing if a speaker is
installed near the tuner. In this case, leave more distance
between the tuner and the speakers or use an outdoor
antenna for better tuner reception without interference from
the speakers.
5
Precautions for Daily Use
• To maintain the appearance of the speakers
Wipe with a dry, soft cloth if the cabinet or control panel
should become dirty.
If very dirty, apply a small amount of water or neutral
detergent to the cloth and wipe clean, then wipe with a dry
cloth.
Approx. 5 m (3);
For satellite speakers for front left/
right channel and center speaker
Approx. 10 m (2);
For satellite speakers for surround
left/right channel
– 1 –
#SP-F303-E-EN.p65
02/03/3, 2:58 pm
2
English
5
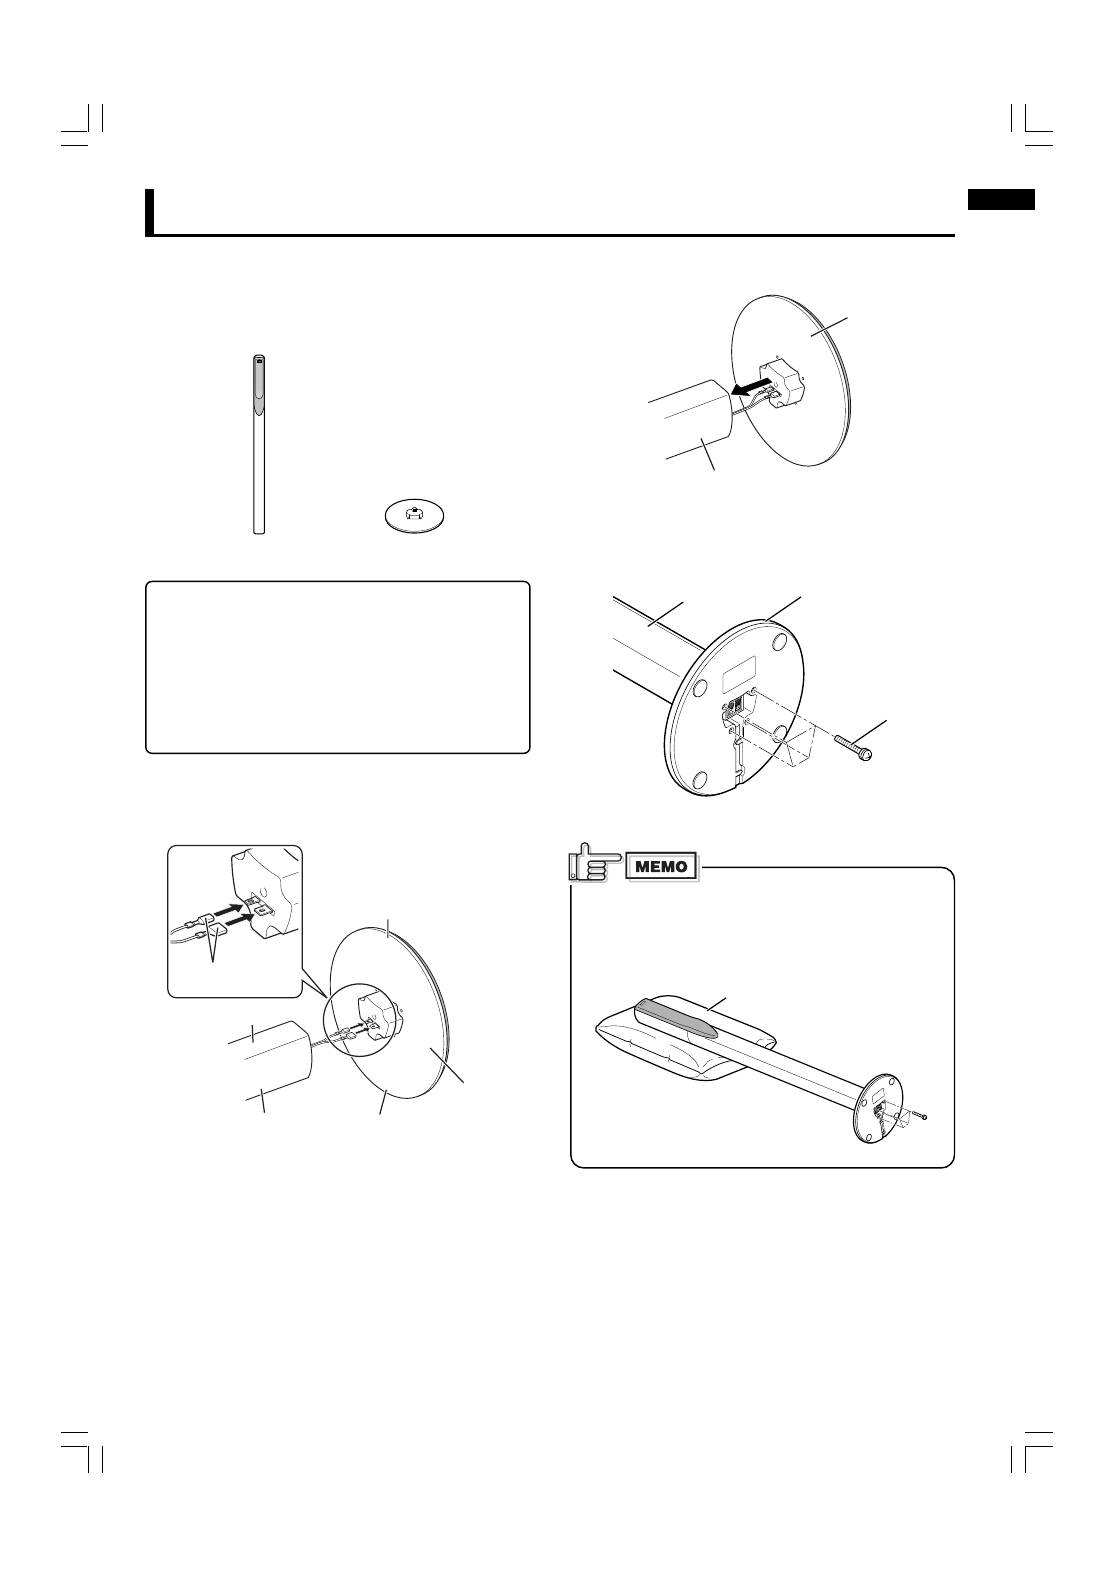
Assembling the satellite speakers
Each speaker (except the center speaker) has been divided
into two parts for shipment. Before using this speaker system,
assemble it first by following the procedure below.
• Prepare a Phillips screw driver.
Before assembling—
• Take care not to drop the stand while assembling;
otherwise, it may cause damage to the floor or injury.
• Ensure enough space for assembly and installation.
• Place a large, thick cloth on the floor where you
assemble the speaker, so you can protect the floor and
the speaker itself.
• Use the speaker only after assembly is fully and
correctly done.
1
Connect the speaker connecters to the
stand connecters.
2
Join the stand to the speaker section.
3
Fix the stand to the speaker section.
• Be sure to tighten the screws firmly.
Cushion (not supplied)
Assembly
Speaker
section
Stand
To be continued on the next page
It is recommended to place a cushion under the speaker
section.
• You can tighten the screws easily by placing the
speaker section horizontally.
Speaker section
Stand
Screw (4)
(Supplied, M4 x 25 mm)
Rear
Front
Front
Speaker connectors
Speaker section
Speaker section
Stand
Stand
– 2 –
#SP-F303-E-EN.p65
02/03/3, 2:58 pm
3
4
Connect the speaker cord to the speaker
terminal.
• Each speaker can be used as front or surround speaker.
Use the 5-meter speaker cords for front speakers and
10-meter speaker cords for surround speakers.
Twist and pull the
insulation coat to
remove.
Black
5
Route the speaker cord as shown below.
• Be sure to take out the slack so that the speaker cord lies
flat.
Repeat the procedure from step
1
to assemble the other
satellite speakers.
Press and hold the
clamp.
Insert the exposed
core of the speaker
cord fully into the
terminal.
Release your finger.
Black
White
Assembly (continued)
White
– 3 –
#SP-F303-E-EN.p65
02/03/3, 2:58 pm
4
English
5
Connecting the Center speaker
• To connect the center speaker, use the same type of
speaker cord (5 m; tagged with “CENTER”) as used for
connecting the front speakers.
Insert the speaker cord into the speaker
terminal.
Black
Press and hold
the clamp.
Insert the exposed
core of the speaker
cord fully into the
terminal.
Release your finger.
Black
White
Make sure to match the polarity (
ª
and
·
); otherwise,
the sound will lose the surround effect.
After connecting, check that the exposed cores are fully
inserted into the terminal.
White
– 4 –
#SP-F303-E-EN.p65
02/03/3, 2:58 pm
5
– 5 –
5
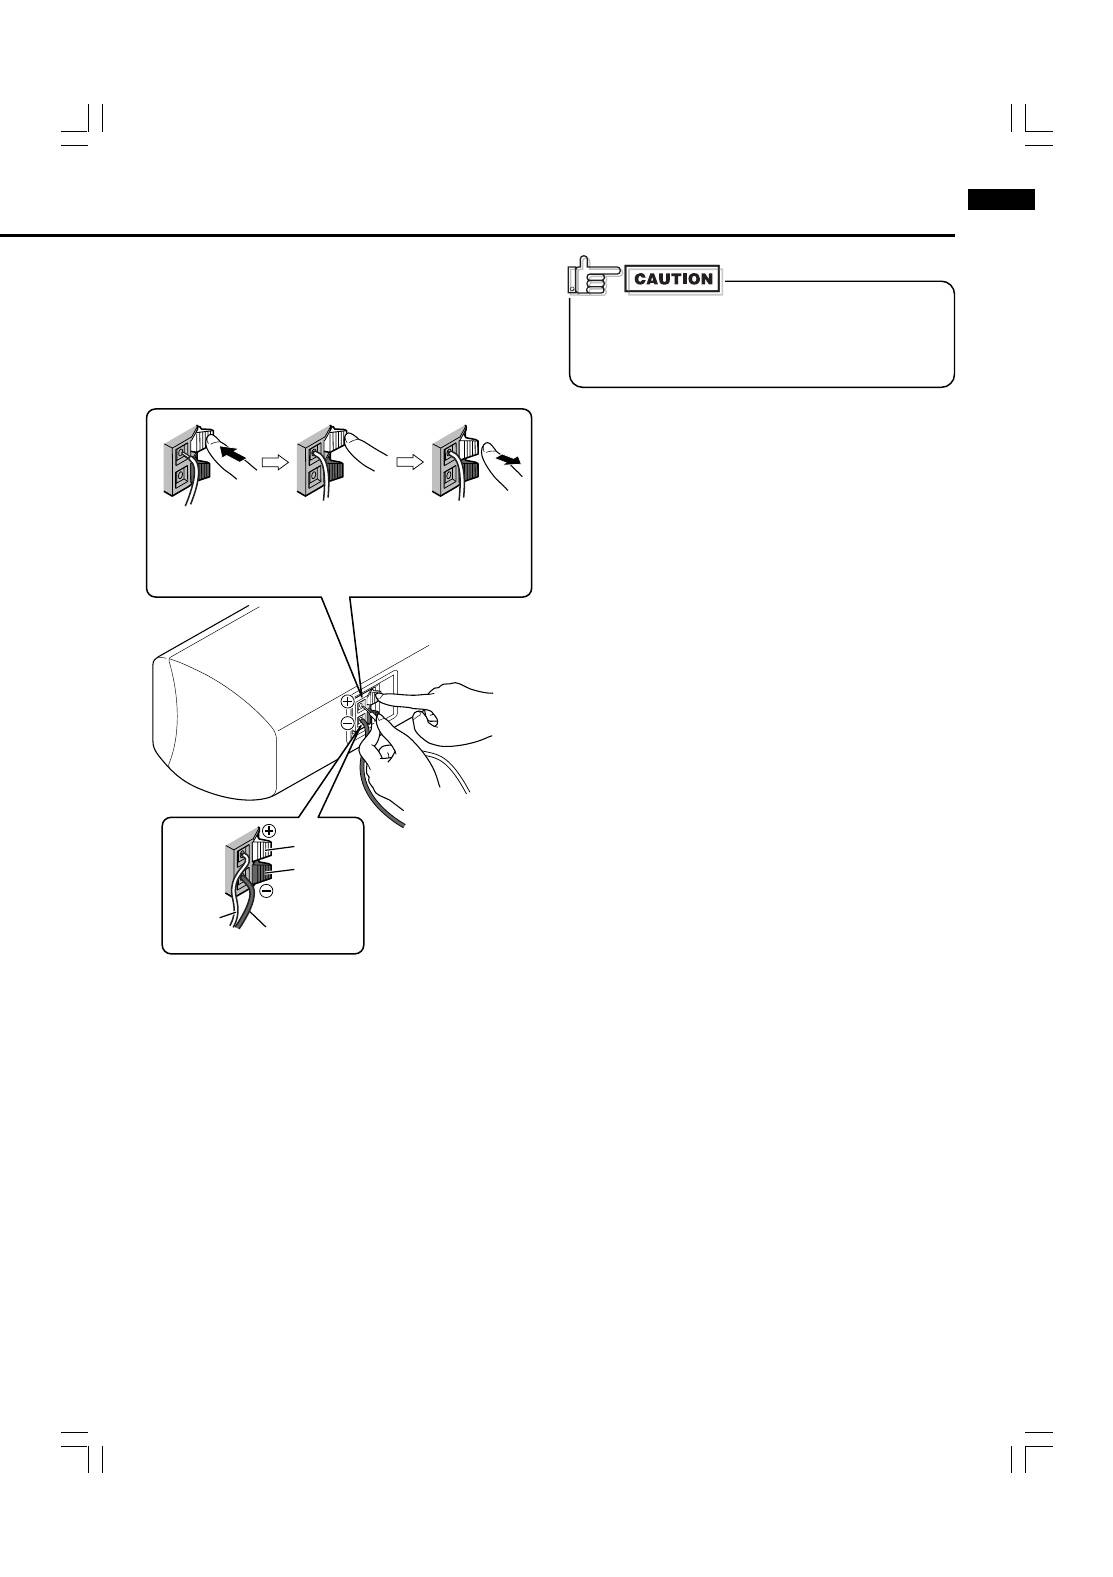
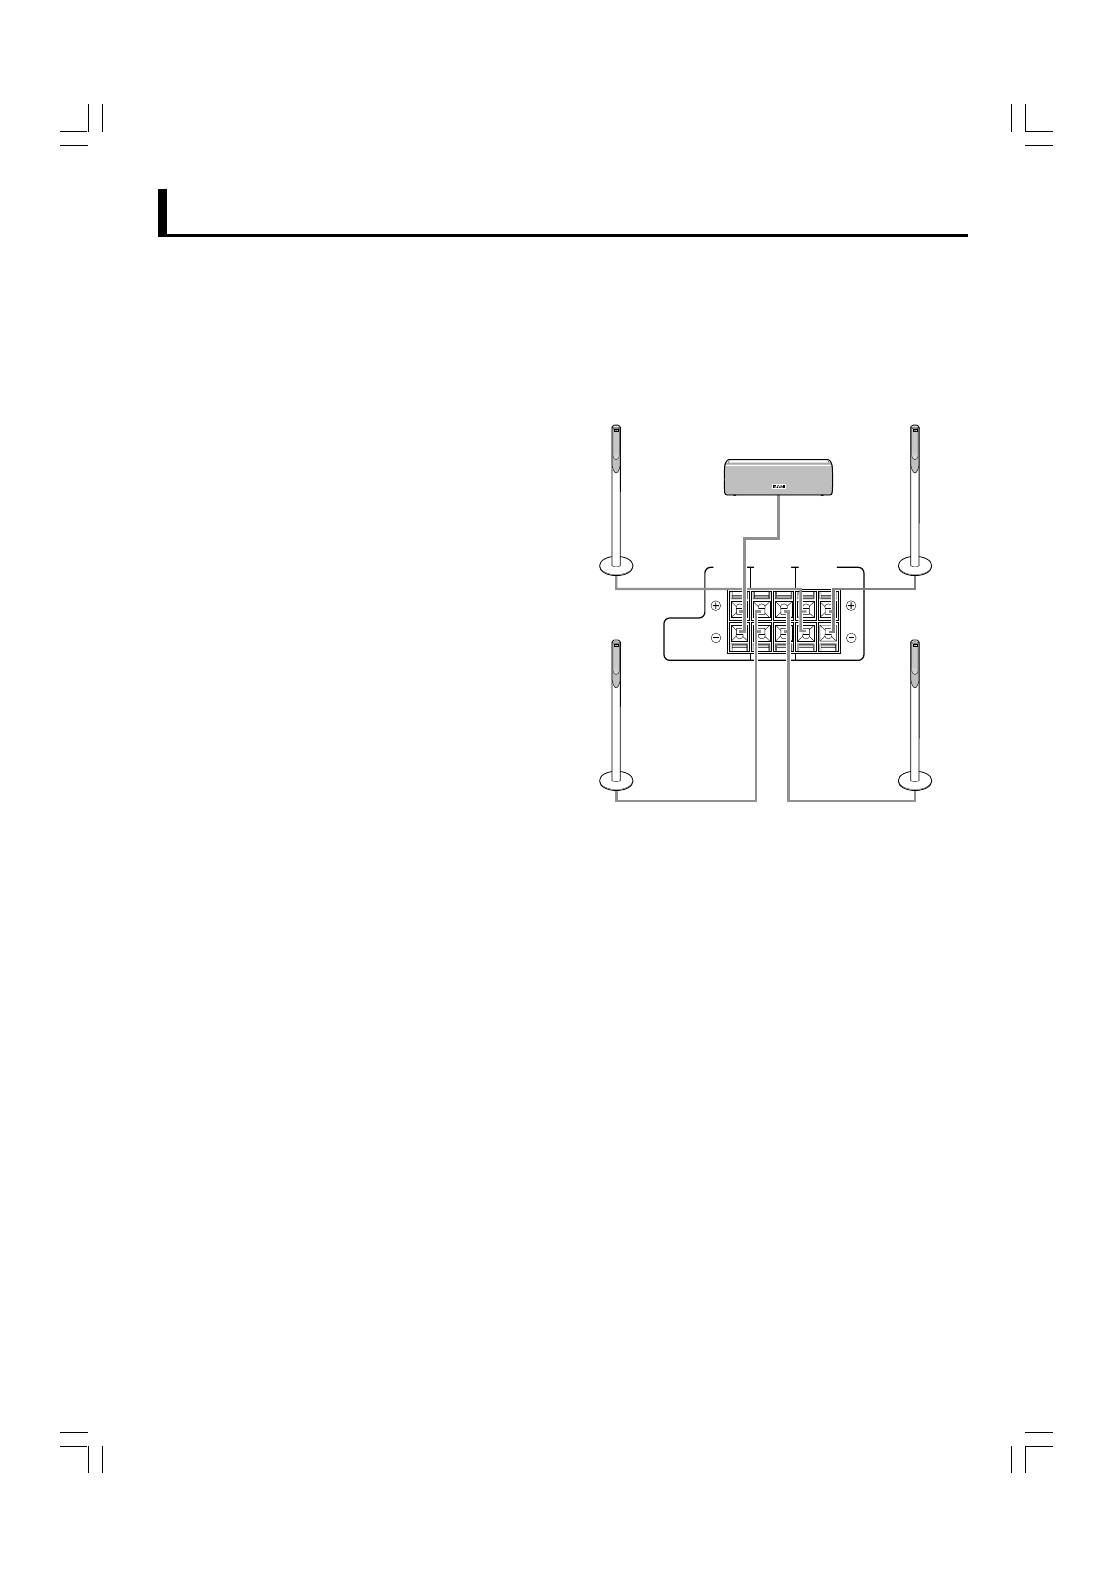
Connecting the speaker system to the amplifier
Before connecting—
• Turn off the power to the amplifier before connecting the
speaker system; otherwise, the speakers may be damaged.
• The impedance of each speaker is 8
Ω
. Before connecting
them to your amplifier, check the speaker impedance range
of your amplifier. If the impedance of this speaker is out of
the speaker impedance range indicated on the amplifier, you
cannot connect this system to the amplifier.
• The maximum power handling capacity of the SP-F303 is
100 W. Excessive input will result in abnormal noise and
possible damage.
• Be sure to turn down the volume level to prevent unwanted
noise before performing following operations:
– Turning on or off other components,
– Operating the amplifier,
– Tuning FM stations,
– Fast-forwarding a tape,
– Continuously reproducing high frequency oscillation or
high pitch electronic sounds.
• When using a microphone, do not aim it at the speakers or
use it near the speakers; otherwise, the howling which
occurs may damage the speakers.
• Before replacing the cartridge, always turn off the power to
the turntable; otherwise, the clicking noise may damage the
speakers.
CENTER
SPEAKER
SURROUND
SPEAKERS
RIGHT
LEFT
RIGHT
LEFT
FRONT
SPEAKERS
Front right
Front left
Center speaker
(Approx. 5 m)
(Approx. 5 m)
(Approx. 5 m)
Surround right
Surround left
Speaker terminals
on the amplifier
(Approx. 10 m)
(Approx. 10 m)
Connection
5
Typical connection method to an amplifier
Connect the speakers to a “SPEAKER” terminal of the amplifier
with the speaker cords by referring to the diagram below.
• Make sure to match the polarity (
ª
and
·
) when
connecting the speaker cords.
• The diagram below is an example of a typical connection
method.
#SP-F303-E-EN.p65
02/03/3, 2:58 pm
6
English
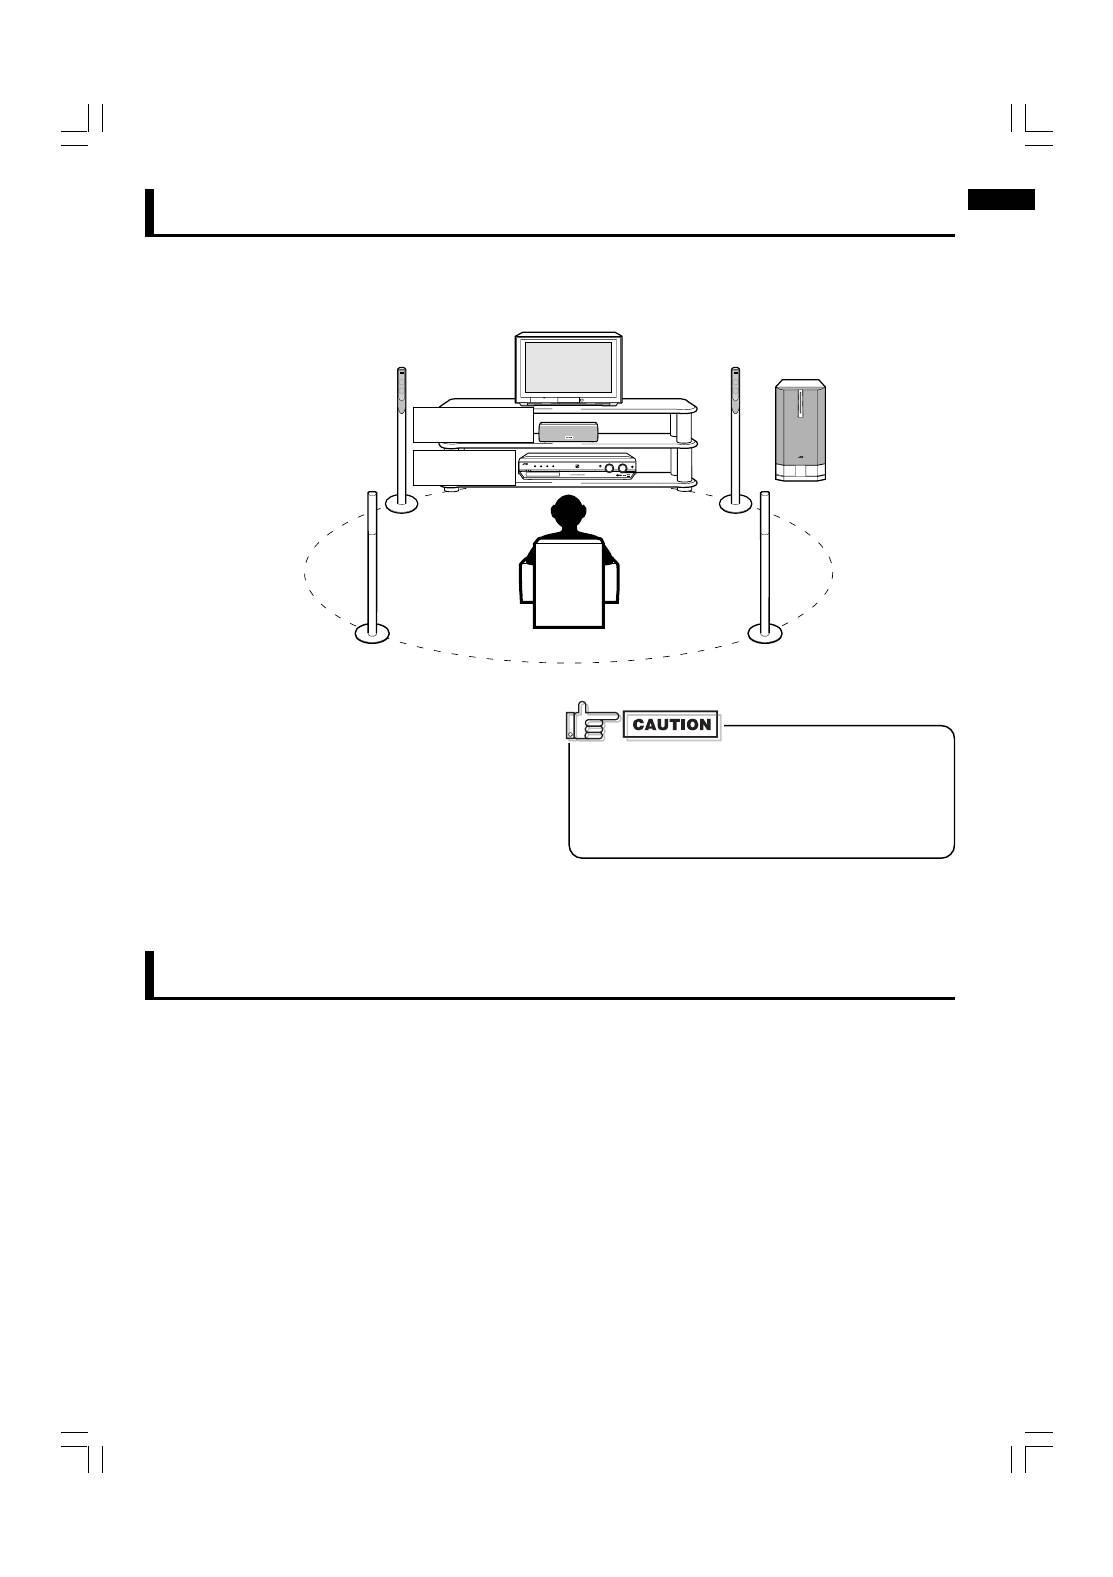
Place all speakers at the same distance from the listening position if possible.
• Usually place the center speaker close to the TV.
SP-F303F (Satellite speaker)
Type :
1-way 2-speaker
Bass reflex type
(magnetically shielded type)
Speaker unit :
5.5 cm cone
×
2
Frequency range :
80 Hz to 20 000 Hz
Input impedance :
8
Ω
Power handling capacity :
100 W
Sound pressure level :
80 dB/W
•
m
Dimensions :
250 mm (width)
×
1103 mm
(height)
×
250 mm (depth)
Mass :
3.77 k
g
each
* For a subwoofer to be used with SP-F303, it is
recommended to use SP-DW103. This combination gives
you the best possible high quality surround sounds.
• Do not lean against the speakers, as the speakers
could fall down or break, possibly causing an injury.
Especially be careful that children do not lean against
them.
• When you place the center speaker on a TV, make sure
the surface is level and stable.
General Layout of Speakers
Specifications
D I G I T A L
S U R R O U N D
D I G I T A L
P R O L O G I C
RX-ES1
HOME CINEMA CONTROL CENTER
STANDBY / ON
STANDBY
TV DIRECT
SETTING
ADJUST
SURROUND
DVD MULTI
DVD
STB
VCR
TV
FM / AM
SET / TUNER PRESET
SOURCE SELECTOR
MASTER VOLUME
PHONES
/ MULTI JOG
Center speaker
Listening position
Subwoofer*
Front right
Front left
Surround right
Surround left
– 6 –
Amplifier
SP-F303C (Center speaker)
Type :
1-way 2-speaker
Bass reflex type
(magnetically shielded type)
Speaker unit :
5.5 cm cone
×
2
Frequency range :
80 Hz to 20 000 Hz
Input impedance :
8
Ω
Power handling capacity :
100 W
Sound pressure level :
81 dB/W
•
m
Dimensions :
258 mm (width)
×
75 mm
(height)
×
81 mm (depth)
Mass :
0.95 k
g
#SP-F303-E-EN.p65
02/04/3, 4:16 pm
7
