JVC AA-V50: инструкция
Раздел: Сети, связь, телекоммуникации, интернет, безопасность
Тип:
Инструкция к JVC AA-V50
ENGLISH
AC POWER ADAPTER/CHARGER
DEUTSCH
NETZADAPTER/LADEGERÄT NÄTTILLSATS/BATTERILADDARE
ADAPTATEUR SECTEUR/CHARGEUR DE BATTERIE
AC SPENNINGSADAPTER/BATTERILADER
FRANÇAIS
LICHTNETADAPTER/ACCULADER
ADAPTADOR/CARGADOR DE CA
NEDERLANDS
CARICABATTERIE/ALIMENTATORE CA
LYSNETADAPTER/OPLADER
CASTELLANO
VERKKOLAITE/AKUN LATAAJA
ITALIANO
DANSK
AA-V50EG/EK
SUOMI
SVENSKA
NORSK
INSTRUCTIONS
BEDIENUNGSANLEITUNG
BRUKSANVISNING
MANUEL D’INSTRUCTIONS
BRUKSANVISNING
GEBRUIKSAANWIJZING
MANUAL DE INSTRUCCIONES
MANUALE DI INSTRUZIONI
INSTRUKTIOSNBOG
KÄYTTÖOHJEET
LYT0389-001A

Thank you for purchasing the JVC AC Power Adapter/Charger. This unit provides DC power for the JVC
Digital Video Camera from a household AC outlet. It can be used to recharge the JVC battery pack for
exclusive use with the JVC Digital Video Camera, and is capable of charging two battery packs
consecutively. To avoid problems and obtain the best results, please read this instruction booklet carefully
before use. Before using as a power adapter, make sure that this unit's model number is the same as that of
the power supply unit specified in the instruction manual of the equipment you wish to power.
WARNING—
CAUTION:
When you are not using this unit for a long
DANGEROUS
period of time, it is recommended that you
VOLTAGE INSIDE
disconnect the power cord from AC outlet.
WARNING:
CAUTION:
TO PREVENT FIRE OR SHOCK HAZARD,
To prevent electric shock, do not open the
DO NOT EXPOSE THIS UNIT TO RAIN
cabinet. No user serviceable parts inside. Refer
OR MOISTURE.
servicing to qualified service personnel.
This unit should be used with AC 110 – 240 V
``
``
`,
50/60 Hz only.
NOTE:
CAUTION:
The rating plate (Serial number plate) is on the
To prevent electric shocks and fire hazards, do
bottom of the unit.
NOT use any other power source.
EN-2
This AC Power Adapter/Charge is for use
IMPORTANT
exclusively with JVC Digital Camcorders.
Connection to the mains supply in the United
Kingdom.
DO NOT cut off the mains plug from this equipment.
CAUTIONS:
If the plug fitted is not suitable for the power points in
•If used near a radio, this unit may interfere
your home or the cable is too short to reach a power
point, then obtain an appropriate safety approved
with reception.
extension lead or consult your dealer.
•Prevent inflammables, water and metallic
BE SURE to replace the fuse only with an identical
objects from entering the unit.
approved type, as originally fitted, and to replace the
•Do not disassemble or modify the unit.
fuse cover.
•Do not apply shocks to the unit.
If nonetheless the mains plug is cut off ensure to
remove the fuse and dispose of the plug immediately,
•Do not subject the unit to direct sunlight.
to avoid a possible shock hazard by inadvertent
•Avoid using the unit in extremely hot or humid
connection to the mains supply.
places.
If this product is not supplied fitted with a mains plug
•Avoid using the unit in places subject to
then follow the instructions given below:
vibrations.
DO NOT make any connection to the Larger Terminal
coded E or Green. The wires in the mains lead are
coloured in accordance with the following code:
Blue to N (Neutral) or Black
A WORD ON THE EXCLUSIVE BATTERY PACKS
Brown to L (Live) or Red
The battery packs are lithium-ion.
If these colours do not correspond with the terminal
Give attention to the following to make the most
identifications of your plug, connect as follows:
of their characteristics.
Blue wire to terminal coded N (Neutral) or coloured
black.
For charging: 10°C to 35°C
Brown wire to terminal coded L (Live) or coloured
For operating: 0°C to 40°C
Red.
For storing: –10°C to 30°C
If in doubt — consult a competent electrician.
EN-3
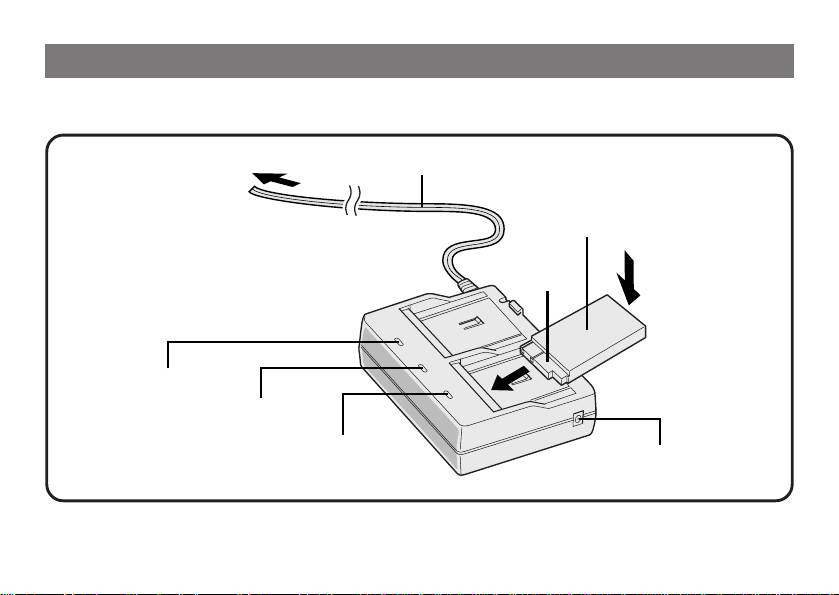
CHARGING THE BATTERY PACK
You can charge one battery pack at a time, or two consecutively.
Power cord
To AC outlet
Battery pack
BN-V507U or
BN-V514U
AC Power
Adapter/Charger
1
Charger
indicator 1
Power lamp
Charger
indicator 2
DC OUT terminal
EN-4

SUPPLY POWER TO CHARGER
DETACH BATTERY/BATTERIES
1
4
Make sure you unplug the camcorder’s
Slide the battery or batteries in the
DC cord from the AC Power Adapter/
opposite direction of the arrow and lift
Charger.
off. Remember to unplug the AC Adapter/
Plug the AC Adapter/Charger’s power
Charger’s power cord from an AC outlet.
cord into an AC outlet. The power lamp
comes on.
NOTE:
Perform charging where the temperature is
ATTACH BATTERY/BATTERIES
between 10° and 35°C. (20°–25°C is the ideal
2
Attach the battery pack while making sure
temperature range for charging.) If the
its terminal side
1 is in contact with the
environment is too cold, charging may be
incomplete.
indicator side of the battery pack mount
on the AC Power Adapter/Charger.
• The Charger Indicator (1 or 2) begins
BATTERY PACK CHARGING TIME
blinking to indicate charging has started.
Battery pack ONE TWO
CONFIRM STATUS
approx. 1 hr.
3
BN-V507U
approx. 3 hrs.*
When the charger indicator stops blinking
30 min.*
but stays lit, charging is finished.
BN-V514U approx. 3 hrs.* approx. 6 hrs.*
• If two batteries are attached to the
charger, they will be charged in the
* When charged at temperatures between 20°
order that they were attached.
and 25°C.
•When charging Battery Packs after a long
storage period, charging time will be longer
than the time indicated above.
EN-5
