JVC CU-VD20ER: инструкция
Раздел: Бытовая, кухонная техника, электроника и оборудование
Тип: DVD-проигрыватель
Инструкция к DVD-проигрывателю JVC CU-VD20ER
ENGLISH
DEUTSCH
FRANÇAIS
NEDERLANDS
CASTELLANO
ESPAÑOL
ITALIANO
DANSK
SUOMI
SVENSKA
NORSK
CU-VD20
E/EK/ER/AA/AC/AG/AS/TW
CU-VD20
E/EK/ER/AA/AC/AG/AS/TW
CU-VD20 E/EK/ER/AA/AC/AG/AS/TW
LYT1772-001A
LYT1772-001A
POLSKI
MAGYAR
PORTUGUÊS
DVD Burner
INSTRUCTIONS
DVD-Brenner
BEDIENUNGSANLEITUNG
Graveur de DVD
DVD-brander
GEBRUIKSAANWIJZING
Grabador de DVD
MANUAL DE INSTRUCCIONES
Masterizzatore di DVD
ISTRUZIONI
DVD-brænder
INSTRUKTIONSBOG
DVD-tallennin
KÄYTTÖOHJE
DVD-brännare
BRUKSANVISNING
DVD-brenner
BRUKSANVISNING
Gravador de DVD
DVD
DVD
DVD
Gravador de DVD
DVD
DVD
DVD
ENGLISH
DEUTSCH
FRANÇAIS
NEDERLANDS
CASTELLANO
ESPAÑOL
ITALIANO
DANSK
SUOMI
SVENSKA
NORSK
POLSKI
MAGYAR
PORTUGUÊS
CU-VD20.book Page 9 Thursday, March 1, 2007 5:55 PM
MANUEL D’UTILISATION
DVD Burner
INSTRUCTIONS
DVD-Brenner
BEDIENUNGSANLEITUNG
Graveur de DVD
DVD-brander
GEBRUIKSAANWIJZING
Grabador de DVD
MANUAL DE INSTRUCCIONES
Masterizzatore di DVD
ISTRUZIONI
DVD-brænder
INSTRUKTIONSBOG
DVD-tallennin
KÄYTTÖOHJE
DVD-brännare
BRUKSANVISNING
DVD-brenner
BRUKSANVISNING
MANUEL D’UTILISATION
2 EN
This burner enables DVDs of videos recorded with the JVC
Hard Disk Camera to be created without using a PC.
●
If you want to edit videos recorded with the camera and create
your original DVDs, use the software provided with the camera for
editing and creating DVDs.
●
The provided data writing software Power2Go 5.5 Lite can be
used for writing data. However, it cannot be used to edit videos or
create DVDs.
●
The burner does not include support for Macintosh.
SOME DO’S AND DON’TS ON THE SAFE
USE OF EQUIPMENT
This equipment has been designed and manufactured to meet
international safety standards but, like any electrical equipment,
care must be taken if you are to obtain the best results and safety
is to be assured.
DO read the operating instructions before you attempt to use the
equipment.
DO ensure that all electrical connections (including the mains plug,
extension leads and interconnections between pieces of
equipment) are properly made and in accordance with the
manufacturer’s instructions. Switch off and withdraw the mains plug
when making or changing connections.
DO consult your dealer if you are ever in doubt about the
installation, operation or safety of your equipment.
DO be careful with glass panels or doors on equipment.
DON’T continue to operate the equipment if you are in any doubt
about it working normally, or if it is damaged in any way
^
switch
off, withdraw the mains plug and consult your dealer.
DON’T remove any fixed cover as this may expose dangerous
voltages.
DON’T leave equipment switched on when it is unattended unless
it is specifically stated that it is designed for unattended operation
or has a standby mode. Switch off using the switch on the
equipment and make sure that your family knows how to do this.
Special arrangements may need to be made for infirm or
handicapped people.
DON’T use equipment such as personal stereos or radios so that
you are distracted from the requirements of road safety. It is illegal
to watch television whilst driving.
DON’T listen to headphones at high volume, as such use can
permanently damage your hearing.
DON’T obstruct the ventilation of the equipment, for example with
curtains or soft furnishings. Overheating will cause damage and
shorten the life of the equipment.
DON’T use makeshift stands and NEVER fix legs with wood
screws
^
to ensure complete safety always fit the manufacturer’s
approved stand or legs with the fixings provided according to the
instructions.
DON’T allow electrical equipment to be exposed to rain or
moisture.
Dear Customer,
Thank you for purchasing this burner. Before use, please read
the safety information and precautions contained in pages 2 and
3 to ensure safe use of this product.
Safety Precautions
IMPORTANT:
In the event that any of the following occur, remove the plug and make
a request for repair to the dealer.
●
Smoke or abnormal odor is emitted
●
Damage from being dropped
●
Water or an object enters inside
CAUTION:
A UNIT IS A CLASS 1 LASER PRODUCT. HOWEVER THIS UNIT
USES A VISIBLE LASER BEAM WHICH COULD CAUSE
HAZARDOUS RADIATION EXPOSURE IF DIRECTED. BE SURE TO
OPERATE THE UNIT CORRECTLY AS INSTRUCTED.
WHEN THIS UNIT IS PLUGGED INTO THE WALL OUTLET, DO NOT
PLACE YOUR EYES CLOSE TO THE OPENING OF THE DISC TRAY
AND OTHER OPENINGS TO LOOK INTO THE INSIDE OF THIS
UNIT.
USE OF CONTROLS OR ADJUSTMENTS OR PERFORMANCE OF
PROCEDURES OTHER THAN THOSE SPECIFIED HEREIN MAY
RESULT IN HAZARDOUS RADIATION EXPOSURE.
DO NOT OPEN COVERS AND DO NOT REPAIR YOURSELF. REFER
SERVICING TO QUALIFIED PERSONNEL.
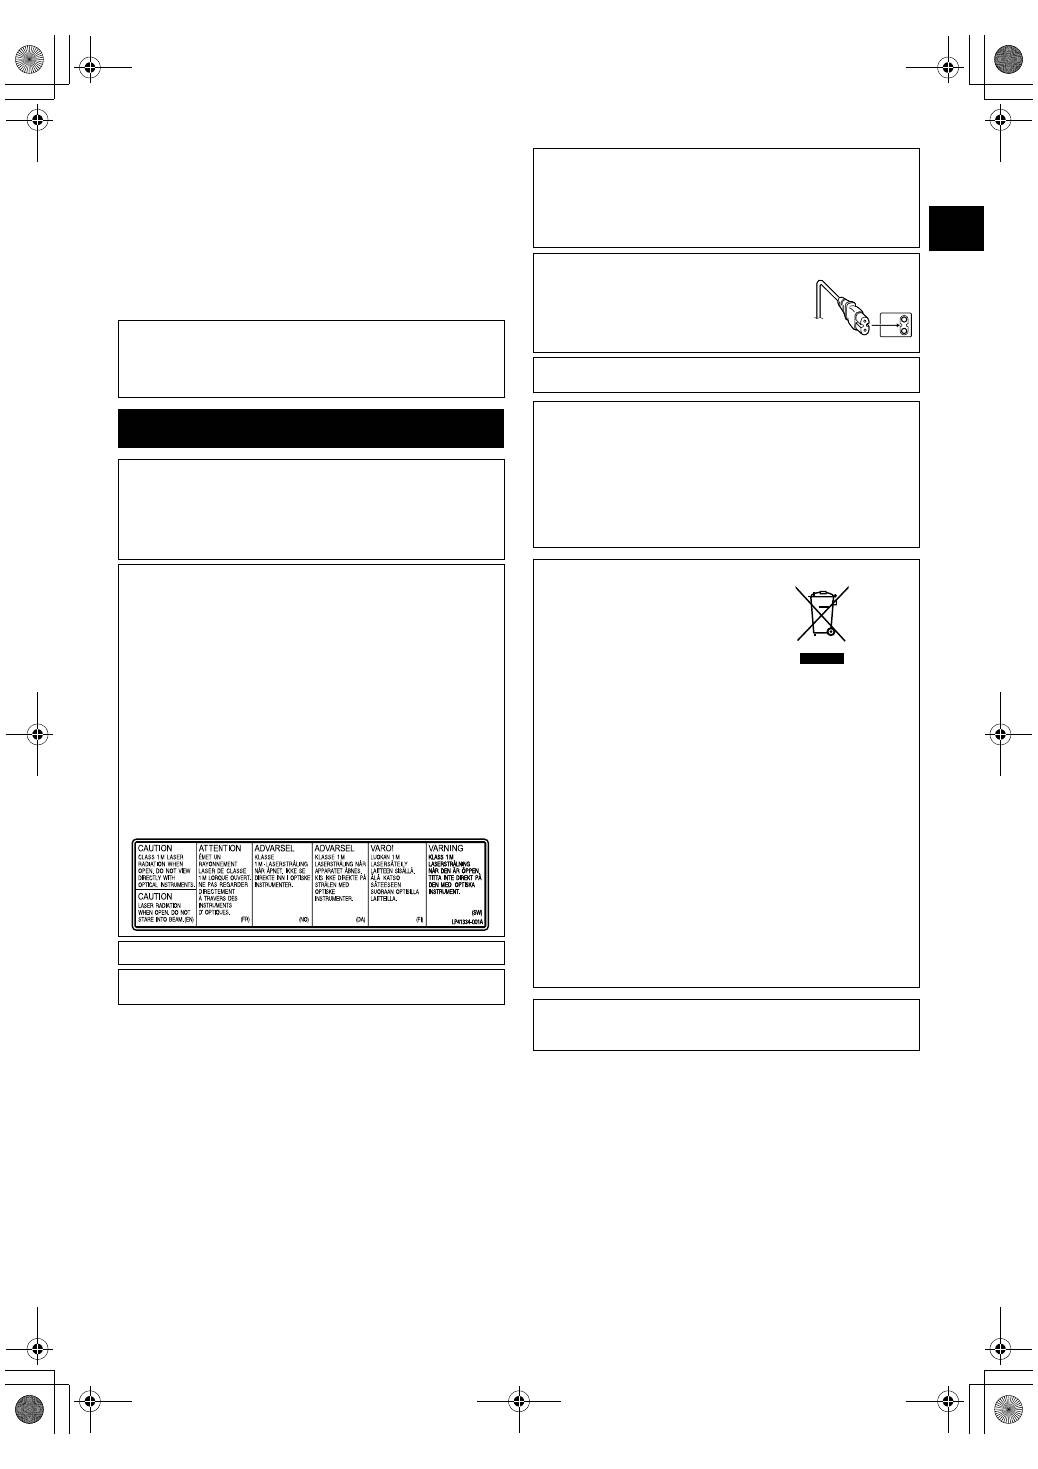
CLASS 1 LASER PRODUCT
REPRODUCTION OF LABELS
WARNING LABEL INSIDE OF THE UNIT
This unit applies to the standard “IEC60825-1:2001” for laser
products.
The socket-outlet shall be installed near the equipment and shall be
easily accessible.
ATTENTION:
This unit contains microcomputers. External electronic noise or
interference could cause malfunctioning. In such cases, switch the unit
off and unplug the mains power cord. Then plug it in again and turn the
unit on. Take out the disc. After checking the disc, operate the unit as
usual.
CAUTION:
To avoid electric shock or damage to the unit,
first firmly insert the small end of the power cord
into the AC Adapter until it is no longer wobbly,
and then plug the larger end of the power cord
into an AC outlet.
If malfunctioning occurs, stop using the unit immediately and consult
your local JVC dealer.
●
FOR USE WITH MODEL NO. AP-V400U (AC ADAPTER).
●
043-124000-I2 (AC Adapter) is also available for customer using
CU-VD20AC/AG/AS.
●
POUR UTILISER AVEC MODELE AP-V400U (ADAPTATEUR CA).
●
Le 043-124000-I2 (adaptateur CA) est aussi disponible pour les
modèles CU-VD20AC/AG/AS.
Dear Customer,
This apparatus is in conformance with the valid European directives
and standards regarding electromagnetic compatibility and electrical
safety.
European representative of Victor Company of Japan, Limited is:
JVC Technology Centre Europe GmbH
Postfach 10 05 52
61145 Friedberg
Germany
Information for Users on Disposal of Old Equipment
[European Union]
This symbol indicates that the electrical and
electronic equipment should not be disposed
as general household waste at its end-of-life.
Instead, the product should be handed over
to the applicable collection point for the
recycling of electrical and electronic
equipment for proper treatment, recovery and
recycling in accordance with your national
legislation.
By disposing of this product correctly, you will
help to conserve natural resources and will
help prevent potential negative effects on the environment and human
health which could otherwise be caused by inappropriate waste
handling of this product. For more information about collection point
and recycling of this product, please contact your local municipal
office, your household waste disposal service or the shop where you
purchased the product.
Penalties may be applicable for incorrect disposal of this waste, in
accordance with national legislation.
(Business users)
If you wish to dispose of this product, please visit our web page
www.jvc-europe.com to obtain information about the take-back of the
product.
[Other Countries outside the European Union]
If you wish to dispose of this product, please do so in accordance with
applicable national legislation or other rules in your country for the
treatment of old electrical and electronic equipment.
Attention:
This symbol is only
valid in the European
Union.
CU-VD20.book Page 2 Thursday, March 1, 2007 5:55 PM
EN
3
ABOVE ALL
●
NEVER let anyone especially children push anything into holes,
slots or any other opening in the case
^
this could result in a
fatal electrical shock;
●
NEVER guess or take chances with electrical equipment of any
kind
^
it is better to be safe than sorry!
Safety Precautions for the Burner
Be sure to observe the following precautions. Failing to do so may
result in electric shock, fire, injury, or malfunction.
●
Do not disassemble, dismantle, or modify the equipment.
Requests for repair and inspection should be made to the dealer.
●
Do not insert metal or combustible objects or pour water or other
liquids inside the burner.
●
Turn off the power when connecting equipment.
●
Remove the plug when the burner will not be used for a
prolonged time or prior to cleaning (electricity flows through the
equipment even when the power is off).
●
Do not block the ventilation holes of the burner.
●
Do not use where there is condensation. Suddenly carrying the
burner from a cold location to a hot location may result in the
formation of drops, which may cause a malfunction or failure.
●
Do not cause the burner to vibrate when discs are in.
Safety Precautions for Accessories
●
When using the AC adapter, the power cord, and the USB cable,
be sure to observe the following precautions. Failing to do so may
result in electric shock, fire, injury, or malfunction.
• Do not insert or remove the plug when your hands are wet.
• Fully insert the plug into the outlet.
• Keep dust and metal objects away from the plug.
• Do not damage the cord.
• Place the cord where it will not trip someone up.
• Do not use when thunder can be heard.
• Do not dismantle.
• Do not use for any product other than this one.
●
Do not play the provided CD-ROM with an audio player. Doing so
may damage the circuits or speakers.
Safety Precautions for Discs
Do not use the following discs.
●
Cracked discs
●
Deeply scratched discs
Installation
Do not install in any of the following locations.
●
Humid location
●
Location of 60 °C or above
●
Location subject to direct sunlight
●
Location where overheating is likely
●
Dusty or smoky locations
●
Locations subject to oily smoke or steam such as a kitchen
counter or beside a humidifier
●
Unstable location
●
Bathroom
●
Dusty places
●
Slanted location
Cleaning Procedure
IMPORTANT:
●
Be sure to unplug the burner before beginning cleaning.
●
Do not use liquid or aerosol cleaners.
●
Ensure that no moisture or liquid comes into contact with the
drive during cleaning.
Exterior of the Burner:
Wipe dirt off with a dry cloth.
Disc Tray:
Wipe off dirt with a soft dry cloth.
Disc:
Gently wipe from the inner edge to
the outer edge with a soft cloth.
Storage:
Make sure that discs are kept in their cases. If discs are piled on
top of one another without their protective cases, they can be
damaged. Do not put discs in a location where they may be
exposed to direct sunlight, or in a place where the humidity or
temperature is high. Avoid leaving discs in your car!
Region Codes
Region codes are numbers for restricting DVD video playback. The
world is separated into six regions and each region is identified by
a number. If the number for a disc does not match the number for
the player, the disc cannot be played on the player. (The initial
region code is indicated on the label on the bottom of the burner.)
Disclaimer
JVC accepts no liability whatsoever for loss of data resulting from
inappropriate connections or handling.
IMPORTANT (for owners in the U.K.)
Connection to the mains supply in the United Kingdom.
DO NOT cut off the mains plug from this equipment.
If the plug fitted is not suitable for the power points in your home or the
cable is too short to reach a power point, then obtain an appropriate
safety approved extension lead or consult your dealer.
In the unlikely event of the plug fuse failing be sure to replace the
fuse only with an identical approved type, as originally fitted, and
to replace the fuse cover. If the fuse fails again consult your
nearest JVC dealer.
If nonetheless the mains plug is cut off be sure to remove the fuse and
dispose of the plug immediately, to avoid possible shock hazard by
inadvertent connection to the mains supply.
If this product is not supplied fitted with a mains plug then follow the
instructions given below:
DO NOT make any connection to the Larger Terminal coded E or
Green.
The wires in the mains lead are coloured in accordance with the
following code:
If these colours do not correspond with the terminal identifications of
your plug, connect as follows:
Blue wire to terminal coded N (Neutral) or coloured black.
Brown wire to terminal coded L (Live) or coloured Red.
If in doubt — consult a competent electrician.
The
C
/
B
button does not completely shut off mains power from the unit,
but switches operating current on and off.
A
B
B
shows electrical power
standby and
A
C
B
shows ON.
Blue to N (Neutral) or Black
Brown to L (Live) or Red
ATTENTION:
On placing the unit:
Some TVs or other appliances generate strong magnetic fields. Do not
place such appliances on top of the unit as it may cause picture
disturbance.
When moving the product:
Press
C
/
B
to turn off the power, and wait at least 30 seconds before
unplugging the power cord. Then, wait at least 2 minutes before
moving the product.
Changing the region codes
You can change the region code to play a DVD that has a different
code. (The code cannot be changed for some playback software.)
When you insert the disc, the Caution screen appears. Follow the
on-screen instructions to change the code.
The region code for the burner can be changed
4 times
only. The
code set the fourth time becomes the final code, so be sure to set
a frequently used code. Take sufficient care when changing the
code.
CU-VD20.book Page 3 Thursday, March 1, 2007 5:55 PM
4 EN
CAUTION:
Do not use AC adapter, power cord and USB cable other than those provided with this burner. Doing so may result in electric shock or fire.
NOTE:
*
043-124000-I2 (AC Adapter) is also available for customer using CU-VD20AC/AG/AS.
This burner can be used either in the horizontal or vertical orientation. When using in the vertical orientation, align the vent of the burner and
the provided stand then place and fix the burner securely on the stand.
When handling a disc, be sure not to touch the playback/recording side of the disc.
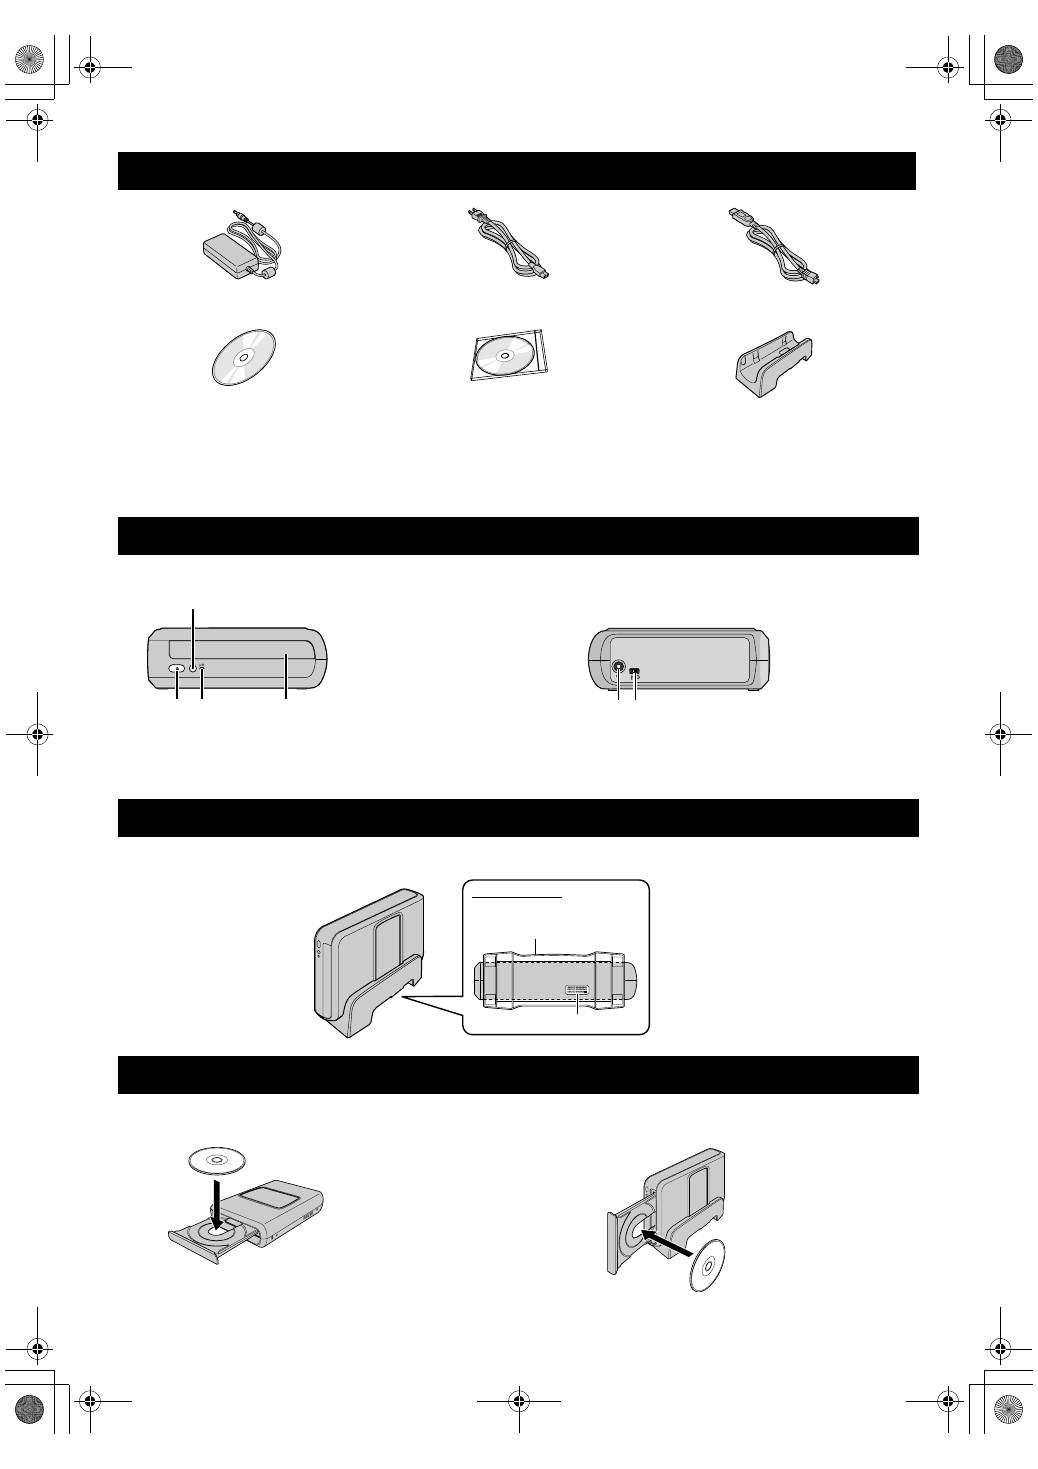
Accessories
AC Adapter (AP-V400U
*
)
Power Cord
USB Cable
(For connection with the camera.)
CD-ROM
Blank Disc (DVD-R)
Stand
Guide to Parts and Controls
Placing the Burner
Inserting A Disc
A
Power Button
(
C
/
B
)
B
Eject Button
C
Power Lamp
D
Disc Tray
D
B C
A
E F
Front
Rear
E
DC Connector
F
USB Connector
Vent
Stand (provided)
Bottom Surface
8
Horizontal orientation
8
Vertical orientation
CU-VD20.book Page 4 Thursday, March 1, 2007 5:55 PM
EN
5
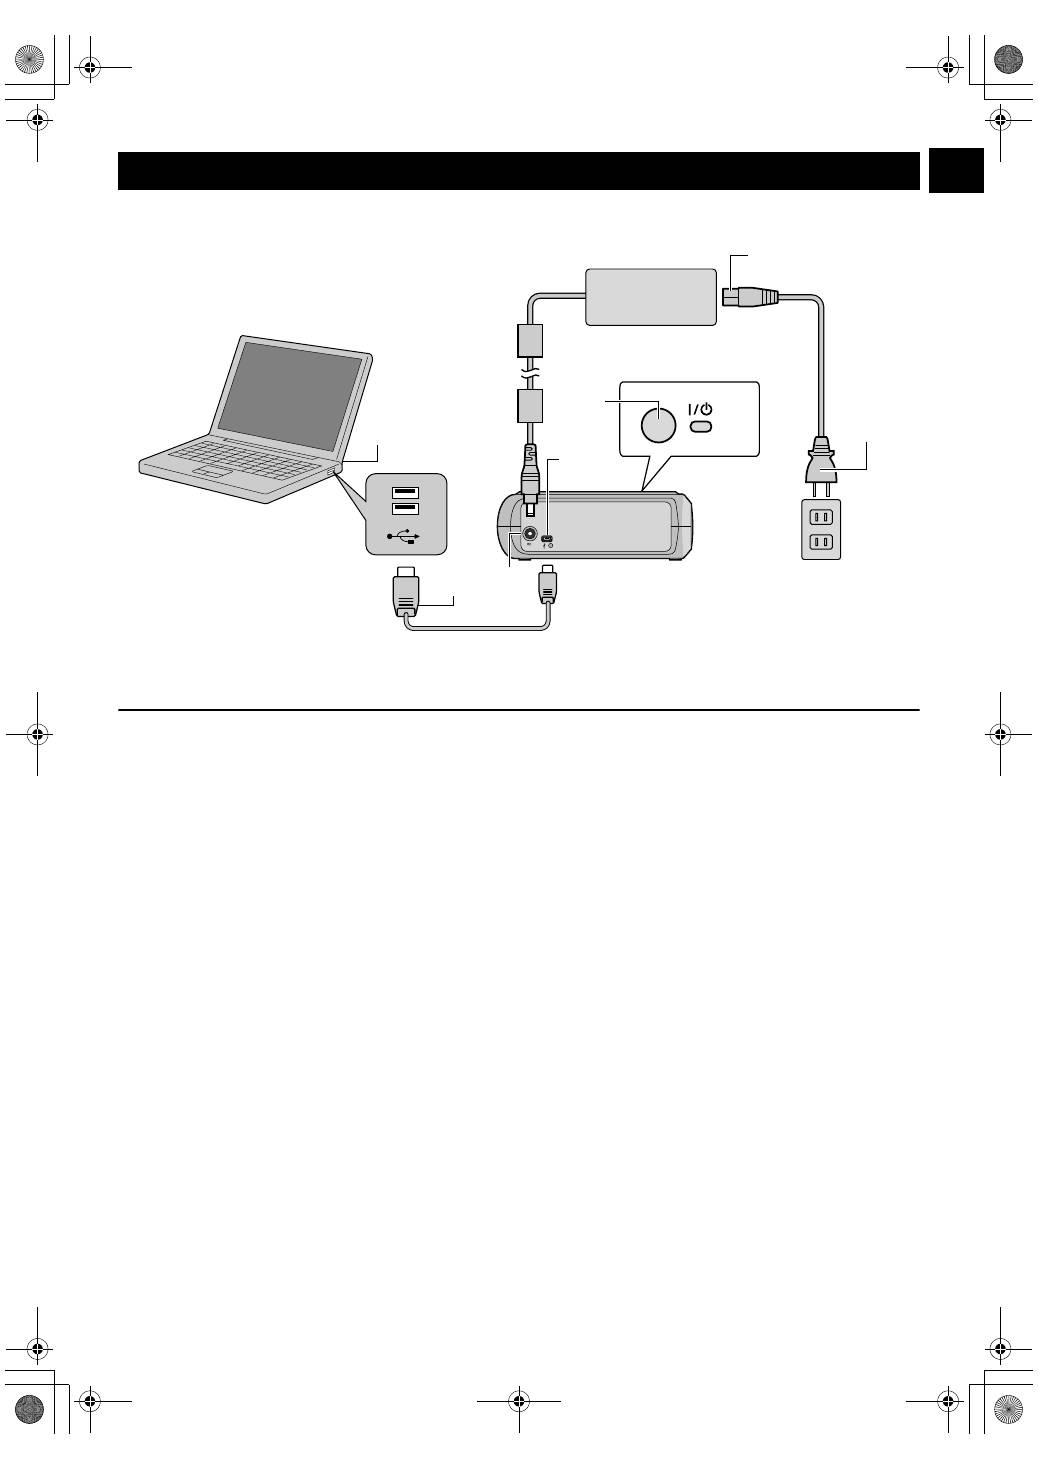
Connecting to PC
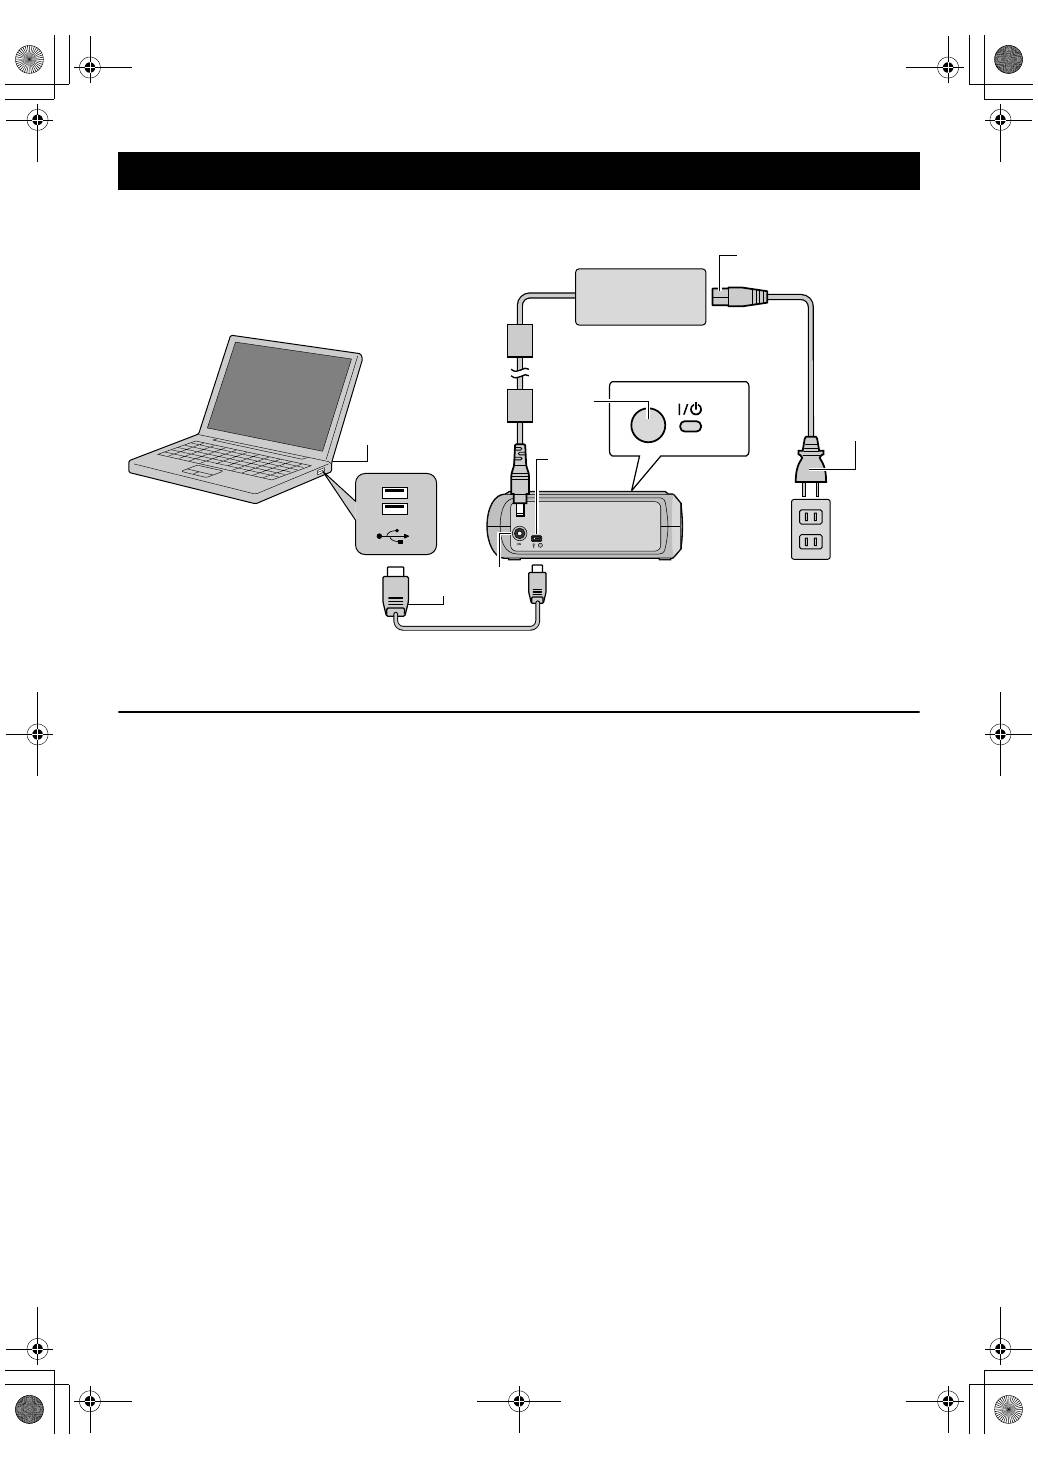
A
Connect the AC adapter to the burner.
B
Connect the power cord to the AC adapter.
C
Connect the power cord to an AC outlet.
D
Press the power button
(
C
/
B
)
on the front to turn on the burner.
The power lamp lights in green.
E
Turn on the PC.
F
Connect the burner to the PC with the USB cable.
NOTE:
To connect the burner to a PC, use the USB cable provided with the camera.
Connections
A B C F E D F
USB Cable (provided for the camera)
AC Adapter
(provided for the burner)
Power Cord
(Provided)
To AC Outlet
To USB Connector
Rear of burner
PC
CU-VD20.book Page 5 Thursday, March 1, 2007 5:55 PM
6 EN
Power2Go 5.5 Lite is software for writing video, image, audio, and
other data files to data DVDs.
System Requirements
The following shows the system requirements for installation.
* If you use USB1.1 cable, it will take approximately 3 hours to write.
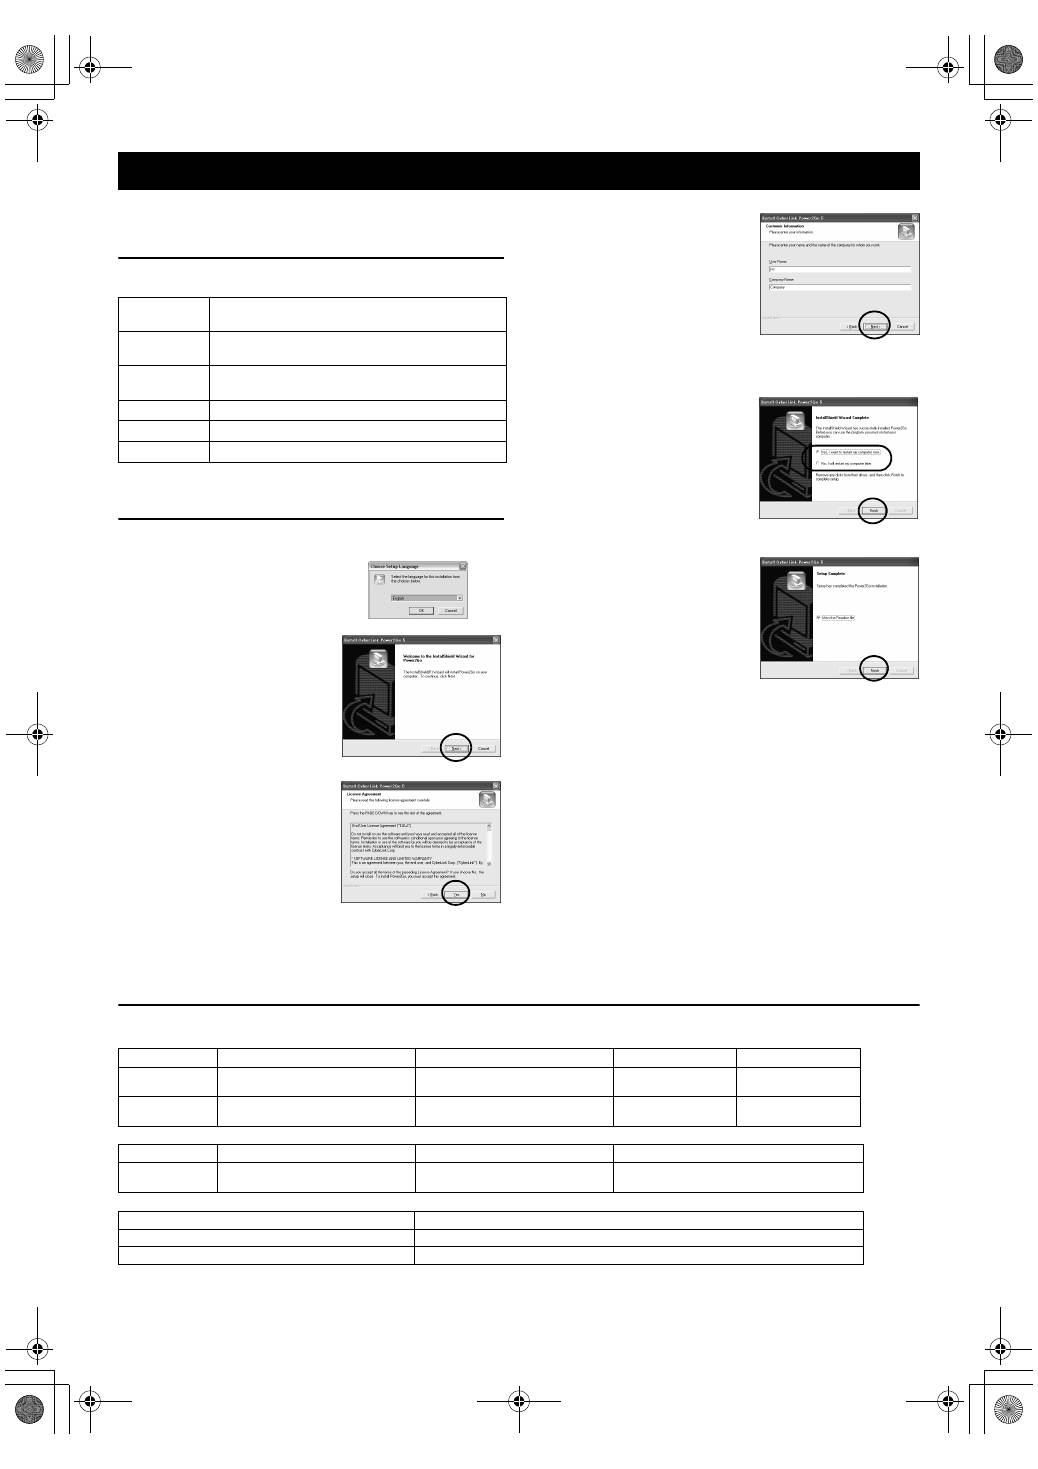
Installation Procedure
1.
Insert the installation CD-ROM in the CD-ROM drive.
The installation is now finished.
NOTES:
●
The above procedure is just a brief explanation on installing the
software. For details on operating Power2Go 5.5 Lite, refer to the
User’s guide, Help, and ReadMe installed at the same time as the
software. You can view the User’s guide, Help, and ReadMe from
the start menu of the PC.
●
This product does not apply to write files into CD-R or CD-RW.
Also, it is not responded to all the functions of Power2Go 5.5 Lite.
●
To get customer support and to register the software, you need
the following product key (CD-Key):
PXNVM-NWE4G-XQD9Q-CU9DX-3FQFN-NAKUS
●
Power2Go 5.5 Lite does not support conversion of audio files to
MP3 format.
●
When the [Enter Activation Key] screen appears while using
Power2Go 5.5 Lite, close the screen without entering the
activation key.
CyberLink Power2Go 5.5 Lite Contact Information
For information on CyberLink Power2Go 5.5 Lite or other products, use the following contact information.
Telephone/fax support
Paid voice support
Support web/e-mail
Writing Software — CyberLink Power2Go 5.5 Lite —
Operating
system
Windows
®
XP Home Edition [XP] (pre-installed) or
Windows
®
XP Professional [XP] (pre-installed)
CPU
Intel
®
Pentium
®
III, at least 800 MHz
(Intel
®
Pentium
®
4, at least 2 GHz recommended)
Free hard disk
space
At least 50 MB for installation
At least 5 GB recommended for making DVDs
RAM
At least 128 MB (at least 256 MB recommended)
Connector
USB 2.0/1.1* connector
Display
Must be capable of displaying 800 x 600 dots
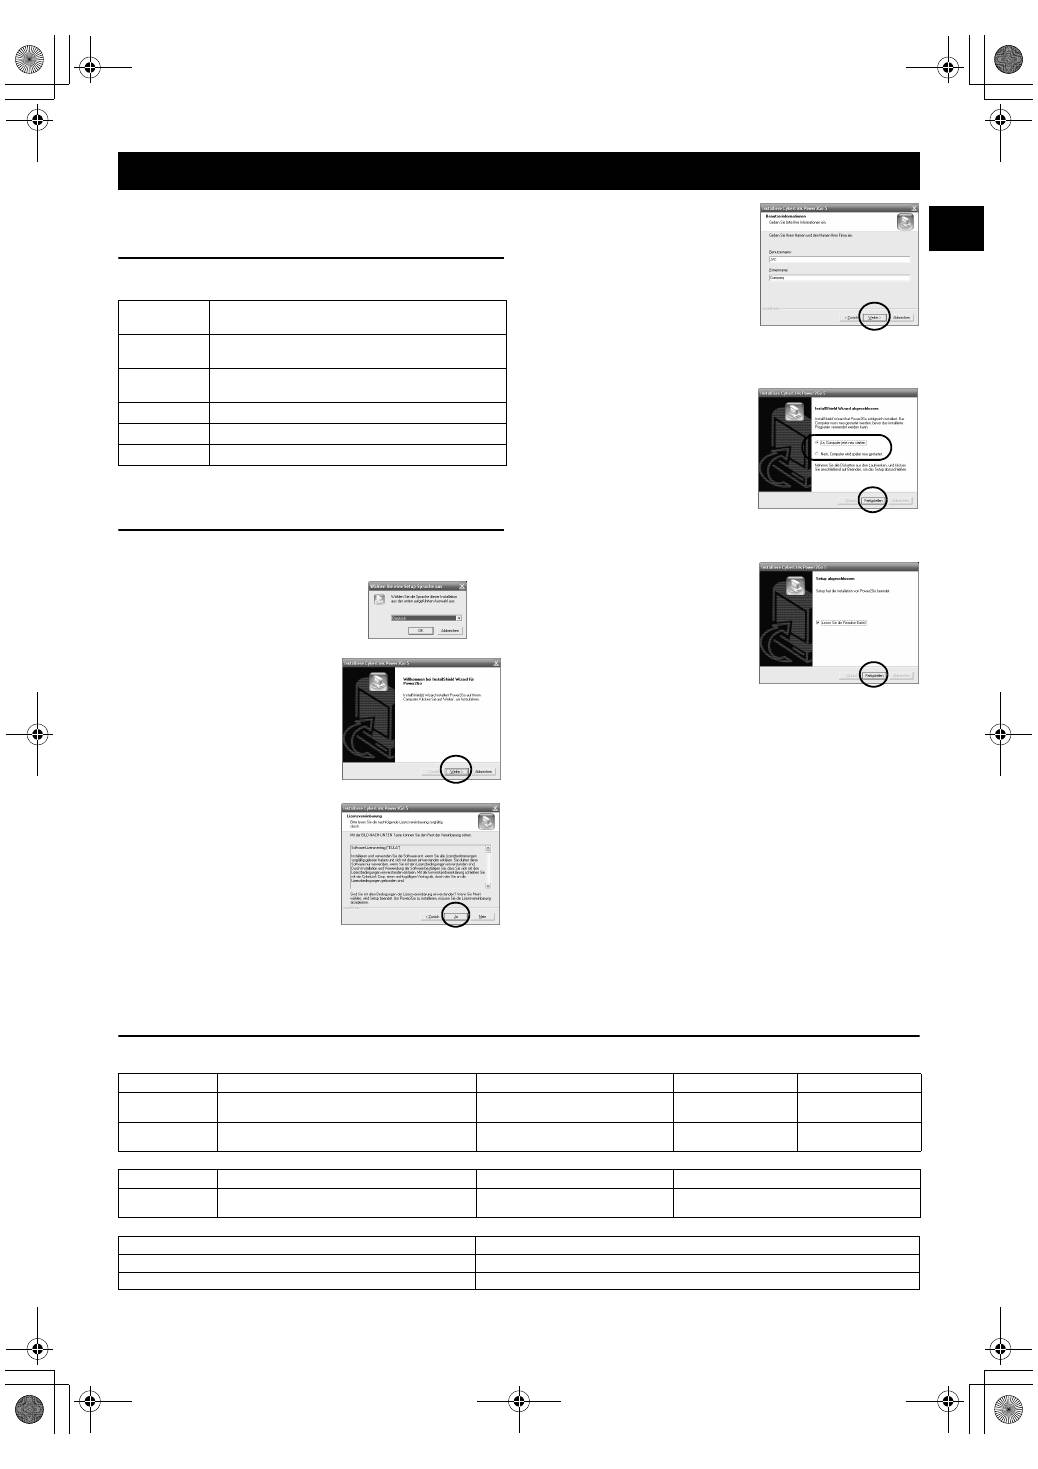
2.
The language selection screen
appears.
3.
The installation start screen
appears.
Click [Next].
4.
Confirm the contents and then
click [Yes].
5.
Enter the user information and
then click [Next].
Follow the on-screen instructions.
6.
Installation starts.
7.
The screen on the right appears
when the installation is complete.
Select the desired checkbox and
then click [Finish].
●
If you select [No, I will restart
my computer later.], the setup
complete screen in step
8.
appears.
8.
Click [Finish].
Location
Language
Office hours (Mon. to Fri.)
Phone #
Fax #
Germany
English / German / French /
Spanish / Italian / Dutch
9:00 am to 5:00 pm
+49-700-462-92375
+49-241-70525-25
Taiwan
Mandarin
9:00 am to 6:00 pm
+886-2-8667-1298
ext. 333
+886-2-8667-1300
Location
Language
Lines are open (Mon. to Fri.)
URL
U.S.A.
English
1:00 pm to 10:00 pm CST
http://www.cyberlink.com/english/cs/support/
new_site/voice_support.jsp
Language
URL/e-mail address
English
http://www.cyberlink.com/english/cs/support/new_site/support_index.html
German / French / Spanish / Italian
goCyberlink@aixtema.de
CU-VD20.book Page 6 Thursday, March 1, 2007 5:55 PM

EN
7
If you think there is a malfunction, first check the following items. If you are still unable to solve the problem, consult your local JVC dealer.
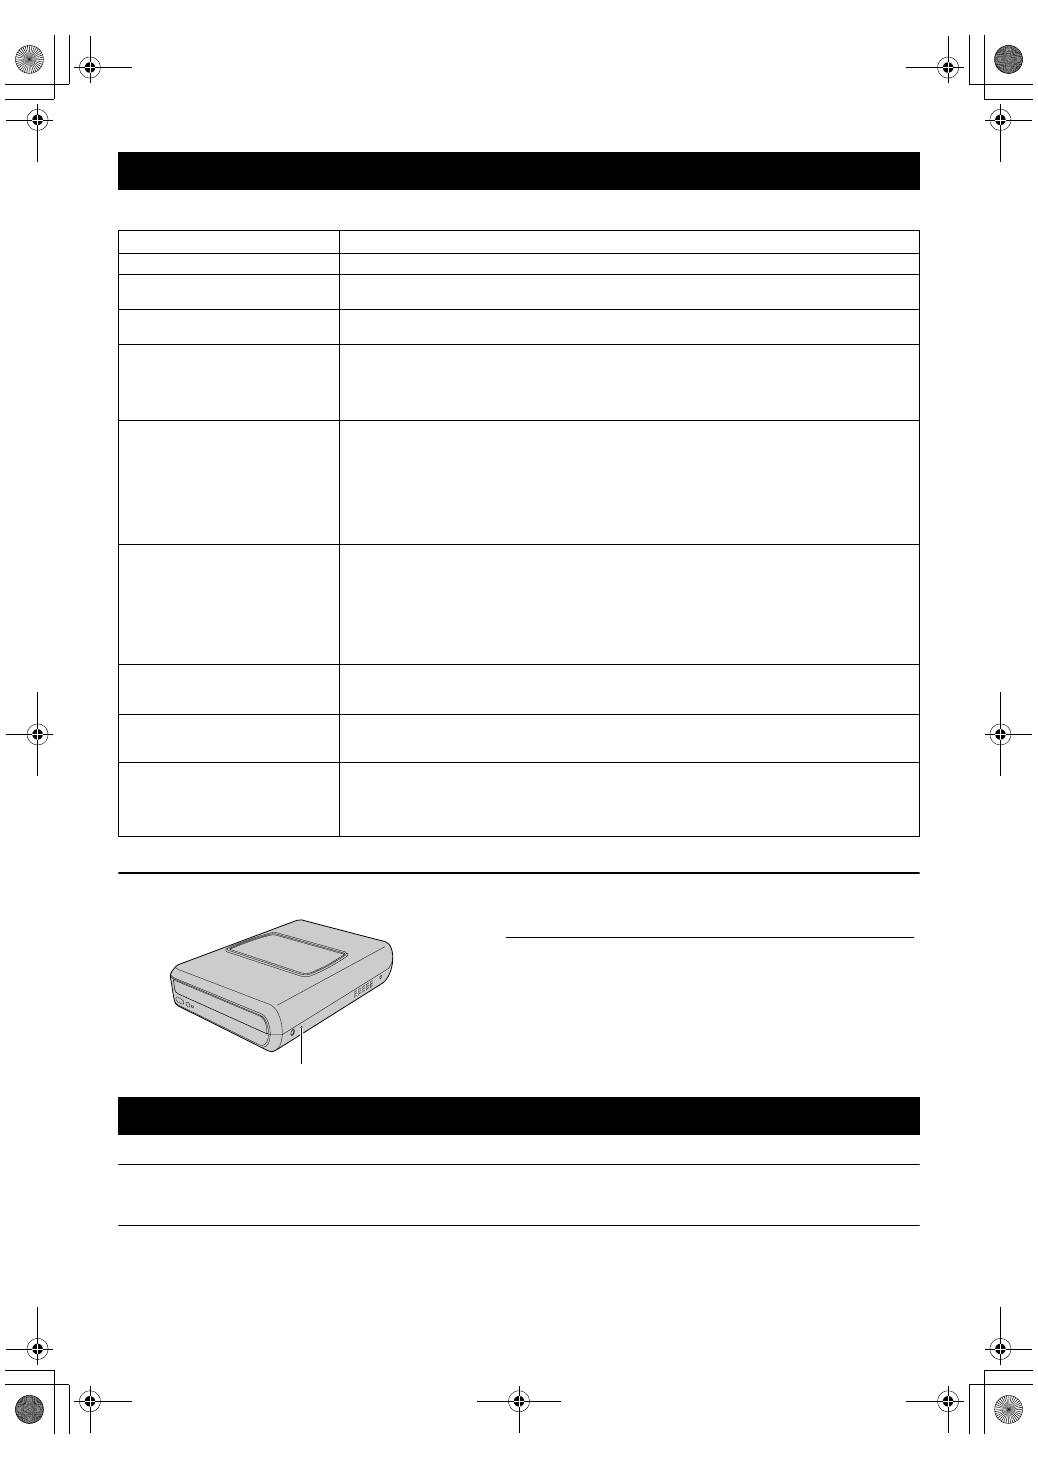
Force Eject Hole
If a disc cannot be ejected with the eject button because of a malfunction, use this hole to eject the disc.
Copyrights
Duplicating copyright protected material, for other than personal use, without the permission of the copyright holder is prohibited by
copyright law.
Registered Trademarks and Trademarks
●
Windows
®
is either registered trademark or trademark of Microsoft Corporation in the United States and/or other countries.
●
Other company and product names mentioned herein are registered trademarks and/or trademarks of their respective holders.
Troubleshooting
Trouble
Cause/Action
Cannot turn the power on.
●
Make sure the AC adapter is connected properly.
The camera/PC is not recognized.
●
Make sure the USB cable is connected properly.
The burner or AC adapter is hot.
●
This is not a malfunction. If the burner is abnormally hot, remove the AC adapter and consult the
dealer from which you purchased the burner.
Cannot open the disc tray.
●
A disc cannot be ejected by pressing the eject button if data is being written to the disc. Wait until
writing finishes.
●
If a disc cannot be ejected with the eject button because of a failure or a malfunction caused by,
for example, the burner being dropped, use the force eject hole to eject the disc. (See below.)
Writing fails.
●
Make sure an appropriate disc is being used. (
A
pg. 3, 8)
●
Use discs recommended for the burner. (
A
pg. 8)
●
Insert the disc with the label facing up.
●
Make sure the writing surface of the disc is not damaged.
●
Make sure the disc tray is not dirty.
●
Writing to irregularly shaped discs such as heart-shaped discs or octagonal discs is not possible.
●
Check the writing speed of the disc being used.
Reading fails.
●
Insert the disc with the label facing up.
●
Make sure the writing surface of the disc is not damaged.
●
Writing to irregularly shaped discs such as heart-shaped discs or octagonal discs is not possible.
●
Any CD recorded using the packet-write method cannot be played.
●
Any CD that does not comply with standards such as the CD-DA standard (copy-control CDs)
cannot be played.
Writing/reading at maximum speed
is not possible.
●
Reading at maximum speed may not be possible if a non-standard disc is used.
●
Use discs recommended for the burner. (
A
pg. 8)
Commercial DVDs cannot be played
when the burner is connected to PC.
●
Check the region code. (
A
pg. 3)
It is impossible to dub the DVD discs,
which were written with this burner,
with DVD recorder with HDD.
●
Connect the burner to the camera, playback using [PLAY DVD] function of the camera, and dub
the DVD discs with the DVD recorder.
(Refer to “Connecting to a TV, VCR or DVD Recorder” or “Using a DVD Burner for Dubbing” in the
camera’s manual.)
Procedure
A
Turn off the burner and disconnect the USB cable and AC adapter.
B
Insert a thin rod of about 10 cm long into the force eject hole
located on the left side of the burner. The disc tray will be ejected
for about 10 mm.
C
Pull out the disc tray manually and take out the disc.
NOTE:
Be sure to place the burner horizontally.
Force eject hole
Copyrights and Trademarks
CU-VD20.book Page 7 Thursday, March 1, 2007 5:55 PM
8 EN
For general
When connected to an Everio
Certain models of Everio are equipped with the “USB Host” function normally found on PCs. These Everio models can be connected directly to this
burner as with a PC.
Recommended discs
Interface cable
AC adapter (AP-V400U)
NOTES:
●
Only 12 cm discs can be used with this burner.
●
DVD-R DL discs can be used when the burner is connected to a high definition Everio or a PC.
●
A double-layer DVD-RW disc cannot be used.
●
Optimal performance of the burner may not be possible depending on the disc used. Using discs of manufacturers for which compatibility
has been confirmed is recommended.
●
The appearance and specifications of the product may change without notice.
●
Any CD recorded using the packet-write method cannot be played.
●
Operation is not guaranteed for any CD not compliant with the CD-DA standard (copy control CD).
●
When connected to the PC, it may not be possible to read the audio files depending on the music CDs (CD-DA). In this case, make use of
applications such as Windows Media Player.
Specifications
Power supply
DC 12 V
Power consumption (during data transfer)
Approx. 5.2 W/1.4 A
Dimensions of main unit (W x H x D)
171 x 56 x 262 mm (6-3/4" x 2-1/5" x 10-3/10")
Weight of main unit
Approx. 1.4 kg (3.1 lbs)
Operating temperature
0 °C to 40 °C (32 °F to 104 °F)
Operating humidity
35 % to 80 %
Storage temperature
–20 °C to 50 °C (–4 °F to 122 °F)
Laser Power
For DVD
Wavelength
653 to 663 nm
Output
1.0 mW
For CD
Wavelength
770 to 810 nm
Output
0.4 mW
Interface
High Speed USB 2.0
Writing speed
(for USB 2.0)
Writing
DVD-R
Maximum 8x
DVD-RW
Maximum 4x
DVD-R DL
Maximum 4x
Reading
DVD-R
Maximum 12x
DVD-RW
Maximum 12x
DVD-R DL
Maximum 8x
DVD-ROM
Maximum 5x
CD-R/RW/ROM
Maximum 10x
Supported disc
DVD
Writing
DVD-R, DVD-R DL, DVD-RW
Reading
DVD-ROM, DVD-VIDEO, DVD-R, DVD-R DL, DVD-RW
CD
Reading
CD-ROM, CD-DA, CD Extra, Video-CD, Mixed-CD, CD-R, CD-RW
Supported operating systems
Windows
®
XP Home Edition/Professional (pre-installed)
Interface cable
USB cable provided with the camera
Supported software
Provided for the camera
CyberLink PowerProducer 3 NE/PowerCinema NE for Everio (Authoring)
Provided for the burner
CyberLink Power2Go 5.5 Lite (data writing)
Interface
High Speed USB 2.0
Supported discs
DVD-R, DVD-RW
Recording format
Everio
DVD video (video only)
High definition Everio
Data DVD (video, still image)
Recording time
Everio
(for each 4.7 GB disc)
Approx. 30 minutes (approx. 90 minutes of video recorded in fine mode)
High definition Everio
Refer to the instruction manual for the high definition Everio.
Interface cable
Provided USB cable
DVD-R
JVC, TDK, Verbatim, SONY
DVD-R DL
JVC, Verbatim
DVD-RW
JVC
Mini USB type A and type B, USB 1.1 and 2.0 compliant
Power requirement
AC 110 V to 240 V
d
, 50 Hz/60 Hz
Output
DC 12 V
, 4 A
CU-VD20_Instruction_EN.fm Page 8 Thursday, March 1, 2007 8:34 PM
DE
2
Mit diesem Brenner können Sie ohne Verwendung eines
PCs DVDs von Videos erstellen, die mit der JVC
Festplattenkamera aufgezeichnet wurden.
●
Wenn Sie mit der Kamera aufgezeichnete Videos bearbeiten und
Ihre ganz persönlichen DVDs erstellen möchten, verwenden Sie
die mit der Kamera mitgelieferte Software für die Bearbeitung
und Erstellung von DVDs.
●
Die mitgelieferte Schreibsoftware Power2Go 5.5 Lite kann für das
Schreiben von Daten verwendet werden. Sie kann jedoch nicht
für das Bearbeiten von Videos oder die Erstellung von DVDs
eingesetzt werden.
●
Der Brenner bietet keine Macintosh Unterstützung.
Sehr geehrter Kunde,
Wir möchten Ihnen für den Kauf dieses Brenners danken. Bitte
lesen Sie vor Inbetriebnahme die Sicherheitsinformationen und -
maßnahmen auf den Seiten 2 und 3, um eine sichere Bedienung
dieses Produkts zu gewährleisten.
Sicherheitsmaßnahmen
WICHTIGER HINWEIS:
Falls einer der im Folgenden beschriebenen Fälle auftritt, ziehen Sie
den Stecker und melden Sie das Gerät bei Ihrem Händler zur
Reparatur an.
●
Rauch oder ungewöhnlicher Geruch strömt aus.
●
Das Gerät weist Beschädigungen durch Herunterfallen auf.
●
Wasser oder ein Gegenstand gelangt in das Geräteinnere.
VORSICHT:
LASERPRODUKT DER KLASSE 1. DIESES GERÄT ARBEITET MIT
EINEM LASERSTRAHL, DER GEFÄHRLICHE STRAHLUNG
ABGEBEN KANN, WENN ER AUF OBJEKTE ODER PERSONEN
GERICHTET WIRD. ACHTEN SIE DARAUF, DASS DIESES GERÄT
STETS KORREKT UND VORSCHRIFTSMÄSSIG BETRIEBEN WIRD.
NICHT MIT DEN AUGEN AN DIE ÖFFNUNG DES CD-FACHES
ODER ANDERE ÖFFNUNGEN AM GERÄT KOMMEN, UM INS
INNERE DES GERÄTES ZU SEHEN, WENN DIESES AN EINE
WANDSTECKDOSE ANGESCHLOSSEN IST.
DIE VERWENDUNG VON STEUERELEMENTEN, EINSTELLUNGEN
ODER VORGEHENSWEISEN, DIE NICHT DEN IN DIESER
DOKUMENTATION VORGESCHRIEBENEN ENTSPRECHEN,
KÖNNEN EINE GEFÄHRDUNG DURCH GEFÄHRLICHE
STRAHLUNG ZUR FOLGE HABEN.
KEINE ABDECKUNGEN ÖFFNEN UND REPARATUREN NICHT
EIGENHÄNDIG VORNEHMEN. WARTUNGSARBEITEN VON
FACHLEUTEN DURCHFÜHREN LASSEN.
LASERPRODUKT DER KLASSE 1
VERVIELFÄLTIGUNG VON ETIKETTEN
WARNETIKETT IM INNEREN DES GERÄTS
Das Gerät erfüllt die „IEC60825-1:2001“-Norm für Laserprodukte.
Die Steckdose sollte sich in der Nähe der Anlage befinden und sollte
leicht zugänglich sein.
ACHTUNG:
Dieses Gerät ist mit Mikroprozessoren ausgerüstet. Elektronische und
magnetische Einstreuungen können Fehlfunktionen verursachen.
Schalten Sie das Gerät in einem solchen Fall aus und ziehen Sie das
Netzkabel ab. Dann schließen Sie das Netzkabel wieder an und
schalten das Gerät ein. Entnehmen Sie die Disc. Bedienen Sie das
Gerät nach einer Überprüfung der Disc wie gewohnt.
VORSICHT:
Zur Vermeidung von Stromschlägen und
Geräteschäden stets erst den geräteseitigen
Stecker des Netzkabels am Netzadapter
einwandfrei anbringen. Dann erst den
Netzstecker an einer Netzsteckdose
anschließen.
Wenn eine schwerwiegende Betriebsstörung auftritt, stellen Sie sofort
den Betrieb ein, und wenden Sie sich an Ihren JVC-Händler.
Sehr geehrter Kunde, sehr geehrte Kundin,
dieses Gerät stimmt mit den gültigen europäischen Richtlinien und
Normen bezüglich elektromagnetischer Verträglichkeit und
elektrischer Sicherheit überein.
Die europäische Vertretung für die Victor Company of Japan, Limited
ist:
JVC Technology Centre Europe GmbH
Postfach 10 05 52
61145 Friedberg
Deutschland
Benutzerinformationen zur Entsorgung alter Geräte
[Europäische Union]
Dieses Symbol zeigt an, dass das elektrische
bzw. elektronische Gerät nicht als normaler
Haushaltsabfall entsorgt werden soll.
Stattdessen sollte das Produkt zur
fachgerechten Entsorgung,
Weiterverwendung und Wiederverwertung in
Übereinstimmung mit der
Landesgesetzgebung einer entsprechenden
Sammelstelle für das Recycling elektrischer
und elektronischer Geräte zugeführt werden.
Die korrekte Entsorgung dieses Produkts
dient dem Umweltschutz und verhindert mögliche Schäden für die
Umwelt und die menschliche Gesundheit, welche durch
unsachgemäße Behandlung des Produkts auftreten können. Weitere
Informationen zu Sammelstellen und dem Recycling dieses Produkts
erhalten Sie bei Ihrer Gemeindeverwaltung, Ihrem örtlichen
Entsorgungsunternehmen oder in dem Geschäft, in dem Sie das
Produkt gekauft haben.
Für die nicht fachgerechte Entsorgung dieses Abfalls können gemäß
der Landesgesetzgebung Strafen ausgesprochen werden.
(Geschäftskunden)
Wenn Sie dieses Produkt entsorgen möchten, besuchen Sie bitte
unsere Webseite www.jvc-europe.com, um Informationen zur
Rücknahme des Produkts zu erhalten.
[Andere Länder außerhalb der Europäischen Union]
Wenn Sie dieses Produkt entsorgen möchten, halten Sie sich dabei
bitte an die entsprechenden Landesgesetze und andere Regelungen
in Ihrem Land zur Behandlung elektrischer und elektronischer Geräte.
Mit der Taste
C
/
B
wird nur die Betriebsspannung des Geräts ein- und
ausgeschaltet.
C
B
D
signalisiert Betriebsbereitschaft,
C
C
D
laufenden
Betrieb.
Hinweis:
Dieses Symbol ist nur
in der Europäischen
Union gültig.
CU-VD20_Instruction_GE.fm Page 2 Thursday, March 1, 2007 2:41 PM
3 DE
Sicherheitsmaßnahmen für den Brenner
Vergessen Sie nicht, die folgenden Vorsichtsmaßnahmen zu
beachten. Bei Nichtbeachten können Stromschläge, Brand,
Verletzungen oder Fehlfunktionen auftreten.
●
Das Gerät darf nicht auseinander genommen, zerlegt oder
verändert werden. Reparatur- und Wartungsanfragen sollten an
Ihren Händler gerichtet werden.
●
Lassen Sie keine Metallgegenstände oder brennbaren
Gegenstände in das Gerät fallen, und verschütten Sie kein
Wasser oder andere Flüssigkeiten in das Gerät.
●
Schalten Sie die Stromzufuhr ab, während Sie das Gerät
anschließen.
●
Ziehen Sie den Stecker, wenn Sie den Brenner längere Zeit nicht
verwenden oder bevor Sie ihn reinigen (durch das Gerät fließt
weiterhin Strom, auch wenn Sie die Stromzufuhr unterbrechen).
●
Verdecken Sie nicht die Entlüftungsschlitze des Brenners.
●
Verwenden Sie das Gerät nicht, wenn sich Kondensat gebildet
hat. Wenn das Gerät von einem kalten an einen warmen Ort
gebracht wird, kann sich Kondensat bilden, was zu einer
Fehlfunktion oder Funktionsstörung führen kann.
●
Vermeiden Sie Vibrationen des Brenners, während Discs
eingelegt sind.
Sicherheitsmaßnahmen für das Zubehör
●
Vergessen Sie nicht bei der Verwendung des Netzteils, des
Netzkabels und des USB-Kabels folgende Vorsichtsmaßnahmen
zu beachten. Bei Nichtbeachten können Stromschläge, Brand,
Verletzungen oder Fehlfunktionen auftreten.
• Berühren Sie den Stecker nicht mit nassen Händen.
• Stecken Sie den Stecker vollständig in die Steckdose.
• Halten Sie Staub und Metallgegenstände vom Stecker fern.
• Das Kabel darf nicht beschädigt werden.
• Legen Sie das Kabel so, dass niemand darüber stolpern kann.
• Es darf bei Gewitter nicht verwendet werden.
• Es darf nicht zerlegt werden.
• Verwenden Sie es ausschließlich für dieses Produkt.
●
Spielen Sie die mitgelieferte CD-ROM niemals mit einem Audio-
Player ab. Dies kann zu einer Beschädigung der Leitungen oder
Lautsprecher führen.
Sicherheitsmaßnahmen für Discs
Verwenden Sie niemals folgende Discs.
●
Gerissene Discs.
●
Stark verkratzte Discs.
Installation
Stellen Sie das Gerät niemals an folgenden Orten auf.
●
In einer feuchten Umgebung
●
An einem Ort mit 60 °C oder höher
●
An einem Ort, der direktem Sonnenlicht ausgesetzt ist
●
An einem Ort, der zu Überhitzungen neigt
●
An staubigen oder verrauchten Orten
●
An Orten, die Öldunst oder -dampf ausgesetzt sind, wie z. B. auf
einem Küchentresen oder neben einem Luftbefeuchter
●
Auf einer instabilen Unterlage
●
Im Badezimmer
●
An staubigen Orten
●
Auf einer unebenen Unterlage
Reinigungsvorgang
WICHTIGER HINWEIS:
●
Vergessen Sie nicht, den Stecker des Brenners zu ziehen, bevor
Sie mit der Reinigung beginnen.
●
Verwenden Sie keine Flüssig- oder Sprühreiniger.
●
Stellen Sie sicher, dass während der Reinigung keine
Feuchtigkeit oder Flüssigkeit mit dem Laufwerk in Berührung
kommt.
Aussenseite des Brenners:
Wischen Sie den Schmutz mit
einem trockenen Tuch ab.
Disc-Lade:
Wischen Sie den Schmutz mit
einem weichen, trockenen Tuch ab.
Disc:
Wischen Sie sanft mit einem
weichen Tuch von innen nach außen.
Aufbewahrung:
Stellen Sie sicher, dass Discs in ihren Hüllen aufbewahrt werden.
Wenn Discs ohne Schutzhülle übereinander gestapelt werden,
können sie beschädigt werden. Legen Sie Discs nicht an einen Ort,
an dem sie direktem Sonnenlicht oder hoher Lufteuchtigkeit und
Temperatur ausgesetzt sind. Vermeiden Sie es, Discs im Auto zu
lassen!
Regionalcodes
Regionalcodes sind Nummern, mit deren Hilfe die Wiedergabe von
DVD-Videos auf einzelne Regionen beschränkt wird. Die Welt ist in
sechs Regionen aufgeteilt, und jede Region wird durch eine
Nummer identifiziert. Wenn die Nummer für eine Disc nicht der
Nummer für den Player entspricht, kann die Disc nicht auf dem
entsprechenden Player abgespielt werden. (Der ursprüngliche
Regionalcode ist auf dem Typenschild auf der Unterseite des
Brenners abgedruckt.)
Haftungsausschlüsse
JVC übernimmt keinerlei Haftung für Datenverluste, die auf
unsachgemäße Anschlüsse oder eine unsachgemäße Bedienung
zurückzuführen sind.
ACHTUNG:
Aufstellen des Gerätes:
Manche TV- oder andere Geräte erzeugen starke Magnetfelder.
Stellen Sie solche Geräte nicht auf das Gerät, da es sonst zu
Bildstörungen kommen kann.
Vor Transport dieses Produkts:
Betätigen Sie
C
/
B
, um das Gerät abzuschalten, und warten Sie dann
mindestens 30 Sekunden, bevor Sie das Netzkabel abziehen. Warten
Sie dann vor Transportbeginn mindestens zwei weitere Minuten.
Ändern der Regionalcodes
Sie können den Regionalcode ändern, um eine DVD abzuspielen,
deren Regionalcode sich von dem des Brenners unterscheidet.
(Bei einigen Wiedergabeprogrammen kann der Code nicht
geändert werden.) Wenn Sie die Disc einlegen, erscheint der
Warnbildschirm. Folgen Sie den Anweisungen auf dem
Bildschirm, um den Code zu ändern.
Der Regionalcode für den Brenner kann nur bis zu 4 Mal geändert
werden. Der beim vierten Mal eingestellte Code wird als
endgültiger Code gespeichert. Achten Sie daher darauf, einen
häufig verwendeten Code einzustellen. Gehen Sie beim Ändern
des Codes mit ausreichender Sorgfalt vor.
CU-VD20_Instruction_GE.fm Page 3 Thursday, March 1, 2007 2:41 PM

DE
4
VORSICHT:
Verwenden Sie zum Anschluss des Brenners ausschließlich die beiliegenden Zubehörteile (Netzteil, Netzkabel und USB-Kabel). Andernfalls besteht
Feuer- und Stromschlaggefahr.
Dieser Brenner kann wahlweise in waagrechter oder senkrechter Aufstellung betrieben werden. Bei senkrechter Aufstellung richten Sie die
Lüftungsöffnung des Brenners und den im Lieferumfang enthaltene Ständer aufeinander aus und befestigen den Brenner dann sicher auf
dem Ständer.
Achten Sie beim Umgang mit einer Disc darauf, nicht die Seite zu berühren, die zur Aufnahme oder Wiedergabe vorgesehen ist.
Zubehör
Netzteil (AP-V400U)
Netzkabel
USB-Kabel
(zum Anschluss an die Kamera)
CD-ROM
Leere Disc (DVD-R)
Ständer
Beschreibung der Geräteteile und -steuerung
Aufstellen des Brenners
A
Netztaste
(
C
/
B
)
B
Auswurftaste
C
Power-Lampe
D
Disc-Lade
D
B C
A
E F
Vorderseite
Rückseite
E
DC-Anschluss
F
USB-Anschluss
Lüftungsöffnung
Ständer
(im Lieferumfang enthalten)
Unterseite
Einlegen einer Disc
8
Waagrechte Ausrichtung
8
Senkrechte Ausrichtung
CU-VD20_Instruction_GE.fm Page 4 Thursday, March 1, 2007 2:41 PM
5 DE
Anschluss an einen PC
A
Schließen Sie das Netzteil an den Brenner an.
B
Schließen Sie das Netzkabel an das Netzteil an.
C
Schließen Sie das Netzkabel an die Netzsteckdose an.
D
Betätigen Sie die Netztaste
(
C
/
B
)
auf der Vorderseite, um den Brenner einzuschalten.
Die Netzanzeige leuchtet grün.
E
Schalten Sie den PC ein.
F
Schließen Sie den Brenner mithilfe des USB-Kabels an den PC an.
HINWEIS:
Um den Brenner an den PC anzuschließen, verwenden Sie das mit der Kamera mitgelieferte USB-Kabel.
Anschlüsse
A B C F E D F
USB-Kabel
(für die Kamera)
Netzteil
(für den Brenner)
Netzkabel
(im
Lieferumfang
enthalten)
An
Netzsteckdose
An USB-Anschluss
Brennerrückseite
PC
CU-VD20_Instruction_GE.fm Page 5 Thursday, March 1, 2007 2:41 PM
DE
6
Power2Go 5.5 Lite ist eine Software zum Aufzeichnen von Video,
Bild, Audio und anderen Datendateien auf Daten-DVDs.
Systemanforderungen
Im Folgenden sind die Systemvoraussetzungen für die Installation
aufgeführt.
* Wenn Sie ein USB1.1-Kabel verwenden, dauert der Schreibvorgang
ca. 3 Stunden.
Installationsvorgang
1.
Legen Sie die Installations-CD-ROM in das CD-ROM-
Laufwerk ein.
Die Installation ist nun beendet.
HINWEISE:
●
Der obige Vorgang ist nur eine Kurzbeschreibung der
Softwareinstallation. Weitere Details zur Bedienung Power2Go
5.5 Lite, finden Sie im Benutzerhandbuch, der Hilfe und dem
ReadMe, die zusammen mit der Software installiert werden. Sie
können das Benutzerhandbuch, die Hilfe und das ReadMe aus
dem Startmenü des PCs aufrufen.
●
Dieses Produkt kann keine Dateien im CD-R- oder CD-RW-
Format schreiben. Des Weiteren enthält es nicht alle Funktionen
von Power2Go 5.5 Lite.
●
Um die Software registrieren zu können und
Kundenunterstützung zu erhalten, benötigen Sie den folgenden
Produktschlüssel (CD-Schlüssel):
PXNVM-NWE4G-XQD9Q-CU9DX-3FQFN-NAKUS
●
Power2Go 5.5 Lite unterstützt die Konvertierung von
Audiodateien in das MP3-Format nicht.
●
Wenn bei der Verwendung von Power2Go 5.5 Lite der Bildschirm
[Aktivierungsschlüssel eingeben] erscheint, schließen Sie diesen
Bildschirm, ohne einen Aktivierungsschlüssel einzugeben.
CyberLink Power2Go 5.5 Lite Kontaktinformationen
Verwenden Sie für Informationen zu CyberLink Power2Go 5.5 Lite oder anderen Produkten, folgende Kontaktinformationen.
Telefon-/Fax-Support
Gebührenpflichtiger Telefon-Support
Support via Web/E-Mail
Schreibsoftware — CyberLink Power2Go 5.5 Lite —
Betriebssys-
tem
Windows® XP Home Edition [XP] (vorinstalliert) oder
Windows® XP Professional [XP] (vorinstalliert)
CPU
Intel® Pentium® III, mindestens 800 MHz
(Intel® Pentium® 4, mindestens 2 GHz empfohlen)
Freier Festplat-
tenspeicher
Mindestens 50 MB für die Installation
Mindestens 5 GB empfohlen für die Erstellung von DVDs
RAM
Mindestens 128 MB (mindestens 256 MB empfohlen)
Anschluss
USB 2.0/1.1*-Anschluss
Display
Muss in der Lage sein, 800 x 600 Pixel anzuzeigen
2.
Der Sprachauswahlbildschirm
erscheint.
3.
Der Installationsstart-Bildschirm
wird angezeigt.
Klicken Sie auf [Weiter].
4.
Lesen Sie den Bildschirminhalt
und klicken Sie dann auf [Ja].
5.
Geben Sie die
Benutzerinformationen ein und
klicken Sie anschließend auf
[Weiter].
Folgen Sie den Anweisungen auf dem Bildschirm.
6.
Die Installation startet.
7.
Der rechts abgebildete Bildschirm
erscheint nach Abschluss der
Installation.
Aktivieren Sie das gewünschte
Kontrollkästchen und klicken Sie
anschließend auf [Fertigstellen].
●
Wenn Sie [Nein, Computer wird
später neu gestartet.], wird in
Schritt
8.
der
Installationsabschluss-
Bildschirm angezeigt.
8.
Klicken Sie auf [Fertigstellen].
Standort
Sprache
Bürozeiten (Mo - Fr)
Telefon #
Fax #
Deutschland
Englisch / Deutsch / Französisch / Spanisch /
Italienisch / Niederländisch
9:00 bis 17:00 Uhr
+49-700-462-92375
+49-241-70525-25
Taiwan
Mandarin
9:00 bis 18:00 Uhr
+886-2-8667-1298
Durchw. 333
+886-2-8667-1300
Standort
Sprache
Leitungen sind offen (Mo – Fr)
URL
USA
Englisch
13:00 bis 22:00 Uhr CST
http://www.cyberlink.com/english/cs/support/
new_site/voice_support.jsp
Sprache
URL/E-Mail-Adresse
Englisch
http://www.cyberlink.com/english/cs/support/new_site/support_index.html
Deutsch / Französisch / Spanisch / Italienisch
goCyberlink@aixtema.de
CU-VD20_Instruction_GE.fm Page 6 Thursday, March 1, 2007 2:41 PM
7 DE
Wenn Sie meinen, eine Fehlfunktion festzustellen, überprüfen Sie zunächst die folgenden Punkte. Wenn Sie danach das Problem immer
noch nicht lösen können, wenden Sie sich an einen JVC Händler in Ihrer Nähe.
Notauswurföffnung
Kann eine Disc aufgrund einer Fehlfunktion nicht mit der Auswurftaste ausgeworfen werden, dann können Sie das Auswerfen mithilfe dieser
Öffnung erzwingen.
Urheberrechte
Die Vervielfältigung von urheberrechtlich geschütztem Material, das nicht für den privaten Gebrauch vorgesehen ist, ist ohne Genehmigung
des Urheberrechtinhabers durch das Urheberrecht untersagt.
Eingetragene Warenzeichen und Warenzeichen
●
Windows® ist entweder ein eingetragenes Warenzeichen oder Warenzeichen der Microsoft Corporation in den Vereinigten Staaten und/
oder anderen Ländern.
●
Alle anderen in diesem Handbuch erwähnten Firmen- und Produktnamen sind eingetragene Warenzeichen und/oder Warenzeichen der
Warenzeicheninhaber.
Fehlersuche
Fehler
Ursache/Maßnahme
Einschalten nicht möglich.
●
Vergewissern Sie sich, dass das Netzteil korrekt angeschlossen ist.
Die Kamera/der PC wird nicht
erkannt.
●
Vergewissern Sie sich, dass das USB-Kabel korrekt angeschlossen ist.
Der Brenner oder das Netzteil ist
heiß.
●
Dies ist keine Fehlfunktion. Falls der Brenner ungewöhnlich heiß wird, entfernen Sie das Netzteil
und wenden Sie sich an den Händler, bei dem Sie den Brenner gekauft haben.
Disc-Lade lässt sich nicht öffnen.
●
Eine Disc kann nicht mithilfe der Auswurftaste ausgeworfen werden, wenn gerade Daten auf die
Disc geschrieben werden. Warten Sie, bis der Schreibvorgang beendet ist.
●
Wenn eine Disc aufgrund einer Fehlfunktion, die durch das Herunterfallen des Brenners
verursacht wurde, nicht mithilfe der Auswurftaste ausgeworfen werden kann, verwenden Sie die
Notauswurföffnung zum Auswerfen der Disc. (Siehe unten.)
Schreibvorgang ist fehlgeschlagen.
●
Vergewissern Sie sich, dass eine geeignete Disc verwendet wird. (
A
S. 3, 8)
●
Verwenden Sie für den Brenner empfohlene Discs. (
A
S. 8)
●
Legen Sie die Disc mit dem Etikett nach oben ein.
●
Vergewissern Sie sich, dass die beschreibbare Oberfläche der Disc nicht beschädigt ist.
●
Vergewissern Sie sich, dass die Disc-Lade nicht verschmutzt ist.
●
Unregelmäßig geformte Discs, wie z. B. herzförmige oder achteckige Discs, können nicht
beschrieben werden.
●
Überprüfen Sie die Schreibgeschwindigkeit der verwendeten Disc.
Lesevorgang ist fehlgeschlagen.
●
Legen Sie die Disc mit dem Etikett nach oben ein.
●
Vergewissern Sie sich, dass die beschreibbare Oberfläche der Disc nicht beschädigt ist.
●
Unregelmäßig geformte Discs, wie z. B. herzförmige oder achteckige Discs, können nicht
beschrieben werden.
●
CDs, die mithilfe der Packet-Writing-Methode aufgezeichnet wurden, können nicht abgespielt
werden.
●
CDs, die keinem Standard wie z. B. dem CD-DA-Standard entsprechen (kopiergeschützte CDs)
können nicht abgespielt werden.
Das Schreiben/Lesen mit maximaler
Geschwindigkeit ist nicht möglich.
●
Das Lesen mit maximaler Geschwindigkeit kann unter Umständen nicht möglich sein, wenn eine
nicht dem Standard entsprechende Disc verwendet wird.
●
Verwenden Sie für den Brenner empfohlene Discs. (
A
S. 8)
Handelsübliche DVDs können nicht
abgespielt werden, wenn der Brenner
an einen PC angeschlossen ist.
●
Überprüfen Sie den Regionalcode. (
A
S. 3)
Es ist nicht möglich, DVD-Discs, die
mit diesem Brenner beschrieben
wurden, mit einem DVD-Recorder
mit HDD zu überspielen.
●
Schließen Sie den Brenner an die Kamera an, starten Sie die Wiedergabe mithilfe der [DVD
PROBEABSPIELEN]-Funktion der Kamera und überspielen Sie die DVD-Discs mit dem
DVDRecorder.
(Siehe
C
Anschluss an einen Fernseher, Videorecorder oder DVD-Recorder
D
oder
C
Verwendung
eines DVD-Brenners für den Überspielvorgang
D
im Handbuch für die Kamera.)
Vorgang
A
Schalten Sie den Brenner ab und trennen Sie USB-Kabel und
Netzteil ab.
B
Führen Sie einen dünnen Stab von etwa 10 cm Länge in die
Notauswurföffnung ein, die sich auf der linken Seite des Brenners
befindet. Die Disc-Lade wird nun etwa 10 mm weit ausgefahren.
C
Ziehen Sie die Disc-Lade manuell auf und entnehmen Sie die Disc.
HINWEIS:
Stellen Sie den Brenner ausschließlich waagrecht auf.
Notauswurföffnung
Urheberrecht, Warenzeichen
CU-VD20_Instruction_GE.fm Page 7 Thursday, March 1, 2007 2:41 PM
DE
8
Allgemein
Bei Verbindung mit einem Everio
Bestimmte Everio-Modelle sind mit einer Funktion namens
C
USB Host
D
ausgestattet, wie man sie von PCs her kennt. An solche Everio-Modelle kann
dieser Brenner ebenso angeschlossen werden wie an einen PC.
Empfohlene Discs
Schnittstellenkabel
Netzteil (AP-V400U)
HINWEISE:
●
Bei diesem Brenner können nur Discs mit einem Durchmesser von 12 cm verwendet werden.
●
DVD-R DL-Discs können verwendet werden, wenn der Brenner an einen hochauflösenden Everio oder einen PC angeschlossen ist.
●
Double-Layer-DVD-RW-Discs können nicht verwendet werden.
●
Je nach verwendeter Disc ist eine optimale Leistung des Brenners nicht möglich. Es wird empfohlen, Discs von Herstellern zu verwenden,
deren Kompatibilität bestätigt wurde.
●
Das Aussehen und die technischen Daten des Produkts können ohne vorherige Ankündigung geändert werden.
●
CDs, die mithilfe der Packet-Writing-Methode aufgezeichnet wurden, können nicht abgespielt werden.
●
Die Funktionsfähigkeit von CDs, die nicht dem CD-DA-Standard entsprechen (kopiergeschützte CDs), wird nicht gewährleistet.
●
Beim Anschluss an einen PC ist je nach verwendeter Musik-CD (CD-DA) ein Auslesen der Audiodateien unter Umständen nicht möglich.
Verwenden Sie in diesem Fall Anwendungen wie den Windows Media Player.
Technische Daten
Stromversorgung
12 V Wechselspannung
Stromverbrauch (während der Datenübertragung)
Ca. 5,2 W/1,4 A
Abmessungen des Geräts (B x H x T)
171 x 56 x 262 mm
Gewicht des Geräts
Ca. 1,4 kg
Betriebstemperatur
0 °C bis 40 °C
Betriebsluftfeuchtigkeit
35 % bis 80 %
Lagertemperatur
–20 °C bis 50 °C
Laserleistung
Für DVD
Wellenlänge
653 bis 663 nm
Ausgang
1,0 mW
Für CD
Wellenlänge
770 bis 810 nm
Ausgang
0,4 mW
Schnittstelle
High-Speed USB 2.0
Schreibgeschwindigkeit
(für USB 2.0)
Schreiben
DVD-R
Maximal 8x
DVD-RW
Maximal 4x
DVD-R DL
Maximal 4x
Lesen
DVD-R
Maximal 12x
DVD-RW
Maximal 12x
DVD-R DL
Maximal 8x
DVD-ROM
Maximal 5x
CD-R/RW/ROM
Maximal 10x
Unterstützte Discs
DVD
Schreiben
DVD-R, DVD-R DL, DVD-RW
Lesen
DVD-ROM, DVD-VIDEO, DVD-R, DVD-R DL, DVD-RW
CD
Lesen
CD-ROM, CD-DA, CD Extra, Video-CD, Mixed-Mode-CD, CD-R, CD-RW
Unterstützte Betriebssysteme
Windows
®
XP Home Edition/Professional (vorinstalliert)
Schnittstellenkabel
Mit der Kamera mitgeliefertes USB-Kabel
Unterstützte Software
für die Kamera
CyberLink PowerProducer 3 NE/PowerCinema NE für Everio (Authoring)
für den Brenner
CyberLink Power2Go 5.5 Lite (Schreiben von Daten)
Schnittstelle
High-Speed USB 2.0
Unterstützte Discs
DVD-R, DVD-RW
Aufnahmeformat
Everio
DVD Video (nur Video)
Hochauflösender Everio Daten-DVD (Video, Standbild)
Aufnahmezeit
Everio
(für jede 4,7 GB Disc)
Ca. 30 Minuten (90 Minuten Stunde Video, aufgezeichnet im Fine-Modus)
Hochauflösender Everio Weitere Informationen zum hochauflösenden Everio finden Sie in der Bedienungsanleitung.
Schnittstellenkabel
Mitgeliefertes USB-Kabel
DVD-R
JVC, TDK, Verbatim, SONY
DVD-R DL
JVC, Verbatim
DVD-RW
JVC
Mini-USB, Typ A und Typ B, kompatibel mit USB 1.1 und 2.0
Spannungsversorgung
110 V bis 240 V Wechselspannungd, 50 Hz/
60 Hz
Ausgang
12 V Gleichspannung
, 4 A
CU-VD20_Instruction_GE.fm Page 8 Thursday, March 1, 2007 8:42 PM

2 FR
Ce graveur vous permet de créer des DVD de vidéos
enregistrées à l’aide de l’appareil photo à disque dur de
JVC sans ordinateur.
●
Si vous souhaitez éditer des vidéos enregistrées à l’aide de
l’appareil photo et créer vos DVD originaux, utilisez le logiciel
fourni avec l’appareil photo afin d’éditer et de créer des DVD.
●
Le logiciel d’écriture de données Power2Go 5.5 Lite fourni
permet d’écrire des données. Néanmoins, il ne permet pas
d’éditer des vidéos ou de créer des DVD.
●
Le graveur ne prend pas en charge Macintosh.
Cher client,
Nous vous remercions d’avoir acheté ce graveur. Avant de
l’utiliser, veuillez lire les informations et mesures de sécurité
figurant pages 2 et 3 afin d’utiliser ce produit en toute sécurité.
Mesures de sécurité
IMPORTANT :
Si l’un des événements suivants venait à se produire, débranchez la
fiche et contactez votre revendeur pour qu’il procède à la réparation.
●
Émission de fumée ou d’odeur anormale
●
Endommagement de l’appareil suite à une chûte
●
Intrusion d’eau ou d’un objet dans l’appareil
PRÉCAUTION :
CET APPAREIL EST UN PRODUIT LASER DE CLASSE 1.
CEPENDANT, CET APPAREIL UTILISE UN FAISCEAU LASER
VISIBLE QUI PEUT ENTRAÎNER UNE EXPOSITION DANGEREUSE
AUX RAYONNEMENTS. S’ASSURER DE FAIRE FONCTIONNER
L’APPAREIL CORRECTEMENT, EN RESPECTANT LES
INSTRUCTIONS.
LORSQUE CET APPAREIL EST BRANCHÉ À UNE PRISE MURALE,
NE PAS PLACER SES YEUX PRÈS DE L’OUVERTURE DU TIROIR
POUR DISQUE OU D’AUTRES OUVERTURES DANS LE BUT
D’OBSERVER L’INTÉRIEUR DE L’APPAREIL.
UN EMPLOI DES COMMANDES, RÉGLAGES OU PROCÉDURES
DE PERFORMANCE AUTRE QUE CELUI SPÉCIFIÉ DANS CE
DOCUMENT RISQUE D’ENTRAÎNER UNE EXPOSITION
DANGEREUSE AUX RAYONNEMENTS.
NE PAS OUVRIR NI RÉPARER DE VOUS-MÊME. FAIRE APPEL À
UN PERSONNEL QUALIFIÉ POUR L’ENTRETIEN.
PRODUIT LASER DE CLASSE 1
REPRODUCTION DES ÉTIQUETTES
ÉTIQUETTE D’AVERTISSEMENT A L’INTÉRIEUR DE L’APPAREIL
Cet appareil est conforme à la norme “IEC60825-1:2001” relative aux
produits laser.
La prise de courant doit être installée près du matériel et être
facilement accessible.
ATTENTION :
Cet appareil contient des micro-ordinateurs. Des bruits électroniques
externes ou des interférences peuvent causer un mauvais
fonctionnement. Dans de tels cas, éteindre l’appareil puis débrancher
le cordon d’alimentation de la prise secteur. Rebrancher ensuite, et
rallumer l’appareil. Retirer le disque. Après vérification du disque,
utiliser l’appareil comme d’habitude.
PRÉCAUTION :
Afin d’éviter tout choc électrique ou dommage,
insérez d’abord l’extrémité la plus courte du
cordon d’alimentation dans l’adaptateur secteur
jusqu’à ce qu’elle soit bien en place, puis
branchez l’extrémité la plus longue sur une
prise secteur.
En cas de dysfonctionnement, cesser immédiatement toute opération
et consulter le revendeur JVC le plus proche.
●
POUR UTILISER AVEC MODELE AP-V400U (ADAPTATEUR CA).
Cher(e) client(e),
Cet appareil est conforme aux directives et normes européennes en
vigueur concernant la compatibilité électromagnétique et à la sécurité
électrique.
Représentant européen de la société Victor Company of Japan,
Limited :
JVC Technology Centre Europe GmbH
Postfach 10 05 52
61145 Friedberg
Allemagne
Informations relatives à l’élimination des appareils usagés, à
l’intention des utilisateurs
[Union européenne]
Lorsque ce symbole figure sur un appareil
électrique et électronique, cela signifie qu’il
ne doit pas être éliminé en tant que déchet
ménager à la fin de son cycle de vie. Le
produit doit être porté au point de pré-collecte
approprié au recyclage des appareils
électriques et électroniques pour y subir un
traitement, une récupération et un recyclage,
conformément à la législation nationale.
En éliminant correctement ce produit, vous
contriburez à la conservation des ressources naturelles et à la
prévention des éventuels effets négatifs sur l’environnement et la
santé humaine, pouvant être dus à la manipulation inappropriée des
déchets de ce produit. Pour plus d’informations sur le point de pré-
collecte et le recyclage de ce produit, contactez votre mairie, le service
d’évacuation des ordures ménagères ou le magasin dans lequel vous
avez acheté le produit.
Des amendes peuvent être infligées en cas d’élimination incorrecte de
ce produit, conformément à la législation nationale.
(Utilisateurs professionnels)
Si vous souhaitez éliminer ce produit, visitez notre page Web
www.jvc-europe.com afin d’obtenir des informations sur sa
récupération.
[Pays ne faisant pas partie de l’Union européenne]
Si vous souhaitez éliminer ce produit, faites-le conformément à la
législation nationale ou autres règles en vigueur dans votre pays pour
le traitement des appareils électriques et électroniques usagés.
Attention:
Ce symbole n’est
reconnu que dans
l’Union européenne.
CU-VD20_Instruction_FR.fm Page 2 Thursday, March 1, 2007 8:38 PM

FR
3
Mesures de sécurité pour le graveur
Veillez à respecter les mesures de sécurité suivantes. Leur non-
respect risque d’entraîner un choc électrique, un incendie, des
blessures ou un dysfonctionnement.
●
Ne désassemblez pas, ne démontez pas et ne modifiez pas le
matériel. Demandez au revendeur de procéder aux réparations et
à la maintenance.
●
N’insérez pas d’objets métalliques ou combustibles et ne versez
pas d’eau ou d’autres liquides à l’intérieur du graveur.
●
Coupez l’alimentation lors du branchement du matériel.
●
Débranchez la prise si vous prévoyez de ne pas utiliser le graveur
pendant une période prolongée ou avant de le nettoyer
(l’électricité circule à l’intérieur du matériel même lorsqu’il n’est
pas sous tension.)
●
N’obstruez pas les orifices d’aération du graveur.
●
N’utilisez pas le graveur en cas de condensation. Le transfert
soudain du graveur d’un lieu froid vers un lieu chaud peut
entraîner la formation de gouttes, susceptibles de provoquer un
dysfonctionnement ou une défaillance.
●
Ne laissez pas le graveur vibrer lorsqu’il contient des disques.
Mesures de sécurité pour les accessoires
●
Lors de l’utilisation de l’adaptateur CA, du cordon d’alimentation
et du câble USB, veillez à respecter les instructions suivantes.
Leur non-respect risque d’entraîner un choc électrique, un
incendie, des blessures ou un dysfonctionnement.
• Ne branchez pas et ne débranchez pas la prise lorsque vos mains
sont mouillées.
• Insérez entièrement la fiche d’alimentation dans la prise.
• Éloignez la poussière et les objets métalliques de la fiche
d’alimentation.
• N’endommagez pas le cordon.
• Placez le cordon de sorte qu’il ne fasse trébucher personne.
• Ne l’utilisez pas en cas d’orage.
• Ne le démontez pas.
• Ne l’utilisez pas pour un produit autre que celui-ci.
●
Ne lisez pas le CD-ROM fourni à l’aide d’un lecteur audio. Vous
risqueriez d’endommager les circuits ou les haut-parleurs.
Mesures de sécurité pour les disques
N’utilisez pas les disques suivants :
●
Disques fissurés
●
Disques profondément éraflés
Installation
Ne l’installez pas dans les lieux suivants.
●
Lieu humide
●
Lieu dont la température est supérieure ou égale à 60 °C
●
Lieu exposé aux rayons directs du soleil
●
Lieu de surchauffe probable
●
Lieu poussiéreux ou enfumé
●
Lieu sujet à de la fumée ou de la vapeur huileuse tel qu’un plan
de travail ou près d’un humidificateur
●
Lieu instable
●
Salle de bain
●
Lieux poussiéreux
●
Plan incliné
Procédure de nettoyage
IMPORTANT :
●
Veillez à débrancher le graveur avant de procéder au nettoyage.
●
N’utilisez pas de nettoyants liquides ou aérosols.
●
Assurez-vous que le lecteur n’entre pas en contact avec de
l’humidité ou du liquide pendant le nettoyage.
Extérieur du graveur :
Essuyez la saleté à l’aide d’un
chiffon sec.
Chargeur de disque :
Essuyez la saleté à l’aide d’un
chiffon doux et sec.
Disque :
Procédez au nettoyage en douceur
en partant du centre pour revenir vers les bords à l’aide d’un chiffon
doux.
Stockage :
Veillez à conserver les disques dans leurs boîtiers. Si vous empilez
les disques les uns sur les autres sans utiliser leurs boîtiers de
protection, vous risquez de les endommager. Ne placez pas les
disques dans un lieu où ils risquent d’être exposés aux rayons
directs du soleil ou bien où l’humidité ou la température est élevée.
Évitez de laisser des disques dans votre véhicule !
Codes de zone
Les codes de zone sont des numéros permettant de restreindre la
lecture de DVD vidéo. Le monde est divisé en six régions et
chaque région est identifiée par un numéro. Si le numéro d’un
disque ne correspond pas au numéro du lecteur, ce disque ne peut
pas être lu sur le lecteur. (Le code de zone initial est indiqué sur
l’étiquette située sous le graveur.)
Clause de non-responsabilité
JVC n’assume aucune responsabilité en cas de perte de données
résultant de branchements incorrects ou d’une mauvaise
manipulation de l’appareil.
La touche
C
/
B
ne coupe pas complètement l’alimentation de l’appareil,
mais commute le courant de fonctionnement.
A
B
B
indique le mode
d’attente de l’alimentation et
A
C
B
correspond à marche.
ATTENTION :
À propos du placement de l’appareil :
Certains téléviseurs ou appareils électroménagers génèrent des
champs magnétiques puissants. Ne pas placer un tel appareil
électroménager sur l’appareil, car cela risque de provoquer des
troubles de l’image.
Pour déplacer le produit :
Appuyez sur
C
/
B
pour éteindre, et patienter pendant 30 secondes au
moins avant de débrancher le cordon d’alimentation. Ensuite, patienter
2 minutes au moins avant de déplacer le produit.
Modification des codes de zone
Vous pouvez modifier le code de zone afin de lire un DVD associé
à un code de zone différent. (Ce code ne peut pas être modifié
sur certains lecteurs.) Lorsque vous insérez le disque, l’écran
Attention apparaît. Pour modifier le code, suivez les instructions à
l’écran.
Le code de zone du graveur ne peut être modifié que
4 fois
. Le
code défini la quatrième fois devenant le code final, veillez à
définir un code fréquemment utilisé. Soyez vigilant lors du
changement de code.
CU-VD20_Instruction_FR.fm Page 3 Thursday, March 1, 2007 8:38 PM
4 FR
ATTENTION :
N’utilisez pas un adaptateur CA, un cordon d’alimentation ou un câble USB autre que ceux fournis avec le graveur. Cela pourrait causer un choc électrique ou un feu.
Ce graveur peut être utilisé soit à la position horizontale ou verticale. Lorsque vous l’utilisez à la position verticale, alignez l’évent du graveur
avec le support fourni et puis placez et fixez le graveur solidement sur le support.
Lorsque vous insérez un disque, veillez à ne pas toucher le côté lecture/enregistrement du disque.
Accessoires
Adaptateur CA (AP-V400U)
Cordon d’alimentation
Câble USB
(Pour se brancher à l’appareil photo)
CD-ROM
Disque vierge (DVD-R)
Support
Guide sur les pièces et les commandes
Mise en place du graveur
A
Interrupteur
(
C
/
B
)
B
Touche d’éjection
C
Lampe témoin
D
Chargeur de disque
D
B C
A
E F
Avant
Arrière
E
Connecteur CC
F
Connecteur USB
Évent
Support (fourni)
Surface inférieure
Insertion d’un disque
8
Position horizontale
8
Position verticale
CU-VD20_Instruction_FR.fm Page 4 Thursday, March 1, 2007 8:38 PM
FR
5
Raccordement à un ordinateur
A
Raccordez l’adaptateur CA au graveur.
B
Raccordez le câble d’alimentation à l’adaptateur CA.
C
Raccordez le câble d’alimentation à une prise CA.
D
Appuyez sur le bouton
C
/
B
situé à l’avant pour mettre le graveur en marche.
Le témoin vert s’allume.
E
Mettez l’ordinateur sous tension.
F
Raccordez le graveur à l’ordinateur à l’aide du câble USB.
REMARQUE :
Pour raccorder le graveur à un ordinateur, utilisez le câble USB fourni avec l’appareil photo.
Connexions
A B C F E D F
Câble USB (fourni pour l’appareil photo)
Cordon
d’alimentation
(fourni)
Vers la
sortie CA
Vers le connecteur USB
Ordinateur
Arrière du graveur
Adaptateur CA
(fourni pour le graveur)
CU-VD20_Instruction_FR.fm Page 5 Thursday, March 1, 2007 8:38 PM

6 FR
Power2Go 5.5 Lite est un logiciel d’écriture de fichiers vidéo,
images, audio et de données vers des DVD de données.
Configuration requise
Le tableau suivant indique la configuration requise pour
l’installation.
* Si vous utilisez un câble USB1.1, l’écriture nécessitera environ 3 heures.
Procédure d’installation
1.
Insérez le CD-ROM d’installation dans le lecteur de CD-ROM.
L’installation est maintenant terminée.
REMARQUES :
●
La procédure ci-dessus ne constitue qu’une explication rapide de
l’installation du logiciel. Pour de plus amples détails sur le
fonctionnement de Power2Go 5.5 Lite, reportez-vous au Guide
de l’utilisateur, à l’Aide et au fichier LisezMoi installés en même
temps que le logiciel. Vous pouvez afficher le Guide de
l’utilisateur, l’Aide et le fichier LisezMoi à partir du menu
Démarrer de l’ordinateur.
●
Ce produit ne peut pas écrire de fichiers sur CD-R ou CD-RW. En
outre, il ne prend pas en charge toutes les commandes de
Power2Go 5.5 Lite.
●
La clé du produit (Clé du CD) suivante est requise pour
communiquer avec le service à la clientèle et enregistrer le logiciel :
PXNVM-NWE4G-XQD9Q-CU9DX-3FQFN-NAKUS
●
Power2Go 5.5 Lite ne prend pas en charge la conversion de
fichiers audio en format MP3.
●
Lorsque l’écran [Saisir la clé d’activation] apparaît durant
l’utilisation de Power2Go 5.5 Lite, fermez l’écran sans saisir la clé
d’activation.
CyberLink Power2Go 5.5 Lite Contacts
Pour plus d’informations sur CyberLink Power2Go 5.5 Lite ou d’autres produits, utilisez les coordonnées suivantes.
Assistance téléphonique/par fax
Assistance téléphonique payante
Assistance Internet/par courrier électronique
Logiciel d’écriture : CyberLink Power2Go 5.5 Lite
Système
d’exploitation
Windows
®
XP Édition familiale [XP] (installé d’origine)
ou Windows
®
XP Professionnel [XP] (installé
d’origine)
CPU
Intel
®
Pentium
®
III, 800 MHz minimum
(Intel
®
Pentium
®
4, 2 GHz minimum recommandés)
Espace libre sur
le disque dur
50 Mo minimum pour l’installation
5 Go minimum recommandés pour la réalisation de DVD
RAM
128 Mo minimum (256 Mo minimum recommandés)
Connecteur
Connecteur USB 2.0/1.1*
Écran
Doit pouvoir afficher 800 x 600 points
2.
L’écran de sélection de la langue
apparaît.
3.
L’écran de démarrage de
l’installation apparaît.
Cliquez sur [Suivant].
4.
Lisez attentivement les directives
affichées et puis cliquez sur [Qui].
5.
Saisissez les données de
l’utilisateur, puis cliquez sur
[Suivant].
Suivez les instructions à l’écran.
6.
L’installation commence.
7.
L’écran à droite apparaît lorsque
l’installation est terminée.
Cochez les cases désirées, puis
cliquez sur [Terminer].
●
Si vous sélectionnez [Non, je
redémarrerai mon ordinateur
plus tard.], l’écran de
configuration terminée à l’étape
8.
apparaît.
8.
Cliquez sur [Terminer].
Lieu
Langue
Heures d’ouverture (du lundi
au vendredi)
Tél. :
Fax :
Allemagne
Anglais / Allemand / Français /
Espagnol / Italien / Néerlandais
de 9h00 à 17h00
+49-700-462-92375
+49-241-70525-25
Taiwan
Mandarin
de 9h00 à 18h00
+886-2-8667-1298
poste 333
+886-2-8667-1300
Lieu
Langue
Les lignes sont ouvertes du
lundi au vendredi
URL
États-Unis
Anglais
De 13h00 à 22h00, heure du centre
des États-Unis
http://www.cyberlink.com/english/cs/support/
new_site/voice_support.jsp
Langue
URL/adresse de messagerie
Anglais
http://www.cyberlink.com/english/cs/support/new_site/support_index.html
Allemand / Français / Espagnol / Italien
goCyberlink@aixtema.de
CU-VD20_Instruction_FR.fm Page 6 Thursday, March 1, 2007 8:38 PM
