JVC WR-MG270: инструкция
Раздел: Видео Аудио Фото Оборудование
Тип: Экшн Камера
Инструкция к Экшн Камере JVC WR-MG270
WR-MG270_EN.book Page 1 Wednesday, March 24, 2010 1:36 PM
WR-MG270
ENGLISH
DEUTSCH
Marine Case
INSTRUCTIONS
FRANÇAIS
Unterwassergehäuse
NEDERLANDS
BEDIENUNGSANLEITUNG
Boîtier sous-marin
CASTE.ESP.
MANUEL D’UTILISATION
ITALIANO
Onderwaterhuis
GEBRUIKSAANWIJZING
РУССКИЙ
Carcasa submarina
POLSKI
MANUAL DE INSTRUCCIONES
Custodia subacquea
ISTRUZIONI
Бокс для подводной съемки
ИНСТРУКЦИЯ ПО ЭКСПЛУАТАЦИИ
Obudowa podwodna
INSTRUKCJA OBSŁUGI
潛水盒
使用說明書
WR-MG270_EN.book Page 12 Wednesday, March 24, 2010 1:36 PM
In order to use this product safely
Safety Precaution
Preparation (A Pg. 16)
Before use, this unit must be pre-
• Check that there is no dirt, cracks, or damage to
tested to check if there is any water
the O-ring.
leakage.
• Always apply grease to the O-ring.
Please read before use
Attaching the Marine Case to the Camera
This marine case is a precision instrument
(A Pg. 17, 18)
designed to permit safe video recording under
• Attach the power button cap depending on the
high water pressure. Please pay careful attention
camera used.
when handling the unit before and after use, as
• Make sure that the O-ring is not twisted, and that
explained in this user’s manual.
you do not forget to attach it.
Each part of the marine case has been subject to
strict controls during the manufacturing process,
• When tightening the seal, make sure there are
and the individual functions have faced stringent
no foreign objects caught in the seal.
tests during the assembly process. Each marine
case has also had to pass waterproof inspections
using high-pressure water testers. However,
damage can sometimes occur during transport
Recording the Video/Still Image Files
and distribution, or during storage after purchase,
(A Pg. 18, 19)
so before diving always carry out the following
• Avoid opening and closing the marine case in
pre-use test to verify safety.
the shooting location.
• When holding the marine case, lower it gently
Pre-use test
into the water.
Be sure to perform the following pre-use test
before diving.
1. Before mounting the camera inside the
marine case, dive with only the empty
Detaching the Marine Case/Maintenance
marine case and test for water leaks.
(A Pg. 19, 20, 21)
Allow 5 or 6 minutes to ensure there are no
• Always wash the marine case in fresh water
leaks.
after use.
Be sure to perform this test to ensure the
• Perform maintenance on the O-ring.
safety of your camera.
2. The following are some common causes of
water leaks:
If water leaks into the case due to careless use of
the marine case, JVC cannot accept responsibility
A. The marine case is used without attaching
for any damage that may occur to the internal
the O-ring.
equipment and materials (video camera, SD card,
B. The O-ring is not mounted in the correct
etc.), or any expenses incurred in taking the
position.
photographs/video. Therefore, please be careful
C. The O-ring is damaged or deformed.
when using the marine case.
D. There is sand, dirt, hair or other foreign
matter on the O-ring.
E. There is sand, dirt, hair or other foreign
matter on the contact surface of the O-ring
or on the inside of the lid.
F. The provided strap or drying agent bag is
pinched inside the marine case when the lid
is closed.
12
WR-MG270_EN.book Page 13 Wednesday, March 24, 2010 1:36 PM
3. Check that there are no scratches or cracks
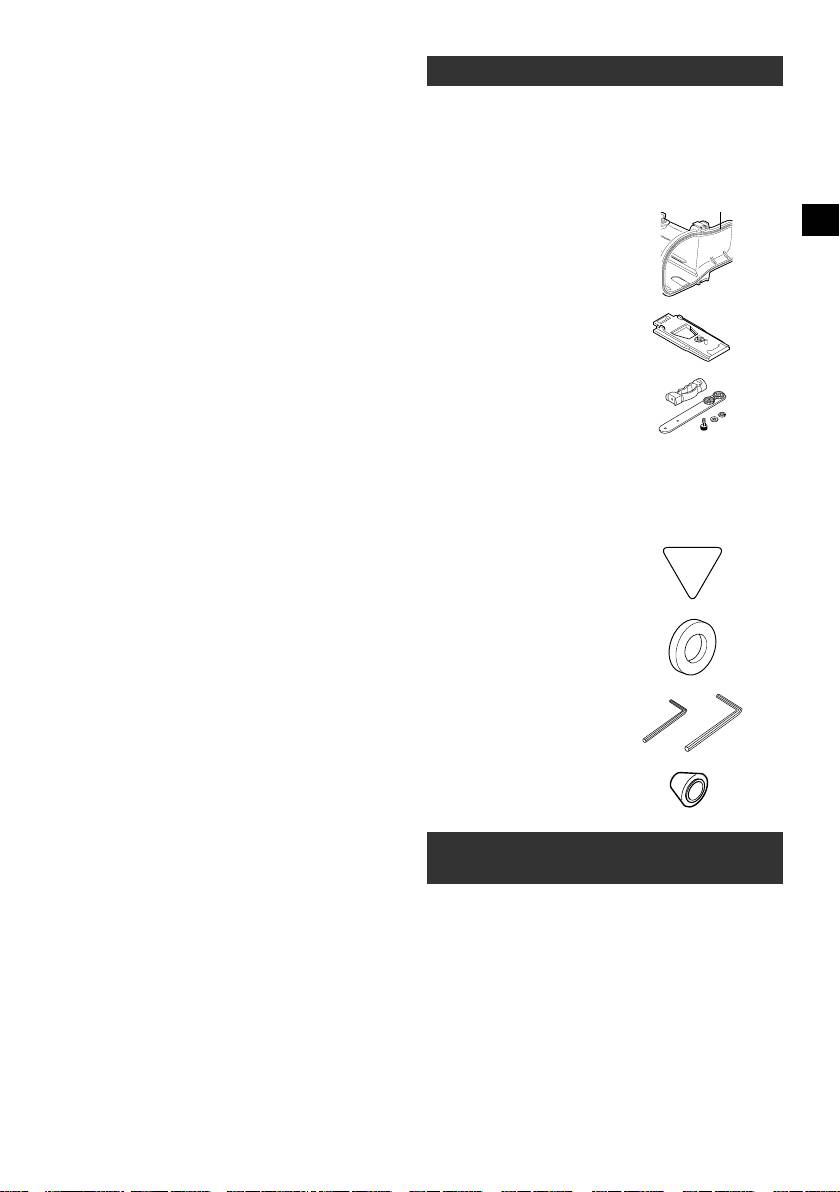
Accessories
on the marine case every time you use it.
The marine case must withstand water
• Anti-fog liquid
pressure with use. Repeated exposure to
• Silicone grease (5 g) x 1
pressure eventually leads to material fatigue,
• Silicone cloth
which may result in damage of the marine
• Drying agent (2 g) x 5
case. Every time you use the marine case,
check in advance that there are no scratches
•Strap
or cracks. If you frequently use the marine
•2 O-rings
O-ring
case, be sure to ask for maintenance at the
One spare O-ring.
store of purchase. (There is a charge for
maintenance.)
To protect your camera and ensure optimum use,
keep the examples listed above in mind when
•Base
using the marine case.
To attach to the camera.
JVC accepts no responsibility for water leakage or
damage to anything inside the marine case
•Grip
(camera, SD card, etc.) due to careless usage of
Commercially available
this product. Be sure to follow correct procedures
lights and weights can also
when using the marine case.
be attached.
¹ When there is a need for
buoyancy adjustment,
attach commercially
available weights to the
grip.
•Pick
• Screw tightening key
• 2 hexagonal wrenches
Large: for screwing the grip
Small: buckle opener
• Power button cap
Maintenance Kit - Sold Separately
(Part Number: MG270_MTKIT)
You can purchase the following set of expendable
parts.
Please contact your local JVC service
representative.
•O-rings x 2
• Silicone grease (5 g) x 1
• Drying agent (2 g) x 5
• Lens tissue paper (50 sheets) x 1
• Power button cap x 2
13
WR-MG270_EN.book Page 14 Wednesday, March 24, 2010 1:36 PM
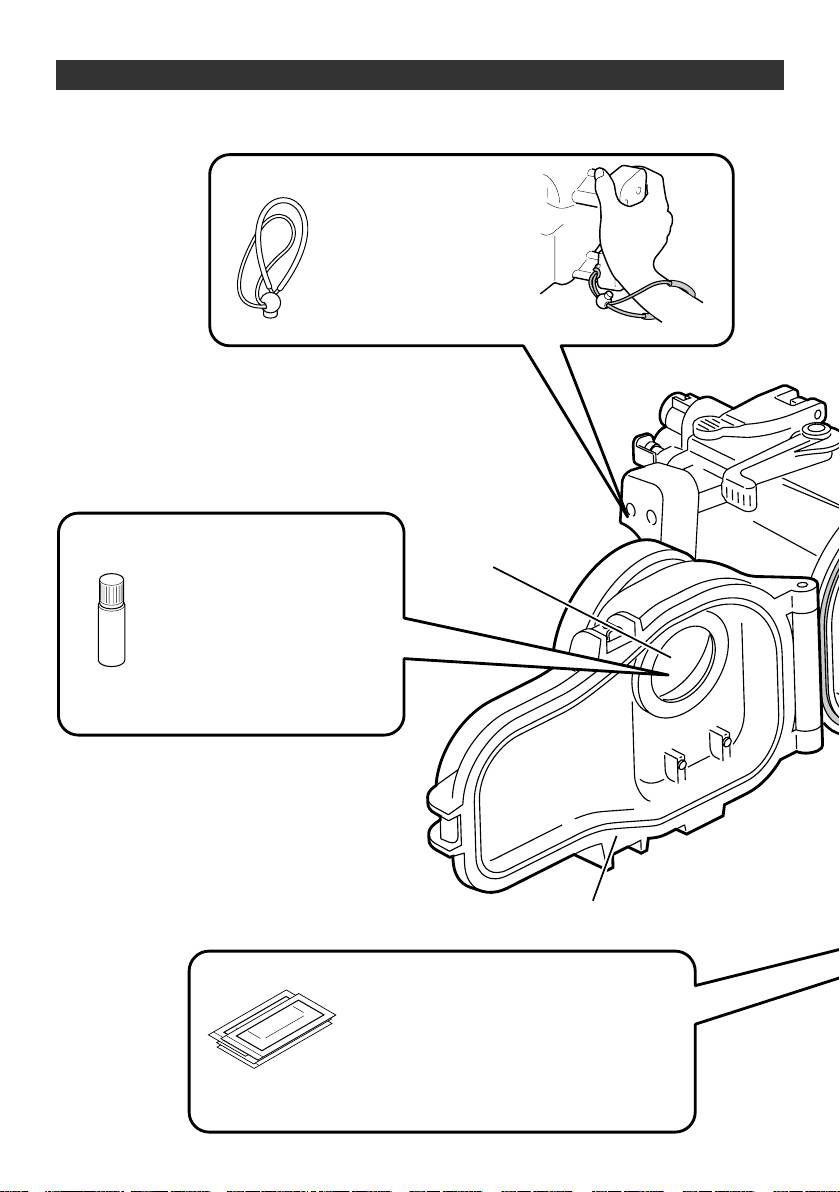
Procedures for Using the Supplied Maintenance Kit
Strap
Pass the strap through the
strap attachment hole
before using the marine
case to maintain a firm grip
in water.
Anti-fog liquid
Front glass
Apply the anti-fog liquid on the
inner side of front glass before
using the marine case.
Add two to three drops of the
liquid on a lens tissue paper
(commercially available) or a
clean cloth, and apply on the inner
side of the front glass.
Marine case
Drying agent
Prevents fogging inside the marine case.
Insert it at the back of the base attached to the
camera.
¹ The moisture absorption ability of drying
agent that has previously been used may
deteriorate depending on the conditions of
use. As such, we recommend that the drying
agent be replaced each time.
14
WR-MG270_EN.book Page 15 Wednesday, March 24, 2010 1:36 PM
Silicone cloth
Wash the marine case with
fresh water, and wipe the outer
side of the whole case with the
silicone cloth after drying.
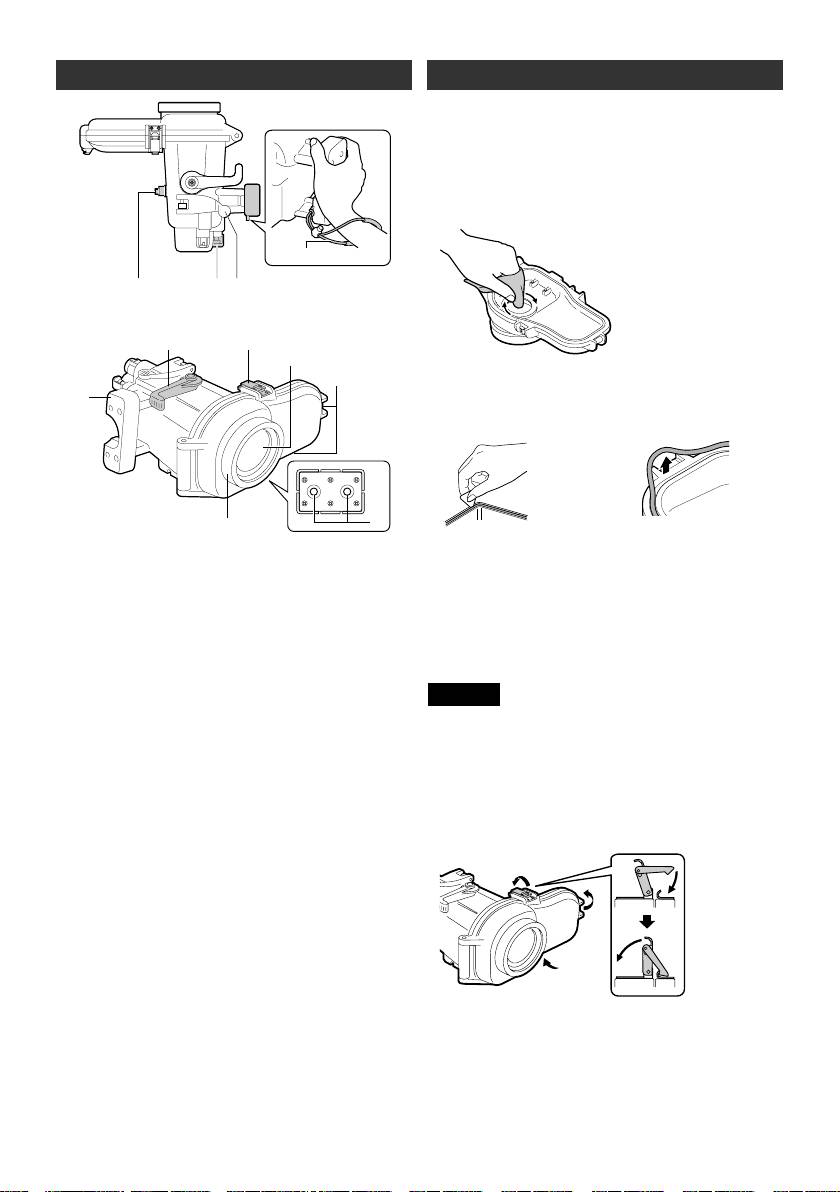
Buckle
Hexagonal wrench (small)
Buckle
(Buckle opener)
For use when you have
difficulty opening the
buckle.
Hook the wrench to the
buckle and pull towards
you.
Base
Grip belt of camera
Screw tightening key
Use the key to tighten
the screw of the base.
15
WR-MG270_EN.book Page 16 Wednesday, March 24, 2010 1:36 PM
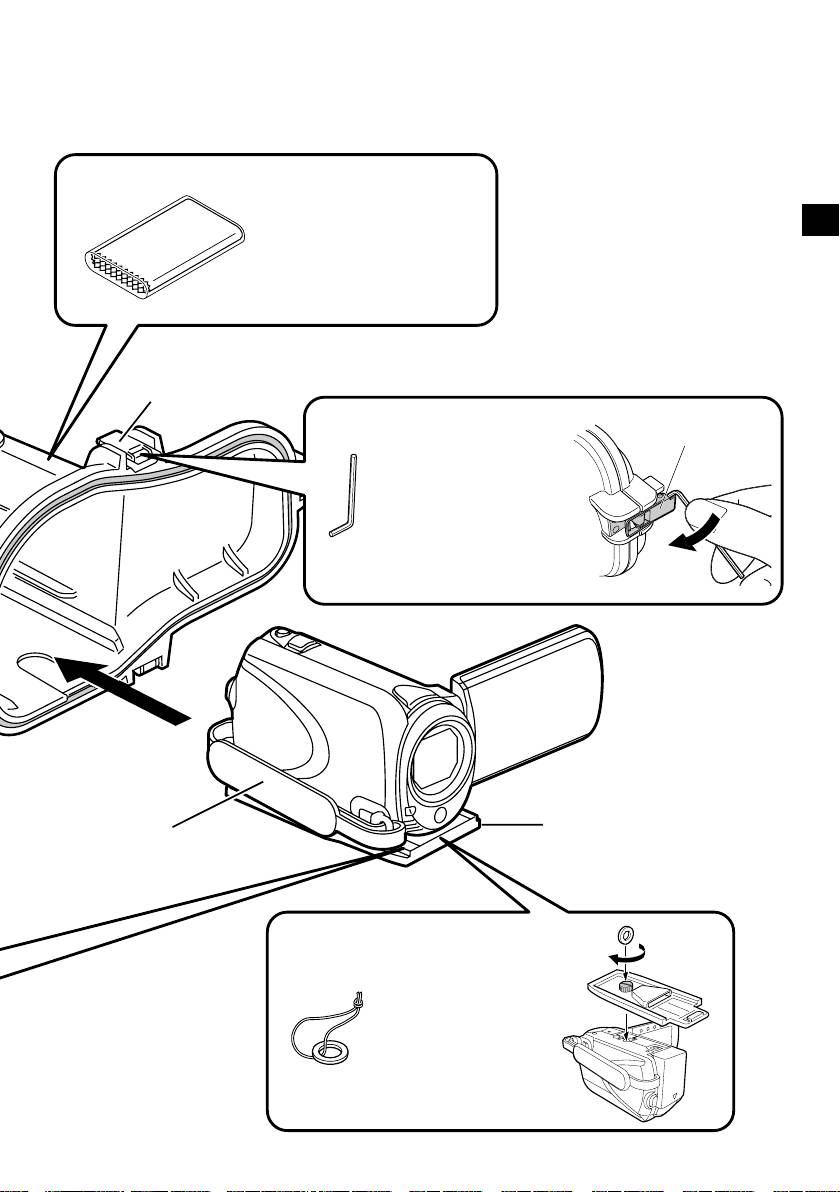
Parts and Functions
Preparation
A
Inspect the main casing for scratches and
cracks.
Apply 2 or 3 drops of the anti-fog liquid
provided onto a lens tissue paper
(commercially available) or a clean cloth, and
wipe the inner side of the marine case front
glass.
Strap
786
24
Front glass
4
B
Check the O-ring.
1
Using the pick provided, remove the O-ring
from the main case.
B
5
3
Bottom view
Check the O-ring, O-ring contact surface, and
1. Main casing grip
groove in which the O-ring fits for foreign
Attach the strap provided as shown in the
matter, nicks, cracks, etc.
diagram above.
Be sure to remove any foreign matter (dirt,
2. Zoom lever
sand, salt crystals, hair, lint, etc.).
Zoom (tele/wide) while shooting.
¹ For details, refer to the “O-ring
3. Ring
Maintenance Manual”.
Commercially available filters (67 mm
diameter) can be attached.
Caution
4. Buckle (3 locations)
z Never use the O-ring in case of nicks and
Seal the marine case.
cracks.
5. Grip attachment holes
z If the O-ring is handled inappropriately, it can
cause water leakage .
You can attach the grip provided, or
commercially available weights.
C
Apply grease to the O-ring and re-attach.
6. Still image lever
D
Close the empty marine case (no camera
Press to take still images.
inside).
7. Video recording start/stop button
Press once to start recording a video.
Press again to stop.
8. Power button
Turns camera’s power on/off.
E
Submerge the marine case in water and
check that there are no water leaks.
(A Pg. 18)
16
WR-MG270_EN.book Page 17 Wednesday, March 24, 2010 1:36 PM
D
Fold the grip belt.
Attaching the Marine Case to the
z Make sure the grip belt is not caught
Camera
between the marine case when sealing.
A
Setup the camera.
E
Open the marine case.
z For models equipped with light, turn off the
z If it is difficult to open buckles, use the
light.
small hexagonal wrench (buckle opener).
z Open the lens cover.
z Set to the shooting mode (video/still
image).
¹ Even when the shooting mode is set to
“video”, still images can be captured by
pressing the still image lever during video
recording.
z It is recommended to set to the auto
Small hexagonal wrench
shooting mode.
(Buckle opener)
z Insert the battery and the microSD/
F
Attach the power button cap.
microSDHC card or SD/SDHC card
(Not required for GZ-HM545 to GZ-HM570.)
beforehand if needed.
z Fit the hollow of the power button cap to
z To turn off the camera, press and hold the
the protrusion of the power button on the
power button for more than 2 seconds.
case.
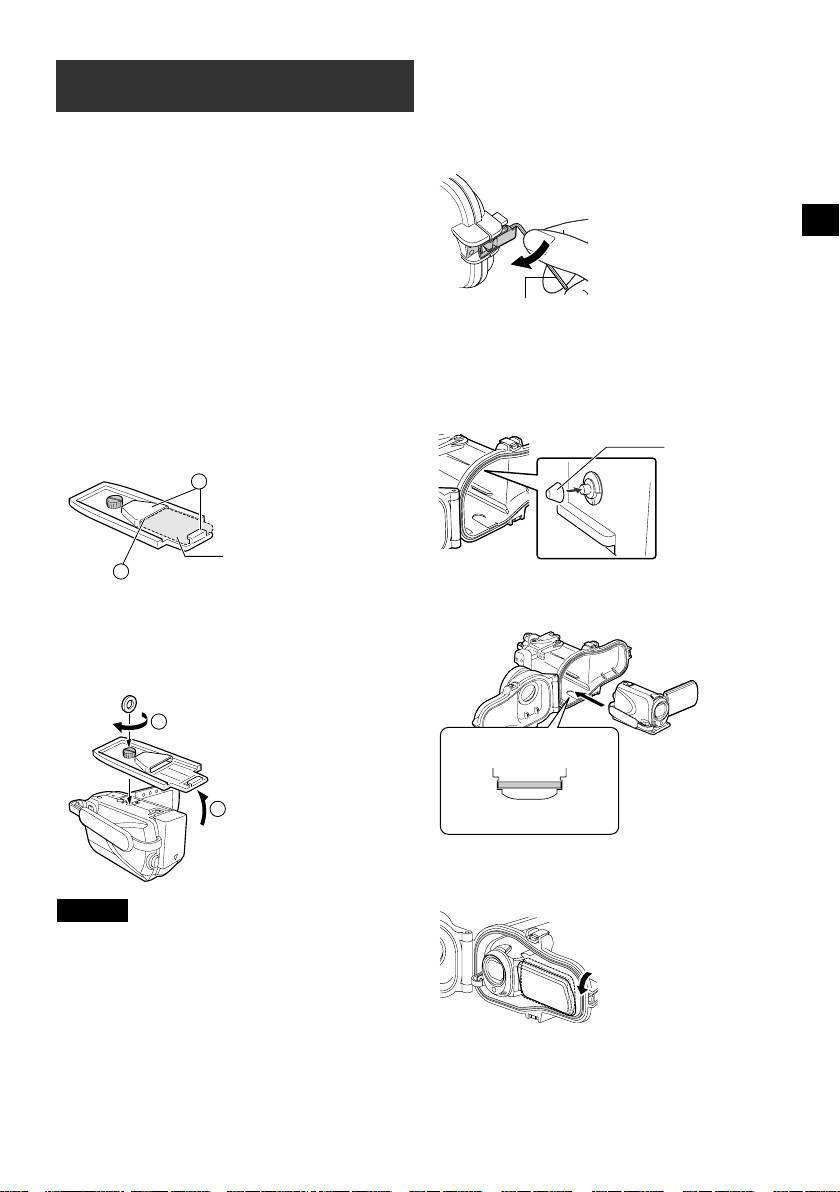
B
Insert the drying agent at the back of the
Power button cap
base.
2
Catch
Drying agent
1
Pass underneath
G
Insert the camera into the marine case.
z Align the base attachment groove with the
C
Attach the base to the bottom of the
base to insert.
camera.
z Align the tripod screw hole at the bottom of
your camera with the screw of the base,
and tighten the screw.
2
Tighten the screw
Base attachment groove
Base
1
Open up the LCD monitor
Marine case internal base
H
Adjust the angle of the LCD monitor.
z The LCD monitor can be tilt upwards to a
maximum angle of 30 degrees.
Caution
z The camera turns on automatically when the
LCD monitor is opened. To turn off the camera,
press and hold the power button for more than
2 seconds.
17
WR-MG270_EN.book Page 18 Wednesday, March 24, 2010 1:36 PM
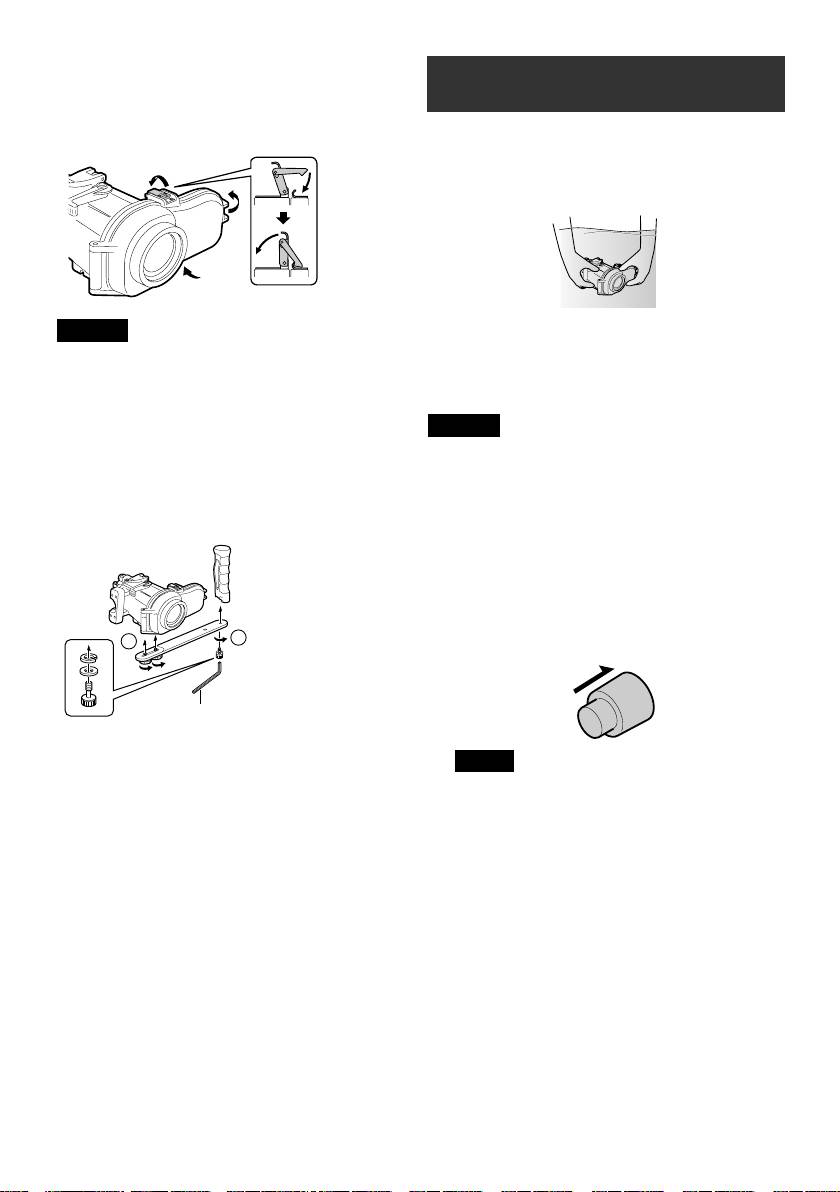
I
Seal the marine case.
Recording the Video/Still Image
z Make sure that the O-ring is not twisted,
Files
and that you did not forget to attach it.
z Make sure that foreign objects (strap, belt,
Before recording
dirt, etc.) have not been caught in between.
Submerge the marine case with the camera
inserted into a bathtub or water tank full of fresh
water. Gradually prolong the time the marine case
is submerged as follows.
Caution
z 1st time: 5 ~ 10 seconds
z 2nd time: 30 seconds ~ 1 minute
z The risk of water leakage is extremely high if
the O-ring is twisted, if you forget to attach it, or
z 3rd time: 3 minutes ~ 5 minutes (try operating
if something is trapped in the seal.
the levers and buttons while the marine case is
submerged).
J
Check that all the operation buttons of the
camera are functioning properly.
Caution
z If it is not functioning, take out the camera
z Always have someone hold the marine case
and insert again.
for you when diving into, or getting out of
water, to prevent loss or damages.
K
Attach the grips.
z If for any reason water leakage occurs, remove
z Attach the grips, lights or weights on the
the camera battery. It may cause the camera to
bottom of the marine case.
explode.
A
Turn on the camera’s power.
z Press and hold the power button for more
than 2 seconds to turn on the power. (The
camera’s power lamp lights and the
monitor turns on.)
2
1
ON/OFF
Large hexagonal wrench
(for screwing the grips)
Note
z Sometimes, due to sudden shaking or
impact to the marine case, the camera’s
drop detection function operates to turn off
the camera’s power. When the camera’s
power is turned off, turn it on again.
18

WR-MG270_EN.book Page 19 Wednesday, March 24, 2010 1:36 PM
B
Press the video recording start/stop button
Detaching the camera
or the still image lever to start recording.
If there is a need to detach immediately:
A
Submerge the marine case in fresh water
Zooming
and shake the marine case in the upward,
(Tele)
downward, left and right directions for at
least 10 times, followed by rinsing it.
Zooming
Still image lever
(Wide)
B
Remove the marine case and wipe off
Shoot still images.
water droplets on the case surface using a
dry towel.
C
Face the front glass of the marine case
Video recording start/stop button
upwards, and open the buckles to remove
Start/stop the video recording.
the camera, while paying attention not to
let water droplets at O-ring or buckles
C
When you have finished recording, press
enter the case.
and hold the power button for more than 2
seconds to turn off the camera.
D
Upon removing the camera, close the
marine case again while paying attention
z The camera’s power lamp goes out and the
not to allow water droplets enter the case,
monitor turns off.
followed by tightening all the buckles.
¹ Always perform maintenance on the
marine case after using. (A Pg. 20)
If there is no need to detach immediately:
Perform maintenance on the marine case.
(A Pg. 20)
19
WR-MG270_EN.book Page 20 Wednesday, March 24, 2010 1:36 PM
Maintenance on the marine case
Caution
z The camera may fall out if the buckles are
Always perform maintenance on the marine case
opened with the front glass facing down.
after you have finished recording.
z If you cannot avoid opening the marine case at
Salt crystal or dirt will accumulate inside the
the diving location, pay attention not to let
marine case if maintenance is not performed, and
water droplets from your hair or your body
this can cause water leakage.
enter the case.
Wash the marine case in water
while it is still sealed
z Do this within 30 minutes after diving.
z Pour in fresh water until the marine case is
completely submerged in the container, and
shake the marine case in the upward,
downward, left and right directions.
z Move the buttons and levers while the marine
case is submerged, and rinse the dirt out from
E
Remove the O-ring, and wipe off salt, sand
any gaps or grooves. Proceed to C
and other foreign matter.
z If used in the sea
z Also wipe the groove in which the O-ring
-> Proceed to
Aerforming salt removal
was inserted, and the part of the marine
case that was in contact with the O-ring,
Performing salt removal
and allow them to dry.
¹ For details on handling and storing the
O-ring, refer to the “O-ring Maintenance
If the marine case was used in the sea, submerge
Manual”.
the marine case in fresh water for at least 1 hour
to remove salt.
A
Prepare a container that contains fresh
water that is five times more than the
volume of the marine case.
Dirt, sand, salt
z The container must be big enough to allow
crystals, etc.
the marine case to submerge fully.
Hair, lint, etc.
z If only small containers are available, pour
in fresh water that is equivalent to at least
five times the volume of the marine case
over a few times.
z Shaking the marine case in the upward,
downward, left and right directions will be
more effective.
z Move the buttons and levers while the
F
Wipe the inside and outside of the marine
marine case is submerged, and rinse the
case with a dry cloth.
salt out from any gaps or grooves etc.
¹ Use a lint-free cloth to wipe the inside of
z Make sure the grip is also free of salt.
the marine case.
G
Wipe the inner side of the front glass.
B
Put in fresh water for at least 1 hour.
z Add a few drops of the cleaner liquid
(commercially available) onto the inner side
C
Remove the marine case and wipe off
water droplets on the case surface using a
of the front glass, and wipe off using a lens
dry towel.
tissue paper, clean cloth, etc.
D
Remove the camera.
z Face the front glass of the marine case
upwards, and open the buckles to remove
the camera, while paying attention not to let
water droplets at O-ring or buckles enter
the case.
20
WR-MG270_EN.book Page 21 Wednesday, March 24, 2010 1:36 PM
Caution
Specifications
z The front glass will fog if it is dirty.
Maximum
Water depth up to 40 meters
H
Let it dry completely in a shaded area.
pressure
Operations Power on/off
Caution
Video recording start/stop
z Do not leave the marine case in direct sunlight.
Still image shooting
z Doing so may cause discoloration of the case,
Zoom (tele/wide)
and may cause the O-ring to deteriorate more
quickly.
Filter diameter 67 mm
Main unit
216 mm x 179 mm x 128 mm
Note
dimensions
z The conditions may vary depending on the
(W x D x H)
environment of use such as temperature,
humidity, water temperature, salinity and
Main unit weight Approx. 890 g
others.
(excluding grip)
Storing the O-ring
o Applicable camera models
From GZ-HM300 to GZ-HM350
If you do not intend to use the marine case for
From GZ-HM545 to GZ-HM570
longer than one month, remove and store the
From GZ-HD500 to GZ-HD620
O-ring away.
¹ For details, refer to the “O-ring Maintenance
Manual”.
The O-ring is an expendable part. Replace the
O-ring with a brand new one every year.
Caution
z When re-using an O-ring after storage, always
check the condition of the O-ring. Never use an
O-ring if it is deformed (crushed, distorted),
cracked, or damaged in any way.
21

WR-MG270_EN.book Page 2 Wednesday, March 24, 2010 1:36 PM
WR-MG270
ENGLISH
DEUTSCH
Marine Case
FRANÇAIS
INSTRUCTIONS
Unterwassergehäuse
NEDERLANDS
BEDIENUNGSANLEITUNG
Boîtier sous-marin
CASTE.ESP.
MANUEL D’UTILISATION
ITALIANO
Onderwaterhuis
GEBRUIKSAANWIJZING
РУССКИЙ
Carcasa submarina
POLSKI
MANUAL DE INSTRUCCIONES
Custodia subacquea
ISTRUZIONI
Бокс для подводной съемки
ИНСТРУКЦИЯ ПО ЭКСПЛУАТАЦИИ
Obudowa podwodna
INSTRUKCJA OBSŁUGI
潛水盒
使用說明書
WR-MG250_SHEET_EN_A5.book Page 1 Wednesday, May 13, 2009 9:34 AM
O-ring Maintenance Manual
ENGLISH
O-Ring-Wartungshandbuch
DEUTSCH
Manuel d’entretien du joint d’étanchéité
FRANÇAIS
Onderhoudshandleiding voor de O-ring
NEDERLANDS
Manual de mantenimiento de la junta tórica
CASTE.ESP.
Manuale di manutenzione dell’anello circolare
ITALIANO
Руководство по уходу за уплотнительным
РУССКИЙ
кольцом
Instrukcja konserwacji pierścienia uszczelniającego
POLSKI
P ীᛩፂᥨ֫ם
WR-MG250_SHEET_EN_A5.book Page 1 Wednesday, May 13, 2009 9:34 AM
O-ring Maintenance Manual
O-Ring-Wartungshandbuch
Manuel d’entretien du joint d’étanchéité
Onderhoudshandleiding voor de O-ring
Manual de mantenimiento de la junta tórica
Manuale di manutenzione dell’anello circolare
Руководство по уходу за уплотнительным
кольцом
Instrukcja konserwacji pierścienia uszczelniającego
P ীᛩፂᥨ֫ם
ENGLISH
DEUTSCH
FRANÇAIS
NEDERLANDS
CASTE.ESP.
ITALIANO
РУССКИЙ
POLSKI
LYT2232-002A
O リングについて
日本語
WR-MG250_SHEET_EN_A5.book Page 2 Wednesday, May 13, 2009 9:34 AM
O-ring
What is O-ring?
● O-ring is a type of seal used to make underwater
O-ring
cameras, strobes and other diving instruments,
waterproof.
It looks like a big, thick rubber band.
● The O-ring is an important component that protects the
camera from water by keeping the marine case airtight.
When should the O-ring be inspected?
● As a general rule, each time before using
(Salt cr ystals are formed when seawater that entered the O-ring groove dries.
Salt crystals just like sand, can cause water leakage.)
● When shooting on the sandy seabed, or when the camera is placed on the
sand
● When not used for a long period of time
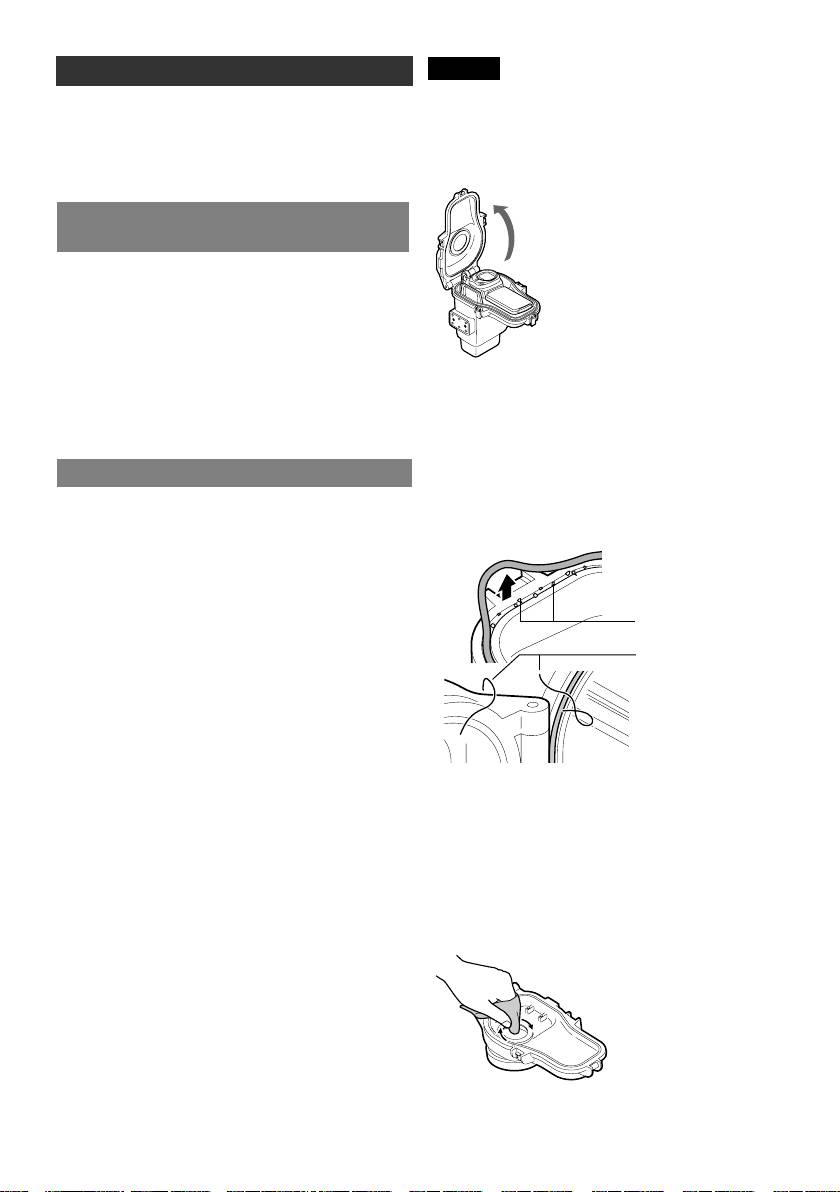
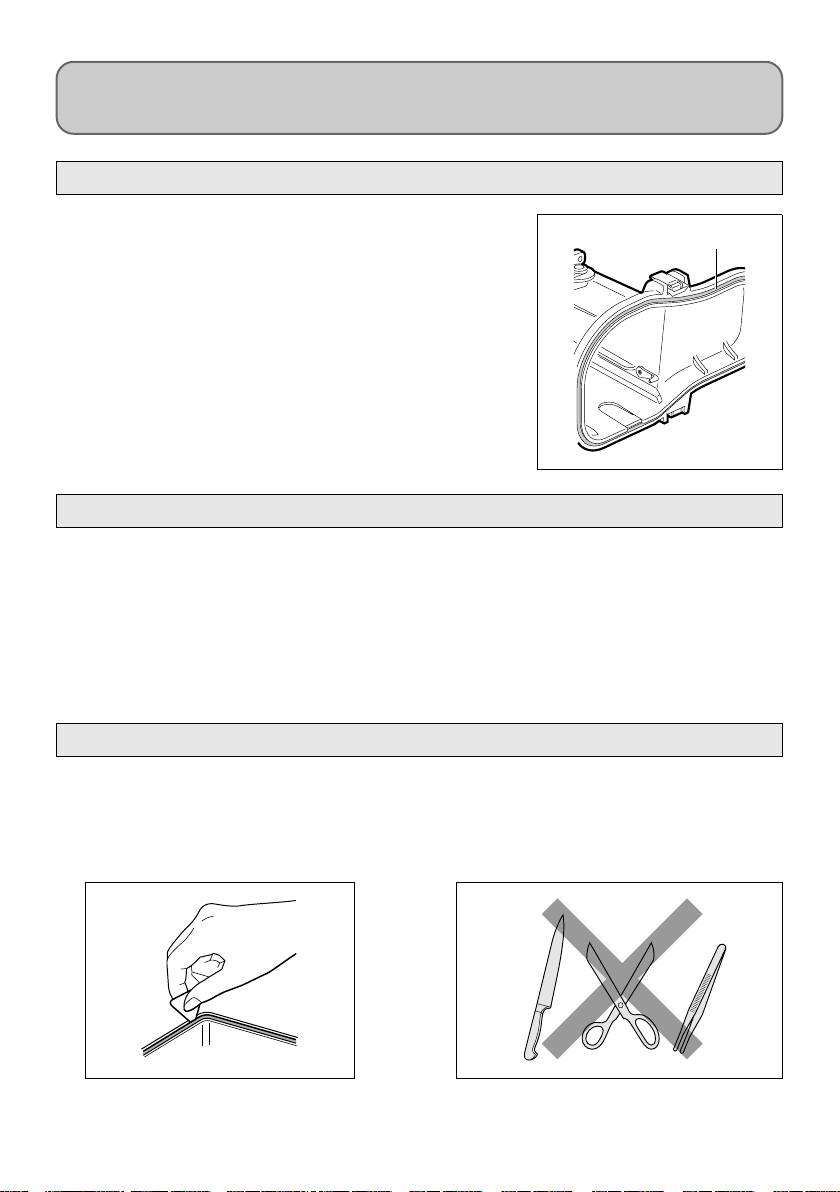
Inspection and maintenance of the O-ring
● Remove the O-ring
¹ To inspect the O-ring, use the pick supplied to remove it from the O-ring groove.
¹ Do not use knifes, scissors, tweezers, and other sharp objects which might damage the
O-ring and the O-ring groove.
WR-MG250_SHEET_EN_A5.book Page 3 Wednesday, May 13, 2009 9:34 AM
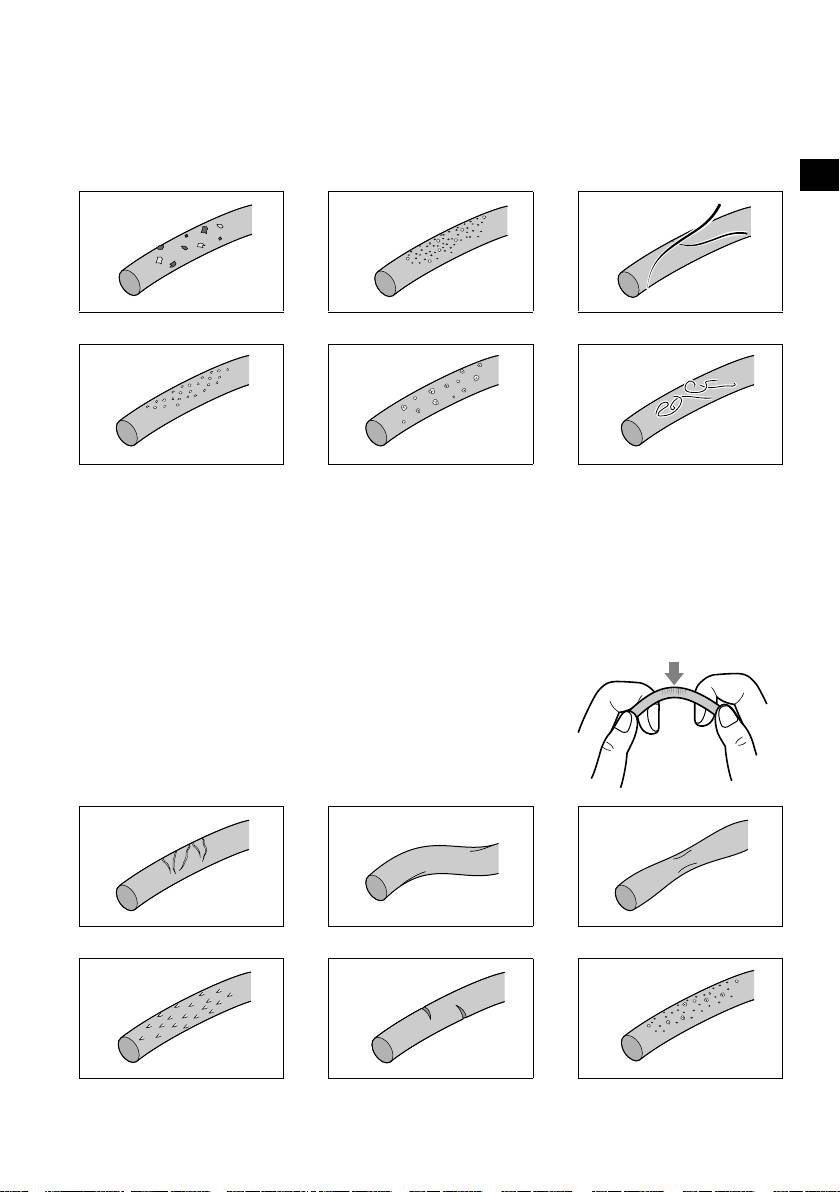
● Check for hair, dirt, sand, salt, dust, and other foreign matter
¹ Even small foreign matter can cause water leakage.
● Check for foreign matter that are not visible by rubbing gently with your
fingers
¹ Be sure to remove all foreign matter.
JDirt JSand JHair
JDust JSalt JLint
● Wipe off any residual grease
Wipe off gently with a soft cloth or tissue paper.
¹ After wiping, make sure the fiber of the cloth or tissue paper is not adhered to the
O-ring.
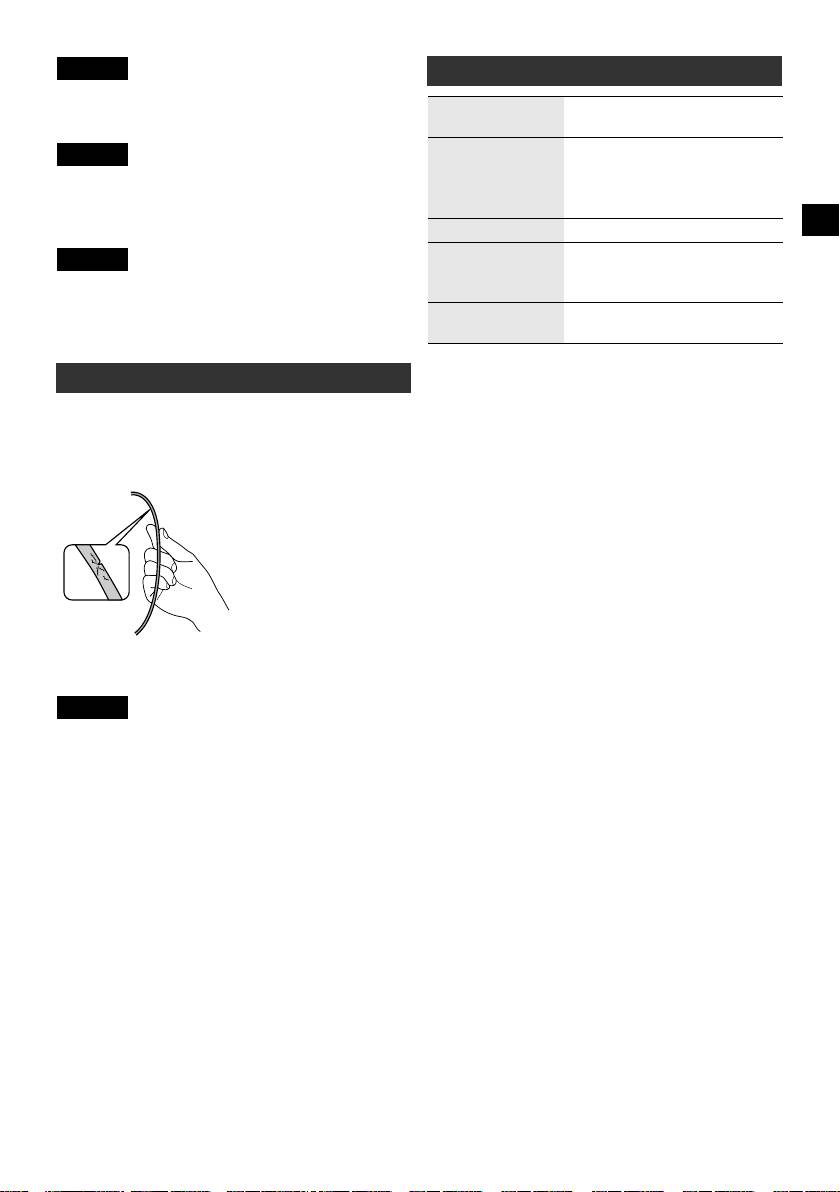
● Check for any deforms (distorted, crushed), cracks or cuts on the surface
Cracks on the O-ring can be easily spotted by bending and
Cracks
twisting it gently.
¹ Never use an O-ring if it is deformed, cracked, or
damaged in any way. It can cause water leakage.
¹ Replace the O-ring with a brand new one every year.
Even if there are no nicks, cracks, etc., its effectiveness
will deteriorate due to wear.
JCracks JDistortion JCrushed
JFrayed JNicks JSand corrosion
WR-MG250_SHEET_EN_A5.book Page 4 Wednesday, May 13, 2009 9:34 AM
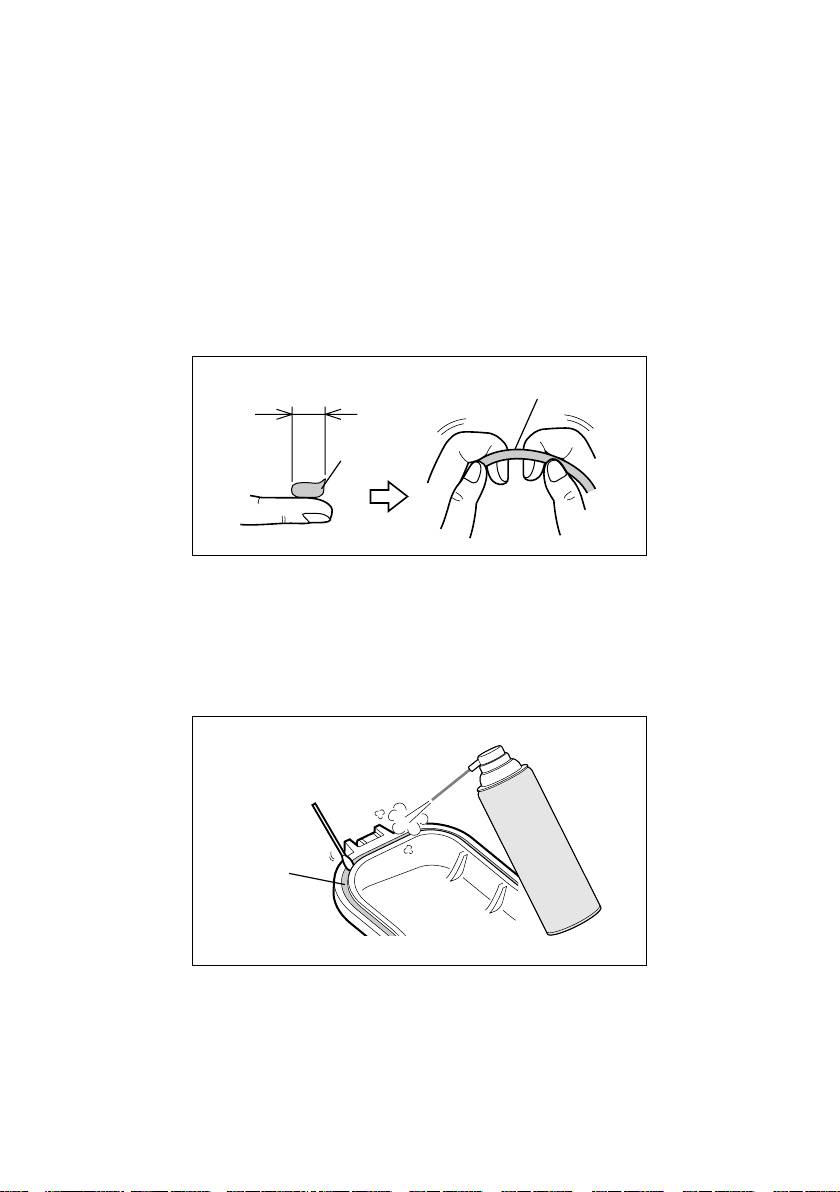
● Apply silicone grease on the O-ring
The O-ring needs to be re-greased when its surface appears dry.
Be sure to remove the O-ring and apply the silicone grease on it.
A Squeeze about 1 cm onto your finger
B Apply it on the O-ring by holding the O-ring with your fingers.
If the amount applied is not enough, repeat the above step.
¹ Make sure that you do not apply too much grease!
Dirt and dust will easily adhere if too much grease is applied.
Neither will it improve the waterproofing. Be sure to apply moderately.
¹ Do not pull too strongly!
This will cause deformation.
About 1 cm
O-ring
Grease
● Check for any foreign matter in the O-ring groove
Inspect thoroughly as it is usually not visible.
Grains of sand and crystallize salt may be stuck inside.
Remove them carefully by either using an air spray or a swab.
¹ Make sure the fibers of the swab are not adhered.
Swab
Y
A
R
P
S
Groove
WR-MG250_SHEET_EN_A5.book Page 5 Wednesday, May 13, 2009 9:34 AM
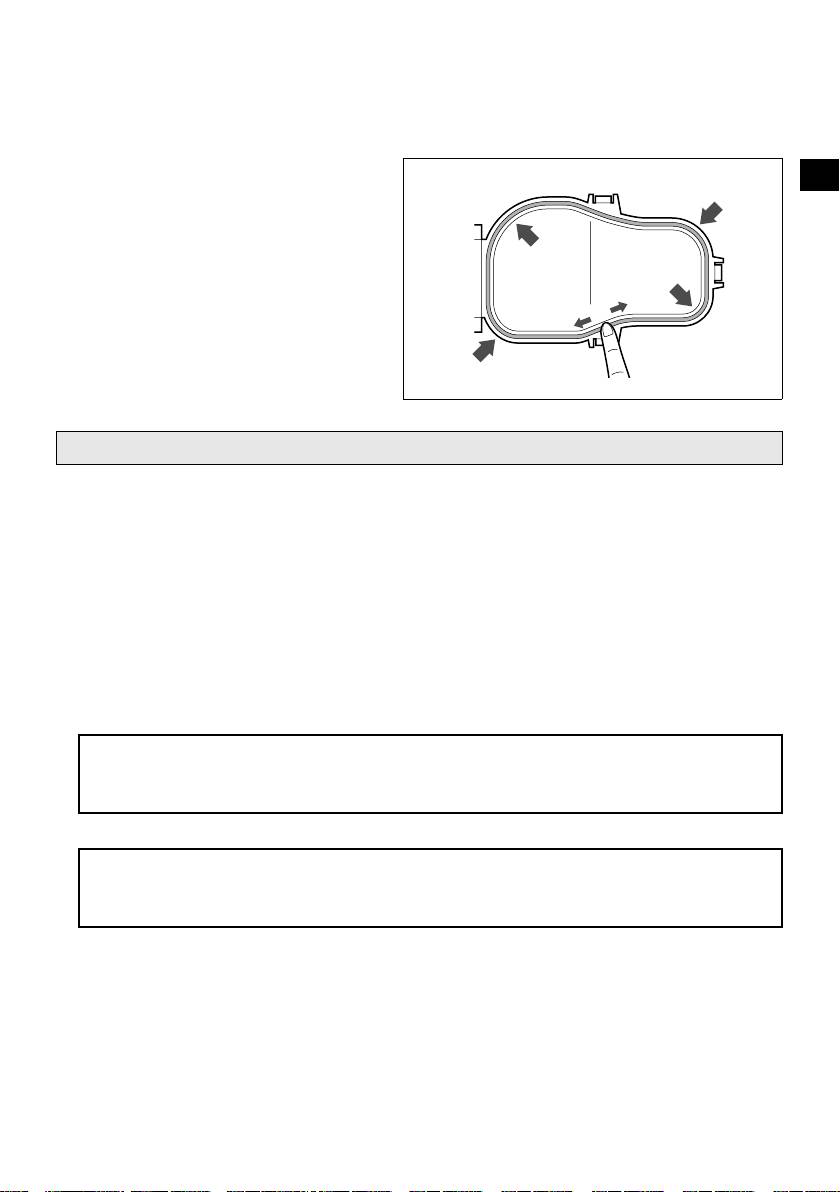
● Insert the O-ring after inspection
Make sure no foreign matter is adhered when placing the greased O-ring back to the
groove.
Do not pull too strongly, and make sure the O-ring is placed evenly and not twisted.
<POINT>
Insert from the four diagonal corners
3
and smooth out evenly.
1
2
5
4
Storing the O-ring
● If you do not intend to use the marine case for a long period of time,
remove the O-ring and allow it to rest.
A Remove the O-ring.
¹ Be sure to use the pick supplied.
B Wipe off the grease gently.
C Check for any foreign matter that might be adhered to it.
D Put the O-ring inside a clean plastic bag, and store in a way that it will not be subject to
stress.
¹ Do not put in moth balls and other insect repellents.
¹ Do not leave the O-ring as-is in the marine case for a long period of time.
It may deform due to heat and pressure resulting from the locked and tightened state.
¹ Do not store in hot and humid locations.
This will cause the O-ring to deteriorate more quickly.
WR-MG250-cover.fm Page 2 Wednesday, May 13, 2009 9:22 AM
ENGLISH
O-ring Maintenance Manual
DEUTSCH
O-Ring-Wartungshandbuch
FRANÇAIS
Manuel d’entretien du joint d’étanchéité
NEDERLANDS
Onderhoudshandleiding voor de O-ring
CASTE.ESP.
Manual de mantenimiento de la junta tórica
ITALIANO
Manuale di manutenzione dell’anello circolare
РУССКИЙ
Руководство по уходу за уплотнительным
кольцом
POLSKI
Instrukcja konserwacji pierścienia uszczelniającego
P ীᛩፂᥨ֫ם
WR-MG250-cover.fm Page 2 Wednesday, May 13, 2009 9:22 AM
ENGLISH
DEUTSCH
FRANÇAIS
NEDERLANDS
CASTE.ESP.
ITALIANO
РУССКИЙ
POLSKI
O-ring Maintenance Manual
O-Ring-Wartungshandbuch
Manuel d’entretien du joint d’étanchéité
Onderhoudshandleiding voor de O-ring
Manual de mantenimiento de la junta tórica
Manuale di manutenzione dell’anello circolare
Руководство по уходу за уплотнительным
кольцом
Instrukcja konserwacji pierścienia uszczelniającego
P ীᛩፂᥨ֫ם
LYT2232-002A
日本語
O リングについて
